Michael dev

This sketch creates a responsive landing page with a gray canvas background and two centered blue links that open external websites. The layout automatically repositions elements when the window is resized, keeping the interactive links always visible and properly aligned.

🧪 Try This!

Experiment with the code by making these changes:

  1. Change link colors to green — Swap the blue hex code '#007bff' for green '#00aa00', making both links stand out in a different color
  2. Make links bigger — Increase the font size from 24px to 36px so the links are more prominent and easier to click
  3. Make the background dark — Lower the background color value from 220 to 40 to create a dark, dramatic appearance
Prefer the full editor? Open it there →

📖 About This Sketch

This sketch demonstrates how p5.js can create more than just animations and graphics. It builds an interactive landing page with two external links that open in new tabs, styled with bold blue text and proper cursor feedback. The key techniques are createA() to generate HTML links, the style() method to customize their appearance, and the windowResized() event to keep everything centered as the browser window changes size.

The code is organized into three functions: setup() runs once to create the canvas, style the links, and position them; draw() stays empty because nothing needs to animate; and windowResized() repositions everything whenever the user resizes their browser window. By studying this sketch, you will learn how p5.js bridges the canvas and the DOM (Document Object Model), giving you the power to mix graphics with interactive web elements.

⚙️ How It Works

  1. When the sketch loads, setup() creates a canvas that fills the entire window and draws a light gray background.
  2. Two HTML link elements are created using createA(), which are styled blue, underlined, and positioned absolutely on the page using style() and position() methods.
  3. The first link is placed one-third of the way down the canvas, and the second link is placed two-thirds down, both horizontally centered.
  4. Instructional text is drawn on the canvas telling the user to click the links.
  5. The draw() function remains empty because nothing needs to animate continuously.
  6. Whenever the user resizes their browser window, windowResized() is automatically triggered, which resizes the canvas and repositions both links to stay centered at their designated vertical positions.

🎓 Concepts You'll Learn

DOM elements and p5.js integrationWindow resize eventsResponsive layout and positioningHTML link creationCSS styling through JavaScriptCanvas-based UI design

📝 Code Breakdown

setup()

setup() runs once when the sketch starts. It creates the canvas, sets up text styling, and creates and positions the DOM elements. This is where all your initialization happens.

🔬 These four lines style the first link. What happens if you change '#007bff' to '#ff0000' (red) and 'underline' to 'none' (no underline)?

  link1.style('color', '#007bff'); // Blue link color
  link1.style('text-decoration', 'underline'); // Underlined
  link1.style('font-size', '24px'); // Match canvas text size
  link1.style('cursor', 'pointer'); // Show pointer cursor on hover
function setup() {
  createCanvas(windowWidth, windowHeight);
  background(220);
  textAlign(CENTER, CENTER);
  textSize(24);
  noStroke();

  // Create the first link as a p5.Element
  // https://p5js.org/reference/p5/createA/
  link1 = createA('https://ai-technologies.itch.io/', 'AI Technologies on itch.io', '_blank');
  link1.style('color', '#007bff'); // Blue link color
  link1.style('text-decoration', 'underline'); // Underlined
  link1.style('font-size', '24px'); // Match canvas text size
  link1.style('cursor', 'pointer'); // Show pointer cursor on hover
  link1.style('display', 'block'); // Make it block-level for easier positioning
  link1.position(width / 2 - link1.width / 2, height / 3); // Position in the center

  // Create the second link as a p5.Element
  link2 = createA('https://vimeo.com/user260286416', 'Vimeo User 260286416', '_blank');
  link2.style('color', '#007bff');
  link2.style('text-decoration', 'underline');
  link2.style('font-size', '24px');
  link2.style('cursor', 'pointer');
  link2.style('display', 'block');
  link2.position(width / 2 - link2.width / 2, height * 2 / 3);

  // Add some instructional text
  fill(0);
  text("Click the links below:", width / 2, height / 6);
}
Line-by-line explanation (13 lines)

🔧 Subcomponents:

calculation Canvas Initialization createCanvas(windowWidth, windowHeight);

Creates a canvas that fills the entire browser window, making the sketch responsive from the start

function-call First Link Creation and Styling link1 = createA('https://ai-technologies.itch.io/', 'AI Technologies on itch.io', '_blank');

Creates an HTML anchor element that opens the itch.io URL in a new tab when clicked

function-call Second Link Creation and Styling link2 = createA('https://vimeo.com/user260286416', 'Vimeo User 260286416', '_blank');

Creates another HTML anchor element linking to a Vimeo profile in a new tab

createCanvas(windowWidth, windowHeight);
Creates a canvas that matches the full width and height of the browser window, making the sketch fill the entire screen
background(220);
Fills the canvas with a light gray color (220 is a neutral gray on the 0-255 scale)
textAlign(CENTER, CENTER);
Centers all text both horizontally and vertically around the coordinates you provide
textSize(24);
Sets the font size for all text drawn on the canvas to 24 pixels
noStroke();
Disables outlines around shapes, though this sketch doesn't draw any shapes so it has minimal effect
link1 = createA('https://ai-technologies.itch.io/', 'AI Technologies on itch.io', '_blank');
Creates an HTML link element: the first argument is the URL, the second is the visible text, and '_blank' opens it in a new tab
link1.style('color', '#007bff');
Colors the link text blue (#007bff is a standard web blue) using inline CSS styling
link1.style('text-decoration', 'underline');
Adds an underline to the link text, making it clearly appear as a clickable link
link1.style('cursor', 'pointer');
Changes the mouse cursor to a pointer hand when hovering over the link, signaling that it's clickable
link1.style('display', 'block');
Makes the link a block-level element so it can be precisely positioned on the page using position()
link1.position(width / 2 - link1.width / 2, height / 3);
Places the link at the horizontal center and one-third of the way down the canvas—subtracting half the link's width ensures it's centered
fill(0);
Sets the text color to black (0) for the instructional text
text("Click the links below:", width / 2, height / 6);
Draws the instruction text centered horizontally and one-sixth of the way down the canvas

draw()

draw() normally runs 60 times per second to animate graphics. In this sketch it's intentionally empty because the HTML links don't need animation—they're static DOM elements managed by the browser. Leaving it empty is the right choice here.

function draw() {
  // We don't need to draw anything continuously, as the links are DOM elements
  // We just keep the background static.
}
Line-by-line explanation (1 lines)
// We don't need to draw anything continuously, as the links are DOM elements
This comment explains why draw() is empty: the links are handled by the browser's DOM, not redrawn by p5.js each frame

windowResized()

windowResized() is a special p5.js function that p5.js automatically calls whenever the browser window is resized. Without it, your sketch would stay at its original size and links would stay at their original positions, looking broken on smaller or larger screens. This function is essential for making responsive web projects.

🔬 These lines position the two links. If you swap the second argument values (put height / 3 where height * 2 / 3 was and vice versa), which link moves where?

  link1.position(width / 2 - link1.width / 2, height / 3);
  link2.position(width / 2 - link2.width / 2, height * 2 / 3);
function windowResized() {
  resizeCanvas(windowWidth, windowHeight);
  background(220);
  // Re-position the links when the window is resized
  link1.position(width / 2 - link1.width / 2, height / 3);
  link2.position(width / 2 - link2.width / 2, height * 2 / 3);
  // Re-draw instructional text
  fill(0);
  text("Click the links below:", width / 2, height / 6);
}
Line-by-line explanation (6 lines)

🔧 Subcomponents:

function-call Canvas Resize Operation resizeCanvas(windowWidth, windowHeight);

Adjusts the canvas dimensions to match the new browser window size

resizeCanvas(windowWidth, windowHeight);
Grows or shrinks the canvas to match the browser window's new dimensions when the user resizes their window
background(220);
Redraws the light gray background so no old content lingers on the canvas
link1.position(width / 2 - link1.width / 2, height / 3);
Recalculates the first link's position based on the new canvas width and height, keeping it centered horizontally and one-third down
link2.position(width / 2 - link2.width / 2, height * 2 / 3);
Recalculates the second link's position to keep it centered horizontally and two-thirds down the new canvas size
fill(0);
Sets the text color back to black
text("Click the links below:", width / 2, height / 6);
Redraws the instruction text at the new canvas dimensions so it stays properly positioned

📦 Key Variables

link1 p5.Renderer

Stores the first HTML link element created by createA(), allowing you to style and position it throughout the sketch

let link1;
link2 p5.Renderer

Stores the second HTML link element created by createA(), allowing you to style and position it throughout the sketch

let link2;

🔧 Potential Improvements (4)

Here are some ways this code could be enhanced:

BUG setup() link positioning

Links are positioned before they have fully rendered, so link1.width might be 0, causing positioning calculations to fail

💡 Use a brief delay before positioning (e.g., setTimeout) or position links after they load: link1.elt.onload = () => { link1.position(...) }

STYLE setup() and windowResized()

Text styling and positioning code is duplicated in both functions, making maintenance harder

💡 Create a helper function drawTitle() that handles text drawing, and call it from both setup() and windowResized()

FEATURE sketch.js

Links have no hover effects or visual feedback beyond the cursor change

💡 Add mouseOver and mouseOut event listeners to the links using link1.mouseOver(() => { link1.style('font-weight', 'bold') }) to enhance interactivity

PERFORMANCE windowResized()

The entire background and text are redrawn every time the window resizes, even if only slightly

💡 Store the previous window dimensions and only redraw if the size actually changed significantly

🔄 Code Flow

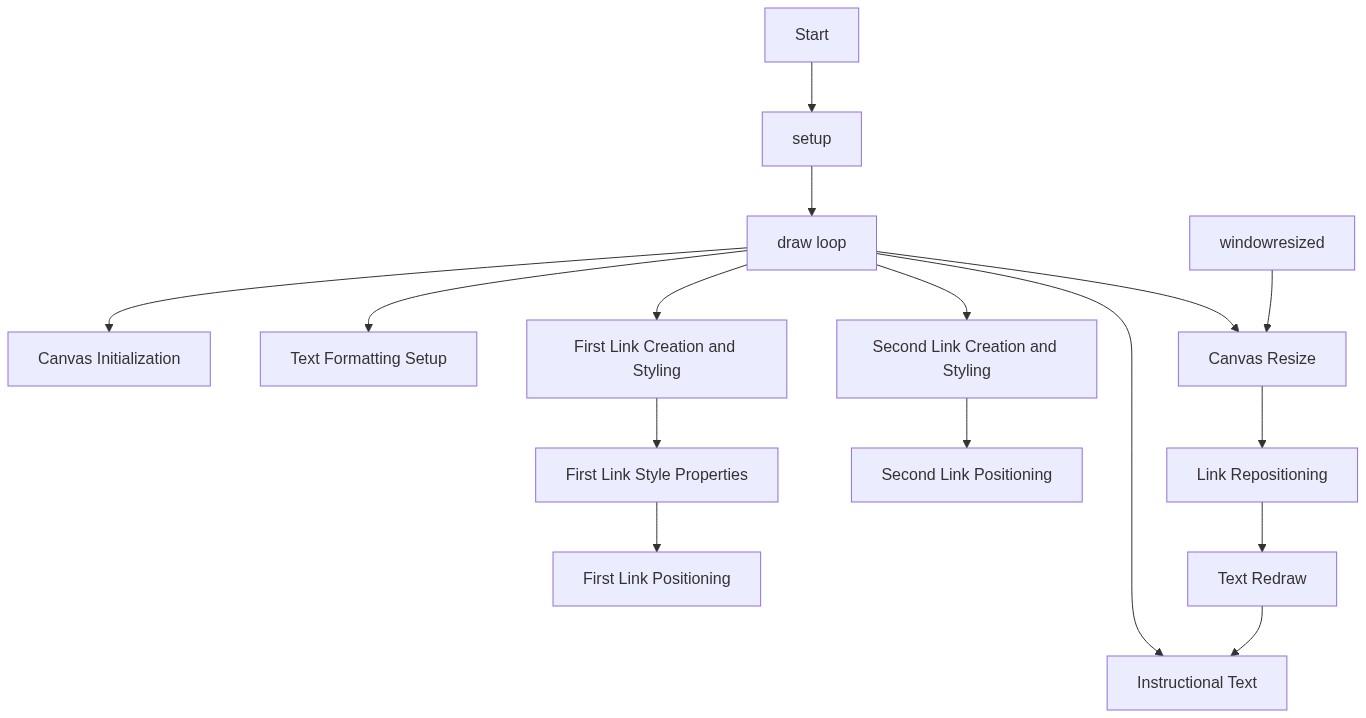
Code flow showing setup, draw, windowresized

💡 Click on function names in the diagram to jump to their code

graph TD start[Start] --> setup[setup] setup --> draw[draw loop] setup --> canvas-setup[Canvas Initialization] setup --> link1-creation[First Link Creation] setup --> link2-creation[Second Link Creation] draw --> canvas-resize[Canvas Resize Operation] draw --> link-repositioning[Link Repositioning Loop] canvas-resize --> draw link-repositioning --> draw click setup href "#fn-setup" click draw href "#fn-draw" click canvas-setup href "#sub-canvas-setup" click link1-creation href "#sub-link1-creation" click link2-creation href "#sub-link2-creation" click canvas-resize href "#sub-canvas-resize" click link-repositioning href "#sub-link-repositioning"

❓ Frequently Asked Questions

What visual elements are present in the Michael dev sketch?

The sketch features a clean, centered canvas with bold blue links and instructional text that dynamically adjusts with the window size.

How can users interact with the Michael dev sketch?

Users can click on the two bold blue links, which open external pages in new tabs.

What creative coding concepts does the Michael dev sketch illustrate?

The sketch demonstrates responsive design by maintaining layout alignment during window resizing and utilizes p5.js's DOM manipulation for interactive elements.

Preview

Michael dev - p5.js creative coding sketch preview
Sketch Preview
Code flow diagram showing the structure of Michael dev - Code flow showing setup, draw, windowresized
Code Flow Diagram