
🙂

This sketch creates an immersive 3D bedroom scene in p5.js WEBGL mode where players hold their mouse or touch to activate a flashlight spotlight that illuminates the dark room. Random jump scares trigger with white flashes, sound effects, and haptic vibration feedback, creating a horror game experience inspired by Five Nights at Freddy's.

đź§Ş Try This!

Experiment with the code by making these changes:

  1. Replace the creepy audio — Loading your own sound files transforms the horror atmosphere—try an eerie wind sound, spooky music, or unsettling ambience instead of the placeholder.
  2. Make scares more frequent — A higher scare chance means jump scares trigger more often, ramping up tension and anxiety—great for max difficulty.
  3. Change the room's base color — Editing the ambientMaterial() colors makes the room feel different—darker reds feel like blood, blues feel cold and alien, greens feel sickly.
  4. Extend the white flash — A longer white flash is more disorienting and scary—raising this number from 10 to 20+ frames creates a more intense jump scare effect.
  5. Disable ambient light for total darkness — With only the flashlight providing illumination, the room becomes pitch black outside the spotlight—maximum horror isolation.
  6. Make the bed bigger — Scaling the bed box makes the room feel smaller and more claustrophobic—or smaller to make the room feel vast.
Prefer the full editor? Open it there →

đź“– About This Sketch

This sketch builds a playable horror experience using p5.js WEBGL 3D rendering, interactive lighting, and sound design. Players hold down their mouse or touch screen to activate a flashlight spotlight that illuminates the dark bedroom, revealing a bed, closet door, and surrounding walls. Random jump scares trigger dramatic white flashes, eerie sounds, and mobile vibration—making this an excellent example of how to combine 3D graphics, audio, haptic feedback, and probability-driven events into a game-like interaction.

The code is organized into preload() for loading sounds, setup() to initialize the 3D canvas and audio, and draw() to update the scene 60 times per second. You will learn how spotLight() creates directional illumination tied to mouse position, how ambientMaterial() colors 3D shapes, how to manage state with timer variables, and how to trigger timed events (jump scares) using random chance and frame counting. The sketch also demonstrates touch and mouse event handlers that work across desktop and mobile devices.

⚙️ How It Works

  1. When the sketch loads, preload() fetches two audio files (ambient and jump scare sounds) and setup() creates a full-window WEBGL canvas, positions the ambient sound to loop at low volume, and displays instructions telling players to tap and hold.
  2. Every frame, draw() clears the background to black and sets up dim ambient lighting so the room is barely visible without the flashlight.
  3. The spotLight() is positioned at the current flashlight location (converted from screen coordinates to WEBGL 3D space) and shines forward, illuminating whatever surfaces it touches.
  4. Five 3D shapes—a floor plane, back wall, left wall, right wall, bed box, and closet door box—are drawn using push/pop transforms, rotations, and ambientMaterial() colors so the spotlight reveals them dynamically.
  5. Jump scare logic runs every frame: if enough time has passed, a random number is checked against jumpScareChance. When a scare triggers, the screen flashes white for 10 frames, the jump scare sound plays, and the device vibrates (on mobile).
  6. Mouse and touch events (mousePressed, mouseDragged, mouseReleased, touchStarted, touchMoved, touchEnded) update the flashlight position and activate/deactivate the spotlight, allowing smooth interactive control across all devices.

🎓 Concepts You'll Learn

3D WEBGL renderingspotLight() directional lightingambientMaterial() and ambientLight()Mouse and touch interactionAudio playback and p5.soundHaptic feedback (vibrate API)Random probability eventsTransform stacks (push/pop)State management and timersResponsive canvas sizing

📝 Code Breakdown

preload()

preload() runs before setup() and is the place to load images, sounds, and other files from the internet. If you skip preload() and try to load sounds in setup(), the sounds may not be ready when you try to play them, causing errors.

function preload() {
  // --- Replace these with your own creepy sounds! ---
  // Placeholder ambient sound (replace with something truly creepy)
  ambientSound = loadSound('https://www.soundhelix.com/examples/mp3/SoundHelix-Song-1.mp3');
  // Placeholder jump scare sound (replace with a sudden, loud scare)
  jumpScareSound = loadSound('https://www.soundhelix.com/examples/mp3/SoundHelix-Song-2.mp3');
  // --------------------------------------------------
}
Line-by-line explanation (2 lines)

đź”§ Subcomponents:

function-call Load ambient sound ambientSound = loadSound('https://www.soundhelix.com/examples/mp3/SoundHelix-Song-1.mp3');

Loads an audio file from a URL and stores it in the ambientSound variable

function-call Load jump scare sound jumpScareSound = loadSound('https://www.soundhelix.com/examples/mp3/SoundHelix-Song-2.mp3');

Loads a second audio file for the scary moment

ambientSound = loadSound('https://www.soundhelix.com/examples/mp3/SoundHelix-Song-1.mp3');
loadSound() downloads an audio file from the internet and stores it in the ambientSound variable so we can play it later. preload() ensures this finishes before setup() runs.
jumpScareSound = loadSound('https://www.soundhelix.com/examples/mp3/SoundHelix-Song-2.mp3');
Similarly, this loads the jump scare sound file so it is ready to play instantly when a scare triggers

setup()

setup() runs once when the sketch starts. Use it to initialize your canvas, load variables to their starting values, and set up resources like audio. The WEBGL parameter is critical—without it, you only get 2D shapes and no 3D lighting.

function setup() {
  // Use WEBGL mode for 3D rendering
  createCanvas(windowWidth, windowHeight, WEBGL);
  noStroke(); // For cleaner 3D shapes
  angleMode(DEGREES); // Make rotations easier (0-360)

  // Initial flashlight position (center of screen)
  flashlightX = 0;
  flashlightY = 0;

  // Set up ambient sound
  ambientSound.loop(); // Loop the ambient sound
  ambientSound.setVolume(0.2); // Start with low volume

  // Instructions for mobile users
  textAlign(CENTER, CENTER);
  textSize(24);
  fill(255);
  text("Tap and hold to use flashlight", 0, 0); // Display instructions
}
Line-by-line explanation (7 lines)

đź”§ Subcomponents:

function-call Create WEBGL canvas createCanvas(windowWidth, windowHeight, WEBGL);

Creates a full-window 3D canvas—the WEBGL parameter enables 3D rendering with lighting and 3D shapes

calculation Configure ambient sound ambientSound.loop(); ambientSound.setVolume(0.2);

Starts the creepy ambience looping continuously at 20% volume

calculation Initialize flashlight flashlightX = 0; flashlightY = 0;

Sets the starting position of the flashlight to the center of the screen

createCanvas(windowWidth, windowHeight, WEBGL);
Creates a full-screen canvas in WEBGL mode (3D rendering). windowWidth and windowHeight make it responsive to the browser size.
noStroke();
Removes outlines from 3D shapes, making them look cleaner and more solid
angleMode(DEGREES);
Tells p5.js that rotation angles use 0-360 degrees instead of radians, making rotations more intuitive
flashlightX = 0;
Sets the flashlight's starting X position to the center (0 is center in WEBGL coordinates)
flashlightY = 0;
Sets the flashlight's starting Y position to the center
ambientSound.loop();
Tells the ambient sound to play continuously, restarting when it reaches the end
ambientSound.setVolume(0.2);
Sets the ambient sound to 20% volume (0 = silent, 1 = max) so it doesn't drown out the jump scare

draw()

draw() runs 60 times per second, updating the entire 3D scene each frame. This is where animation happens. The key insight is that every frame, we clear the background, redraw all the geometry with its new position/rotation, and update timers. The spotlight follows the flashlight, which follows the mouse, so interaction feels immediate and responsive.

function draw() {
  // Clear the background to black
  background(0);

  // === Lighting ===
  // Very dim ambient light for base visibility
  ambientLight(20);
  // Dim directional light from above-front
  directionalLight(10, 10, 10, 0, 0.5, -1);

  // === Flashlight Spotlight ===
  // Position the spotlight at the center of the screen
  // Convert mouseX/mouseY from screen coordinates to WEBGL coordinates
  let webglFlashlightX = map(flashlightX, 0, width, -width / 2, width / 2);
  let webglFlashlightY = map(flashlightY, 0, height, -height / 2, height / 2);

  // Create a spotlight at the flashlight position, shining forward
  // The spotlight needs a position (x, y, z) and a direction (dx, dy, dz)
  // For a flashlight, the direction is usually straight ahead (0, 0, -1) from its position
  spotLight(
    255, 255, 255, // White light
    webglFlashlightX, webglFlashlightY, 200, // Position (slightly in front of the camera)
    0, 0, -1, // Direction (pointing forward)
    1000, 0.5 // Cone angle and concentration
  );

  // Disable the spotlight if the flashlight is not active
  // We do this by setting its intensity very low or making it invisible
  if (!flashlightActive) {
    // A simple way to "turn off" the spotlight is to create a black one
    // at the same position, effectively canceling out the white one.
    // Or, if p5.js supported dynamic spotlight intensity, we'd set it to 0.
    // For now, we'll just rely on the ambient light when off.
    // The previous spotLight call will still run, but the ambient light will dominate.
    // A more advanced approach would be to manage a light object, but p5.js doesn't expose that directly.
  }

  // === Draw Bedroom Scene ===
  // Floor
  push();
  translate(0, height / 2 - 10, 0); // Position at the bottom of the screen
  rotateX(90); // Rotate to be horizontal
  ambientMaterial(50, 50, 50); // Dark grey material
  plane(width, height); // Floor plane
  pop();

  // Back Wall
  push();
  translate(0, 0, -width / 2); // Position at the back of the room
  ambientMaterial(70, 70, 70); // Slightly lighter grey
  plane(width, height); // Back wall plane
  pop();

  // Left Wall
  push();
  translate(-width / 2, 0, 0); // Position at the left
  rotateY(90); // Rotate to be vertical
  ambientMaterial(60, 60, 60); // Medium grey
  plane(width, height); // Left wall plane
  pop();

  // Right Wall
  push();
  translate(width / 2, 0, 0); // Position at the right
  rotateY(-90); // Rotate to be vertical
  ambientMaterial(60, 60, 60); // Medium grey
  plane(width, height); // Right wall plane
  pop();

  // Bed (simple box)
  push();
  translate(0, height / 4, 100); // Position in the room
  ambientMaterial(100, 40, 40); // Dark red
  box(width / 3, 50, height / 3); // Bed box
  pop();

  // Closet Door (simple box)
  push();
  translate(width / 3, 0, -width / 2 + 5); // Position on the back wall
  ambientMaterial(80, 60, 40); // Dark wood color
  box(width / 6, height / 2, 10); // Closet door box
  pop();

  // === Jump Scare Logic ===
  if (!jumpScareActive && frameCount > minJumpScareTime * frameRate()) {
    // If not currently scared and min time passed, check for a scare
    if (random() < jumpScareChance) {
      triggerJumpScare();
    }
  }

  if (whiteFlashTimer > 0) {
    // If a white flash is active, draw a full screen white rectangle
    push();
    translate(0, 0, 500); // Position it in front of everything
    ambientMaterial(255); // White material
    rect(-width / 2, -height / 2, width, height); // Draw a rectangle covering the screen
    pop();
    whiteFlashTimer--; // Decrease the timer
  }

  // === Mobile Instructions (only show briefly in setup) ===
  if (frameCount < 120 && !jumpScareActive) { // Show for 2 seconds
    push();
    translate(0, 0, 500); // Position in front of the 3D scene
    fill(255);
    textAlign(CENTER, CENTER);
    textSize(width / 20); // Responsive text size
    text("Tap and hold to use flashlight", 0, -height / 4);
    text("Listen closely...", 0, -height / 8);
    pop();
  }
}
Line-by-line explanation (12 lines)

đź”§ Subcomponents:

calculation Scene lighting ambientLight(20); directionalLight(10, 10, 10, 0, 0.5, -1);

Establishes dim base lighting so the room is barely visible without the flashlight

calculation Convert flashlight to WEBGL coords let webglFlashlightX = map(flashlightX, 0, width, -width / 2, width / 2); let webglFlashlightY = map(flashlightY, 0, height, -height / 2, height / 2);

Converts screen-space mouse coordinates to WEBGL 3D space so the spotlight follows the cursor accurately

function-call Create spotlight spotLight( 255, 255, 255, webglFlashlightX, webglFlashlightY, 200, 0, 0, -1, 1000, 0.5 );

Places a white spotlight at the flashlight position, pointing forward, creating the illumination effect

calculation Draw 3D room geometry // Floor, Back Wall, Left Wall, Right Wall, Bed, Closet Door

Six separate push/pop blocks that draw and position the 3D shapes making up the bedroom

conditional Check for jump scare if (!jumpScareActive && frameCount > minJumpScareTime * frameRate()) { if (random() < jumpScareChance) { triggerJumpScare(); } }

Every frame, checks if enough time has passed and randomly decides whether to trigger a scare

conditional Draw white flash overlay if (whiteFlashTimer > 0) { // ... whiteFlashTimer--; }

If a scare just triggered, draws a white rectangle on top of the scene and counts down the flash duration

background(0);
Clears the entire canvas to black (0 brightness) every frame, making the previous frame disappear
ambientLight(20);
Adds a very dim ambient light (brightness 20 out of 255) that illuminates all surfaces equally, allowing faint visibility without the flashlight
directionalLight(10, 10, 10, 0, 0.5, -1);
Creates a dim directional light (like sunlight) coming from above-front, adding subtle shadows and depth to the room
let webglFlashlightX = map(flashlightX, 0, width, -width / 2, width / 2);
map() converts the flashlight's screen X position (0 to width) into WEBGL 3D space (-width/2 to width/2), so it aligns with the 3D camera view
let webglFlashlightY = map(flashlightY, 0, height, -height / 2, height / 2);
Similarly converts the Y position from screen space to WEBGL 3D space
spotLight(255, 255, 255, webglFlashlightX, webglFlashlightY, 200, 0, 0, -1, 1000, 0.5);
Creates a white spotlight at the converted flashlight position, positioned at Z=200 (in front of the camera), pointing forward (0,0,-1), with a cone angle of 1000 degrees and concentration 0.5
if (!flashlightActive) {
This block is intentionally empty—the spotlight always runs, but when flashlightActive is false, the ambient light dominates and the spotlight becomes invisible
if (!jumpScareActive && frameCount > minJumpScareTime * frameRate()) {
Checks if a scare is not currently active AND enough frames have passed. frameCount is the number of frames since start; multiplying minJumpScareTime by frameRate() converts seconds to frame count.
if (random() < jumpScareChance) {
random() generates a number 0-1. If it is less than jumpScareChance (0.005), a scare triggers. This makes scares random but controllable.
if (whiteFlashTimer > 0) {
If whiteFlashTimer is greater than zero, the white flash is still active and needs to be drawn
rect(-width / 2, -height / 2, width, height);
Draws a rectangle covering the entire screen in WEBGL coordinates, creating the white flash overlay
whiteFlashTimer--;
Decrements the timer by 1. When it reaches 0, the flash stops on the next frame.

triggerJumpScare()

triggerJumpScare() is called when random() decides a scare should happen. It combines three horror elements: visual (white flash), audio (jump scare sound), and tactile (device vibration). The setTimeout() is critical—without it, the scare would reset immediately and the player wouldn't experience the full effect. setTimeout() shows how JavaScript runs delayed code without blocking the animation.

🔬 This plays sound and vibrates the device. What if you comment out the jumpScareSound.play() line by adding // before it? The scare would still have white flash and vibration, but no sound—how would that change the horror?

  // Play jump scare sound
  if (jumpScareSound.isLoaded()) {
    jumpScareSound.play();
  }

  // Haptic feedback for mobile devices
  if (navigator.vibrate) {
    navigator.vibrate(200); // Vibrate for 200ms
  }
function triggerJumpScare() {
  jumpScareActive = true;
  whiteFlashTimer = 10; // Flash white for 10 frames

  // Play jump scare sound
  if (jumpScareSound.isLoaded()) {
    jumpScareSound.play();
  }

  // Haptic feedback for mobile devices
  if (navigator.vibrate) {
    navigator.vibrate(200); // Vibrate for 200ms
  }

  // Reset after a delay (e.g., 2 seconds)
  setTimeout(() => {
    jumpScareActive = false;
    jumpScareTimer = 0; // Reset the timer
  }, 2000);
}
Line-by-line explanation (9 lines)

đź”§ Subcomponents:

calculation Set scare state jumpScareActive = true; whiteFlashTimer = 10;

Marks a scare as active and starts the white flash timer

conditional Play scare audio if (jumpScareSound.isLoaded()) { jumpScareSound.play(); }

Checks that the sound file loaded successfully, then plays it

conditional Mobile vibration if (navigator.vibrate) { navigator.vibrate(200); }

If the device supports vibration (navigator.vibrate), vibrates for 200 milliseconds

function-call Schedule scare reset setTimeout(() => { jumpScareActive = false; jumpScareTimer = 0; }, 2000);

After 2000 milliseconds (2 seconds), resets the scare state so another can occur

jumpScareActive = true;
Sets the flag indicating a scare is currently happening, preventing multiple scares from triggering at once
whiteFlashTimer = 10;
Starts the white flash countdown. The draw() function will see whiteFlashTimer > 0 and draw the white overlay for 10 frames
if (jumpScareSound.isLoaded()) {
Checks if the jump scare sound file was successfully loaded from the internet. If it wasn't, this prevents an error.
jumpScareSound.play();
If the sound is loaded, play it immediately, creating the sudden audio shock
if (navigator.vibrate) {
navigator.vibrate is a browser API that detects if the device can vibrate (phones, tablets). If it exists, the device supports vibration.
navigator.vibrate(200);
Tells the device to vibrate for 200 milliseconds, adding tactile feedback to the scare
setTimeout(() => {
setTimeout schedules a function to run after a delay (2000 milliseconds = 2 seconds). The arrow function () => { } is the code to run.
jumpScareActive = false;
After 2 seconds, marks the scare as inactive so the next scare can trigger
jumpScareTimer = 0;
Resets the timer to 0, ensuring the scare logic is clean for the next trigger

windowResized()

windowResized() is called automatically by p5.js whenever the browser window changes size (user drags the edge, rotates their phone, etc.). Without this function, the canvas would stay at its original size and not respond to resizing. This keeps the experience immersive on any device.

function windowResized() {
  resizeCanvas(windowWidth, windowHeight);
}
Line-by-line explanation (1 lines)
resizeCanvas(windowWidth, windowHeight);
Resizes the p5.js canvas to match the current browser window dimensions, ensuring the sketch fills the screen even when resized

touchStarted()

touchStarted() is called on mobile when the user first touches the screen. Combined with touchMoved() and touchEnded(), it lets you respond to touch input just like mouse events. The return false is crucial—without it, the browser would scroll or zoom while playing, breaking immersion.

function touchStarted() {
  // Start audio on first touch
  if (getAudioContext().state !== 'running') {
    userStartAudio();
  }
  flashlightActive = true;
  flashlightX = mouseX;
  flashlightY = mouseY;
  return false; // Prevent default touch behavior (like scrolling)
}
Line-by-line explanation (6 lines)

đź”§ Subcomponents:

conditional Enable audio on first touch if (getAudioContext().state !== 'running') { userStartAudio(); }

Checks if audio is not already playing, and if so, starts it—required by browsers for sound on mobile

calculation Activate flashlight on touch flashlightActive = true; flashlightX = mouseX; flashlightY = mouseY;

Marks the flashlight as active and sets its position to the touch location

if (getAudioContext().state !== 'running') {
getAudioContext() accesses the p5.sound audio engine. Its state is 'running' when audio is already playing, 'suspended' when it hasn't started yet (due to browser autoplay restrictions). This checks if audio is NOT running.
userStartAudio();
userStartAudio() is a p5.js function that starts the audio context, allowing sounds to play. Browsers require a user interaction (touch or click) to start audio, so this must be called in response to touchStarted() or mousePressed().
flashlightActive = true;
Sets the flag to true so the draw() function knows the spotlight should be visible
flashlightX = mouseX;
Stores the touch X position. In touch events, mouseX and mouseY are automatically set to the touch position.
flashlightY = mouseY;
Stores the touch Y position
return false;
Prevents the default browser touch behavior (like scrolling or zoom), keeping the focus on the game

touchMoved()

touchMoved() is called continuously while a touch is active and moving. It tracks the touch position so the flashlight follows the player's finger. This gives smooth, responsive interactive control.

function touchMoved() {
  if (flashlightActive) {
    flashlightX = mouseX;
    flashlightY = mouseY;
  }
  return false; // Prevent default touch behavior
}
Line-by-line explanation (4 lines)

đź”§ Subcomponents:

conditional Update flashlight position if (flashlightActive) { flashlightX = mouseX; flashlightY = mouseY; }

If the flashlight is active, updates its position to follow the touch

if (flashlightActive) {
Only update the flashlight if it is currently active (touch is still down)
flashlightX = mouseX;
Updates the flashlight's X position to the current touch X position
flashlightY = mouseY;
Updates the flashlight's Y position to the current touch Y position
return false;
Prevents default scrolling behavior while dragging the flashlight

touchEnded()

touchEnded() is called when the user lifts their finger off the screen. It deactivates the flashlight, requiring the player to touch again to reactivate it. This creates a sense of control—hold to look, release to blind.

function touchEnded() {
  flashlightActive = false;
  return false; // Prevent default touch behavior
}
Line-by-line explanation (2 lines)
flashlightActive = false;
Sets the flag to false so the spotlight disappears and stops following the cursor
return false;
Prevents default touch behavior

mousePressed()

mousePressed() is the desktop equivalent of touchStarted(). It runs when the mouse button is clicked. This lets the sketch work on both desktop and mobile with parallel code.

function mousePressed() {
  if (getAudioContext().state !== 'running') {
    userStartAudio();
  }
  flashlightActive = true;
  flashlightX = mouseX;
  flashlightY = mouseY;
}
Line-by-line explanation (5 lines)

đź”§ Subcomponents:

conditional Start audio on click if (getAudioContext().state !== 'running') { userStartAudio(); }

Ensures audio starts playing when the player first clicks, required by browsers

calculation Activate flashlight on click flashlightActive = true; flashlightX = mouseX; flashlightY = mouseY;

Marks the flashlight as active and sets its position to the mouse click location

if (getAudioContext().state !== 'running') {
Checks if audio is not yet running (same logic as touchStarted())
userStartAudio();
Starts the audio context so sounds can play
flashlightActive = true;
Activates the spotlight
flashlightX = mouseX;
Sets the flashlight to the mouse click position
flashlightY = mouseY;
Sets the flashlight Y position

mouseDragged()

mouseDragged() runs every frame while the mouse button is held down and the cursor moves. It's the desktop version of touchMoved(), allowing smooth tracking of the flashlight as the player drags their mouse.

function mouseDragged() {
  if (flashlightActive) {
    flashlightX = mouseX;
    flashlightY = mouseY;
  }
}
Line-by-line explanation (3 lines)

đź”§ Subcomponents:

conditional Update flashlight while dragging if (flashlightActive) { flashlightX = mouseX; flashlightY = mouseY; }

While the mouse is held down and dragging, updates the flashlight position

if (flashlightActive) {
Only update if the flashlight is currently active (mouse is down)
flashlightX = mouseX;
Updates flashlight X to the current mouse X position
flashlightY = mouseY;
Updates flashlight Y to the current mouse Y position

mouseReleased()

mouseReleased() is called when the mouse button is released after being pressed. It mirrors touchEnded()—releasing the mouse button turns off the flashlight, requiring the player to click again to look.

function mouseReleased() {
  flashlightActive = false;
}
Line-by-line explanation (1 lines)
flashlightActive = false;
Deactivates the flashlight when the mouse button is released

📦 Key Variables

ambientSound p5.SoundFile

Holds the loaded audio file that plays continuously as creepy ambience in the background

let ambientSound;
jumpScareSound p5.SoundFile

Holds the sudden jump scare sound that plays when a scare triggers

let jumpScareSound;
flashlightActive boolean

Flag that tracks whether the flashlight is currently on (true) or off (false)

let flashlightActive = false;
flashlightX number

Stores the horizontal (X) position of the flashlight, updated by mouse/touch movement

let flashlightX, flashlightY;
flashlightY number

Stores the vertical (Y) position of the flashlight, updated by mouse/touch movement

let flashlightX, flashlightY;
jumpScareActive boolean

Flag that indicates whether a jump scare is currently happening, preventing multiple scares at once

let jumpScareActive = false;
jumpScareTimer number

Counts the number of frames since the start, used to calculate when enough time has passed to allow the next scare

let jumpScareTimer = 0;
minJumpScareTime number

The minimum number of seconds that must pass before the first jump scare can occur (difficulty tuning)

let minJumpScareTime = 10;
jumpScareChance number

The probability (0-1) that a jump scare occurs each frame after the minimum time has passed (difficulty tuning)

let jumpScareChance = 0.005;
whiteFlashTimer number

Counts down the frames for which the white flash overlay should be drawn when a scare triggers

let whiteFlashTimer = 0;

đź”§ Potential Improvements (6)

Here are some ways this code could be enhanced:

BUG draw() - spotlight always visible

The spotLight() is always rendered, even when flashlightActive is false. The if (!flashlightActive) block is empty, so the light only appears to turn off due to ambient light dominating.

đź’ˇ To truly disable the spotlight, either (1) save the spotlight as a state variable and only call spotLight() when flashlightActive is true, or (2) use a separate graphic buffer to apply the spotlight conditionally. A simpler fix: before spotLight(), add if (!flashlightActive) return; to skip the light calculation entirely when inactive.

BUG draw() - white flash rect() call

The white flash uses rect() with WEBGL coordinates, but rect() in WEBGL mode draws from top-left, not centered. This may cause the white overlay to not cover the full screen correctly depending on how rect() is centered.

đź’ˇ Replace the rect() call with a plane() or use rectMode(CENTER) before drawing, and verify the overlay covers the entire viewport. Alternatively, use fill() to tint the background instead of drawing geometry.

PERFORMANCE draw() - geometry drawn every frame

The six walls, bed, and closet door are drawn and their geometry is recalculated every frame. Since they don't move, this is redundant work.

đź’ˇ Create these geometries once in setup() using createGraphics() or buffer them, then display the static buffer in draw(). This would reduce per-frame computation, especially on low-end mobile devices.

STYLE draw() - empty if block

The if (!flashlightActive) block has a long comment but no actual code, creating confusion about whether the spotlight truly deactivates.

đź’ˇ Either implement a real off-state (see the bug fix above) or remove the empty block entirely. Comments should clarify behavior, not mask it.

FEATURE sketch.js - no difficulty progression

minJumpScareTime and jumpScareChance are fixed constants. After 10 seconds, scares occur at a constant 0.5% chance—there is no difficulty escalation to keep the player engaged.

đź’ˇ Add a simple difficulty increase: every 30 seconds, increase jumpScareChance by 0.002 and decrease minJumpScareTime by 1 second. Track elapsed time and update these variables in draw(). This creates escalating tension.

FEATURE triggerJumpScare() - no visual randomness

Every jump scare triggers the same white flash and sound. After a few scares, the player habituates to the effect.

đź’ˇ Add variation: randomize the flash duration (whiteFlashTimer = random(8, 15)), play different jump scare sounds from an array, or add random distorted geometry to the scene. Unpredictability increases fear.

🔄 Code Flow

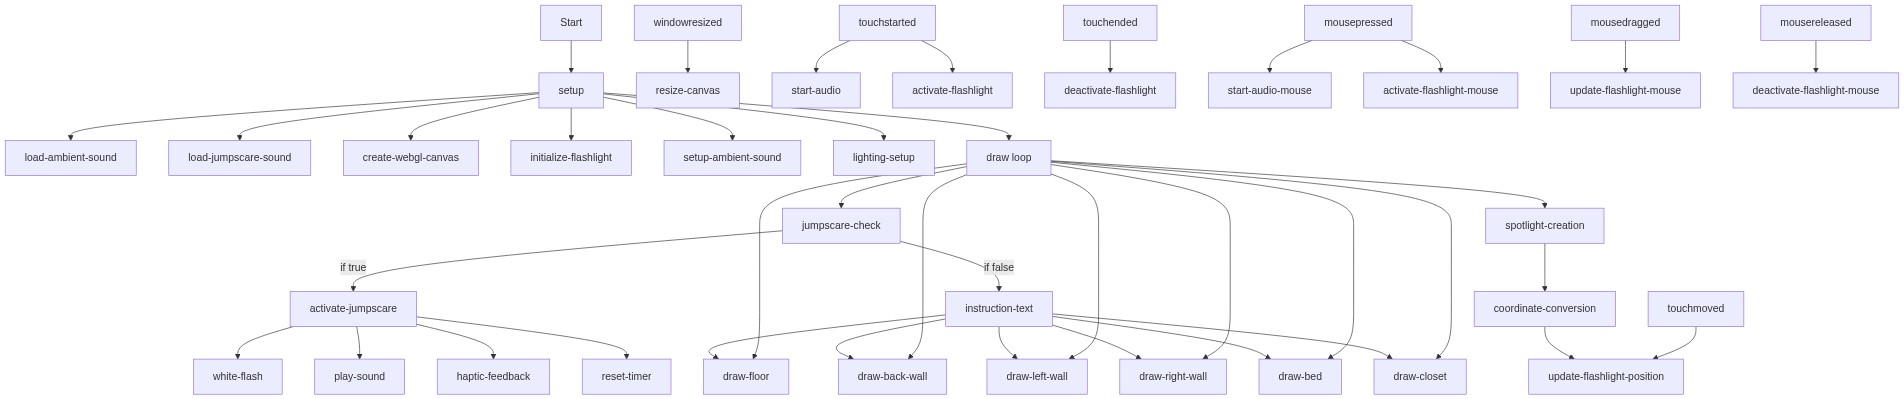
Code flow showing preload, setup, draw, triggerjumpscare, windowresized, touchstarted, touchmoved, touchended, mousepressed, mousedragged, mousereleased

đź’ˇ Click on function names in the diagram to jump to their code

graph TD start[Start] --> setup[setup] setup --> preload[preload] preload --> load-ambient[Load Ambient Sound] preload --> load-jumpscare[Load Jump Scare Sound] setup --> create-webgl-canvas[Create WEBGL Canvas] setup --> audio-setup[Audio Setup] setup --> flashlight-init[Flashlight Init] setup --> lighting-setup[Lighting Setup] setup --> draw[draw loop] draw --> jumpscare-check[Jumpscare Check] jumpscare-check -->|if enough time has passed| triggerjumpscare[triggerJumpScare] jumpscare-check -->|else| draw draw --> spotlight-positioning[Spotlight Positioning] draw --> spotlight-creation[Spotlight Creation] draw --> bedroom-geometry[Bedroom Geometry] draw --> white-flash[White Flash] triggerjumpscare --> activate-scare[Activate Scare] activate-scare --> play-sound[Play Sound] activate-scare --> vibrate-device[Vibrate Device] activate-scare --> reset-timeout[Reset Timeout] white-flash -->|if scare active| draw windowresized[windowResized] --> draw touchstarted[touchStarted] --> audio-context-check[Audio Context Check] audio-context-check -->|if audio not playing| audio-start[Audio Start] audio-context-check --> activate-flashlight[Activate Flashlight] touchmoved[touchMoved] --> update-flashlight-pos[Update Flashlight Position] touchended[touchEnded] --> draw mousepressed[mousePressed] --> audio-start[Audio Start] mousepressed --> flashlight-click[Flashlight Click] mousedragged[mouseDragged] --> update-on-drag[Update on Drag] mousereleased[mouseReleased] --> draw click setup href "#fn-setup" click preload href "#fn-preload" click draw href "#fn-draw" click triggerjumpscare href "#fn-triggerjumpscare" click windowresized href "#fn-windowresized" click touchstarted href "#fn-touchstarted" click touchmoved href "#fn-touchmoved" click touchended href "#fn-touchended" click mousepressed href "#fn-mousepressed" click mousedragged href "#fn-mousedragged" click mousereleased href "#fn-mousereleased" click load-ambient href "#sub-load-ambient" click load-jumpscare href "#sub-load-jumpscare" click create-webgl-canvas href "#sub-create-webgl-canvas" click audio-setup href "#sub-audio-setup" click flashlight-init href "#sub-flashlight-init" click lighting-setup href "#sub-lighting-setup" click spotlight-positioning href "#sub-spotlight-positioning" click spotlight-creation href "#sub-spotlight-creation" click bedroom-geometry href "#sub-bedroom-geometry" click jumpscare-check href "#sub-jumpscare-check" click white-flash href "#sub-white-flash" click activate-scare href "#sub-activate-scare" click play-sound href "#sub-play-sound" click vibrate-device href "#sub-vibrate-device" click reset-timeout href "#sub-reset-timeout" click audio-context-check href "#sub-audio-context-check" click activate-flashlight href "#sub-activate-flashlight" click update-flashlight-pos href "#sub-update-flashlight-pos" click audio-start href "#sub-audio-start" click flashlight-click href "#sub-flashlight-click" click update-on-drag href "#sub-update-on-drag"

âť“ Frequently Asked Questions

What kind of visual experience does this p5.js sketch create?

This sketch creates a dark, atmospheric 3D environment with ambient lighting and the effect of a flashlight illuminating certain areas, enhancing the eerie mood.

How can users interact with the flashlight in this sketch?

Users can tap and hold on the screen to activate and control the flashlight, which adds an interactive element to the experience.

What creative coding techniques are demonstrated in this p5.js sketch?

The sketch showcases the use of 3D rendering in WEBGL, ambient and directional lighting, and the integration of sound to build an immersive atmosphere.

Preview

🙂 - p5.js creative coding sketch preview
Sketch Preview
Code flow diagram showing the structure of 🙂 - Code flow showing preload, setup, draw, triggerjumpscare, windowresized, touchstarted, touchmoved, touchended, mousepressed, mousedragged, mousereleased
Code Flow Diagram