monkey game hehe

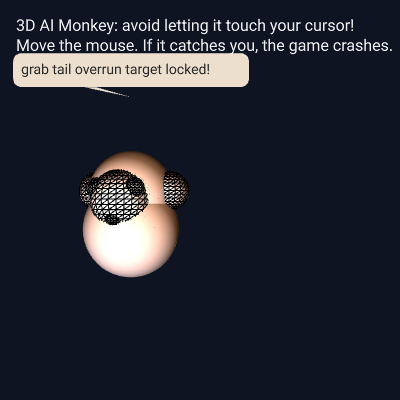
This sketch creates a chunky 3D monkey in WebGL that chases your cursor around the screen using steering AI. The monkey changes behavior based on distance, displays silly thoughts in speech bubbles, and triggers a crash screen when it catches you—combining 3D graphics, vector physics, and playful game mechanics.

🧪 Try This!

Experiment with the code by making these changes:

  1. Make the monkey catchable from farther away — The monkey only chases when you're 260 pixels away; decrease this threshold so it starts hunting earlier and the game becomes harder.
  2. Make the monkey even smarter at prediction — The monkey predicts 12 pixels ahead of your cursor movement; increase this to make it intercept you more accurately.
  3. Double the monkey's maximum speed — Increase maxSpeed from 4.0 to 8.0 so the monkey zooms around much faster and is harder to escape.
  4. Make the monkey glow brighter when chasing — The orange point light that follows the monkey is subtle; increase its brightness to make the glowing effect more dramatic.
  5. Make the monkey gibber more frequently — The monkey generates a new phrase every 180 frames (~3 seconds); lower this to make it chatter constantly.
  6. Turn off the cursor prediction — The monkey aims ahead of where you're moving; comment out the prediction lines so it only chases your current cursor position.
Prefer the full editor? Open it there →

📖 About This Sketch

This sketch creates a fully 3D animated monkey that intelligently hunts your cursor across the screen. It combines WebGL 3D rendering with sophisticated steering behavior, making the monkey feel alive as it switches between wandering and aggressive chasing modes. The visual design includes glowing point lights, a bobbing animation, pupils that look toward the mouse, and a speech bubble that blurts out monkey-themed nonsense—all layered together to create something both technically impressive and delightfully silly.

The code is organized around a Monkey class that encapsulates position, velocity, steering logic, and 3D rendering. You'll study setup() and draw() to understand how game state management works, the Monkey class to see how steering behaviors (seek and wander) create intelligent movement, and the speech and crash systems to learn how game states trigger different visuals. By reading this sketch you'll learn vector-based AI, 3D shape composition in WebGL, 2D-3D coordinate conversion, and how to layer 2D UI overtop of 3D scenes.

⚙️ How It Works

  1. When the sketch loads, setup() creates a WebGL canvas, instantiates a single Monkey object at the screen center, loads a font for text rendering, and initializes the game state to 'play'.
  2. Every frame, draw() checks the game state: if playing, drawScene() updates the monkey, applies lighting, draws the 3D model, and renders the speech bubble; if crashed, drawCrashScreen() displays a glitchy overlay and stops the loop.
  3. The Monkey class tracks position, velocity, and acceleration using vectors. Its update() method applies one of two steering forces: seek() (aggressive chase with look-ahead prediction) when within 260 pixels of the cursor, or wander() (gentle noise-based movement) otherwise.
  4. The monkey's 3D model is built from nested spheres positioned via translate() and rotateY() to form a body, head, ears, eyes with looking pupils, nose, and tail. The body color and mouth size change when chasing to show emotional state.
  5. A speech bubble appears above the monkey filled with random phrases from pools that change based on whether the monkey is idle, chasing, or experiencing glitchy errors. Phrases regenerate every 180 frames or when the state changes.
  6. Collision is detected by comparing the distance between monkey and cursor to the monkey's catch radius—when triggered, the game state flips to 'crashed', which freezes animation and draws a glitchy red-and-black crash screen with the message 'GAME CRASHED'.

🎓 Concepts You'll Learn

Vector steering behavior3D graphics and WebGLGame state managementCollision detectionCoordinate system conversionObject-oriented design with classesPerlin noise for wanderingLook-ahead targeting prediction

📝 Code Breakdown

preload()

preload() runs before setup() and is the right place to load images, fonts, and sounds that the sketch needs to start. WEBGL text requires a proper font file, which is why we fetch it from a CDN.

function preload() {
  uiFont = loadFont(
    "https://cdn.jsdelivr.net/fontsource/fonts/roboto@latest/latin-400-normal.woff"
  );
}
Line-by-line explanation (1 lines)
uiFont = loadFont(
Loads a Google Font (Roboto) from a CDN so text renders correctly in WEBGL mode—p5.js's default font doesn't work well in 3D

setup()

setup() runs once at startup. Use it to initialize the canvas, create objects, and set initial values. Notice how the third argument to createCanvas() is what makes this 3D instead of 2D—that single word WEBGL unlocks an entirely different rendering engine.

function setup() {
  // WEBGL renderer for 3D
  createCanvas(windowWidth, windowHeight, WEBGL);

  monkey = new Monkey(width * 0.5, height * 0.5);

  textFont(uiFont);
  textSize(16);
  textAlign(CENTER, CENTER);

  lastMouseX = mouseX;
  lastMouseY = mouseY;

  newMonkeyPhrase("idle");
}
Line-by-line explanation (5 lines)
createCanvas(windowWidth, windowHeight, WEBGL);
Creates a full-window WebGL canvas—the third parameter enables 3D rendering instead of the default 2D canvas
monkey = new Monkey(width * 0.5, height * 0.5);
Instantiates the Monkey object at the screen center by passing 50% of width and height to its constructor
textFont(uiFont);
Applies the loaded Roboto font to all subsequent text() calls so the speech bubble and HUD render with the custom font
lastMouseX = mouseX;
Records the initial mouse position so the monkey can calculate mouse velocity (direction of movement) on the next frame
newMonkeyPhrase("idle");
Generates the first speech bubble phrase from the idle word pool before the game loop starts

draw()

draw() is the main game loop—it runs at ~60 FPS and decides what happens based on game state. The pattern of 'if gameState == X, do Y' is a state machine, which is a core technique for game logic.

function draw() {
  if (gameState === "play") {
    drawScene();
  } else if (gameState === "crashed") {
    drawCrashScreen();
    noLoop(); // Freeze everything = "crash"
  }
}
Line-by-line explanation (5 lines)

🔧 Subcomponents:

conditional Game State Branch if (gameState === "play") {

Determines whether to render normal gameplay or show the crash screen

if (gameState === "play") {
Checks if the game is still active—if true, call drawScene() to update and render the 3D monkey
drawScene();
Renders the normal gameplay: monkey movement, lighting, 3D model, speech bubble, and collision detection
} else if (gameState === "crashed") {
If the monkey caught the cursor, the game state switched to 'crashed', so we skip gameplay and show the crash screen instead
drawCrashScreen();
Displays the crash overlay: red glitches, text saying 'GAME CRASHED', and instructions to reload
noLoop();
Stops calling draw() every frame, freezing the animation to represent the game crashing

drawScene()

drawScene() is the heart of the game—it orchestrates animation, state changes, lighting, speech, and collision detection. Notice how it uses three distances: one to toggle state (260px), one to decide speech (phraseTimer), and one to trigger the crash (catchRadius). This layering of distance-based logic is a core game design pattern.

🔬 This code calculates where the cursor is and where it's moving. What happens if you comment out the lines `const lead = mouseVel.copy().mult(12);` and `target.add(lead);` so the monkey only targets your cursor's CURRENT position instead of where you're heading?

  const mouseVel = createVector(mouseX - lastMouseX, mouseY - lastMouseY);
  let target = createVector(mouseX, mouseY);
  if (mouseVel.mag() > 0.5) {
    // Predict a bit ahead in the direction of motion
    const lead = mouseVel.copy().mult(12);
    target.add(lead);
  }
function drawScene() {
  // Simple background instead of heavy per-frame gradient
  background(15, 20, 35);

  // Lighting for 3D monkey
  ambientLight(80);
  directionalLight(200, 200, 230, 0.3, -0.7, -1);
  // Warm point light following the monkey
  pointLight(
    255, 190, 150,
    monkey.pos.x - width / 2,
    monkey.pos.y - height / 2,
    250
  );

  // Compute cursor "future" target for slightly smarter chase
  const mouseVel = createVector(mouseX - lastMouseX, mouseY - lastMouseY);
  let target = createVector(mouseX, mouseY);
  if (mouseVel.mag() > 0.5) {
    // Predict a bit ahead in the direction of motion
    const lead = mouseVel.copy().mult(12);
    target.add(lead);
  }
  target.x = constrain(target.x, 0, width);
  target.y = constrain(target.y, 0, height);

  // Update monkey state based on distance
  const dToMouse = dist(monkey.pos.x, monkey.pos.y, mouseX, mouseY);
  if (dToMouse < 260) {
    monkey.setState("chasing");
  } else {
    monkey.setState("wandering");
  }

  // AI movement
  monkey.update(target);
  monkey.display3D();

  // Monkey speech logic
  phraseTimer--;
  if (monkey.justChangedState) {
    if (monkey.state === "chasing") {
      newMonkeyPhrase("chase");
    } else {
      newMonkeyPhrase("idle");
    }
    monkey.justChangedState = false;
    phraseTimer = PHRASE_INTERVAL;
  } else if (phraseTimer <= 0) {
    newMonkeyPhrase(monkey.state === "chasing" ? "chase" : "idle");
    phraseTimer = PHRASE_INTERVAL;
  }

  // After 3D drawing, switch to a 2D-style overlay
  resetMatrix();
  translate(-width / 2, -height / 2, 0);
  noLights();

  // Speech bubble (2D overlay)
  drawSpeechBubble(
    monkey.pos.x,
    monkey.pos.y - monkey.size * 0.8,
    currentPhrase
  );

  // UI / Instructions
  drawHUD();

  // Collision: monkey catches cursor → crash
  const catchRadius = monkey.size * 0.45;
  if (dToMouse < catchRadius) {
    triggerCrash();
  }

  // Save last mouse for next frame
  lastMouseX = mouseX;
  lastMouseY = mouseY;
}
Line-by-line explanation (15 lines)

🔧 Subcomponents:

calculation Cursor prediction logic if (mouseVel.mag() > 0.5) { const lead = mouseVel.copy().mult(12); target.add(lead); }

Predicts where the cursor is moving and offsets the target ahead so the monkey aims for the future cursor position instead of where it currently is

conditional State change detection if (dToMouse < 260) { monkey.setState("chasing"); } else { monkey.setState("wandering"); }

Switches the monkey between wandering (calm) and chasing (aggressive) based on proximity to the cursor

conditional Speech bubble phrase generation if (monkey.justChangedState) { if (monkey.state === "chasing") { newMonkeyPhrase("chase"); } else { newMonkeyPhrase("idle"); } monkey.justChangedState = false; phraseTimer = PHRASE_INTERVAL; } else if (phraseTimer <= 0) { newMonkeyPhrase(monkey.state === "chasing" ? "chase" : "idle"); phraseTimer = PHRASE_INTERVAL; }

Generates a new phrase immediately when the monkey changes state, and regenerates phrases at regular intervals otherwise

conditional Catch collision if (dToMouse < catchRadius) { triggerCrash(); }

Ends the game and triggers the crash screen when the monkey closes within its catch radius

background(15, 20, 35);
Clears the canvas with a dark blue-black color each frame, erasing the previous frame's 3D scene
ambientLight(80);
Adds global ambient lighting so all 3D shapes have a baseline brightness and aren't pitch black on unexposed sides
directionalLight(200, 200, 230, 0.3, -0.7, -1);
Creates a cool blue directional light (like the sun) shining from above-right, giving the monkey form and shadow
pointLight( 255, 190, 150, monkey.pos.x - width / 2, monkey.pos.y - height / 2, 250 );
Places a warm orange point light 250 units behind the monkey, following its position to create a glowing halo effect
const mouseVel = createVector(mouseX - lastMouseX, mouseY - lastMouseY);
Calculates how far the mouse moved this frame by subtracting its last position from its current position
const lead = mouseVel.copy().mult(12);
Multiplies the mouse velocity by 12 frames into the future, so the monkey aims 12 pixels ahead of where the cursor is moving
const dToMouse = dist(monkey.pos.x, monkey.pos.y, mouseX, mouseY);
Calculates the straight-line distance from the monkey to the cursor in pixels
if (dToMouse < 260) {
When the cursor is within 260 pixels, the monkey shifts to aggressive chasing mode
monkey.update(target);
Calls the monkey's physics update with the predicted target, moving it one frame closer via steering forces
monkey.display3D();
Renders the monkey's 3D model at its current position, rotating and drawing all its component spheres
phraseTimer--;
Decrements the countdown timer for the current phrase—when it hits 0, a new phrase is generated
resetMatrix();
Clears all WEBGL transformations (translate, rotate, scale) to return to the origin, preparing for 2D overlay drawing
translate(-width / 2, -height / 2, 0);
Shifts the coordinate system so (0,0) is the top-left corner of the screen instead of the WEBGL center, letting us draw 2D UI
noLights();
Disables all 3D lighting so the 2D speech bubble and HUD text render at full brightness without light effects
const catchRadius = monkey.size * 0.45;
Defines a collision radius around the monkey—45% of its size—within which catching the cursor triggers the crash

update()

update() implements steering behavior, a core technique in game AI. The pattern of force → velocity → position is called Euler integration and is the foundation of physics simulation. The acc.mult(0) at the end is crucial—without it, forces from the previous frame would mysteriously persist.

🔬 This switches between two behaviors. What if you changed the condition to ALWAYS use seek, even when wandering? Try replacing the conditional with just `steering = this.seek(target);` to see what happens.

    if (this.state === "chasing") {
      steering = this.seek(target);
    } else {
      steering = this.wander();
    }
  update(target) {
    let steering;

    if (this.state === "chasing") {
      steering = this.seek(target);
    } else {
      steering = this.wander();
    }

    this.applyForce(steering);

    this.vel.add(this.acc);
    this.vel.limit(this.maxSpeed);
    this.pos.add(this.vel);
    this.acc.mult(0);

    this.handleEdges();
  }
Line-by-line explanation (9 lines)

🔧 Subcomponents:

conditional Behavior selection if (this.state === "chasing") { steering = this.seek(target); } else { steering = this.wander(); }

Chooses which steering behavior to apply based on the monkey's current state

calculation Velocity Verlet integration this.vel.add(this.acc); this.vel.limit(this.maxSpeed); this.pos.add(this.vel); this.acc.mult(0);

Classic physics: accumulation adds up, velocity is capped, position updates, and forces reset for the next frame

if (this.state === "chasing") {
Checks the monkey's current behavior state to decide which steering calculation to use
steering = this.seek(target);
Calls seek() to calculate an aggressive steering force that pulls the monkey toward the predicted cursor position
steering = this.wander();
Calls wander() to calculate a gentle, noise-based steering force for calm wandering around the screen
this.applyForce(steering);
Adds the calculated steering force to the monkey's acceleration, queuing it up for velocity changes
this.vel.add(this.acc);
Updates velocity by adding acceleration—classic F=ma in discrete timesteps
this.vel.limit(this.maxSpeed);
Caps the speed so the monkey never goes faster than maxSpeed (4.0), preventing it from zooming out of control
this.pos.add(this.vel);
Updates the monkey's position by its velocity, moving it slightly each frame—this creates the visual motion
this.acc.mult(0);
Resets acceleration to zero at the end of the frame so forces don't accumulate over multiple frames
this.handleEdges();
Checks if the monkey has hit a screen boundary and bounces it back if so

seek()

seek() is a steering behavior algorithm from Craig Reynolds' seminal work on boids. It calculates how hard the monkey should 'steer' toward a target by comparing its desired velocity (toward target at max speed) with its current velocity (its momentum). The closer it gets, the more it slows, which prevents the shaking that would otherwise happen.

🔬 This code slows the monkey when it gets within 120 pixels of the target. What happens if you increase 120 to 300? The monkey will start braking from much further away—is the chase smoother or less aggressive?

    // Slow down very close to avoid ugly jitter
    let speed = this.maxSpeed;
    if (d < 120) {
      speed = map(d, 0, 120, 0, this.maxSpeed);
    }
  // Steering towards a target
  seek(target) {
    const desired = p5.Vector.sub(target, this.pos);
    const d = desired.mag();

    if (d === 0) return createVector(0, 0);

    // Slow down very close to avoid ugly jitter
    let speed = this.maxSpeed;
    if (d < 120) {
      speed = map(d, 0, 120, 0, this.maxSpeed);
    }
    desired.setMag(speed);

    const steer = p5.Vector.sub(desired, this.vel);
    steer.limit(this.maxForce * 1.8); // more aggressive steering when seeking
    return steer;
  }
Line-by-line explanation (9 lines)

🔧 Subcomponents:

conditional Zero distance guard if (d === 0) return createVector(0, 0);

Prevents a divide-by-zero error if the monkey reaches the target exactly

conditional Approach slowdown if (d < 120) { speed = map(d, 0, 120, 0, this.maxSpeed); }

Reduces speed as the monkey gets very close to the target, preventing annoying jittering at the goal

const desired = p5.Vector.sub(target, this.pos);
Calculates the direction from the monkey to the target by subtracting current position from target position
const d = desired.mag();
Gets the distance to the target—the length of the desired vector
if (d === 0) return createVector(0, 0);
If the monkey is exactly at the target, return zero steering so it doesn't thrash around trying to reach a point it's already on
let speed = this.maxSpeed;
By default, aim at full speed
if (d < 120) {
When within 120 pixels of the target, start slowing down to smooth the approach
speed = map(d, 0, 120, 0, this.maxSpeed);
Linearly interpolate speed from 0 (at the target) to maxSpeed (at 120px away) based on current distance
desired.setMag(speed);
Sets the magnitude of the desired vector to the calculated speed, preserving direction but adjusting intensity
const steer = p5.Vector.sub(desired, this.vel);
Calculates steering as the difference between desired velocity and current velocity—the steering force needed to match the target direction
steer.limit(this.maxForce * 1.8);
Caps steering force at 1.8× the normal maxForce, making chase mode more aggressive than wander mode

wander()

wander() implements a classic steering behavior using Perlin noise instead of purely random angles. Perlin noise creates smooth, continuous randomness—the monkey's direction changes gradually and naturally instead of twitching randomly. This is why the wandering looks alive instead of mechanical.

🔬 This generates a smooth random angle using Perlin noise. What happens if you increase noiseScale from 0.005 to 0.05? The monkey's turns will happen much faster—it'll dart around erratically instead of gliding smoothly.

    const noiseScale = 0.005;
    this.wanderTheta = noise(frameCount * noiseScale) * TWO_PI * 2;
  // Gentle wandering using noise-based angle
  wander() {
    const noiseScale = 0.005;
    this.wanderTheta = noise(frameCount * noiseScale) * TWO_PI * 2;

    const desired = p5.Vector.fromAngle(this.wanderTheta);
    desired.setMag(this.maxSpeed * 0.7);

    const steer = p5.Vector.sub(desired, this.vel);
    steer.limit(this.maxForce * 0.8);
    return steer;
  }
Line-by-line explanation (6 lines)

🔧 Subcomponents:

calculation Perlin noise steering angle this.wanderTheta = noise(frameCount * noiseScale) * TWO_PI * 2;

Uses Perlin noise to generate a smooth, natural-looking random direction that changes gradually over time

const noiseScale = 0.005;
Controls how fast the wandering direction changes—smaller values = slower, smoother turns
this.wanderTheta = noise(frameCount * noiseScale) * TWO_PI * 2;
Uses Perlin noise based on the current frame number to generate a wandering angle between 0 and 4π, creating smooth undulating direction changes
const desired = p5.Vector.fromAngle(this.wanderTheta);
Creates a unit vector pointing in the random wandering direction
desired.setMag(this.maxSpeed * 0.7);
Sets the speed to 70% of maxSpeed, making the monkey wander slower than it chases—it's lazy when not hunting
const steer = p5.Vector.sub(desired, this.vel);
Calculates steering as the difference between desired wandering velocity and current velocity
steer.limit(this.maxForce * 0.8);
Limits steering force to 80% of maxForce, making turns gentler and more natural-looking than chase mode

handleEdges()

handleEdges() implements boundary collision. The multiplication by -0.7 (not just -1) is what makes the bounce feel soft and realistic—the monkey loses a little energy each bounce, eventually settling into slower movement near walls instead of bouncing forever at full speed.

  // Keep monkey on screen, with soft bouncing
  handleEdges() {
    const r = this.size * 0.5;

    if (this.pos.x < r) {
      this.pos.x = r;
      this.vel.x *= -0.7;
    } else if (this.pos.x > width - r) {
      this.pos.x = width - r;
      this.vel.x *= -0.7;
    }

    if (this.pos.y < r) {
      this.pos.y = r;
      this.vel.y *= -0.7;
    } else if (this.pos.y > height - r) {
      this.pos.y = height - r;
      this.vel.y *= -0.7;
    }
  }
Line-by-line explanation (4 lines)
const r = this.size * 0.5;
Calculates the monkey's collision radius—half its size—used to define the bounce boundary
if (this.pos.x < r) {
Checks if the monkey has hit the left edge of the screen
this.pos.x = r;
Clamps the monkey's position back to the boundary so it doesn't leave the screen
this.vel.x *= -0.7;
Reverses the horizontal velocity and reduces it to 70% (losing energy), creating a soft bounce effect

display3D()

display3D() is the longest function because it's essentially a 3D assembly line: translate and push/pop to build the monkey piece by piece. Each part (body, head, ears, eyes, etc.) is a sphere positioned relative to a parent sphere. Notice how push() and pop() are used like parentheses—you push, make some transforms, draw, then pop to undo the transforms before building the next part. This is how complex 3D models are built from simple shapes in p5.js.

🔬 These constants control where the eyes are positioned on the head. What happens if you make eyeOffsetX much larger, like `this.size * 0.4` instead of 0.16? The eyes will move further apart, making the monkey look wider and sillier.

    // Eyes (white)
    const eyeOffsetX = this.size * 0.16;
    const eyeOffsetY = -this.size * 0.04;
    const eyeZ = this.size * 0.34;
  // 3D monkey model
  display3D() {
    push();

    // Convert from screen coords (0..width, 0..height) to WEBGL coords (centered)
    translate(this.pos.x - width / 2, this.pos.y - height / 2, 0);

    // Small up‑down bob
    const bob = sin(frameCount * 0.08 + this.pos.x * 0.01) * 4;
    translate(0, bob, 0);

    // Slight Y rotation based on velocity (leans when moving left/right)
    const yaw = map(this.vel.x, -this.maxSpeed, this.maxSpeed, -0.5, 0.5);
    rotateY(yaw);

    // Body color changes slightly when chasing
    let bodyR = this.state === "chasing" ? 180 : 150;
    let bodyG = this.state === "chasing" ? 110 : 100;
    let bodyB = this.state === "chasing" ? 60  : 55;

    // --- Body ---
    push();
    translate(0, this.size * 0.25, 0);
    ambientMaterial(bodyR, bodyG, bodyB);
    sphere(this.size * 0.4, 32, 24);
    pop();

    // --- Head ---
    push();
    ambientMaterial(bodyR, bodyG, bodyB);
    translate(0, -this.size * 0.05, 0);
    sphere(this.size * 0.35, 32, 24);

    // Ears
    push();
    ambientMaterial(130, 80, 45);
    translate(-this.size * 0.32, -this.size * 0.02, -this.size * 0.05);
    sphere(this.size * 0.16, 20, 16);
    pop();

    push();
    ambientMaterial(130, 80, 45);
    translate(this.size * 0.32, -this.size * 0.02, -this.size * 0.05);
    sphere(this.size * 0.16, 20, 16);
    pop();

    // Inner ears
    push();
    ambientMaterial(190, 140, 90);
    translate(-this.size * 0.32, -this.size * 0.02, 0);
    sphere(this.size * 0.1, 18, 14);
    pop();

    push();
    ambientMaterial(190, 140, 90);
    translate(this.size * 0.32, -this.size * 0.02, 0);
    sphere(this.size * 0.1, 18, 14);
    pop();

    // Face / muzzle patch
    push();
    ambientMaterial(220, 190, 150);
    translate(0, this.size * 0.05, this.size * 0.24);
    sphere(this.size * 0.24, 24, 18);
    pop();

    // Eyes (white)
    const eyeOffsetX = this.size * 0.16;
    const eyeOffsetY = -this.size * 0.04;
    const eyeZ = this.size * 0.34;

    push();
    ambientMaterial(255);
    translate(-eyeOffsetX, eyeOffsetY, eyeZ);
    sphere(this.size * 0.08, 16, 12);
    pop();

    push();
    ambientMaterial(255);
    translate(eyeOffsetX, eyeOffsetY, eyeZ);
    sphere(this.size * 0.08, 16, 12);
    pop();

    // Pupils look toward mouse (2D direction mapped to small offset)
    const look = createVector(mouseX - this.pos.x, mouseY - this.pos.y);
    look.limit(this.size * 0.06);

    const pupilOffsetX = look.x * 0.15;
    const pupilOffsetY = look.y * 0.15;

    push();
    ambientMaterial(0);
    translate(
      -eyeOffsetX + pupilOffsetX,
      eyeOffsetY + pupilOffsetY,
      eyeZ + this.size * 0.03
    );
    sphere(this.size * 0.03, 10, 8);
    pop();

    push();
    ambientMaterial(0);
    translate(
      eyeOffsetX + pupilOffsetX,
      eyeOffsetY + pupilOffsetY,
      eyeZ + this.size * 0.03
    );
    sphere(this.size * 0.03, 10, 8);
    pop();

    // Nose
    push();
    ambientMaterial(80, 50, 40);
    translate(0, this.size * 0.11, this.size * 0.35);
    sphere(this.size * 0.06, 16, 12);
    pop();

    // Simple mouth: a darker patch that changes size when chasing
    push();
    if (this.state === "chasing") {
      ambientMaterial(90, 40, 30);
      translate(0, this.size * 0.18, this.size * 0.36);
      sphere(this.size * 0.08, 16, 12);
    } else {
      ambientMaterial(100, 60, 45);
      translate(0, this.size * 0.19, this.size * 0.34);
      sphere(this.size * 0.06, 16, 12);
    }
    pop();

    pop(); // end head

    // Tail
    push();
    ambientMaterial(bodyR, bodyG, bodyB);
    translate(0, this.size * 0.3, -this.size * 0.35);
    rotateX(-PI / 3);
    cylinder(this.size * 0.05, this.size * 0.8, 8, 1);
    pop();

    pop();
  }

Line-by-line explanation (12 lines)

🔧 Subcomponents:

calculation Screen to WEBGL coordinate conversion translate(this.pos.x - width / 2, this.pos.y - height / 2, 0);

Converts the monkey's 2D screen coordinates (0..width, 0..height) into WEBGL's centered coordinate system

calculation Vertical bobbing motion const bob = sin(frameCount * 0.08 + this.pos.x * 0.01) * 4; translate(0, bob, 0);

Uses a sine wave to make the monkey bob up and down smoothly, with slight variation based on its position for depth

calculation Leaning based on movement direction const yaw = map(this.vel.x, -this.maxSpeed, this.maxSpeed, -0.5, 0.5); rotateY(yaw);

Maps the monkey's horizontal velocity to a small Y-axis rotation so it leans left when moving left and right when moving right

conditional Color shift when chasing let bodyR = this.state === "chasing" ? 180 : 150; let bodyG = this.state === "chasing" ? 110 : 100; let bodyB = this.state === "chasing" ? 60 : 55;

Makes the monkey's body slightly redder and more saturated when actively chasing to signal aggression

calculation Eyes following the cursor const look = createVector(mouseX - this.pos.x, mouseY - this.pos.y); look.limit(this.size * 0.06); const pupilOffsetX = look.x * 0.15; const pupilOffsetY = look.y * 0.15;

Calculates the direction from monkey to cursor and scales it to move the pupils, making the monkey look at you

push();
Saves the current transformation matrix so we can restore it after drawing the 3D model
translate(this.pos.x - width / 2, this.pos.y - height / 2, 0);
In WEBGL, coordinates are centered at (0,0)—this converts from screen coordinates (where (0,0) is top-left) to WEBGL space by offsetting by half the canvas
const bob = sin(frameCount * 0.08 + this.pos.x * 0.01) * 4;
Uses a sine wave based on frame count to create smooth up-down bobbing, with slight variation based on position
const yaw = map(this.vel.x, -this.maxSpeed, this.maxSpeed, -0.5, 0.5);
Maps the monkey's horizontal velocity to a rotation angle: full left speed = -0.5 radians, full right speed = +0.5 radians
rotateY(yaw);
Rotates around the Y-axis so the monkey leans in the direction it's moving, adding character to the motion
let bodyR = this.state === "chasing" ? 180 : 150;
Sets red channel to 180 (brighter) when chasing, 150 (duller) when wandering—a visual state indicator
sphere(this.size * 0.4, 32, 24);
Draws the body as a sphere with radius 40% of the monkey's size, with 32 horizontal and 24 vertical subdivisions for smooth shading
translate(-this.size * 0.32, -this.size * 0.02, -this.size * 0.05);
Positions the left ear 32% to the left of center, slightly up, and slightly back in Z
const look = createVector(mouseX - this.pos.x, mouseY - this.pos.y);
Creates a vector pointing from the monkey toward the cursor
look.limit(this.size * 0.06);
Caps the magnitude so the eyes don't track too far away when the cursor is distant—limits the pupil movement to 6% of body size
const pupilOffsetX = look.x * 0.15;
Scales the look vector by 15% to create the small pupil offset relative to the eye white
pop();
Restores the previous transformation matrix, undoing all the translates and rotates for the next part of the model

newMonkeyPhrase()

newMonkeyPhrase() shows how to procedurally generate text by randomly combining words from predefined pools. This is the foundation of simple natural language generation—the same technique used in context-free grammars, Markov chains, and even modern language models at their core.

🔬 This loop assembles 3-7 random words. What happens if you change `random(3, 7)` to `random(1, 3)` so phrases are shorter, or `random(8, 15)` so the monkey speaks in long rambling monologues?

  const wordCount = floor(random(3, 7));
  let words = [];
  for (let i = 0; i < wordCount; i++) {
    words.push(random(pool));
  }
function newMonkeyPhrase(mode) {
  let pool;
  if (mode === "chase") {
    pool = monkeyChaseWords.concat(monkeyGlitchWords);
  } else if (mode === "idle") {
    pool = monkeyIdleWords.concat(monkeyGlitchWords);
  } else {
    pool = monkeyIdleWords.concat(monkeyChaseWords, monkeyGlitchWords);
  }

  const wordCount = floor(random(3, 7));
  let words = [];
  for (let i = 0; i < wordCount; i++) {
    words.push(random(pool));
  }

  let phrase = words.join(" ");
  // Random punctuation
  const punct = random(["!", "!!", "?!", "...", ""]);
  currentPhrase = phrase + punct;
}
Line-by-line explanation (10 lines)

🔧 Subcomponents:

conditional Word pool selection by mode if (mode === "chase") { pool = monkeyChaseWords.concat(monkeyGlitchWords); } else if (mode === "idle") { pool = monkeyIdleWords.concat(monkeyGlitchWords); } else { pool = monkeyIdleWords.concat(monkeyChaseWords, monkeyGlitchWords); }

Selects which set of words to draw from based on the monkey's current behavior

for-loop Random word selection loop for (let i = 0; i < wordCount; i++) { words.push(random(pool)); }

Picks a random number of words (3-7) from the chosen pool and assembles them into a phrase

let pool;
Declares a variable to hold the array of words that will be sampled from
if (mode === "chase") {
Checks if the monkey is actively chasing
pool = monkeyChaseWords.concat(monkeyGlitchWords);
Combines the aggressive chase words with occasional glitchy words for variety—.concat() merges two arrays
const wordCount = floor(random(3, 7));
Randomly picks a number between 3 and 7 (inclusive) to determine how many words the phrase will contain
let words = [];
Creates an empty array to collect the randomly selected words
for (let i = 0; i < wordCount; i++) {
Loops wordCount times to build up an array of random words
words.push(random(pool));
On each iteration, picks a random word from the pool array and adds it to the words array
let phrase = words.join(" ");
Joins all the words into a single string with spaces between them—'ook eek banana' instead of ['ook','eek','banana']
const punct = random(["!", "!!", "?!", "...", ""]);
Randomly selects punctuation to append: mostly exclamation marks, sometimes ellipsis, sometimes nothing
currentPhrase = phrase + punct;
Concatenates the phrase and punctuation into the global currentPhrase variable, which is then drawn in the speech bubble next frame

drawSpeechBubble()

drawSpeechBubble() shows how to build UI elements in p5.js by combining simple shapes (rect and triangle) with calculated positioning. The constrain() calls are essential game design: they prevent UI from disappearing off-screen when the monkey is near an edge. This is a pattern used in every game with on-screen labels.

function drawSpeechBubble(x, y, txt) {
  push();
  textAlign(LEFT, TOP);
  textSize(14);

  const padding = 8;
  const maxWidth = 220;

  const lines = splitIntoLines(txt, maxWidth);
  const lineHeight = 18;
  const bubbleW = maxWidth + padding * 2;
  const bubbleH = lines.length * lineHeight + padding * 2;

  const bx = constrain(x - bubbleW * 0.5, 10, width - bubbleW - 10);
  const by = constrain(y - bubbleH - 20, 10, height - bubbleH - 10);

  // Bubble
  noStroke();
  fill(255, 240, 220, 235);
  rect(bx, by, bubbleW, bubbleH, 10);

  // Tail toward monkey head
  fill(255, 240, 220, 235);
  triangle(
    x, y - 10,
    bx + bubbleW * 0.3, by + bubbleH,
    bx + bubbleW * 0.35, by + bubbleH
  );

  // Text
  fill(40);
  let ty = by + padding;
  for (let line of lines) {
    text(line, bx + padding, ty);
    ty += lineHeight;
  }

  pop();
}
Line-by-line explanation (11 lines)

🔧 Subcomponents:

calculation Line wrapping calculation const lines = splitIntoLines(txt, maxWidth);

Breaks the monkey's phrase into multiple lines so it fits within the speech bubble width

calculation Off-screen boundary constraint const bx = constrain(x - bubbleW * 0.5, 10, width - bubbleW - 10); const by = constrain(y - bubbleH - 20, 10, height - bubbleH - 10);

Keeps the speech bubble on screen by constraining its position to stay within safe margins

for-loop Multi-line text rendering for (let line of lines) { text(line, bx + padding, ty); ty += lineHeight; }

Draws each wrapped line of text at the correct Y position, spaced by lineHeight

const lines = splitIntoLines(txt, maxWidth);
Calls the helper function splitIntoLines() to break the phrase into multiple lines that fit within maxWidth pixels
const bubbleW = maxWidth + padding * 2;
Calculates the bubble width as the max text width plus 8 pixels of padding on left and right
const bubbleH = lines.length * lineHeight + padding * 2;
Calculates height based on how many lines are needed plus padding top and bottom
const bx = constrain(x - bubbleW * 0.5, 10, width - bubbleW - 10);
Centers the bubble on the monkey but constrains it so it stays at least 10 pixels from the left/right edges
const by = constrain(y - bubbleH - 20, 10, height - bubbleH - 10);
Positions the bubble above the monkey (hence the -bubbleH) but keeps it 10 pixels from top/bottom edges
fill(255, 240, 220, 235);
Sets the bubble color to a warm off-white with slight transparency (235 = ~92% opaque)
rect(bx, by, bubbleW, bubbleH, 10);
Draws the bubble as a rounded rectangle with 10-pixel corner radius
triangle( x, y - 10, bx + bubbleW * 0.3, by + bubbleH, bx + bubbleW * 0.35, by + bubbleH );
Draws the tail/pointer of the speech bubble, connecting the bubble to the monkey's position
for (let line of lines) {
Loops through each wrapped line of text
text(line, bx + padding, ty);
Draws the current line at position (bx + padding, ty), offset from the bubble's top-left corner
ty += lineHeight;
Increments Y for the next line by the lineHeight (18 pixels), creating vertical spacing

splitIntoLines()

splitIntoLines() implements basic word wrapping by testing the pixel width of each potential line with textWidth(). This is how text UI avoids overflowing—it's a key technique for responsive design in games and interactive art. Note that it's approximation: monospace fonts would make this simpler, but proportional fonts require checking actual rendered width.

// Simple word-wrapping into approx width
function splitIntoLines(str, maxWidth) {
  const words = str.split(" ");
  let lines = [];
  let current = "";

  for (let w of words) {
    const test = current === "" ? w : current + " " + w;
    if (textWidth(test) > maxWidth) {
      if (current !== "") lines.push(current);
      current = w;
    } else {
      current = test;
    }
  }
  if (current !== "") lines.push(current);
  return lines;
}
Line-by-line explanation (11 lines)

🔧 Subcomponents:

for-loop Word wrapping iteration for (let w of words) { const test = current === "" ? w : current + " " + w; if (textWidth(test) > maxWidth) { if (current !== "") lines.push(current); current = w; } else { current = test; } }

Tests each word to see if adding it to the current line would exceed maxWidth, breaking to a new line if so

const words = str.split(" ");
Splits the input string by spaces to get an array of individual words
let lines = [];
Creates an empty array to accumulate completed lines of text
let current = "";
Tracks the current line being built, starting empty
for (let w of words) {
Loops through each word in the phrase
const test = current === "" ? w : current + " " + w;
Creates a test string: if current is empty, just use the word; otherwise, append it with a space
if (textWidth(test) > maxWidth) {
Checks if the test string is too wide—if so, it's time to wrap
if (current !== "") lines.push(current);
If the current line isn't empty, save it to the lines array before breaking
current = w;
Start a new line with just this word
} else { current = test; }
The word fits, so update current to include it
if (current !== "") lines.push(current);
After the loop, push any remaining text as the final line
return lines;
Return the array of wrapped lines

drawHUD()

drawHUD() is a simple text overlay. HUD stands for 'Heads-Up Display'—in games, it's the static UI that tells the player what's happening. This one is minimal: just instructions. Notice how it uses push/pop to preserve the text state without affecting other drawing modes.

function drawHUD() {
  push();
  textAlign(LEFT, TOP);
  textSize(16);
  fill(255, 240);
  text("3D AI Monkey: avoid letting it touch your cursor!", 16, 16);
  text("Move the mouse. If it catches you, the game crashes.", 16, 36);
  pop();
}
Line-by-line explanation (3 lines)
textAlign(LEFT, TOP);
Sets text alignment so the text is positioned at its top-left corner, making positioning predictable
fill(255, 240);
Sets text color to white with 240 alpha (~94% opacity) so it's readable but slightly transparent
text("3D AI Monkey: avoid letting it touch your cursor!", 16, 16);
Draws the title instruction at pixel (16, 16)

triggerCrash()

triggerCrash() is a state-change handler—it's a single entry point for all the changes that happen when the game ends. This pattern scales: if the end-game behavior got more complex, you'd add more logic here.

function triggerCrash() {
  gameState = "crashed";
  // One last special phrase
  currentPhrase = "monkey.exe has stopped your game";
}
Line-by-line explanation (2 lines)
gameState = "crashed";
Changes the global game state, which tells the draw() loop to switch to drawCrashScreen() next frame
currentPhrase = "monkey.exe has stopped your game";
Sets a final humorous error message that will be displayed in the speech bubble as the game crashes

drawCrashScreen()

drawCrashScreen() uses randomness to create visual chaos—the random red rectangles evoke computer glitches and screen artifacts. This is a classic game design trick: randomness makes the scene feel more chaotic and impactful than a static image. The game never resets automatically; you have to reload, which adds to the 'crash' effect.

function drawCrashScreen() {
  background(10);

  resetMatrix();
  translate(-width / 2, -height / 2, 0);
  noLights();

  // Flash effect
  const flashes = 40;
  for (let i = 0; i < flashes; i++) {
    const x = random(width);
    const y = random(height);
    const w = random(20, 200);
    const h = random(5, 40);
    const alpha = random(80, 200);
    fill(random(200, 255), random(0, 50), random(0, 50), alpha);
    noStroke();
    rect(x, y, w, h);
  }

  fill(255, 40, 40);
  textAlign(CENTER, CENTER);
  textSize(48);
  text("GAME CRASHED", width / 2, height / 2 - 20);

  textSize(20);
  fill(240);
  text("The AI monkey caught your cursor.", width / 2, height / 2 + 20);
  text("Reload to try again.", width / 2, height / 2 + 50);
}
Line-by-line explanation (8 lines)

🔧 Subcomponents:

for-loop Random glitch rectangles const flashes = 40; for (let i = 0; i < flashes; i++) { const x = random(width); const y = random(height); const w = random(20, 200); const h = random(5, 40); const alpha = random(80, 200); fill(random(200, 255), random(0, 50), random(0, 50), alpha); noStroke(); rect(x, y, w, h); }

Draws 40 random red/reddish rectangles across the screen to create a chaotic 'computer crash' visual effect

background(10);
Fills the screen with a dark gray-black color
resetMatrix();
Clears WEBGL transformations to prepare for 2D drawing
translate(-width / 2, -height / 2, 0);
Converts WEBGL coordinates back to screen coordinates (top-left origin)
const flashes = 40;
Decides to draw 40 random glitch rectangles
const x = random(width);
Picks a random X position across the screen
const w = random(20, 200);
Generates a random width between 20 and 200 pixels
fill(random(200, 255), random(0, 50), random(0, 50), alpha);
Sets color to a reddish hue (high red, low green/blue) with randomized brightness and opacity
text("GAME CRASHED", width / 2, height / 2 - 20);
Draws the crash message in red at the center of the screen

windowResized()

windowResized() is a p5.js callback that fires whenever the browser window is resized. It's essential for fullscreen interactive sketches—without it, the canvas would stay at its original size and not fill the newly resized window.

function windowResized() {
  resizeCanvas(windowWidth, windowHeight);
}
Line-by-line explanation (1 lines)
resizeCanvas(windowWidth, windowHeight);
Automatically resizes the canvas to match the browser window whenever the window is resized, keeping the sketch fullscreen

📦 Key Variables

uiFont p5.Font

Stores the loaded Roboto font so text renders correctly in WEBGL mode (default fonts don't work in 3D)

uiFont = loadFont('https://cdn.jsdelivr.net/fontsource/fonts/roboto@latest/latin-400-normal.woff')
monkey Monkey (object)

The single Monkey instance that the player must evade—stores its position, velocity, AI state, and 3D model

monkey = new Monkey(width * 0.5, height * 0.5);
gameState string

Controls whether the game is running ('play') or has ended ('crashed')—determines which draw function is called

let gameState = 'play';
currentPhrase string

Stores the current monkey speech bubble text, regenerated at intervals or when state changes

let currentPhrase = '';
phraseTimer number

Countdown timer (in frames) until a new monkey phrase is generated—decrements each frame

let phraseTimer = 0;
PHRASE_INTERVAL number

The frame interval at which the monkey generates a new phrase (180 = ~3 seconds at 60 FPS)

const PHRASE_INTERVAL = 180;
lastMouseX number

Stores the mouse X position from the previous frame, used to calculate mouse velocity for prediction

let lastMouseX;
lastMouseY number

Stores the mouse Y position from the previous frame, used to calculate mouse velocity for prediction

let lastMouseY;
monkeyIdleWords array of strings

Word pool for when the monkey is wandering calmly ('ook', 'eek', 'banana', etc.)

const monkeyIdleWords = ['ook', 'eek', 'ooh', 'aa', 'banana', ...];
monkeyChaseWords array of strings

Word pool for when the monkey is actively hunting ('BANANA!', 'got you', 'hunt', etc.)

const monkeyChaseWords = ['BANANA!', 'human!', 'got you', ...];
monkeyGlitchWords array of strings

Word pool for error/crash messages ('banana 404', 'monkey.exe', etc.) that can appear in any state

const monkeyGlitchWords = ['banana 404', 'brain buffer', 'monkey.exe', ...];

🔧 Potential Improvements (6)

Here are some ways this code could be enhanced:

BUG display3D() pupil calculation

The pupils track the cursor in 2D screen space but don't account for the Z depth of the 3D eyes, so the tracking looks slightly off from certain angles

💡 Project the 3D eye position to screen space and calculate the look direction from there, or use a simplified direction in 3D space instead of mixing coordinate systems

PERFORMANCE drawCrashScreen() glitch loop

The crash screen regenerates 40 random rectangles every frame, which is wasteful—they're completely random and flicker chaotically

💡 Either cache the rectangles once when the crash is triggered, or draw fewer rectangles per frame to smooth the animation

STYLE newMonkeyPhrase() mode parameter

The function uses string mode ('idle', 'chase') which is easy to typo; the else clause silently falls back to mixing all pools

💡 Use an enum object or switch statement to validate the mode, or throw an error if an invalid mode is passed

FEATURE global scope

The sketch loads a font from a CDN every time—if the network is slow, text rendering will be delayed

💡 Add a loading screen or graceful fallback to use the system font while the Roboto font loads asynchronously

BUG seek() distance threshold

When the distance is exactly 0, the function returns early with zero steering, but the monkey is then stuck at that position with no force to move it away

💡 Add a small random repulsion force when distance is very small, or clamp the distance to a minimum threshold

STYLE drawSpeechBubble() positioning

The constrain() values (10 pixels margin) are magic numbers with no explanation

💡 Extract them to named constants at the top of the function or as parameters for clarity and easy tweaking

🔄 Code Flow

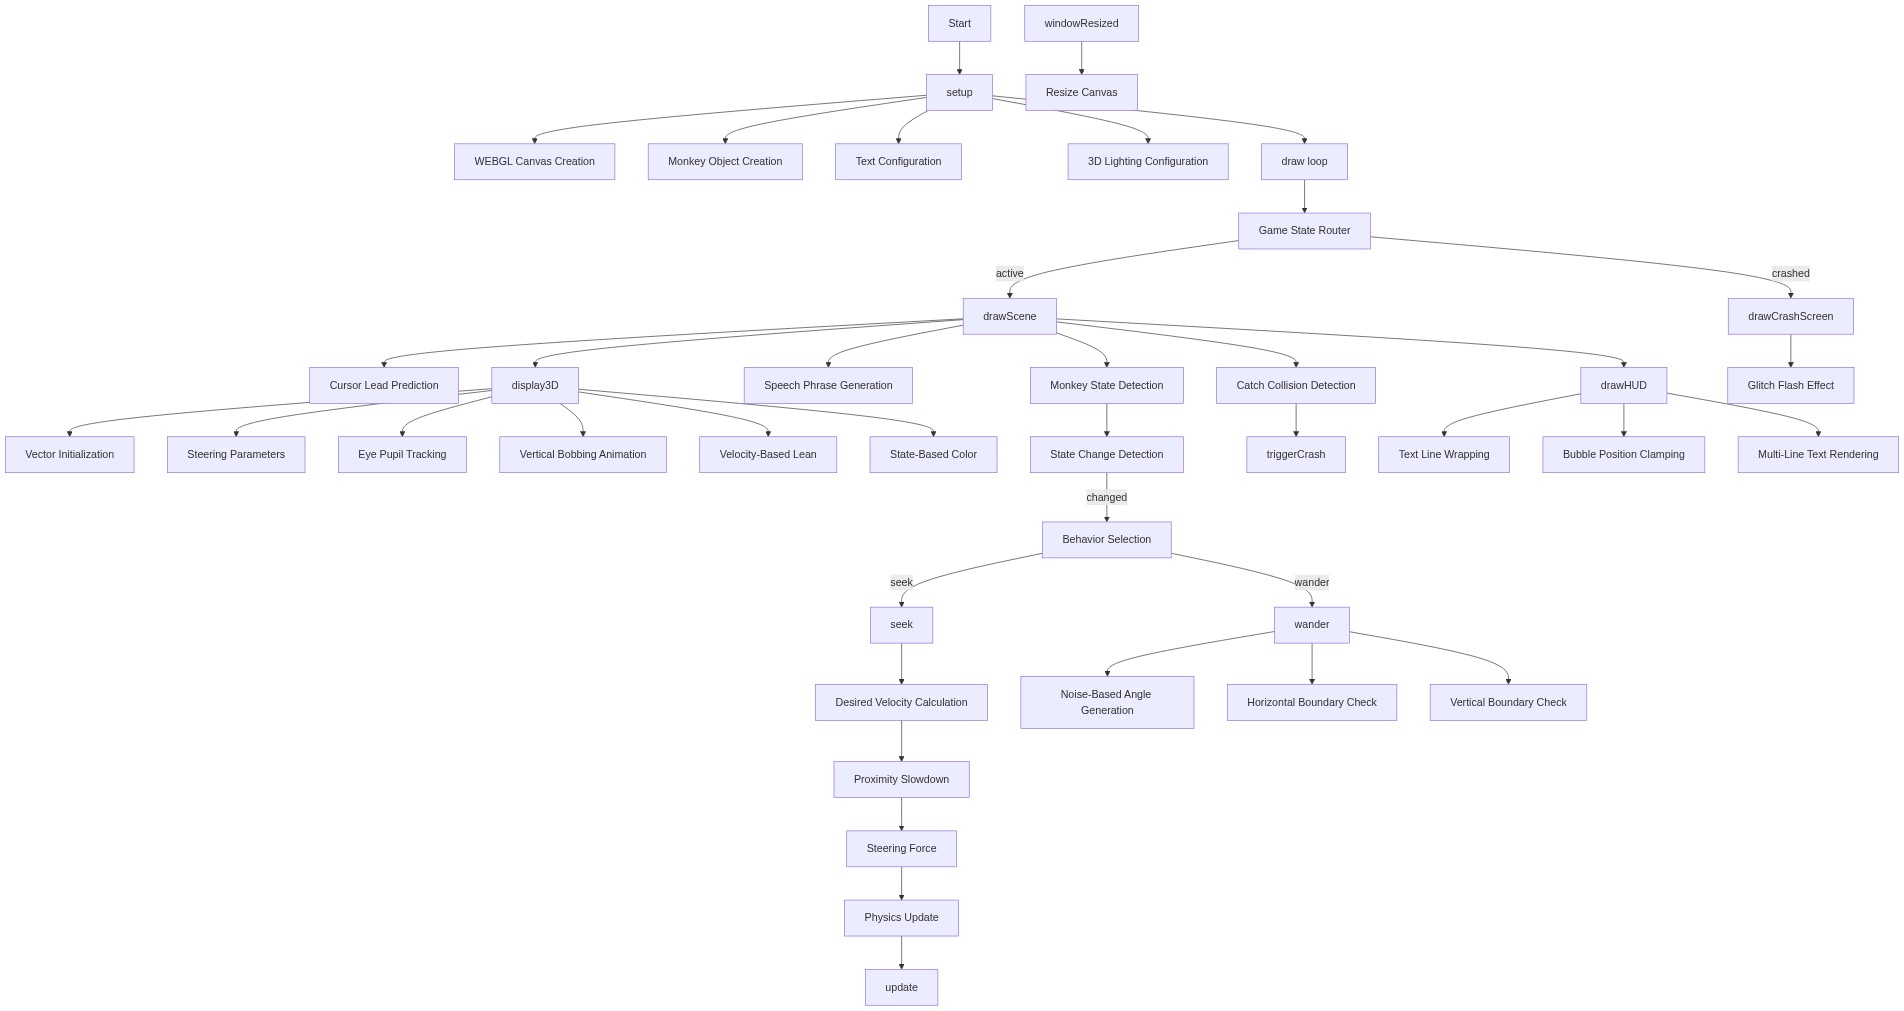
Code flow showing preload, setup, draw, drawscene, monkeyupdate, seek, wander, handleedges, display3d, newmonkeyphrase, drawspeechbubble, splitintolines, drawhud, triggercrash, drawcrashscreen, windowresized

💡 Click on function names in the diagram to jump to their code

graph TD start[Start] --> setup[setup] setup --> draw[draw loop] draw --> statecheck[state-check] draw --> lookahead[look-ahead] draw --> statetransition[state-transition] draw --> phraselogic[phrase-logic] draw --> collisioncheck[collision-check] draw --> steeringchoice[steering-choice] draw --> physicsintegration[physics-integration] statecheck -->|if gameState == normal| drawscene[drawScene] statecheck -->|if gameState == crash| drawcrashscreen[drawCrashScreen] lookahead --> coordinateconversion[coordinate-conversion] statetransition -->|if close to cursor| monkeyupdate[monkeyupdate] statetransition -->|if not close to cursor| wander[wander] phraselogic --> newmonkeyphrase[newMonkeyPhrase] collisioncheck -->|if within catch radius| triggercrash[triggerCrash] steeringchoice -->|if wandering| wander steeringchoice -->|if chasing| seek[seek] physicsintegration --> distancecheck[distance-check] physicsintegration --> slowdown[slowdown] physicsintegration --> bobanimation[bob-animation] physicsintegration --> velocitylean[velocity-lean] click setup href "#fn-setup" click draw href "#fn-draw" click statecheck href "#sub-state-check" click lookahead href "#sub-look-ahead" click statetransition href "#sub-state-transition" click phraselogic href "#sub-phrase-logic" click collisioncheck href "#sub-collision-check" click steeringchoice href "#sub-steering-choice" click physicsintegration href "#sub-physics-integration" click distancecheck href "#sub-distance-check" click slowdown href "#sub-slowdown" click bobanimation href "#sub-bob-animation" click velocitylean href "#sub-velocity-lean" click drawscene href "#fn-drawscene" click triggercrash href "#fn-triggercrash" click newmonkeyphrase href "#fn-newmonkeyphrase" click seek href "#fn-seek" click wander href "#fn-wander" click drawcrashscreen href "#fn-drawcrashscreen" click coordinateconversion href "#sub-coordinate-conversion"

❓ Frequently Asked Questions

What visual experience does the 'monkey game hehe' sketch offer?

The sketch creates a vibrant 3D scene featuring a chunky monkey model that chases the user's cursor with glowing lights and simple shapes, enhancing the playful atmosphere.

How can players interact with the monkey game?

Users can control the game by moving their cursor around the screen, prompting the monkey to chase them and respond with silly phrases until it eventually catches them.

What creative coding concepts are showcased in this p5.js sketch?

This sketch demonstrates steering behavior for character movement and dynamic text display, showcasing how AI can create engaging interactions in a playful visual environment.

Preview

monkey game hehe - p5.js creative coding sketch preview
Sketch Preview
Code flow diagram showing the structure of monkey game hehe - Code flow showing preload, setup, draw, drawscene, monkeyupdate, seek, wander, handleedges, display3d, newmonkeyphrase, drawspeechbubble, splitintolines, drawhud, triggercrash, drawcrashscreen, windowresized
Code Flow Diagram