monster reastraunt

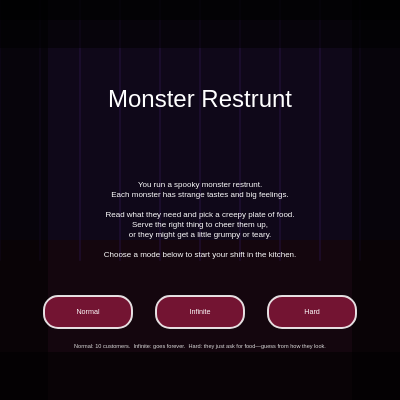
Monster Restrunt is an interactive emotion management game where you run a spooky restaurant serving three unique monster types with distinct personalities and food preferences. Players read each monster's cravings, select from three dish options, and earn reputation by matching their tastes—or watch them react dramatically if you get it wrong.

🧪 Try This!

Experiment with the code by making these changes:

  1. Change the game to always spawn Vampires — Modify the monster archetype selection so you only ever see Vampires, perfect for testing that one character type without randomness.
  2. Make reputation loss harsher — Increase the penalty for wrong food choices to -4, making the game much harder to survive.
  3. Speed up reaction animations — Reduce the reaction timer from 120 frames to 60 so monsters leave twice as fast, adding urgency.
  4. Add a fourth recipe button
  5. Change Vampire color from dark red to bright purple — Edit the monster archetype data to give Vampires a totally different visual identity.
  6. Make Hard mode actually show hints (disable it) — Remove the hard-mode check so all modes show the flavor-specific dialogue, making the game easier.
Prefer the full editor? Open it there →

📖 About This Sketch

Monster Restrunt is a charming management game that combines character animation, interactive buttons, and emotional AI responses. Three monster archetypes—Vampire, Dragon, and Slime—each shuffle in with quirky food cravings written as desire lines. You click recipe buttons to serve them food, and their reactions (happy, angry, sad, or explosive) teach you their personalities over multiple rounds. The sketch powers these feelings with color-shifting, animated facial expressions, reaction particle effects, and state machine logic that governs when monsters arrive, react, and leave.

The code is organized around a central game loop (updateGame and drawGame), a Monster class that renders three distinct character designs and emotional expressions, global state variables tracking reputation and game progress, and a data-driven approach using recipe definitions and archetype templates. By studying it, you will learn how to build a complete game with multiple screens (title, playing, day end, game over), manage complex animation timing with counters, construct interactive buttons with hover states, and use procedural dialogue generation to create personality-driven interactions.

⚙️ How It Works

  1. When the sketch loads, setup() creates a responsive canvas and sets text alignment. The draw loop starts at the title screen, displaying the game name, instructions, and three clickable mode buttons (Normal, Infinite, Hard).
  2. Clicking a mode button calls startNewGame(), which initializes reputation, customer counter, and switches gameState to 'playing'. This triggers the first monster spawn.
  3. spawnMonster() picks a random Monster archetype, generates one of three dish options (ensuring at least one matches the monster's desired flavor tag), and builds a personalized desire line from a data-driven DESIRE_LINES object. In Hard mode, the desire line becomes generic and players must guess from how the monster looks.
  4. Every frame, updateGame() checks if a reaction timer is running and increments the customer count when the timer expires. It also spawns the next monster if the current one has left and the day isn't over.
  5. The player clicks one of three food buttons. serveRecipe() compares the chosen recipe's tags to the monster's desired tag, setting reactionMood ('happy' for a match, 'explode'/'angry'/'cry'/'sad' for mismatches based on temperament), updating reputation, and starting a reaction timer.
  6. During the reaction, the monster's colors shift (brighter for happy, redder for angry, bluer for sad), their facial expression changes, and special effects play (radiating fire rings for 'explode', falling tears for 'cry'). The reaction text overlay appears on screen.
  7. When the reaction timer reaches zero, the monster leaves. If reputation drops below -6, the game ends. If (in Normal mode) 10 customers have been served, the day ends. Otherwise, the cycle repeats with a new monster.

🎓 Concepts You'll Learn

Game state machineClass-based character designProcedural dialogue and data-driven designInteractive button UI with hover detectionAnimation timing and reaction sequencesEmotion-driven visual feedbackResponsive canvas and relative positioning

📝 Code Breakdown

setup()

setup() runs exactly once when the sketch loads. Here it configures p5's drawing modes globally so the rest of your code can rely on consistent positioning behavior.

function setup() {
  createCanvas(windowWidth, windowHeight);
  textAlign(CENTER, CENTER);
  rectMode(CENTER);
}
Line-by-line explanation (3 lines)
createCanvas(windowWidth, windowHeight);
Creates a canvas that fills the entire browser window, making the game responsive to screen size.
textAlign(CENTER, CENTER);
Sets all text to align at its center point—every text() call will be centered both horizontally and vertically around its x, y coordinates.
rectMode(CENTER);
Makes rect() and other shape commands draw from the center point instead of the corner, making button and panel positioning easier to reason about.

draw()

draw() is p5's animation loop—it runs 60 times per second. The state machine pattern (checking gameState) is the heart of game architecture: every possible screen or phase gets its own branch, keeping code organized and scalable.

function draw() {
  drawBackground();

  if (gameState === "title") {
    drawTitleScreen();
  } else if (gameState === "playing") {
    updateGame();
    drawGame();
  } else if (gameState === "dayEnd") {
    drawDayEndScreen();
  } else if (gameState === "gameOver") {
    drawGameOverScreen();
  }
}
Line-by-line explanation (5 lines)

🔧 Subcomponents:

switch-case Game state dispatcher if (gameState === "title") { ... } else if (gameState === "playing") { ... }

Routes the draw() function to different screens depending on the current game state—title, playing, day end, or game over.

drawBackground();
Draws the dark spooky restaurant background and visual elements (walls, counter, stripes, vignette) that are the same on every screen.
if (gameState === "title") {
Checks if the game is on the title screen. If true, show the title, instructions, and mode-select buttons.
} else if (gameState === "playing") {
If the player is actively serving monsters, run the game update logic and draw the game screen with monster, buttons, and UI.
} else if (gameState === "dayEnd") {
If the day is complete (10 customers served in normal mode), show the day-end summary screen.
} else if (gameState === "gameOver") {
If reputation dropped below -6, show the game-over screen and offer to restart.

drawBackground()

This function draws the static environment every frame. By centralizing background rendering, the code stays clean—all screen-level drawing happens in one place, and individual screens layer on top. The use of proportional sizing (height * 0.6 instead of hardcoded pixel values) makes the restaurant scale beautifully from phone to desktop.

🔬 This loop draws vertical shadow stripes. What happens if you change 'width / 30' to 'width / 15'? To 'width / 50'? How does it change the wall's visual texture?

  stroke(40, 20, 70, 110);
  strokeWeight(2);
  const stripeSpacing = max(40, width / 30);
  for (let x = 0; x < width; x += stripeSpacing) {
    line(x, 0, x, height * 0.65);
  }
function drawBackground() {
  // Dark spooky background
  background(5, 2, 12);

  // Back wall
  noStroke();
  fill(15, 8, 25);
  rectMode(CORNER);
  rect(0, 0, width, height * 0.65);

  // Counter
  fill(20, 6, 14);
  rect(0, height * 0.6, width, height * 0.4);

  // Vertical shadow stripes on the wall
  stroke(40, 20, 70, 110);
  strokeWeight(2);
  const stripeSpacing = max(40, width / 30);
  for (let x = 0; x < width; x += stripeSpacing) {
    line(x, 0, x, height * 0.65);
  }

  // Ceiling beam
  noStroke();
  fill(0, 0, 0, 140);
  rect(0, 0, width, height * 0.05);

  // Simple vignette
  const v = min(width, height) * 0.12;
  fill(0, 0, 0, 140);
  rect(0, 0, width, v); // top
  rect(0, height - v, width, v); // bottom
  rect(0, 0, v, height); // left
  rect(width - v, 0, v, height); // right
}
Line-by-line explanation (10 lines)

🔧 Subcomponents:

for-loop Vertical shadow stripes for (let x = 0; x < width; x += stripeSpacing) {

Draws evenly-spaced vertical lines across the wall to create an eerie ribbed/striped shadow effect.

calculation Screen vignette darkening const v = min(width, height) * 0.12;

Creates a darkened border around the screen edges to draw focus toward the center where the monster and buttons are.

background(5, 2, 12);
Clears the entire canvas and fills it with a very dark purple (nearly black), setting the spooky restaurant tone.
fill(15, 8, 25);
Sets the fill color to a very dark purplish tone for the back wall—slightly lighter than the background to show depth.
rectMode(CORNER);
Temporarily switches to corner-based rectangle drawing for the background elements (different from the CENTER mode set in setup).
rect(0, 0, width, height * 0.65);
Draws the back wall rectangle from the top-left corner, covering 65% of the screen height.
fill(20, 6, 14);
Sets fill to an even darker red-purple for the counter (service area) to distinguish it from the wall.
rect(0, height * 0.6, width, height * 0.4);
Draws the counter rectangle starting at 60% down the screen, filling the bottom 40% of the canvas.
const stripeSpacing = max(40, width / 30);
Calculates spacing between shadow stripes: at least 40 pixels, but scales with screen width so thin screens don't get too many lines.
for (let x = 0; x < width; x += stripeSpacing) {
Loops across the screen width, incrementing by stripeSpacing, to draw vertical lines at regular intervals.
line(x, 0, x, height * 0.65);
Draws a single vertical line from top to 65% down, creating one shadow stripe on the wall.
const v = min(width, height) * 0.12;
Calculates the vignette border thickness as 12% of the smaller screen dimension, keeping it proportional on any device.

drawGame()

drawGame() is the main gameplay screen layout. It's simple because each visual element (status bar, monster, info panel, buttons, overlay) gets its own function. This modular approach makes it easy to add new UI elements or tweak one piece without breaking the rest.

function drawGame() {
  // Top status bar
  drawStatusBar();

  // Monster & their needs
  if (currentMonster) {
    currentMonster.display(monsterState, reactionMood);
    drawMonsterInfoPanel();
  }

  // Food choice buttons
  drawRecipeButtons();

  // Reaction text overlay
  if (reactionTimer > 0 && reactionText) {
    drawReactionOverlay();
  }
}
Line-by-line explanation (6 lines)
drawStatusBar();
Draws the top bar showing current reputation, monsters served count, and game mode.
if (currentMonster) {
Checks if a monster is currently in the restaurant. If null (between customers), skip rendering the monster.
currentMonster.display(monsterState, reactionMood);
Calls the Monster object's display method, passing its current state ('idle' or 'reacting') and mood ('happy', 'angry', etc.) so it animates accordingly.
drawMonsterInfoPanel();
Draws the speech bubble showing the monster's name, personality blurb, and their desire text (what they want to eat).
drawRecipeButtons();
Draws the three clickable food option buttons at the bottom of the screen, updating their bounds so clicks are detected correctly.
if (reactionTimer > 0 && reactionText) {
Only show the reaction overlay if a reaction is currently animating (timer still counting down) and there is text to display.

updateGame()

updateGame() is the game logic heartbeat. Every frame it counts down the reaction timer and watches for conditions that transition the game to new states. This separation of update (logic) from draw (rendering) keeps code clear and testable.

🔬 These two conditions determine when the game ends. What happens if you change '-6' to '0'? To '-10'? How much harder or easier does the game become?

      if (reputation <= -6) {
        gameState = "gameOver";
      } else if (
        gameMode !== "infinite" &&
        customersServed >= MAX_CUSTOMERS_PER_DAY
      ) {
        gameState = "dayEnd";
      }
function updateGame() {
  // Handle reaction timer & monster departure
  if (reactionTimer > 0) {
    reactionTimer--;
    if (reactionTimer <= 0 && monsterState === "reacting") {
      // Current monster leaves
      currentMonster = null;
      monsterState = "idle";
      reactionText = "";
      reactionMood = "";
      customersServed++;

      if (reputation <= -6) {
        gameState = "gameOver";
      } else if (
        gameMode !== "infinite" &&
        customersServed >= MAX_CUSTOMERS_PER_DAY
      ) {
        gameState = "dayEnd";
      }
    }
  }

  // Spawn next monster if needed
  if (
    gameState === "playing" &&
    !currentMonster &&
    reactionTimer <= 0 &&
    (gameMode === "infinite" ||
      customersServed < MAX_CUSTOMERS_PER_DAY)
  ) {
    spawnMonster();
  }
}
Line-by-line explanation (8 lines)

🔧 Subcomponents:

conditional Reaction timer countdown and exit logic if (reactionTimer > 0) { reactionTimer--; if (reactionTimer <= 0 && monsterState === "reacting") { ... } }

Counts down the reaction display timer each frame and handles monster departure, reputation checks, and day/game-over transitions when the timer expires.

conditional Monster spawn trigger if (gameState === "playing" && !currentMonster && reactionTimer <= 0 && (...)) {

Spawns the next monster once the previous one has left and the game hasn't ended, respecting the customer limit in normal modes.

if (reactionTimer > 0) {
Checks if a reaction is currently animating (timer is still counting down).
reactionTimer--;
Decrements the reaction timer by 1 frame, advancing the animation countdown.
if (reactionTimer <= 0 && monsterState === "reacting") {
When the timer reaches zero AND the monster is still in the reacting state, the reaction is complete and it's time for the monster to leave.
currentMonster = null;
Removes the current monster from the game by setting it to null, so the next draw() won't render it.
customersServed++;
Increments the customer counter to track progress toward the end of the day.
if (reputation <= -6) {
Checks if reputation has dropped to -6 or below, which triggers a game-over state.
} else if (gameMode !== "infinite" && customersServed >= MAX_CUSTOMERS_PER_DAY) {
If the game mode is not infinite and we've served 10 customers, the day is complete—transition to dayEnd screen.
if (gameState === "playing" && !currentMonster && reactionTimer <= 0 && ...) {
Checks four conditions: (1) game is actively playing, (2) no monster is currently present, (3) no reaction is animating, and (4) either infinite mode or we haven't hit the customer limit. If all true, spawn the next monster.

spawnMonster()

spawnMonster() is the character generation engine. It combines randomness (random archetype and desired tag) with data-driven design (archetype templates, recipe tags, desire line pools) to make every monster feel unique yet consistent. The hard-mode check shows how game difficulty is controlled through information—harder games show less.

🔬 This loop builds a list of the monster's preferences that are actually available. What happens if you comment out the 'if' statement and push ALL of archetype.likes—even tags not in any recipe? Why might that cause problems?

  const validLikeTags = [];
  for (let t of archetype.likes) {
    if (RECIPES.some(r => r.tags.includes(t))) {
      validLikeTags.push(t);
    }
  }
function spawnMonster() {
  const archetype = random(MONSTER_ARCHETYPES);
  currentMonster = new Monster(archetype);
  monsterState = "idle";

  // Choose a desired flavor tag from likes that appears in some recipe
  const validLikeTags = [];
  for (let t of archetype.likes) {
    if (RECIPES.some(r => r.tags.includes(t))) {
      validLikeTags.push(t);
    }
  }

  if (validLikeTags.length > 0) {
    currentDesiredTag = random(validLikeTags);
  } else {
    // fallback: pick any tag present in recipes
    const allTags = new Set();
    RECIPES.forEach(r => r.tags.forEach(t => allTags.add(t)));
    const tagArray = Array.from(allTags);
    currentDesiredTag = random(tagArray);
  }

  // In hard mode, hide the exact flavor hint
  if (gameMode === "hard") {
    const genericLines = [
      "I'd like some food, please!",
      "Surprise me with something tasty to eat.",
      "I'm hungry. Pick something you think I'll like."
    ];
    currentDesireText = random(genericLines);
  } else {
    currentDesireText = buildDesireLine(archetype, currentDesiredTag);
  }

  // Build food options (ensure at least one matches desired tag)
  activeRecipes = generateRecipeOptions(currentDesiredTag);

  reactionText = "";
  reactionMood = "";
  reactionTimer = 0;
}
Line-by-line explanation (12 lines)

🔧 Subcomponents:

for-loop Valid likes tag filtering for (let t of archetype.likes) { if (RECIPES.some(r => r.tags.includes(t))) { validLikeTags.push(t); } }

Builds a list of the monster's preferred flavor tags that actually exist in available recipes, ensuring the desire is always satisfiable.

conditional Hard mode dialogue hiding if (gameMode === "hard") { ... } else { ... }

In hard mode, gives a generic desire text so players can't read hints and must guess based on the monster's appearance and archetype.

const archetype = random(MONSTER_ARCHETYPES);
Picks a random monster type from the three archetypes (Vampire, Dragon, or Slime).
currentMonster = new Monster(archetype);
Creates a new Monster instance with the chosen archetype, initializing its position, size, and color.
monsterState = "idle";
Sets the monster to idle state so they are ready to receive a food choice.
for (let t of archetype.likes) {
Loops through the monster archetype's list of flavor tags it likes (e.g., ['berry', 'cool', 'bitter', 'sweet'] for Vampire).
if (RECIPES.some(r => r.tags.includes(t))) {
Uses the .some() array method to check if at least one recipe in the RECIPES array contains this flavor tag.
validLikeTags.push(t);
If a recipe with this tag exists, add it to the validLikeTags list so it can be chosen as the desired tag.
if (validLikeTags.length > 0) {
If the monster has at least one preference that maps to an available recipe, use that list.
currentDesiredTag = random(validLikeTags);
Picks a random preference from the valid list as the current desired tag (what the monster secretly wants).
if (gameMode === "hard") {
In hard mode, don't reveal the monster's preference in the dialogue text.
currentDesireText = random(genericLines);
In hard mode, assign a vague generic line like 'Surprise me' instead of a flavor-specific hint.
currentDesireText = buildDesireLine(archetype, currentDesiredTag);
In normal or infinite mode, build a personality-driven desire line using the archetype and the specific desired tag (e.g., 'I need something sweet to cheer me up').
activeRecipes = generateRecipeOptions(currentDesiredTag);
Generates three recipe options, ensuring at least one has the desired tag, and shuffles them randomly.

serveRecipe(recipe)

serveRecipe() is the heart of game logic. It evaluates the player's choice, updates state (reputation, mood, timer), and selects personality-driven reactions. The temperament-based branching shows how character archetypes shape gameplay—each monster type fails uniquely, creating memorable moments and teaching the player their personalities over repeated rounds.

function serveRecipe(recipe) {
  if (!currentMonster || monsterState !== "idle") return;

  const archetype = currentMonster.archetype;
  const hasDesiredTag = recipe.tags.includes(currentDesiredTag);

  if (hasDesiredTag) {
    reputation += 2;
    monsterState = "reacting";
    reactionMood = "happy";

    const happyLines = [
      "Perfect! This is exactly what I wanted.",
      "You really get my spooky taste.",
      "Delicious! I'm telling all my monster friends.",
      "You've earned a glowing review on GhoulMaps."
    ];
    reactionText = random(happyLines);
  } else {
    // Wrong choice: big but safe emotions
    reputation -= 2;
    monsterState = "reacting";

    if (archetype.temperament === "explosive") {
      reactionMood = "explode";
      const lines = [
        "WHAT IS THIS?! It's all wrong!",
        "My tummy feels all fizzed up!",
        "You call this food? I'm giving you a very grumpy review."
      ];
      reactionText = random(lines);
    } else if (archetype.temperament === "sensitive") {
      reactionMood = random(["sad", "cry"]);
      const lines = [
        "Oh… that's… not what I asked for…",
        "It's okay… I guess… I'll just wobble sadly over here.",
        "I knew this was a mistake. I'm slime, not a trash can."
      ];
      reactionText = random(lines);
    } else {
      // dramatic
      reactionMood = random(["angry", "cry"]);
      const lines = [
        "How DARE you mix up my order!",
        "This is even worse than waking up before sunset.",
        "I specifically said I needed something else!"
      ];
      reactionText = random(lines);
    }
  }

  reactionTimer = 120; // ~2 seconds at 60fps
}
Line-by-line explanation (11 lines)

🔧 Subcomponents:

conditional Correct food reaction path if (hasDesiredTag) { ... }

If the recipe matches the monster's desired tag, reward the player with reputation and a happy emotion.

conditional Temperament-based emotion selection if (archetype.temperament === "explosive") { ... } else if (archetype.temperament === "sensitive") { ... } else { ... }

Routes wrong-food reactions through the monster's personality type, so different archetypes fail in dramatically different ways.

if (!currentMonster || monsterState !== "idle") return;
Safety check: only allow serving if there is a monster present and they're in idle state (not already reacting). If not, exit early.
const hasDesiredTag = recipe.tags.includes(currentDesiredTag);
Checks if the chosen recipe's tags array contains the desired tag—this determines success or failure.
if (hasDesiredTag) {
If the recipe matches what the monster wanted, they're happy.
reputation += 2;
Adds 2 points to reputation as a reward for correct choice.
reactionMood = "happy";
Sets the emotion mood to 'happy', which triggers happy facial expressions and animations in the monster's display method.
reactionText = random(happyLines);
Picks a random happy response from the happyLines array to display in the reaction overlay.
reputation -= 2;
Subtracts 2 points from reputation as a penalty for wrong choice.
if (archetype.temperament === "explosive") {
If the monster is a Dragon (explosive temperament), they respond with an 'explode' mood featuring fiery effects.
} else if (archetype.temperament === "sensitive") {
If the monster is Slime (sensitive temperament), they respond with a random 'sad' or 'cry' mood featuring tears.
} else {
If the monster is Vampire (dramatic temperament), they respond with a random 'angry' or 'cry' mood.
reactionTimer = 120; // ~2 seconds at 60fps
Sets the reaction timer to 120 frames, which at 60 fps equals 2 seconds of reaction display time before the monster leaves.

drawMonsterInfoPanel()

This function demonstrates text positioning within a sized container using margins. By calculating textX and textY relative to the panel bounds, text stays readable and proportional regardless of screen size. The formatted output (name, description, quoted desire) creates a coherent character presentation.

function drawMonsterInfoPanel() {
  // Speech bubble with desire text
  const panelW = min(width * 0.6, 600);
  const panelH = min(height * 0.24, 180);
  const panelX = width * 0.6;
  const panelY = height * 0.3;

  fill(25, 10, 40, 240);
  stroke(255, 200);
  strokeWeight(2);
  rectMode(CENTER);
  rect(panelX, panelY, panelW, panelH, 16);
  noStroke();

  fill(255);
  textAlign(LEFT, TOP);
  textSize(min(22, width * 0.018));
  const margin = 24;
  const textX = panelX - panelW / 2 + margin;
  const textY = panelY - panelH / 2 + margin;

  const arch = currentMonster.archetype;

  const line = arch.kind + " — " + arch.blurb;
  text(
    line + "\n\n\"" + currentDesireText + "\"",
    textX,
    textY,
    panelW - margin * 2,
    panelH - margin * 2
  );
}
Line-by-line explanation (6 lines)
const panelW = min(width * 0.6, 600);
Calculates panel width as 60% of screen width, but caps it at 600 pixels maximum to keep it readable on ultra-wide displays.
const panelX = width * 0.6;
Positions the panel at 60% across the screen horizontally—to the right of the monster.
fill(25, 10, 40, 240);
Sets a dark semi-transparent purple background for the speech bubble—visible but muted.
rect(panelX, panelY, panelW, panelH, 16);
Draws the panel rectangle with 16-pixel rounded corners, making it feel like a comic-style speech bubble.
const line = arch.kind + " — " + arch.blurb;
Combines the monster archetype's name (e.g., 'Vampire') with its personality blurb to introduce them.
text(line + "\n\n\"" + currentDesireText + "\"", ...
Displays the monster's introduction and their desire text (quoted) in the panel, with two newlines creating visual separation.

drawRecipeButtons()

drawRecipeButtons() demonstrates professional UI layout: center alignment with variable button counts, hover states, proportional sizing, and organized hit detection. The buttons array pattern is key—every interactive element must store its bounds so mousePressed() can test clicks against them. This separation of drawing and hit detection is fundamental to all interactive p5 sketches.

🔬 This code makes buttons change color when you hover over them. What happens if you swap the two fill colors? How would reversed hover feedback feel to a player?

    if (hovered) {
      fill(170, 40, 70);
    } else {
      fill(110, 20, 50);
    }
function drawRecipeButtons() {
  buttons = []; // recompute each frame
  if (activeRecipes.length === 0) return;

  const btnCount = activeRecipes.length;
  const btnW = min(260, width / (btnCount + 1));
  const btnH = min(90, height * 0.12);
  const spacing = 20;

  const totalWidth = btnCount * btnW + (btnCount - 1) * spacing;
  let startX = width / 2 - totalWidth / 2 + btnW / 2;
  const y = height * 0.78;

  textAlign(CENTER, CENTER);
  textSize(min(20, width * 0.016));

  for (let i = 0; i < btnCount; i++) {
    const recipe = activeRecipes[i];
    const cx = startX + i * (btnW + spacing);
    const cy = y;

    const hovered =
      mouseX > cx - btnW / 2 &&
      mouseX < cx + btnW / 2 &&
      mouseY > cy - btnH / 2 &&
      mouseY < cy + btnH / 2 &&
      gameState === "playing" &&
      monsterState === "idle";

    // Button background
    if (hovered) {
      fill(170, 40, 70);
    } else {
      fill(110, 20, 50);
    }
    stroke(255, 220);
    strokeWeight(2);
    rectMode(CENTER);
    rect(cx, cy, btnW, btnH, 14);
    noStroke();

    fill(255);
    const nameText = recipe.name;
    const tagText = recipe.tags.join(", ");

    text(nameText, cx, cy - btnH * 0.18);
    textSize(min(16, width * 0.014));
    fill(220);
    text(tagText, cx, cy + btnH * 0.1);

    // Save clickable bounds
    buttons.push({
      cx,
      cy,
      w: btnW,
      h: btnH,
      recipe
    });
  }
}
Line-by-line explanation (9 lines)

🔧 Subcomponents:

conditional Button hover detection const hovered = mouseX > cx - btnW / 2 && mouseX < cx + btnW / 2 && ...

Checks if the mouse is over this button AND the game is in a valid playing/idle state, enabling hover visual feedback and click detection.

for-loop Recipe button rendering loop for (let i = 0; i < btnCount; i++) { ... }

Iterates through the three active recipes and draws a clickable button for each, storing hit bounds for mousePressed() to use.

buttons = []; // recompute each frame
Clears the buttons array at the start so it's always fresh—every frame recalculates button positions (important if the window resizes).
if (activeRecipes.length === 0) return;
If there are no recipes to display (shouldn't happen in normal play), exit early to avoid drawing invisible buttons.
const btnW = min(260, width / (btnCount + 1));
Calculates button width as either 260 pixels (capped) or 1/(btnCount+1) of screen width, ensuring buttons fit without overlap.
const totalWidth = btnCount * btnW + (btnCount - 1) * spacing;
Calculates the total width needed for all buttons plus spacing between them.
let startX = width / 2 - totalWidth / 2 + btnW / 2;
Positions the first button so the group of buttons is centered on screen (subtract half the total width, add half of first button width).
const cx = startX + i * (btnW + spacing);
Calculates each button's x position by stepping across startX, adding (btnW + spacing) for each successive button.
const hovered = mouseX > cx - btnW / 2 && mouseX < cx + btnW / 2 && gameState === "playing" && monsterState === "idle";
Detects hover by checking if mouse is within button bounds AND the game is in a playable state (not reacting or on a menu).
if (hovered) { fill(170, 40, 70); } else { fill(110, 20, 50); }
Changes button color when hovered (brighter) vs. normal (darker) to give visual feedback.
buttons.push({ cx, cy, w: btnW, h: btnH, recipe });
Stores this button's position and recipe in the global buttons array so mousePressed() can check clicks against these bounds.

drawReactionOverlay()

This function shows how mood drives aesthetics. The color variable creates a visual hierarchy—players instantly understand the emotion before reading the text. The darkened background is a key UX pattern that directs attention and pauses gameplay, making the reaction feel impactful.

function drawReactionOverlay() {
  const overlayW = min(width * 0.6, 540);
  const overlayH = min(height * 0.18, 130);
  const x = width / 2;
  const y = height * 0.2;

  // Darken whole screen
  fill(0, 0, 0, 170);
  rectMode(CORNER);
  rect(0, 0, width, height);

  rectMode(CENTER);
  let col;
  if (reactionMood === "happy") col = color(80, 200, 140);
  else if (reactionMood === "explode" || reactionMood === "angry")
    col = color(200, 80, 60);
  else col = color(120, 140, 220);

  fill(red(col), green(col), blue(col), 245);
  stroke(0, 150);
  strokeWeight(2);
  rect(x, y, overlayW, overlayH, 18);
  noStroke();

  fill(10);
  textAlign(CENTER, CENTER);
  textSize(min(22, width * 0.018));
  text(reactionText, x, y, overlayW * 0.9, overlayH * 0.8);
}
Line-by-line explanation (8 lines)

🔧 Subcomponents:

conditional Mood-based color selection if (reactionMood === "happy") col = color(80, 200, 140); else if ...

Changes the reaction overlay's color based on the monster's mood, providing visual feedback (green for happy, red for angry, blue for sad).

const overlayW = min(width * 0.6, 540);
Sets overlay width to 60% of screen or 540px max, keeping the text box readable.
fill(0, 0, 0, 170);
Darkens the entire screen behind the overlay with a semi-transparent black (alpha 170) to focus attention on the reaction message.
rect(0, 0, width, height);
Draws the darkening overlay across the entire canvas.
if (reactionMood === "happy") col = color(80, 200, 140);
If the mood is happy, use a green color to reinforce positivity.
else if (reactionMood === "explode" || reactionMood === "angry") col = color(200, 80, 60);
If the mood is explosive or angry, use a red/orange color to show heat and aggression.
else col = color(120, 140, 220);
For sad or crying moods, use a cool blue color.
fill(red(col), green(col), blue(col), 245);
Extracts the RGB components of the mood color and applies them with high alpha (245) for the reaction box background.
text(reactionText, x, y, overlayW * 0.9, overlayH * 0.8);
Displays the reaction text in the center of the overlay box, with width and height constraints to keep text readable.

mousePressed()

mousePressed() is p5's built-in click handler. The pattern here—loop through interactive elements and test hits against stored bounds—applies to every interactive p5 sketch. The multiple early returns keep the code clear by handling different game states in separate branches. The break statement is crucial to prevent double-serving when a click lands on a button.

function mousePressed() {
  if (gameState === "title") {
    // Choose mode by clicking a mode button
    for (let b of modeButtons) {
      if (
        mouseX > b.cx - b.w / 2 &&
        mouseX < b.cx + b.w / 2 &&
        mouseY > b.cy - b.h / 2 &&
        mouseY < b.cy + b.h / 2
      ) {
        startNewGame(b.mode);
        return;
      }
    }
    return; // clicks on title screen outside buttons do nothing
  }

  if (gameState === "dayEnd" || gameState === "gameOver") {
    // Restart with the same mode
    startNewGame();
    return;
  }

  if (gameState !== "playing") return;

  // Ignore input during reaction animations
  if (monsterState !== "idle" || !currentMonster) return;

  // Check food button clicks
  for (let b of buttons) {
    if (
      mouseX > b.cx - b.w / 2 &&
      mouseX < b.cx + b.w / 2 &&
      mouseY > b.cy - b.h / 2 &&
      mouseY < b.cy + b.h / 2
    ) {
      serveRecipe(b.recipe);
      break;
    }
  }
}
Line-by-line explanation (10 lines)

🔧 Subcomponents:

conditional Title screen mode button detection if (gameState === "title") { for (let b of modeButtons) { ... } }

Loops through mode buttons and calls startNewGame() if a click is detected on the title screen.

conditional Recipe button click detection for (let b of buttons) { if (mouseX > b.cx - b.w / 2 && ...) { serveRecipe(b.recipe); break; } }

Checks if the click landed on any recipe button and serves that recipe if valid, then breaks to prevent multiple recipes from being served on one click.

if (gameState === "title") {
Checks if the player is on the title screen (mode selection).
for (let b of modeButtons) {
Loops through the stored mode buttons to test for clicks on each one.
if (mouseX > b.cx - b.w / 2 && mouseX < b.cx + b.w / 2 && mouseY > b.cy - b.h / 2 && mouseY < b.cy + b.h / 2) {
Checks if the click position (mouseX, mouseY) falls within the button's rectangular bounds—tests horizontal and vertical extents.
startNewGame(b.mode);
Calls startNewGame() with the selected game mode to initialize a new game and switch to the playing state.
if (gameState === "dayEnd" || gameState === "gameOver") {
Checks if the player is on an end screen and allows them to restart by clicking anywhere.
startNewGame();
Restarts the game with the previously selected mode (gameMode variable preserves the choice).
if (monsterState !== "idle" || !currentMonster) return;
Safety check: ignore clicks if the monster is reacting or if there's no monster present—prevents player input during animations.
for (let b of buttons) {
Loops through the food recipe buttons to test for clicks on each one.
serveRecipe(b.recipe);
If a recipe button is clicked, call serveRecipe() with that recipe's data.
break;
Exits the loop immediately after serving, preventing multiple recipes from being served on a single click.

startNewGame(selectedMode)

startNewGame() is the initialization function that resets all game state. By clearing every variable, it ensures that starting a new game creates a clean slate. This centralized reset prevents bugs where old state leaks into new games.

function startNewGame(selectedMode) {
  if (selectedMode) {
    gameMode = selectedMode;
  }
  gameState = "playing";
  reputation = 0;
  customersServed = 0;
  currentMonster = null;
  monsterState = "idle";
  reactionText = "";
  reactionMood = "";
  reactionTimer = 0;
  activeRecipes = [];
}
Line-by-line explanation (10 lines)
if (selectedMode) {
If a mode was passed as an argument (from title screen), update the global gameMode variable.
gameMode = selectedMode;
Sets the game mode to 'normal', 'infinite', or 'hard', which controls difficulty and day length.
gameState = "playing";
Transitions the game to the 'playing' state, which makes the main game loop run instead of the title screen.
reputation = 0;
Resets reputation to 0 for a fresh start.
customersServed = 0;
Resets the customer count to 0.
currentMonster = null;
Clears the current monster so the game loop will spawn a new one on the next frame.
monsterState = "idle";
Sets monster state to idle, preparing for the first interaction.
reactionText = "";
Clears any leftover reaction text from the previous game.
reactionTimer = 0;
Resets the reaction timer so no overlay displays immediately.
activeRecipes = [];
Clears the active recipes array so buttons won't render until the first monster is spawned.

buildDesireLine(archetype, tag)

buildDesireLine() demonstrates data-driven dialogue. Rather than hardcoding desire text per monster combination, it indexes a centralized DESIRE_LINES object. This scales: adding new flavor tags or dialogue is just a matter of updating the data structure, not touching the code logic.

function buildDesireLine(archetype, tag) {
  const lines = DESIRE_LINES[tag];
  if (lines && lines.length > 0) {
    return random(lines);
  }
  // Fallback generic
  return "I'm craving some " + tag + " food today.";
}
Line-by-line explanation (4 lines)
const lines = DESIRE_LINES[tag];
Looks up the tag in the DESIRE_LINES object to find an array of personality-driven dialogue options for that flavor.
if (lines && lines.length > 0) {
Checks if the tag exists in DESIRE_LINES and has at least one dialogue line.
return random(lines);
Picks a random line from the array, ensuring the same desire tag produces different text each playthrough.
return "I'm craving some " + tag + " food today.";
Fallback: if the tag has no custom dialogue, build a generic line on the fly by inserting the tag name.

generateRecipeOptions(desiredTag)

generateRecipeOptions() implements 'game fairness'—it guarantees at least one correct choice while filling other slots with decoys. The double shuffle (remaining, then final options) randomizes the game while maintaining balanced difficulty. This function shows how to combine filtering, randomization, and constraints to create engaging game moments.

function generateRecipeOptions(desiredTag) {
  const matches = RECIPES.filter(r => r.tags.includes(desiredTag));
  const options = [];

  if (matches.length > 0) {
    options.push(random(matches));
  } else {
    options.push(random(RECIPES));
  }

  // Fill remaining options with different recipes
  const remaining = shuffle(
    RECIPES.filter(r => !options.includes(r)),
    true
  );
  for (let i = 0; i < remaining.length && options.length < 3; i++) {
    options.push(remaining[i]);
  }

  // Shuffle final order
  return shuffle(options, true);
}
Line-by-line explanation (8 lines)

🔧 Subcomponents:

calculation Recipes matching desired tag const matches = RECIPES.filter(r => r.tags.includes(desiredTag));

Finds all recipes that contain the desired tag so at least one correct answer is always available.

for-loop Fill remaining button slots for (let i = 0; i < remaining.length && options.length < 3; i++) { options.push(remaining[i]); }

Adds decoy recipes until three options are available, ensuring the monster always has three choices.

const matches = RECIPES.filter(r => r.tags.includes(desiredTag));
Uses the .filter() method to find all recipes that have the desiredTag in their tags array.
const options = [];
Initializes an empty array to build the three recipe options.
if (matches.length > 0) {
Checks if at least one recipe matched the desired tag.
options.push(random(matches));
If matches exist, pick a random one and add it as the first option (the correct answer).
options.push(random(RECIPES));
Fallback: if no matches, pick any random recipe (guarantees at least one option).
const remaining = shuffle(RECIPES.filter(r => !options.includes(r)), true);
Filters the recipe list to exclude recipes already chosen, then shuffles the rest to randomize the decoy order.
for (let i = 0; i < remaining.length && options.length < 3; i++) {
Loops through remaining recipes, adding them until the options array has 3 items.
return shuffle(options, true);
Shuffles the final three options so the correct answer isn't always in the same position, then returns the randomized array.

class Monster

The Monster class demonstrates object-oriented game design. By encapsulating all drawing logic in a single class, the code stays clean—each monster instance tracks its own state (position, color, animation phase) and knows how to render itself with all its nuances (archetype-specific design, mood-based expressions, reaction effects). The separation of display logic (how it looks) from game logic (what it does) makes the code maintainable and lets you add new archetypes easily.

🔬 The Vampire is drawn using vertex() and beginShape()—this defines a five-pointed shape. What happens if you add a vertex(0, -s * 0.5) at the beginning to make a pointy hat? Or remove the vertex(0, s * 0.58) at the bottom?

    if (this.archetype.kind === "Vampire") {
      // Tall, sharp cloak with ragged bottom
      beginShape();
      vertex(-s * 0.32, -s * 0.1);
      vertex(s * 0.32, -s * 0.1);
      vertex(s * 0.26, s * 0.45);
      vertex(0, s * 0.58);
      vertex(-s * 0.26, s * 0.45);
      endShape(CLOSE);
class Monster {
  constructor(archetype) {
    this.archetype = archetype;
    // Position & size relative to canvas
    this.x = width * 0.25;
    this.baseY = height * 0.6;
    this.size = min(width, height) * 0.25;
    this.bobPhase = random(TWO_PI); // for subtle bobbing animation
    this.baseColor = color(archetype.color);
  }

  display(state, mood) {
    push();
    translate(
      this.x,
      this.baseY + sin(frameCount * 0.03 + this.bobPhase) * 10
    );

    const s = this.size;

    // Ground shadow
    noStroke();
    fill(0, 0, 0, 160);
    ellipse(0, s * 0.45, s * 0.9, s * 0.28);

    // Adjust color slightly based on mood
    let bodyColor = this.baseColor;
    if (state === "reacting") {
      if (mood === "happy") {
        bodyColor = lerpColor(this.baseColor, color(255), 0.25);
      } else if (mood === "angry" || mood === "explode") {
        bodyColor = lerpColor(this.baseColor, color(0), 0.45);
      } else if (mood === "sad" || mood === "cry") {
        bodyColor = lerpColor(this.baseColor, color("#3366ff"), 0.3);
      }
    }

    // Slight outline to make them pop
    stroke(0, 180);
    strokeWeight(3);
    fill(bodyColor);

    // Scarier cartoon bodies per archetype
    if (this.archetype.kind === "Vampire") {
      // Tall, sharp cloak with ragged bottom
      beginShape();
      vertex(-s * 0.32, -s * 0.1);
      vertex(s * 0.32, -s * 0.1);
      vertex(s * 0.26, s * 0.45);
      vertex(0, s * 0.58);
      vertex(-s * 0.26, s * 0.45);
      endShape(CLOSE);

      // Dark inner cloak
      fill(15, 0, 20);
      beginShape();
      vertex(-s * 0.2, -s * 0.08);
      vertex(s * 0.2, -s * 0.08);
      vertex(s * 0.16, s * 0.4);
      vertex(0, s * 0.5);
      vertex(-s * 0.16, s * 0.4);
      endShape(CLOSE);

      // High collar (bat-like)
      fill(bodyColor);
      triangle(-s * 0.32, -s * 0.1, -s * 0.05, -s * 0.55, 0, -s * 0.1);
      triangle(s * 0.32, -s * 0.1, s * 0.05, -s * 0.55, 0, -s * 0.1);

      // Head (pale)
      fill(235);
      ellipse(0, -s * 0.6, s * 0.5, s * 0.5);

      // Pointy ears
      fill(210);
      triangle(-s * 0.22, -s * 0.7, -s * 0.06, -s * 0.62, -s * 0.18, -s * 0.5);
      triangle(s * 0.22, -s * 0.7, s * 0.06, -s * 0.62, s * 0.18, -s * 0.5);

      // Tiny fangs
      fill(250);
      noStroke();
      triangle(-s * 0.07, -s * 0.47, -s * 0.03, -s * 0.47, -s * 0.05, -s * 0.38);
      triangle(s * 0.03, -s * 0.47, s * 0.07, -s * 0.47, s * 0.05, -s * 0.38);
      stroke(0, 180);
      strokeWeight(3);
    } else if (this.archetype.kind === "Dragon") {
      // Bulkier, spiky body
      beginShape();
      vertex(-s * 0.35, -s * 0.1);
      vertex(s * 0.35, -s * 0.1);
      vertex(s * 0.3, s * 0.45);
      vertex(-s * 0.3, s * 0.45);
      endShape(CLOSE);

      // Spiky back ridge
      fill(255, 240, 160);
      for (let i = -2; i <= 2; i++) {
        const px = (i / 2) * s * 0.3;
        triangle(px - s * 0.06, -s * 0.05, px, -s * 0.35, px + s * 0.06, -s * 0.05);
      }

      // Horns
      fill(240, 230, 210);
      triangle(-s * 0.18, -s * 0.45, -s * 0.06, -s * 0.75, -s * 0.01, -s * 0.45);
      triangle(s * 0.18, -s * 0.45, s * 0.06, -s * 0.75, s * 0.01, -s * 0.45);

      // Dragon head
      fill(bodyColor);
      rectMode(CENTER);
      rect(0, -s * 0.45, s * 0.42, s * 0.32, s * 0.08);

      // Jaw
      rect(0, -s * 0.32, s * 0.3, s * 0.14, s * 0.04);

      // Little teeth
      noStroke();
      fill(250);
      for (let i = -2; i <= 2; i++) {
        const px = (i / 2) * s * 0.24;
        triangle(px - s * 0.02, -s * 0.26, px + s * 0.02, -s * 0.26, px, -s * 0.21);
      }
      stroke(0, 180);
      strokeWeight(3);

      // Simple wings
      fill(25, 5, 0, 210);
      beginShape();
      vertex(-s * 0.4, -s * 0.05);
      vertex(-s * 0.9, -s * 0.15);
      vertex(-s * 0.6, s * 0.2);
      vertex(-s * 0.35, s * 0.1);
      endShape(CLOSE);

      beginShape();
      vertex(s * 0.4, -s * 0.05);
      vertex(s * 0.9, -s * 0.15);
      vertex(s * 0.6, s * 0.2);
      vertex(s * 0.35, s * 0.1);
      endShape(CLOSE);
    } else {
      // Slime blob - eerie outline
      beginShape();
      vertex(-s * 0.32, s * 0.2);
      bezierVertex(-s * 0.5, 0, -s * 0.38, -s * 0.5, 0, -s * 0.55);
      bezierVertex(s * 0.38, -s * 0.5, s * 0.5, 0, s * 0.32, s * 0.2);
      bezierVertex(s * 0.25, s * 0.5, s * 0.05, s * 0.55, 0, s * 0.58);
      bezierVertex(-s * 0.05, s * 0.55, -s * 0.25, s * 0.5, -s * 0.32, s * 0.2);
      endShape(CLOSE);

      // Inner darker slime core
      noStroke();
      fill(5, 50, 30, 160);
      ellipse(0, 0, s * 0.45, s * 0.55);
      stroke(0, 180);
      strokeWeight(3);
    }

    // Eyes & mouth (expression)
    this.drawFace(state, mood, s);

    pop();

    // Extra FX for big feelings
    if (state === "reacting") {
      this.drawReactionFX(mood);
    }
  }

  drawFace(state, mood, s) {
    const arch = this.archetype;

    const isHappy = mood === "happy";
    const isAngry = mood === "angry" || mood === "explode";
    const isSad = mood === "sad" || mood === "cry";

    // Glowing eye colors per monster
    let eyeColor = color(255);
    if (arch.kind === "Vampire") {
      eyeColor = color(255, 80, 80);
    } else if (arch.kind === "Dragon") {
      eyeColor = color(255, 240, 150);
    } else {
      eyeColor = color(160, 255, 230);
    }

    if (isAngry) {
      eyeColor = lerpColor(eyeColor, color(255, 0, 0), 0.4);
    } else if (isSad) {
      eyeColor = lerpColor(eyeColor, color(120, 170, 255), 0.4);
    }

    // Eyes
    let eyeY = -s * 0.55;
    let eyeOffsetX = s * 0.12;

    if (arch.kind === "Dragon") eyeY = -s * 0.42;
    if (arch.kind === "Slime") eyeY = -s * 0.18;

    stroke(0);
    strokeWeight(3);

    if (isHappy) {
      // happy glowing arcs
      noFill();
      stroke(eyeColor);
      strokeWeight(4);
      arc(-eyeOffsetX, eyeY, s * 0.15, s * 0.1, PI, TWO_PI);
      arc(eyeOffsetX, eyeY, s * 0.15, s * 0.1, PI, TWO_PI);
      noStroke();
    } else if (isAngry) {
      // Sharp, angled eyes
      stroke(eyeColor);
      strokeWeight(5);
      line(
        -eyeOffsetX - s * 0.07,
        eyeY - s * 0.03,
        -eyeOffsetX + s * 0.04,
        eyeY + s * 0.03
      );
      line(
        eyeOffsetX - s * 0.04,
        eyeY + s * 0.03,
        eyeOffsetX + s * 0.07,
        eyeY - s * 0.03
      );
      // Small glowing pupils
      noStroke();
      fill(eyeColor);
      ellipse(-eyeOffsetX, eyeY + s * 0.03, s * 0.05, s * 0.05);
      ellipse(eyeOffsetX, eyeY + s * 0.03, s * 0.05, s * 0.05);
    } else if (isSad) {
      // Droopy glowing eyes
      noStroke();
      fill(eyeColor);
      ellipse(-eyeOffsetX, eyeY, s * 0.06, s * 0.08);
      ellipse(eyeOffsetX, eyeY, s * 0.06, s * 0.08);
    } else {
      // Neutral glow
      noStroke();
      fill(eyeColor);
      ellipse(-eyeOffsetX, eyeY, s * 0.06, s * 0.06);
      ellipse(eyeOffsetX, eyeY, s * 0.06, s * 0.06);
    }

    // Extra third eye for slime
    if (arch.kind === "Slime") {
      fill(eyeColor);
      ellipse(0, eyeY - s * 0.03, s * 0.04, s * 0.04);
    }

    // Mouth
    let mouthY = eyeY + s * 0.16;
    if (arch.kind === "Dragon") mouthY = eyeY + s * 0.16;
    if (arch.kind === "Slime") mouthY = eyeY + s * 0.12;

    stroke(0);
    strokeWeight(3);
    noFill();

    if (isHappy) {
      // Big, sharp grin
      arc(0, mouthY, s * 0.22, s * 0.16, 0, PI);
      // Tiny teeth inside grin
      noStroke();
      fill(250);
      for (let i = -2; i <= 2; i++) {
        const px = (i / 2) * s * 0.16;
        triangle(px - s * 0.01, mouthY, px + s * 0.01, mouthY, px, mouthY - s * 0.04);
      }
    } else if (isAngry) {
      // Jagged mouth
      beginShape();
      const w = s * 0.22;
      const segs = 5;
      for (let i = 0; i <= segs; i++) {
        const t = i / segs;
        const x = lerp(-w / 2, w / 2, t);
        const y = mouthY + (i % 2 === 0 ? -s * 0.02 : s * 0.05);
        vertex(x, y);
      }
      endShape();
    } else if (isSad) {
      // Upside-down curve
      arc(0, mouthY + s * 0.07, s * 0.18, s * 0.13, PI, TWO_PI);
    } else {
      // Neutral
      line(-s * 0.1, mouthY, s * 0.1, mouthY);
    }
  }

  drawReactionFX(mood) {
    if (mood === "explode") {
      // Radiating fiery rings + spikes
      push();
      translate(this.x, this.baseY);
      noFill();
      const baseR = this.size * 0.65;
      const t = frameCount * 0.15;

      // Glowing rings
      for (let i = 0; i < 3; i++) {
        const r = baseR + sin(t + i) * this.size * 0.18;
        stroke(255, 150 + i * 30, 80, 200 - i * 40);
        strokeWeight(4 - i);
        ellipse(0, 0, r, r);
      }

      // Fiery spikes
      noStroke();
      fill(255, 200, 120, 190);
      const spikes = 10;
      for (let i = 0; i < spikes; i++) {
        const ang = (TWO_PI * i) / spikes + t * 0.4;
        const r1 = baseR * 0.6;
        const r2 = baseR * 0.95;
        const x1 = cos(ang) * r1;
        const y1 = sin(ang) * r1;
        const x2 = cos(ang + 0.1) * r2;
        const y2 = sin(ang + 0.1) * r2;
        const x3 = cos(ang - 0.1) * r2;
        const y3 = sin(ang - 0.1) * r2;
        triangle(x1, y1, x2, y2, x3, y3);
      }

      pop();
    } else if (mood === "cry") {
      // Falling tears
      push();
      translate(this.x, this.baseY);
      noStroke();
      fill(100, 180, 255, 200);
      for (let i = 0; i < 4; i++) {
        const offsetX = (i < 2 ? -1 : 1) * this.size * 0.12;
        const phase = (i % 2) * PI;
        const y =
          sin(frameCount * 0.12 + phase) * this.size * 0.1 +
          this.size * 0.25;
        ellipse(offsetX, y, this.size * 0.06, this.size * 0.12);
      }
      pop();
    }
  }
}

Line-by-line explanation (10 lines)

🔧 Subcomponents:

calculation Monster initialization constructor(archetype) { this.archetype = archetype; this.x = width * 0.25; ... }

Initializes a monster with an archetype, positions it on screen, and sets up its base color and bobbing animation phase.

calculation Main display and animation display(state, mood) { push(); translate(...); ... drawFace(...); drawReactionFX(...); pop(); }

The main rendering method that draws the monster's body, adjusts colors based on mood, handles facial expressions, and applies special effects.

conditional Emotion-driven facial expressions drawFace(state, mood, s) { ... if (isHappy) { ... } else if (isAngry) { ... } ... }

Draws eyes and mouth that change dramatically based on the monster's mood, creating strong emotional feedback.

conditional Reaction particle and animation effects drawReactionFX(mood) { if (mood === "explode") { ... } else if (mood === "cry") { ... } }

Draws special effects like explosion rings/spikes or falling tears to amplify the monster's emotional reaction.

class Monster {
Declares the Monster class, which encapsulates all the drawing and animation logic for a single monster.
this.x = width * 0.25;
Positions the monster at 25% across the canvas horizontally (left-center area).
this.bobPhase = random(TWO_PI);
Stores a random starting phase (0 to 2π) so each monster's bobbing animation starts at a different point.
translate(this.x, this.baseY + sin(frameCount * 0.03 + this.bobPhase) * 10);
Moves the drawing origin to the monster's position, then applies a subtle vertical bobbing motion using sine wave animation.
if (state === "reacting") { bodyColor = lerpColor(this.baseColor, color(255), 0.25); }
When the monster is reacting happily, shift its color toward white (25% of the way) to make it brighter and more emotional.
if (this.archetype.kind === "Vampire") {
Checks the monster type and draws a vampire-specific body design (cloak, ears, fangs, pale head).
const isHappy = mood === "happy";
Creates a boolean flag to simplify mood checks later (cleaner than repeating mood === "happy").
if (arch.kind === "Slime") { fill(eyeColor); ellipse(0, eyeY - s * 0.03, s * 0.04, s * 0.04); }
Slimes get a third eye in the center, making them visually unique compared to vampires and dragons.
for (let i = 0; i < spikes; i++) {
Loops to draw multiple spike triangles radiating outward, creating a dynamic explosion effect when the dragon gets angry.
const y = sin(frameCount * 0.12 + phase) * this.size * 0.1 + this.size * 0.25;
Animates tear position using a sine wave so tears bob up and down smoothly as they fall, rather than moving in straight lines.

📦 Key Variables

gameState string

Tracks which screen the player is on: 'title' (mode select), 'playing' (main game), 'dayEnd' (shift complete), or 'gameOver' (failed day). Controls which draw function runs each frame.

let gameState = "title";
gameMode string

Stores the selected difficulty mode: 'normal' (10 customers), 'infinite' (endless), or 'hard' (no hints). Affects spawn limits and dialogue.

let gameMode = "normal";
currentMonster Monster (object)

Holds the Monster instance currently in the restaurant, or null if empty. Used to render and handle interactions with the active customer.

let currentMonster = null;
currentDesiredTag string

Stores the flavor tag the current monster wants (e.g., 'berry', 'hot', 'sweet'). Used to evaluate if the served recipe is correct.

let currentDesiredTag = null;
activeRecipes array

Array of 3 recipe objects available for the current customer, shuffled randomly. Players click these to serve food.

let activeRecipes = [];
reactionTimer number

Counts down frames (120 = 2 seconds at 60fps) while the monster is reacting. When it reaches 0, the monster leaves and the next spawns.

let reactionTimer = 0;
reactionMood string

The monster's emotional response: 'happy', 'angry', 'sad', 'cry', 'explode', or empty. Drives facial expressions and special effects.

let reactionMood = "happy";
reactionText string

The dialogue text the monster speaks during their reaction. Displayed in the overlay during reactionTimer countdown.

let reactionText = "Perfect! This is exactly what I wanted.";
reputation number

The player's score. Increases by 2 for correct choices, decreases by 2 for wrong ones. Game over at -6 or below.

let reputation = 0;
customersServed number

Counter of how many monsters have been served so far this day. Reaches MAX_CUSTOMERS_PER_DAY (10) to end normal mode.

let customersServed = 0;
buttons array

Array of objects storing each food button's position (cx, cy) and dimensions (w, h), plus the recipe it represents. Rebuilt every frame for hit detection.

let buttons = [];
modeButtons array

Array of objects storing the three game-mode button positions and labels on the title screen. Used for click detection when selecting difficulty.

let modeButtons = [];
RECIPES array of objects

Constant array of all available dishes, each with an id, name, and array of flavor tags. Never changes during gameplay.

const RECIPES = [{ id: 0, name: "Lava Soup", tags: ["hot", "spicy"] }, ...];
MONSTER_ARCHETYPES array of objects

Constant array of the three monster types (Vampire, Dragon, Slime) with their personalities, colors, food preferences, and descriptions.

const MONSTER_ARCHETYPES = [{ kind: "Vampire", color: "#a00040", ... }, ...];
DESIRE_LINES object (lookup table)

Maps flavor tags to arrays of personality-driven dialogue options. Enables procedural, varied desire text for each monster.

const DESIRE_LINES = { hot: ["I'm freezing in here...", "I want something that warms me..."], ... };

🔧 Potential Improvements (6)

Here are some ways this code could be enhanced:

PERFORMANCE drawRecipeButtons() and drawModeButtons()

The buttons arrays are recomputed every single frame (60 times per second), even though button positions only change if the window resizes.

💡 Move button layout calculation to windowResized() or trigger it only when window size changes, not every frame. Store button positions in variables rather than regenerating them.

BUG serveRecipe() and monsterState transitions

If a player clicks a recipe button twice very quickly (before reactionTimer counts down), the second click might trigger serveRecipe() on a null monster if the first reaction just finished, causing silent failures.

💡 Add an additional guard in mousePressed(): only allow clicks when gameState === 'playing' AND monsterState === 'idle' AND currentMonster !== null. This triple-check prevents edge-case race conditions.

STYLE DESIRE_LINES object

Some flavor tags (like 'ethereal' and 'cool') have only 2 dialogue options while others have more, creating uneven variety.

💡 Add 2-3 more lines to underrepresented tags so every tag has consistent dialogue depth. This makes repeated playthroughs feel more varied.

FEATURE Monster display and reactions

All three archetypes use the same reaction emotions ('happy', 'angry', 'cry', 'explode') without archetype-specific flavor.

💡 Add archetype-specific reaction types (e.g., Vampire gets 'contemptuous' instead of just 'angry') with unique facial expressions and FX. This deepens personality differentiation and replayability.

BUG generateRecipeOptions() and RECIPES array

If a desired tag has only 1 recipe that matches it, and hard-mode players never see that hint, they have 66% chance of guessing wrong (2 out of 3 buttons are wrong). This is potentially unfair if some tags are rare.

💡 Check if a desired tag appears in fewer than 2 recipes; if so, add a second recipe with that tag, or reweight the desire generation to prefer more-common tags. Ensure fairness: every desired tag should have at least 2 recipes so hard-mode players can make educated guesses based on monster type.

STYLE Monster class and display method

The Monster.display() method is very long (200+ lines) with nested if-statements for each archetype's body, face, and effects. This makes it hard to read and modify individual archetypes.

💡 Refactor by creating separate methods for each archetype: drawVampireBody(), drawDragonBody(), drawSlimeBody(). Then call the appropriate method based on archetype.kind. This splits the 200-line method into smaller, reusable pieces and makes it easier to design new monster types.

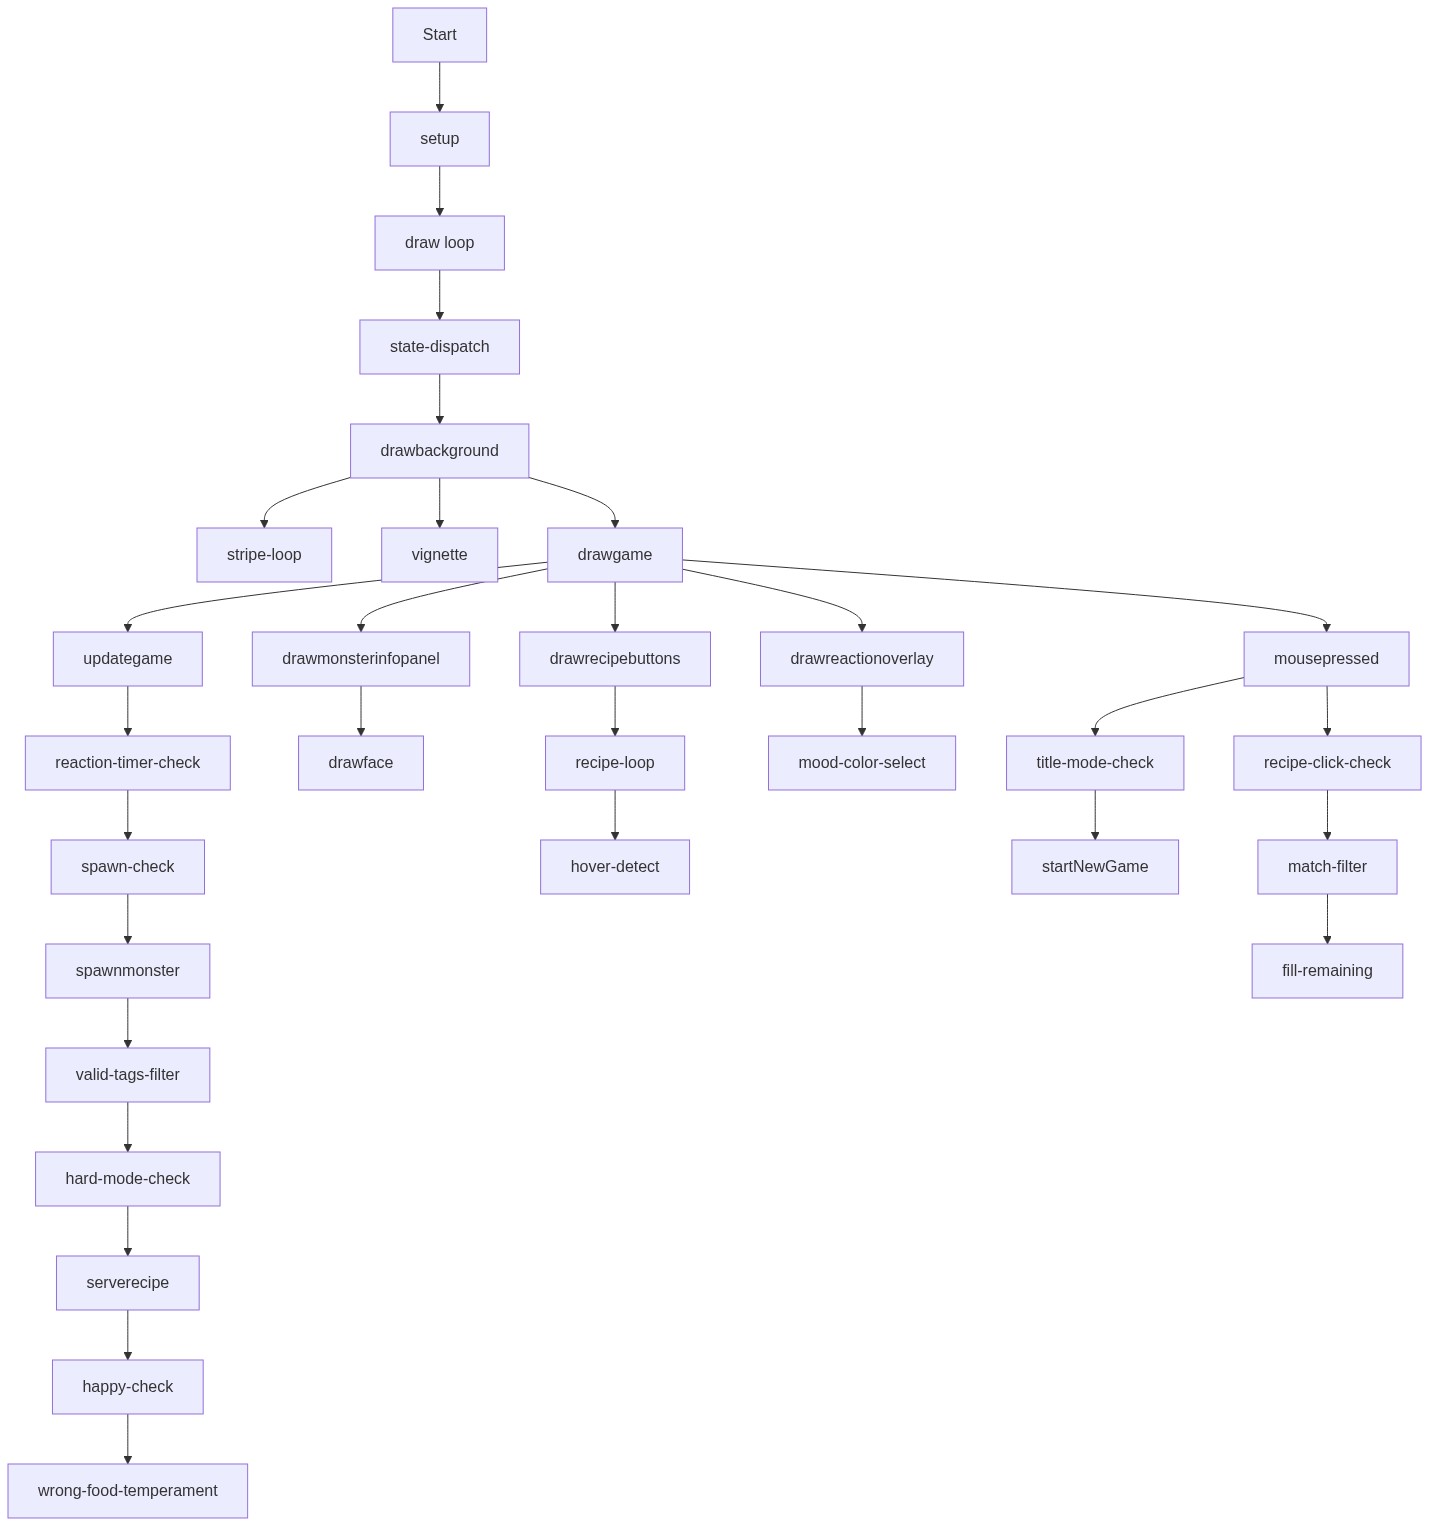
🔄 Code Flow

Code flow showing setup, draw, drawbackground, drawgame, updategame, spawnmonster, serverecipe, drawmonsterinfopanel, drawrecipebuttons, drawreactionoverlay, mousepressed, startnewgame, builddesireline, generaterecipeoptions, monster

💡 Click on function names in the diagram to jump to their code

graph TD start[Start] --> setup[setup] setup --> draw[draw loop] draw --> state_dispatch[state-dispatch] state_dispatch --> drawbackground[drawbackground] drawbackground --> stripe_loop[stripe-loop] drawbackground --> vignette[vignette] drawbackground --> drawgame[drawgame] drawgame --> updategame[updategame] updategame --> reaction_timer_check[reaction-timer-check] reaction_timer_check --> spawn_check[spawn-check] spawn_check --> spawnmonster[spawnmonster] spawnmonster --> valid_tags_filter[valid-tags-filter] valid_tags_filter --> hard_mode_check[hard-mode-check] hard_mode_check --> serverecipe[serverecipe] serverecipe --> happy_check[happy-check] happy_check --> wrong_food_temperament[wrong-food-temperament] drawgame --> drawmonsterinfopanel[drawmonsterinfopanel] drawmonsterinfopanel --> drawface[drawface] drawgame --> drawrecipebuttons[drawrecipebuttons] drawrecipebuttons --> recipe_loop[recipe-loop] recipe_loop --> hover_detect[hover-detect] drawgame --> drawreactionoverlay[drawreactionoverlay] drawreactionoverlay --> mood_color_select[mood-color-select] drawgame --> mousepressed[mousepressed] mousepressed --> title_mode_check[title-mode-check] title_mode_check --> startnewgame[startNewGame] mousepressed --> recipe_click_check[recipe-click-check] recipe_click_check --> match_filter[match-filter] match_filter --> fill_remaining[fill-remaining] click setup href "#fn-setup" click draw href "#fn-draw" click state_dispatch href "#sub-state-dispatch" click drawbackground href "#fn-drawbackground" click stripe_loop href "#sub-stripe-loop" click vignette href "#sub-vignette" click drawgame href "#fn-drawgame" click updategame href "#fn-updategame" click reaction_timer_check href "#sub-reaction-timer-check" click spawn_check href "#sub-spawn-check" click spawnmonster href "#fn-spawnmonster" click valid_tags_filter href "#sub-valid-tags-filter" click hard_mode_check href "#sub-hard-mode-check" click serverecipe href "#fn-serverecipe" click happy_check href "#sub-happy-check" click wrong_food_temperament href "#sub-wrong-food-temperament" click drawmonsterinfopanel href "#fn-drawmonsterinfopanel" click drawface href "#sub-drawface" click drawrecipebuttons href "#fn-drawrecipebuttons" click recipe_loop href "#sub-recipe-loop" click hover_detect href "#sub-hover-detect" click drawreactionoverlay href "#fn-drawreactionoverlay" click mood_color_select href "#sub-mood-color-select" click mousepressed href "#fn-mousepressed" click title_mode_check href "#sub-title-mode-check" click startnewgame href "#fn-startNewGame" click recipe_click_check href "#sub-recipe-click-check" click match_filter href "#sub-match-filter" click fill_remaining href "#sub-fill-remaining"

❓ Frequently Asked Questions

What visual experience does the Monster Restaurant sketch offer?

The sketch presents a vibrant and whimsical environment filled with colorful, animated monsters and bizarre food items that react dramatically to user interactions.

How can users engage with the Monster Restaurant game?

Users interact by clicking through menus to serve animated dishes to the quirky monsters, matching their moods and cravings to keep the restaurant thriving.

What coding concepts does the Monster Restaurant sketch illustrate?

This sketch demonstrates creative coding techniques such as dynamic animation, user input handling, and the use of object-oriented programming to manage character behaviors and interactions.

Preview

monster reastraunt - p5.js creative coding sketch preview
Sketch Preview
Code flow diagram showing the structure of monster reastraunt - Code flow showing setup, draw, drawbackground, drawgame, updategame, spawnmonster, serverecipe, drawmonsterinfopanel, drawrecipebuttons, drawreactionoverlay, mousepressed, startnewgame, builddesireline, generaterecipeoptions, monster
Code Flow Diagram