
MY FIRST TEST

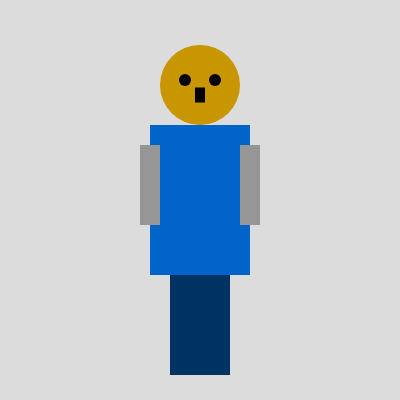
This sketch creates an interactive robot that you can click to control. The robot has a rotating head, swinging arms, bouncing body, and facial features that all respond to mouse clicks on different parts of the robot.

🧪 Try This!

Experiment with the code by making these changes:

  1. Paint the robot rainbow
  2. Make the robot twice as big — Increase all the dimension variables to scale up every part of the robot proportionally—watch it grow to dominate the canvas.
  3. Speed up all animations — Increase the animation speeds to see the robot bounce faster, rotate its head quicker, and swing its arms more frantically.
  4. Make the robot bounce higher — Increase bounceAmplitude to see the robot leap higher into the air when you click the body.
  5. Give the robot a crazy smile — Reposition and resize the facial features to create a different expression—move the eyes, enlarge the nose, and completely change the robot's personality.
  6. Change head rotation to spin forever — Remove the one-rotation limit so clicking the head makes it spin continuously instead of stopping after 360 degrees.
Prefer the full editor? Open it there →

📖 About This Sketch

This sketch draws a stylized robot made of geometric shapes—a blue rectangular body, orange circular head with eyes and nose, gray arms, and darker blue legs. You can click on different parts to trigger animations: spin the head for a full rotation, swing the arms side-to-side, or bounce the entire robot up and down. The sketch teaches three crucial p5.js techniques that unlock interactive animation: transforms (translate and rotate) to pivot body parts around joints, the mousePressed() function to detect clicks and toggle state, and trigonometric functions (sin and cos) to create smooth oscillating motion.

The code is organized into global variables that store dimensions and animation states, a setup() function that initializes the canvas, a draw() function that animates everything sixty times per second, a mousePressed() function that detects clicks and toggles animations, and a windowResized() function that keeps the robot centered if the screen resizes. By reading it you will learn how to build a character from component shapes, how to use push() and pop() to isolate transformations, how to layer multiple animations on the same object, and how click detection works on different regions of a complex drawing.

⚙️ How It Works

  1. When the sketch loads, setup() initializes a full-screen canvas, centers the robot in the middle, and sets angle mode to radians so rotation math works correctly.
  2. On every frame, draw() calculates a bounce offset using sin() to move the entire robot up and down smoothly, then draws all body parts at their current positions—body, head with facial features, two arms, and two legs.
  3. The head rotates by incrementing headAngle each frame when isHeadRotating is true, continuing until one full rotation (TWO_PI radians) is complete, then stopping automatically.
  4. Both arms swing by calculating their angles using sin(phase) multiplied by amplitude, creating a smooth back-and-forth oscillation when isLeftArmAnimating or isRightArmAnimating is toggled on.
  5. The transforms push(), translate(), and rotate() work together to pivot each limb around its joint—the head rotates around its center, and each arm rotates around its shoulder—while the body's bounce applies to all parts at once.
  6. When you click the mouse, mousePressed() checks whether you clicked on the head, left arm, right arm, or body, and toggles the corresponding animation flag to start or stop that motion.

🎓 Concepts You'll Learn

Transform matrices (push, pop, translate, rotate)Trigonometric animation (sin for oscillation)Mouse interaction and click detectionState management with boolean flagsOffset-based positioning and coordinate systemsBounding box collision detection

📝 Code Breakdown

setup()

setup() runs once when the sketch starts. It configures the canvas and initializes all the starting values your sketch needs. Notice how angleMode(RADIANS) and rectMode(CENTER) set the 'rules' for how p5.js will interpret your draw commands—these two lines are the foundation for everything that happens later.

function setup() {
  createCanvas(windowWidth, windowHeight);
  robotX = width / 2;
  robotY = height / 2; // Store original Y position
  
  rectMode(CENTER); // Draw rectangles from their center
  angleMode(RADIANS); // Ensure rotation angles are in radians

  // Assign value to armAnimationAmplitude here, where PI is defined
  armAnimationAmplitude = PI / 4; // Max swing angle (e.g., 45 degrees from vertical)
}
Line-by-line explanation (6 lines)

🔧 Subcomponents:

calculation Canvas initialization createCanvas(windowWidth, windowHeight);

Creates a canvas that fills the entire browser window

calculation Robot center positioning robotX = width / 2;

Places the robot horizontally in the center of the canvas

calculation Rectangle centering mode rectMode(CENTER); // Draw rectangles from their center

Makes all rectangles draw from their center point instead of top-left, simplifying positioning logic

calculation Radian angle mode angleMode(RADIANS); // Ensure rotation angles are in radians

Configures p5.js to interpret all angles as radians rather than degrees, required for sin() and cos() to work correctly

createCanvas(windowWidth, windowHeight);
Creates a canvas that stretches to fill the entire browser window, so the robot scales with screen size
robotX = width / 2;
Calculates the center X coordinate of the canvas and stores it in robotX so the robot draws in the middle horizontally
robotY = height / 2; // Store original Y position
Calculates the center Y coordinate and stores it so the robot starts in the middle vertically—this value stays fixed even when the robot bounces
rectMode(CENTER); // Draw rectangles from their center
Tells p5.js that all rect() calls should draw from their center point; without this, positioning calculations would be much more confusing
angleMode(RADIANS); // Ensure rotation angles are in radians
Sets angle measurement to radians (where TWO_PI = 360 degrees) so that sin(), cos(), and rotate() work with the math.js functions correctly
armAnimationAmplitude = PI / 4; // Max swing angle (e.g., 45 degrees from vertical)
Calculates the maximum arm swing angle as 45 degrees (PI/4 radians)—this defines how far the arms swing side to side
draw()

draw() runs 60 times per second, updating animation and redrawing everything. Notice how it calculates bounceOffset and currentRobotY first, then uses currentRobotY for all the parts—this cascades the bounce to the entire robot at once. The push()/pop() pairs isolate transformations: the head's rotation doesn't affect the body, and each arm's rotation doesn't affect the other. This is the core technique for building animated characters from component parts.

🔬 This uses sin() to create smooth oscillation. What happens if you change sin() to cos()? Or what if you multiply leftArmPhase by 2 before taking the sine to make the arm swing twice as fast?

    leftArmAngle = sin(leftArmPhase) * armAnimationAmplitude;
    leftArmPhase += armAnimationSpeed;
function draw() {
  background(220); // Light gray background

  // --- Apply Bouncing Motion to the entire robot ---
  let bounceOffset = 0;
  if (isBouncing) {
    bounceOffset = sin(bouncePhase) * bounceAmplitude;
    bouncePhase += bounceSpeed;
  }
  
  // Calculate the current Y position of the robot's center, incorporating the bounce
  let currentRobotY = robotY + bounceOffset;

  // --- Draw Body ---
  fill(0, 100, 200); // Blue body
  noStroke();
  rect(robotX, currentRobotY, bodyWidth, bodyHeight); // Use currentRobotY

  // --- Draw Head (with rotation and features) ---
  fill(200, 150, 0); // Orange head
  push(); // Save current transformation state
  translate(robotX, currentRobotY + headYOffset); // Move origin to the CENTER of the head, use currentRobotY
  rotate(headAngle); // Apply head rotation
  ellipse(0, 0, headRadius * 2, headRadius * 2); // Draw head centered on new origin

  // Draw Facial Features (they will rotate with the head)
  fill(0); // Black for eyes and nose
  ellipse(-eyeOffsetX, eyeOffsetY, eyeRadius * 2, eyeRadius * 2); // Left eye
  ellipse(eyeOffsetX, eyeOffsetY, eyeRadius * 2, eyeRadius * 2); // Right eye
  rect(0, noseYOffset, noseWidth, noseHeight); // Nose

  pop(); // Restore previous transformation state

  // --- Head Rotation Logic (happens continuously in draw if isHeadRotating is true) ---
  if (isHeadRotating) {
    headAngle += headRotationSpeed; // Increment angle
    // Check if one full rotation (TWO_PI radians) is complete
    if (headAngle >= initialHeadAngle + TWO_PI) {
      headAngle = initialHeadAngle + TWO_PI; // Snap to exact 360-degree rotation
      isHeadRotating = false; // Stop rotating
    }
  }

  // --- Update Arm Angles for Animation ---
  if (isLeftArmAnimating) {
    leftArmAngle = sin(leftArmPhase) * armAnimationAmplitude;
    leftArmPhase += armAnimationSpeed;
  }
  if (isRightArmAnimating) {
    rightArmAngle = sin(rightArmPhase) * armAnimationAmplitude;
    rightArmPhase += armAnimationSpeed;
  }

  // --- Draw Left Arm (with rotation) ---
  fill(150); // Gray arms
  push();
  translate(robotX + leftArmXOffset, currentRobotY + armsYOffset); // Move origin to shoulder pivot, use currentRobotY
  rotate(leftArmAngle); // Apply arm rotation
  rect(armWidth / 2, armHeight / 2, armWidth, armHeight); // Draw arm, shoulder is at its top-left
  pop();

  // --- Draw Right Arm (with rotation) ---
  fill(150); // Gray arms
  push();
  translate(robotX + rightArmXOffset, currentRobotY + armsYOffset); // Move origin to shoulder pivot, use currentRobotY
  rotate(rightArmAngle); // Apply arm rotation
  rect(-armWidth / 2, armHeight / 2, armWidth, armHeight); // Draw arm, shoulder is at its top-right (negative width offset)
  pop();

  // --- Draw Legs ---
  fill(0, 50, 100); // Darker blue legs
  rect(robotX - legWidth / 2, currentRobotY + legsYOffset + legHeight / 2, legWidth, legHeight); // Use currentRobotY
  rect(robotX + legWidth / 2, currentRobotY + legsYOffset + legHeight / 2, legWidth, legHeight); // Use currentRobotY
}
Line-by-line explanation (29 lines)

🔧 Subcomponents:

conditional Bouncing oscillation if (isBouncing) { bounceOffset = sin(bouncePhase) * bounceAmplitude; bouncePhase += bounceSpeed; }

Calculates a smooth up-and-down bounce using a sine wave, applied to the entire robot's Y position

conditional Head rotation completion check if (isHeadRotating) { headAngle += headRotationSpeed; if (headAngle >= initialHeadAngle + TWO_PI) { headAngle = initialHeadAngle + TWO_PI; isHeadRotating = false; } }

Increments the head's rotation angle each frame and stops rotating after a full 360-degree turn

conditional Left arm oscillation if (isLeftArmAnimating) { leftArmAngle = sin(leftArmPhase) * armAnimationAmplitude; leftArmPhase += armAnimationSpeed; }

Swings the left arm back and forth using a sine wave oscillation

conditional Right arm oscillation if (isRightArmAnimating) { rightArmAngle = sin(rightArmPhase) * armAnimationAmplitude; rightArmPhase += armAnimationSpeed; }

Swings the right arm back and forth using a sine wave oscillation

background(220); // Light gray background
Clears the canvas with light gray on every frame, erasing the previous frame so animation appears smooth instead of leaving trails
let bounceOffset = 0;
Initializes a variable to store how much the robot should move up or down due to bouncing
if (isBouncing) {
Only calculate bounce motion if the isBouncing flag is true (user clicked on the body)
bounceOffset = sin(bouncePhase) * bounceAmplitude;
Uses sin() to create smooth up-and-down motion; sin() oscillates between -1 and 1, multiplied by bounceAmplitude to scale the motion
bouncePhase += bounceSpeed;
Increments the bounce phase each frame, advancing the sine wave so the motion continues to animate
let currentRobotY = robotY + bounceOffset;
Combines the robot's base Y position with the bounce offset to get the actual Y position to draw at this frame
fill(0, 100, 200); // Blue body
Sets the fill color to blue (RGB: 0 red, 100 green, 200 blue) for all shapes drawn until the next fill() call
rect(robotX, currentRobotY, bodyWidth, bodyHeight); // Use currentRobotY
Draws the body rectangle centered at robotX and currentRobotY with the specified width and height
push(); // Save current transformation state
Saves the current canvas transformation state so that any rotations or translations applied next won't affect other drawings
translate(robotX, currentRobotY + headYOffset); // Move origin to the CENTER of the head, use currentRobotY
Moves the coordinate system origin to where the head should be drawn; now (0,0) is at the head's center
rotate(headAngle); // Apply head rotation
Rotates the coordinate system by headAngle radians, so any shapes drawn after this will rotate around the head's center
ellipse(0, 0, headRadius * 2, headRadius * 2); // Draw head centered on new origin
Draws the head as a circle at (0,0), which is now the head's center after translate(); the diameter is headRadius * 2
ellipse(-eyeOffsetX, eyeOffsetY, eyeRadius * 2, eyeRadius * 2); // Left eye
Draws the left eye relative to the head's center; because of the earlier rotate(), this eye rotates with the head
ellipse(eyeOffsetX, eyeOffsetY, eyeRadius * 2, eyeRadius * 2); // Right eye
Draws the right eye; it's offset to the right and also rotates with the head
rect(0, noseYOffset, noseWidth, noseHeight); // Nose
Draws a rectangular nose centered on the head, also rotating with the head
pop(); // Restore previous transformation state
Restores the canvas to its state before the push(), undoing all rotations and translations so the body, arms, and legs draw normally
if (isHeadRotating) {
Only update the head rotation angle if the isHeadRotating flag is true
headAngle += headRotationSpeed; // Increment angle
Increases the head's rotation angle by headRotationSpeed each frame, causing a continuous spin
if (headAngle >= initialHeadAngle + TWO_PI) {
Checks if the head has rotated a full 360 degrees (TWO_PI radians) from where it started
headAngle = initialHeadAngle + TWO_PI; // Snap to exact 360-degree rotation
Locks the angle to exactly one full rotation to prevent slight overshooting due to frame timing
isHeadRotating = false; // Stop rotating
Sets the flag to false so the head stops rotating and the angle stops incrementing
if (isLeftArmAnimating) {
Only animate the left arm if its animation flag is true
leftArmAngle = sin(leftArmPhase) * armAnimationAmplitude;
Calculates the left arm's angle using a sine wave; sin() makes it oscillate smoothly between -armAnimationAmplitude and +armAnimationAmplitude
leftArmPhase += armAnimationSpeed;
Advances the phase of the sine wave each frame so the arm continues to swing back and forth
translate(robotX + leftArmXOffset, currentRobotY + armsYOffset); // Move origin to shoulder pivot, use currentRobotY
Moves the coordinate origin to the left arm's shoulder joint so the arm rotates around this pivot point
rotate(leftArmAngle); // Apply arm rotation
Rotates the coordinate system by the left arm's angle so the arm draws rotated around its shoulder
rect(armWidth / 2, armHeight / 2, armWidth, armHeight); // Draw arm, shoulder is at its top-left
Draws the left arm as a rectangle; the positioning places the shoulder at the origin and the arm extends downward
rect(-armWidth / 2, armHeight / 2, armWidth, armHeight); // Draw arm, shoulder is at its top-right (negative width offset)
Draws the right arm with negative width offset so it extends from the right shoulder, mirroring the left arm
rect(robotX - legWidth / 2, currentRobotY + legsYOffset + legHeight / 2, legWidth, legHeight); // Use currentRobotY
Draws the left leg as a rectangle below the body; currentRobotY ensures it moves up and down with the bounce

mousePressed()

mousePressed() is called automatically whenever the user clicks the mouse. It detects which part of the robot was clicked by checking bounding boxes and distances, then toggles the corresponding animation flag. Notice the difference in collision detection: the body uses a rectangular bounding box (min/max comparisons), while the head uses circular distance (dist() function). Each body part resets its animation phase to 0 when starting, so the motion always begins from the same point rather than wherever the previous animation left off.

🔬 This toggles bouncing with !isBouncing, which flips the boolean. What if you remove the ! and always set isBouncing = true instead? What if you set it to false? What happens to the click feedback?

  // Toggle bouncing if clicked anywhere on the robot
  if (mouseX > robotMinX && mouseX < robotMaxX &&
      mouseY > robotMinY && mouseY < robotMaxY) {
    isBouncing = !isBouncing;
function mousePressed() {
  // Determine the overall bounding box of the robot for bouncing
  // Note: These calculations use the base robotY, as the bounceOffset is applied in draw()
  let robotMinX = robotX - bodyWidth / 2 - armWidth / 2;
  let robotMaxX = robotX + bodyWidth / 2 + armWidth / 2;
  let robotMinY = robotY + headYOffset - headRadius;
  let robotMaxY = robotY + legsYOffset + legHeight;

  // Toggle bouncing if clicked anywhere on the robot
  if (mouseX > robotMinX && mouseX < robotMaxX &&
      mouseY > robotMinY && mouseY < robotMaxY) {
    isBouncing = !isBouncing;
    if (isBouncing) {
      bouncePhase = 0; // Reset bounce phase when starting animation
    }
  }

  // Existing click detection for head rotation
  let headCenterX = robotX;
  let headCenterY = robotY + headYOffset;
  if (dist(mouseX, mouseY, headCenterX, headCenterY) < headRadius) {
    if (!isHeadRotating) {
      isHeadRotating = true;
      initialHeadAngle = headAngle;
    }
  }

  // Existing click detection for left arm animation
  let leftArmX = robotX + leftArmXOffset - armWidth / 2;
  let leftArmY = robotY + armsYOffset - armHeight / 2;
  if (mouseX > leftArmX && mouseX < leftArmX + armWidth &&
      mouseY > leftArmY && mouseY < leftArmY + armHeight) {
    isLeftArmAnimating = !isLeftArmAnimating;
    if (isLeftArmAnimating) {
      leftArmPhase = 0;
    } else {
      leftArmAngle = 0;
    }
  }

  // Existing click detection for right arm animation
  let rightArmX = robotX + rightArmXOffset - armWidth / 2;
  let rightArmY = robotY + armsYOffset - armHeight / 2;
  if (mouseX > rightArmX && mouseX < rightArmX + armWidth &&
      mouseY > rightArmY && mouseY < rightArmY + armHeight) {
    isRightArmAnimating = !isRightArmAnimating;
    if (isRightArmAnimating) {
      rightArmPhase = 0;
    } else {
      rightArmAngle = 0;
    }
  }
}
Line-by-line explanation (26 lines)

🔧 Subcomponents:

conditional Body bounding box check and bounce toggle if (mouseX > robotMinX && mouseX < robotMaxX && mouseY > robotMinY && mouseY < robotMaxY)

Detects if the click is anywhere within the robot's bounding box and toggles bouncing

conditional Head circular click detection if (dist(mouseX, mouseY, headCenterX, headCenterY) < headRadius)

Uses distance to detect if the click is within the circular head area

conditional Left arm rectangular click detection if (mouseX > leftArmX && mouseX < leftArmX + armWidth && mouseY > leftArmY && mouseY < leftArmY + armHeight)

Detects if the click is within the left arm's rectangular bounds

conditional Right arm rectangular click detection if (mouseX > rightArmX && mouseX < rightArmX + armWidth && mouseY > rightArmY && mouseY < rightArmY + armHeight)

Detects if the click is within the right arm's rectangular bounds

let robotMinX = robotX - bodyWidth / 2 - armWidth / 2;
Calculates the leftmost edge of the robot's bounding box by subtracting half the body width and half the arm width from the robot's center
let robotMaxX = robotX + bodyWidth / 2 + armWidth / 2;
Calculates the rightmost edge of the robot's bounding box by adding half the body width and half the arm width to the robot's center
let robotMinY = robotY + headYOffset - headRadius;
Calculates the topmost edge of the robot's bounding box (head's top) by using the head's offset and radius
let robotMaxY = robotY + legsYOffset + legHeight;
Calculates the bottommost edge of the robot's bounding box (legs' bottom) by adding leg offset and height to the base Y
if (mouseX > robotMinX && mouseX < robotMaxX &&
Checks if the mouse click's X coordinate is between the robot's left and right edges
mouseY > robotMinY && mouseY < robotMaxY) {
Checks if the mouse click's Y coordinate is between the robot's top and bottom edges—both conditions must be true for a hit
isBouncing = !isBouncing;
Toggles the bounce flag: if it was true, set it to false; if it was false, set it to true—this starts or stops bouncing
if (isBouncing) {
Only execute the next line if bouncing just started (isBouncing is now true)
bouncePhase = 0; // Reset bounce phase when starting animation
Resets bouncePhase to 0 so the bounce starts at the bottom of its oscillation cycle instead of at a random point
let headCenterX = robotX;
Stores the X coordinate of the head's center (same as robot center)
let headCenterY = robotY + headYOffset;
Stores the Y coordinate of the head's center (robot center plus the offset that positions it above the body)
if (dist(mouseX, mouseY, headCenterX, headCenterY) < headRadius) {
Uses dist() to calculate the distance from the mouse click to the head's center; if less than headRadius, the click is inside the head
if (!isHeadRotating) {
Only start a new rotation if the head is not already rotating (prevents starting multiple rotations)
isHeadRotating = true;
Sets the head rotation flag to true so the head will start spinning in draw()
initialHeadAngle = headAngle;
Stores the current head angle so the rotation code knows when exactly one full rotation (TWO_PI) is complete
let leftArmX = robotX + leftArmXOffset - armWidth / 2;
Calculates the left edge of the left arm's bounding box by positioning it at the arm's offset minus half its width
let leftArmY = robotY + armsYOffset - armHeight / 2;
Calculates the top edge of the left arm's bounding box
if (mouseX > leftArmX && mouseX < leftArmX + armWidth &&
Checks if the mouse X is within the left arm's left and right boundaries
mouseY > leftArmY && mouseY < leftArmY + armHeight) {
Checks if the mouse Y is within the left arm's top and bottom boundaries
isLeftArmAnimating = !isLeftArmAnimating;
Toggles the left arm's animation flag to start or stop swinging
if (isLeftArmAnimating) {
Only execute if animation is starting (just set to true)
leftArmPhase = 0;
Resets the arm's animation phase to 0 so swinging starts from the center position
} else {
Animation is stopping
leftArmAngle = 0;
Resets the arm's angle to 0 so it returns to hanging straight down when animation stops
let rightArmX = robotX + rightArmXOffset - armWidth / 2;
Calculates the left edge of the right arm's bounding box (note: rightArmXOffset is positive, so this is further right than leftArmX)
let rightArmY = robotY + armsYOffset - armHeight / 2;
Calculates the top edge of the right arm's bounding box

windowResized()

windowResized() is called automatically whenever the browser window is resized. Without this function, the canvas would stay at its original size and the robot would stay in a fixed screen position. By resizing the canvas and updating robotX and robotY, the sketch scales gracefully to any window size and keeps the robot centered.

function windowResized() {
  resizeCanvas(windowWidth, windowHeight);
  robotX = width / 2;
  robotY = height / 2; // Reset base Y position
}
Line-by-line explanation (3 lines)
resizeCanvas(windowWidth, windowHeight);
Resizes the p5.js canvas to match the new browser window size whenever the user resizes their window
robotX = width / 2;
Recalculates the robot's center X position based on the new canvas width so it stays centered horizontally
robotY = height / 2; // Reset base Y position
Recalculates the robot's center Y position based on the new canvas height so it stays centered vertically

📦 Key Variables

bodyWidth number

Width of the robot's rectangular body in pixels

let bodyWidth = 100;
bodyHeight number

Height of the robot's rectangular body in pixels

let bodyHeight = 150;
headRadius number

Radius of the robot's circular head in pixels; diameter is headRadius * 2

let headRadius = 40;
armWidth number

Width of each arm rectangle in pixels

let armWidth = 20;
armHeight number

Height of each arm rectangle in pixels

let armHeight = 80;
legWidth number

Width of each leg rectangle in pixels

let legWidth = 30;
legHeight number

Height of each leg rectangle in pixels

let legHeight = 100;
robotX number

Horizontal center position of the robot on the canvas

let robotX;
robotY number

Vertical center position of the robot on the canvas (base position, before bounce)

let robotY;
headYOffset number

Vertical distance from the robot's center to the head's center (negative because head is above body)

let headYOffset = -(bodyHeight / 2 + headRadius);
leftArmXOffset number

Horizontal distance from robot center to left arm's shoulder joint (negative)

let leftArmXOffset = -(bodyWidth / 2 + armWidth / 2);
rightArmXOffset number

Horizontal distance from robot center to right arm's shoulder joint (positive)

let rightArmXOffset = bodyWidth / 2 + armWidth / 2;
armsYOffset number

Vertical distance from robot center to both arms' shoulder joints

let armsYOffset = -(bodyHeight / 2 - armHeight / 4);
legsYOffset number

Vertical distance from robot center to legs attachment point

let legsYOffset = bodyHeight / 2;
eyeRadius number

Radius of each eye circle in pixels; diameter is eyeRadius * 2

let eyeRadius = 6;
eyeOffsetX number

Horizontal distance from head center to each eye (left is negative, right is positive)

let eyeOffsetX = 15;
eyeOffsetY number

Vertical distance from head center to eyes (negative places them above center)

let eyeOffsetY = -5;
noseWidth number

Width of the nose rectangle in pixels

let noseWidth = 10;
noseHeight number

Height of the nose rectangle in pixels

let noseHeight = 15;
noseYOffset number

Vertical distance from head center to nose (positive places it below center)

let noseYOffset = 10;
headAngle number

Current rotation angle of the head in radians

let headAngle = 0;
leftArmAngle number

Current rotation angle of the left arm in radians

let leftArmAngle = 0;
rightArmAngle number

Current rotation angle of the right arm in radians

let rightArmAngle = 0;
isHeadRotating boolean

Flag indicating whether the head is currently spinning

let isHeadRotating = false;
initialHeadAngle number

Starting angle of the head rotation, stored when rotation begins to calculate when one full turn is complete

let initialHeadAngle = 0;
headRotationSpeed number

Speed of head rotation in radians per frame

let headRotationSpeed = 0.1;
isLeftArmAnimating boolean

Flag indicating whether the left arm is currently swinging

let isLeftArmAnimating = false;
isRightArmAnimating boolean

Flag indicating whether the right arm is currently swinging

let isRightArmAnimating = false;
leftArmPhase number

Current phase of the left arm's sine wave oscillation

let leftArmPhase = 0;
rightArmPhase number

Current phase of the right arm's sine wave oscillation

let rightArmPhase = 0;
armAnimationAmplitude number

Maximum swing angle for arm animation in radians (assigned in setup)

let armAnimationAmplitude; // Assigned as PI / 4 in setup()
armAnimationSpeed number

Speed at which the arm animation phase advances per frame

let armAnimationSpeed = 0.05;
isBouncing boolean

Flag indicating whether the robot is currently bouncing

let isBouncing = false;
bouncePhase number

Current phase of the bounce sine wave oscillation

let bouncePhase = 0;
bounceAmplitude number

Height of the bounce in pixels (how far up and down the robot moves)

let bounceAmplitude = 20;
bounceSpeed number

Speed at which the bounce phase advances per frame

let bounceSpeed = 0.1;

🔧 Potential Improvements (6)

Here are some ways this code could be enhanced:

BUG mousePressed() - collision detection

The body bounding box collision does not account for the bounce offset. When the robot is bouncing, the actual visual position differs from the calculated bounding box, causing clicks to miss or hit invisible areas above/below the robot.

💡 Store and apply bounceOffset in mousePressed() when calculating robotMinY and robotMaxY, or use a more forgiving collision detection method like a distance-based check from the robot's center.

BUG draw() - arm animation

If the user toggles arm animation on and off very quickly, leftArmPhase and rightArmPhase accumulate values that don't reset properly, causing the arm to snap into unexpected positions on the next toggle.

💡 Reset both armPhase values to 0 whenever their animation flag is turned off, not just when toggled on: add `leftArmPhase = 0;` in the else clause of the left arm animation check.

PERFORMANCE mousePressed()

The function recalculates bounding boxes and positions for every body part on every click, even though these values don't change during animation.

💡 Calculate bounding boxes once in setup() or as constants at the top of the file, then reference them in mousePressed(). This reduces redundant math on every click.

STYLE Global variables section

Facial feature dimensions (eyeRadius, noseWidth, etc.) are scattered separately from body dimensions, making the code organization harder to follow.

💡 Group facial dimensions immediately after head dimensions, and arm/leg dimensions immediately after their respective parts, to make the variable purposes clearer.

FEATURE draw()

The robot has no feet or toe details, making it feel flat and less character-driven.

💡 Add small circles or rectangles at the ends of the legs to represent feet, and position them so they move with the legs during bounce.

FEATURE mousePressed()

There's no visual feedback when you click—the user doesn't know if their click was registered or if they missed.

💡 Add a temporary color change or scale animation when any part is clicked, or display a debug message showing which part was hit.

🔄 Code Flow

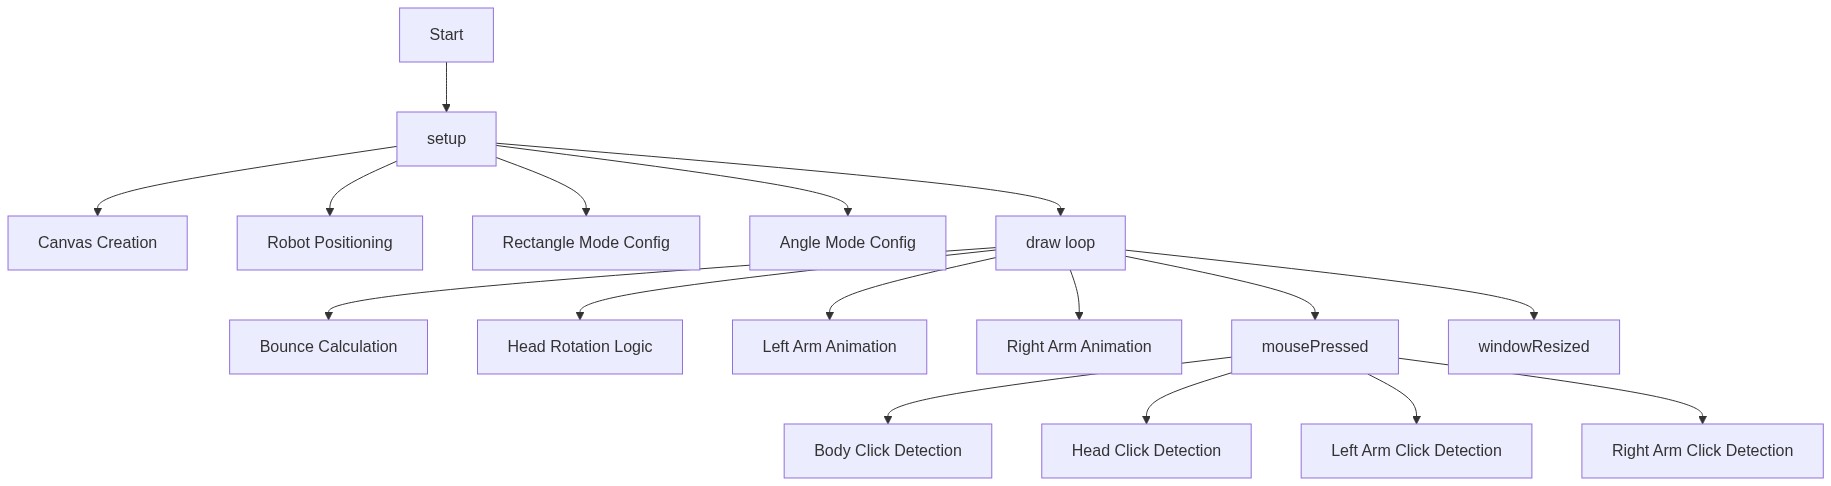
Code flow showing setup, draw, mousepressed, windowresized

💡 Click on function names in the diagram to jump to their code

graph TD start[Start] --> setup[setup] setup --> canvas-creation[Canvas Creation] setup --> robot-positioning[Robot Positioning] setup --> rect-mode-config[Rectangle Mode Config] setup --> angle-mode-config[Angle Mode Config] setup --> draw[draw loop] click setup href "#fn-setup" click canvas-creation href "#sub-canvas-creation" click robot-positioning href "#sub-robot-positioning" click rect-mode-config href "#sub-rect-mode-config" click angle-mode-config href "#sub-angle-mode-config" draw --> bounce-calculation[Bounce Calculation] draw --> head-rotation-logic[Head Rotation Logic] draw --> arm-animation-left[Left Arm Animation] draw --> arm-animation-right[Right Arm Animation] draw --> mousepressed[mousePressed] draw --> windowresized[windowResized] click draw href "#fn-draw" click bounce-calculation href "#sub-bounce-calculation" click head-rotation-logic href "#sub-head-rotation-logic" click arm-animation-left href "#sub-arm-animation-left" click arm-animation-right href "#sub-arm-animation-right" click mousepressed href "#fn-mousepressed" click windowresized href "#fn-windowresized" mousepressed --> body-click-detection[Body Click Detection] mousepressed --> head-click-detection[Head Click Detection] mousepressed --> left-arm-click-detection[Left Arm Click Detection] mousepressed --> right-arm-click-detection[Right Arm Click Detection] click body-click-detection href "#sub-body-click-detection" click head-click-detection href "#sub-head-click-detection" click left-arm-click-detection href "#sub-left-arm-click-detection" click right-arm-click-detection href "#sub-right-arm-click-detection"

❓ Frequently Asked Questions

What visual elements are created by the MY FIRST TEST sketch in p5.js?

The sketch visually represents a robot with a rectangular body, circular head, arms, and legs, all animated with various movements.

How can users interact with the MY FIRST TEST sketch to influence the robot's movements?

Users can trigger the robot's head rotation and arm animations, as well as initiate bouncing behavior, potentially through mouse clicks or keyboard inputs depending on additional code.

What creative coding techniques are showcased in the MY FIRST TEST sketch?

This sketch demonstrates techniques such as using trigonometric functions for animation, managing state with flags, and structuring a modular code layout for easy adjustments.

Preview

MY FIRST TEST - p5.js creative coding sketch preview
Sketch Preview
Code flow diagram showing the structure of MY FIRST TEST - Code flow showing setup, draw, mousepressed, windowresized
Code Flow Diagram