
Neon Radar Pulse Rings - xelsed.ai

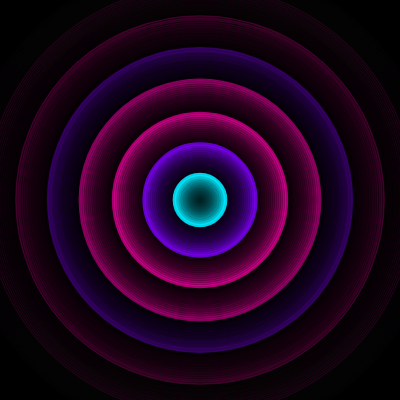
This sketch generates an endless sequence of glowing rings that expand outward from the center of the screen like radar pulses or ripples in water. Each ring is drawn in a random neon color (pink, cyan, or purple) and gradually grows, thins, and fades to nothing using HSB color mode and linear interpolation.

🧪 Try This!

Experiment with the code by making these changes:

  1. Speed up the pulse — Lowering spawnInterval makes new rings appear much more frequently, turning the slow pulse into a rapid, dense radar sweep.
  2. Let rings linger longer — Increasing ringDuration makes each ring take longer to grow and fade, so more rings overlap on screen at once.
  3. Add long glowing trails — Lowering the background alpha means old frames barely get erased, leaving long dreamy light trails behind every ring.
Prefer the full editor? Open it there →

📖 About This Sketch

This sketch produces a hypnotic radar-style animation: glowing neon rings continuously spawn at the center of the canvas and expand outward, fading from bright to invisible as they grow. The vivid pink, cyan, and purple glow comes from p5.js's HSB color mode, while the smooth growth-and-fade motion is powered entirely by the lerp() function mapping each ring's age to its radius, transparency, and stroke thickness.

The code is organized around a Ring class that packages up a single ring's position, birth time, and color, plus a global array called rings that holds every ring currently on screen. Studying this sketch teaches you how to manage a growing-and-shrinking collection of objects safely (adding new ones, removing expired ones), how millis()-based timers can control spawn rates independent of frame rate, and how a single line of transparent background() fill can create smooth motion trails.

⚙️ How It Works

  1. When the sketch loads, setup() creates a full-window canvas, switches to HSB color mode for easy neon color control, builds a three-color palette (pink, cyan, purple), and paints the canvas solid black.
  2. Every frame, draw() paints a nearly-black semi-transparent rectangle over the whole canvas instead of a solid black one, which very slightly dims everything already drawn - this is what creates the soft glowing trail effect instead of clean erasing.
  3. draw() checks the clock with millis() and, once enough time (spawnInterval) has passed since the last spawn, calls spawnRing() to create a brand new Ring object at the canvas center with a random neon color.
  4. draw() then loops backwards through the rings array, calling each ring's draw() method to render it and checking isDead() to remove any ring whose lifetime has expired.
  5. Inside Ring.draw(), the ring's age is converted into a 0-to-1 progress value t, which is used with lerp() to grow the radius from 0 to maxRadius, fade the alpha from 255 to 0, and shrink the stroke weight from 4 to 1 - so every ring visibly grows, thins, and vanishes over its 2-second lifetime.
  6. If the browser window is resized, windowResized() automatically resizes the canvas and recalculates maxRadius so the rings still fit nicely on screen.

🎓 Concepts You'll Learn

HSB color modeES6 classesArrays of objectsLinear interpolation (lerp)Time-based animation with millis()Alpha transparency motion trails

📝 Code Breakdown

setup()

setup() runs once when the sketch starts. Here it configures the color system (HSB), builds the reusable color palette, and establishes the maximum size a ring is allowed to reach based on the screen dimensions.

function setup() {
  createCanvas(windowWidth, windowHeight);
  // Use HSB for easier neon color control
  colorMode(HSB, 360, 100, 100, 255);
  noFill();
  
  maxRadius = min(width, height) * 0.6;

  // Neon color palette: pink, cyan, purple
  palette = [
    color(320, 100, 100), // neon pink
    color(185, 100, 100), // cyan
    color(270, 100, 100)  // purple
  ];

  background(0, 0, 0); // pure black (HSB: any hue, 0 sat, 0 bright)
}
Line-by-line explanation (6 lines)
createCanvas(windowWidth, windowHeight);
Makes the canvas fill the entire browser window.
colorMode(HSB, 360, 100, 100, 255);
Switches p5's color system to Hue-Saturation-Brightness with ranges 0-360, 0-100, 0-100, and alpha 0-255 - this makes it easy to pick vivid neon hues by just changing one number.
noFill();
Tells p5 not to fill any shapes with color, so the rings will only show as outlines (strokes).
maxRadius = min(width, height) * 0.6;
Calculates how large a ring is allowed to grow - 60% of whichever canvas dimension (width or height) is smaller, so rings never grow off-screen awkwardly.
palette = [color(320, 100, 100), color(185, 100, 100), color(270, 100, 100)];
Builds an array of three p5.Color objects representing neon pink, cyan, and purple, which will be randomly chosen for each new ring.
background(0, 0, 0);
Paints the canvas solid black once at the start, giving the animation a clean dark backdrop to begin with.
draw()

draw() runs about 60 times per second and is the heartbeat of the animation. It combines a fading background trick, a millis()-based timer, and safe array removal into one compact loop that keeps the ring effect running forever.

🔬 This loop counts DOWN from the end of the array so that splicing out a dead ring doesn't cause the next ring to be skipped. What do you predict happens if you rewrite it to count UP from i = 0 instead - will any rings ever fail to get removed properly?

  for (let i = rings.length - 1; i >= 0; i--) {
    rings[i].draw();
    if (rings[i].isDead()) {
      rings.splice(i, 1);
    }
  }
function draw() {
  // Slight transparency for a soft trailing effect
  // HSB: hue doesn't matter when saturation is 0; this is just "almost black"
  background(0, 0, 0, 40);

  const now = millis();

  // Spawn new rings at regular time intervals
  if (now - lastSpawnTime >= spawnInterval) {
    spawnRing();
    lastSpawnTime = now;
  }

  // Update and draw rings, remove dead ones
  for (let i = rings.length - 1; i >= 0; i--) {
    rings[i].draw();
    if (rings[i].isDead()) {
      rings.splice(i, 1);
    }
  }
}
Line-by-line explanation (8 lines)

🔧 Subcomponents:

conditional Spawn Timer Check if (now - lastSpawnTime >= spawnInterval) {

Only spawns a new ring once enough time has passed since the previous one, so rings appear at a steady rhythm regardless of frame rate.

for-loop Update & Cull Rings Loop for (let i = rings.length - 1; i >= 0; i--) {

Walks backward through every active ring, drawing it and removing it from the array once it has finished its lifetime.

background(0, 0, 0, 40);
Paints a mostly-opaque black rectangle over everything drawn last frame. Because the alpha is only 40 (not 255), old pixels aren't fully erased - they just get a little darker, which is what creates the soft glowing trail behind each ring.
const now = millis();
Grabs the number of milliseconds since the sketch started, used as a timestamp for deciding when to spawn rings.
if (now - lastSpawnTime >= spawnInterval) {
Compares how much time has passed since the last spawn to the desired spawnInterval - if enough time has elapsed, it's time for a new ring.
spawnRing();
Calls the helper function that creates and adds a brand new Ring object to the array.
lastSpawnTime = now;
Resets the spawn timer so the next ring waits its own full spawnInterval before appearing.
for (let i = rings.length - 1; i >= 0; i--) {
Loops through the rings array backwards. Going backwards is important because we remove items with splice() inside the loop, and removing from the end avoids skipping elements.
rings[i].draw();
Calls the draw() method on each ring so it renders itself at its current age-based size and transparency.
if (rings[i].isDead()) { rings.splice(i, 1); }
Checks whether a ring has outlived its lifetime and, if so, removes it from the array so the sketch doesn't keep tracking (and slowing down with) rings nobody can see anymore.

spawnRing()

spawnRing() is a factory function - its only job is to construct a new Ring object with sensible starting values and hand it off to the rings array so draw() can manage its lifecycle.

🔬 Right now every ring picks a fully random color from the palette, so the same color can appear twice in a row. What happens if you replace random(palette) with a value that cycles through the array in order using rings.length % palette.length?

  const col = random(palette); // pick a random neon color

  rings.push(new Ring(centerX, centerY, maxRadius, ringDuration, col));
function spawnRing() {
  const centerX = width / 2;
  const centerY = height / 2;
  const col = random(palette); // pick a random neon color

  rings.push(new Ring(centerX, centerY, maxRadius, ringDuration, col));
}
Line-by-line explanation (4 lines)
const centerX = width / 2;
Calculates the horizontal center of the canvas, where every ring will originate.
const centerY = height / 2;
Calculates the vertical center of the canvas.
const col = random(palette);
Picks one random color object out of the three-color neon palette array - this is why rings appear in unpredictable pink/cyan/purple order.
rings.push(new Ring(centerX, centerY, maxRadius, ringDuration, col));
Creates a brand new Ring object with the chosen position, max size, lifetime, and color, then adds it to the end of the global rings array so draw() will start rendering and animating it.

Ring (constructor)

The constructor is what runs when you write 'new Ring(...)'. It packages all the data one ring needs - position, size limit, lifetime, birth time, and color - into a single self-contained object stored in the rings array.

constructor(x, y, maxRadius, lifetime, col) {
    this.x = x;
    this.y = y;
    this.maxRadius = maxRadius;
    this.lifetime = lifetime; // in ms
    this.birth = millis();
    this.col = col;
  }
Line-by-line explanation (5 lines)
this.x = x; this.y = y;
Stores the ring's center position so it knows where to draw itself every frame.
this.maxRadius = maxRadius;
Remembers how large this ring is allowed to grow before it's fully expanded.
this.lifetime = lifetime;
Stores how many milliseconds this ring should exist for before disappearing.
this.birth = millis();
Records the exact moment (in milliseconds) the ring was created - this timestamp is used later to calculate the ring's age every frame.
this.col = col;
Saves the neon color assigned to this ring so draw() can use it later.

Ring.draw()

This method is called every frame for every living ring. It's a great example of driving multiple animated properties (size, opacity, thickness) from a single normalized 0-1 progress variable using lerp().

🔬 These three lerp() calls all use the same progress value t but map it to different ranges. What happens visually if you swap alpha's arguments to lerp(0, 255, t) so rings fade IN instead of out as they grow?

    const radius = lerp(0, this.maxRadius, t);
    const alpha = lerp(255, 0, t);        // fade out
    const weight = lerp(4, 1, t);        // thinner as it grows
draw() {
    const age = millis() - this.birth;
    const t = constrain(age / this.lifetime, 0, 1); // 0 → 1 over lifetime

    const radius = lerp(0, this.maxRadius, t);
    const alpha = lerp(255, 0, t);        // fade out
    const weight = lerp(4, 1, t);        // thinner as it grows

    const base = this.col;
    const c = color(
      hue(base),
      saturation(base),
      brightness(base),
      alpha
    );

    stroke(c);
    strokeWeight(weight);
    // p5 circle reference: https://p5js.org/reference/#/p5/circle
    circle(this.x, this.y, radius * 2);
  }
Line-by-line explanation (9 lines)

🔧 Subcomponents:

calculation Age-to-Progress Calculation const t = constrain(age / this.lifetime, 0, 1); // 0 → 1 over lifetime

Converts how long the ring has existed into a 0-to-1 progress value used to drive every visual change.

calculation Radius/Alpha/Weight Interpolation const radius = lerp(0, this.maxRadius, t);

Smoothly animates the ring's size, transparency, and stroke thickness based on its age progress t.

const age = millis() - this.birth;
Calculates how many milliseconds have passed since this specific ring was created.
const t = constrain(age / this.lifetime, 0, 1);
Turns the raw age into a clean 0-to-1 fraction of the ring's total lifetime, clamped so it never goes below 0 or above 1 even if a frame is delayed.
const radius = lerp(0, this.maxRadius, t);
Interpolates the ring's radius from 0 (just born) to maxRadius (fully expanded) based on progress t.
const alpha = lerp(255, 0, t);
Interpolates opacity from fully visible (255) down to fully invisible (0), making the ring fade out as it expands.
const weight = lerp(4, 1, t);
Interpolates the stroke thickness from 4 pixels down to 1 pixel, so the ring's line gets thinner as it grows outward.
const c = color(hue(base), saturation(base), brightness(base), alpha);
Rebuilds a new color using the ring's original hue and saturation but with the freshly calculated fade-out alpha applied.
stroke(c);
Sets the outline color for the next shape drawn to this newly computed faded color.
strokeWeight(weight);
Sets how thick the ring's outline will be drawn this frame.
circle(this.x, this.y, radius * 2);
Draws the ring as a circle outline at its stored position; circle() takes a diameter, so the radius is doubled.

isDead()

isDead() is a simple boolean check used by draw() to decide when a ring should be removed from the rings array, keeping the array from growing forever.

isDead() {
    return millis() - this.birth > this.lifetime;
  }
Line-by-line explanation (1 lines)
return millis() - this.birth > this.lifetime;
Compares the ring's current age (current time minus birth time) to its allowed lifetime, returning true once the ring has outlived its expected duration.

windowResized()

windowResized() is a special p5.js function that p5 calls automatically on browser resize events, letting you keep responsive sketches that adapt to any screen size.

function windowResized() {
  resizeCanvas(windowWidth, windowHeight);
  maxRadius = min(width, height) * 0.6;
}
Line-by-line explanation (2 lines)
resizeCanvas(windowWidth, windowHeight);
A built-in p5.js callback that fires automatically whenever the browser window changes size; this line resizes the canvas to match the new window dimensions.
maxRadius = min(width, height) * 0.6;
Recalculates the maximum ring radius using the new canvas size, so rings continue to scale appropriately after a resize.

📦 Key Variables

rings array

Holds every currently-alive Ring object; new rings are pushed in and expired rings are spliced out each frame.

let rings = [];
spawnInterval number

Number of milliseconds to wait between spawning each new ring - controls how densely packed the pulses feel.

let spawnInterval = 250;
lastSpawnTime number

Timestamp (from millis()) of the most recent ring spawn, used to calculate when the next spawn should happen.

let lastSpawnTime = 0;
ringDuration number

How many milliseconds each ring lives before disappearing - determines how slowly or quickly rings grow and fade.

let ringDuration = 2000;
maxRadius number

The largest radius a ring is allowed to reach, calculated from the canvas size so rings scale to any screen.

let maxRadius;
palette array

Stores the three neon p5.Color objects (pink, cyan, purple) that rings randomly draw their color from.

let palette = [];

🔧 Potential Improvements (3)

Here are some ways this code could be enhanced:

BUG end of sketch.js, outside any function

The two stray '// AI Addition' lines call background(0, 0, 0, 40) and background(0, 0, 0) at the top level of the script, outside setup() or draw(). These execute once as soon as the script parses (before p5 has necessarily created a canvas), which can throw errors or silently do nothing useful, and serve no purpose in the animation.

💡 Delete these two stray top-level background() calls entirely - they are leftover/duplicated code that isn't part of the actual draw loop and adds risk without any visual benefit.

PERFORMANCE Ring.draw()

Every frame, for every ring, the code calls hue(base), saturation(base), and brightness(base) to decompose the stored color back into its components just to rebuild a new color() with a different alpha.

💡 Store the hue and saturation directly on the ring in the constructor (e.g. this.h = hue(col); this.s = saturation(col); this.b = brightness(col);) so draw() can skip the three extraction function calls every frame, which adds up when many rings are active.

FEATURE spawnRing()

Rings always spawn from the exact center of the canvas, which is visually pleasant but static and non-interactive.

💡 Let clicking the mouse spawn a ring at mouseX/mouseY (in addition to or instead of the automatic center spawns) using a mousePressed() function, turning the radar effect into something the viewer can trigger themselves.

🔄 Code Flow

Code flow showing setup, draw, spawnring, ring, ringdraw, isdead, windowresized

💡 Click on function names in the diagram to jump to their code

graph TD start[Start] --> setup[setup] setup --> draw[draw loop] draw --> spawncheck[Spawn Timer Check] draw --> ringloop[Update & Cull Rings Loop] spawncheck -->|if enough time| spawnring[spawnRing()] spawncheck -->|if not enough time| draw ringloop -->|for each active ring| ringdraw[ring.draw()] ringloop -->|check if dead| isdead[isDead()] ringloop -->|if dead| remove[Remove from rings array] ringloop -->|if not dead| draw ringdraw --> ageprogress[Age-to-Progress Calculation] ageprogress --> lerpvisuals[Radius/Alpha/Weight Interpolation] click setup href "#fn-setup" click draw href "#fn-draw" click spawncheck href "#sub-spawn-check" click ringloop href "#sub-ring-loop" click ringdraw href "#fn-ringdraw" click isdead href "#fn-isdead" click ageprogress href "#sub-age-progress" click lerpvisuals href "#sub-lerp-visuals" click spawnring href "#fn-spawnring"

❓ Frequently Asked Questions

What visual effects can users expect from the Neon Radar Pulse Rings sketch?

The sketch creates hypnotic concentric rings that pulse outward in vibrant neon colors like pink, cyan, and purple, resembling a radar sweep or ripples in water.

Is there any user interaction available in the Neon Radar Pulse Rings sketch?

The sketch is not interactive; it continuously generates and displays pulsing rings automatically, providing a mesmerizing visual experience.

What creative coding concepts are showcased in the Neon Radar Pulse Rings sketch?

This sketch demonstrates techniques like object-oriented programming with rings, color manipulation using HSB, and animation through time-based updates.

Preview

Neon Radar Pulse Rings - xelsed.ai - p5.js creative coding sketch preview
Sketch Preview
Code flow diagram showing the structure of Neon Radar Pulse Rings - xelsed.ai - Code flow showing setup, draw, spawnring, ring, ringdraw, isdead, windowresized
Code Flow Diagram