
never ending hole with fun end

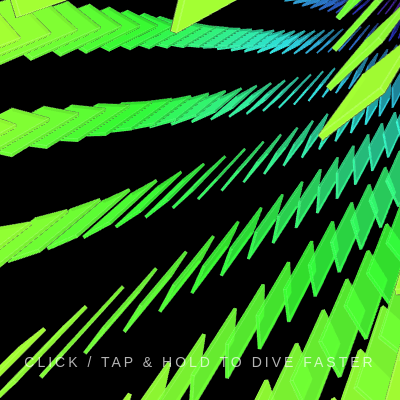
This sketch creates an immersive 3D tunnel experience where the player falls through a spiraling vortex of colorful rings that rush toward the camera. The rings twist, fade, and cycle through hues as they approach, with mouse/touch input controlling acceleration and camera tilt to create an intense, interactive descent.

🧪 Try This!

Experiment with the code by making these changes:

  1. Triple the tunnel width — Larger tunnelRadius spreads the ring segments farther from center, making a wider vortex
  2. Make acceleration less dramatic — Lowering the target speed difference makes clicking barely affect tunnel speed
  3. Rainbow colors cycle faster — Increasing the hue increment makes the tunnel's colors shift through the spectrum quicker
  4. Shorter tunnel before ending — Lower remainingRings makes the end-screen appear after fewer rings have passed
  5. Make the tunnel less responsive to mouse — Smaller camera rotation range dampens how much the view tilts when you move your mouse
Prefer the full editor? Open it there →

📖 About This Sketch

This sketch builds a hypnotic 3D tunnel where rings of light spiral toward you at increasing speed. What makes it visually striking is the combination of three p5.js techniques working together: WEBGL 3D rendering for true depth, real-time camera transforms that respond to mouse position, and HSB color mode that cycles hues smoothly as rings fall. The instruction text and hidden end-screen overlay show how to bridge p5.js canvas code with DOM HTML elements.

The code is organized around a central rings array that stores the depth, hue, and visibility state of each ring currently visible. You will learn how to fake infinite depth by recycling rings (moving them from front to back), how mouse interaction directly controls both speed and camera angle, and how the draw loop's frame counter creates continuous twisting motion. The sketch also demonstrates the pattern of triggering a 'game over' state when a condition is met.

⚙️ How It Works

  1. When the sketch loads, setup() creates a WEBGL canvas (true 3D rendering), initializes 70 rings at different depths with cycling hues in HSB color space, and displays instructions at the bottom of the screen.
  2. Every frame, draw() clears the background to black and updates the fall speed using lerp—when the mouse is pressed, speed ramps up smoothly to 80; otherwise it drifts back down to 15.
  3. The camera angle is controlled by mapping mouse position: moving your mouse left/right rotates the view around the Y axis, moving up/down tilts around the X axis, creating a 'look around' effect while falling.
  4. Each visible ring moves toward the camera (its z coordinate increases by fallSpeed), rotates gradually to create a twisting effect, and cycles its hue to generate rainbow colors.
  5. When a ring reaches the camera (z > 200), it wraps back to the bottom of the tunnel and decrements a countdown counter; once 150 rings have passed and the counter hits zero, new rings stop spawning and the tunnel ends.
  6. When the last ring exits, the sketch triggers an end-screen overlay by hiding the instruction text and showing a hidden DOM element with credits.

🎓 Concepts You'll Learn

3D rendering with WEBGLCamera transforms and perspectiveInteractive mouse and touch inputHSB color mode and hue cyclingInfinite scroll effect through recyclingState management and event triggersArray-based object poolsLerp for smooth transitions

📝 Code Breakdown

setup()

setup() runs once at the start and prepares all your variables and canvas settings. WEBGL is p5.js's 3D mode and unlocks translate(), rotate, and z-coordinates. HSB color mode is perfect for rainbow effects because changing hue alone doesn't change brightness.

function setup() {
  createCanvas(windowWidth, windowHeight, WEBGL);
  colorMode(HSB, 360, 100, 100, 1);
  
  // Create an overlay instruction text
  inst = createDiv('CLICK / TAP & HOLD TO DIVE FASTER');
  inst.style('position', 'absolute');
  inst.style('bottom', '30px');
  inst.style('width', '100%');
  inst.style('text-align', 'center');
  inst.style('color', 'rgba(255, 255, 255, 0.7)');
  inst.style('font-family', 'sans-serif');
  inst.style('font-size', '14px');
  inst.style('letter-spacing', '3px');
  inst.style('pointer-events', 'none');

  // Initialize the rings
  for (let i = 0; i < numRings; i++) {
    rings.push({
      z: map(i, 0, numRings, 0, -totalDepth),
      hue: map(i, 0, numRings, 0, 360),
      active: true // Tracks if the ring is still rendering
    });
  }
}
Line-by-line explanation (6 lines)

🔧 Subcomponents:

calculation Canvas and color mode initialization createCanvas(windowWidth, windowHeight, WEBGL); colorMode(HSB, 360, 100, 100, 1);

Enables true 3D drawing with WEBGL and switches to HSB color space for smooth hue cycling

calculation Instruction text overlay creation inst = createDiv('CLICK / TAP & HOLD TO DIVE FASTER'); inst.style('position', 'absolute'); inst.style('bottom', '30px');

Creates a DOM element overlay at the bottom of the screen to guide player interaction

for-loop Ring array population for (let i = 0; i < numRings; i++) { rings.push({ z: map(i, 0, numRings, 0, -totalDepth), hue: map(i, 0, numRings, 0, 360), active: true }); }

Distributes rings evenly from front to back of the tunnel with hues cycling from 0 to 360 degrees

createCanvas(windowWidth, windowHeight, WEBGL)
Creates a full-window 3D canvas using WEBGL renderer, which allows translate(), rotateX(), rotateY() and 3D transformations
colorMode(HSB, 360, 100, 100, 1)
Switches from RGB to HSB (Hue, Saturation, Brightness)—hue ranges 0-360, saturation 0-100, brightness 0-100, alpha 0-1. This makes color cycling easier
inst = createDiv('CLICK / TAP & HOLD TO DIVE FASTER')
Creates a p5.js DOM element containing text and stores it in the inst variable so we can hide it later
inst.style('position', 'absolute')
Positions the text absolutely over the canvas instead of in document flow
z: map(i, 0, numRings, 0, -totalDepth)
Maps ring index i from 0 to numRings onto depth range 0 to -totalDepth, spreading rings evenly in 3D space
hue: map(i, 0, numRings, 0, 360)
Maps ring index onto hue values 0 to 360, giving each ring a different starting color
draw()

draw() is where all animation happens—it runs 60 times per second. This function combines mouse input (fallSpeed acceleration), camera transforms (rotateX/Y for look-around), object recycling (wrapping rings), and end-state detection (showing credits). It demonstrates how p5.js's WEBGL 3D transforms, array state management, and JavaScript DOM manipulation can work together.

🔬 The second line cycles the hue. What happens if you change 0.5 to 2? To 0.1? How does this change the rainbow speed?

    // Move the ring towards the camera
    r.z += fallSpeed;
    r.hue = (r.hue + 0.5) % 360;

🔬 This loop draws 12 segments around a circle (numSegments = 12). What happens if you change the loop to j < numSegments / 2 so only 6 boxes draw? Or j < numSegments * 2 for 24 boxes?

    for (let j = 0; j < numSegments; j++) {
      let angle = (TWO_PI / numSegments) * j;
      push();
      let x = cos(angle) * tunnelRadius;
      let y = sin(angle) * tunnelRadius;
      translate(x, y, 0);
      rotateZ(angle);
      box(50, 4, 150);
      pop();
    }
function draw() {
  background(0);

  // 1. Calculate Fall Speed
  let targetSpeed = mouseIsPressed ? 80 : 15;
  fallSpeed = lerp(fallSpeed, targetSpeed, 0.05);

  // 2. Camera Look Mechanics
  let lookX = map(mouseX, 0, width, -0.4, 0.4);
  let lookY = map(mouseY, 0, height, -0.4, 0.4);
  rotateY(lookX);
  rotateX(lookY);

  let anyActive = false; // Check if there are any rings left on screen

  // 3. Render the Tunnel
  for (let i = 0; i < rings.length; i++) {
    let r = rings[i];
    
    // Skip this ring if it has already passed the camera and no more should spawn
    if (!r.active) continue;
    
    anyActive = true;
    
    // Move the ring towards the camera
    r.z += fallSpeed;
    r.hue = (r.hue + 0.5) % 360;

    // If the ring passes behind the camera
    if (r.z > 200) {
      if (remainingRings > 0) {
        // Send it back to the bottom of the hole
        r.z -= totalDepth;
        remainingRings--; // Decrease the counter
      } else {
        // We've reached the end! Stop wrapping rings.
        r.active = false; 
      }
    }

    let alpha = map(r.z, 200, -totalDepth + 1500, 1, 0, true);

    push();
    translate(0, 0, r.z);
    let twist = frameCount * 0.005 + r.z * 0.001;
    rotateZ(twist);

    let numSegments = 12;
    fill(r.hue, 80, 100, alpha);
    stroke(r.hue, 50, 100, alpha * 0.5);
    strokeWeight(1);

    for (let j = 0; j < numSegments; j++) {
      let angle = (TWO_PI / numSegments) * j;
      push();
      let x = cos(angle) * tunnelRadius;
      let y = sin(angle) * tunnelRadius;
      translate(x, y, 0);
      rotateZ(angle);
      box(50, 4, 150);
      pop();
    }
    pop();
  }

  // 4. Trigger End Screen when all rings are gone
  if (!anyActive && !isEnded) {
    isEnded = true;
    inst.style('display', 'none'); // Hide the dive text
    document.getElementById('end-screen').style.display = 'flex'; // Show the DOM container
  }
}
Line-by-line explanation (23 lines)

🔧 Subcomponents:

calculation Smooth speed transition let targetSpeed = mouseIsPressed ? 80 : 15; fallSpeed = lerp(fallSpeed, targetSpeed, 0.05);

Uses lerp to smoothly animate fallSpeed from current value toward targetSpeed (either 80 or 15 depending on mouse pressure)

calculation Mouse-controlled camera tilt let lookX = map(mouseX, 0, width, -0.4, 0.4); let lookY = map(mouseY, 0, height, -0.4, 0.4); rotateY(lookX); rotateX(lookY);

Maps mouse position to rotation angles and applies them to the camera, letting player look around while falling

for-loop Render all active rings for (let i = 0; i < rings.length; i++) { let r = rings[i]; if (!r.active) continue; anyActive = true;

Iterates through each ring and skips inactive ones; also tracks whether any rings remain active

calculation Move rings toward camera r.z += fallSpeed; r.hue = (r.hue + 0.5) % 360;

Increments ring depth by fallSpeed and slowly rotates its hue to create color cycling

conditional Ring recycling and end detection if (r.z > 200) { if (remainingRings > 0) { r.z -= totalDepth; remainingRings--; } else { r.active = false; } }

When a ring passes the camera, either recycles it to the back or marks it inactive if no rings remain to spawn

for-loop Draw 12 box segments in a circle for (let j = 0; j < numSegments; j++) { let angle = (TWO_PI / numSegments) * j; push(); let x = cos(angle) * tunnelRadius; let y = sin(angle) * tunnelRadius; translate(x, y, 0); rotateZ(angle); box(50, 4, 150); pop(); }

Places 12 box segments evenly around a circle at tunnelRadius distance, creating the appearance of a ring

conditional End screen activation if (!anyActive && !isEnded) { isEnded = true; inst.style('display', 'none'); document.getElementById('end-screen').style.display = 'flex'; }

When all rings become inactive and we haven't already triggered the end, hide instructions and show the credits overlay

background(0)
Clears the canvas to pure black every frame, erasing the previous ring positions
let targetSpeed = mouseIsPressed ? 80 : 15
Sets targetSpeed to 80 if mouse is held down, otherwise 15—this is the speed we want to reach
fallSpeed = lerp(fallSpeed, targetSpeed, 0.05)
Lerp smoothly blends the current fallSpeed toward targetSpeed at 5% per frame, creating a smooth acceleration
let lookX = map(mouseX, 0, width, -0.4, 0.4)
Maps mouse X position across the screen to a rotation range of -0.4 to 0.4 radians
rotateY(lookX)
Rotates the entire 3D scene around the Y axis (vertical), so moving mouse left/right tilts the camera
rotateX(lookY)
Rotates the scene around the X axis, so moving mouse up/down tilts the camera vertically
if (!r.active) continue
Skips to the next ring if this ring's active property is false, preventing dead rings from rendering
anyActive = true
Sets the anyActive flag to true so we know at least one ring is still visible
r.z += fallSpeed
Moves the ring closer to the camera by increasing its z position each frame
r.hue = (r.hue + 0.5) % 360
Increments hue by 0.5 degrees per frame and uses modulo 360 to wrap back to 0, creating smooth color cycling
if (r.z > 200) {
Checks if the ring has moved past the camera threshold at z = 200
r.z -= totalDepth
Teleports the ring back to the bottom of the tunnel, creating the illusion of infinite depth
remainingRings--
Decrements the counter, tracking how many more rings will spawn before the tunnel ends
r.active = false
Marks the ring as inactive when no more rings should spawn, causing it to no longer render
let alpha = map(r.z, 200, -totalDepth + 1500, 1, 0, true)
Maps ring depth to an alpha value from 1 (opaque) to 0 (transparent), fading distant rings into darkness
let twist = frameCount * 0.005 + r.z * 0.001
Calculates a rotation angle that increases over time (frameCount) and varies by ring depth, creating the twisting effect
rotateZ(twist)
Rotates the ring around the Z axis by the twist amount, animating the spiral effect
fill(r.hue, 80, 100, alpha)
Sets fill color to the ring's hue (cycling), full saturation (80), full brightness (100), and its depth-based alpha
let angle = (TWO_PI / numSegments) * j
Calculates the angle for the j-th segment around the circle, dividing 360 degrees evenly
let x = cos(angle) * tunnelRadius; let y = sin(angle) * tunnelRadius
Uses trigonometry to place a point on a circle of radius tunnelRadius at the given angle
box(50, 4, 150)
Draws a rectangular box (50 wide, 4 tall, 150 deep) as one segment of the ring
if (!anyActive && !isEnded) {
Only triggers the end screen if no rings remain active AND we haven't already ended
document.getElementById('end-screen').style.display = 'flex'
Uses vanilla JavaScript to find the HTML end-screen div and make it visible by changing its CSS display property

windowResized()

windowResized() is a p5.js callback that fires automatically whenever the browser window changes size. Always include this function when using createCanvas(windowWidth, windowHeight) so your sketch stays responsive on mobile and desktop.

function windowResized() {
  resizeCanvas(windowWidth, windowHeight);
}
Line-by-line explanation (1 lines)
resizeCanvas(windowWidth, windowHeight)
When the browser window resizes, this updates the p5.js canvas to match the new window dimensions

touchStarted()

touchStarted() is a p5.js callback that fires when the user touches the screen on mobile. Returning false tells the browser 'don't do your default thing'—this prevents scrolling and zoom so the sketch responds cleanly to touch input. The actual touch logic is handled by mouseIsPressed since p5.js maps touch to mouse coordinates.

function touchStarted() {
  return false; 
}
Line-by-line explanation (1 lines)
return false
Returning false prevents the browser's default touch behavior (like scrolling or zoom), letting the sketch capture all touch events

📦 Key Variables

rings array

Stores all ring objects in the tunnel; each ring has z (depth), hue (color), and active (visibility state)

let rings = [];
numRings number

How many ring objects to create and keep active on screen at once—controls tunnel density

const numRings = 70;
totalDepth number

The total distance from front of tunnel to back, used to recycle rings and calculate fading

const totalDepth = 5000;
tunnelRadius number

The radius (distance from center) at which ring segments are placed, controlling tunnel width

const tunnelRadius = 250;
fallSpeed number

Current speed at which rings move toward the camera; lerps between 15 (normal) and 80 (mouse pressed)

let fallSpeed = 15;
remainingRings number

Countdown counter for how many more rings can spawn before the tunnel ends; decrements each time a ring wraps

let remainingRings = 150;
isEnded boolean

Flag that tracks whether the tunnel has already ended; prevents multiple end-screen triggers

let isEnded = false;
inst object

Stores the p5.js DOM element containing the instruction text so it can be hidden at the end

let inst;

🔧 Potential Improvements (5)

Here are some ways this code could be enhanced:

BUG draw() ring wrapping logic

When a ring recycles, its hue continues from its last value rather than resetting, causing hue distribution to drift over many cycles

💡 Reset hue when recycling: add r.hue = map((rings.length - 1 - i), 0, numRings, 0, 360) inside the r.z -= totalDepth block to maintain consistent color distribution throughout the tunnel

PERFORMANCE draw() inner ring-rendering loop

Every frame, box geometry is created and destroyed for each segment; on slower devices this can cause stuttering with many rings

💡 Pre-compute ring geometry in setup() using p5.Geometry or cache it, then reuse it in draw() with translate/rotate transforms only

STYLE setup() instruction text styling

Styling is scattered across multiple inst.style() calls, making it hard to maintain or change look-and-feel globally

💡 Move all styles to CSS in style.css as a class (e.g., .instruction-text) and apply with inst.addClass('instruction-text') for cleaner code

FEATURE draw()

Camera rotation is fixed to a maximum tilt; on mobile, players might want to invert Y or adjust sensitivity

💡 Add tunable variables for lookX/Y sensitivity ranges and invert options, letting players customize camera feel

BUG setup() and draw() interaction

If the window is extremely small, the instruction text may overflow or become unreadable

💡 Add media queries to style.css to reduce font-size on mobile, or use viewport-relative units (e.g., vw, vh) for the font-size

🔄 Code Flow

Code flow showing setup, draw, windowresized, touchstarted

💡 Click on function names in the diagram to jump to their code

graph TD start[Start] --> setup[setup] setup --> draw[draw loop] click setup href "#fn-setup" click draw href "#fn-draw" draw --> canvas-setup[Canvas Setup] draw --> instruction-text[Instruction Text] draw --> ring-initialization[Ring Initialization] draw --> speed-calculation[Speed Calculation] draw --> camera-rotation[Camera Rotation] draw --> ring-loop[Ring Loop] draw --> end-trigger[End Trigger] click canvas-setup href "#sub-canvas-setup" click instruction-text href "#sub-instruction-text" click ring-initialization href "#sub-ring-initialization" click speed-calculation href "#sub-speed-calculation" click camera-rotation href "#sub-camera-rotation" click ring-loop href "#sub-ring-loop" click end-trigger href "#sub-end-trigger" ring-loop --> ring-rendering[Ring Rendering] ring-loop --> depth-advancement[Depth Advancement] ring-loop --> ring-wrapping[Ring Wrapping] click ring-rendering href "#sub-ring-rendering" click depth-advancement href "#sub-depth-advancement" click ring-wrapping href "#sub-ring-wrapping"

❓ Frequently Asked Questions

What visual experience does the never ending hole with fun end sketch provide?

This sketch creates a mesmerizing visual of a glowing, spiraling tunnel filled with colorful rings that rush toward the viewer in a dynamic 3D space.

How can users interact with the never ending hole sketch?

Users can click or tap and hold to accelerate their fall, which enhances the visual vortex effect as they dive deeper into the tunnel.

What creative coding concept is showcased in this p5.js sketch?

The sketch demonstrates 3D rendering techniques, including depth layering and dynamic visual effects, to create an immersive interactive experience.

Preview

never ending hole with fun end - p5.js creative coding sketch preview
Sketch Preview
Code flow diagram showing the structure of never ending hole with fun end - Code flow showing setup, draw, windowresized, touchstarted
Code Flow Diagram