
never ending hole with fun end 2.0

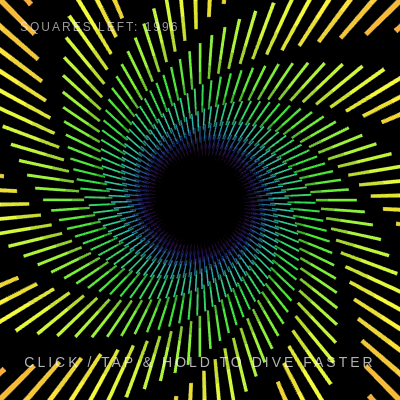
This sketch creates an immersive neon tunnel experience where the viewer falls through an endless stream of spinning, colorful squares. As you plummet deeper, the counter tracks remaining squares, and clicking or tapping accelerates your descent until you reach the end.

🧪 Try This!

Experiment with the code by making these changes:

  1. Make the tunnel spin faster — The twist variable controls rotation speed. Increase its multiplier to make the squares spin dramatically faster.
  2. Create a narrow tunnel — Lower the tunnelRadius constant to squeeze the tunnel walls closer together, creating claustrophobic tension.
  3. Make the end come quicker — Reduce remainingRings to 500 so you hit the end screen in seconds instead of minutes.
  4. Jam the colors to a single hue — Stop the hue from cycling by removing the line that increments r.hue, so all squares stay one color.
  5. Switch to ultra-fast mode by default — Raise the base fallSpeed to 40 so the tunnel rushes even without holding the mouse.
  6. Change tunnel to a triangle — Set numSegments to 3 inside draw() to make each ring a 3-sided polygon instead of a circle.
Prefer the full editor? Open it there →

📖 About This Sketch

This sketch builds a captivating 3D tunnel made of glowing rotating squares that rush toward you at increasing speeds. The visual effect is hypnotic and immersive, combining p5.js 3D transforms (translate, rotateZ, box), HSB color cycling, and frame-based animation to create depth and motion. The tunnel is made of rings—each ring contains 12 spinning squares arranged in a circle—that move toward the camera, wrap around, and repeat until a counter reaches zero.

The code is organized around a rings array that stores the state of each depth layer. The setup() function initializes the 3D canvas and creates HTML overlay text for instructions and a live counter. The draw() function runs the core game loop: it moves rings toward the camera, handles wrapping and despawning, renders the tunnel geometry, checks for the ending condition, and responds to mouse input to speed up your fall. By reading this sketch, you will learn how to build interactive 3D experiences, manage state with arrays of objects, and synchronize DOM elements with a p5.js canvas.

⚙️ How It Works

  1. When the sketch loads, setup() creates a fullscreen 3D canvas in WEBGL mode, switches to HSB color mode for easier hue cycling, and populates an array with 70 rings positioned at increasing depths down the tunnel. Each ring stores its z-position, hue color, and active status.
  2. Every frame, draw() updates the counter display showing how many squares remain, then calculates a target fall speed (15 pixels per frame normally, 80 when the mouse is pressed).
  3. For each ring in the array, the code moves it toward the camera by increasing its z-position, rotates its hue smoothly, and applies a twist rotation to make the squares spin.
  4. When a ring reaches the camera (z > 200), it wraps back to the bottom of the tunnel and the remaining counter decreases by one. If the counter is already zero, the ring is marked inactive instead of wrapping.
  5. Each ring is rendered as 12 small box shapes arranged in a circle using trigonometry (cos and sin) to place them at equal angles, creating the tunnel walls. Alpha transparency fades rings as they approach, creating depth.
  6. When all rings become inactive, the sketch hides the instructions and counter, displays an end-screen overlay with an image, and sets isEnded to true to stop processing.

🎓 Concepts You'll Learn

3D graphics with WEBGLTransform matrices (translate, rotate, push/pop)Array of objects for state managementHSB color mode and hue cyclingParticle wrapping and recyclingMouse interaction and lerp for smooth speed transitionsDepth and alpha transparencyGame state and ending conditions

📝 Code Breakdown

setup()

setup() runs once when the sketch starts. It initializes the canvas, color mode, HTML overlay elements, and the rings array that powers the entire tunnel. The map() function is essential here—it transforms a sequence (0, 1, 2...69) into evenly spaced positions and colors across the tunnel.

function setup() {
  createCanvas(windowWidth, windowHeight, WEBGL);
  colorMode(HSB, 360, 100, 100, 1);
  
  // Create an overlay instruction text
  inst = createDiv('CLICK / TAP & HOLD TO DIVE FASTER');
  inst.style('position', 'absolute');
  inst.style('bottom', '30px');
  inst.style('width', '100%');
  inst.style('text-align', 'center');
  inst.style('color', 'rgba(255, 255, 255, 0.7)');
  inst.style('font-family', 'sans-serif');
  inst.style('font-size', '14px');
  inst.style('letter-spacing', '3px');
  inst.style('pointer-events', 'none');

  // Create the squares counter text in the top left corner
  counterDiv = createDiv('');
  counterDiv.style('position', 'absolute');
  counterDiv.style('top', '20px');
  counterDiv.style('left', '20px');
  counterDiv.style('color', 'rgba(255, 255, 255, 0.6)');
  counterDiv.style('font-family', 'sans-serif');
  counterDiv.style('font-size', '12px');
  counterDiv.style('letter-spacing', '2px');
  counterDiv.style('pointer-events', 'none');

  // Initialize the rings
  for (let i = 0; i < numRings; i++) {
    rings.push({
      z: map(i, 0, numRings, 0, -totalDepth),
      hue: map(i, 0, numRings, 0, 360),
      active: true // Tracks if the ring is still rendering
    });
  }
}
Line-by-line explanation (12 lines)

🔧 Subcomponents:

function-call Canvas and Color Mode Setup createCanvas(windowWidth, windowHeight, WEBGL);

Creates a fullscreen 3D canvas using WEBGL renderer, making 3D transforms and depth possible

loop Instruction Text Overlay inst = createDiv('CLICK / TAP & HOLD TO DIVE FASTER');

Creates an HTML text element positioned at the bottom of the screen to guide the player

loop Counter Display Setup counterDiv = createDiv('');

Creates an HTML element in the top-left to display the remaining squares counter

for-loop Rings Array Population for (let i = 0; i < numRings; i++) { rings.push({ z: map(i, 0, numRings, 0, -totalDepth), hue: map(i, 0, numRings, 0, 360), active: true }); }

Populates the rings array with initial objects spaced evenly down the tunnel depth, each with a z-position and hue that cycles through the color spectrum

createCanvas(windowWidth, windowHeight, WEBGL);
Creates a fullscreen 3D canvas. WEBGL is the renderer that enables 3D transforms like translate() and rotateZ()
colorMode(HSB, 360, 100, 100, 1);
Switches color mode to HSB (Hue, Saturation, Brightness) with hue 0-360, saturation 0-100, brightness 0-100, and alpha 0-1. This makes smooth color cycling easy
inst = createDiv('CLICK / TAP & HOLD TO DIVE FASTER');
Creates an HTML div element for instructions that sits on top of the canvas
inst.style('position', 'absolute');
Positions the div absolutely so it floats over the canvas rather than affecting the page layout
inst.style('bottom', '30px');
Places the instruction text 30 pixels from the bottom of the screen
counterDiv = createDiv('');
Creates an empty HTML div that will hold the counter text, updated every frame in draw()
counterDiv.style('top', '20px');
Places the counter 20 pixels from the top of the screen
counterDiv.style('left', '20px');
Places the counter 20 pixels from the left edge of the screen
for (let i = 0; i < numRings; i++) {
Loops once for each ring (70 times by default), creating an initial array of ring objects
z: map(i, 0, numRings, 0, -totalDepth),
Uses map() to spread rings from z=0 (nearest camera) to z=-5000 (farthest), creating initial depth spacing
hue: map(i, 0, numRings, 0, 360),
Assigns each ring a hue from 0 (red) to 360 (red again), cycling through the full color spectrum as you move down
active: true // Tracks if the ring is still rendering
Marks each ring as active so draw() knows to render it; becomes false when remainingRings hits zero
draw()

draw() is where the magic happens—it runs 60 times per second. Every frame, it updates the counter, adjusts fall speed based on mouse input using lerp() for smoothing, cycles ring colors, moves rings toward the camera, recycles them at the tunnel bottom, fades them with alpha mapping, renders each ring as 12 3D boxes arranged in a circle, and detects when the game ends. This is a complete game loop: input, update, render, check for win condition.

🔬 This loop draws 12 boxes in a circle to form each ring's wall. What happens if you change numSegments from 12 to 3? To 6? Notice how the tunnel shape changes from circular to polygonal.

    for (let j = 0; j < numSegments; j++) {
      let angle = (TWO_PI / numSegments) * j;
      push();
      let x = cos(angle) * tunnelRadius;
      let y = sin(angle) * tunnelRadius;
      translate(x, y, 0);
      rotateZ(angle);
      box(50, 4, 150);
      pop();
    }
function draw() {
  background(0);

  // Update the counter text
  // Only show the remaining rings that haven't spawned yet, floor to 0
  counterDiv.html('SQUARES LEFT: ' + max(0, remainingRings));

  // 1. Calculate Fall Speed
  let targetSpeed = mouseIsPressed ? 80 : 15;
  fallSpeed = lerp(fallSpeed, targetSpeed, 0.05);

  // 2. Center locked camera
  // Camera rotations (lookX / lookY) have been removed so you stay dead center

  let anyActive = false; // Check if there are any rings left on screen

  // 3. Render the Tunnel
  for (let i = 0; i < rings.length; i++) {
    let r = rings[i];
    
    // Skip this ring if it has already passed the camera and no more should spawn
    if (!r.active) continue;
    
    anyActive = true;
    
    // Move the ring towards the camera
    r.z += fallSpeed;
    r.hue = (r.hue + 0.5) % 360;

    // If the ring passes behind the camera
    if (r.z > 200) {
      if (remainingRings > 0) {
        // Send it back to the bottom of the hole
        r.z -= totalDepth;
        remainingRings--; // Decrease the counter
      } else {
        // We've reached the end! Stop wrapping rings.
        r.active = false; 
      }
    }

    let alpha = map(r.z, 200, -totalDepth + 1500, 1, 0, true);

    push();
    translate(0, 0, r.z);
    let twist = frameCount * 0.005 + r.z * 0.001;
    rotateZ(twist);

    let numSegments = 12;
    fill(r.hue, 80, 100, alpha);
    stroke(r.hue, 50, 100, alpha * 0.5);
    strokeWeight(1);

    for (let j = 0; j < numSegments; j++) {
      let angle = (TWO_PI / numSegments) * j;
      push();
      let x = cos(angle) * tunnelRadius;
      let y = sin(angle) * tunnelRadius;
      translate(x, y, 0);
      rotateZ(angle);
      box(50, 4, 150);
      pop();
    }
    pop();
  }

  // 4. Trigger End Screen when all rings are gone
  if (!anyActive && !isEnded) {
    isEnded = true;
    inst.style('display', 'none');     // Hide the dive text
    counterDiv.style('display', 'none'); // Hide the counter text
    document.getElementById('end-screen').style.display = 'flex'; // Show the DOM container
  }
}
Line-by-line explanation (38 lines)

🔧 Subcomponents:

conditional Mouse-based Speed Control let targetSpeed = mouseIsPressed ? 80 : 15; fallSpeed = lerp(fallSpeed, targetSpeed, 0.05);

Sets target speed to 80 when mouse is pressed, otherwise 15, then smoothly transitions fallSpeed toward the target using lerp()

for-loop Ring Movement and Rendering Loop for (let i = 0; i < rings.length; i++) {

Iterates through all rings, updating their positions, checking for wrapping/ending, and rendering them as 3D tunnel geometry

conditional Ring Wrapping and Despawn Logic if (r.z > 200) { if (remainingRings > 0) { r.z -= totalDepth; remainingRings--; } else { r.active = false; } }

When a ring passes the camera (z > 200), either recycles it to the bottom and decrements the counter, or marks it inactive if the game is over

for-loop Square Segment Rendering for (let j = 0; j < numSegments; j++) { let angle = (TWO_PI / numSegments) * j; push(); let x = cos(angle) * tunnelRadius; let y = sin(angle) * tunnelRadius; translate(x, y, 0); rotateZ(angle); box(50, 4, 150); pop(); }

For each ring, draws 12 small boxes arranged in a circle using cos/sin to calculate positions at equal angles around the tunnel

conditional End Game Detection if (!anyActive && !isEnded) { isEnded = true; inst.style('display', 'none'); counterDiv.style('display', 'none'); document.getElementById('end-screen').style.display = 'flex'; }

When all rings become inactive and the game hasn't ended yet, hides the overlays and shows the end screen

background(0);
Clears the canvas to black every frame, erasing the previous frame's drawing
counterDiv.html('SQUARES LEFT: ' + max(0, remainingRings));
Updates the HTML counter display with the current remainingRings value, using max(0, ...) to never show negative numbers
let targetSpeed = mouseIsPressed ? 80 : 15;
Sets targetSpeed to 80 if the mouse is pressed, otherwise 15. This is a ternary operator that checks mouseIsPressed each frame
fallSpeed = lerp(fallSpeed, targetSpeed, 0.05);
Smoothly transitions fallSpeed toward targetSpeed at 5% per frame using lerp(), creating acceleration/deceleration instead of instant jumps
let anyActive = false; // Check if there are any rings left on screen
Initializes a flag to track whether any active rings remain; used later to detect the end of the game
for (let i = 0; i < rings.length; i++) {
Loops through every ring in the array to update and render each one
let r = rings[i];
Shorthand reference to the current ring object, making the code inside the loop cleaner
if (!r.active) continue;
Skips this ring if it is inactive (already passed and no more to spawn), jumping to the next iteration of the loop
anyActive = true;
Sets the flag to true because we found at least one active ring—used to detect when the tunnel ends
r.z += fallSpeed;
Moves the ring toward the camera by adding fallSpeed to its z-position. Larger fallSpeed means rings rush at you faster
r.hue = (r.hue + 0.5) % 360;
Shifts the ring's hue by 0.5 degrees per frame, cycling through colors. The % 360 wraps it back to 0 when it exceeds 360
if (r.z > 200) {
Checks if the ring has passed the camera (z > 200). When true, the ring needs to wrap or despawn
if (remainingRings > 0) {
If there are still rings left to spawn, wrap this ring back to the bottom of the tunnel
r.z -= totalDepth;
Subtracts totalDepth (5000) from z, moving the ring from just past the camera to the far bottom of the tunnel
remainingRings--;
Decrements the counter by 1, tracking that one more ring has been used up
} else {
If remainingRings is already 0, we've reached the end of the game
r.active = false;
Marks this ring as inactive so it stops rendering and the anyActive flag eventually becomes false
let alpha = map(r.z, 200, -totalDepth + 1500, 1, 0, true);
Maps the ring's z-position to an alpha (transparency) value: rings at z=200 (near camera) are fully opaque (1), and rings far back fade to transparent (0). The 'true' flag clamps the value between 0 and 1
push();
Saves the current transformation matrix (position, rotation, scale) so that transforms inside don't affect rings after this one
translate(0, 0, r.z);
Moves the coordinate system to the ring's z-position, making all subsequent drawing relative to that depth
let twist = frameCount * 0.005 + r.z * 0.001;
Calculates a rotation angle that depends on both the current frame and the ring's depth, creating continuous twisting and depth-based rotation variation
rotateZ(twist);
Rotates all shapes around the z-axis by the twist angle, making the squares spin
let numSegments = 12;
Sets the number of boxes per ring to 12, creating a smooth circular tunnel. Lower numbers (3-6) create polygon tunnels, higher numbers create smoother circles
fill(r.hue, 80, 100, alpha);
Sets the fill color to the ring's hue with saturation 80, brightness 100, and the calculated alpha transparency
stroke(r.hue, 50, 100, alpha * 0.5);
Sets the outline color to the same hue but with lower saturation (50) and half the alpha, making outlines subtler than fills
for (let j = 0; j < numSegments; j++) {
Loops 12 times to draw 12 boxes arranged around a circle
let angle = (TWO_PI / numSegments) * j;
Calculates the angle for the j-th box by dividing the full circle (TWO_PI radians) into equal slices
let x = cos(angle) * tunnelRadius;
Uses cosine to calculate the x-coordinate of the box, placing it on a circle of tunnelRadius (250 pixels)
let y = sin(angle) * tunnelRadius;
Uses sine to calculate the y-coordinate, completing the circular placement
translate(x, y, 0);
Moves the coordinate system to the calculated (x, y) position on the ring
rotateZ(angle);
Rotates the box so it faces outward (tangent) to the circle, making the tunnel feel like it's made of walls
box(50, 4, 150);
Draws a box (cube) with width 50, height 4, and depth 150. The thin height (4) makes it look like a flat wall rather than a solid block
pop();
Restores the transformation matrix to before this ring was drawn, so the next ring starts fresh and isn't affected by these transforms
if (!anyActive && !isEnded) {
Checks if all rings are now inactive AND the game hasn't already been marked as ended—triggers the end sequence
isEnded = true;
Sets the flag to prevent the end sequence from running multiple times
inst.style('display', 'none');
Hides the instruction text overlay
counterDiv.style('display', 'none');
Hides the counter display
document.getElementById('end-screen').style.display = 'flex';
Shows the end screen HTML element by changing its CSS display property from 'none' to 'flex'

windowResized()

windowResized() is a built-in p5.js function that p5 calls automatically whenever the browser window is resized. Without it, the canvas would keep its original size and not adapt to fullscreen changes. This is essential for responsive web sketches.

function windowResized() {
  resizeCanvas(windowWidth, windowHeight);
}
Line-by-line explanation (1 lines)
resizeCanvas(windowWidth, windowHeight);
Adjusts the canvas size to match the window's new dimensions whenever the browser is resized, keeping the tunnel fullscreen

touchStarted()

touchStarted() is a built-in p5.js function that fires whenever the user touches the screen. Returning false here prevents the browser's default touch handlers from interfering with gameplay. The sketch uses mouseIsPressed (which also works on touch devices) to detect input, so this function just prevents unwanted page scrolling.

function touchStarted() {
  return false; 
}
Line-by-line explanation (1 lines)
return false;
Returning false prevents the default browser touch behavior (like scrolling or zooming) from triggering, giving full control to the sketch

📦 Key Variables

rings array

Stores all ring objects that make up the tunnel. Each ring has z-position, hue color, and active status. New rings are recycled as you descend.

let rings = []; // Populated in setup() with 70 initial rings
numRings number

Constant controlling how many rings are visible on screen at once (70 by default). More rings = denser tunnel but less performance.

const numRings = 70;
totalDepth number

Constant defining the total z-distance from the camera to the far end of the tunnel (5000 by default). Used to calculate initial ring spacing and wrapping.

const totalDepth = 5000;
tunnelRadius number

Constant controlling the width of the tunnel in pixels (250 by default). Larger values make the tunnel wider and more spacious.

const tunnelRadius = 250;
fallSpeed number

Current speed in pixels per frame that you fall through the tunnel. Starts at 15, increases to 80 when mouse is pressed, smoothly transitions via lerp().

let fallSpeed = 15;
remainingRings number

Counter tracking how many rings still need to spawn before hitting the end. Decrements by 1 each time a ring recycles. Displayed in the UI.

let remainingRings = 2000;
isEnded boolean

Flag tracking whether the game has reached its end. Set to true when all rings become inactive, triggering the end screen.

let isEnded = false;
inst object

Reference to the HTML div element displaying the instruction text 'CLICK / TAP & HOLD TO DIVE FASTER' at the bottom of the screen.

let inst; // Created in setup() with createDiv()
counterDiv object

Reference to the HTML div element displaying 'SQUARES LEFT: ' counter in the top-left corner. Updated every frame in draw().

let counterDiv; // Created in setup() with createDiv()

🔧 Potential Improvements (6)

Here are some ways this code could be enhanced:

PERFORMANCE draw() - ring loop

Every frame, the code checks r.active for all rings in the array, including inactive ones far down. After 2000 rings have spawned, the array grows very large and iteration becomes slower.

💡 Instead of marking rings inactive, use array.splice() or a queue data structure to remove spent rings, keeping the array small and iteration fast. Alternatively, use a fixed-size circular buffer that overwrites old rings.

BUG draw() - ring wrapping

If remainingRings is exactly 0 when a ring passes the camera, it marks that ring inactive but doesn't immediately show the end screen. The end screen only appears on the NEXT frame when anyActive becomes false. This causes a one-frame delay.

💡 Move the end-screen check inside the loop so it triggers immediately, or set up an observer pattern to detect the exact moment remainingRings hits 0.

STYLE setup() - CSS styling

The instruction div and counter div styling are hardcoded inline across many lines, making the code verbose and hard to maintain. If you want to change fonts or colors globally, you must edit multiple lines.

💡 Move all style strings into CSS variables or a single style object at the top of the file: `const textStyle = { font: 'sans-serif', size: '14px', color: 'rgba(255,255,255,0.7)' };` then apply them consistently.

FEATURE draw()

The sketch has no pause/resume mechanism. Once started, you cannot pause mid-dive to admire the visuals or take a breath.

💡 Add a keyPressed() function that checks for 'p' or space and toggles a `isPaused` flag. In draw(), only increment r.z if !isPaused, effectively freezing the tunnel.

BUG draw() - alpha mapping

The alpha calculation uses map(r.z, 200, -totalDepth + 1500, 1, 0, true). The second argument (-totalDepth + 1500 = -3500) is a magic number not explained. If totalDepth changes, this offset must also change or fading breaks.

💡 Replace the magic number with a named constant: `const FADE_START = totalDepth - 1500;` then use `map(r.z, 200, -FADE_START, 1, 0, true)` for clarity and maintainability.

FEATURE global

The sketch has no sound effects. The visual experience is immersive, but audio feedback (whoosh sounds as rings pass, a chime at the end) would amplify the impact.

💡 Integrate p5.sound.js library. Add oscillators or pre-loaded samples that play when: (1) fallSpeed increases, (2) remainingRings decrements, and (3) isEnded is triggered.

🔄 Code Flow

Code flow showing setup, draw, windowresized, touchstarted

💡 Click on function names in the diagram to jump to their code

graph TD start[Start] --> setup[setup] setup --> draw[draw loop] draw --> speedcontrol[speed-control] draw --> ringupdate[ring-update-loop] draw --> endtrigger[end-trigger] draw --> instructiondiv[instruction-div] draw --> counterdiv[counter-div] draw --> ringwrapping[ring-wrapping] ringupdate --> segmentrendering[segment-rendering] setup --> canvascreation[canvas-creation] setup --> ringsinitialization[rings-initialization] click setup href "#fn-setup" click draw href "#fn-draw" click speedcontrol href "#sub-speed-control" click ringupdate href "#sub-ring-update-loop" click endtrigger href "#sub-end-trigger" click instructiondiv href "#sub-instruction-div" click counterdiv href "#sub-counter-div" click ringwrapping href "#sub-ring-wrapping" click segmentrendering href "#sub-segment-rendering" click canvascreation href "#sub-canvas-creation" click ringsinitialization href "#sub-rings-initialization"

❓ Frequently Asked Questions

What visual effects can users expect from the never ending hole with fun end 2.0 sketch?

This sketch creates a mesmerizing neon tunnel filled with spinning squares that rush toward the viewer, showcasing vibrant, shifting colors as they fall through the endless space.

How can users interact with the never ending hole with fun end 2.0 sketch?

Users can click or tap and hold to increase their falling speed, while a counter tracks the number of glowing squares remaining in the tunnel.

What creative coding techniques are showcased in the never ending hole with fun end 2.0 sketch?

The sketch demonstrates the use of 3D graphics in p5.js, leveraging WebGL for depth layering and dynamic color changes to create an engaging visual experience.

Preview

never ending hole with fun end 2.0 - p5.js creative coding sketch preview
Sketch Preview
Code flow diagram showing the structure of never ending hole with fun end 2.0 - Code flow showing setup, draw, windowresized, touchstarted
Code Flow Diagram