
Particle System

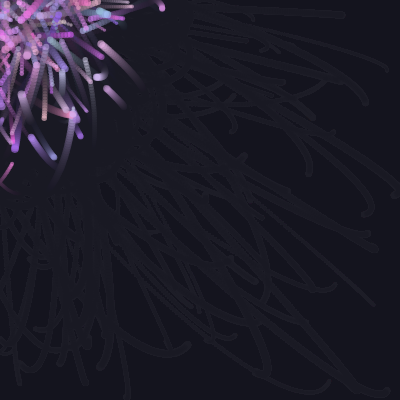
This sketch creates an interactive particle system with 100 colorful particles that bounce around the canvas and are attracted toward the mouse cursor. Each particle has randomized size and color, creating a dynamic visual effect that responds to user interaction in real time.

🧪 Try This!

Experiment with the code by making these changes:

  1. Make particles bigger and slower — Larger particles moving slower create a more sluggish, heavy feel—like balloons instead of sparks.
  2. Make particles chase the mouse aggressively — Increasing attraction strength pulls particles toward the cursor much more forcefully, creating tight clustering at the mouse.
  3. Remove the motion trails — Changing the background alpha to 255 makes it fully opaque instead of semi-transparent, erasing all trails every frame.
  4. Create bright neon particles — Adjusting the color ranges lets you shift the entire swarm toward hot neon pinks, greens, and oranges instead of cool blues.
Prefer the full editor? Open it there →

📖 About This Sketch

This sketch creates a swarm of 100 colorful particles that animate across the canvas while being pulled toward your mouse cursor. Every particle is unique—randomized in size and color—which makes the effect visually rich and hypnotic. The code uses p5.js vectors, classes, and the attraction algorithm to create a responsive system that feels alive.

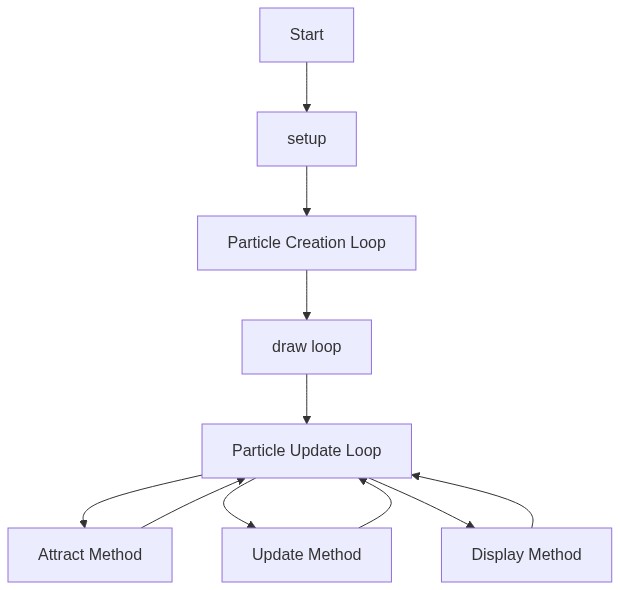
The sketch is organized around a Particle class that encapsulates all the behavior for one particle: its position, velocity, size, and color. The draw loop iterates through all particles every frame, calling three methods on each: update() to move it and bounce off walls, display() to draw it, and attract() to pull it toward the mouse. By studying this code, you will learn how classes organize complex behavior, how vectors simplify physics, and how to build interactive systems that respond to user input.

⚙️ How It Works

  1. When the sketch loads, setup() creates a full-window canvas and populates the particles array with 100 new Particle objects, each randomly positioned and with random velocity, size, and color.
  2. Every frame, draw() clears the background with a semi-transparent dark color (this creates a subtle motion trail effect), then iterates through every particle in the array.
  3. For each particle, update() adds its velocity to its position (moving it), then bounces it off any canvas edge by flipping the sign of that velocity component.
  4. attract() calculates the vector from the particle toward the mouse, limits its strength to 0.05, and adds it to the particle's velocity—pulling it toward the cursor without yanking it there instantly.
  5. The velocity is then capped at a maximum of 4 pixels per frame so particles don't accelerate uncontrollably.
  6. Finally, display() draws the particle as a semi-transparent colored ellipse at its current position, and the loop repeats 60 times per second to create smooth animation.

🎓 Concepts You'll Learn

Object-oriented programming with classesp5.Vector and vector mathAttraction and force simulationParticle systemsCollision detection with canvas boundariesReal-time user interactionThe draw loop and animation

📝 Code Breakdown

setup()

setup() runs once when the sketch starts. It is the perfect place to initialize your canvas and create all the objects your animation will use. The loop here demonstrates a common pattern: repeat an action N times and store the results in an array.

function setup() {
  createCanvas(windowWidth, windowHeight);
  for (let i = 0; i < 100; i++) {
    particles.push(new Particle(random(width), random(height)));
  }
}
Line-by-line explanation (3 lines)

🔧 Subcomponents:

for-loop Particle initialization loop for (let i = 0; i < 100; i++) {

Creates 100 Particle objects at random positions and adds them to the particles array

createCanvas(windowWidth, windowHeight);
Creates a canvas that fills the entire browser window—windowWidth and windowHeight are p5.js variables that update if the user resizes the browser
for (let i = 0; i < 100; i++) {
Loops 100 times, once for each particle you want to create
particles.push(new Particle(random(width), random(height)));
Creates a new Particle object with a random starting position (somewhere on the canvas) and adds it to the particles array using push()
draw()

draw() is the heart of every p5.js animation. It runs 60 times per second and should contain all the code that changes what the viewer sees. The semi-transparent background() creates a 'fade trail' effect—instead of fully erasing the canvas each frame, you partially erase it, so recent motion leaves a ghostly trail.

🔬 This loop calls three methods on every particle. What happens if you comment out the attract() line so particles no longer chase the mouse? Try it and see how they behave differently.

  for (let p of particles) {
    p.update();
    p.display();
    p.attract(mouseX, mouseY);
  }
function draw() {
  background(20, 20, 30, 25);
  
  for (let p of particles) {
    p.update();
    p.display();
    p.attract(mouseX, mouseY);
  }
}
Line-by-line explanation (5 lines)

🔧 Subcomponents:

for-loop Particle update loop for (let p of particles) {

Iterates through every particle in the array and calls its three core methods in order

background(20, 20, 30, 25);
Fills the canvas with a dark blue-purple color. The fourth argument (25) is the alpha/transparency—it's semi-transparent, so the previous frame shows through slightly, creating a motion trail effect
for (let p of particles) {
Uses a for-of loop to iterate through every particle in the particles array. 'p' is a shorthand variable for each Particle object as the loop goes through them
p.update();
Calls the update() method on the current particle, which moves it and bounces it off canvas edges
p.display();
Calls the display() method to draw the particle as a colored ellipse at its current position
p.attract(mouseX, mouseY);
Calls the attract() method to pull the particle toward the mouse cursor by adding an attraction force to its velocity

Particle (class)

In p5.js, a class is a blueprint for creating objects that all behave the same way but have their own properties. This Particle class defines what every particle knows about itself (position, velocity, size, color) and what it can do (attract, update, display). Instead of writing the same update code 100 times, you write it once in a method and call it on every particle.

class Particle {
  constructor(x, y) {
    this.pos = createVector(x, y);
    this.vel = createVector(random(-1, 1), random(-1, 1));
    this.size = random(3, 8);
    this.color = color(random(150, 255), random(100, 200), random(200, 255), 150);
  }
  
  attract(tx, ty) {
    let target = createVector(tx, ty);
    let force = p5.Vector.sub(target, this.pos);
    force.setMag(0.05);
    this.vel.add(force);
    this.vel.limit(4);
  }
  
  update() {
    this.pos.add(this.vel);
    if (this.pos.x < 0 || this.pos.x > width) this.vel.x *= -1;
    if (this.pos.y < 0 || this.pos.y > height) this.vel.y *= -1;
  }
  
  display() {
    noStroke();
    fill(this.color);
    ellipse(this.pos.x, this.pos.y, this.size);
  }
}

constructor(x, y)

The constructor() method runs once for each new Particle, initializing all of its properties. Think of it as the 'birth' of a particle—this is where you set its starting position, velocity, size, and color. All subsequent methods (update, display, attract) read and modify these properties.

🔬 This line randomizes the particle colors. What happens if you change the red range from (150, 255) to (0, 255) so particles can be much redder? Or change the blue range to (0, 100) to remove blue tones entirely?

    this.color = color(random(150, 255), random(100, 200), random(200, 255), 150);
  constructor(x, y) {
    this.pos = createVector(x, y);
    this.vel = createVector(random(-1, 1), random(-1, 1));
    this.size = random(3, 8);
    this.color = color(random(150, 255), random(100, 200), random(200, 255), 150);
  }
Line-by-line explanation (4 lines)
this.pos = createVector(x, y);
Stores the particle's position as a p5.Vector. Vectors are like arrows that point from (0,0) to (x,y)—they make math easier when you need to move things around
this.vel = createVector(random(-1, 1), random(-1, 1));
Creates a random starting velocity (direction and speed of movement). Random values between -1 and 1 mean each particle starts drifting in a random direction at a slow speed
this.size = random(3, 8);
Assigns a random size (diameter) between 3 and 8 pixels so particles look varied and organic, not identical
this.color = color(random(150, 255), random(100, 200), random(200, 255), 150);
Creates a random color by picking random RGB values. The ranges (150-255 red, 100-200 green, 200-255 blue) bias toward bright cyan-blue-purple tones. The 150 is alpha (transparency), making particles semi-translucent

attract(tx, ty)

attract() is where the magic happens. By calculating a vector from the particle to the mouse and adding it to velocity, we create the illusion that the mouse 'pulls' the particles. This is a simplified version of gravity or magnetism. The setMag() and limit() calls keep the behavior stable and visually interesting instead of chaotic.

🔬 This is the core attraction algorithm. What happens if you remove the setMag() line so the force magnitude is never capped? Particles should be pulled toward the mouse much more violently. Try it and watch them cluster tightly at the cursor.

    let force = p5.Vector.sub(target, this.pos);
    force.setMag(0.05);
    this.vel.add(force);
  attract(tx, ty) {
    let target = createVector(tx, ty);
    let force = p5.Vector.sub(target, this.pos);
    force.setMag(0.05);
    this.vel.add(force);
    this.vel.limit(4);
  }
Line-by-line explanation (5 lines)

🔧 Subcomponents:

calculation Direction toward target let force = p5.Vector.sub(target, this.pos);

Calculates the vector from the particle's position to the target (mouse), which points in the direction to move

calculation Force strength cap force.setMag(0.05);

Limits how strong the attraction force is so particles don't snap to the mouse instantly

calculation Apply force to velocity this.vel.add(force);

Adds the attraction force to the particle's velocity, slowly changing its direction toward the mouse

calculation Speed cap this.vel.limit(4);

Prevents particles from speeding up infinitely—caps their maximum speed at 4 pixels per frame

let target = createVector(tx, ty);
Converts the mouse's x,y coordinates (tx, ty) into a vector so you can do math with them
let force = p5.Vector.sub(target, this.pos);
Subtracts the particle's position from the target position to get a vector pointing FROM the particle TOWARD the mouse—this is the direction to accelerate
force.setMag(0.05);
Sets the magnitude (length) of the force vector to 0.05, so the attraction pull is gentle and consistent no matter how far the mouse is
this.vel.add(force);
Adds the attraction force to the particle's velocity. Since velocity is added to position every frame, this makes the particle gradually accelerate toward the mouse
this.vel.limit(4);
Caps the velocity magnitude at 4 so particles can't accelerate endlessly—they eventually reach a maximum speed and stay there

update()

update() is called every frame and handles two things: moving the particle and keeping it inside the canvas. The position update is pure physics (velocity → position change). The bounce logic is collision detection—it detects the particle hitting an edge and reflects it back. This is a simplified version used in many game and animation engines.

🔬 These two lines make particles bounce off walls. What happens if you remove them entirely so particles can leave the canvas? Where will they go?

    if (this.pos.x < 0 || this.pos.x > width) this.vel.x *= -1;
    if (this.pos.y < 0 || this.pos.y > height) this.vel.y *= -1;
  update() {
    this.pos.add(this.vel);
    if (this.pos.x < 0 || this.pos.x > width) this.vel.x *= -1;
    if (this.pos.y < 0 || this.pos.y > height) this.vel.y *= -1;
  }
Line-by-line explanation (3 lines)

🔧 Subcomponents:

calculation Position update this.pos.add(this.vel);

Adds velocity to position each frame, creating smooth animation

conditional Horizontal wall bounce if (this.pos.x < 0 || this.pos.x > width) this.vel.x *= -1;

Bounces the particle off left and right canvas edges

conditional Vertical wall bounce if (this.pos.y < 0 || this.pos.y > height) this.vel.y *= -1;

Bounces the particle off top and bottom canvas edges

this.pos.add(this.vel);
Adds the velocity vector to the position vector. If velocity is (2, 3), this moves the particle 2 pixels right and 3 pixels down—the foundation of animation
if (this.pos.x < 0 || this.pos.x > width) this.vel.x *= -1;
Checks if the particle has left the canvas on the left (x < 0) or right (x > width). If so, multiply its horizontal velocity by -1 to reverse direction and bounce it back
if (this.pos.y < 0 || this.pos.y > height) this.vel.y *= -1;
Same idea as horizontal bounce, but for vertical walls (top at y=0 and bottom at y=height)

display()

display() is a pure drawing function—it reads the particle's current properties (position, color, size) and renders them to the canvas. Notice it doesn't modify any state; it just visualizes what the particle currently is. Separating drawing from logic makes code easier to understand and modify.

  display() {
    noStroke();
    fill(this.color);
    ellipse(this.pos.x, this.pos.y, this.size);
  }
Line-by-line explanation (3 lines)
noStroke();
Tells p5.js not to draw an outline around the ellipse—only fill it with color
fill(this.color);
Sets the fill color to this particle's unique color (which was randomized in the constructor)
ellipse(this.pos.x, this.pos.y, this.size);
Draws a circle (ellipse with equal width and height) at the particle's current position with its stored size as the diameter

windowResized()

windowResized() is a special p5.js function that runs automatically whenever the browser window is resized. By putting resizeCanvas() here, you ensure the sketch stays full-screen even if the viewer stretches their window. This is a best practice for interactive sketches meant to fill the screen.

function windowResized() {
  resizeCanvas(windowWidth, windowHeight);
}
Line-by-line explanation (1 lines)
resizeCanvas(windowWidth, windowHeight);
Automatically resizes the canvas if the user resizes their browser window, so the sketch always fills the screen

📦 Key Variables

particles array

Stores all 100 Particle objects. The draw loop iterates through this array every frame to update and display each particle.

let particles = [];
this.pos p5.Vector

Stores each particle's x,y position on the canvas as a vector

this.pos = createVector(x, y);
this.vel p5.Vector

Stores each particle's horizontal and vertical velocity (speed and direction of movement)

this.vel = createVector(random(-1, 1), random(-1, 1));
this.size number

Stores the diameter of the particle's ellipse in pixels—randomized between 3 and 8 for visual variety

this.size = random(3, 8);
this.color p5.Color

Stores the particle's RGBA color value—randomized in the constructor to create a colorful swarm

this.color = color(random(150, 255), random(100, 200), random(200, 255), 150);

🔧 Potential Improvements (4)

Here are some ways this code could be enhanced:

BUG update() collision detection

Particles can get stuck or pass through walls if velocity is high enough, because the collision check only looks at the current frame's position, not the distance traveled

💡 Use the particle's radius in the boundary check: if (this.pos.x - this.size/2 < 0 || this.pos.x + this.size/2 > width)

PERFORMANCE draw() loop

Calling p.update(), p.display(), and p.attract() in sequence means three function calls per particle per frame; with 100 particles, that's 300 calls/frame. The methods are simple but the overhead adds up on slower devices

💡 For better performance on large particle counts, consider batching updates and draws: update all particles first, then display all particles, rather than alternating per particle

STYLE attract() method

Magic numbers (0.05 for attraction strength, 4 for max speed) are hard-coded and not easily adjustable without editing the source

💡 Move these to global constants at the top of the sketch: const ATTRACTION_FORCE = 0.05; const MAX_SPEED = 4; This makes tuning easier and code more readable

FEATURE Particle class

All particles are always attracted to the mouse—there is no way to toggle this behavior or use different attraction targets

💡 Add a boolean flag like this.attracted = true to each particle, or pass an optional parameter to attract() so you can create inactive particles or particles attracted to different points

🔄 Code Flow

Code flow showing setup, draw, particle, constructor, attract, update, display, windowresized

💡 Click on function names in the diagram to jump to their code

graph TD start[Start] --> setup[setup] setup --> draw[draw loop] draw --> particle-loop1[particle-loop] particle-loop1 --> particle-loop2[particle-loop] particle-loop2 --> vector-subtraction[vector-subtraction] vector-subtraction --> magnitude-set[magnitude-set] magnitude-set --> velocity-add[velocity-add] velocity-add --> velocity-limit[velocity-limit] velocity-limit --> position-update[position-update] position-update --> horizontal-bounce[horizontal-bounce] horizontal-bounce --> vertical-bounce[vertical-bounce] vertical-bounce --> draw click setup href "#fn-setup" click draw href "#fn-draw" click particle-loop1 href "#sub-particle-loop" click particle-loop2 href "#sub-particle-loop" click vector-subtraction href "#sub-vector-subtraction" click magnitude-set href "#sub-magnitude-set" click velocity-add href "#sub-velocity-add" click velocity-limit href "#sub-velocity-limit" click position-update href "#sub-position-update" click horizontal-bounce href "#sub-horizontal-bounce" click vertical-bounce href "#sub-vertical-bounce"

❓ Frequently Asked Questions

What visual experience does the Particle System sketch provide?

The sketch creates a dynamic visual display of colorful, floating particles that move across the canvas and react to the mouse position.

How can users interact with the Particle System sketch?

Users can interact by moving their mouse around the canvas, which causes the particles to attract towards the cursor, creating an engaging and responsive effect.

What creative coding concepts are showcased in this Particle System sketch?

This sketch demonstrates concepts such as particle physics, vector manipulation, and responsive design, highlighting the interaction between particles and user input.

Preview

Particle System - p5.js creative coding sketch preview
Sketch Preview
Code flow diagram showing the structure of Particle System - Code flow showing setup, draw, particle, constructor, attract, update, display, windowresized
Code Flow Diagram