
Particle System with crazy meterđź« 

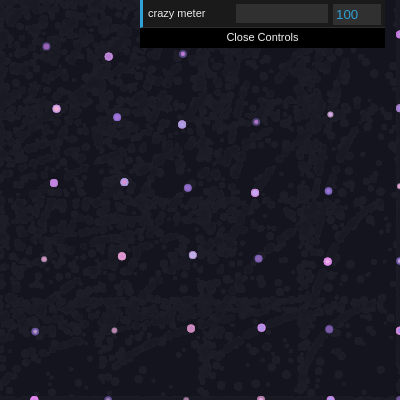
This sketch creates a swarm of glowing pastel particles that float across a dark canvas and wrap around its edges. Moving your mouse pulls them into chaotic motion, and the "crazy meter" slider controls their maximum speed and attraction strength.

đź§Ş Try This!

Experiment with the code by making these changes:

  1. Make particles much faster — The crazy meter slider currently goes up to an absurdly high number - change the max value to something reasonable like 500 so you can actually use the slider
  2. Create a denser swarm — Spawn 500 particles instead of 100 for a much fuller, more chaotic effect
  3. Make trails vanish instantly — Increase the background's alpha from 25 to 255 to completely erase the canvas each frame instead of fading trails
  4. Swap to warmer colors — Change the particle color range from cool pastels to warm pastels by adjusting the RGB values in the constructor
Prefer the full editor? Open it there →

đź“– About This Sketch

This sketch creates an endless swarm of glowing pastel particles that drift across a dark canvas, leaving soft ghostly trails as they wrap around screen edges. It combines several essential p5.js techniques: vector math for particle movement, the p5.Vector library for forces and velocity, mouse interaction to attract particles, and dat.gui to expose real-time controls that dramatically change the behavior. Moving your mouse pulls particles toward it, and cranking the "crazy meter" slider sends them into wild, swirling motion.

The code is organized around a Particle class that encapsulates each particle's position, velocity, size, and color. The setup() function creates 100 particles and initializes the dat.gui control panel, while draw() updates every particle and draws them every frame. By reading this sketch, you will learn how to build interactive parameter controls, use vectors to calculate forces and attraction, and structure object-oriented code with ES6 classes.

⚙️ How It Works

  1. When the sketch loads, setup() creates a canvas the size of the browser window and builds a dat.gui panel with one slider called "crazy meter" that controls particleSpeed. It then creates 100 Particle objects at random positions with random velocities.
  2. Every frame, draw() clears the background with a semi-transparent dark color to create trailing ghost effects, then loops through all particles and calls update(), display(), and attract() on each one.
  3. Each particle's update() method adds its velocity to its position to move it, then wraps the particle to the opposite side of the canvas if it goes out of bounds (instead of bouncing back).
  4. Each particle's display() method draws the particle as a small colored ellipse at its current position.
  5. Each particle's attract() method calculates a force vector pointing from the particle toward the mouse cursor, limits that force to a constant magnitude, and adds it to the particle's velocity - pulling it toward the mouse.
  6. The particle's velocity is then limited to the "crazy meter" value, so sliding the meter higher allows particles to move faster and respond more dramatically to mouse attraction.

🎓 Concepts You'll Learn

Vector math and forcesParticle systemsMouse interactiondat.gui parameter controlsES6 classesAnimation loopsCanvas wrappingSemi-transparent backgrounds for trails

📝 Code Breakdown

setup()

setup() runs once when the sketch starts. It is the ideal place to initialize your canvas, build UI controls with libraries like dat.gui, and spawn objects that will be animated in the draw loop.

function setup() {
  createCanvas(windowWidth, windowHeight);
  
  // Create dat.gui
  gui = new dat.GUI();
  gui.add(settings, 'particleSpeed', 1, 10000000000000000000000000000000000000000000000000000000000000000000000000000000000000000000000000000000000000000000000000000000000000000000000000000000000000000000000000000000000000000000000000000000000000000000000000000000000000000000000000000000000000000000000000000000000000000000000000000000000000000000000000000000000000000000
).name('crazy meter');

  for (let i = 0; i < 100; i++) {
    particles.push(new Particle(random(width), random(height)));
  }
}
Line-by-line explanation (5 lines)

đź”§ Subcomponents:

calculation Canvas Setup createCanvas(windowWidth, windowHeight);

Creates a canvas that fills the entire browser window

calculation dat.gui Initialization gui = new dat.GUI();

Creates a control panel that will hold interactive sliders

calculation Crazy Meter Slider gui.add(settings, 'particleSpeed', 1, 10000000000000000000000000000000000000000000000000000000000000000000000000000000000000000000000000000000000000000000000000000000000000000000000000000000000000000000000000000000000000000000000000000000000000000000000000000000000000000000000000000000000000000000000000000000000000000000000000000000000000000000000000000000000000000000 ).name('crazy meter');

Adds a slider to control particleSpeed between 1 and a huge number, labeled 'crazy meter'

for-loop Create 100 Particles for (let i = 0; i < 100; i++) { particles.push(new Particle(random(width), random(height))); }

Spawns 100 Particle objects at random positions across the canvas

createCanvas(windowWidth, windowHeight);
Creates a canvas as wide and tall as the browser window, so the sketch fills the entire screen
gui = new dat.GUI();
Initializes the dat.gui library, which creates an interactive control panel in the top-right corner
gui.add(settings, 'particleSpeed', 1, 10000000000000000000000000000000000000000000000000000000000000000000000000000000000000000000000000000000000000000000000000000000000000000000000000000000000000000000000000000000000000000000000000000000000000000000000000000000000000000000000000000000000000000000000000000000000000000000000000000000000000000000000000000000000000000000 ).name('crazy meter');
Adds a slider to the gui panel that controls the 'particleSpeed' property in settings - you can drag the slider to change this number, and it updates in real-time
for (let i = 0; i < 100; i++) {
Starts a loop that will run 100 times, creating 100 particles
particles.push(new Particle(random(width), random(height)));
Creates a new Particle at a random x and y position, and adds it to the particles array
draw()

draw() runs 60 times per second, creating animation. The semi-transparent background is the key to the ghostly trails - instead of erasing the canvas completely, it fades away slowly, layering frames on top of each other.

🔬 What happens if you comment out the p.attract(mouseX, mouseY) line so particles ignore your mouse? Does the sketch feel less interactive or more meditative?

  for (let p of particles) {
    p.update();
    p.display();
    p.attract(mouseX, mouseY);
  }
function draw() {
  background(20, 20, 30, 25);
  
  for (let p of particles) {
    p.update();
    p.display();
    p.attract(mouseX, mouseY);
  }
}
Line-by-line explanation (5 lines)

đź”§ Subcomponents:

calculation Semi-Transparent Background background(20, 20, 30, 25);

Clears the canvas to a dark blue-gray while keeping 25/255 opacity, creating ghostly motion trails

for-loop Update All Particles for (let p of particles) { p.update(); p.display(); p.attract(mouseX, mouseY); }

Loops through every particle and calls its update, display, and attract methods each frame

background(20, 20, 30, 25);
Fills the canvas with a dark blue-gray color (RGB 20, 20, 30). The fourth number (25) is alpha transparency - it's semi-transparent, so previous frames show through slightly, creating soft trails
for (let p of particles) {
Starts a loop that iterates through each particle in the particles array, assigning each one to the variable 'p'
p.update();
Calls the particle's update() method, which moves it by adding its velocity to its position and wraps it around screen edges
p.display();
Calls the particle's display() method, which draws the particle as a colored ellipse on the canvas
p.attract(mouseX, mouseY);
Calls the particle's attract() method with the current mouse position, pulling the particle toward wherever your cursor is

Particle class

The Particle class encapsulates all the data and behavior of a single particle. Creating a class makes the code reusable and organized - you can create as many particles as you want without duplicating logic. The attract() method demonstrates vector math: subtracting positions to find direction, setting magnitude to control strength, and adding forces to velocity for physics-based motion.

🔬 These four lines create the wrapping effect. What if you changed them to bounce the particle instead - for example, this.vel.x *= -1 when hitting an edge? How would the motion feel different?

    if (this.pos.x < 0) this.pos.x = width;
    if (this.pos.x > width) this.pos.x = 0;
    if (this.pos.y < 0) this.pos.y = height;
    if (this.pos.y > height) this.pos.y = 0;
class Particle {
  constructor(x, y) {
    this.pos = createVector(x, y);
    this.vel = createVector(random(-1, 1), random(-1, 1));
    this.vel.setMag(settings.particleSpeed); // Use GUI speed for initial magnitude
    this.size = random(3, 8);
    this.color = color(random(150, 255), random(100, 200), random(200, 255), 150);
  }
  
  attract(tx, ty) {
    let target = createVector(tx, ty);
    let force = p5.Vector.sub(target, this.pos);
    force.setMag(5); // Keep acceleration force, but limit max speed
    this.vel.add(force);
    this.vel.limit(settings.particleSpeed); // Use GUI speed as max speed limit
  }
  
  update() {
    this.pos.add(this.vel);
    // Wrap around canvas edges instead of bouncing
    if (this.pos.x < 0) this.pos.x = width;
    if (this.pos.x > width) this.pos.x = 0;
    if (this.pos.y < 0) this.pos.y = height;
    if (this.pos.y > height) this.pos.y = 0;
  }
  
  display() {
    noStroke();
    fill(this.color);
    ellipse(this.pos.x, this.pos.y, this.size);
  }
}
Line-by-line explanation (19 lines)

đź”§ Subcomponents:

calculation Particle Constructor constructor(x, y) { this.pos = createVector(x, y); this.vel = createVector(random(-1, 1), random(-1, 1)); this.vel.setMag(settings.particleSpeed); this.size = random(3, 8); this.color = color(random(150, 255), random(100, 200), random(200, 255), 150); }

Initializes a new particle with a position, random velocity direction, random size, and random pastel color

calculation Attraction to Mouse attract(tx, ty) { let target = createVector(tx, ty); let force = p5.Vector.sub(target, this.pos); force.setMag(5); this.vel.add(force); this.vel.limit(settings.particleSpeed); }

Calculates a force vector pointing from the particle toward the mouse and adds it to velocity, capping speed at the crazy meter value

calculation Position Update and Wrapping update() { this.pos.add(this.vel); if (this.pos.x < 0) this.pos.x = width; if (this.pos.x > width) this.pos.x = 0; if (this.pos.y < 0) this.pos.y = height; if (this.pos.y > height) this.pos.y = 0; }

Moves the particle by its velocity and wraps it to the opposite side of the canvas if it exits

calculation Draw Particle display() { noStroke(); fill(this.color); ellipse(this.pos.x, this.pos.y, this.size); }

Draws the particle as a filled, strokeless ellipse at its current position

constructor(x, y) {
Defines the constructor method that runs when a new Particle is created - it receives x and y position parameters
this.pos = createVector(x, y);
Creates a p5.Vector to store the particle's position using the x and y parameters passed in
this.vel = createVector(random(-1, 1), random(-1, 1));
Creates a p5.Vector with random x and y values between -1 and 1 - this will be the particle's velocity direction
this.vel.setMag(settings.particleSpeed);
Uses setMag() to set the velocity vector's length (magnitude) to match the crazy meter slider value, so all particles move at the same speed initially
this.size = random(3, 8);
Assigns a random size between 3 and 8 pixels to this particle, so they are not all identical
this.color = color(random(150, 255), random(100, 200), random(200, 255), 150);
Creates a random pastel color by picking RGB values in the 100-255 range (avoiding very dark colors), with alpha 150 for semi-transparency
let target = createVector(tx, ty);
Creates a vector representing the target position (the mouse cursor)
let force = p5.Vector.sub(target, this.pos);
Subtracts the particle's position from the target position, creating a vector that points from the particle toward the mouse
force.setMag(5);
Sets the magnitude of the force to a constant 5, so the pull strength is always the same regardless of distance from the mouse
this.vel.add(force);
Adds the force vector to the particle's velocity, accelerating it toward the mouse
this.vel.limit(settings.particleSpeed);
Caps the particle's velocity to the crazy meter value so it cannot go faster than that limit, preventing chaotic speeds
this.pos.add(this.vel);
Adds the velocity vector to the position vector, moving the particle by one step in its current direction
if (this.pos.x < 0) this.pos.x = width;
If the particle moves off the left edge of the canvas, teleport it to the right edge, creating a seamless wrap effect
if (this.pos.x > width) this.pos.x = 0;
If the particle moves off the right edge, teleport it to the left edge
if (this.pos.y < 0) this.pos.y = height;
If the particle moves off the top edge, teleport it to the bottom edge
if (this.pos.y > height) this.pos.y = 0;
If the particle moves off the bottom edge, teleport it to the top edge
noStroke();
Disables the outline of shapes, so the particles will be solid colored circles without borders
fill(this.color);
Sets the fill color to this particle's unique pastel color
ellipse(this.pos.x, this.pos.y, this.size);
Draws an ellipse (circle) at the particle's current position with its assigned size

windowResized()

windowResized() is a p5.js lifecycle function that fires whenever the window is resized. Without it, the canvas would stay at its original size and not adapt to a smaller or larger browser window. It's essential for responsive sketches.

function windowResized() {
  resizeCanvas(windowWidth, windowHeight);
}
Line-by-line explanation (2 lines)
function windowResized() {
This special p5.js function is called automatically whenever the browser window is resized
resizeCanvas(windowWidth, windowHeight);
Updates the canvas size to match the new window dimensions, keeping the sketch responsive as you resize the browser

📦 Key Variables

particles array

Stores all the Particle objects in the sketch - each element is one particle that gets updated and drawn every frame

let particles = [];
gui object

Holds the dat.gui control panel instance, which lets you create interactive sliders and controls

let gui;
settings object

An object that stores configuration values controlled by the gui - currently just particleSpeed, but you can add more properties here

let settings = { particleSpeed: 100 };
particleSpeed number

The maximum speed particles can move, controlled by the crazy meter slider - higher values make particles move faster and respond more dramatically to mouse attraction

particleSpeed: 100

đź”§ Potential Improvements (4)

Here are some ways this code could be enhanced:

BUG setup() - gui slider range

The crazy meter slider has an insanely large max value (a number with hundreds of digits), making it impossible to use - the slider becomes non-functional

đź’ˇ Change the max value to something reasonable like 500: gui.add(settings, 'particleSpeed', 1, 500).name('crazy meter');

PERFORMANCE Particle.attract()

Creating new vectors (target and force) every frame for every particle is wasteful - this allocates memory 6000 times per second with 100 particles

đź’ˇ Reuse a single p5.Vector or simplify the calculation to avoid creating temporary objects inside the method

STYLE Particle constructor

Random pastel colors are generated once at creation - particles born at the same time will have very similar colors, creating visual clustering

đź’ˇ Consider regenerating colors each frame in display() or using HSL colorMode for more varied hues across the spectrum

FEATURE dat.gui controls

Only one slider exists (crazy meter) - there are other fun parameters buried in the code that should be exposed to the GUI

đź’ˇ Add sliders for: particleSize, attractionStrength (the 5 in force.setMag), trailLength (background alpha), and number of particles so users can explore without editing code

🔄 Code Flow

Code flow showing setup, draw, particle, windowresized

đź’ˇ Click on function names in the diagram to jump to their code

graph TD start[Start] --> setup[setup] setup --> canvas-creation[Canvas Setup] setup --> gui-creation[dat.gui Initialization] gui-creation --> gui-slider[Crazy Meter Slider] setup --> particle-initialization[Create 100 Particles] setup --> draw[draw loop] click setup href "#fn-setup" click canvas-creation href "#sub-canvas-creation" click gui-creation href "#sub-gui-creation" click gui-slider href "#sub-gui-slider" click particle-initialization href "#sub-particle-initialization" click draw href "#fn-draw" draw --> background-clear[Semi-Transparent Background] draw --> particle-loop[Update All Particles] particle-loop --> constructor[Particle Constructor] particle-loop --> attract-method[Attraction to Mouse] particle-loop --> update-method[Position Update and Wrapping] particle-loop --> display-method[Draw Particle] click background-clear href "#sub-background-clear" click particle-loop href "#sub-particle-loop" click constructor href "#sub-constructor" click attract-method href "#sub-attract-method" click update-method href "#sub-update-method" click display-method href "#sub-display-method" windowresized[windowResized] --> setup click windowresized href "#fn-windowresized"

âť“ Frequently Asked Questions

What visual effects can I expect from the Particle System with crazy meter sketch?

This sketch creates a mesmerizing display of glowing pastel particles that stream across a dark canvas, leaving soft, ghostly trails as they wrap around the screen.

How can I interact with the Particle System in this creative coding sketch?

Users can move their mouse to influence the particles' motion and adjust the 'crazy meter' using a GUI slider to increase the particles' speed and create wild swirling effects.

What creative coding concepts does this p5.js sketch demonstrate?

This sketch showcases particle systems, including concepts like particle attraction, velocity manipulation, and wrapping behavior at canvas edges.

Preview

Particle System with crazy meterđź«  - p5.js creative coding sketch preview
Sketch Preview
Code flow diagram showing the structure of Particle System with crazy meterđź«  - Code flow showing setup, draw, particle, windowresized
Code Flow Diagram
