
Particle System with crazy meter 2

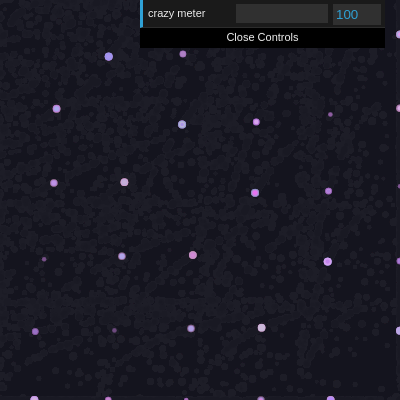
This sketch creates a swarm of glowing particles that drift across a dark canvas and are magnetically attracted to your mouse. A dat.gui slider labeled "crazy meter" lets you control the particle speed from calm and slow to wild and chaotic.

🧪 Try This!

Experiment with the code by making these changes:

  1. Double the number of particles — More particles create a denser, more visually impressive swarm that fills the screen faster when you move the mouse
  2. Make particles chase the cursor more aggressively — Increasing the attraction force makes particles respond immediately and dramatically to mouse movement, creating a tighter, more reactive swarm
  3. Create longer, more visible motion trails — Lowering the background's alpha value makes the canvas clear slower, leaving ghostly trails that linger longer as particles move
  4. Make particles bigger and more visible — Particles are sized between 3 and 8 on creation—increasing this range makes them more prominent on screen
Prefer the full editor? Open it there →

📖 About This Sketch

This sketch animates a swarm of 100 glowing particles that are drawn to your mouse cursor like a magnetic storm. The particles wrap around canvas edges instead of bouncing, creating a seamless flow across the screen. The sketch uses three core p5.js techniques: the p5.Vector class for physics calculations, a custom Particle class to manage each individual particle, and the dat.gui library to add an interactive slider that controls particle speed in real time.

The code is organized into a setup() function that initializes the canvas and particle array, a draw() loop that updates and displays all particles every frame, and a Particle class with methods for attraction, movement, and rendering. By studying it you will learn how to build a reusable particle class, use vector forces to simulate attraction, and integrate an external GUI library into a p5.js sketch for live parameter tuning.

⚙️ How It Works

  1. When the sketch loads, setup() creates a full-window canvas, initializes a dat.gui interface with a "crazy meter" slider, and spawns 100 particles at random positions with random velocities.
  2. Every frame, draw() clears the background with a semi-transparent dark color so particle trails fade over time.
  3. For each particle, update() moves it by its velocity and wraps it around canvas edges, attract() calculates a force vector pointing toward the mouse and accelerates the particle in that direction (limited by the current speed from the slider), and display() draws a colored ellipse at the particle's position.
  4. The dat.gui slider continuously updates the particleSpeed value, which controls both the initial magnitude of each particle's velocity and the maximum speed limit—turning the slider makes particles chase the mouse faster and more aggressively.
  5. Particle colors are randomly assigned on creation and remain fixed, while the semi-transparent background creates a glowing trail effect as particles move.

🎓 Concepts You'll Learn

Particle systemsVector physicsObject-oriented programmingMouse interactionGUI integrationCanvas wrappingClass methodsVector forces

📝 Code Breakdown

setup()

setup() runs once when the sketch starts. It is the perfect place to initialize your canvas, create GUI controls, and spawn objects that populate the rest of your sketch.

🔬 This loop creates all the particles at startup. What happens if you change 100 to 10? To 500? How does particle count affect the visual density and smoothness of the swarm?

  for (let i = 0; i < 100; i++) {
    particles.push(new Particle(random(width), random(height)));
  }
function setup() {
  createCanvas(windowWidth, windowHeight);
  
  // Create dat.gui
  gui = new dat.GUI();
  gui.add(settings, 'particleSpeed', 1, 10000000000000000000000000000000000000000000000000000000000000000000000000000000000000000000000000000000000000000000000000000000000000000000000000000000000000000000000000000000000000000000000000000000000000000000000000000000000000000000000000000000000000000000000000000000000
).name('crazy meter');

  for (let i = 0; i < 100; i++) {
    particles.push(new Particle(random(width), random(height)));
  }
}
Line-by-line explanation (5 lines)

🔧 Subcomponents:

function-call Canvas Setup createCanvas(windowWidth, windowHeight);

Creates a canvas that fills the entire browser window

calculation GUI Initialization gui = new dat.GUI();

Instantiates the dat.gui interface for interactive controls

function-call Crazy Meter Slider gui.add(settings, 'particleSpeed', 1, 10000000000000000000000000000000000000000000000000000000000000000000000000000000000000000000000000000000000000000000000000000000000000000000000000000000000000000000000000000000000000000000000000000000000000000000000000000000000000000000000000000000000000000000000000000000000 ).name('crazy meter');

Creates an interactive slider that controls the particleSpeed setting

for-loop Particle Spawning Loop for (let i = 0; i < 100; i++) { particles.push(new Particle(random(width), random(height))); }

Creates 100 particles at random locations and adds them to the particles array

createCanvas(windowWidth, windowHeight);
Creates a canvas sized to fill the entire browser window, making the particle system responsive to window size
gui = new dat.GUI();
Creates a new dat.gui interface object that will hold interactive controls like the crazy meter slider
gui.add(settings, 'particleSpeed', 1, 10000000000000000000000000000000000000000000000000000000000000000000000000000000000000000000000000000000000000000000000000000000000000000000000000000000000000000000000000000000000000000000000000000000000000000000000000000000000000000000000000000000000000000000000000000000000 ).name('crazy meter');
Adds a slider to the GUI that controls settings.particleSpeed from 1 to an extremely large max value, labeled 'crazy meter'—note the max is intentionally huge to allow dramatic speed increases
for (let i = 0; i < 100; i++) {
Starts a loop that will run 100 times to create 100 particles
particles.push(new Particle(random(width), random(height)));
Creates a new Particle at a random x,y position on the canvas and adds it to the particles array
draw()

draw() is called 60 times per second by p5.js. This is where you update all state and redraw everything. The semi-transparent background creates the motion blur effect that makes trails visible.

🔬 This loop is the heartbeat of the animation—it updates, draws, and attracts every particle each frame. What happens if you swap the order and call attract() BEFORE update()? Does the order matter for the visual effect?

  for (let p of particles) {
    p.update();
    p.display();
    p.attract(mouseX, mouseY);
  }
function draw() {
  background(20, 20, 30, 25);
  
  for (let p of particles) {
    p.update();
    p.display();
    p.attract(mouseX, mouseY);
  }
}
Line-by-line explanation (5 lines)

🔧 Subcomponents:

function-call Semi-Transparent Background background(20, 20, 30, 25);

Clears the canvas with a dark, slightly transparent color, creating glowing particle trails

for-loop Particle Update Loop for (let p of particles) { p.update(); p.display(); p.attract(mouseX, mouseY); }

Iterates through every particle and calls update, display, and attract methods

background(20, 20, 30, 25);
Fills the canvas with a dark blue-gray color (RGB: 20, 20, 30) with alpha 25, making it semi-transparent so old particle positions remain slightly visible, creating motion trails
for (let p of particles) {
A for-of loop that iterates through each Particle object in the particles array, storing the current particle in variable p
p.update();
Calls the update method on the current particle, which moves it based on velocity and wraps it around canvas edges
p.display();
Calls the display method on the current particle, which draws it as a colored ellipse at its current position
p.attract(mouseX, mouseY);
Calls the attract method on the current particle, passing the mouse coordinates to pull the particle toward the cursor

attract(tx, ty)

The attract() method uses vector subtraction and magnitude to create a simple force-based physics system. The speed limit ensures particles don't escape control, while the fixed force magnitude keeps the attraction consistent across any distance.

🔬 These three lines calculate the pull toward the mouse. If you change setMag(5) to setMag(20), how will the swarm's behavior change? Try it and watch whether particles respond more or less aggressively to the mouse.

    let target = createVector(tx, ty);
    let force = p5.Vector.sub(target, this.pos);
    force.setMag(5);
  attract(tx, ty) {
    let target = createVector(tx, ty);
    let force = p5.Vector.sub(target, this.pos);
    force.setMag(5); // Keep acceleration force, but limit max speed
    this.vel.add(force);
    this.vel.limit(settings.particleSpeed); // Use GUI speed as max speed limit
  }
Line-by-line explanation (5 lines)

🔧 Subcomponents:

calculation Target Vector Creation let target = createVector(tx, ty);

Creates a vector representing the mouse position

calculation Force Vector Calculation let force = p5.Vector.sub(target, this.pos);

Subtracts the particle's position from the target position to get a vector pointing from particle to mouse

function-call Force Magnitude Setting force.setMag(5);

Sets the force vector's magnitude to exactly 5, normalizing its strength regardless of distance

calculation Velocity Update this.vel.add(force);

Adds the force vector to the particle's velocity, accelerating it toward the mouse

function-call Speed Limiter this.vel.limit(settings.particleSpeed);

Caps the particle's velocity magnitude at the current particleSpeed value from the slider

let target = createVector(tx, ty);
Creates a p5.Vector object representing the mouse's x,y coordinates passed in as tx and ty
let force = p5.Vector.sub(target, this.pos);
Calculates a new vector by subtracting this particle's position from the target (mouse) position, producing a vector that points from the particle toward the mouse
force.setMag(5);
Normalizes the force vector to have a magnitude (length) of exactly 5, so particles are always pulled with the same strength regardless of how far they are from the mouse
this.vel.add(force);
Adds the force vector to the particle's velocity vector, accelerating it toward the mouse
this.vel.limit(settings.particleSpeed);
Caps the particle's velocity magnitude at the current particleSpeed value from the crazy meter slider—this prevents particles from accelerating infinitely

update()

update() is called every frame and is responsible for moving the particle based on its velocity and handling boundary conditions. Wrapping around edges creates a seamless, toroidal space—useful for swarms and continuous motion.

🔬 These four lines wrap particles around edges instead of bouncing. What happens if you replace these with bounce code like 'if (this.pos.x < 0) this.vel.x *= -1'? Try bouncing and compare it to wrapping—which feels more natural for a swarm?

    if (this.pos.x < 0) this.pos.x = width;
    if (this.pos.x > width) this.pos.x = 0;
    if (this.pos.y < 0) this.pos.y = height;
    if (this.pos.y > height) this.pos.y = 0;
  update() {
    this.pos.add(this.vel);
    // Wrap around canvas edges instead of bouncing
    if (this.pos.x < 0) this.pos.x = width;
    if (this.pos.x > width) this.pos.x = 0;
    if (this.pos.y < 0) this.pos.y = height;
    if (this.pos.y > height) this.pos.y = 0;
  }
Line-by-line explanation (5 lines)

🔧 Subcomponents:

calculation Position Update this.pos.add(this.vel);

Adds the velocity vector to the position vector, moving the particle

conditional Horizontal Edge Wrapping if (this.pos.x < 0) this.pos.x = width; if (this.pos.x > width) this.pos.x = 0;

Teleports the particle to the opposite side when it exits left or right edges

conditional Vertical Edge Wrapping if (this.pos.y < 0) this.pos.y = height; if (this.pos.y > height) this.pos.y = 0;

Teleports the particle to the opposite side when it exits top or bottom edges

this.pos.add(this.vel);
Adds the particle's velocity vector to its position vector, moving it by a small amount each frame
if (this.pos.x < 0) this.pos.x = width;
If the particle moves past the left edge (x < 0), teleport it to the right edge (x = width)
if (this.pos.x > width) this.pos.x = 0;
If the particle moves past the right edge (x > width), teleport it to the left edge (x = 0)
if (this.pos.y < 0) this.pos.y = height;
If the particle moves past the top edge (y < 0), teleport it to the bottom edge (y = height)
if (this.pos.y > height) this.pos.y = 0;
If the particle moves past the bottom edge (y > height), teleport it to the top edge (y = 0)

display()

display() is called every frame to render the particle. It uses the particle's stored position, color, and size properties to draw itself on the canvas.

  display() {
    noStroke();
    fill(this.color);
    ellipse(this.pos.x, this.pos.y, this.size);
  }
Line-by-line explanation (3 lines)

🔧 Subcomponents:

function-call Disable Outline noStroke();

Turns off the stroke/outline so ellipses are filled only

function-call Set Fill Color fill(this.color);

Sets the fill color to this particle's pre-assigned color

function-call Draw Ellipse ellipse(this.pos.x, this.pos.y, this.size);

Draws a circle at the particle's current position with its assigned size

noStroke();
Disables the stroke (outline) for shapes, so only the fill color is visible
fill(this.color);
Sets the fill color to this particle's color, which was randomly assigned during construction
ellipse(this.pos.x, this.pos.y, this.size);
Draws an ellipse centered at the particle's x,y position with a diameter equal to this.size (which was randomly set between 3 and 8)

windowResized()

windowResized() is a special p5.js function that gets called whenever the browser window is resized. Implement it to keep your canvas responsive to window size changes.

function windowResized() {
  resizeCanvas(windowWidth, windowHeight);
}
Line-by-line explanation (1 lines)

🔧 Subcomponents:

function-call Canvas Resize resizeCanvas(windowWidth, windowHeight);

Resizes the canvas to match the current window dimensions

resizeCanvas(windowWidth, windowHeight);
Automatically resizes the p5.js canvas when the browser window is resized, ensuring particles stay visible and bounds checking works correctly

📦 Key Variables

particles array

Stores all Particle objects created in setup()—the array is iterated in draw() to update and display each particle

let particles = [];
gui object

Holds the dat.gui interface object, which manages interactive controls like the crazy meter slider

let gui;
settings object

An object with properties like particleSpeed that are controlled by the dat.gui sliders and used by particles

let settings = { particleSpeed: 100 };

🔧 Potential Improvements (4)

Here are some ways this code could be enhanced:

BUG setup() GUI slider max value

The max value for the particleSpeed slider is an absurdly large number (essentially infinity), which can cause particles to move so fast they become invisible or create performance issues. The excessively long number also makes the code hard to read.

💡 Replace the enormous max value with a reasonable number like 500 or 1000: `gui.add(settings, 'particleSpeed', 1, 500).name('crazy meter');` This provides dramatic speed increases while staying within usable performance bounds.

PERFORMANCE draw() background clearing

The semi-transparent background (alpha 25) is redrawn every single frame. On large screens or with many particles, this can be computationally expensive.

💡 Consider reducing the frame rate for slower hardware, or experimenting with a fully opaque background (alpha 255) if trails are not essential to your design. Alternatively, use a graphics buffer (createGraphics) for custom rendering control.

STYLE Particle constructor

The random colors are generated with hardcoded ranges (150-255 for R, 100-200 for G, 200-255 for B) that favor blue-cyan, limiting color variety. The ranges feel arbitrary and make the sketch harder to customize.

💡 Define color ranges as constants or pass them to the Particle constructor. Example: `let color = color(random(200, 255), random(50, 150), random(200, 255), 150);` would shift the palette. Or use a single hue-based approach: `colorMode(HSB); this.color = color(random(180, 270), 100, 200, 150);`

FEATURE Particle class

The sketch has no way for users to reset or clear particles without reloading the page. With the aggressive mouse attraction, particles accumulate and can clutter the canvas.

💡 Add a keyboard handler or GUI button to reset: `if (keyPressed && key === 'r') { particles = []; for (let i = 0; i < 100; i++) particles.push(new Particle(random(width), random(height))); }` Or add a GUI button: `gui.add({reset: () => { particles = []; ... }}, 'reset').name('Clear Particles');`

🔄 Code Flow

Code flow showing setup, draw, attract, update, display, windowresized

💡 Click on function names in the diagram to jump to their code

graph TD start[Start] --> setup[setup] setup --> canvas-creation[Canvas Setup] setup --> gui-creation[GUI Initialization] setup --> slider-creation[Crazy Meter Slider] setup --> particle-spawning[Particle Spawning Loop] setup --> draw[draw loop] click setup href "#fn-setup" click canvas-creation href "#sub-canvas-creation" click gui-creation href "#sub-gui-creation" click slider-creation href "#sub-slider-creation" click particle-spawning href "#sub-particle-spawning" draw --> background-clear[Semi-Transparent Background] draw --> particle-loop[Particle Update Loop] draw --> windowresized[windowResized] click draw href "#fn-draw" click background-clear href "#sub-background-clear" click particle-loop href "#sub-particle-loop" click windowresized href "#fn-windowresized" particle-loop --> target-vector[Target Vector Creation] particle-loop --> force-calculation[Force Vector Calculation] particle-loop --> force-magnitude[Force Magnitude Setting] particle-loop --> velocity-addition[Velocity Update] particle-loop --> speed-limit[Speed Limiter] particle-loop --> position-update[Position Update] particle-loop --> horizontal-wrap[Horizontal Edge Wrapping] particle-loop --> vertical-wrap[Vertical Edge Wrapping] particle-loop --> display[display] click target-vector href "#sub-target-vector" click force-calculation href "#sub-force-calculation" click force-magnitude href "#sub-force-magnitude" click velocity-addition href "#sub-velocity-addition" click speed-limit href "#sub-speed-limit" click position-update href "#sub-position-update" click horizontal-wrap href "#sub-horizontal-wrap" click vertical-wrap href "#sub-vertical-wrap" click display href "#fn-display" display --> no-stroke[Disable Outline] display --> fill-color[Set Fill Color] display --> draw-ellipse[Draw Ellipse] click no-stroke href "#sub-no-stroke" click fill-color href "#sub-fill-color" click draw-ellipse href "#sub-draw-ellipse"

❓ Frequently Asked Questions

What visual experience does the Particle System with crazy meter 2 sketch create?

This sketch generates a dynamic swarm of glowing particles that chase the mouse cursor across a dark canvas, creating a mesmerizing visual effect reminiscent of a magnetic storm.

How can users interact with the Particle System sketch?

Users can interact with the sketch by adjusting the 'crazy meter' slider to control the speed of the particles, ranging from a calm drift to a high-energy chaotic movement.

What creative coding concepts are demonstrated in the Particle System with crazy meter 2 sketch?

The sketch showcases particle systems, mouse interaction, and edge wrapping techniques, allowing particles to simulate attraction and movement in a visually engaging way.

Preview

Particle System with crazy meter 2 - p5.js creative coding sketch preview
Sketch Preview
Code flow diagram showing the structure of Particle System with crazy meter 2 - Code flow showing setup, draw, attract, update, display, windowresized
Code Flow Diagram
