play with your food

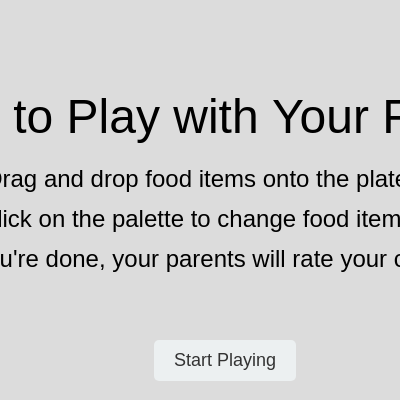
This interactive p5.js sketch lets players drag colorful food items onto a white plate to create edible arrangements. A scoring system judges creativity based on variety, balance, symmetry, and food pairings, then delivers parent-themed feedback on the player's culinary design.

🧪 Try This!

Experiment with the code by making these changes:

  1. Make bigger food items — Increasing foodSize makes all dragged items larger and easier to see, which may change the visible layout of the plate.
  2. Add a new food type — Extending the foodTypes array lets you add a new food (like a tomato) with its own draw function, color, and group. The whole game scales automatically.
  3. Make symmetry more valuable — Increasing the symmetry multiplier rewards carefully balanced, mirrored plate arrangements more generously.
  4. Lower the item limit — Reducing TOO_MANY_ITEMS_THRESHOLD makes the parents scold the player for overcrowding at a lower item count, encouraging minimalism.
  5. Change the plate color — The white fill in drawPlayingScreen() creates the plate—try a different color like cream, pastel, or even a pattern for a different aesthetic.
Prefer the full editor? Open it there →

📖 About This Sketch

This sketch creates a three-screen interactive game where players design a plate of food by dragging colorful items (peas, carrots, crackers, berries, cheese) onto a central white canvas. The game uses mouse interaction, game state management, and a sophisticated scoring engine that rewards variety, balance, symmetry, and smart food pairings. The drawing functions showcase how to create distinct visual styles for each food type using circles, triangles, and rectangles with highlights.

The code is organized into three major sections: the intro screen (static text), the playing screen (interactive plate and food palette with live dragging), and the judging screen (scoring and feedback). By reading it, you will learn how to manage game states with a switch statement, track complex game objects in arrays, detect mouse interactions over specific regions, and build a multi-factor scoring system that evaluates player creativity in real time.

⚙️ How It Works

  1. When the sketch loads, setup() initializes the canvas and button UI, then displays the intro screen with instructions.
  2. Clicking 'Start Playing' switches to the playing state, hiding the start button and revealing the food palette (type buttons) and action buttons (Clear, Done).
  3. As the player drags over the white plate, the mouseDragged() function continuously adds new food objects to the foodItems array, each capturing the mouse position, food type, and color.
  4. The draw loop renders the plate and all placed food items, calling the appropriate drawing function (drawPea, drawCarrot, etc.) for each item based on its type.
  5. When the player clicks 'Done Playing', the game calculates a creativity score using nine weighted factors: variety of foods, food group diversity, balanced ratios, item count, plate coverage, left-right symmetry, complementary food pairings, bonus for using all types, and penalties for overcrowding.
  6. The judging screen displays the final score and parent feedback, and clicking anywhere restarts the game.

🎓 Concepts You'll Learn

Game state management with switch statementsMouse interaction and dragging detectionArray manipulation and object iterationScoring algorithms with multiple weighted factorsCollision detection and proximity checkingCanvas responsiveness with windowResized()Color manipulation with lerpColor()UI element creation and visibility toggling

📝 Code Breakdown

setup()

setup() runs exactly once when the sketch starts. It's the perfect place to initialize canvas dimensions, calculate starting positions, and prepare any UI elements that stay constant throughout the game.

function setup() {
  createCanvas(windowWidth, windowHeight);
  // Tip: Use windowWidth/windowHeight for responsive canvas

  // Initialize plate dimensions
  plateSize = min(width, height) * 0.7;
  plateX = width / 2;
  plateY = height / 2;

  // Create UI buttons
  createUI();
  updateUIVisibility(); // Set initial button visibility
}
Line-by-line explanation (6 lines)
createCanvas(windowWidth, windowHeight);
Creates a full-screen canvas that adapts to the browser window size—this makes the game responsive on different devices
plateSize = min(width, height) * 0.7;
Sets the diameter of the white plate to 70% of the smaller screen dimension, ensuring it scales with the window
plateX = width / 2;
Centers the plate horizontally by positioning its center at the middle of the canvas width
plateY = height / 2;
Centers the plate vertically by positioning its center at the middle of the canvas height
createUI();
Calls a helper function to create all the buttons (Start, Done, Clear, and food type buttons)
updateUIVisibility();
Sets initial visibility state—hides playing buttons and shows only the Start button until the game begins

draw()

draw() is p5.js's game loop—it runs 60 times per second by default. The switch statement is a classic pattern for routing between different screens or game states. Every interactive p5.js sketch uses this structure.

🔬 This switch statement is the game's brain—it picks which screen to show. What happens if you add a new case called 'paused' and call a drawPausedScreen() function? (You'd need to create that function too.)

  switch (gameState) {
    case 'intro':
      drawIntroScreen();
      break;
    case 'playing':
      drawPlayingScreen();
      break;
    case 'judging':
      drawJudgingScreen();
      break;
  }
function draw() {
  background(220); // Light grey background

  switch (gameState) {
    case 'intro':
      drawIntroScreen();
      break;
    case 'playing':
      drawPlayingScreen();
      break;
    case 'judging':
      drawJudgingScreen();
      break;
  }
}
Line-by-line explanation (5 lines)

🔧 Subcomponents:

switch-case Game State Router switch (gameState) {

Routes to the correct screen based on the current game state—one of 'intro', 'playing', or 'judging'

background(220);
Clears the canvas every frame with a light grey color (RGB 220, 220, 220)—this erases the previous frame so you don't see motion trails
switch (gameState) {
Checks the current game state and branches to the appropriate drawing function—this is the central logic that controls what screen the player sees
case 'intro':
If gameState is 'intro', draw the title screen with instructions
case 'playing':
If gameState is 'playing', draw the plate, food items, and interactive palette
case 'judging':
If gameState is 'judging', draw the score and parent feedback message

drawIntroScreen()

This function is called when gameState is 'intro'. It displays the welcome screen with instructions. Notice how all the text is centered using textAlign(CENTER, CENTER)—this is cleaner than calculating offsets manually.

function drawIntroScreen() {
  fill(0);
  textAlign(CENTER, CENTER);
  textSize(48);
  text("Time to Play with Your Food!", width / 2, height / 2 - 80);

  textSize(24);
  text("Drag and drop food items onto the plate.", width / 2, height / 2 - 20);
  text("Click on the palette to change food items.", width / 2, height / 2 + 20);
  text("When you're done, your parents will rate your creativity!", width / 2, height / 2 + 60);
}
Line-by-line explanation (5 lines)
fill(0);
Sets the text color to black (RGB 0, 0, 0) for all text that follows
textAlign(CENTER, CENTER);
Aligns text to the center both horizontally and vertically—this makes positioning cleaner because coordinates point to the text's center rather than its top-left
textSize(48);
Sets the title font size to 48 pixels—larger text for the main heading
text("Time to Play with Your Food!", width / 2, height / 2 - 80);
Draws the title text at the horizontal center (width / 2) and near the top of the screen (height / 2 - 80)
textSize(24);
Reduces font size to 24 pixels for instruction text—half the title size

drawPlayingScreen()

This function is the core playing experience. The plate is static, but the food items are drawn from the array, and a live preview follows the cursor whenever the player drags. The isMouseOverPlate() check ensures food can only be placed inside the circular plate.

🔬 This loop draws every item in the foodItems array. What happens if you add a console.log(item.type) inside the loop? Can you check the browser console to see what food types are being placed?

  // Draw all food items
  for (const item of foodItems) {
    drawFoodItem(item);
  }
function drawPlayingScreen() {
  // Draw the plate
  noStroke();
  fill(255); // White plate
  ellipse(plateX, plateY, plateSize, plateSize);

  // Draw all food items
  for (const item of foodItems) {
    drawFoodItem(item);
  }

  // Draw the current food item at mouse position (if over plate)
  if (isMouseOverPlate() && mouseIsPressed) {
    const tempItem = {
      x: mouseX,
      y: mouseY,
      type: currentFoodType,
      size: foodSize,
      color: currentFoodColor // Current color is determined by food type's default
    };
    drawFoodItem(tempItem);
  }

  // Draw food palette (only type buttons for now as colors are tied to types)
  drawFoodPalette();
}
Line-by-line explanation (7 lines)

🔧 Subcomponents:

calculation Plate Drawing ellipse(plateX, plateY, plateSize, plateSize);

Renders the white circular plate at the center of the canvas

for-loop Food Item Rendering Loop for (const item of foodItems) {

Iterates through all placed food items and draws each one with its specific draw function

conditional Dragging Preview Item if (isMouseOverPlate() && mouseIsPressed) {

Shows a preview of the food being dragged at the current mouse position while the player drags

noStroke();
Disables outline drawing for the plate shape—this gives the plate a clean, filled appearance without a border
fill(255); // White plate
Sets the fill color to white (RGB 255, 255, 255) for the ellipse that represents the plate
ellipse(plateX, plateY, plateSize, plateSize);
Draws a circular white plate centered at (plateX, plateY) with a diameter of plateSize pixels
for (const item of foodItems) {
Loops through every food object stored in the foodItems array—this is the modern for-of syntax
drawFoodItem(item);
Calls the helper function to draw the current item using its specific draw function (drawPea, drawCarrot, etc.)
if (isMouseOverPlate() && mouseIsPressed) {
Only draws a preview if the mouse is over the plate AND the mouse button is currently pressed—this previews what you're about to place
x: mouseX,
Creates a temporary food object with the current mouse position—this preview follows your cursor in real time

drawJudgingScreen()

This screen appears when gameState changes to 'judging'. It displays the creativity score (calculated by calculateCreativityScore()) and parent feedback (generated by getParentFeedback()). The template literal syntax with ${} is a clean way to embed variable values into strings.

function drawJudgingScreen() {
  fill(0);
  textAlign(CENTER, CENTER);
  textSize(48);
  text("Parents' Creativity Rating:", width / 2, height / 2 - 80);

  textSize(36);
  text(`Score: ${creativityScore}`, width / 2, height / 2 - 20);

  textSize(24);
  text(parentFeedback, width / 2, height / 2 + 40);

  textSize(18);
  text("Click anywhere to play again!", width / 2, height / 2 + 100);
}
Line-by-line explanation (4 lines)
fill(0);
Sets text color to black for the entire judging screen
textAlign(CENTER, CENTER);
Centers all text both horizontally and vertically so coordinates point to the center of each text block
text(`Score: ${creativityScore}`, width / 2, height / 2 - 20);
Uses a JavaScript template literal (backticks) to embed the creativityScore variable into the text—this displays the calculated score dynamically
text(parentFeedback, width / 2, height / 2 + 40);
Displays the parent feedback string, which is generated by getParentFeedback() based on the score—this can wrap to multiple lines

drawPea(item)

drawPea() is called whenever a food item of type 'pea' needs to be rendered. It demonstrates two key p5.js techniques: using lerpColor() to create color variations for shading, and layering multiple shapes (the main body + highlight) to create visual depth.

function drawPea(item) {
  fill(item.color);
  noStroke();
  ellipse(item.x, item.y, item.size * 0.8, item.size * 0.8);
  fill(lerpColor(color(item.color), color(255), 0.3)); // Lighter highlight
  ellipse(item.x - item.size * 0.1, item.y - item.size * 0.1, item.size * 0.3, item.size * 0.3);
}
Line-by-line explanation (5 lines)

🔧 Subcomponents:

calculation Main Pea Body ellipse(item.x, item.y, item.size * 0.8, item.size * 0.8);

Draws the main green circular body of the pea at 80% of the food size

calculation Shine Highlight ellipse(item.x - item.size * 0.1, item.y - item.size * 0.1, item.size * 0.3, item.size * 0.3);

Adds a lighter highlight circle to make the pea look shiny and three-dimensional

fill(item.color);
Sets the fill color to the pea's color (stored in the item object, typically green '#2ECC71')
noStroke();
Disables outlines for a smooth, filled appearance
ellipse(item.x, item.y, item.size * 0.8, item.size * 0.8);
Draws the main pea body as a circle, sized to 80% of the base foodSize to give it nice proportions
fill(lerpColor(color(item.color), color(255), 0.3));
Creates a lighter version of the pea's color using lerpColor (linear interpolation)—this blends the pea color 70% with white 30%, creating a pastel highlight color
ellipse(item.x - item.size * 0.1, item.y - item.size * 0.1, item.size * 0.3, item.size * 0.3);
Draws a small highlight circle offset up and to the left (using negative offsets), making the pea appear shiny and three-dimensional

drawCarrot(item)

drawCarrot() demonstrates shape composition—combining a triangle (the carrot body) with a rectangle (the leafy top) to create a recognizable object. The height calculation using sqrt(3) ensures proportional geometry.

function drawCarrot(item) {
  fill(item.color);
  noStroke();
  rectMode(CENTER);
  let h = item.size * sqrt(3) / 2;
  triangle(item.x, item.y - h / 2,
           item.x - item.size / 2, item.y + h / 2,
           item.x + item.size / 2, item.y + h / 2);
  fill('#4CAF50'); // Green top
  noStroke();
  rect(item.x, item.y - h / 2 - item.size * 0.1, item.size * 0.3, item.size * 0.2);
}
Line-by-line explanation (7 lines)

🔧 Subcomponents:

calculation Carrot Body Triangle triangle(item.x, item.y - h / 2,

Draws an orange triangle pointing downward to represent the carrot's tapered body

calculation Green Carrot Top rect(item.x, item.y - h / 2 - item.size * 0.1, item.size * 0.3, item.size * 0.2);

Draws a small green rectangle above the carrot body to represent leafy greens

fill(item.color);
Sets fill to the carrot's orange color (typically '#E67E22')
noStroke();
Disables outlines for a clean look
rectMode(CENTER);
Switches rectangle drawing mode so coordinates point to the center rather than the top-left—this makes the green top easier to position
let h = item.size * sqrt(3) / 2;
Calculates the height of an equilateral triangle using the formula h = side × √3 / 2, ensuring the carrot shape is proportional
triangle(item.x, item.y - h / 2,
Starts drawing a triangle with the tip pointing up—the three coordinates define the three corners of the triangle
fill('#4CAF50'); // Green top
Changes fill color to green for the leafy carrot top
rect(item.x, item.y - h / 2 - item.size * 0.1, item.size * 0.3, item.size * 0.2);
Draws a small green rectangle above the triangle tip to represent the carrot's edible leaves

drawCracker(item)

drawCracker() demonstrates how to layer shapes with different stroke and fill properties. The rounded rectangle with holes creates texture and visual interest. The alpha value in fill(0, 50) shows how transparency adds realism.

🔬 These four lines draw holes in a 2×2 grid pattern. What happens if you add more ellipse lines to create a 3×3 grid of holes instead? Try adding 5 more lines!

  ellipse(item.x - item.size * 0.2, item.y - item.size * 0.2, item.size * 0.1, item.size * 0.1);
  ellipse(item.x + item.size * 0.2, item.y - item.size * 0.2, item.size * 0.1, item.size * 0.1);
  ellipse(item.x - item.size * 0.2, item.y + item.size * 0.2, item.size * 0.1, item.size * 0.1);
  ellipse(item.x + item.size * 0.2, item.y + item.size * 0.2, item.size * 0.1, item.size * 0.1);
function drawCracker(item) {
  fill(item.color);
  stroke('#333');
  strokeWeight(2);
  rectMode(CENTER);
  rect(item.x, item.y, item.size, item.size, item.size * 0.2); // Rounded square
  fill(0, 50); // Small holes
  noStroke();
  ellipse(item.x - item.size * 0.2, item.y - item.size * 0.2, item.size * 0.1, item.size * 0.1);
  ellipse(item.x + item.size * 0.2, item.y - item.size * 0.2, item.size * 0.1, item.size * 0.1);
  ellipse(item.x - item.size * 0.2, item.y + item.size * 0.2, item.size * 0.1, item.size * 0.1);
  ellipse(item.x + item.size * 0.2, item.y + item.size * 0.2, item.size * 0.1, item.size * 0.1);
}
Line-by-line explanation (7 lines)

🔧 Subcomponents:

calculation Cracker Body rect(item.x, item.y, item.size, item.size, item.size * 0.2);

Draws a tan rounded square with dark outline to represent the cracker

calculation Cracker Texture Holes ellipse(item.x - item.size * 0.2, item.y - item.size * 0.2, item.size * 0.1, item.size * 0.1);

Draws four small semi-transparent dark circles in a grid pattern to simulate the texture of a real cracker

fill(item.color);
Sets fill to the cracker's color (typically '#BDC3C7', a tan/beige)
stroke('#333');
Sets outline color to dark grey ('#333') so the cracker has a defined edge
strokeWeight(2);
Sets the outline thickness to 2 pixels—thin enough to be subtle but visible
rectMode(CENTER);
Switches to center-based rectangle mode so the coordinates point to the center
rect(item.x, item.y, item.size, item.size, item.size * 0.2);
Draws a rounded square cracker (the fifth parameter item.size * 0.2 sets the corner radius for rounded edges)
fill(0, 50);
Sets fill to black with 50 alpha (transparency)—creates semi-transparent holes for texture
noStroke();
Removes the outline for the hole circles so they're just simple dark circles

drawBerry(item)

drawBerry() mirrors the structure of drawPea() with similar highlights and lerpColor() usage. The berries and peas are visually similar, both using circular geometry with light highlights to suggest a three-dimensional, glossy surface.

function drawBerry(item) {
  fill(item.color);
  noStroke();
  ellipse(item.x, item.y, item.size * 0.9, item.size * 0.9);
  fill(lerpColor(color(item.color), color(255), 0.4)); // Highlight
  ellipse(item.x - item.size * 0.2, item.y - item.size * 0.2, item.size * 0.2, item.size * 0.2);
}
Line-by-line explanation (4 lines)

🔧 Subcomponents:

calculation Berry Main Body ellipse(item.x, item.y, item.size * 0.9, item.size * 0.9);

Draws the main purple/dark circular berry body at 90% of the food size

calculation Berry Highlight ellipse(item.x - item.size * 0.2, item.y - item.size * 0.2, item.size * 0.2, item.size * 0.2);

Adds a light highlight circle to make the berry look shiny and round

fill(item.color);
Sets the berry's color (typically '#9B59B6', a purple)
noStroke();
Disables outlines for a smooth, filled appearance
ellipse(item.x, item.y, item.size * 0.9, item.size * 0.9);
Draws the main berry as a circle at 90% of the base foodSize
fill(lerpColor(color(item.color), color(255), 0.4));
Creates a lighter highlight color by blending the berry's color (60%) with white (40%)—lighter than the pea's highlight

drawCheese(item)

drawCheese() shows how to create unique shapes by adjusting rectangle dimensions. The rectangular form is very different from the round peas and berries, adding visual variety to the game. The highlight stripe technique is similar to the pea and berry highlights but applied horizontally.

function drawCheese(item) {
  fill(item.color);
  noStroke();
  rectMode(CENTER);
  rect(item.x, item.y, item.size * 1.2, item.size * 0.8, item.size * 0.1); // Rectangular slice
  fill(lerpColor(color(item.color), color(255), 0.3)); // Highlight
  rect(item.x, item.y - item.size * 0.2, item.size * 1.0, item.size * 0.1);
}
Line-by-line explanation (6 lines)

🔧 Subcomponents:

calculation Cheese Slice Body rect(item.x, item.y, item.size * 1.2, item.size * 0.8, item.size * 0.1);

Draws a yellow rectangular cheese slice with slightly rounded corners

calculation Cheese Highlight Stripe rect(item.x, item.y - item.size * 0.2, item.size * 1.0, item.size * 0.1);

Adds a lighter horizontal stripe to make the cheese appear shiny and three-dimensional

fill(item.color);
Sets the cheese color (typically '#F1C40F', a bright yellow)
noStroke();
Disables outlines for a smooth look
rectMode(CENTER);
Switches to center-based rectangle mode
rect(item.x, item.y, item.size * 1.2, item.size * 0.8, item.size * 0.1);
Draws a horizontal rectangular cheese slice that's wider (1.2×) than tall (0.8×), with gently rounded corners (0.1× radius)
fill(lerpColor(color(item.color), color(255), 0.3));
Creates a lighter yellow for the highlight by blending the cheese color 70% with white 30%
rect(item.x, item.y - item.size * 0.2, item.size * 1.0, item.size * 0.1);
Draws a thin light-yellow horizontal stripe above the cheese center to create a shiny reflection effect

drawFoodItem(item)

drawFoodItem() is a dispatcher function that routes to the correct drawing function based on the item's type. This pattern—storing function references in data objects—is a powerful technique called 'function dispatch' or 'polymorphism'. It avoids long if-else chains and makes adding new food types very easy (just add to the foodTypes array).

function drawFoodItem(item) {
  const foodDef = foodTypes.find(f => f.name === item.type);
  if (foodDef) {
    foodDef.draw(item);
  }
}
Line-by-line explanation (3 lines)

🔧 Subcomponents:

calculation Food Type Lookup const foodDef = foodTypes.find(f => f.name === item.type);

Searches the foodTypes array to find the definition object matching the item's type

const foodDef = foodTypes.find(f => f.name === item.type);
Uses the array find() method to locate the foodTypes definition that matches the item's type (e.g., 'pea', 'carrot'). The find() method returns the first object where f.name === item.type is true
if (foodDef) {
Checks if the definition was found—this prevents errors if the item type is invalid
foodDef.draw(item);
Calls the draw function stored in the definition (e.g., drawPea, drawCarrot) with the item as an argument—this is dynamic dispatch, where the function called depends on data at runtime

drawFoodPalette()

drawFoodPalette() runs every frame and updates button styles based on the current game state. This creates dynamic, responsive UI—the buttons light up and dim without requiring explicit click handlers, just by checking the currentFoodType variable each draw cycle.

function drawFoodPalette() {
  // Highlight current food type button
  for (const btn of foodTypeButtons) {
    if (btn.elt.textContent.toLowerCase() === currentFoodType) {
      btn.style('background-color', '#FFD700'); // Gold
    } else {
      btn.style('background-color', '#ECF0F1'); // Light grey
    }
  }
}
Line-by-line explanation (4 lines)

🔧 Subcomponents:

for-loop Button Highlight Loop for (const btn of foodTypeButtons) {

Iterates through all food type buttons to update their visual state each frame

for (const btn of foodTypeButtons) {
Loops through every button in the foodTypeButtons array—these are the pea, carrot, cracker, berry, and cheese selection buttons
if (btn.elt.textContent.toLowerCase() === currentFoodType) {
Checks if this button's label (converted to lowercase) matches the currently selected food type. btn.elt gives access to the underlying HTML element
btn.style('background-color', '#FFD700');
If this is the current food, highlights the button with gold background color so the player sees which food is selected
btn.style('background-color', '#ECF0F1');
If this is not the current food, sets the background to light grey so it appears unselected

mouseDragged()

mouseDragged() is called continuously while the player drags, making it perfect for this game mechanic. Every frame of dragging adds a new item to the array, creating the effect of 'painting' food onto the plate. The frequent additions (60 per second) create the smooth visual effect of continuous placement.

🔬 This code creates and adds ONE new food item every frame while dragging. What happens if you multiply foodSize by 1.5 here? Will the dragged foods be larger than the ones already on the plate?

    foodItems.push({
      x: mouseX,
      y: mouseY,
      type: currentFoodType,
      size: foodSize,
      color: foodDef ? foodDef.defaultColor : '#BDC3C7' // Use default color from definition
    });
function mouseDragged() {
  if (gameState === 'playing' && isMouseOverPlate()) {
    // Get the definition of the current food type
    const foodDef = foodTypes.find(f => f.name === currentFoodType);

    // Add a new food item if dragging
    foodItems.push({
      x: mouseX,
      y: mouseY,
      type: currentFoodType,
      size: foodSize,
      color: foodDef ? foodDef.defaultColor : '#BDC3C7' // Use default color from definition
    });
  }
}
Line-by-line explanation (9 lines)

🔧 Subcomponents:

conditional Playing State Check if (gameState === 'playing' && isMouseOverPlate()) {

Ensures food can only be placed when the game is active AND the mouse is over the plate

calculation Food Object Creation foodItems.push({

Creates a new food item object with position, type, size, and color, then adds it to the foodItems array

function mouseDragged() {
This p5.js special function is called continuously while the mouse button is held down and the mouse moves—perfect for dragging interactions
if (gameState === 'playing' && isMouseOverPlate()) {
Only allows placement if two conditions are true: 1) the game is in 'playing' state, and 2) the mouse is over the plate (checked by isMouseOverPlate())
const foodDef = foodTypes.find(f => f.name === currentFoodType);
Looks up the definition of the current food type to get its default color
foodItems.push({
Creates a new object representing a placed food item and adds it to the end of the foodItems array using push()
x: mouseX,
Stores the current mouse X position—the food appears exactly where the cursor is
y: mouseY,
Stores the current mouse Y position
type: currentFoodType,
Records which type of food this is (pea, carrot, etc.) so the draw function knows how to render it
size: foodSize,
Stores the food's size—all foods use the same base foodSize value
color: foodDef ? foodDef.defaultColor : '#BDC3C7'
Uses the ternary operator to set color: if foodDef exists, use its default color; otherwise, use a fallback grey color

isMouseOverPlate()

isMouseOverPlate() demonstrates circle-based collision detection. Since the plate is drawn as an ellipse (a circle), checking if the distance from the mouse to the center is less than the radius is the correct way to test if a point is inside the circle. This is much faster than pixel-based collision checks.

function isMouseOverPlate() {
  let d = dist(mouseX, mouseY, plateX, plateY);
  return d < plateSize / 2;
}
Line-by-line explanation (2 lines)

🔧 Subcomponents:

calculation Distance to Plate Center let d = dist(mouseX, mouseY, plateX, plateY);

Calculates the straight-line distance between the mouse and the center of the plate

let d = dist(mouseX, mouseY, plateX, plateY);
Uses p5.js's built-in dist() function to calculate the Euclidean distance between the mouse position and the plate's center. This gives the radius from the center to the cursor
return d < plateSize / 2;
Returns true if the distance is less than the plate's radius (plateSize / 2), meaning the mouse is inside the circular plate; returns false otherwise. This is circle collision detection

calculateCreativityScore()

calculateCreativityScore() is the heart of the game logic—a sophisticated scoring algorithm with 9 different factors. It teaches set operations (tracking unique values), grid-based spatial analysis, nested loops for pair detection, and how to design reward systems that incentivize specific player behaviors. This is production-quality game design.

🔬 These two scoring lines reward different kinds of variety—one for food types, one for food groups. What happens if you swap their multipliers (50 and 80)? Which bonus becomes more valuable?

  // 1. Variety of specific food items
  score += typesUsed.size * 50; // Each unique food item type adds to score

  // 2. Variety of food groups
  const uniqueFoodGroups = Object.keys(foodGroupCounts).length;
  score += uniqueFoodGroups * 80; // Reward for using different food groups
function calculateCreativityScore() {
  let score = 0;
  const typesUsed = new Set();
  const foodGroupCounts = {};
  const foodGroupDefs = {}; // Store definitions to get group names
  const positionGrid = create2DArray(10, 10, 0); // 10x10 grid for density/spread

  // NEW: Check for "Too Many Items" first
  if (foodItems.length > TOO_MANY_ITEMS_THRESHOLD) {
    return -1000; // Special score to trigger scolding feedback
  }

  if (foodItems.length === 0) return 0; // No food, no score

  for (const item of foodItems) {
    typesUsed.add(item.type);
    const foodDef = foodTypes.find(f => f.name === item.type);
    if (foodDef && foodDef.group) {
      foodGroupCounts[foodDef.group] = (foodGroupCounts[foodDef.group] || 0) + 1;
      foodGroupDefs[foodDef.group] = foodDef.group; // Store group name
    }

    // Calculate grid position for density
    let gridX = floor(map(item.x, plateX - plateSize / 2, plateX + plateSize / 2, 0, 9));
    let gridY = floor(map(item.y, plateY - plateSize / 2, plateY + plateSize / 2, 0, 9));
    gridX = constrain(gridX, 0, 9);
    gridY = constrain(gridY, 0, 9);
    positionGrid[gridY][gridX]++;
  }

  // 1. Variety of specific food items
  score += typesUsed.size * 50; // Each unique food item type adds to score

  // 2. Variety of food groups
  const uniqueFoodGroups = Object.keys(foodGroupCounts).length;
  score += uniqueFoodGroups * 80; // Reward for using different food groups

  // 3. Balanced ratios of food groups
  // Aim for a relatively even distribution across used groups
  if (uniqueFoodGroups > 1) {
    let totalItemsInGroups = Object.values(foodGroupCounts).reduce((a, b) => a + b, 0);
    let idealPerGroup = totalItemsInGroups / uniqueFoodGroups;
    let ratioPenalty = 0;
    for (const group in foodGroupCounts) {
      ratioPenalty += abs(foodGroupCounts[group] - idealPerGroup);
    }
    score += max(0, 100 - ratioPenalty * 0.5); // Max 100 points, penalty for imbalance
  }

  // 4. Number of food items (encourages more effort, but capped)
  score += min(foodItems.length, TOO_MANY_ITEMS_THRESHOLD * 0.5) * 2; // Max 200 points for 100 items

  // 5. Spread/Coverage on the plate
  let cellsCovered = 0;
  let maxDensity = 0;
  for (let r = 0; r < 10; r++) {
    for (let c = 0; c < 10; c++) {
      if (positionGrid[r][c] > 0) {
        cellsCovered++;
      }
      maxDensity = max(maxDensity, positionGrid[r][c]);
    }
  }
  score += cellsCovered * 5; // Reward for covering more area

  // 6. Symmetry (Left-Right)
  score += calculateSymmetryScore() * 100; // Symmetry score (0 to 1) * 100

  // 7. NEW: Food Pairing Bonus
  let pairingBonus = 0;
  let pairedCombinations = new Set(); // To track unique pairs like 'cracker-cheese'

  for (let i = 0; i < foodItems.length; i++) {
    const itemA = foodItems[i];
    for (let j = i + 1; j < foodItems.length; j++) { // Start from i+1 to avoid A-A and A-B vs B-A
      const itemB = foodItems[j];

      // Check if these two items form a complimentary pair
      for (const pairDef of complimentaryFoodPairs) {
        let isComplimentary = false;
        if ((itemA.type === pairDef.item1 && itemB.type === pairDef.item2) ||
            (itemA.type === pairDef.item2 && itemB.type === pairDef.item1)) {
          isComplimentary = true;
        }

        if (isComplimentary) {
          // If they are complimentary, check proximity
          const d = dist(itemA.x, itemA.y, itemB.x, itemB.y);
          if (d < PAIRING_DISTANCE_THRESHOLD) {
            // Found a complimentary pair in proximity!
            // Create a unique identifier for this pair to avoid double counting
            const pairKey = [itemA.type, itemB.type].sort().join('-');
            if (!pairedCombinations.has(pairKey)) {
              pairingBonus += pairDef.bonus;
              pairedCombinations.add(pairKey);
            }
          }
        }
      }
    }
  }
  score += pairingBonus;

  // 8. Bonus for using all food types (if applicable)
  if (typesUsed.size === foodTypes.length) score += 100;

  // 9. Penalty for extreme density in one spot (e.g., too many food items in one grid cell)
  // This encourages spreading out the food
  if (maxDensity > 20) { // If more than 20 items in one grid cell
    score -= maxDensity * 5;
    score = max(score, 0); // Score can't go below 0
  }

  return score;
}
Line-by-line explanation (19 lines)

🔧 Subcomponents:

conditional Too Many Items Check if (foodItems.length > TOO_MANY_ITEMS_THRESHOLD) {

Returns a special negative score if the player places excessive food, triggering scolding feedback

for-loop Item Analysis Loop for (const item of foodItems) {

Iterates through all placed items to count variety, group distribution, and calculate grid density

calculation Variety Points score += typesUsed.size * 50;

Awards 50 points per unique food type (max 250 for all 5 types)

for-loop Food Pairing Detection for (let i = 0; i < foodItems.length; i++) {

Compares each pair of items to check if they are complementary foods positioned close together

let score = 0;
Initializes the score to 0—points will be added for different achievements
const typesUsed = new Set();
Creates a Set to track unique food types used (sets automatically prevent duplicates)
const foodGroupCounts = {};
Creates an empty object to count how many items are in each food group (vegetable, fruit, dairy, etc.)
const positionGrid = create2DArray(10, 10, 0);
Creates a 10×10 grid to track density distribution across the plate—helps determine if food is spread out or clustered
if (foodItems.length > TOO_MANY_ITEMS_THRESHOLD) {
Checks if the player placed more items than the threshold (200)—if so, return a special score (-1000) to trigger scolding
if (foodItems.length === 0) return 0;
If no food was placed at all, return 0 score immediately—no point continuing calculations
typesUsed.add(item.type);
Adds the item's type to the Set—this automatically ignores duplicates, so typesUsed.size will be the count of unique types
score += typesUsed.size * 50;
Awards 50 points for each unique food type (e.g., 5 types = 250 points)
score += uniqueFoodGroups * 80;
Awards 80 points for each different food group (vegetable, carb, fruit, dairy)—encourages balanced nutrition
let gridX = floor(map(item.x, plateX - plateSize / 2, plateX + plateSize / 2, 0, 9));
Maps the item's actual X coordinate on the plate to a grid column (0-9). map() converts from one range to another, floor() rounds down to an integer
score += cellsCovered * 5;
Awards 5 points for each grid cell that contains at least one food item—encourages spreading food around the plate
score += calculateSymmetryScore() * 100;
Calls a helper function that returns a score from 0 to 1, then multiplies by 100 for up to 100 bonus points for left-right symmetry
for (let i = 0; i < foodItems.length; i++) {
Loops through all items using index i, starting from 0
for (let j = i + 1; j < foodItems.length; j++) {
Inner loop that starts from i+1 to avoid checking the same pair twice (e.g., A-B and B-A)
const d = dist(itemA.x, itemA.y, itemB.x, itemB.y);
Calculates the distance between two items using the dist() function
if (d < PAIRING_DISTANCE_THRESHOLD) {
If the two items are close enough (within PAIRING_DISTANCE_THRESHOLD pixels), they earn a pairing bonus
const pairKey = [itemA.type, itemB.type].sort().join('-');
Creates a unique identifier for this pair (e.g., 'cheese-cracker') by sorting the types and joining with '-'—ensures 'cheese-cracker' and 'cracker-cheese' are treated as the same pair
if (typesUsed.size === foodTypes.length) score += 100;
Awards a 100-point bonus if the player used all 5 food types
if (maxDensity > 20) {
Penalty: if any grid cell has more than 20 items (too clustered), subtract maxDensity * 5 points

calculateSymmetryScore()

calculateSymmetryScore() detects left-right mirror symmetry in the food placement. It uses a greedy matching algorithm: for each item, find the closest item that mirrors it, then remove that matched item from consideration. This prevents one item from being counted as a mirror for multiple items. The function returns a ratio (0 to 1), which is multiplied by 100 in the main scoring function.

function calculateSymmetryScore() {
  if (foodItems.length < 2) return 0; // Need at least two items for symmetry

  let symmetryMatches = 0;
  let totalSymmetryPotential = 0;
  const matchTolerance = foodSize * 0.8; // Allow some deviation for a match

  // Create a temporary set of items to check matches against,
  // preventing double-matching and ensuring each item has a chance to find its mirror.
  let unmatchedItems = [...foodItems];

  for (let i = 0; i < foodItems.length; i++) {
    const itemA = foodItems[i];
    const mirroredX = plateX + (plateX - itemA.x); // Calculate mirrored X position

    let bestMatchIndex = -1;
    let minMatchDist = Infinity;

    // Search for a matching item in the unmatched set
    for (let j = 0; j < unmatchedItems.length; j++) {
      const itemB = unmatchedItems[j];

      // Exclude matching an item with itself if it happens to be at the center line
      if (itemA === itemB) continue;

      const dx = mirroredX - itemB.x;
      const dy = itemA.y - itemB.y;
      const matchDist = sqrt(dx*dx + dy*dy);

      if (itemA.type === itemB.type && itemA.color === itemB.color && matchDist < minMatchDist) {
        minMatchDist = matchDist;
        bestMatchIndex = j;
      }
    }

    if (bestMatchIndex !== -1 && minMatchDist < matchTolerance) {
      symmetryMatches++;
      // Remove the matched item from unmatchedItems to avoid re-matching
      unmatchedItems.splice(bestMatchIndex, 1);
    }
    totalSymmetryPotential++; // Each item has the potential to find a mirror
  }

  // Symmetry score is the ratio of matched items to total items
  return totalSymmetryPotential > 0 ? symmetryMatches / totalSymmetryPotential : 0;
}
Line-by-line explanation (8 lines)

🔧 Subcomponents:

calculation Mirror Position Calculation const mirroredX = plateX + (plateX - itemA.x);

Calculates where an item would be if reflected across the vertical center line of the plate

if (foodItems.length < 2) return 0;
If there's fewer than 2 items, symmetry is not possible—return 0 immediately
let unmatchedItems = [...foodItems];
Creates a shallow copy of the foodItems array using spread syntax (...) so we can remove matched items without altering the original array
const mirroredX = plateX + (plateX - itemA.x);
Calculates the X position of a vertically mirrored point: if the plate center is at plateX, and item is at itemA.x, the mirror is at plateX + (plateX - itemA.x)
if (itemA === itemB) continue;
Skips the comparison if the item is comparing itself—avoids false symmetry matches
const matchDist = sqrt(dx*dx + dy*dy);
Calculates the Euclidean distance between the mirrored position and itemB—this is the Pythagorean theorem: distance = √(dx² + dy²)
if (itemA.type === itemB.type && itemA.color === itemB.color && matchDist < minMatchDist) {
Only considers itemB as a match candidate if: 1) it's the same type, 2) it's the same color, and 3) it's closer than any previous best match
unmatchedItems.splice(bestMatchIndex, 1);
Removes the matched item from the unmatched list so it can't be matched again—ensures each item has at most one mirror
return totalSymmetryPotential > 0 ? symmetryMatches / totalSymmetryPotential : 0;
Returns the symmetry ratio (0 to 1): how many items found a mirror divided by total items. Returns 0 if there are no items to check

getParentFeedback(score)

getParentFeedback() maps numeric scores to emotional, parental messages. This pattern of dividing a continuous range into tiers is common in game design. The feedback becomes progressively more enthusiastic as the score increases, creating motivation for players to refine their techniques and achieve higher scores.

function getParentFeedback(score) {
  // NEW: Special feedback for too many items
  if (score === -1000) {
    return "Oh my goodness! You've put FAR too much food on that plate! That's just wasteful. We're going to have a talk about portion control, young man/lady.";
  }

  if (score < 400) {
    return "Oh dear, that's a bit of a chaotic mess, isn't it? Try to use more different kinds of food, balance your groups, and maybe arrange them a bit more neatly next time.";
  } else if (score < 800) {
    return "That's... interesting. You used some different foods, but maybe try arranging them a bit more thoughtfully? And don't forget your veggies!";
  } else if (score < 1200) {
    return "Not bad! You've got some good variety and coverage there. Keep practicing your food arranging skills and try some more balanced groups!";
  } else if (score < 1500) {
    return "Very creative, sweetie! We love how you've used different foods and balanced your groups. We even see a bit of symmetry and some nice pairings! You're quite the little artist!";
  } else {
    return "Absolutely brilliant! This is a masterpiece! So balanced, so symmetrical, full of delicious variety, and you've even made some lovely food pairings! We're so proud of your food art! You can have extra dessert tonight!";
  }
}
Line-by-line explanation (6 lines)

🔧 Subcomponents:

conditional Overload Penalty Message if (score === -1000) {

Returns special scolding feedback if the player exceeded the item limit

switch-case Score Tier Feedback if (score < 400) {

Routes to different feedback messages based on 5 score thresholds (400, 800, 1200, 1500)

if (score === -1000) {
Checks for the special overload score—if true, returns harsh feedback about portion control
if (score < 400) {
If score is very low, returns encouraging but critical feedback
} else if (score < 800) {
If score is in the low-medium range, returns mixed feedback acknowledging some effort
} else if (score < 1200) {
If score is in the medium range, returns positive feedback with encouragement to improve
} else if (score < 1500) {
If score is high, returns enthusiastic praise recognizing variety, balance, and symmetry
} else {
If score is very high (1500+), returns maximum praise including the reward of extra dessert

createUI()

createUI() demonstrates p5.js's HTML element creation functions (createButton, position, mousePressed, style). The food type buttons use a loop and a closure to dynamically create buttons for each food type, avoiding code duplication. This pattern scales automatically if you add new food types to the foodTypes array.

function createUI() {
  // Start Button
  startButton = createButton('Start Playing');
  startButton.position(width / 2 - startButton.width / 2, height / 2 + 140);
  startButton.mousePressed(startGame);
  styleButton(startButton);

  // Done Button
  doneButton = createButton('Done Playing');
  doneButton.position(width - doneButton.width - 20, height - doneButton.height - 20);
  doneButton.mousePressed(finishPlaying);
  styleButton(doneButton);

  // Clear Button
  clearButton = createButton('Clear Plate');
  clearButton.position(20, height - clearButton.height - 20);
  clearButton.mousePressed(clearPlate);
  styleButton(clearButton);

  // Food Type Buttons
  let typeBtnY = 20;
  for (const typeDef of foodTypes) {
    let btn = createButton(typeDef.name);
    btn.position(20, typeBtnY);
    btn.mousePressed(() => setCurrentFood(typeDef.name, typeDef.defaultColor));
    styleButton(btn);
    foodTypeButtons.push(btn);
    typeBtnY += btn.height + 10;
  }
}
Line-by-line explanation (9 lines)

🔧 Subcomponents:

calculation Start Button Creation startButton = createButton('Start Playing');

Creates the initial button to transition from intro to playing state

for-loop Food Type Buttons Loop for (const typeDef of foodTypes) {

Loops through the foodTypes array to create a button for each food type

startButton = createButton('Start Playing');
Creates a button with text 'Start Playing' and stores it in the startButton variable
startButton.position(width / 2 - startButton.width / 2, height / 2 + 140);
Centers the button horizontally by subtracting half its width from the center, and positions it near the center vertically
startButton.mousePressed(startGame);
Registers the startGame() function to be called when the button is clicked
styleButton(startButton);
Applies consistent styling (padding, colors, fonts) to the button by calling the styleButton() helper function
for (const typeDef of foodTypes) {
Loops through each food type definition in the foodTypes array
let btn = createButton(typeDef.name);
Creates a button with the food type's name (pea, carrot, cracker, berry, cheese)
btn.mousePressed(() => setCurrentFood(typeDef.name, typeDef.defaultColor));
Uses an arrow function (=>) to create a closure that captures the current typeDef, so clicking the button sets that food type and color
foodTypeButtons.push(btn);
Adds the button to the foodTypeButtons array for later reference (e.g., to highlight the current selection or reposition on resize)
typeBtnY += btn.height + 10;
Increments the Y position for the next button by the button's height plus 10 pixels of spacing

styleButton(btn)

styleButton() applies consistent CSS styling to all buttons in the game using p5.js's style() method. Centralizing styling logic in one function makes it easy to change the button appearance throughout the entire game—just modify this one function instead of updating every button individually.

function styleButton(btn) {
  btn.style('padding', '10px 20px');
  btn.style('background-color', '#ECF0F1'); // Light grey
  btn.style('color', '#333');
  btn.style('border', 'none');
  btn.style('border-radius', '5px');
  btn.style('cursor', 'pointer');
  btn.style('font-size', '18px');
  btn.style('font-family', 'sans-serif');
}
Line-by-line explanation (8 lines)
btn.style('padding', '10px 20px');
Adds internal spacing inside the button: 10 pixels top/bottom, 20 pixels left/right
btn.style('background-color', '#ECF0F1');
Sets the button background to light grey
btn.style('color', '#333');
Sets the text color to dark grey so it's readable on the light background
btn.style('border', 'none');
Removes the default browser button border for a custom look
btn.style('border-radius', '5px');
Rounds the button corners by 5 pixels for a modern, softer appearance
btn.style('cursor', 'pointer');
Changes the cursor to a pointer hand when hovering over the button to indicate it's clickable
btn.style('font-size', '18px');
Sets the button text size to 18 pixels
btn.style('font-family', 'sans-serif');
Sets the button font to a generic sans-serif typeface for a clean, modern look

startGame()

startGame() is called when the player clicks the 'Start Playing' button. It demonstrates a simple state transition pattern: change the gameState variable, reset game data (foodItems), and update the UI to match the new state. This pattern is fundamental to game development.

function startGame() {
  gameState = 'playing';
  foodItems = []; // Clear any previous food
  updateUIVisibility();
}
Line-by-line explanation (3 lines)
gameState = 'playing';
Transitions the game state from 'intro' to 'playing', which causes the draw() function to call drawPlayingScreen() instead of drawIntroScreen()
foodItems = [];
Clears the foodItems array so the player starts with an empty plate—no leftovers from previous games
updateUIVisibility();
Shows the playing UI elements (Done and Clear buttons, food type buttons) and hides the Start button

finishPlaying()

finishPlaying() orchestrates the transition from active play to score presentation. It calls two heavy-duty functions (calculateCreativityScore and getParentFeedback) that were already built and tested. This is a good example of composition—combining existing functions to create a new behavior.

function finishPlaying() {
  gameState = 'judging';
  creativityScore = calculateCreativityScore();
  parentFeedback = getParentFeedback(creativityScore);
  updateUIVisibility();
}
Line-by-line explanation (4 lines)
gameState = 'judging';
Transitions the game state to 'judging', causing the draw() function to call drawJudgingScreen()
creativityScore = calculateCreativityScore();
Calls the scoring algorithm to calculate a final score based on everything the player placed on the plate
parentFeedback = getParentFeedback(creativityScore);
Generates the parental feedback message based on the calculated score
updateUIVisibility();
Hides all playing UI elements so only the judging screen appears

clearPlate()

clearPlate() is the simplest function in the sketch—it just empties the array. This shows that not every function needs to be complex; sometimes the clearest code is the most straightforward. The 'Clear Plate' button provides a quick undo for the player without ending the game.

function clearPlate() {
  foodItems = [];
}
Line-by-line explanation (1 lines)
foodItems = [];
Empties the foodItems array, removing all placed food from the plate so the player can start over

setCurrentFood(type, color)

setCurrentFood() is called whenever the player clicks a food type button. It updates the global variables that control what gets drawn when the player drags. Simple setter functions like this make code more readable and maintainable than directly assigning to globals everywhere.

function setCurrentFood(type, color) {
  currentFoodType = type;
  currentFoodColor = color;
}
Line-by-line explanation (2 lines)
currentFoodType = type;
Stores which food type is currently selected (pea, carrot, cracker, berry, or cheese)
currentFoodColor = color;
Stores the color to use when drawing that food type

updateUIVisibility()

updateUIVisibility() centralizes the logic for showing/hiding buttons based on game state. Rather than having UI logic scattered throughout the code, all visibility rules are in one place. This pattern is easy to debug and modify—if you want to change what buttons appear during judging, you only have to edit this function.

function updateUIVisibility() {
  startButton.show();
  doneButton.hide();
  clearButton.hide();
  for (const btn of foodTypeButtons) btn.hide();

  if (gameState === 'playing') {
    startButton.hide();
    doneButton.show();
    clearButton.show();
    for (const btn of foodTypeButtons) btn.show();
  } else if (gameState === 'judging') {
    startButton.hide();
    doneButton.hide();
    clearButton.hide();
    for (const btn of foodTypeButtons) btn.hide();
  }
}
Line-by-line explanation (8 lines)

🔧 Subcomponents:

conditional Intro State Visibility if (gameState === 'playing') {

Shows only the Start button during the intro screen

conditional Playing State Visibility } else if (gameState === 'playing') {

Shows Done, Clear, and food type buttons during active play

startButton.show();
Makes the Start button visible
doneButton.hide();
Hides the Done button
clearButton.hide();
Hides the Clear button
for (const btn of foodTypeButtons) btn.hide();
Loops through all food type buttons and hides them
if (gameState === 'playing') {
Checks if the game is in the playing state
startButton.hide();
If playing, hides the Start button since the game has already started
doneButton.show();
If playing, shows the Done button so the player can finish when ready
for (const btn of foodTypeButtons) btn.show();
If playing, shows all food type buttons so the player can select which food to place

mousePressed()

mousePressed() is a p5.js special function called whenever the mouse button is pressed (anywhere on the canvas). Here it provides a simple restart mechanism—clicking the judging screen transitions back to playing state. This avoids needing a separate 'Play Again' button.

function mousePressed() {
  if (gameState === 'judging') {
    startGame(); // Click anywhere to restart
  }
}
Line-by-line explanation (2 lines)
if (gameState === 'judging') {
Checks if the game is in judging state (showing the score and feedback)
startGame();
Clicking anywhere on the judging screen calls startGame(), which resets and returns to the playing state for another round

windowResized()

windowResized() is a p5.js special function called automatically whenever the browser window is resized. It demonstrates responsive design—the sketch scales and repositions elements to adapt to different screen sizes. Without this function, the UI would be broken on resized windows. The function removes and recreates buttons because p5.js buttons don't update their internal dimensions perfectly after repositioning.

function windowResized() {
  resizeCanvas(windowWidth, windowHeight);
  // Recalculate plate position and size for responsiveness
  plateSize = min(width, height) * 0.7;
  plateX = width / 2;
  plateY = height / 2;

  // Adjust button positions
  startButton.position(width / 2 - startButton.width / 2, height / 2 + 140);
  doneButton.position(width - doneButton.width - 20, height - doneButton.height - 20);
  clearButton.position(20, height - clearButton.height - 20);

  // Recreate type/color buttons to reposition them correctly
  for (const btn of foodTypeButtons) btn.remove();
  foodTypeButtons = [];
  createUI(); // Recreate UI elements
  updateUIVisibility(); // Ensure correct visibility
}
Line-by-line explanation (7 lines)

🔧 Subcomponents:

calculation Canvas and Plate Resizing resizeCanvas(windowWidth, windowHeight);

Adjusts the p5.js canvas to match the new window size

calculation Button Repositioning startButton.position(width / 2 - startButton.width / 2, height / 2 + 140);

Recalculates button positions based on the new canvas size

resizeCanvas(windowWidth, windowHeight);
Resizes the p5.js canvas to fit the new browser window size
plateSize = min(width, height) * 0.7;
Recalculates the plate size to scale with the new window (70% of smaller dimension)
plateX = width / 2;
Recenters the plate horizontally
startButton.position(width / 2 - startButton.width / 2, height / 2 + 140);
Repositions the Start button to stay centered and properly spaced relative to the new canvas size
for (const btn of foodTypeButtons) btn.remove();
Removes all food type buttons from the DOM before recreating them—prevents duplicate buttons
createUI();
Recreates all UI buttons with the new canvas dimensions, so they position correctly
updateUIVisibility();
Ensures the correct buttons are shown/hidden after the UI recreation

create2DArray(cols, rows, val)

create2DArray() is a utility function that creates a grid structure used for tracking food density across the plate. In JavaScript, 2D arrays are arrays of arrays. This helper function is called from calculateCreativityScore() to create a 10×10 grid. The fill(val) method is a convenient way to initialize all array elements to the same starting value.

function create2DArray(cols, rows, val) {
  let arr = new Array(rows);
  for (let i = 0; i < arr.length; i++) {
    arr[i] = new Array(cols).fill(val);
  }
  return arr;
}
Line-by-line explanation (4 lines)

🔧 Subcomponents:

for-loop Row Initialization Loop for (let i = 0; i < arr.length; i++) {

Creates a new array for each row and fills it with the initial value

let arr = new Array(rows);
Creates an empty array with length equal to 'rows'—this will become the outer array of our 2D structure
for (let i = 0; i < arr.length; i++) {
Loops through each row index from 0 to rows-1
arr[i] = new Array(cols).fill(val);
For each row, creates a new array of length 'cols' and fills every element with 'val'. fill(val) is an array method that sets all elements to the same value
return arr;
Returns the completed 2D array (array of arrays)

📦 Key Variables

gameState string

Tracks which screen is currently displayed: 'intro', 'playing', or 'judging'. Controls the flow of the entire game.

let gameState = 'intro';
foodItems array

Stores all placed food objects. Each object contains x, y, type, size, and color. This is the core game data.

let foodItems = [];
currentFoodType string

Tracks which food type the player has selected to place (pea, carrot, cracker, berry, or cheese). Used when dragging.

let currentFoodType = 'pea';
foodTypes array of objects

Stores definitions for all food types, including their name, default color, draw function, and food group. Used to render foods and populate buttons.

const foodTypes = [{ name: 'pea', draw: drawPea, defaultColor: '#2ECC71', group: 'vegetable' }, ...];
currentFoodColor string

Stores the hex color code of the currently selected food type. Used when drawing preview items during dragging.

let currentFoodColor = '#2ECC71';
foodSize number

Base size in pixels for all food items. Multiplied by different values in each food's draw function for variety.

let foodSize = 30;
complimentaryFoodPairs array of objects

Defines which food types work well together (like cracker + cheese) and how many bonus points they earn when placed close together.

const complimentaryFoodPairs = [{ item1: 'cracker', item2: 'cheese', bonus: 60 }, ...];
PAIRING_DISTANCE_THRESHOLD number

Maximum pixel distance between two foods for them to be considered a complementary pair. Encourages thoughtful placement.

const PAIRING_DISTANCE_THRESHOLD = foodSize * 2;
TOO_MANY_ITEMS_THRESHOLD number

Limit on the number of items a player can place. Exceeding this triggers a special scolding feedback message.

const TOO_MANY_ITEMS_THRESHOLD = 200;
startButton p5.Renderer (button element)

The 'Start Playing' button shown on the intro screen. Triggers startGame() when clicked.

let startButton;
doneButton p5.Renderer (button element)

The 'Done Playing' button shown during play. Triggers finishPlaying() when clicked.

let doneButton;
clearButton p5.Renderer (button element)

The 'Clear Plate' button shown during play. Triggers clearPlate() when clicked.

let clearButton;
foodTypeButtons array of p5.Renderer (button elements)

Stores references to all food type selection buttons (pea, carrot, etc.). Used to show/hide them and highlight the current selection.

let foodTypeButtons = [];
creativityScore number

The final calculated score based on the player's plate arrangement. Displayed and used to generate feedback.

let creativityScore = 0;
parentFeedback string

The parental commentary on the player's plate, generated based on the creativity score. Displayed on the judging screen.

let parentFeedback = '';
plateX number

Horizontal pixel coordinate of the plate's center. Calculated in setup() and updated on window resize.

let plateX, plateY, plateSize;
plateY number

Vertical pixel coordinate of the plate's center. Calculated in setup() and updated on window resize.

let plateX, plateY, plateSize;
plateSize number

Diameter in pixels of the circular white plate. Calculated to be 70% of the smaller screen dimension for responsive scaling.

let plateX, plateY, plateSize;

🔧 Potential Improvements (6)

Here are some ways this code could be enhanced:

BUG calculateCreativityScore() - Food Pairing Bonus

The pairing bonus uses only the first matching pair definition found. If two items form a pair, only the first pair in complimentaryFoodPairs that matches them gets applied. If you later add duplicate pairs or similar matches, only one bonus is awarded.

💡 Document this behavior clearly in comments, or if multiple pair types should stack, refactor the pairing loop to accumulate bonuses for all matching pair definitions rather than breaking after the first match.

PERFORMANCE calculateCreativityScore() - Pairing Detection

The nested triple loop (i over items, j over remaining items, and iterate through complimentaryFoodPairs) has O(n² × p) complexity where n = number of items and p = number of pair definitions. With 200 items and 3 pairs, this is 120,000 iterations—still fast but inefficient.

💡 Pre-index the complimentaryFoodPairs by type combinations using a Map or object. Replace the inner pair-finding loop with a direct lookup: `const pairKey = [itemA.type, itemB.type].sort().join('-'); const pairDef = pairingMap.get(pairKey);` This reduces the complexity to O(n²).

STYLE createUI()

The function recreates all buttons every time windowResized() is called. This works but is inefficient—p5.js buttons have some quirks with re-creation.

💡 Instead of destroying and recreating, simply reposition existing buttons: iterate through foodTypeButtons and call btn.position() with new coordinates. This avoids DOM churn and is faster.

BUG mouseDragged()

Food items are added on EVERY frame while dragging. If the player drags slowly, very few items are placed; if they drag fast, many items accumulate quickly. This creates unpredictable item counts.

💡 Track the last food position and only add a new item if the mouse has moved more than a threshold distance (e.g., foodSize / 2). Example: `const d = dist(mouseX, mouseY, lastFoodX, lastFoodY); if (d > foodSize / 2) { /* add item */ }`.

FEATURE Game overall

There is no undo button. If the player places food incorrectly, they must clear the entire plate and start over.

💡 Add an 'Undo' button that pops the last item from the foodItems array: `foodItems.pop();`. This provides a better user experience without complicating the core logic.

FEATURE calculateSymmetryScore()

Only vertical (left-right) symmetry is detected. Radial or other symmetries are ignored.

💡 Add a second symmetry check for radial symmetry (items arranged in circles around the plate center). This would further reward thoughtful, artistic arrangements and add complexity to the scoring.

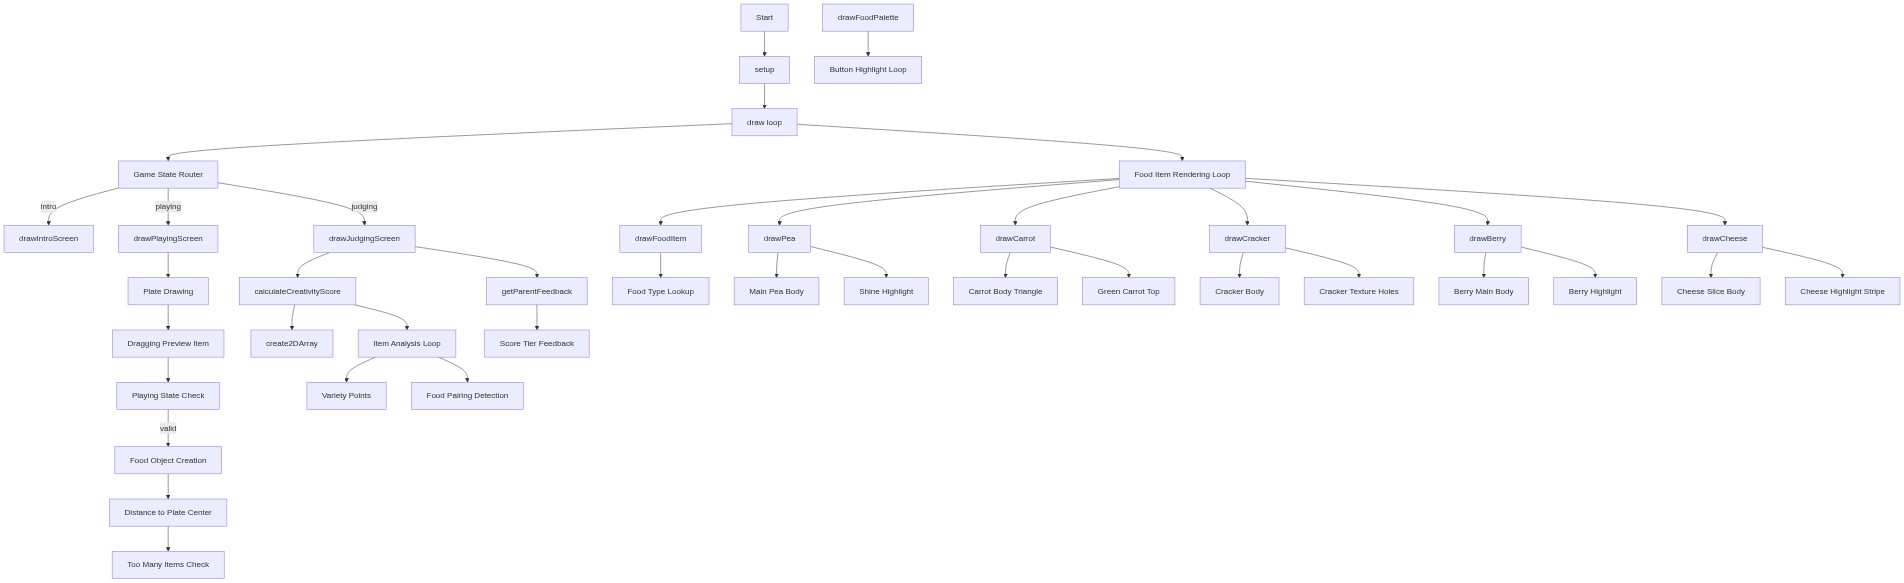
🔄 Code Flow

Code flow showing setup, draw, drawintroscreen, drawplayingscreen, drawjudgingscreen, drawpea, drawcarrot, drawcracker, drawberry, drawcheese, drawfooditem, drawfoodpalette, mousedragged, ismouseoverplate, calculatecreativityscore, calculatesymmetryscore, getparentfeedback, createui, stylebutton, startgame, finishplaying, clearplate, setcurrentfood, updateuivisibility, mousepressed, windowresized, create2darray

💡 Click on function names in the diagram to jump to their code

graph TD start[Start] --> setup[setup] setup --> draw[draw loop] draw --> state-switch[Game State Router] state-switch -->|intro| drawintroscreen[drawIntroScreen] state-switch -->|playing| drawplayingscreen[drawPlayingScreen] state-switch -->|judging| drawjudgingscreen[drawJudgingScreen] draw --> food-loop[Food Item Rendering Loop] food-loop --> drawfooditem[drawFoodItem] drawfooditem --> find-definition[Food Type Lookup] drawplayingscreen --> plate-drawing[Plate Drawing] plate-drawing --> preview-item[Dragging Preview Item] preview-item --> state-check[Playing State Check] state-check -->|valid| food-creation[Food Object Creation] food-creation --> distance-calculation[Distance to Plate Center] distance-calculation --> overload-check[Too Many Items Check] food-loop --> drawpea[drawPea] food-loop --> drawcarrot[drawCarrot] food-loop --> drawcracker[drawCracker] food-loop --> drawberry[drawBerry] food-loop --> drawcheese[drawCheese] drawpea --> main-circle[Main Pea Body] drawpea --> highlight[Shine Highlight] drawcarrot --> carrot-body[Carrot Body Triangle] drawcarrot --> carrot-top[Green Carrot Top] drawcracker --> cracker-body[Cracker Body] drawcracker --> cracker-holes[Cracker Texture Holes] drawberry --> berry-body[Berry Main Body] drawberry --> berry-shine[Berry Highlight] drawcheese --> cheese-body[Cheese Slice Body] drawcheese --> cheese-shine[Cheese Highlight Stripe] drawjudgingscreen --> calculatecreativityscore[calculateCreativityScore] calculatecreativityscore --> create2darray[create2DArray] calculatecreativityscore --> item-loop[Item Analysis Loop] item-loop --> variety-score[Variety Points] item-loop --> pairing-loop[Food Pairing Detection] drawjudgingscreen --> getparentfeedback[getParentFeedback] getparentfeedback --> score-tiers[Score Tier Feedback] drawfoodpalette[drawFoodPalette] --> button-loop[Button Highlight Loop] click setup href "#fn-setup" click draw href "#fn-draw" click drawintroscreen href "#fn-drawintroscreen" click drawplayingscreen href "#fn-drawplayingscreen" click drawjudgingscreen href "#fn-drawjudgingscreen" click drawfooditem href "#fn-drawfooditem" click drawpea href "#fn-drawpea" click drawcarrot href "#fn-drawcarrot" click drawcracker href "#fn-drawcracker" click drawberry href "#fn-drawberry" click drawcheese href "#fn-drawcheese" click calculatecreativityscore href "#fn-calculatecreativityscore" click getparentfeedback href "#fn-getparentfeedback" click create2darray href "#fn-create2darray" click food-loop href "#sub-food-loop" click plate-drawing href "#sub-plate-drawing" click preview-item href "#sub-preview-item" click state-check href "#sub-state-check" click food-creation href "#sub-food-creation" click distance-calculation href "#sub-distance-calculation" click overload-check href "#sub-overload-check" click item-loop href "#sub-item-loop" click variety-score href "#sub-variety-score" click pairing-loop href "#sub-pairing-loop" click button-loop href "#sub-button-loop" click main-circle href "#sub-main-circle" click highlight href "#sub-highlight" click carrot-body href "#sub-carrot-body" click carrot-top href "#sub-carrot-top" click cracker-body href "#sub-cracker-body" click cracker-holes href "#sub-cracker-holes" click berry-body href "#sub-berry-body" click berry-shine href "#sub-berry-shine" click cheese-body href "#sub-cheese-body" click cheese-shine href "#sub-cheese-shine" click find-definition href "#sub-find-definition" click state-switch href "#sub-state-switch"

❓ Frequently Asked Questions

What visual experience does the 'Play with Your Food' sketch offer?

The sketch creates a playful and colorful scene where users can arrange various food items like peas, carrots, and cheese on a large white plate.

How can users interact with the 'Play with Your Food' creative coding sketch?

Users can drag and drop different food items onto the plate, mixing and matching them to create their own unique foodie designs.

What creative coding concepts are showcased in this p5.js sketch?

This sketch demonstrates interactive design and game mechanics, including user input handling, object manipulation, and feedback systems.

Preview

play with your food - p5.js creative coding sketch preview
Sketch Preview
Code flow diagram showing the structure of play with your food - Code flow showing setup, draw, drawintroscreen, drawplayingscreen, drawjudgingscreen, drawpea, drawcarrot, drawcracker, drawberry, drawcheese, drawfooditem, drawfoodpalette, mousedragged, ismouseoverplate, calculatecreativityscore, calculatesymmetryscore, getparentfeedback, createui, stylebutton, startgame, finishplaying, clearplate, setcurrentfood, updateuivisibility, mousepressed, windowresized, create2darray
Code Flow Diagram