
Police

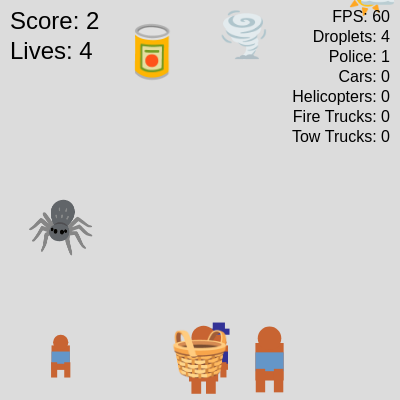
This sketch is a full arcade game where emoji fall from the sky and must be caught in a basket. Catching good food emojis spawns a customer, while catching bad emojis triggers escalating chain reactions - arrests, police cars, helicopter crashes, fire trucks, and tow trucks - each driven by its own state machine.

🧪 Try This!

Experiment with the code by making these changes:

  1. Make good emoji harder to spot — Shrinking or shuffling the emoji size range changes how easy droplets are to visually track and catch.
  2. Faster falling emoji — Raising the droplet speed range makes the whole game feel more frantic and harder to react to.
  3. Bigger explosions — More fire particles per frame makes crashes look much more dramatic and dense.
  4. Give everyone a bigger basket — Increasing the catcher's width makes it much easier to catch falling emoji, essentially lowering difficulty.
Prefer the full editor? Open it there →

📖 About This Sketch

This sketch turns a simple 'catch the falling object' game into a small emergent city simulation: catch a food emoji and a customer walks in to collect it, catch a bad emoji and an offender appears who gets arrested by a police officer, catch a tulip and a police car speeds in and explodes, catch a spider and a helicopter flies in, crashes, gets sprayed by a fire truck, and finally gets hauled away by a tow truck. Every character and vehicle is drawn from p5.js primitives - rect(), ellipse(), triangle() - and animated using simple state machines rather than physics, with push()/pop()/translate()/rotate() used to position and spin helicopter rotors.

The code is organized around one giant playGame() function that loops through six parallel arrays (droplets, customers, offenders, policeOfficers, policeCars, policeHelicopters, fireTrucks, towTrucks) every frame, and a switch statement inside each loop moves objects through named states like 'entering', 'grabbing', 'arresting', 'exploding', and 'leaving'. Studying this sketch teaches you how to manage many independent animated entities with plain JavaScript objects and arrays, how state machines replace complicated if/else chains, and how AABB (axis-aligned bounding box) collision detection is used everywhere from catching droplets to a police car hitting a pedestrian.

⚙️ How It Works

  1. On load, setup() creates a full-window canvas, centers the basket-shaped catcher near the bottom, and calculates figureGroundY - a shared ground line that all human figures and ground vehicles stand on.
  2. Every frame, draw() clears the background and calls playGame(), which first randomly spawns a new falling emoji if there's room, then loops backwards through the droplets array updating each one's position and checking for a collision with the catcher.
  3. When a droplet is caught, its isGood flag decides the outcome: good emojis increase the score and spawn a customer that walks in to 'grab' the item, while bad emojis lose a life and spawn either an offender-plus-police-officer pair, a police car (for tulips), or a police helicopter (for spiders).
  4. Each spawned entity is a plain object pushed into its own array with a 'state' property; every frame playGame() loops through each array and uses a switch(entity.state) block to decide how to move and draw it, and to trigger the next state (e.g. 'exploding' after a helicopter hits the ground, then 'waitingForFireTruck', then 'beingSprayed', then 'waitingForTowTruck').
  5. Collisions aren't limited to the catcher - driving police cars are also checked against customers and offenders using the same AABB checkCollision() helper, removing anyone they run over.
  6. Mouse dragging, mouse pressing, and touchMoved all reposition the catcher horizontally in real time, and windowResized() recalculates the canvas size and every ground-relative Y position so the layout still works if the browser window changes size.

🎓 Concepts You'll Learn

State machines with switch statementsManaging multiple entities with arrays of objectsAABB collision detectionEmoji rendering with text()push()/pop()/translate()/rotate() for compound shapesmillis() for time-based animation transitionsChained event spawning (one event triggers the next)Responsive canvas with windowResized()

📝 Code Breakdown

setup()

setup() runs once before the game starts. Here it's used not just to create the canvas, but to compute several 'derived' constants (figureGroundY and the vehicle Y positions) that depend on the canvas height, which isn't known until createCanvas() has run.

function setup() {
  createCanvas(windowWidth, windowHeight);
  textSize(32);
  textAlign(CENTER, CENTER);
  rectMode(CENTER); // Draw rectangles from their center
  ellipseMode(CENTER); // Draw ellipses from their center

  // Initialize catcher
  catcher = {
    x: width / 2,
    y: height - catcherHeight / 2 - 20, // Catcher remains relative to the bottom
    width: catcherWidth,
    height: catcherHeight
  };

  // Define figureGroundY here, after height is available
  figureGroundY = height - 50; // New consistent ground level for figures and ground vehicles

  // Adjust vehicle Y positions relative to figureGroundY
  policeCarY = figureGroundY - policeCarHeight / 2 - 10; // Car is slightly above ground
  fireTruckY = figureGroundY - fireTruckHeight / 2 - 10;
  towTruckY = figureGroundY - towTruckHeight / 2 - 10;
}
Line-by-line explanation (6 lines)
createCanvas(windowWidth, windowHeight);
Makes the canvas fill the entire browser window.
rectMode(CENTER); // Draw rectangles from their center
Changes rect() so its x,y arguments refer to the center of the rectangle instead of the top-left corner - this makes positioning figures and vehicles much easier.
ellipseMode(CENTER); // Draw ellipses from their center
Same idea but for ellipse()/circle() - keeps all shapes centered on the same point.
catcher = { x: width / 2, y: height - catcherHeight / 2 - 20, // Catcher remains relative to the bottom width: catcherWidth, height: catcherHeight };
Creates the catcher as a plain JavaScript object holding its position and size, centered horizontally and near the bottom of the screen.
figureGroundY = height - 50; // New consistent ground level for figures and ground vehicles
Defines one shared 'ground line' Y coordinate that every walking figure and every ground vehicle will be drawn at, so everything lines up visually.
policeCarY = figureGroundY - policeCarHeight / 2 - 10; // Car is slightly above ground
Calculates the police car's fixed vertical position relative to the shared ground level rather than a hardcoded number.
draw()

draw() is p5.js's main animation loop, called ~60 times per second. Keeping it short and delegating to playGame() is good practice - it separates 'redraw everything' from 'run the game logic'.

function draw() {
  background(220);

  playGame();

  // Display frame rate and droplet count for debugging performance
  fill(0);
  textSize(16);
  textAlign(RIGHT, TOP);
  text(`FPS: ${floor(getFrameRate())}`, width - 10, 10);
  text(`Droplets: ${droplets.length}`, width - 10, 30);
  text(`Police: ${policeOfficers.length}`, width - 10, 50); // Added police count
  text(`Cars: ${policeCars.length}`, width - 10, 70); // Added police car count
  text(`Helicopters: ${policeHelicopters.length}`, width - 10, 90); // Added helicopter count
  text(`Fire Trucks: ${fireTrucks.length}`, width - 10, 110); // Added fire truck count
  text(`Tow Trucks: ${towTrucks.length}`, width - 10, 130); // Added tow truck count
  textAlign(CENTER, CENTER); // Reset for other text
}
Line-by-line explanation (4 lines)
background(220);
Repaints the whole canvas light gray every frame, erasing the previous frame's drawings so animation looks smooth instead of leaving trails.
playGame();
Delegates all the actual game logic - spawning, moving, drawing, and colliding every entity - to one big helper function.
text(`FPS: ${floor(getFrameRate())}`, width - 10, 10);
Uses a template literal to show the current frames-per-second in the corner, handy for spotting performance problems.
textAlign(CENTER, CENTER); // Reset for other text
Restores the default text alignment so later text() calls elsewhere in the game (like the catcher emoji) are centered again.

playGame()

playGame() is the heart of the sketch. Every one of its seven loops follows the same recipe: loop backwards through an array, use a switch on entity.state to decide movement and drawing, check a millis()-based timer to advance to the next state, and splice() the entity out once it's fully off-screen. Once you recognize this pattern once, you can read every loop in the file.

🔬 This block decides what happens on a catch. What would happen if you swapped score++ and lives-- so that catching GOOD emojis cost you a life instead?

    if (dLeft < cRight && dRight > cLeft && dTop < cBottom && dBottom > cTop) {
      // Collision detected
      if (droplet.isGood) { // This is TRUE only for food/drink
        score++;
        spawnCustomer(catcher.x, catcher.y, droplet.emoji); // Spawn a customer with the grabbed emoji!
      } else { // This is TRUE for ALL non-food items (disasters, weather, cutlery, tulip, spider)
        lives--;
function playGame() {
  // Spawn new droplets, but limit the total number on screen
  if (random(1) < dropletSpawnChance && droplets.length < maxDroplets) {
    spawnDroplet();
  }

  // Update and draw droplets
  for (let i = droplets.length - 1; i >= 0; i--) {
    let droplet = droplets[i];
    droplet.y += droplet.speed;

    // Draw emoji
    textSize(droplet.size);
    text(droplet.emoji, droplet.x, droplet.y);

    // --- Optimized Collision Check (AABB) ---
    let dLeft = droplet.x - droplet.size / 2;
    let dRight = droplet.x + droplet.size / 2;
    let dTop = droplet.y - droplet.size / 2;
    let dBottom = droplet.y + droplet.size / 2;

    let cLeft = catcher.x - catcher.width / 2;
    let cRight = catcher.x + catcher.width / 2;
    let cTop = catcher.y - catcher.height / 2;
    let cBottom = catcher.y + catcher.height / 2;

    if (dLeft < cRight && dRight > cLeft && dTop < cBottom && dBottom > cTop) {
      if (droplet.isGood) {
        score++;
        spawnCustomer(catcher.x, catcher.y, droplet.emoji);
      } else {
        lives--;
        if (droplet.emoji === '🌷') {
          spawnPoliceCar();
        } else if (droplet.emoji === '🕷️') {
          spawnPoliceHelicopter();
        } else {
          let offender = spawnOffender(catcher.x, catcher.y);
          spawnPoliceOfficer(offender);
        }
      }
      droplets.splice(i, 1);
    }

    if (droplet.y > height + droplet.size / 2) {
      if (droplet.isGood) {
        missedGood++;
      }
      droplets.splice(i, 1);
    }
  }

  // ...customer, police officer, police car, helicopter, fire truck, tow truck loops (see subcomponents)...

  // Draw catcher
  textSize(48);
  text(catcherEmoji, catcher.x, catcher.y);

  // Display score and lives
  fill(0);
  textSize(24);
  textAlign(LEFT, TOP);
  text(`Score: ${score}`, 10, 10);
  text(`Lives: ${lives}`, 10, 40);
  textAlign(CENTER, CENTER);
}
Line-by-line explanation (6 lines)

🔧 Subcomponents:

for-loop Droplet Update & Collision Loop for (let i = droplets.length - 1; i >= 0; i--) { ... }

Moves each falling emoji down the screen, draws it, checks for a catch or a miss, and removes it from the array when either happens.

switch-case Customer State Machine switch (customer.state) { case 'entering': ... case 'grabbing': ... case 'leaving': ... }

Walks a customer to the basket, pauses them while they 'grab' the food emoji, then walks them off-screen.

switch-case Police Officer State Machine switch (officer.state) { case 'arresting': ... case 'leaving': ... }

Holds the officer and offender together for arrestDuration milliseconds, then marches both off screen together.

switch-case Police Car State Machine switch (car.state) { case 'driving': ... case 'exploding': ... case 'leaving': ... }

Drives the car across the screen, explodes it at the midpoint, then sends it off-screen; also checks for running over pedestrians.

switch-case Helicopter State Machine switch (helicopter.state) { case 'flying': ... case 'descending': ... case 'exploding': ... }

Flies the helicopter in, drops it to the ground at the midpoint, explodes it, then hands it off to the fire truck and tow truck chain.

switch-case Fire Truck State Machine switch (truck.state) { case 'entering': ... case 'spraying': ... case 'leaving': ... }

Drives to the crashed helicopter, sprays water on it, then leaves and spawns a tow truck.

switch-case Tow Truck State Machine switch (truck.state) { case 'entering': ... case 'towing': ... case 'leaving': ... }

Drives to the helicopter, attaches it, and drags it off screen together.

conditional AABB Catch Check if (dLeft < cRight && dRight > cLeft && dTop < cBottom && dBottom > cTop) { ... }

Classic bounding-box overlap test that decides whether a falling emoji has been caught by the basket.

if (random(1) < dropletSpawnChance && droplets.length < maxDroplets) {
Rolls a random number each frame; only spawns a new droplet if the roll succeeds AND the droplet cap hasn't been reached, keeping performance in check.
droplet.y += droplet.speed;
Moves the emoji straight down by its own individual speed value every frame.
if (dLeft < cRight && dRight > cLeft && dTop < cBottom && dBottom > cTop) {
Standard AABB (axis-aligned bounding box) test: two rectangles overlap only if each one's left edge is left of the other's right edge, and vice versa for top/bottom.
if (droplet.emoji === '🌷') { spawnPoliceCar(); }
Special-cases one particular bad emoji (the tulip) to trigger a totally different consequence - a police car chase - instead of a simple arrest.
droplets.splice(i, 1);
Removes the droplet from the array once it's been handled, using splice() at index i - looping backwards (from length-1 to 0) makes this safe.
if (droplet.y > height + droplet.size / 2) {
Detects when an emoji has fallen completely past the bottom of the screen without being caught.

spawnDroplet()

This function shows how to weight random outcomes using nested if/else and random(1) thresholds, and how random(array) is a quick way to pick a random item from a list - both very common creative-coding patterns.

🔬 Both special-event emoji currently have a roughly 10% chance each. What happens to the pace of the game if you raise the tulip chance to 0.4?

  if (random(1) < 0.1) {
    emoji = '🌷';
    isGood = false;
  } else if (random(1) < 0.1) { // New: 10% chance for a spider (after tulip check)
    emoji = '🕷️';
    isGood = false;
  }
function spawnDroplet() {
  let emoji;
  let isGood;

  // 10% chance for a tulip
  if (random(1) < 0.1) {
    emoji = '🌷';
    isGood = false;
  } else if (random(1) < 0.1) { // New: 10% chance for a spider (after tulip check)
    emoji = '🕷️';
    isGood = false;
  } else {
    // From the remaining 80%, apply the 70% good / 30% other bad split
    if (random(1) < 0.7) { // 70% of 80% = 56% overall chance for good emoji
      emoji = random(goodEmojis);
      isGood = true;
    } else { // 30% of 80% = 24% overall chance for other bad emoji
      emoji = random(otherBadEmojis); // Use the new array without tulips and spiders
      isGood = false;
    }
  }

  let size = random(30, 60);
  let speed = random(2, 6); // Adjust speed
  let x = random(size / 2, width - size / 2);
  let y = -size / 2; // Start above canvas

  droplets.push({
    emoji: emoji,
    x: x,
    y: y,
    size: size,
    speed: speed,
    isGood: isGood
  });
}
Line-by-line explanation (4 lines)

🔧 Subcomponents:

conditional Nested Probability Chooser if (random(1) < 0.1) { ... } else if (random(1) < 0.1) { ... } else { ... }

Picks which emoji category to spawn using nested probability checks: 10% tulip, 10% spider, then a 70/30 split between good and other-bad emoji.

if (random(1) < 0.1) {
random(1) returns a decimal between 0 and 1; comparing it to 0.1 gives roughly a 10% chance of this branch running.
emoji = random(goodEmojis);
random(array) picks one random element from the array - here a random food/drink emoji.
let x = random(size / 2, width - size / 2);
Picks a random horizontal spawn position, but keeps it inset by half the emoji's size so it never spawns partly off-screen.
droplets.push({ emoji: emoji, x: x, y: y, size: size, speed: speed, isGood: isGood });
Adds a new plain object describing this droplet to the droplets array, which playGame() will then update and draw every frame.

spawnCustomer()

This is one of several 'spawn' functions that build a fresh state object and push it into the array that playGame() iterates over - the same shape is reused for offenders, officers, and every vehicle.

function spawnCustomer(catcherX, catcherY, grabbedEmoji) {
  let size = random(30, 50);
  let entrySide = random(['left', 'right']);
  let startX = entrySide === 'left' ? -size / 2 : width + size / 2; 
  
  let targetX = constrain(catcherX + random(-catcher.width / 2, catcher.width / 2), size / 2, width - size / 2);
  let y = figureGroundY; // Use the new ground level for figures

  customers.push({
    x: startX,
    y: y, // This is the 'ground' Y for the figure
    size: size,
    state: 'entering', // Initial state
    targetX: targetX,
    speed: customerWalkSpeed,
    grabEmoji: grabbedEmoji, // The emoji they just "grabbed"
    grabStartTime: 0, // Will be set when they enter 'grabbing' state
    bodyColor: skinColor,
    headColor: skinColor,
    shirtColor: customerShirtColor,
    isPolice: false
  });
}
Line-by-line explanation (4 lines)
let entrySide = random(['left', 'right']);
Randomly decides whether the customer walks in from the left or right edge of the screen.
let startX = entrySide === 'left' ? -size / 2 : width + size / 2;
Uses a ternary expression to place the customer just off-screen on whichever side they're entering from.
let targetX = constrain(catcherX + random(-catcher.width / 2, catcher.width / 2), size / 2, width - size / 2);
Picks a destination near the basket, then constrain() clamps it so the customer never tries to walk to an off-screen or negative position.
customers.push({ ... state: 'entering', ... });
Adds the new customer object to the customers array in the 'entering' state, which the customer state machine in playGame() will pick up next frame.

spawnOffender()

Returning a reference to a freshly-created object (rather than just an index) is what lets the police officer object store officer.offenderRef and keep the two figures visually linked as they move and leave together.

function spawnOffender(catcherX, catcherY) {
  let size = random(30, 50);
  // Position the offender at the new ground level
  let offenderX = constrain(catcherX + random(-catcher.width / 2, catcher.width / 2), size / 2, width - size / 2);
  let offenderY = figureGroundY; // Use the new ground level

  offenders.push({
    x: offenderX,
    y: offenderY, // This is the 'ground' Y for the figure
    size: size,
    state: 'arrested', // Offender is immediately 'arrested' when spawned with a police officer
    targetX: offenderX, // Stays in place until police arrive
    speed: 0, // Doesn't move initially
    bodyColor: skinColor,
    headColor: skinColor,
    shirtColor: offenderShirtColor,
    isPolice: false
  });
  return offenders[offenders.length - 1]; // Return reference to the newly created offender
}
Line-by-line explanation (2 lines)
state: 'arrested', // Offender is immediately 'arrested' when spawned with a police officer
Unlike customers, offenders start out already 'caught' since they always spawn together with a police officer that arrests them on the same frame.
return offenders[offenders.length - 1]; // Return reference to the newly created offender
Returns a direct reference to the object just pushed, so the calling code (spawnPoliceOfficer) can link the officer and offender together.

spawnPoliceOfficer()

This function demonstrates linking two independent objects together via an object reference (offenderRef) - a lightweight alternative to a proper parent/child class hierarchy.

function spawnPoliceOfficer(offenderRef) {
  let size = random(30, 50);
  // Position the police officer at the new ground level, next to the offender
  let officerX = offenderRef.x + random(-size/2, size/2); // Spawn near offender
  let officerY = figureGroundY; // Use the new ground level

  policeOfficers.push({
    x: officerX,
    y: officerY, // This is the 'ground' Y for the figure
    size: size,
    state: 'arresting', // Start directly in arresting state for immediate response
    targetX: officerX, // Not used for entering, but keeps structure consistent
    speed: 0, // Not used for entering - will be set when leaving
    arrestStartTime: millis(), // Start arrest timer immediately
    offenderRef: offenderRef, // Reference to the person they are arresting
    bodyColor: skinColor,
    headColor: skinColor,
    shirtColor: policeShirtColor,
    isPolice: true
  });
  
  // Ensure the offender is also in the arrested state immediately
  if (offenderRef) {
    offenderRef.state = 'arrested';
  }
}
Line-by-line explanation (2 lines)
arrestStartTime: millis(), // Start arrest timer immediately
Records the current time in milliseconds so playGame() can later check 'has arrestDuration passed?' by comparing millis() against this stored value.
offenderRef: offenderRef, // Reference to the person they are arresting
Stores a direct pointer to the offender object, letting the officer's drawing code position and later move the offender alongside them.

spawnPoliceCar()

This is the simplest of the vehicle spawners - a good starting point if you want to add your own new vehicle type, since it shows the minimum set of properties (position, size, speed, direction, state) needed for playGame() to animate it.

function spawnPoliceCar() {
  let direction = random(['left', 'right']);
  let startX = direction === 'left' ? width + policeCarWidth / 2 : -policeCarWidth / 2;

  policeCars.push({
    x: startX,
    y: policeCarY, // Now relative to figureGroundY
    width: policeCarWidth,
    height: policeCarHeight,
    speed: policeCarSpeed,
    direction: direction,
    lightState: 0, // 0 for red, 1 for blue
    lightToggleTime: 0, // When to toggle lights next
    state: 'driving', // Initial state for the police car
    explosionStartTime: 0 // Will be set when car hits a wall
  });
}
Line-by-line explanation (2 lines)
let startX = direction === 'left' ? width + policeCarWidth / 2 : -policeCarWidth / 2;
If the car is going to drive left, it starts just off the right edge; if driving right, it starts just off the left edge - so it always drives across the whole screen.
state: 'driving', // Initial state for the police car
Every police car begins in the 'driving' state, which the police car switch statement in playGame() will animate.

spawnPoliceHelicopter()

The helicopter has the longest state chain in the whole sketch, which is why it needs extra properties like descentSpeed and rotorAngle that the simpler police car doesn't.

function spawnPoliceHelicopter() {
  let direction = random(['left', 'right']);
  let startX = direction === 'left' ? width + policeHelicopterWidth / 2 : -policeHelicopterWidth / 2;

  policeHelicopters.push({
    x: startX,
    y: policeHelicopterY, // Initial flying height (absolute)
    width: policeHelicopterWidth,
    height: policeHelicopterHeight,
    speed: policeHelicopterFlyingSpeed, // Horizontal speed
    descentSpeed: policeHelicopterDescentSpeed, // Vertical descent speed
    direction: direction,
    lightState: 0,
    lightToggleTime: 0,
    rotorAngle: 0, // For spinning animation
    state: 'flying', // Initial state
    descentStartTime: 0, // When descent begins
    explosionStartTime: 0 // When ground explosion begins
  });
}
Line-by-line explanation (2 lines)
rotorAngle: 0, // For spinning animation
Stores the current rotation angle of the helicopter's rotor blades; drawPoliceHelicopter() increments this every frame while flying.
state: 'flying', // Initial state
Kicks off the helicopter's long chain of states: flying → descending → exploding → waitingForFireTruck → beingSprayed → waitingForTowTruck → beingTowed → leaving.

spawnFireTruck()

This function is only ever called from inside playGame()'s helicopter 'exploding' case, illustrating how one entity's state transition can spawn an entirely new entity as a consequence.

function spawnFireTruck(targetX) {
  let direction = targetX < width / 2 ? 'right' : 'left';
  let startX = direction === 'left' ? width + fireTruckWidth / 2 : -fireTruckWidth / 2;

  fireTrucks.push({
    x: startX,
    y: fireTruckY, // Now relative to figureGroundY
    width: fireTruckWidth,
    height: fireTruckHeight,
    speed: fireTruckSpeed,
    direction: direction,
    targetX: targetX, // Position to stop and spray
    lightState: 0,
    lightToggleTime: 0,
    state: 'entering', // Initial state
    sprayingStartTime: 0 // When spraying begins
  });
}
Line-by-line explanation (2 lines)
let direction = targetX < width / 2 ? 'right' : 'left';
Decides which side of the screen to enter from based on where the crashed helicopter is - if the helicopter is on the left half, the truck enters from the left driving right, and vice versa.
targetX: targetX, // Position to stop and spray
Stores the exact x position the truck needs to reach (the helicopter's location) before switching from 'entering' to 'spraying'.

spawnTowTruck()

This is the final link in the crash-response chain: helicopter crashes → fire truck spawned → fire truck finishes spraying → tow truck spawned here → tow truck drags the helicopter away.

function spawnTowTruck(helicopterRef) {
  let direction = helicopterRef.x < width / 2 ? 'right' : 'left';
  let startX = direction === 'left' ? width + towTruckWidth / 2 : -towTruckWidth / 2;

  towTrucks.push({
    x: startX,
    y: towTruckY, // Now relative to figureGroundY
    width: towTruckWidth,
    height: towTruckHeight,
    speed: towTruckSpeed,
    direction: direction,
    targetX: helicopterRef.x, // Position to stop and tow
    lightState: 0,
    lightToggleTime: 0,
    state: 'entering', // Initial state
    towingStartTime: 0, // When towing begins
    helicopterRef: helicopterRef // Reference to the helicopter it will tow
  });
}
Line-by-line explanation (1 lines)
helicopterRef: helicopterRef // Reference to the helicopter it will tow
Keeps a direct object reference to the crashed helicopter so the tow truck's update logic can reposition the helicopter to stay attached to its hook every frame.

drawFigure()

drawFigure() is a single reusable function that draws customers, offenders, AND police officers, using object properties (bodyColor, shirtColor, isPolice) instead of separate functions - a compact example of data-driven rendering.

🔬 The '20' here controls how many frames make up one full leg-swing cycle. What happens if you lower it to 6? Does the walk look faster or jittery?

  if (fig.state === 'entering' || fig.state === 'leaving') {
    legOffset = (frameCount % 20 < 10) ? 2 : -2;
  }
function drawFigure(fig) {
  let legOffset = 0;
  // Simple walking animation: toggle legs slightly every 10 frames
  if (fig.state === 'entering' || fig.state === 'leaving') {
    legOffset = (frameCount % 20 < 10) ? 2 : -2;
  }
  
  // Draw body (rectangle)
  fill(fig.bodyColor);
  noStroke();
  rect(fig.x, fig.y + fig.size / 4, fig.size * 0.6, fig.size * 0.8);
  
  // Draw head (circle)
  fill(fig.headColor);
  ellipse(fig.x, fig.y - fig.size / 4, fig.size * 0.5);
  
  // Draw shirt (rectangle)
  fill(fig.shirtColor);
  rect(fig.x, fig.y + fig.size * 0.25, fig.size * 0.6, fig.size * 0.4);

  // Draw legs (two smaller rectangles)
  fill(fig.headColor); // Skin color for legs
  rect(fig.x - fig.size * 0.15 + legOffset, fig.y + fig.size * 0.65, fig.size * 0.2, fig.size * 0.5);
  rect(fig.x + fig.size * 0.15 - legOffset, fig.y + fig.size * 0.65, fig.size * 0.2, fig.size * 0.5);

  // Draw hat for police
  if (fig.isPolice) {
    fill(fig.shirtColor);
    rect(fig.x, fig.y - fig.size * 0.6, fig.size * 0.7, fig.size * 0.2); // Brim
    rect(fig.x, fig.y - fig.size * 0.75, fig.size * 0.4, fig.size * 0.3); // Top part
  }
}
Line-by-line explanation (4 lines)

🔧 Subcomponents:

conditional Walking Leg Animation legOffset = (frameCount % 20 < 10) ? 2 : -2;

Alternates the leg offset between +2 and -2 every 10 frames, creating a simple walking-in-place wiggle.

conditional Police Hat Drawing if (fig.isPolice) { ... }

Draws an extra two-part hat on top of the head, but only for figures flagged as police.

legOffset = (frameCount % 20 < 10) ? 2 : -2;
Uses the modulo operator on frameCount (which increases by 1 every frame) to flip legOffset back and forth every 10 frames, without needing a separate timer variable.
rect(fig.x, fig.y + fig.size / 4, fig.size * 0.6, fig.size * 0.8);
Draws the torso as a rectangle sized proportionally to the figure's overall 'size', so bigger figures scale up consistently.
rect(fig.x - fig.size * 0.15 + legOffset, fig.y + fig.size * 0.65, fig.size * 0.2, fig.size * 0.5);
Draws the left leg shifted by legOffset, while the right leg (next line) is shifted by the opposite amount, so the legs swing in opposite directions like a walk cycle.
if (fig.isPolice) {
Checks a boolean flag on the figure object to decide whether to draw the extra police hat shapes - a simple way to reuse one drawing function for multiple character types.

drawPoliceCar()

This millis()-based toggle pattern (compare millis() to a stored future timestamp, then schedule the next one) appears again in the helicopter, fire truck, and tow truck light code - learning it once here means you'll recognize it everywhere else.

function drawPoliceCar(car) {
  // Car body
  fill(policeCarColor);
  noStroke();
  rect(car.x, car.y, car.width, car.height);

  // Blinking lights (only when driving or leaving, not exploding for visual clarity)
  if (car.state === 'driving' || car.state === 'leaving') {
    if (millis() > car.lightToggleTime) {
      car.lightState = 1 - car.lightState; // Toggle between 0 and 1
      car.lightToggleTime = millis() + 200; // Toggle every 200ms
    }

    noStroke();
    if (car.lightState === 0) {
      fill(policeLightRed);
      rect(car.x - car.width / 4, car.y - car.height / 2, car.width / 6, car.height / 4);
      fill(policeLightBlue);
      rect(car.x + car.width / 4, car.y - car.height / 2, car.width / 6, car.height / 4);
    } else {
      fill(policeLightBlue);
      rect(car.x - car.width / 4, car.y - car.height / 2, car.width / 6, car.height / 4);
      fill(policeLightRed);
      rect(car.x + car.width / 4, car.y - car.height / 2, car.width / 6, car.height / 4);
    }
    stroke(0); // Reset stroke
  }
}
Line-by-line explanation (3 lines)

🔧 Subcomponents:

conditional Light Toggle Timer if (millis() > car.lightToggleTime) { car.lightState = 1 - car.lightState; car.lightToggleTime = millis() + 200; }

Every 200 real-world milliseconds, flips lightState between 0 and 1, which the drawing code below uses to swap red/blue light positions and simulate blinking.

if (millis() > car.lightToggleTime) {
millis() returns milliseconds since the sketch started; comparing it to a stored 'next toggle time' is a common time-based-animation trick that doesn't depend on frame rate.
car.lightState = 1 - car.lightState; // Toggle between 0 and 1
A neat trick to flip a 0/1 value: 1 minus 0 is 1, and 1 minus 1 is 0.
car.lightToggleTime = millis() + 200; // Toggle every 200ms
Schedules the next toggle 200ms in the future by storing an absolute future timestamp rather than counting down a separate timer variable.

drawPoliceHelicopter()

This function is the best example in the whole sketch of using push(), translate(), and rotate() together to build a compound animated object out of simple rectangles - a core p5.js technique for any rotating part (wheels, propellers, clock hands, etc.).

🔬 The rotor only spins while state === 'flying'. What do you think happens visually if you also let it spin while 'descending' by adding that state to the check?

  if (helicopter.state === 'flying') {
    helicopter.rotorAngle += helicopterRotorSpeed;
    push();
    translate(-helicopter.width * 0.7, -helicopter.height * 0.3); // Position at vertical tail
    rotate(helicopter.rotorAngle);
function drawPoliceHelicopter(helicopter) {
  push();
  translate(helicopter.x, helicopter.y);

  // Body
  fill(helicopterBodyColor);
  noStroke();
  rect(0, 0, helicopter.width, helicopter.height, 10); // Main body

  // Cabin/Glass
  fill(helicopterGlassColor);
  rect(helicopter.width * 0.25, -helicopter.height * 0.1, helicopter.width * 0.3, helicopter.height * 0.7, 5);

  // Tail
  fill(helicopterBodyColor);
  rect(-helicopter.width * 0.5, 0, helicopter.width * 0.5, helicopter.height * 0.2); // Tail boom
  rect(-helicopter.width * 0.7, -helicopter.height * 0.3, helicopter.height * 0.2, helicopter.height * 0.6); // Vertical tail

  // Tail rotor (only spins if flying)
  if (helicopter.state === 'flying') {
    helicopter.rotorAngle += helicopterRotorSpeed;
    push();
    translate(-helicopter.width * 0.7, -helicopter.height * 0.3); // Position at vertical tail
    rotate(helicopter.rotorAngle);
    fill(helicopterRotorColor);
    rect(0, 0, helicopter.height * 0.05, helicopter.height * 0.4); // Tail rotor blade
    rect(0, 0, helicopter.height * 0.4, helicopter.height * 0.05); // Tail rotor blade
    pop();
  }

  // Main rotor (only spins if flying)
  if (helicopter.state === 'flying') {
    push();
    translate(helicopter.width * 0.1, -helicopter.height * 0.5); // Position above main body
    rotate(helicopter.rotorAngle); // Same angle for main rotor
    fill(helicopterRotorColor);
    rect(0, 0, policeHelicopterWidth * 0.8, 5); // Main rotor blade
    rect(0, 0, 5, policeHelicopterWidth * 0.8); // Main rotor blade
    pop();
  }

  // Lights (similar to car, but on top)
  if (helicopter.state === 'flying' || helicopter.state === 'descending') { // Lights stay on during descent
    if (millis() > helicopter.lightToggleTime) {
      helicopter.lightState = 1 - helicopter.lightState;
      helicopter.lightToggleTime = millis() + 200;
    }

    noStroke();
    if (helicopter.lightState === 0) {
      fill(policeLightRed);
      ellipse(helicopter.width * 0.1, -helicopter.height * 0.3, 10);
      fill(policeLightBlue);
      ellipse(helicopter.width * 0.3, -helicopter.height * 0.3, 10);
    } else {
      fill(policeLightBlue);
      ellipse(helicopter.width * 0.1, -helicopter.height * 0.3, 10);
      fill(policeLightRed);
      ellipse(helicopter.width * 0.3, -helicopter.height * 0.3, 10);
    }
  }
  
  pop();
}
Line-by-line explanation (6 lines)

🔧 Subcomponents:

conditional Tail Rotor Spin push(); translate(-helicopter.width * 0.7, -helicopter.height * 0.3); rotate(helicopter.rotorAngle); ... pop();

Uses a nested push()/translate()/rotate()/pop() block to spin the small tail rotor around its own pivot point without affecting the rest of the drawing.

conditional Main Rotor Spin push(); translate(helicopter.width * 0.1, -helicopter.height * 0.5); rotate(helicopter.rotorAngle); ... pop();

Spins the large top rotor blade using the same rotorAngle as the tail rotor, so both stay in sync.

push();
Saves the current drawing state (position, rotation) so any translate()/rotate() calls that follow can be undone later with pop().
translate(helicopter.x, helicopter.y);
Shifts the coordinate system so that (0,0) is now at the helicopter's position - every shape drawn afterward can use simple relative coordinates instead of adding helicopter.x/y every time.
rect(0, 0, helicopter.width, helicopter.height, 10); // Main body
Draws the fuselage at the new local origin; the extra '10' argument gives the rectangle rounded corners.
helicopter.rotorAngle += helicopterRotorSpeed;
Increases the stored rotor angle a little every frame, which is what makes the rotor appear to spin continuously.
rotate(helicopter.rotorAngle);
Rotates the local coordinate system by the current rotor angle before drawing the rotor blade rectangles, making them visually spin around their pivot.
pop();
Restores the coordinate system to how it was before this push(), so later drawing (like the lights, or the next helicopter in the array) isn't affected by the translate/rotate calls made here.

drawFireTruck()

This function reuses the same push()/translate()/rotate()/pop() pattern seen in drawPoliceHelicopter(), showing how the same technique applies to a static angled part (the ladder) instead of a continuously spinning one.

function drawFireTruck(truck) {
  push();
  translate(truck.x, truck.y);

  // Main body
  fill(fireTruckColor);
  noStroke();
  rect(0, 0, truck.width, truck.height, 5);

  // Cabin
  fill(policeCarColor);
  rect(truck.width * 0.35, -truck.height * 0.1, truck.width * 0.3, truck.height * 0.7, 3);

  // Ladder base
  fill(policeLightRed);
  rect(-truck.width * 0.25, -truck.height * 0.5, truck.width * 0.4, truck.height * 0.4, 3);

  // Ladder (always slightly raised)
  push();
  translate(-truck.width * 0.25, -truck.height * 0.5);
  rotate(-PI / 6); // Angle the ladder up
  fill(200); // Silver/gray
  rect(0, 0, truck.height * 0.2, truck.width * 0.4);
  pop();

  // Blinking lights
  if (millis() > truck.lightToggleTime) {
    truck.lightState = 1 - truck.lightState; // Toggle between 0 and 1
    truck.lightToggleTime = millis() + 200; // Toggle every 200ms
  }

  noStroke();
  if (truck.lightState === 0) {
    fill(policeLightRed);
    ellipse(truck.width * 0.1, -truck.height * 0.3, 10);
    fill(policeLightBlue);
    ellipse(truck.width * 0.3, -truck.height * 0.3, 10);
  } else {
    fill(policeLightBlue);
    ellipse(truck.width * 0.1, -truck.height * 0.3, 10);
    fill(policeLightRed);
    ellipse(truck.width * 0.3, -truck.height * 0.3, 10);
  }
  stroke(0); // Reset stroke

  pop();
}
Line-by-line explanation (2 lines)

🔧 Subcomponents:

calculation Angled Ladder rotate(-PI / 6); // Angle the ladder up

Rotates the ladder rectangle by -30 degrees (in radians) around its base so it looks propped up at an angle rather than lying flat.

rotate(-PI / 6); // Angle the ladder up
p5.js rotate() takes radians, not degrees; PI radians equals 180 degrees, so PI/6 is 30 degrees - the negative sign tilts it upward/backward.
rect(0, 0, truck.height * 0.2, truck.width * 0.4);
Draws the ladder as a long thin rectangle, sized relative to the truck's own height and width so it scales if the truck's dimensions change.

drawWaterSpray()

This is the only place in the sketch that uses triangle() - a quick way to fake a cone/beam shape with just three points, much simpler than trying to build the same effect out of rectangles.

function drawWaterSpray(truck) {
  noStroke();
  fill(waterSprayColor);
  // Spray from the ladder towards the helicopter (which is at figureGroundY - helicopterHeight/2)
  let sprayX = truck.x - truck.width * 0.25; // Base of ladder
  let sprayY = truck.y - truck.height * 0.5; // Base of ladder

  // Draw a triangular spray effect
  triangle(
    sprayX, sprayY,
    sprayX - truck.width * 0.5, figureGroundY - policeHelicopterHeight / 2, // Wider at the helicopter
    sprayX - truck.width * 0.1, figureGroundY - policeHelicopterHeight / 2 // Narrower at the helicopter
  );
}
Line-by-line explanation (2 lines)
fill(waterSprayColor);
Uses the semi-transparent blue color defined at the top of the file (with an alpha value) so the water spray looks translucent rather than solid.
triangle( sprayX, sprayY, sprayX - truck.width * 0.5, figureGroundY - policeHelicopterHeight / 2, sprayX - truck.width * 0.1, figureGroundY - policeHelicopterHeight / 2 );
Draws one triangle with three (x,y) points: a narrow point at the ladder tip and two wider points near the ground, creating a cone-shaped spray effect with a single shape call.

drawTowTruck()

This function demonstrates scale() as a cheap alternative to drawing two separate 'facing left' and 'facing right' versions of the same vehicle - you draw it once facing one way, then mirror it as needed.

🔬 What do you think happens if you flip vertically too by changing scale(-1, 1) to scale(-1, -1)?

  if (truck.direction === 'left') {
    scale(-1, 1); // Flip horizontally if moving left
  }
function drawTowTruck(truck) {
  push();
  translate(truck.x, truck.y);

  if (truck.direction === 'left') {
    scale(-1, 1); // Flip horizontally if moving left
  }

  // Main body (relative to truck.x, truck.y)
  fill(towTruckColor);
  noStroke();
  rect(0, 0, truck.width, truck.height, 5);

  // Cabin (positioned on the left side of the body, assuming facing right)
  fill(policeCarColor);
  rect(-truck.width * 0.3, -truck.height * 0.1, truck.width * 0.3, truck.height * 0.7, 3); // Cabin on left

  // Towing arm (positioned on the right side of the body, assuming facing right)
  fill(200); // Silver/gray
  rect(truck.width * 0.3, -truck.height * 0.4, truck.width * 0.4, truck.height * 0.2); // Arm body
  rect(truck.width * 0.5, -truck.height * 0.3, truck.height * 0.1, truck.height * 0.4); // Hook

  // Blinking lights (still on top, relative to truck.x)
  if (millis() > truck.lightToggleTime) {
    truck.lightState = 1 - truck.lightState; // Toggle between 0 and 1
    truck.lightToggleTime = millis() + 200; // Toggle every 200ms
  }

  noStroke();
  if (truck.lightState === 0) {
    fill(policeLightRed);
    ellipse(-truck.width * 0.1, -truck.height * 0.3, 10); // Left light
    fill(policeLightBlue);
    ellipse(truck.width * 0.1, -truck.height * 0.3, 10); // Right light
  } else {
    fill(policeLightBlue);
    ellipse(-truck.width * 0.1, -truck.height * 0.3, 10); // Left light
    fill(policeLightRed);
    ellipse(truck.width * 0.1, -truck.height * 0.3, 10); // Right light
  }
  stroke(0); // Reset stroke

  pop();
}
Line-by-line explanation (1 lines)

🔧 Subcomponents:

conditional Horizontal Flip if (truck.direction === 'left') { scale(-1, 1); // Flip horizontally if moving left }

Uses scale(-1, 1) to mirror the entire truck drawing horizontally so it visually faces whichever direction it's driving.

scale(-1, 1); // Flip horizontally if moving left
scale() multiplies the coordinate system - a factor of -1 on the x-axis mirrors everything drawn afterward left-to-right, while 1 on the y-axis leaves vertical size unchanged.

drawFireEffect()

This function is a nice example of a fake particle system without any particle array or physics - it just redraws a fresh batch of random ellipses every single frame, using map() to tie their size/opacity to elapsed time.

🔬 fireSize and alpha both shrink toward 0 as intensity drops. What happens if you make alpha map to 0,255 instead of 0,200 - does the fire look more solid at its peak?

      let fireSize = random(10, 30) * intensity;
      let alpha = map(intensity, 0, 1, 0, 200); // Fire fades as intensity decreases
function drawFireEffect(obj) { // Generalized for car or helicopter
  let elapsed = millis() - obj.explosionStartTime;
  let intensity = map(elapsed, 0, explosionDuration, 1, 0); // Fade out fire over duration

  // If helicopter is being sprayed, fade fire faster
  if (obj.state === 'beingSprayed') {
    elapsed = millis() - obj.explosionStartTime - (explosionDuration - sprayingDuration); // Start fading from when spraying begins
    intensity = map(elapsed, 0, sprayingDuration, 1, 0);
  }

  if (intensity > 0) {
    noStroke();
    for (let i = 0; i < 15; i++) { // Draw 15 fire particles
      let fireX = obj.x + random(-obj.width / 3, obj.width / 3);
      let fireY = obj.y - obj.height / 2 + random(-10, 10); // Around the top/center of the object

      let fireSize = random(10, 30) * intensity;
      let alpha = map(intensity, 0, 1, 0, 200); // Fire fades as intensity decreases

      // Color based on intensity and randomness
      if (random(1) < 0.5) {
        fill(255, random(100, 200), 0, alpha); // Red-orange
      } else {
        fill(255, 255, random(0, 100), alpha); // Yellow-orange
      }
      ellipse(fireX, fireY, fireSize, fireSize * random(0.5, 1.5));
    }
  }
}
Line-by-line explanation (4 lines)

🔧 Subcomponents:

for-loop Fire Particle Loop for (let i = 0; i < 15; i++) { ... }

Draws 15 randomly-sized, randomly-positioned, randomly-colored semi-transparent ellipses every frame to fake a flickering fire effect.

let intensity = map(elapsed, 0, explosionDuration, 1, 0); // Fade out fire over duration
map() rescales a value from one range to another; here it converts 'milliseconds elapsed since explosion' (0 to explosionDuration) into a fade-out intensity that goes from 1 down to 0.
let fireX = obj.x + random(-obj.width / 3, obj.width / 3);
Scatters each fire particle randomly around the object's horizontal center, proportional to the object's width, so bigger objects get a wider fire spread.
let fireSize = random(10, 30) * intensity;
Multiplies a random base size by the current intensity, so particles shrink as the fire dies down.
if (random(1) < 0.5) { fill(255, random(100, 200), 0, alpha); // Red-orange } else { fill(255, 255, random(0, 100), alpha); // Yellow-orange }
Randomly picks between a red-orange and yellow-orange fill color for each particle, and uses the calculated alpha so the whole effect becomes more transparent as it fades.

checkCollision()

checkCollision() is a general-purpose AABB test reused for a different pairing (car vs. person) than the hand-written version inside playGame() (droplet vs. catcher) - comparing the two shows how the same math can either be inlined or extracted into a helper function.

function checkCollision(objA, objB) {
  // Police car bounding box
  let carLeft = objA.x - objA.width / 2;
  let carRight = objA.x + objA.width / 2;
  let carTop = objA.y - objA.height / 2;
  let carBottom = objA.y + objA.height / 2;

  // Figure bounding box (simplified for body)
  let figureLeft = objB.x - objB.size * 0.3; // Half body width
  let figureRight = objB.x + objB.size * 0.3;
  let figureTop = objB.y - objB.size / 4; // Body center Y
  let figureBottom = objB.y + objB.size / 4 + objB.size * 0.4; // Body center Y + half body height

  return carLeft < figureRight && carRight > figureLeft && carTop < figureBottom && carBottom > figureTop;
}
Line-by-line explanation (3 lines)
let carLeft = objA.x - objA.width / 2;
Because rectMode(CENTER) is used, a vehicle's x is its center, so its left edge is center minus half the width.
let figureLeft = objB.x - objB.size * 0.3; // Half body width
Approximates the figure's torso width (drawn at fig.size * 0.6 wide in drawFigure()) as a bounding box half that wide on each side, rather than trying to match every body part exactly.
return carLeft < figureRight && carRight > figureLeft && carTop < figureBottom && carBottom > figureTop;
The same AABB overlap test used for droplet-vs-catcher collision, reused here for vehicle-vs-pedestrian collision - proof that one simple collision formula works for any two rectangular boxes.

touchMoved()

This is p5.js's built-in touchMoved() callback, automatically invoked whenever a finger moves on a touchscreen - essential for making the game playable on mobile devices.

function touchMoved() {
  if (touches.length > 0) { // Check if there's at least one touch
    catcher.x = touches[0].x; // Use touches[0].x for continuous touch movement
    catcher.x = constrain(catcher.x, catcher.width / 2, width - catcher.width / 2);
  }
  // Prevent default scroll behavior on touch devices
  return false;
}
Line-by-line explanation (4 lines)
if (touches.length > 0) {
p5.js automatically fills the touches array with every current finger touch; checking its length confirms there's actually a touch to read before using it.
catcher.x = touches[0].x;
Reads the x-coordinate of the first (or only) finger touching the screen and uses it directly as the catcher's new horizontal position.
catcher.x = constrain(catcher.x, catcher.width / 2, width - catcher.width / 2);
Clamps the catcher's position so it can never move so far left or right that part of it would go off-screen.
return false;
Returning false from a p5.js touch event handler stops the browser's default behavior (like scrolling the page) so dragging your finger only moves the catcher.

mousePressed()

mousePressed() fires once, exactly when a mouse button goes down - useful for an initial 'jump to click position' before mouseDragged() takes over for continuous movement.

function mousePressed() {
  catcher.x = mouseX;
  catcher.x = constrain(catcher.x, catcher.width / 2, width - catcher.width / 2);
}
Line-by-line explanation (2 lines)
catcher.x = mouseX;
mouseX is a built-in p5.js variable always holding the mouse's current horizontal position; assigning it instantly teleports the catcher there on click.
catcher.x = constrain(catcher.x, catcher.width / 2, width - catcher.width / 2);
Applies the same boundary clamp as touchMoved() so a click near the very edge doesn't push the catcher off-screen.

mouseDragged()

mouseDragged() fires repeatedly while the mouse button is held and the cursor moves, giving smooth continuous control of the catcher (as opposed to mousePressed(), which only fires once per click).

function mouseDragged() {
  catcher.x = mouseX;
  catcher.x = constrain(catcher.x, catcher.width / 2, width - catcher.width / 2);
}
Line-by-line explanation (1 lines)
catcher.x = mouseX;
Continuously updates the catcher's x to match the mouse while a button is held down and the mouse is moving.

windowResized()

windowResized() is a p5.js callback fired automatically whenever the browser window changes size. Duplicating the ground-Y calculations from setup() here (rather than only setting them once) keeps the layout correct after a resize - a good example of why derived layout values sometimes need to be recalculated more than once.

function windowResized() {
  resizeCanvas(windowWidth, windowHeight);
  // Update catcher position on resize
  catcher.x = width / 2;
  catcher.y = height - catcherHeight / 2 - 20;

  // Re-initialize figureGroundY and vehicle Y positions on resize
  figureGroundY = height - 50;
  policeCarY = figureGroundY - policeCarHeight / 2 - 10;
  fireTruckY = figureGroundY - fireTruckHeight / 2 - 10;
  towTruckY = figureGroundY - towTruckHeight / 2 - 10;
}
Line-by-line explanation (3 lines)
resizeCanvas(windowWidth, windowHeight);
Resizes the existing canvas to match the browser window's new dimensions, rather than destroying and recreating it.
catcher.x = width / 2;
Re-centers the catcher horizontally using the freshly updated width value.
figureGroundY = height - 50;
Recalculates the shared ground line using the new height, exactly mirroring what setup() did originally - necessary because all the vehicle Y positions depend on this value.

📦 Key Variables

droplets array

Holds every currently falling emoji object (position, speed, emoji, isGood flag).

let droplets = [];
customers array

Holds every customer figure walking in to grab a caught food emoji.

let customers = [];
offenders array

Holds every offender figure spawned from catching a bad emoji, awaiting or undergoing arrest.

let offenders = [];
policeOfficers array

Holds every police officer figure, each linked to the offender they're arresting via offenderRef.

let policeOfficers = [];
policeCars array

Holds every police car spawned when a tulip is caught, tracking driving/exploding/leaving state.

let policeCars = [];
policeHelicopters array

Holds every police helicopter spawned when a spider is caught, tracking its long flying-to-towed state chain.

let policeHelicopters = [];
fireTrucks array

Holds fire trucks that respond to a crashed helicopter to put out the fire.

let fireTrucks = [];
towTrucks array

Holds tow trucks that haul away a helicopter after it's been sprayed.

let towTrucks = [];
catcher object

The player-controlled basket object storing its x/y position and dimensions.

let catcher;
score number

Counts how many good (food) emojis have been successfully caught.

let score = 0;
lives number

Counts down each time a bad emoji is caught; game presumably ends when it hits 0.

let lives = 5;
missedGood number

Tracks how many good emojis fell past the catcher and were never caught.

let missedGood = 0;
figureGroundY number

The shared vertical 'ground line' Y coordinate used by all walking figures and ground vehicles for consistent positioning.

let figureGroundY;
goodEmojis array

List of food/drink emoji that count as 'good' catches and increase score.

const goodEmojis = ['🧅', '🥩', ...];
badEmojis array

Full reference list of all bad emoji (not directly used for spawning, but documents the bad category).

const badEmojis = ['🌪️', '⚡️', ...];
otherBadEmojis array

Bad emoji excluding the special tulip and spider, used for the generic 'spawn offender+officer' outcome.

const otherBadEmojis = ['🌪️', '⚡️', ...];

🔧 Potential Improvements (5)

Here are some ways this code could be enhanced:

BUG playGame() fire truck 'spraying' state

The code matches a helicopter to a fire truck using `hel.x === truck.targetX` and `hel.x === truck.x`, an exact floating-point equality check. If two helicopters happen to share nearly the same x, or values drift from repeated float math, this match could silently fail or match the wrong helicopter.

💡 Store a direct reference (e.g. truck.helicopterRef, like the tow truck already does) when spawning the fire truck instead of matching by x position.

PERFORMANCE drawFireEffect()

Every frame while an explosion is active, this function calls random() and fill() 15 times per exploding object with no object pooling, and it runs entirely inside the main draw loop for every car/helicopter simultaneously.

💡 For many simultaneous explosions this could get expensive; consider capping the number of simultaneous exploding objects or reducing the particle count on lower frame rates using deltaTime.

STYLE playGame()

playGame() is an extremely long function (~300+ lines) handling seven completely different entity types in one place, making it hard to navigate and modify safely.

💡 Split each entity loop into its own function (e.g. updateDroplets(), updateCustomers(), updatePoliceCars()) and call them in sequence from playGame() - functionally identical but much easier to read and maintain.

BUG checkCollision()

The parameter names carLeft/carRight/carTop/carBottom assume objA is always a vehicle, but the function is generic - this is only a naming/readability issue today, but could mislead future edits if checkCollision() is reused for a non-vehicle pairing.

💡 Rename to boxALeft/boxARight etc. to make clear the function works for any two rectangular objects with width/height or size properties.

FEATURE draw() / lives variable

The lives variable decrements but there's no visible game-over screen or restart mechanism when lives reaches 0 - the game currently just keeps running with a negative or zero life count.

💡 Add a check like `if (lives <= 0) { noLoop(); drawGameOverScreen(); }` in draw() to give the game a clear ending and restart button.

🔄 Code Flow

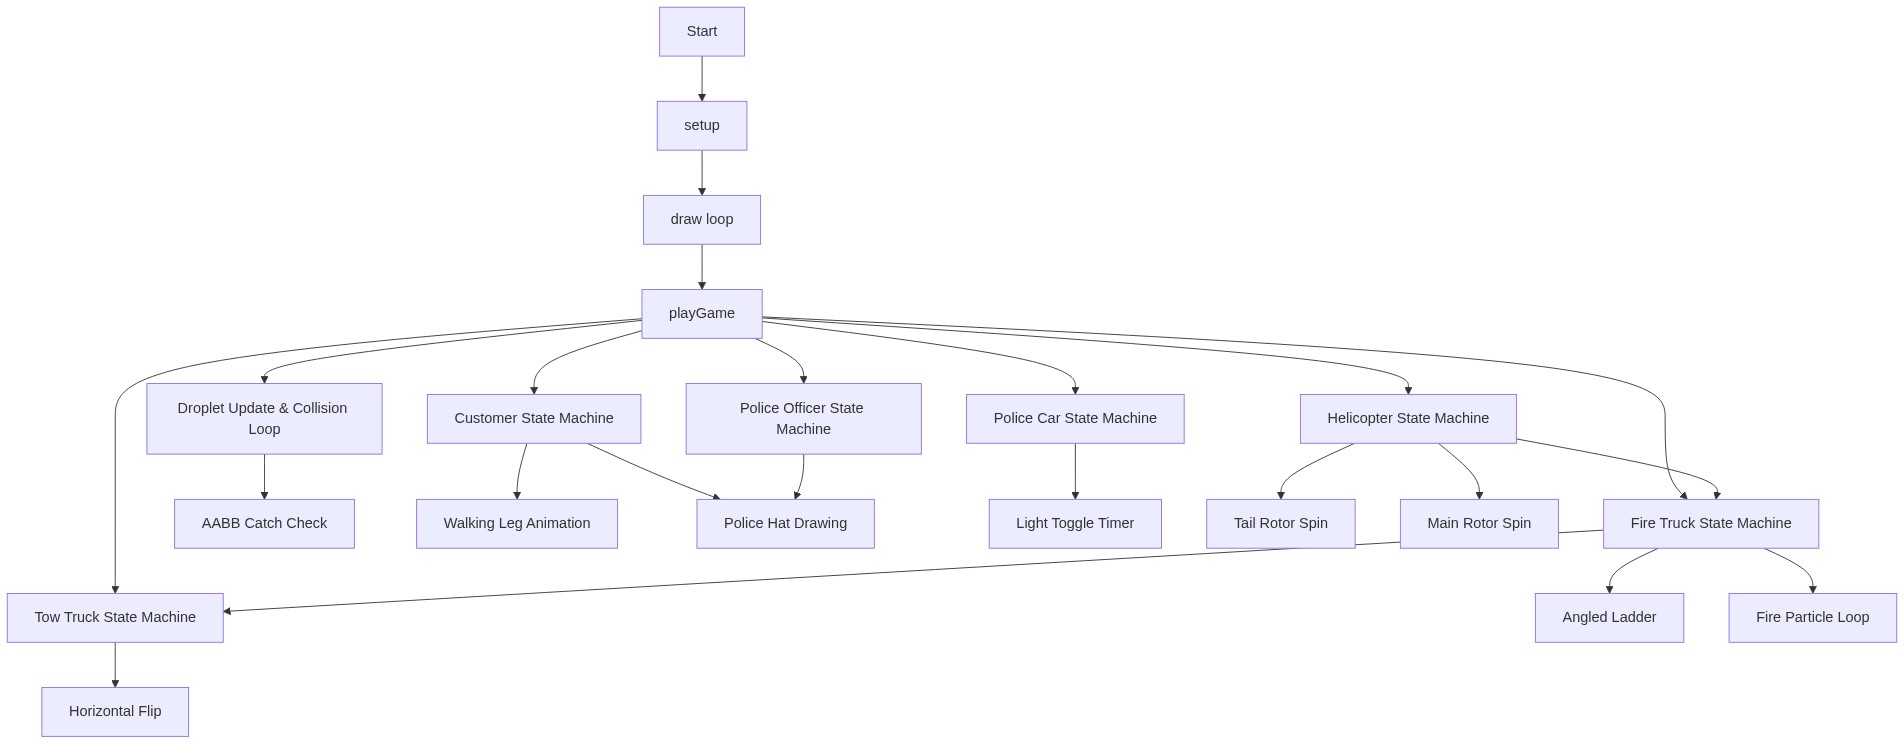
Code flow showing setup, draw, playgame, spawndroplet, spawncustomer, spawnoffender, spawnpoliceofficer, spawnpolicecar, spawnpolicehelicopter, spawnfiretruck, spawntowtruck, drawfigure, drawpolicecar, drawpolicehelicopter, drawfiretruck, drawwaterspray, drawtowtruck, drawfireeffect, checkcollision, touchmoved, mousepressed, mousedragged, windowresized

💡 Click on function names in the diagram to jump to their code

graph TD start[Start] --> setup[setup] setup --> draw[draw loop] draw --> playgame[playGame] playgame --> droplet-loop[Droplet Update & Collision Loop] playgame --> customer-switch[Customer State Machine] playgame --> police-officer-switch[Police Officer State Machine] playgame --> police-car-switch[Police Car State Machine] playgame --> helicopter-switch[Helicopter State Machine] playgame --> firetruck-switch[Fire Truck State Machine] playgame --> towtruck-switch[Tow Truck State Machine] droplet-loop --> catcher-collision[AABB Catch Check] customer-switch --> leg-walk-anim[Walking Leg Animation] customer-switch --> police-hat[Police Hat Drawing] police-officer-switch --> police-hat police-car-switch --> light-toggle-timer[Light Toggle Timer] helicopter-switch --> tail-rotor-spin[Tail Rotor Spin] helicopter-switch --> main-rotor-spin[Main Rotor Spin] helicopter-switch --> firetruck-switch firetruck-switch --> towtruck-switch towtruck-switch --> flip-scale[Horizontal Flip] firetruck-switch --> ladder-angle[Angled Ladder] firetruck-switch --> fire-particle-loop[Fire Particle Loop] click setup href "#fn-setup" click draw href "#fn-draw" click playgame href "#fn-playgame" click droplet-loop href "#sub-droplet-loop" click customer-switch href "#sub-customer-switch" click police-officer-switch href "#sub-police-officer-switch" click police-car-switch href "#sub-police-car-switch" click helicopter-switch href "#sub-helicopter-switch" click firetruck-switch href "#sub-firetruck-switch" click towtruck-switch href "#sub-towtruck-switch" click catcher-collision href "#sub-catcher-collision" click leg-walk-anim href "#sub-leg-walk-anim" click police-hat href "#sub-police-hat" click light-toggle-timer href "#sub-light-toggle-timer" click tail-rotor-spin href "#sub-tail-rotor-spin" click main-rotor-spin href "#sub-main-rotor-spin" click ladder-angle href "#sub-ladder-angle" click flip-scale href "#sub-flip-scale" click fire-particle-loop href "#sub-fire-particle-loop"

❓ Frequently Asked Questions

What visual elements are featured in the Police p5.js sketch?

The sketch displays a variety of emojis representing good and bad items, including food and drink for good emojis and disaster-themed emojis for bad ones, while also incorporating graphics of police cars, helicopters, and other emergency vehicles.

How can users engage with the Police sketch in p5.js?

Users can interact with the sketch by moving a catcher emoji to collect falling good emojis while avoiding bad emojis, striving to maintain their lives and score.

What creative coding techniques are showcased in this p5.js sketch?

This sketch demonstrates the use of arrays to manage dynamic elements, randomization for emoji spawning, and collision detection to enhance user interaction and gameplay.

Preview

Police - p5.js creative coding sketch preview
Sketch Preview
Code flow diagram showing the structure of Police - Code flow showing setup, draw, playgame, spawndroplet, spawncustomer, spawnoffender, spawnpoliceofficer, spawnpolicecar, spawnpolicehelicopter, spawnfiretruck, spawntowtruck, drawfigure, drawpolicecar, drawpolicehelicopter, drawfiretruck, drawwaterspray, drawtowtruck, drawfireeffect, checkcollision, touchmoved, mousepressed, mousedragged, windowresized
Code Flow Diagram