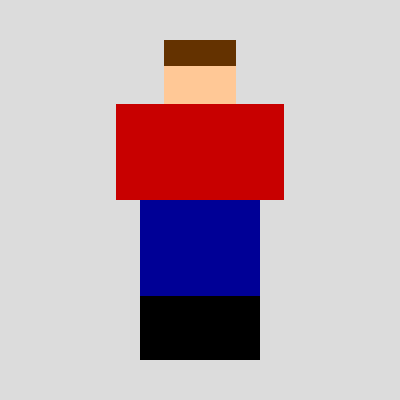
poop game

This sketch draws a colorful stick figure man that fills the canvas using direct pixel manipulation. The figure scales dynamically to fit the window and demonstrates how to control individual pixels rather than using p5.js shape functions.

🧪 Try This!

Experiment with the code by making these changes:

  1. Make the figure taller — Increase the multiplier so the figure fills more of the canvas height—watch it grow instantly
  2. Make the figure wider — Increase the width multiplier to make the figure spread across more of the canvas—arms and body stretch proportionally
  3. Give him a yellow shirt — Red + Green make yellow (in RGB color mixing)—change the shirt and arm color instantly
  4. Black background — Lower the background color value to darken it dramatically—0 is pure black
  5. Invert the pixel index formula — This advanced experiment breaks the pixel rendering—add a comment or change the formula to see how critical this line is
Prefer the full editor? Open it there →

📖 About This Sketch

This sketch creates a simple stick figure composed of a head, hair, shirt, arms, pants, and shoes—all rendered by directly manipulating p5.js's pixels array instead of using built-in shape functions like circle() or rect(). The figure scales responsively to fill 80% of the canvas height and responds instantly when you resize your browser window. It is a masterclass in how pixel arrays work under the hood and teaches you to think about the canvas as a grid of colors you can control directly.

The code is organized into setup(), which defines color objects with .levels arrays for easy RGB access, draw(), which calculates proportional body part dimensions and then loops through every pixel on the canvas to decide its color based on rectangular collision detection, and windowResized(), which keeps the figure responsive. By studying this sketch you will understand loadPixels(), the pixels array indexing formula, and how to use nested loops and conditionals to render shapes pixel-by-pixel.

⚙️ How It Works

  1. When the sketch loads, setup() creates a canvas matching your window size and pre-defines six color objects (red, blue, brown, black, skin tone, and background gray) using p5.js color() functions.
  2. Every frame, draw() clears the canvas with the background color and calculates proportional dimensions for each body part (head, hair, shirt, arms, pants, shoes) based on the canvas size.
  3. The sketch then calls loadPixels() to copy all canvas pixel data into a one-dimensional pixels array where every pixel's RGBA channels sit at indices (x + y * width) * 4, (x + y * width) * 4 + 1, (x + y * width) * 4 + 2, and (x + y * width) * 4 + 3.
  4. Two nested for-loops iterate through every (x, y) coordinate on the canvas; for each pixel, a series of if-else statements check whether that pixel falls inside any body part rectangle using simple collision detection (x >= partX && x < partX + partWidth && y >= partY && y < partY + partHeight).
  5. When a pixel collides with a body part, the code extracts the red, green, and blue values from that part's color object using .levels[0], .levels[1], and .levels[2], then writes those values into the pixels array at the correct index.
  6. Finally, updatePixels() pushes all the modified color data back to the canvas, and windowResized() ensures the figure re-renders at full resolution whenever the window is resized.

🎓 Concepts You'll Learn

Pixel array manipulationDirect pixel renderingColor objects and RGB channelsCollision detection with rectanglesResponsive canvas scalingNested loops and conditionalsIndex calculation for 2D grids

📝 Code Breakdown

setup()

setup() runs once at sketch start. This function initializes all your colors as global variables so that draw() can reference them 60 times per second without recreating them—a performance best practice.

function setup() {
  createCanvas(windowWidth, windowHeight);
  pixelDensity(1); // Crucial for direct pixel array manipulation to work consistently
  noStroke();      // Not strictly necessary for pixel manipulation, but good practice
  
  // Define colors using p5.Color objects for easy RGB level access
  cRed = color(200, 0, 0); // Red for shirt
  cBlue = color(0, 0, 150); // Blue for pants
  cBrown = color(100, 50, 0); // Brown for hair
  cBlack = color(0, 0, 0); // Black for shoes
  cSkin = color(255, 200, 150); // Light peach/orange for skin
  cBackground = color(220); // Light grey background
}
Line-by-line explanation (7 lines)

🔧 Subcomponents:

variable-assignment Color Object Definitions cRed = color(200, 0, 0);

Creates p5.Color objects with .levels arrays that store RGB values for easy pixel-by-pixel access later

function-call Pixel Density Setting pixelDensity(1);

Ensures pixel array indices match canvas coordinates exactly without device pixel scaling complications

createCanvas(windowWidth, windowHeight);
Creates a canvas that matches your entire browser window size, making the figure fill whatever space you give it
pixelDensity(1);
Tells p5.js to use a 1:1 ratio between canvas coordinates and actual pixels; without this, high-DPI screens would create misaligned pixel indices
noStroke();
Disables outline strokes on shapes (not needed for pixel manipulation but good habit to prevent confusion)
cRed = color(200, 0, 0);
Creates a p5.Color object with 100% red, 0% green, 0% blue; stores it in a global variable so draw() can access its .levels array
cBlue = color(0, 0, 150);
Creates a p5.Color object with strong blue tone for the pants
cBrown = color(100, 50, 0);
Creates a brownish color for hair by mixing red and green but no blue
cSkin = color(255, 200, 150);
Creates a peachy skin tone by mixing high red and green with medium blue
draw()

draw() is the heart of this sketch. It runs 60 times per second, recalculating all body part dimensions (so the figure stays centered and proportional when you resize the window), then loops through every pixel to decide its color based on collision detection with body part rectangles. The nested loop structure is O(width * height) complexity—for a 1920×1080 canvas that's over 2 million pixels per frame, so this is computationally expensive but fascinating to understand.

🔬 The code defaults every pixel to background, THEN overwrites it if inside a body part. What happens if you delete the if-statement checking for hair? Will the head still be visible? Why?

      // Default background color for pixels not part of the man
      r = cBackground.levels[0];
      g = cBackground.levels[1];
      b = cBackground.levels[2];
      a = 255; // Fully opaque

      // Check conditions for each body part and set its color
      // Hair
      if (x >= hairX && x < hairX + hairWidth && y >= hairY && y < hairY + hairHeight) {
        r = cBrown.levels[0];
        g = cBrown.levels[1];
        b = cBrown.levels[2];
      }

🔬 These four lines write one pixel's color into the array. What happens if you change pixels[index + 3] = a to pixels[index + 3] = 128? (Hint: 255 is fully opaque, 0 is fully transparent, 128 is halfway between)

      // Set the pixel color in the pixels array
      pixels[index] = r;
      pixels[index + 1] = g;
      pixels[index + 2] = b;
      pixels[index + 3] = a;
function draw() {
  background(cBackground); // Clear the canvas to the background color each frame

  // Calculate dimensions and positions based on canvas size
  // The man will take up about 80% of the canvas height and 30% of its width, centered
  let manHeight = height * 0.8;
  let manWidth = width * 0.3;
  let manX = (width - manWidth) / 2;
  let manY = (height - manHeight) / 2;

  // Head dimensions and position
  let headHeight = manHeight * 0.2;
  let headWidth = manWidth * 0.6; // Head is narrower than the body
  let headX = manX + (manWidth - headWidth) / 2; // Center head on body width
  let headY = manY;

  // Hair dimensions and position (overlaps the top of the head)
  let hairHeight = headHeight * 0.4;
  let hairWidth = headWidth;
  let hairX = headX;
  let hairY = headY; 

  // Shirt dimensions and position
  let shirtHeight = manHeight * 0.3;
  let shirtWidth = manWidth;
  let shirtX = manX;
  let shirtY = headY + headHeight;

  // Arms dimensions and position (simple extensions from the shirt)
  let armWidth = manWidth * 0.2;
  let armHeight = shirtHeight;
  let leftArmX = manX - armWidth;
  let rightArmX = manX + manWidth;
  let armY = shirtY;

  // Pants dimensions and position
  let pantsHeight = manHeight * 0.3;
  let pantsWidth = manWidth;
  let pantsX = manX;
  let pantsY = shirtY + shirtHeight;

  // Shoes dimensions and position
  let shoesHeight = manHeight * 0.2;
  let shoesWidth = manWidth;
  let shoesX = manX;
  let shoesY = pantsY + pantsHeight;

  // Load the current canvas pixels into the pixels array
  loadPixels();

  // Iterate over every pixel on the canvas
  for (let y = 0; y < height; y++) {
    for (let x = 0; x < width; x++) {
      // Calculate the index for the red channel of the current pixel (x, y)
      // Each pixel has 4 channels: Red, Green, Blue, Alpha
      let index = (x + y * width) * 4;
      let r, g, b, a;

      // Default background color for pixels not part of the man
      r = cBackground.levels[0];
      g = cBackground.levels[1];
      b = cBackground.levels[2];
      a = 255; // Fully opaque

      // Check conditions for each body part and set its color
      // Hair
      if (x >= hairX && x < hairX + hairWidth && y >= hairY && y < hairY + hairHeight) {
        r = cBrown.levels[0];
        g = cBrown.levels[1];
        b = cBrown.levels[2];
      }
      // Head (face)
      else if (x >= headX && x < headX + headWidth && y >= headY && y < headY + headHeight) {
        r = cSkin.levels[0];
        g = cSkin.levels[1];
        b = cSkin.levels[2];
      }
      // Shirt
      else if (x >= shirtX && x < shirtX + shirtWidth && y >= shirtY && y < shirtY + shirtHeight) {
        r = cRed.levels[0];
        g = cRed.levels[1];
        b = cRed.levels[2];
      }
      // Left Arm
      else if (x >= leftArmX && x < leftArmX + armWidth && y >= armY && y < armY + armHeight) {
        r = cRed.levels[0];
        g = cRed.levels[1];
        b = cRed.levels[2];
      }
      // Right Arm
      else if (x >= rightArmX && x < rightArmX + armWidth && y >= armY && y < armY + armHeight) {
        r = cRed.levels[0];
        g = cRed.levels[1];
        b = cRed.levels[2];
      }
      // Pants
      else if (x >= pantsX && x < pantsX + pantsWidth && y >= pantsY && y < pantsY + pantsHeight) {
        r = cBlue.levels[0];
        g = cBlue.levels[1];
        b = cBlue.levels[2];
      }
      // Shoes
      else if (x >= shoesX && x < shoesX + shoesWidth && y >= shoesY && y < shoesY + shoesHeight) {
        r = cBlack.levels[0];
        g = cBlack.levels[1];
        b = cBlack.levels[2];
      }

      // Set the pixel color in the pixels array
      pixels[index] = r;
      pixels[index + 1] = g;
      pixels[index + 2] = b;
      pixels[index + 3] = a;
    }
  }

  // Update the canvas with the modified pixels array, making the man visible
  updatePixels();
}
Line-by-line explanation (21 lines)

🔧 Subcomponents:

calculation Body Part Dimension Calculations let manHeight = height * 0.8;

Computes all proportional sizes for head, arms, shirt, pants, and shoes so the figure scales with the window

function-call Load Pixels loadPixels();

Copies all current canvas pixels into the pixels array so you can read and modify individual pixel colors

for-loop Nested Pixel Iteration for (let y = 0; y < height; y++) { for (let x = 0; x < width; x++) {

Steps through every (x, y) coordinate on the canvas so you can decide the color of each pixel individually

conditional Body Part Collision Detection if (x >= hairX && x < hairX + hairWidth && y >= hairY && y < hairY + hairHeight) {

Checks if the current pixel (x, y) falls inside a rectangular body part; if true, sets that pixel to the part's color

variable-assignment Pixel Color Assignment pixels[index] = r;

Writes red, green, blue, and alpha values into the pixels array at the correct index for this coordinate

function-call Update Canvas Display updatePixels();

Pushes all modified pixel data from the pixels array back to the canvas so you see your changes on screen

background(cBackground);
Clears the entire canvas to the background color each frame, erasing the previous frame so the figure doesn't leave trails
let manHeight = height * 0.8;
Sets the figure's total height to 80% of the canvas height; 0.8 is a multiplier, so changing it makes the figure taller or shorter
let manWidth = width * 0.3;
Sets the figure's total width to 30% of the canvas width
let manX = (width - manWidth) / 2;
Centers the figure horizontally by subtracting the figure's width from canvas width, then dividing by 2 to get the left edge position
let manY = (height - manHeight) / 2;
Centers the figure vertically using the same centering math
let headHeight = manHeight * 0.2;
Head takes up 20% of total figure height; all body parts use similar proportional math so they scale together
let headX = manX + (manWidth - headWidth) / 2;
Centers the head horizontally on top of the body by calculating the offset from the body's left edge
let leftArmX = manX - armWidth;
Places the left arm to the LEFT of the body (negative offset) so it sticks out from the body's left edge
let rightArmX = manX + manWidth;
Places the right arm to the RIGHT of the body (starting where the body ends) so it sticks out from the right edge
loadPixels();
Copies all pixel color data from the canvas into a one-dimensional array called pixels; essential before reading or modifying any pixel colors
for (let y = 0; y < height; y++) {
Outer loop iterates through all vertical coordinates from top (y=0) to bottom (y=height)
for (let x = 0; x < width; x++) {
Inner loop iterates through all horizontal coordinates from left to right for each row; together these loops hit every single pixel
let index = (x + y * width) * 4;
Calculates the index of the red channel for pixel (x, y); pixels is a flat array, so we use (x + y * width) to convert 2D (x,y) to 1D index, then multiply by 4 because each pixel has 4 channels (R, G, B, A)
r = cBackground.levels[0];
Sets the default red value to the background color's red channel; .levels[0] extracts the red component from a p5.Color object
if (x >= hairX && x < hairX + hairWidth && y >= hairY && y < hairY + hairHeight) {
Checks whether pixel (x, y) is inside the hair rectangle; if x is at least hairX AND less than the right edge AND y is at least hairY AND less than the bottom edge, we're inside the hair
r = cBrown.levels[0];
If inside a body part, overwrite the red channel with that part's color by extracting the red value from its p5.Color object
pixels[index] = r;
Writes the final red value into the pixels array at the correct index for pixel (x, y)
pixels[index + 1] = g;
Writes the green value at index + 1 (immediately after red in the 4-channel sequence)
pixels[index + 2] = b;
Writes the blue value at index + 2
pixels[index + 3] = a;
Writes the alpha (transparency) value at index + 3; always 255 here (fully opaque), but you can use lower values for see-through effects
updatePixels();
Pushes all the modified pixel data back to the canvas; without this line, your color changes stay in the pixels array but never appear on screen

windowResized()

windowResized() is a built-in p5.js callback function. Whenever the browser window size changes, p5.js calls this function automatically. Our implementation simply resizes the canvas; on the next draw() loop, all body part dimensions recalculate using height and width, so the figure smoothly adapts to any window size.

function windowResized() {
  resizeCanvas(windowWidth, windowHeight);
  // No need to redraw background here as draw() does it every frame
}
Line-by-line explanation (1 lines)

🔧 Subcomponents:

function-call Canvas Resize Call resizeCanvas(windowWidth, windowHeight);

Resizes the p5.js canvas whenever the browser window changes size, ensuring the figure always fills the new dimensions

resizeCanvas(windowWidth, windowHeight);
p5.js automatically calls windowResized() whenever you resize your browser window; this line updates the canvas size to match the new window dimensions so the figure stays responsive

📦 Key Variables

cRed p5.Color

Stores the red color (RGB 200, 0, 0) used for the shirt and both arms; p5.Color objects have a .levels array for easy pixel-by-pixel access

cRed = color(200, 0, 0);
cBlue p5.Color

Stores the blue color (RGB 0, 0, 150) used for the pants

cBlue = color(0, 0, 150);
cBrown p5.Color

Stores the brown color (RGB 100, 50, 0) used for the hair

cBrown = color(100, 50, 0);
cBlack p5.Color

Stores the black color (RGB 0, 0, 0) used for the shoes

cBlack = color(0, 0, 0);
cSkin p5.Color

Stores the skin tone color (RGB 255, 200, 150) used for the head/face

cSkin = color(255, 200, 150);
cBackground p5.Color

Stores the background gray color (RGB 220, 220, 220) used to fill pixels not part of the figure

cBackground = color(220);
manHeight number

Stores the total height of the figure as a percentage of canvas height; used to calculate all body part sizes proportionally

let manHeight = height * 0.8;
manWidth number

Stores the total width of the figure as a percentage of canvas width

let manWidth = width * 0.3;
manX number

Stores the left edge x-coordinate of the figure's bounding box; calculated to center the figure horizontally

let manX = (width - manWidth) / 2;
index number

Stores the calculated array index for the red channel of the current pixel; used to access and modify pixels at (x, y)

let index = (x + y * width) * 4;
r number

Stores the red (0-255) component of the current pixel's color

let r; // declared, then assigned in the loop
g number

Stores the green (0-255) component of the current pixel's color

let g;
b number

Stores the blue (0-255) component of the current pixel's color

let b;
a number

Stores the alpha/transparency (0-255) component of the current pixel; always 255 here (fully opaque)

let a;

🔧 Potential Improvements (5)

Here are some ways this code could be enhanced:

PERFORMANCE draw() nested loop

The nested loop iterates over EVERY pixel every frame (width * height iterations × 60 fps). For a 1920×1080 canvas that's 124 million operations per second, causing potential lag on slower devices

💡 Render the figure once to a createGraphics() buffer, then simply display that buffer each frame using image(). Only recalculate when windowResized() is triggered. This reduces pixel manipulation from continuous to once-per-resize.

BUG draw() pixel assignment

If hairX, hairY, hairWidth, or hairHeight are not initialized (or are NaN), the collision detection will silently fail and those pixels will stay background color, creating confusing visual bugs

💡 Add console.log() statements after calculating each body part's dimensions to verify they are positive numbers: console.log('hairX:', hairX, 'hairWidth:', hairWidth);

STYLE draw() color assignment

The code repeats r = cColor.levels[0]; g = cColor.levels[1]; b = cColor.levels[2]; for every body part, creating 7 duplicate blocks that are hard to maintain

💡 Create a helper function setPixelColor(colorObj) that extracts and assigns R, G, B in one call, reducing boilerplate: function setPixelColor(colorObj) { r = colorObj.levels[0]; g = colorObj.levels[1]; b = colorObj.levels[2]; }

FEATURE sketch overall

The figure is static and non-interactive—it doesn't respond to mouse clicks or keyboard input despite the 'troll friends' description suggesting potential multiplayer or interaction

💡 Add mousePressed() to log click coordinates, or add animation to body parts (e.g., swaying arms using sin(frameCount)). This would make it suitable for a game or interactive art piece.

STYLE setup() color definitions

Magic RGB numbers like color(200, 0, 0) are hard to tweak and understand without comments; it's not immediately clear what (100, 50, 0) looks like

💡 Define named color constants at the top with hex codes or HSB values for better readability: const SHIRT_RED = '#C80000'; then use setFill() or document the intended colors in a color reference section

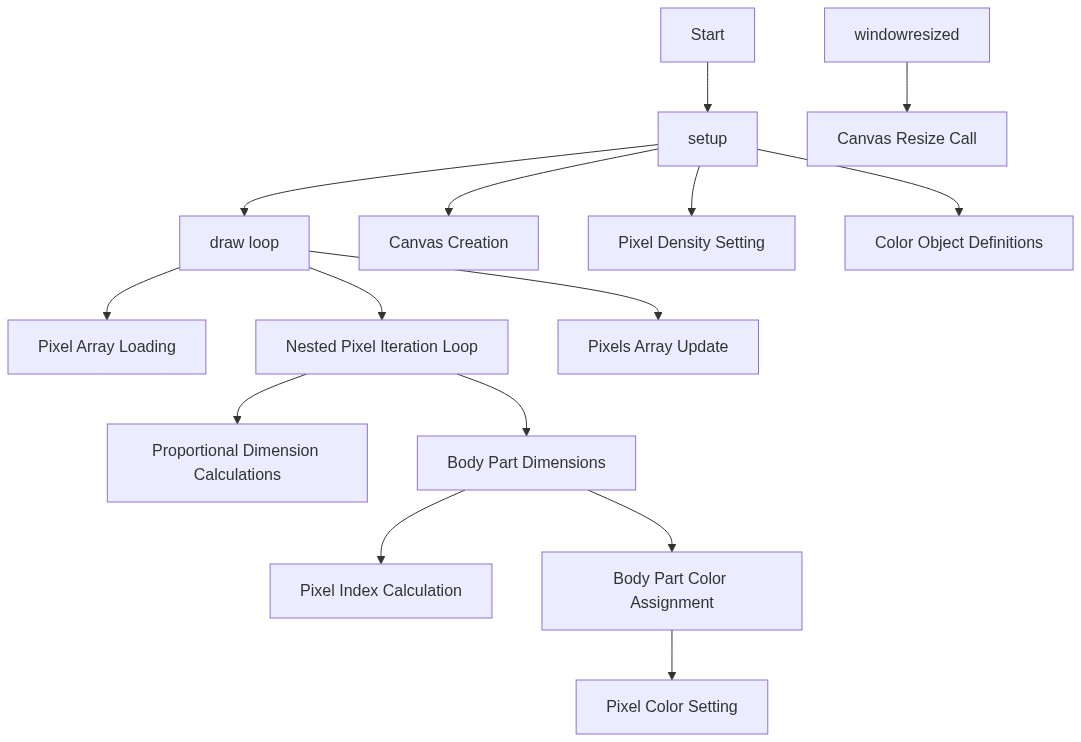
🔄 Code Flow

Code flow showing setup, draw, windowresized

💡 Click on function names in the diagram to jump to their code

graph TD start[Start] --> setup[setup] setup --> draw[draw loop] draw --> color_definitions[color-definitions] draw --> pixel_density[pixel-density] draw --> dimension_calculation[dimension-calculation] draw --> pixel_loading[pixel-loading] draw --> pixel_loop[pixel-loop] pixel_loop --> collision_detection[collision-detection] collision_detection --> pixel_assignment[pixel-assignment] pixel_assignment --> pixel_update[pixel-update] draw --> windowresized[windowresized] windowresized --> canvas_resize[canvas-resize] click setup href "#fn-setup" click draw href "#fn-draw" click color_definitions href "#sub-color-definitions" click pixel_density href "#sub-pixel-density" click dimension_calculation href "#sub-dimension-calculation" click pixel_loading href "#sub-pixel-loading" click pixel_loop href "#sub-pixel-loop" click collision_detection href "#sub-collision-detection" click pixel_assignment href "#sub-pixel-assignment" click pixel_update href "#sub-pixel-update" click windowresized href "#fn-windowresized" click canvas_resize href "#sub-canvas-resize"

❓ Frequently Asked Questions

What visual elements are created in the poop game sketch?

The sketch visually represents a cartoonish character with distinct features like a head, hair, shirt, and pants, all designed using specific color schemes.

How can users interact with the poop game sketch?

Currently, the sketch does not include interactive elements; it primarily serves as a static visual representation.

What creative coding concepts does the poop game sketch demonstrate?

This sketch showcases pixel manipulation techniques and the use of p5.js for defining shapes and colors dynamically based on the canvas size.

Preview

poop game - p5.js creative coding sketch preview
Sketch Preview
Code flow diagram showing the structure of poop game - Code flow showing setup, draw, windowresized
Code Flow Diagram