
PRANK CALL SIM (PREPARE YOUR EYES)

This playful interactive sketch transforms your screen into a retro phone where you dial secret numbers, trigger absurd phone calls, and navigate branching dialogue trees with ridiculous outcomes. Each number connects to a different parody scenario—from calling 911 to order pizza to awakening a chaotic "67 Hell" mode complete with text-to-speech screaming.

🧪 Try This!

Experiment with the code by making these changes:

  1. Change the number length limit — Edit the maximum digits allowed before the CALL button activates. Try 5 for short numbers only, or 20 for marathon dialing.
  2. Add a new secret number — Create a new dialogue path for a custom number. Add it to secretNumbers, create new dialogue nodes, and route it in drawDialingScreen().
  3. Make the 67 flashing faster — Change the strobe speed in 67_HELL mode. Lower numbers flash faster.
  4. Disable the epilepsy warning entirely — Skip straight to 67_HELL without the 5 warning screens. (Warning: this is not recommended for accessibility!)
  5. Change button colors — Edit the KEYPAD screen button colors—try bright cyan or neon pink instead of gray.
Prefer the full editor? Open it there →

📖 About This Sketch

This sketch creates an interactive phone dialer that plays out hilarious prank call scenarios with branching dialogue trees. The visuals include a retro keypad, animated dialing sequences, flashing "busted" screens, and a deliberately chaotic "67" easter egg mode. It demonstrates several advanced p5.js techniques: state machines to manage different screens, audio synthesis with p5.sound oscillators and envelopes for beeps and sirens, touch and mouse input handling, text-to-speech integration via the Web Speech API, and dynamic button layout that adapts to window resizing.

The code is organized around a central state machine that switches between START, KEYPAD, DIALING, DIALOGUE, BUSTED, WARNING_67, and 67_HELL screens. You will learn how to structure complex interactive experiences by managing state, routing user input to different handlers based on current mode, building reusable button classes, and storing branching narrative data in nested objects. This sketch also shows best practices for accessibility—including an epilepsy warning, a toggle to disable flashing lights, and graceful fallbacks for unsupported browser features.

⚙️ How It Works

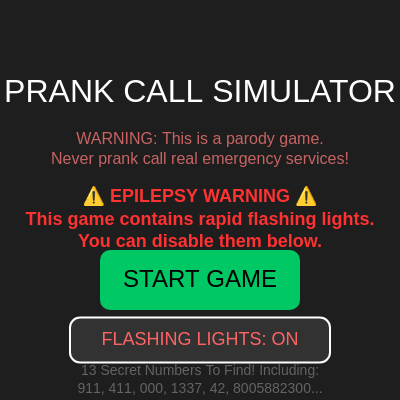
  1. When the sketch loads, setup() initializes the canvas and creates p5.sound oscillators that will generate beeps and siren sounds. The first screen displays a START state with a parody warning, epilepsy alert, and a toggle to disable flashing lights.
  2. Clicking START transitions to KEYPAD state, where the user taps numbers on a retro phone dial pad. Each tap plays a beep and appends the digit to typedNumber. The AUTO-FILL button lets them grab a random secret number instantly.
  3. Pressing CALL moves to DIALING state, where the screen shows "Calling [number]..." with animated ring text and sound. After two ring animations (240 frames), the sketch routes to the correct dialogue tree based on the number dialed.
  4. In DIALOGUE state, the operator's message appears in a box at the top, and interactive response buttons appear below. Clicking a response either advances to the next dialogue node or triggers a busted ending.
  5. If the number was 67, a special WARNING_67 state appears first—five escalating epilepsy warnings with a PROCEED button that advances through each level before entering 67_HELL.
  6. In BUSTED state, the screen flashes red and blue (or stays solid dark red if flashing is disabled), a siren sound plays, and the ending text displays. A PLAY AGAIN button returns to the keypad.
  7. The 67_HELL state feature rapid background flashing between red and yellow, shaking black text saying "67!!!", and triggers the browser's text-to-speech engine to repeatedly yell "67!" until the user clicks MAKE IT STOP.

🎓 Concepts You'll Learn

State machines for screen managementAudio synthesis and envelopesBranching dialogue treesMouse and touch input handlingReusable button classesText-to-speech integrationAccessibility and content warningsConditional rendering based on game state

📝 Code Breakdown

setup()

setup() runs once when the sketch starts. It configures the canvas size, drawing modes, and audio engine. The audio must be initialized here, but won't actually produce sound until userStartAudio() is called by first user interaction (a browser security requirement).

function setup() {
  createCanvas(windowWidth, windowHeight);
  textAlign(CENTER, CENTER);
  rectMode(CENTER);
  
  // Setup Audio (will start on first interaction)
  osc = new p5.Oscillator('sine');
  osc2 = new p5.Oscillator('sine');
  sirenOsc = new p5.Oscillator('square');
  
  env = new p5.Envelope();
  env.setADSR(0.01, 0.1, 0.5, 0.1);
  env.setRange(0.5, 0);
  
  osc.amp(env);
  osc2.amp(env);
  sirenOsc.amp(0);
  
  createKeypad();
}
Line-by-line explanation (11 lines)

🔧 Subcomponents:

calculation Canvas initialization createCanvas(windowWidth, windowHeight);

Creates a full-window canvas that adapts to any screen size

calculation Text alignment and drawing modes textAlign(CENTER, CENTER); rectMode(CENTER);

Centers all text and rectangles around their x,y coordinates—essential for positioning UI elements

calculation p5.sound oscillator setup osc = new p5.Oscillator('sine'); osc2 = new p5.Oscillator('sine'); sirenOsc = new p5.Oscillator('square');

Creates three tone generators: two sine waves for beeps, one square wave for the siren

calculation Envelope ADSR configuration env = new p5.Envelope(); env.setADSR(0.01, 0.1, 0.5, 0.1); env.setRange(0.5, 0);

Defines the attack/decay/sustain/release of beep sounds—making them feel punchy and retro

createCanvas(windowWidth, windowHeight);
Fills the entire browser window with a canvas. windowWidth and windowHeight are p5.js variables that update if the window resizes.
textAlign(CENTER, CENTER);
Centers all text horizontally and vertically around the x,y coordinates you give to text(). Without this, text would be left-aligned and top-aligned.
rectMode(CENTER);
Makes all rectangles draw from their center point instead of from the top-left corner. This makes positioning UI buttons much simpler.
osc = new p5.Oscillator('sine');
Creates a sine wave oscillator—the smoothest sounding tone, good for beeps. You need p5.sound library for this.
osc2 = new p5.Oscillator('sine');
Creates a second sine oscillator at a slightly different frequency—when played together, they create a richer, slightly dissonant retro beep sound.
sirenOsc = new p5.Oscillator('square');
Creates a square wave oscillator with a harsher, more aggressive tone—perfect for police sirens.
env = new p5.Envelope();
Creates an envelope object that will control how sound fades in and out over time—instead of just clicking on/off abruptly.
env.setADSR(0.01, 0.1, 0.5, 0.1);
Sets Attack (0.01s fade-in), Decay (0.1s drop), Sustain (0.5 volume level), Release (0.1s fade-out). This makes beeps sound snappy.
env.setRange(0.5, 0);
Sets the envelope's peak volume (0.5) and minimum volume (0). The envelope will scale between these values.
osc.amp(env);
Connects the envelope to control the first oscillator's volume—so when env.play() is called, osc will fade in and out.
createKeypad();
Calls a helper function that builds the 12 buttons (0-9, *, #) for the phone keypad.
draw()

draw() runs 60 times per second (by default). It's the heart of your animation loop. This sketch uses a state machine pattern: the state variable acts like a master switch that selects which screen to display. This is one of the most powerful patterns in interactive p5.js code—far cleaner than sprawling if-else chains.

🔬 This switch statement is how p5.js handles multiple screens. What happens if you remove the break statement after drawStartScreen()? Try it and predict whether multiple screens draw at once or if something else odd happens.

  switch(state) {
    case "START":
      drawStartScreen();
      break;
function draw() {
  background(30);
  
  switch(state) {
    case "START":
      drawStartScreen();
      break;
    case "KEYPAD":
      drawKeypadScreen();
      break;
    case "DIALING":
      drawDialingScreen();
      break;
    case "DIALOGUE":
      drawDialogueScreen();
      break;
    case "BUSTED":
      drawBustedScreen();
      break;
    case "WARNING_67":
      drawWarning67Screen();
      break;
    case "67_HELL":
      draw67HellScreen();
      break;
  }
}
Line-by-line explanation (9 lines)

🔧 Subcomponents:

switch-case State machine dispatcher switch(state) { ... }

Calls the correct drawing function based on the current game state, creating the illusion of multiple screens

background(30);
Clears the canvas with a dark gray color (RGB value 30) every frame. This erases the previous frame so animations appear smooth.
switch(state) {
Starts a switch statement that checks the current state variable. This is the core of the state machine pattern—different states, different screens.
case "START":
If state equals "START", this case matches and calls drawStartScreen().
case "KEYPAD":
If state equals "KEYPAD", calls drawKeypadScreen() to show the phone dial pad.
case "DIALING":
If state equals "DIALING", calls drawDialingScreen() to animate the ringing phone effect.
case "DIALOGUE":
If state equals "DIALOGUE", calls drawDialogueScreen() to show the conversation with the operator.
case "BUSTED":
If state equals "BUSTED", calls drawBustedScreen() to show flashing lights and the ending message.
case "WARNING_67":
If state equals "WARNING_67", calls drawWarning67Screen() to show epilepsy warnings before the chaos mode.
case "67_HELL":
If state equals "67_HELL", calls draw67HellScreen() to render the chaotic flashing and yelling easter egg.

drawStartScreen()

This is the first screen the user sees. It combines text rendering at multiple font sizes with button layouts and a critical accessibility feature: the epilepsy warning and the ability to disable flashing lights. This demonstrates how to embed health and safety considerations into interactive experiences from the start.

function drawStartScreen() {
  fill(255);
  textSize(min(width*0.08, 40));
  text("PRANK CALL SIMULATOR", width/2, height/3 - 40);
  
  // Parody Warning
  textSize(16);
  fill(200, 100, 100);
  text("WARNING: This is a parody game.\nNever prank call real emergency services!", width/2, height/2 - 50);
  
  // EPILEPSY WARNING
  fill(255, 50, 50);
  textSize(18);
  textStyle(BOLD);
  text("⚠️ EPILEPSY WARNING ⚠️\nThis game contains rapid flashing lights.\nYou can disable them below.", width/2, height/2 + 20);
  textStyle(NORMAL);
  
  // Start Button
  fill(0, 200, 100);
  rect(width/2, height * 0.70, 200, 60, 10);
  fill(0);
  textSize(24);
  text("START GAME", width/2, height * 0.70);
  
  // Flashing Lights Toggle Button
  fill(50);
  stroke(255);
  strokeWeight(2);
  rect(width/2, height * 0.85, 260, 45, 10);
  noStroke();
  fill(disableFlashing ? color(100, 255, 100) : color(255, 100, 100));
  textSize(18);
  text(disableFlashing ? "FLASHING LIGHTS: OFF" : "FLASHING LIGHTS: ON", width/2, height * 0.85);
  
  // Hint text
  fill(100);
  textSize(14);
  text("13 Secret Numbers To Find! Including:\n911, 411, 000, 1337, 42, 8005882300...", width/2, height * 0.95);
}
Line-by-line explanation (8 lines)

🔧 Subcomponents:

calculation Title rendering fill(255); textSize(min(width*0.08, 40)); text("PRANK CALL SIMULATOR", width/2, height/3 - 40);

Draws the main title with responsive font size that scales with window width but caps at 40 pixels

calculation Health warning display fill(255, 50, 50); textSize(18); textStyle(BOLD); text("⚠️ EPILEPSY WARNING ⚠️\nThis game contains rapid flashing lights.\nYou can disable them below.", width/2, height/2 + 20);

Displays a prominent epilepsy warning in bold red text to alert users before they begin

calculation Start button rendering fill(0, 200, 100); rect(width/2, height * 0.70, 200, 60, 10); fill(0); textSize(24); text("START GAME", width/2, height * 0.70);

Draws a green button at 70% down the screen with centered white text

conditional Accessibility toggle button fill(disableFlashing ? color(100, 255, 100) : color(255, 100, 100));

Changes button color from red (flashing ON) to green (flashing OFF) based on the disableFlashing variable

fill(255);
Sets the fill color to white (255 in grayscale = full brightness). All shapes drawn after this will be white until fill() is called again.
textSize(min(width*0.08, 40));
Sets font size to 8% of the window width, but never larger than 40 pixels. This makes the title scale nicely on mobile and desktop.
text("PRANK CALL SIMULATOR", width/2, height/3 - 40);
Draws the title text at the horizontal center (width/2) and at 1/3 down the screen minus 40 pixels.
fill(200, 100, 100);
Changes fill to a muted reddish-brown (RGB: 200, 100, 100) for the parody warning.
fill(255, 50, 50);
Sets fill to bright red (RGB: 255, 50, 50) for the epilepsy warning—more alarming.
textStyle(BOLD);
Makes all subsequent text bold until textStyle(NORMAL) is called.
fill(disableFlashing ? color(100, 255, 100) : color(255, 100, 100));
Uses a ternary operator: if disableFlashing is true, use green; otherwise use red. This makes the toggle button's color convey its state.
text(disableFlashing ? "FLASHING LIGHTS: OFF" : "FLASHING LIGHTS: ON", width/2, height * 0.85);
Displays different text depending on whether flashing is disabled—keeps the UI honest about the current setting.

drawKeypadScreen()

drawKeypadScreen() renders the phone interface: a retro display screen, a clear button, an auto-fill convenience button, and the 12-button keypad. It also shows conditional rendering—the CALL button's color changes based on game state (whether digits have been entered). This pattern is crucial in interactive UI design.

🔬 This code draws the CALL button: it starts dark green, then switches to bright green when you've typed a number. What happens if you change the condition to `typedNumber.length > 5`? Will the button be bright green with fewer digits, or more?

  // Call Button
  fill(0, 150, 0);
  if (typedNumber.length > 0) fill(0, 255, 0);
  rect(width/2, height*0.85, 200, 50, 25);
function drawKeypadScreen() {
  // Screen Display Background
  fill(20);
  stroke(100);
  strokeWeight(3);
  rect(width/2, height*0.15, 300, 60, 10);
  
  // Typed Number
  noStroke();
  fill(0, 255, 0);
  textSize(32);
  // Scale down text if number gets too long
  if (typedNumber.length > 10) textSize(24);
  text(typedNumber, width/2, height*0.15);
  
  // Clear "C" Button next to the screen
  fill(150, 40, 40);
  stroke(100);
  strokeWeight(2);
  rect(width/2 + 180, height*0.15, 40, 40, 5);
  fill(255);
  noStroke();
  textSize(20);
  text("C", width/2 + 180, height*0.15);
  
  // AUTO-FILL RANDOM BUTTON
  fill(50, 80, 120);
  stroke(100);
  strokeWeight(2);
  rect(width/2, height*0.28, 220, 40, 10);
  fill(200, 220, 255);
  noStroke();
  textSize(16);
  text("🎲 AUTO-FILL SECRET #", width/2, height*0.28);
  
  // Draw Keypad Buttons
  for (let b of keypadButtons) {
    b.display();
  }
  
  // Call Button
  fill(0, 150, 0);
  if (typedNumber.length > 0) fill(0, 255, 0);
  rect(width/2, height*0.85, 200, 50, 25);
  fill(0);
  textSize(24);
  text("CALL", width/2, height*0.85);
}
Line-by-line explanation (13 lines)

🔧 Subcomponents:

calculation Phone screen display box fill(20); stroke(100); strokeWeight(3); rect(width/2, height*0.15, 300, 60, 10);

Draws the dark gray retro phone screen border at the top where dialed numbers appear

conditional Dynamic text scaling if (typedNumber.length > 10) textSize(24);

Shrinks the font if more than 10 digits are entered so long numbers don't overflow the screen

calculation Clear (C) button rect(width/2 + 180, height*0.15, 40, 40, 5);

Draws a red clear button to the right of the phone screen display

calculation Auto-fill secret number button fill(50, 80, 120); stroke(100); strokeWeight(2); rect(width/2, height*0.28, 220, 40, 10);

Draws a blue button that fills the number with a random secret when clicked

for-loop Render all keypad buttons for (let b of keypadButtons) { b.display(); }

Loops through the keypadButtons array and calls display() on each button to render the 12 dial pad numbers

conditional Call button state indicator if (typedNumber.length > 0) fill(0, 255, 0);

Makes the CALL button glow bright green only when at least one digit has been entered, showing it's active

fill(20);
Sets fill to very dark gray (RGB 20) for the phone screen background—retro and readable.
stroke(100);
Sets outline color to medium gray so the screen box stands out from the black background.
strokeWeight(3);
Makes the outline 3 pixels thick—bold enough to see on retro phone aesthetic.
rect(width/2, height*0.15, 300, 60, 10);
Draws a 300×60 pixel rectangle at the horizontal center and 15% down the screen, with 10-pixel rounded corners.
fill(0, 255, 0);
Sets fill to bright green (classic phone screen color)—numbers will display in this color.
if (typedNumber.length > 10) textSize(24);
Checks if the user has typed more than 10 digits. If so, shrink the font from 32 to 24 to prevent overflow.
text(typedNumber, width/2, height*0.15);
Displays the digits the user has typed so far in the center of the phone screen.
fill(150, 40, 40);
Sets fill to dark red for the clear button—instantly communicates 'danger/delete'.
rect(width/2 + 180, height*0.15, 40, 40, 5);
Draws a 40×40 pixel red square to the right of the screen display (offset by 180 pixels from center).
fill(50, 80, 120);
Sets fill to a dark blue for the auto-fill button—distinct from red and green.
for (let b of keypadButtons) {
Starts a for-of loop. For each button object 'b' in the keypadButtons array, the loop body runs once.
b.display();
Calls the display() method on button b, which renders that button's shape and label on screen.
if (typedNumber.length > 0) fill(0, 255, 0);
If at least one digit has been typed, change the CALL button color to bright green to signal it's ready to click.

drawDialingScreen()

drawDialingScreen() creates the anticipation before the call connects. It demonstrates animation timing (using a counter variable and the modulo operator), sound synthesis (playing tones at specific moments), and state transitions (moving to either the warning screen or dialogue based on the number). The if-else chain that routes to different dialogues could be refactored into a lookup object for cleaner code, but this explicit form shows exactly which numbers connect to which stories.

🔬 This block creates a blinking "Ring..." text and plays the tone once per cycle. Try changing the 60 to 80—will the ring text appear more often, less often, or stay the same?

  ringTimer++;
  if (ringTimer % 120 < 60) {
    text("Ring...", width/2, height/2 + 20);
    // Play ring sound
    if (ringTimer % 120 === 1) {
function drawDialingScreen() {
  fill(255);
  textSize(32);
  if (typedNumber.length > 10) textSize(24);
  text("Calling " + typedNumber + "...", width/2, height/2 - 50);
  
  // Ringing animation
  ringTimer++;
  if (ringTimer % 120 < 60) {
    text("Ring...", width/2, height/2 + 20);
    // Play ring sound
    if (ringTimer % 120 === 1) {
      osc.freq(440); osc2.freq(480);
      env.play();
    }
  }
  
  if (ringTimer > 240) { // Connect after 2 rings
    if (typedNumber === "67") {
      state = "WARNING_67";
      warningStep = 1;
      return;
    }

    state = "DIALOGUE";
    
    // Route to the correct dialogue tree based on the number
    if (typedNumber === "911") createDialogButtons(0);
    else if (typedNumber === "411") createDialogButtons(10);
    else if (typedNumber === "8675309") createDialogButtons(20);
    else if (typedNumber === "3141592") createDialogButtons(40);
    else if (typedNumber === "12345") createDialogButtons(50);
    else if (typedNumber === "999") createDialogButtons(60);
    else if (typedNumber === "5550199") createDialogButtons(70);
    else if (typedNumber === "000") createDialogButtons(80);
    else if (typedNumber === "8005882300") createDialogButtons(90);
    else if (typedNumber === "5555555") createDialogButtons(100);
    else if (typedNumber === "1337") createDialogButtons(110);
    else if (typedNumber === "42") createDialogButtons(120);
    else createDialogButtons(404); // Random disconnected number
  }
}
Line-by-line explanation (14 lines)

🔧 Subcomponents:

calculation Dialing text rendering fill(255); textSize(32); if (typedNumber.length > 10) textSize(24); text("Calling " + typedNumber + "...", width/2, height/2 - 50);

Displays the number being called on screen in large text, with responsive font sizing

calculation Ring animation counter ringTimer++;

Increments the timer every frame to track how long the phone has been ringing

conditional Blinking ring animation if (ringTimer % 120 < 60) {

Checks if we're in the first half of a 120-frame cycle—if so, display "Ring..." and play sound

conditional Ring sound trigger if (ringTimer % 120 === 1) {

Plays the ring tone exactly once per ring cycle (when the timer hits 1, 121, 241, etc.)

conditional Check if call connects if (ringTimer > 240) {

After 240 frames (2 complete ring cycles), the call connects and transitions to the next state

conditional Special case for 67 if (typedNumber === "67") { state = "WARNING_67"; warningStep = 1; return; }

If the user dialed 67, skip dialogue and jump to epilepsy warnings before chaos mode

conditional Route to correct dialogue tree if (typedNumber === "911") createDialogButtons(0); else if (typedNumber === "411") createDialogButtons(10);

A long chain of if-else statements that selects the correct dialogue tree based on the dialed number

fill(255);
Sets text color to white.
textSize(32);
Sets initial font size to 32 pixels for the dialing message.
if (typedNumber.length > 10) textSize(24);
If the user typed more than 10 digits, shrink text to 24 pixels to prevent overflow.
text("Calling " + typedNumber + "...", width/2, height/2 - 50);
Concatenates the string "Calling " with the dialed number, then displays it centered on screen.
ringTimer++;
Increases ringTimer by 1 each frame. This variable counts how long the dialing animation has been running.
if (ringTimer % 120 < 60) {
Uses modulo (%) to create a cycle: every 120 frames, the condition is true for the first 60 frames, false for the next 60. This creates a blinking effect.
text("Ring...", width/2, height/2 + 20);
Displays "Ring..." below the dialing number when ringTimer % 120 is less than 60 (first half of the cycle).
if (ringTimer % 120 === 1) {
Checks if ringTimer % 120 exactly equals 1—this happens once per 120-frame cycle, at frames 1, 121, 241, etc.
osc.freq(440); osc2.freq(480);
Sets the two oscillators to slightly different frequencies (440 and 480 Hz) to create a dissonant, retro ring tone.
env.play();
Triggers the envelope to play, which fades the oscillators in and out according to the ADSR settings.
if (ringTimer > 240) {
After 240 frames (4 seconds at 60 fps, or 2 complete ring cycles), the call connects.
if (typedNumber === "67") {
Special case: if the user dialed exactly "67", skip the dialogue and go straight to the warning screen.
state = "WARNING_67";
Changes the game state to WARNING_67, which will trigger the epilepsy warning screens.
if (typedNumber === "911") createDialogButtons(0);
If the number was 911, start the dialogue tree at node 0 (the operator asking about the emergency).

drawDialogueScreen()

drawDialogueScreen() renders the conversation interface. The key pattern is `dialogue[currentNode]`, which retrieves the current dialogue node from the nested dialogue object. By changing currentNode, the sketch navigates through the branching tree of conversations. The dialogButtons array was populated by createDialogButtons() and contains interactive response options for this specific node.

function drawDialogueScreen() {
  // Operator box
  fill(40, 40, 60);
  stroke(255);
  rect(width/2, height*0.2, width*0.9, height*0.2, 10);
  
  fill(255);
  noStroke();
  textSize(18);
  textWrap(WORD);
  text(dialogue[currentNode].text, width/2, height*0.2, width*0.8);
  
  // Draw options
  for (let b of dialogButtons) {
    b.display();
  }
}
Line-by-line explanation (10 lines)

🔧 Subcomponents:

calculation Operator message box fill(40, 40, 60); stroke(255); rect(width/2, height*0.2, width*0.9, height*0.2, 10);

Draws a dark blue-gray box at the top of the screen to contain the operator's message

calculation Operator dialogue rendering text(dialogue[currentNode].text, width/2, height*0.2, width*0.8);

Displays the current dialogue node's text from the nested dialogue object, with word wrapping

for-loop Render response buttons for (let b of dialogButtons) { b.display(); }

Loops through all dialogue buttons and calls display() on each to render the player's response options

fill(40, 40, 60);
Sets fill to a dark blue-gray (RGB: 40, 40, 60) for the dialogue box background.
stroke(255);
Sets outline color to white so the dialogue box stands out against the dark background.
rect(width/2, height*0.2, width*0.9, height*0.2, 10);
Draws a rectangle 90% of the window width and 20% of the window height, positioned at the top 20% of the screen.
fill(255);
Changes fill to white for the text that will appear inside the dialogue box.
noStroke();
Removes the outline for the text so only the text itself is visible.
textSize(18);
Sets font size to 18 pixels for the dialogue.
textWrap(WORD);
Enables word wrapping—long dialogue automatically breaks into multiple lines instead of running off screen.
text(dialogue[currentNode].text, width/2, height*0.2, width*0.8);
Looks up the current dialogue node in the dialogue object and displays its text property, constrained to a width of 80% of the window.
for (let b of dialogButtons) {
Starts a for-of loop iterating through each button in the dialogButtons array.
b.display();
Calls the display() method on each dialogue button, rendering it on screen.

drawBustedScreen()

drawBustedScreen() demonstrates critical accessibility patterns. It respects the user's preference to disable flashing and shows a safe alternative instead. The flashing effect itself uses modulo arithmetic to create timing cycles, and the siren sound uses trigonometry (sine wave) combined with map() to create a smooth frequency sweep. This is how real p5.js interactive experiences handle both visual spectacle and user safety.

🔬 This code respects the disableFlashing setting. What happens if you remove the `!` before `disableFlashing` on the first line? Will flashing be inverted, or will it break?

  // Flashing lights (or solid if disabled)
  if (!disableFlashing) {
    if (flashTimer % 20 < 10) {
      background(255, 0, 0);
    } else {
      background(0, 0, 255);
    }
  } else {
    background(100, 0, 0); // Solid, non-flashing dark red
  }
function drawBustedScreen() {
  flashTimer++;
  
  // Flashing lights (or solid if disabled)
  if (!disableFlashing) {
    if (flashTimer % 20 < 10) {
      background(255, 0, 0);
    } else {
      background(0, 0, 255);
    }
  } else {
    background(100, 0, 0); // Solid, non-flashing dark red
  }
  
  // Siren sound sweep
  let freq = map(sin(frameCount * 0.1), -1, 1, 600, 1200);
  sirenOsc.freq(freq);
  
  fill(255);
  textSize(48);
  stroke(0);
  strokeWeight(5);
  text("BUSTED!", width/2, height/3);
  
  textSize(24);
  noStroke();
  textWrap(WORD);
  text(endings[endReason], width/2, height/2, width*0.8);
  
  fill(255, 255, 255, 200);
  rect(width/2, height * 0.8, 200, 60, 10);
  fill(0);
  text("PLAY AGAIN", width/2, height * 0.8);
}
Line-by-line explanation (10 lines)

🔧 Subcomponents:

calculation Flash animation counter flashTimer++;

Increments the flash counter each frame to drive the red/blue strobe effect

conditional Accessibility-aware flashing if (!disableFlashing) { if (flashTimer % 20 < 10) { background(255, 0, 0); } else { background(0, 0, 255); } } else { background(100, 0, 0); }

Flashes red and blue unless the user disabled flashing—then it shows solid dark red instead

calculation Siren frequency sweep let freq = map(sin(frameCount * 0.1), -1, 1, 600, 1200);

Uses sine wave and map() to create a smooth frequency sweep from 600 to 1200 Hz for a classic police siren sound

flashTimer++;
Increments the flash counter by 1 each frame.
if (!disableFlashing) {
Checks if flashing is NOT disabled (! means 'not'). If true, proceed with flashing. If false, skip to the else block.
if (flashTimer % 20 < 10) {
Creates a 20-frame cycle: first 10 frames show one color, next 10 frames show another, then repeat.
background(255, 0, 0);
Sets background to pure red (RGB: 255, 0, 0) for the first half of the flash cycle.
background(0, 0, 255);
Sets background to pure blue (RGB: 0, 0, 255) for the second half of the cycle.
background(100, 0, 0);
If flashing is disabled, shows a solid dark red background instead—less jarring but still conveys 'busted'.
let freq = map(sin(frameCount * 0.1), -1, 1, 600, 1200);
Calculates a frequency between 600 and 1200 Hz that changes smoothly with time. sin(frameCount * 0.1) oscillates between -1 and 1, and map() converts that to the frequency range.
sirenOsc.freq(freq);
Sets the siren oscillator's frequency to the calculated value, creating the classic woop-woop sweep sound.
text("BUSTED!", width/2, height/3);
Displays the word "BUSTED!" in white with a black outline in the upper third of the screen.
text(endings[endReason], width/2, height/2, width*0.8);
Looks up the ending message from the endings object using endReason as the key and displays it in the center of the screen.

drawWarning67Screen()

drawWarning67Screen() shows a five-step escalating warning before entering the chaotic 67_HELL mode. This demonstrates how to implement robust accessibility and health warnings in interactive experiences. The warningTexts object is a nice pattern for managing state-dependent text, and the conditional reassurance for users with flashing disabled shows thoughtful design. The five steps create a funnel that gives users multiple opportunities to reconsider before entering intense visuals.

function drawWarning67Screen() {
  background(20, 0, 0); // Spooky dark red background
  
  fill(255, 50, 50);
  textSize(32);
  textStyle(BOLD);
  text("WARNING " + warningStep + " OF 5", width/2, height/3 - 40);
  
  fill(255);
  textSize(20);
  textStyle(NORMAL);
  textWrap(WORD);
  
  // The increasingly ominous texts specifically about epilepsy
  let warningTexts = {
    1: "WARNING: The following sequence contains SEVERE flashing lights.",
    2: "These visuals may trigger seizures for people with photosensitive epilepsy.",
    3: "If you or anyone in your family has an epileptic condition, DO NOT PROCEED.",
    4: "This sequence features intense, high-frequency strobing colors.",
    5: "FINAL WARNING: You are about to view rapid flashing lights. Proceed at your own risk."
  };
  
  let currentText = warningTexts[warningStep];
  
  // Reassure them if they have safe mode on
  if (disableFlashing) {
    currentText += "\n\n(Flashing Lights are currently OFF in your settings. You are safe to proceed.)";
  }
  
  text(currentText, width/2, height/2 - 20, width*0.8);
  
  // Proceed Button
  fill(150, 0, 0);
  rect(width/2, height * 0.7, 200, 50, 10);
  fill(255);
  textSize(20);
  text("PROCEED", width/2, height * 0.7);
  
  // Cancel Button
  fill(60);
  rect(width/2, height * 0.85, 200, 50, 10);
  fill(255);
  text("CANCEL", width/2, height * 0.85);
}
Line-by-line explanation (10 lines)

🔧 Subcomponents:

calculation Ominous background color background(20, 0, 0);

Sets the background to a spooky dark red to prepare the user for danger

calculation Warning step display text("WARNING " + warningStep + " OF 5", width/2, height/3 - 40);

Shows progress through the five warning screens (1/5, 2/5, etc.)

calculation Warning text lookup let warningTexts = { 1: "WARNING: The following sequence contains SEVERE flashing lights.", 2: "These visuals may trigger seizures for people with photosensitive epilepsy.", 3: "If you or anyone in your family has an epileptic condition, DO NOT PROCEED.", 4: "This sequence features intense, high-frequency strobing colors.", 5: "FINAL WARNING: You are about to view rapid flashing lights. Proceed at your own risk." };

Stores escalating warning messages indexed by warning step number

conditional Accessibility message if (disableFlashing) { currentText += "\n\n(Flashing Lights are currently OFF in your settings. You are safe to proceed.)"; }

Adds reassuring text if the user has already disabled flashing lights

background(20, 0, 0);
Sets background to very dark red (RGB: 20, 0, 0)—ominous and foreboding.
fill(255, 50, 50);
Sets fill to bright red for warning text.
textSize(32);
Large font for the warning level indicator.
textStyle(BOLD);
Makes the warning level text bold for emphasis.
text("WARNING " + warningStep + " OF 5", width/2, height/3 - 40);
Displays which warning screen this is (e.g., "WARNING 2 OF 5"), showing progress through the escalation.
let warningTexts = {
Starts an object literal that maps warning step numbers (1-5) to escalating warning messages.
let currentText = warningTexts[warningStep];
Retrieves the warning message for the current step from the warningTexts object.
if (disableFlashing) {
If the user has disabled flashing, append a reassuring message.
currentText += "\n\n(Flashing Lights are currently OFF in your settings. You are safe to proceed.)";
Adds reassuring text that confirms flashing is safely disabled, reducing anxiety.
text(currentText, width/2, height/2 - 20, width*0.8);
Displays the warning message (plus reassurance if applicable) with word wrapping.

draw67HellScreen()

draw67HellScreen() is the payoff for dialing 67—a deliberately chaotic easter egg that combines rapid flashing, text shaking, and text-to-speech yelling. Despite the chaos, it respects the disableFlashing setting by reducing shake intensity when flashing is off. This demonstrates how you can create wild, immersive effects while still maintaining accessibility boundaries.

function draw67HellScreen() {
  // Flashing chaotic background (or solid if disabled)
  if (!disableFlashing) {
    if (frameCount % 6 < 3) {
      background(255, 0, 0); // Red
    } else {
      background(255, 255, 0); // Yellow
    }
  } else {
    background(150, 0, 0); // Solid, non-flashing dark red
  }

  // Shaking Text
  let shakeX = random(-15, 15);
  let shakeY = random(-15, 15);
  
  // If flashing is off, reduce the shake to a mild vibration
  if (disableFlashing) {
    shakeX = random(-2, 2);
    shakeY = random(-2, 2);
  }
  
  fill(0);
  textSize(120);
  text("67!!!", width/2 + shakeX, height/2 + shakeY);

  // Escape button
  fill(255, 255, 255, 200);
  rect(width/2, height * 0.85, 250, 60, 10);
  fill(0);
  textSize(24);
  text("MAKE IT STOP", width/2, height * 0.85);
}
Line-by-line explanation (11 lines)

🔧 Subcomponents:

conditional Rapid red-yellow strobe if (frameCount % 6 < 3) { background(255, 0, 0); } else { background(255, 255, 0); }

Creates intense flashing between red and yellow every 3 frames (twice as fast as the BUSTED screen)

calculation Text position randomization let shakeX = random(-15, 15); let shakeY = random(-15, 15);

Randomizes the text position every frame to create a shaking effect

conditional Reduced shake when flashing off if (disableFlashing) { shakeX = random(-2, 2); shakeY = random(-2, 2); }

If flashing is disabled, reduce shake magnitude from ±15 to ±2 pixels for a gentler effect

if (!disableFlashing) {
If flashing is NOT disabled, proceed with the intense red-yellow strobe.
if (frameCount % 6 < 3) {
Creates a 6-frame cycle: first 3 frames show red, next 3 show yellow. This is twice as fast as the BUSTED screen (which was 20-frame cycle).
background(255, 0, 0); // Red
Sets background to pure red for the first half of the cycle.
background(255, 255, 0); // Yellow
Sets background to pure yellow for the second half—red+green makes yellow, creating maximum visual contrast.
let shakeX = random(-15, 15);
Generates a random number between -15 and 15 each frame—text will jump around horizontally.
let shakeY = random(-15, 15);
Generates a random number between -15 and 15 for vertical shake.
if (disableFlashing) {
If flashing is disabled, reduce the shake intensity.
shakeX = random(-2, 2);
Recalculates shakeX with a much smaller range (±2 instead of ±15) for a subtle vibration instead of wild thrashing.
fill(0);
Sets fill to black for the text.
textSize(120);
Makes the text huge—120 pixels tall.
text("67!!!", width/2 + shakeX, height/2 + shakeY);
Displays the text at the center plus the random shake offset, creating the illusion that the text is vibrating.

handleInput(x, y)

handleInput() is the central dispatcher for all user interaction. It uses the state variable to decide which inputs are valid at any moment, then checks click positions against button bounds using distance formulas. This pattern—centralized input handler with state-dependent routing—is essential for managing complex, multi-screen interactive experiences. The abs() distance check is simpler than rectangular bounding boxes but works well for round/square buttons.

🔬 This loop checks every button and appends the digit if clicked. What happens if you change `< 15` to `< 5` or `< 20`? Will you be able to type longer or shorter numbers?

    // Check keypad (now allows up to 15 digits)
    for (let b of keypadButtons) {
      if (b.isHovered(x, y)) {
        if (typedNumber.length < 15) {
          typedNumber += b.label;
          playBeep(300 + parseInt(b.label || 0) * 50);
        }
function handleInput(x, y) {
  // Initialize Audio Engine on first interaction
  userStartAudio();
  if (!osc.started) {
    osc.start();
    osc2.start();
    sirenOsc.start();
  }
  
  if (state === "START") {
    // Start button
    if (abs(x - width/2) < 100 && abs(y - height*0.70) < 30) {
      state = "KEYPAD";
      playBeep(800);
    }
    // Toggle Flashing button
    if (abs(x - width/2) < 130 && abs(y - height*0.85) < 22) {
      disableFlashing = !disableFlashing;
      playBeep(600);
    }
  } 
  else if (state === "KEYPAD") {
    // Check Auto-fill button
    if (abs(x - width/2) < 110 && abs(y - height*0.28) < 20) {
      typedNumber = random(secretNumbers);
      playBeep(700);
      return;
    }
    
    // Check Clear "C" Button
    if (abs(x - (width/2 + 180)) < 20 && abs(y - height*0.15) < 20) {
      typedNumber = "";
      playBeep(400);
      return;
    }

    // Check keypad (now allows up to 15 digits)
    for (let b of keypadButtons) {
      if (b.isHovered(x, y)) {
        if (typedNumber.length < 15) {
          typedNumber += b.label;
          playBeep(300 + parseInt(b.label || 0) * 50);
        }
      }
    }
    // Check Call button
    if (abs(x - width/2) < 100 && abs(y - height*0.85) < 25 && typedNumber.length > 0) {
      state = "DIALING";
      ringTimer = 0;
      playBeep(1000);
    }
  }
  else if (state === "WARNING_67") {
    // Proceed Button bounds check
    if (abs(x - width/2) < 100 && abs(y - height*0.7) < 25) {
      warningStep++;
      playBeep(400 - warningStep * 40); // Gets lower and scarier each click
      
      if (warningStep > 5) {
        state = "67_HELL";
        startYelling67();
      }
    }
    
    // Cancel Button bounds check
    if (abs(x - width/2) < 100 && abs(y - height*0.85) < 25) {
      state = "KEYPAD";
      typedNumber = "";
      playBeep(800);
    }
  }
  else if (state === "DIALOGUE") {
    for (let b of dialogButtons) {
      if (b.isHovered(x, y)) {
        playBeep(600);
        let nextState = b.targetNode;
        if (typeof nextState === 'number') {
          createDialogButtons(nextState);
        } else {
          // Busted!
          endReason = nextState;
          state = "BUSTED";
          flashTimer = 0;
          sirenOsc.amp(0.3, 0.1); // Turn on siren
        }
      }
    }
  }
  else if (state === "BUSTED") {
    // Reset button
    if (abs(x - width/2) < 100 && abs(y - height*0.8) < 30) {
      state = "KEYPAD";
      typedNumber = "";
      sirenOsc.amp(0, 0.1); // Turn off siren
      playBeep(800);
    }
  }
  else if (state === "67_HELL") {
    // Escape button for 67 Hell
    if (abs(x - width/2) < 125 && abs(y - height*0.85) < 30) {
      stopYelling67();
      state = "KEYPAD";
      typedNumber = "";
      playBeep(800);
    }
  }
}
Line-by-line explanation (14 lines)

🔧 Subcomponents:

calculation Audio engine initialization userStartAudio(); if (!osc.started) { osc.start(); osc2.start(); sirenOsc.start(); }

Starts the audio context and oscillators on first user interaction (required by browser security)

conditional START screen button detection if (state === "START") {

Handles clicks on the START screen (Start Game and toggle buttons)

conditional KEYPAD screen input detection else if (state === "KEYPAD") {

Handles clicks on the keypad: number buttons, clear button, auto-fill, and call button

for-loop Check all keypad buttons for (let b of keypadButtons) { if (b.isHovered(x, y)) { if (typedNumber.length < 15) { typedNumber += b.label; playBeep(300 + parseInt(b.label || 0) * 50); } } }

Tests each button to see if it was clicked; if so, appends its digit to typedNumber and plays a beep

conditional WARNING_67 screen input else if (state === "WARNING_67") {

Handles PROCEED and CANCEL buttons during the escalating warning sequence

for-loop Check dialogue response buttons for (let b of dialogButtons) { if (b.isHovered(x, y)) {

Tests each dialogue button; if clicked, advances to the next dialogue node or triggers ending

conditional BUSTED screen reset button else if (state === "BUSTED") {

Detects clicks on PLAY AGAIN to restart the game

conditional 67_HELL escape button else if (state === "67_HELL") {

Detects clicks on MAKE IT STOP to exit the chaos mode

function handleInput(x, y) {
Defines a function that processes clicks/taps at screen coordinates (x, y).
userStartAudio();
Initializes the browser's audio context on first user interaction—required by modern browsers for security.
if (!osc.started) {
Checks if the oscillators haven't been started yet. If not, start them.
osc.start();
Starts the first sine wave oscillator so it can produce sound.
if (state === "START") {
If we're on the start screen, check for clicks on the start button or toggle button.
if (abs(x - width/2) < 100 && abs(y - height*0.70) < 30) {
Checks if click is within 100 pixels horizontally and 30 pixels vertically of the start button at (width/2, height*0.70). Uses abs() to check distance from center.
typedNumber = random(secretNumbers);
Picks a random element from the secretNumbers array and displays it in the keypad screen.
for (let b of keypadButtons) {
Loops through all 12 keypad buttons to check if any was clicked.
if (b.isHovered(x, y)) {
Calls the button's isHovered() method—returns true if the click (x, y) is within the button's bounds.
if (typedNumber.length < 15) {
Before adding another digit, check that the number doesn't exceed 15 digits.
typedNumber += b.label;
Appends the button's label (the digit it represents) to the end of typedNumber.
playBeep(300 + parseInt(b.label || 0) * 50);
Plays a beep whose frequency is based on which digit was pressed (0-9)—each digit gets its own pitch.
let nextState = b.targetNode;
Retrieves the target dialogue node from the clicked button.
if (typeof nextState === 'number') {
If targetNode is a number, it's the next dialogue node index. If it's a string, it's an ending trigger.

playBeep(f)

playBeep() demonstrates audio synthesis at its simplest: set oscillator frequencies and trigger an envelope. The detuning technique (using two slightly different frequencies) is a classic synthesizer trick that makes beeps sound more interesting than a single pure tone. This is used throughout the sketch for button presses, ring tones, and alerts.

function playBeep(f) {
  osc.freq(f);
  osc2.freq(f * 1.1); // add some dissonance for retro feel
  env.play();
}
Line-by-line explanation (4 lines)

🔧 Subcomponents:

calculation Frequency assignment osc.freq(f); osc2.freq(f * 1.1);

Sets two oscillators to slightly different frequencies—creates a richer, dissonant retro sound

calculation Envelope playback env.play();

Triggers the ADSR envelope, which fades the sound in and out smoothly

function playBeep(f) {
Defines a helper function that takes a frequency parameter and plays a beep sound.
osc.freq(f);
Sets the first oscillator to the requested frequency.
osc2.freq(f * 1.1);
Sets the second oscillator to 10% higher frequency (f * 1.1). When two slightly different frequencies play together, they create a shimmering, retro effect called 'detuning'.
env.play();
Triggers the envelope, which fades both oscillators in and out according to their ADSR settings.

createKeypad()

createKeypad() demonstrates a common pattern: converting a 1D loop index into 2D grid coordinates using modulo and division. This is the same technique used to generate any grid (chess boards, tile maps, spreadsheets, etc.). The spacing values (80 for cols, 70 for rows) control the layout; adjusting them changes button spacing. This function is called in setup() and again in windowResized() to adapt the layout if the window changes size.

function createKeypad() {
  keypadButtons = [];
  let keys = ['1','2','3','4','5','6','7','8','9','*','0','#'];
  let startX = width/2 - 80;
  let startY = height/2 - 50;
  
  for (let i = 0; i < 12; i++) {
    let col = i % 3;
    let row = floor(i / 3);
    keypadButtons.push(new Button(startX + col*80, startY + row*70, 60, 60, keys[i]));
  }
}
Line-by-line explanation (8 lines)

🔧 Subcomponents:

calculation Grid positioning let col = i % 3; let row = floor(i / 3);

Converts loop index i (0-11) into row and column in a 3×4 grid

calculation Button instantiation keypadButtons.push(new Button(startX + col*80, startY + row*70, 60, 60, keys[i]));

Creates a button at the calculated grid position and adds it to the keypadButtons array

keypadButtons = [];
Empties the keypadButtons array so we can rebuild it (important when the window resizes).
let keys = ['1','2','3','4','5','6','7','8','9','*','0','#'];
Array of the 12 labels in phone keypad order (1-9, *, 0, #).
let startX = width/2 - 80;
Calculates the left edge of the keypad grid so it's centered on screen (width/2 is center, minus 80 moves it left).
let startY = height/2 - 50;
Calculates the top edge of the keypad grid so it's vertically centered.
for (let i = 0; i < 12; i++) {
Loops 12 times, once for each key on the phone keypad.
let col = i % 3;
Uses modulo to get which column (0, 1, or 2) this button belongs in. i % 3 cycles 0-2 as i goes 0-11.
let row = floor(i / 3);
Divides i by 3 and rounds down (floor) to get which row (0, 1, 2, or 3) this button belongs in.
keypadButtons.push(new Button(startX + col*80, startY + row*70, 60, 60, keys[i]));
Creates a new Button at grid position (col, row), each button is 60×60 pixels with 80 pixels horizontal spacing and 70 pixels vertical spacing.

createDialogButtons(nodeIndex)

createDialogButtons() is called whenever the dialogue tree advances to a new node. It fetches the dialogue object, creates buttons for each option, and stores them in dialogButtons. The sketch then loops through these buttons each frame in drawDialogueScreen() to display them. This pattern—data-driven UI generation—is powerful because adding new dialogue nodes or options requires only editing the dialogue object, not the drawing code.

function createDialogButtons(nodeIndex) {
  currentNode = nodeIndex;
  dialogButtons = [];
  let node = dialogue[nodeIndex];
  
  let startY = height * 0.5;
  for (let i = 0; i < node.options.length; i++) {
    let opt = node.options[i];
    dialogButtons.push(new DialogButton(width/2, startY + i*80, width*0.8, 60, opt.text, opt.next));
  }
}
Line-by-line explanation (7 lines)

🔧 Subcomponents:

calculation Retrieve dialogue node let node = dialogue[nodeIndex];

Looks up the dialogue node in the dialogue object by its index

for-loop Create buttons for all options for (let i = 0; i < node.options.length; i++) {

Iterates through every response option in this dialogue node

calculation DialogButton creation dialogButtons.push(new DialogButton(width/2, startY + i*80, width*0.8, 60, opt.text, opt.next));

Creates a button for each option and adds it to the dialogButtons array

currentNode = nodeIndex;
Updates the currentNode global variable so drawDialogueScreen() knows which dialogue to display.
dialogButtons = [];
Clears the dialogButtons array so we only have buttons for this node's options.
let node = dialogue[nodeIndex];
Retrieves the entire dialogue node object (which contains text and options array).
let startY = height * 0.5;
Positions the first button at 50% down the screen, so buttons appear below the dialogue text.
for (let i = 0; i < node.options.length; i++) {
Loops once for each response option available at this dialogue node.
let opt = node.options[i];
Gets the current option object, which has text (what to display) and next (where to go when clicked).
new DialogButton(width/2, startY + i*80, width*0.8, 60, opt.text, opt.next)
Creates a DialogButton at position (width/2, startY + i*80), spaced 80 pixels apart vertically.

startYelling67()

startYelling67() activates the text-to-speech easter egg. It includes a browser compatibility check (failsafe) so the sketch doesn't crash on browsers without Web Speech API. This is good defensive programming—always anticipate that browsers may not support your features.

function startYelling67() {
  if (!('speechSynthesis' in window)) return; // Failsafe for unsupported browsers
  isYelling67 = true;
  triggerYell();
}
Line-by-line explanation (3 lines)

🔧 Subcomponents:

conditional Web Speech API availability check if (!('speechSynthesis' in window)) return;

Checks if the browser supports Web Speech API; if not, silently exits

if (!('speechSynthesis' in window)) return;
Tests if the browser has the speechSynthesis object. If not, the function returns early (does nothing). This prevents errors on unsupported browsers.
isYelling67 = true;
Sets the flag that allows triggerYell() to keep looping.
triggerYell();
Calls triggerYell() to start the chain of voice utterances.

triggerYell()

triggerYell() uses the Web Speech API to generate voice. The clever part is the recursive callback: when one utterance finishes, it immediately starts another, creating the illusion of continuous yelling. This pattern—using onend callbacks to chain voice synthesis—is how you build any looping voice effect. The rate and pitch adjustments show how to make synthesized speech sound more emotional and chaotic.

function triggerYell() {
  if (!isYelling67) return;
  
  let utterance = new SpeechSynthesisUtterance("67!");
  utterance.rate = 1.8; // Talk faster
  utterance.pitch = 1.5; // Slightly higher pitch
  utterance.volume = 1;
  
  // When it finishes saying "67!", trigger it again
  utterance.onend = function() {
    if (isYelling67) {
      triggerYell();
    }
  };
  
  window.speechSynthesis.speak(utterance);
}
Line-by-line explanation (9 lines)

🔧 Subcomponents:

conditional Exit if not yelling if (!isYelling67) return;

Exits the function if the user has already stopped the yelling

calculation Speech utterance setup let utterance = new SpeechSynthesisUtterance("67!"); utterance.rate = 1.8; utterance.pitch = 1.5; utterance.volume = 1;

Creates a voice utterance and adjusts its rate, pitch, and volume for maximum dramatic effect

calculation Recursive voice loop utterance.onend = function() { if (isYelling67) { triggerYell(); } };

Sets a callback that runs when the utterance finishes, triggering another yell if isYelling67 is still true

if (!isYelling67) return;
If the user has clicked MAKE IT STOP, isYelling67 is false, so this function exits early and stops the loop.
let utterance = new SpeechSynthesisUtterance("67!");
Creates a new voice utterance object with the text "67!".
utterance.rate = 1.8;
Sets speech rate to 1.8× normal speed—talks fast and anxiously.
utterance.pitch = 1.5;
Sets pitch to 1.5× normal—makes the voice higher and more frantic.
utterance.volume = 1;
Sets volume to maximum (1.0).
utterance.onend = function() {
Registers a callback function that will run when this utterance finishes speaking.
if (isYelling67) {
Inside the callback, check if yelling is still enabled.
triggerYell();
If yelling is still on, call triggerYell() again—recursively creating an endless loop of "67!" utterances.
window.speechSynthesis.speak(utterance);
Plays the utterance through the browser's text-to-speech engine.

stopYelling67()

stopYelling67() is the emergency stop button. It disables the yelling flag and cancels all pending speech synthesis. This is important because Web Speech API queues utterances; without cancel(), the yelling would continue for a while even after the user clicks MAKE IT STOP.

function stopYelling67() {
  isYelling67 = false;
  if ('speechSynthesis' in window) {
    window.speechSynthesis.cancel(); // Clears out the voice queue completely
  }
}
Line-by-line explanation (3 lines)

🔧 Subcomponents:

calculation Stop yelling flag isYelling67 = false;

Sets the flag to false so triggerYell() will stop recursing

calculation Cancel all queued utterances window.speechSynthesis.cancel();

Immediately stops any speech currently playing and clears the queue

isYelling67 = false;
Sets the yelling flag to false so if triggerYell() is called again, it will exit early.
if ('speechSynthesis' in window) {
Checks that Web Speech API is supported before trying to use it.
window.speechSynthesis.cancel();
Stops all speech synthesis immediately and clears any pending utterances from the queue.

Button class

The Button class is a reusable template. Create as many buttons as you want—each gets its own properties. The isHovered() method uses a distance formula (abs() checks) to detect clicks, which is simpler than testing rectangular bounds. In JavaScript classes, `this` refers to the individual button object, so `this.x` is that specific button's x position.

class Button {
  constructor(x, y, w, h, label) {
    this.x = x; this.y = y;
    this.w = w; this.h = h;
    this.label = label;
  }
  
  display() {
    fill(50);
    stroke(100);
    rect(this.x, this.y, this.w, this.h, 10);
    fill(255);
    noStroke();
    textSize(24);
    text(this.label, this.x, this.y);
  }
  
  isHovered(mx, my) {
    return abs(mx - this.x) < this.w/2 && abs(my - this.y) < this.h/2;
  }
}
Line-by-line explanation (9 lines)

🔧 Subcomponents:

calculation Button initialization constructor(x, y, w, h, label) { this.x = x; this.y = y; this.w = w; this.h = h; this.label = label; }

Stores button position, size, and label as properties

calculation Render button on screen display() { ... }

Draws a gray rectangle with white text centered on it

calculation Click detection isHovered(mx, my) { return abs(mx - this.x) < this.w/2 && abs(my - this.y) < this.h/2; }

Returns true if click coordinates (mx, my) are within the button's rectangle

class Button {
Defines a Button class—a reusable template for creating clickable buttons.
constructor(x, y, w, h, label) {
The constructor runs when you create a new Button. It receives position (x, y), size (w, h), and label.
this.x = x; this.y = y;
Stores x and y as properties of this button object so they persist for later use.
display() {
A method (function inside the class) that renders this button on screen.
fill(50);
Sets the button color to dark gray.
rect(this.x, this.y, this.w, this.h, 10);
Draws the button rectangle using this button's stored position and size.
text(this.label, this.x, this.y);
Renders the button's label text (e.g., '5', '7', 'CALL') at the button's center.
isHovered(mx, my) {
A method that checks if mouse coordinates (mx, my) are inside this button.
return abs(mx - this.x) < this.w/2 && abs(my - this.y) < this.h/2;
Returns true if the click is within half the width on either side and half the height above/below the button's center.

DialogButton class

DialogButton demonstrates class inheritance (extends). Instead of duplicating code, DialogButton reuses Button's isHovered() method and constructor setup, then adds its own display() style and targetNode property. This is the DRY principle (Don't Repeat Yourself) in action—less code to maintain, fewer bugs.

class DialogButton extends Button {
  constructor(x, y, w, h, label, targetNode) {
    super(x, y, w, h, label);
    this.targetNode = targetNode;
  }
  
  display() {
    fill(60, 60, 80);
    stroke(150);
    rect(this.x, this.y, this.w, this.h, 5);
    fill(200, 255, 200);
    noStroke();
    textSize(14);
    textWrap(WORD);
    text(this.label, this.x, this.y, this.w * 0.9);
  }
}
Line-by-line explanation (8 lines)

🔧 Subcomponents:

calculation Extends Button class class DialogButton extends Button {

DialogButton inherits all Button properties and methods, but overrides display()

calculation Call parent constructor super(x, y, w, h, label);

Calls the Button constructor to set up position, size, and label before adding targetNode

calculation Override display method display() { ... }

Replaces Button's display() with a custom version that looks different and wraps text

class DialogButton extends Button {
Creates a new class that inherits from Button. DialogButton will have all of Button's properties and methods.
constructor(x, y, w, h, label, targetNode) {
DialogButton's constructor takes an extra parameter: targetNode, which is where this dialogue choice leads.
super(x, y, w, h, label);
Calls the parent Button constructor with the shared parameters. This sets up x, y, w, h, and label.
this.targetNode = targetNode;
Stores the dialogue target (could be a node number or an ending string).
display() {
Overrides the parent's display() method with a custom rendering for dialogue buttons.
fill(60, 60, 80);
Dialogue buttons are darker blue (different from keypad button gray).
textWrap(WORD);
Enables word wrapping so long response text breaks into multiple lines inside the button.
text(this.label, this.x, this.y, this.w * 0.9);
Renders the button text constrained to 90% of the button width to leave padding.

📦 Key Variables

state string

Tracks the current game screen: START, KEYPAD, DIALING, DIALOGUE, BUSTED, WARNING_67, or 67_HELL. The draw() switch statement uses this to decide which screen to render.

let state = "START";
typedNumber string

Stores the phone number the player has typed digit by digit. Displayed on the keypad screen and used for routing to the correct dialogue tree.

let typedNumber = "";
ringTimer number

Counts frames during the DIALING state to animate the ringing phone and decide when the call connects (at 240 frames).

let ringTimer = 0;
flashTimer number

Counts frames in the BUSTED state to drive the red/blue strobe flashing lights effect.

let flashTimer = 0;
currentNode number

Stores the index of the current dialogue node being displayed. Used by drawDialogueScreen() to look up the text and options from the dialogue object.

let currentNode = 0;
endReason string

Stores the key to the ending message (e.g., 'busted_pizza'). When the player reaches a dead end in dialogue, this is looked up in the endings object to display the result.

let endReason = "";
isYelling67 boolean

Flag that controls whether the text-to-speech engine should keep saying '67!'. Set to true when entering 67_HELL, false when MAKE IT STOP is clicked.

let isYelling67 = false;
warningStep number

Tracks which of the 5 epilepsy warning screens the player is currently viewing (1-5).

let warningStep = 1;
disableFlashing boolean

Accessibility toggle. When true, all flashing lights become solid dark colors instead, and screen shake is reduced. Allows players with photosensitive epilepsy to play safely.

let disableFlashing = false;
secretNumbers array

Array of all 13 valid secret phone numbers that trigger dialogue trees. Used by the AUTO-FILL button to pick a random number.

const secretNumbers = ["911", "411", "8675309", ...];
dialogue object

Nested object storing all dialogue nodes, each with text and an array of response options. Keyed by node indices (0, 1, 10, 20, etc.).

const dialogue = { 0: { text: "...", options: [...] }, ... };
endings object

Object mapping ending keys (e.g., 'busted_pizza') to their corresponding humorous outcome messages.

const endings = { 'busted_pizza': "DISPATCHING SWAT TEAM...", ... };
keypadButtons array

Array of Button objects representing the 12 keys (1-9, *, 0, #) on the phone dial pad. Populated by createKeypad().

let keypadButtons = [];
dialogButtons array

Array of DialogButton objects representing the player's response choices in the current dialogue node. Repopulated by createDialogButtons() when advancing to a new node.

let dialogButtons = [];
osc p5.Oscillator

First sine wave oscillator for generating beep tones. Frequency is controlled by playBeep() calls.

let osc = new p5.Oscillator('sine');
osc2 p5.Oscillator

Second sine wave oscillator, detuned 10% higher than osc to create a richer retro beep sound.

let osc2 = new p5.Oscillator('sine');
sirenOsc p5.Oscillator

Square wave oscillator used for the police siren sound in the BUSTED state. Frequency sweeps up and down continuously.

let sirenOsc = new p5.Oscillator('square');
env p5.Envelope

ADSR envelope that controls how beep sounds fade in and out. Triggered by playBeep() and by the ring tone during DIALING state.

let env = new p5.Envelope();

🔧 Potential Improvements (6)

Here are some ways this code could be enhanced:

PERFORMANCE drawDialingScreen() routing logic

The 12 if-else statements to route to different dialogue nodes is repetitive and hard to maintain. Adding a new number requires editing multiple lines.

💡 Replace the if-else chain with a lookup object: `const numberRoutes = { '911': 0, '411': 10, ... }; createDialogButtons(numberRoutes[typedNumber] || 404);` This is DRY (Don't Repeat Yourself) and scales better.

BUG dialogButton display()

If a dialogue option has very long text, it may overflow the button height because textWrap(WORD) only wraps horizontally, not vertically. Buttons with 3+ lines of text will overflow.

💡 Increase button height dynamically based on text length, or cap the maximum response text length in the dialogue object to prevent overflow.

STYLE handleInput() function

The function is very long (100+ lines) with deeply nested if-else statements that are hard to follow.

💡 Refactor input handling by state: create separate functions like `handleStartInput()`, `handleKeypadInput()`, `handleDialogueInput()`, etc., then call the appropriate one based on state. This makes each function shorter and easier to test.

ACCESSIBILITY triggerYell() function

Text-to-speech can be jarring and intrusive for screen reader users who expect their assistive technology to speak, not a prank voice. There's no way to suppress it for users with screen readers.

💡 Check if a screen reader is active using `navigator.accessibilityServiceEnabled` (when available) or add a toggle in the accessibility menu to disable voice output entirely.

FEATURE Setup and global state

There's no way to quit mid-dialogue or reset the game without reaching an ending. Users stuck in a boring conversation path have to wait for an ending.

💡 Add an ESC key handler in keyPressed() that allows the player to return to the keypad at any time, or add a "Hang Up" button visible during DIALOGUE state.

BUG warningStep display

If a player clicks the PROCEED button after warningStep > 5, the code will look for `warningTexts[6]` which doesn't exist, resulting in undefined text being displayed.

💡 Add a bounds check: `let text = warningTexts[Math.min(warningStep, 5)];` to ensure warningStep never exceeds 5.

🔄 Code Flow

Code flow showing setup, draw, drawstartscreen, drawkeypadscreen, drawdialingscreen, drawdialoguescreen, drawbustedscreen, drawwarning67screen, draw67hellscreen, handleinput, playbeep, createkeypad, createdialognodes, startyelling67, triggeryell, stopyelling67, button, dialogbutton

💡 Click on function names in the diagram to jump to their code

graph TD start[Start] --> setup[setup] setup --> draw[draw loop] draw --> state-switch[state-switch] state-switch --> drawstartscreen[drawStartScreen] state-switch --> drawkeypadscreen[drawKeypadScreen] state-switch --> drawdialingscreen[drawDialingScreen] state-switch --> drawdialoguescreen[drawDialogueScreen] state-switch --> drawbustedscreen[drawBustedScreen] state-switch --> drawwarning67screen[drawWarning67Screen] state-switch --> draw67hellscreen[draw67HellScreen] drawstartscreen --> title-text[title-text] drawstartscreen --> epilepsy-warning[epilepsy-warning] drawstartscreen --> start-button[start-button] drawstartscreen --> flashing-toggle[flashing-toggle] drawkeypadscreen --> screen-display[screen-display] drawkeypadscreen --> typed-number-display[typed-number-display] drawkeypadscreen --> clear-button[clear-button] drawkeypadscreen --> autofill-button[autofill-button] drawkeypadscreen --> keypad-loop[keypad-loop] drawkeypadscreen --> call-button-color[call-button-color] drawdialingscreen --> dialing-display[dialing-display] drawdialingscreen --> ring-timer-increment[ring-timer-increment] drawdialingscreen --> ring-animation[ring-animation] drawdialingscreen --> ring-sound[ring-sound] drawdialingscreen --> connection-check[connection-check] drawdialingscreen --> special-67-route[special-67-route] drawdialingscreen --> number-routing[number-routing] drawdialoguescreen --> dialogue-box[dialogue-box] drawdialoguescreen --> dialogue-text[dialogue-text] drawdialoguescreen --> button-loop[button-loop] drawbustedscreen --> flash-timer[flash-timer] drawbustedscreen --> conditional-flashing[conditional-flashing] drawwarning67screen --> warning-counter[warning-counter] drawwarning67screen --> warning-object[warning-object] drawwarning67screen --> safe-mode-reassurance[safe-mode-reassurance] draw67hellscreen --> rapid-flashing[rapid-flashing] draw67hellscreen --> random-shake[random-shake] draw67hellscreen --> shake-accessibility[shake-accessibility] click setup href "#fn-setup" click draw href "#fn-draw" click state-switch href "#sub-state-switch" click drawstartscreen href "#fn-drawstartscreen" click drawkeypadscreen href "#fn-drawkeypadscreen" click drawdialingscreen href "#fn-drawdialingscreen" click drawdialoguescreen href "#fn-drawdialoguescreen" click drawbustedscreen href "#fn-drawbustedscreen" click drawwarning67screen href "#fn-drawwarning67screen" click draw67hellscreen href "#fn-draw67hellscreen" click title-text href "#sub-title-text" click epilepsy-warning href "#sub-epilepsy-warning" click start-button href "#sub-start-button" click flashing-toggle href "#sub-flashing-toggle" click screen-display href "#sub-screen-display" click typed-number-display href "#sub-typed-number-display" click clear-button href "#sub-clear-button" click autofill-button href "#sub-autofill-button" click keypad-loop href "#sub-keypad-loop" click call-button-color href "#sub-call-button-color" click dialing-display href "#sub-dialing-display" click ring-timer-increment href "#sub-ring-timer-increment" click ring-animation href "#sub-ring-animation" click ring-sound href "#sub-ring-sound" click connection-check href "#sub-connection-check" click special-67-route href "#sub-special-67-route" click number-routing href "#sub-number-routing" click dialogue-box href "#sub-dialogue-box" click dialogue-text href "#sub-dialogue-text" click button-loop href "#sub-button-loop" click flash-timer href "#sub-flash-timer" click conditional-flashing href "#sub-conditional-flashing" click warning-counter href "#sub-warning-counter" click warning-object href "#sub-warning-object" click safe-mode-reassurance href "#sub-safe-mode-reassurance" click rapid-flashing href "#sub-rapid-flashing" click random-shake href "#sub-random-shake" click shake-accessibility href "#sub-shake-accessibility"

❓ Frequently Asked Questions

What kind of visuals can I expect from the PRANK CALL SIM sketch?

The sketch features a retro phone interface with playful animations and dynamic visual effects that react to user interactions, creating an engaging and humorous atmosphere.

How can I interact with the PRANK CALL SIM sketch?

Users can tap on the virtual keypad to input secret numbers, triggering funny calls and navigating through a branching dialogue tree based on their selections.

What creative coding techniques are showcased in the PRANK CALL SIM sketch?

This sketch demonstrates the use of branching dialogue trees and sound synthesis, allowing for interactive storytelling and real-time audio feedback based on user choices.

Preview

PRANK CALL SIM (PREPARE YOUR EYES) - p5.js creative coding sketch preview
Sketch Preview
Code flow diagram showing the structure of PRANK CALL SIM (PREPARE YOUR EYES) - Code flow showing setup, draw, drawstartscreen, drawkeypadscreen, drawdialingscreen, drawdialoguescreen, drawbustedscreen, drawwarning67screen, draw67hellscreen, handleinput, playbeep, createkeypad, createdialognodes, startyelling67, triggeryell, stopyelling67, button, dialogbutton
Code Flow Diagram
