pronk

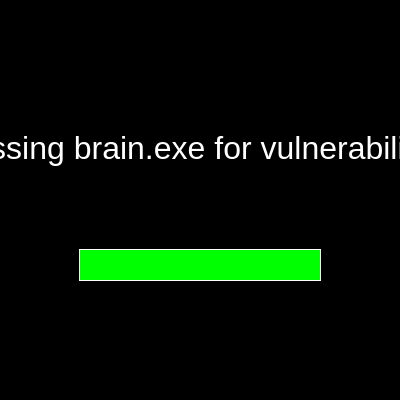
This sketch creates a playful prank that mimics a dramatic software crash with a fake blue screen, then reveals a cheerful "You've been pranked!" message. It combines state management, timed transitions, and animations to build suspense before delivering the joke.

🧪 Try This!

Experiment with the code by making these changes:

  1. Speed up the installation phase — Lower the messageDisplayTime so messages change faster and the installation feels quicker - speeds up the buildup to the prank.
  2. Make the crash screen appear instantly — Set crashDelay to 1 millisecond so the blue screen is barely visible before jumping to the reveal - creates a faster-paced joke.
  3. Make the bouncing circle huge — Increase the maximum size of the bouncing circle during the reveal from 200 to 400 pixels - makes the animation more exuberant.
  4. Add a custom prank message — Change one of the installation messages to something personal - shows how the messages array powers the first phase.
  5. Change the reveal background color to red — Swap the gold reveal background to red for a different emotional tone - red feels more urgent, gold feels more playful.
Prefer the full editor? Open it there →

📖 About This Sketch

This sketch is a full prank experience that unfolds in three acts: a fake software installation with silly messages and a loading bar, a dramatic blue-screen crash, and finally a bright, animated reveal. The visual comedy comes from the contrast between the serious tone of the first two states and the joyful reveal at the end. The code teaches state machines (a powerful pattern for managing different phases of an interactive sketch), timed state transitions, and how to coordinate animations with user input.

The sketch is organized around a state variable that determines which of three functions to call each frame: drawInstallingState(), drawCrashedState(), or drawRevealState(). By reading this code, you will learn how to structure sketches with multiple distinct modes, how to time events without blocking the draw loop, and how animation variables can create bouncing or pulsing effects. This is a masterclass in using state machines to tell a story with code.

⚙️ How It Works

  1. When the sketch loads, setup() creates a full-screen canvas and initializes the state to STATE_INSTALLING, then sets a timer to track when the last message was displayed.
  2. The draw() function runs 60 times per second and uses a switch statement to call different drawing functions based on the current state.
  3. In STATE_INSTALLING, a black screen displays messages from an array one at a time, with each message appearing for 2 seconds. A green loading bar below fills up slowly as messages cycle.
  4. When all messages have been shown, the state changes to STATE_CRASHED and displays a blue screen with dramatic text about the error.
  5. After 3 seconds (or if any key is pressed), the state transitions to STATE_REVEAL, which shows a cheerful gold background with "APRIL FOOLS!" and an expanding/contracting circle animation that bounces between 0 and 200 pixels.
  6. The mouse cursor is hidden during the prank and restored during the reveal so the user can close the tab.

🎓 Concepts You'll Learn

State machinesSwitch statementsTiming and delaysArray iterationAnimation loopsUser input handlingConditional state transitions

📝 Code Breakdown

setup()

setup() runs once when the sketch first loads. It prepares the canvas, hides the cursor for immersion, and initializes all the timing variables and state that the draw loop will depend on.

function setup() {
  createCanvas(windowWidth, windowHeight);
  textAlign(CENTER, CENTER);
  noCursor(); // Hide the mouse cursor for a more immersive experience
  currentState = STATE_INSTALLING;
  lastMessageChangeTime = millis();
  loadingProgress = 0;
  userStartAudio(); // Required for p5.sound to work in browsers
}
Line-by-line explanation (7 lines)
createCanvas(windowWidth, windowHeight);
Creates a canvas that fills the entire browser window, making the prank more immersive and full-screen.
textAlign(CENTER, CENTER);
Centers all text both horizontally and vertically, so text() draws from its middle point instead of top-left.
noCursor(); // Hide the mouse cursor for a more immersive experience
Hides the mouse cursor to make the fake crash feel more authentic and immersive.
currentState = STATE_INSTALLING;
Sets the initial state to STATE_INSTALLING so the prank begins with the fake software installation phase.
lastMessageChangeTime = millis();
Records the current time in milliseconds - this is used to track when to change to the next message.
loadingProgress = 0;
Initializes the loading bar to 0%, ready to fill up as the fake installation progresses.
userStartAudio(); // Required for p5.sound to work in browsers
Initializes p5.sound library - required before playing any audio in modern browsers due to autoplay restrictions.

draw()

The draw() function is the heart of a state machine: it's a dispatcher that directs traffic to different visual scenes based on currentState. This pattern scales beautifully to sketches with many scenes or modes.

function draw() {
  switch (currentState) {
    case STATE_INSTALLING:
      drawInstallingState();
      break;
    case STATE_CRASHED:
      drawCrashedState();
      break;
    case STATE_REVEAL:
      drawRevealState();
      break;
  }
}
Line-by-line explanation (7 lines)

🔧 Subcomponents:

switch-case State Router switch (currentState) { ... }

Routes execution to the correct drawing function based on the current state of the prank

switch (currentState) {
Checks the value of currentState and directs the code to the matching case below.
case STATE_INSTALLING:
If currentState equals 0 (STATE_INSTALLING), run the installation screen code.
drawInstallingState();
Calls the function that draws the fake software installation with messages and a loading bar.
case STATE_CRASHED:
If currentState equals 1 (STATE_CRASHED), run the crash screen code.
drawCrashedState();
Calls the function that draws the blue screen crash message.
case STATE_REVEAL:
If currentState equals 2 (STATE_REVEAL), run the prank reveal code.
drawRevealState();
Calls the function that draws the cheerful 'You've been pranked!' reveal with animation.

drawInstallingState()

This function is the beating heart of the first act. It demonstrates how to display different content over time (the messages array), animate a progress bar, and use timing logic to transition between states without blocking. The key insight is that millis() gives you elapsed time, and you use simple math to trigger events when enough time has passed.

🔬 These lines define the loading bar's size and position. What happens if you change 0.6 to 0.3? What if you change barHeight from 30 to 60?

  let barWidth = width * 0.6;
  let barHeight = 30;
  let barX = (width - barWidth) / 2;
  let barY = height / 2 + 50;
function drawInstallingState() {
  background(0); // Black background
  fill(messageColor);
  textSize(messageFontSize);
  text(messages[currentMessageIndex], width / 2, height / 2 - 50);

  // Update loading progress
  loadingProgress += loadingSpeed;
  if (loadingProgress >= 1) loadingProgress = 1; // Cap at 100%

  // Draw loading bar
  let barWidth = width * 0.6;
  let barHeight = 30;
  let barX = (width - barWidth) / 2;
  let barY = height / 2 + 50;
  noFill();
  stroke(messageColor);
  strokeWeight(2);
  rect(barX, barY, barWidth, barHeight);
  fill(loadingBarColor);
  noStroke();
  rect(barX, barY, barWidth * loadingProgress, barHeight);

  // Check for message change or state transition
  if (millis() - lastMessageChangeTime > messageDisplayTime) {
    currentMessageIndex++;
    lastMessageChangeTime = millis();
    if (currentMessageIndex >= messages.length) {
      currentState = STATE_CRASHED;
      crashStartTime = millis(); // Record time of crash
    }
  }
}
Line-by-line explanation (18 lines)

🔧 Subcomponents:

calculation Display Current Message text(messages[currentMessageIndex], width / 2, height / 2 - 50);

Shows the current message from the messages array in the center of the screen

calculation Draw Loading Bar rect(barX, barY, barWidth * loadingProgress, barHeight);

Draws the green fill portion of the loading bar, scaled by the current progress (0 to 1)

conditional Message Timeout Logic if (millis() - lastMessageChangeTime > messageDisplayTime) {

Checks if enough time has passed to advance to the next message

background(0); // Black background
Clears the canvas with black at the start of each frame, erasing the previous frame's content.
fill(messageColor);
Sets the text color to white (messageColor) so the next text() call will be white.
textSize(messageFontSize);
Sets the font size to 32 pixels for the installation messages.
text(messages[currentMessageIndex], width / 2, height / 2 - 50);
Displays the current message from the messages array at the center-top of the screen.
loadingProgress += loadingSpeed;
Increments the loading progress by a small amount (0.005) every frame, slowly filling the bar.
if (loadingProgress >= 1) loadingProgress = 1; // Cap at 100%
Prevents the loading bar from exceeding 100% by capping it at 1.0.
let barWidth = width * 0.6;
Calculates the loading bar width as 60% of the canvas width.
let barHeight = 30;
Sets a fixed bar height of 30 pixels.
let barX = (width - barWidth) / 2;
Calculates the x position so the bar is horizontally centered on the canvas.
let barY = height / 2 + 50;
Positions the bar 50 pixels below the vertical center of the canvas.
rect(barX, barY, barWidth, barHeight);
Draws the outline (border) of the loading bar in white with 2-pixel stroke.
rect(barX, barY, barWidth * loadingProgress, barHeight);
Draws the green fill portion of the bar, scaled by loadingProgress (0 to 1).
if (millis() - lastMessageChangeTime > messageDisplayTime) {
Checks if 2000 milliseconds (2 seconds) have elapsed since the last message change.
currentMessageIndex++;
Advances to the next message in the messages array by incrementing the index.
lastMessageChangeTime = millis();
Records the current time, resetting the 2-second timer for the next message.
if (currentMessageIndex >= messages.length) {
Checks if we've displayed all messages - if so, it's time to crash.
currentState = STATE_CRASHED;
Transitions the prank to the crash screen phase.
crashStartTime = millis(); // Record time of crash
Records the time when the crash occurs so the reveal can happen after a delay.

drawCrashedState()

This function demonstrates the power of OR conditions (||) to create multiple paths to the same event. The user can trigger the reveal either by waiting for the timer OR by pressing a key - either way feels satisfying. The sound plays only once because of the !revealSound.isPlaying() check.

🔬 This condition uses OR (||) to trigger on two different events. What happens if you remove '|| keyIsPressed' - can the user still proceed? What if you change crashDelay to 1000 instead of 3000?

  if (millis() - crashStartTime > crashDelay || keyIsPressed) {
    currentState = STATE_REVEAL;
    if (!revealSound.isPlaying()) {
      revealSound.play(); // Play sound on reveal
    }
  }
function drawCrashedState() {
  background(crashScreenColor); // Classic blue screen color
  fill(crashScreenTextColor);
  textSize(crashFontSize);
  text("A serious error has occurred.", width / 2, height / 2 - 100);
  text("Prank initiated successfully. Do not be alarmed.", width / 2, height / 2 - 50);
  text("Press any key to reveal the truth.", width / 2, height / 2 + 50);

  // Transition to reveal state after a delay or if any key is pressed
  if (millis() - crashStartTime > crashDelay || keyIsPressed) {
    currentState = STATE_REVEAL;
    if (!revealSound.isPlaying()) {
      revealSound.play(); // Play sound on reveal
    }
  }
}
Line-by-line explanation (10 lines)

🔧 Subcomponents:

conditional Crash to Reveal Transition if (millis() - crashStartTime > crashDelay || keyIsPressed) {

Transitions to the reveal state either after 3 seconds have elapsed OR if the user presses any key, whichever comes first

background(crashScreenColor); // Classic blue screen color
Fills the canvas with the classic blue screen color (#0000AA) to mimic a Windows crash.
fill(crashScreenTextColor);
Sets the text color to white (#FFFFFF) so the text will be visible on the blue background.
textSize(crashFontSize);
Sets the font size to 24 pixels for the crash messages.
text("A serious error has occurred.", width / 2, height / 2 - 100);
Displays the first line of the crash message at the top of the screen.
text("Prank initiated successfully. Do not be alarmed.", width / 2, height / 2 - 50);
Displays the second line revealing this is actually a prank (a subtle clue for observant viewers).
text("Press any key to reveal the truth.", width / 2, height / 2 + 50);
Displays instructions inviting the user to press a key to transition to the reveal.
if (millis() - crashStartTime > crashDelay || keyIsPressed) {
Checks if either 3 seconds have passed OR the user has pressed a key - if either is true, proceed to reveal.
currentState = STATE_REVEAL;
Changes the state to STATE_REVEAL, which causes draw() to call drawRevealState() next frame.
if (!revealSound.isPlaying()) {
Checks if the reveal sound is not already playing before starting it.
revealSound.play(); // Play sound on reveal
Plays the reveal sound effect when transitioning to the final reveal state.

drawRevealState()

This function showcases simple animation logic: by incrementing a variable each frame and checking boundaries, you create smooth, bouncing motion. The <= and >= checks trigger state reversals, a common pattern for looping or bouncing animations. This is the same technique used for raindrops bouncing, balls bouncing, or breathing effects.

🔬 This code makes the circle bounce: it grows, hits 200 pixels, bounces back, shrinks to near-zero, and bounces back again. What happens if you change 200 to 100? What if you change the *= -1 to *= -0.5?

  revealAnimationSize += revealAnimationSpeed;
  if (revealAnimationSize > 200 || revealAnimationSize < 0) {
    revealAnimationSpeed *= -1; // Reverse direction
  }
function drawRevealState() {
  background(revealColor); // Cheerful yellow background
  fill(revealTextColor);
  textSize(revealFontSize);
  text("APRIL FOOLS!", width / 2, height / 2 - 100);
  text("You've been pranked!", width / 2, height / 2);

  // Simple goofy animation: Expanding/contracting circle
  noFill();
  stroke(revealTextColor);
  strokeWeight(5);
  ellipse(width / 2, height / 2 + 100, revealAnimationSize, revealAnimationSize);
  revealAnimationSize += revealAnimationSpeed;
  if (revealAnimationSize > 200 || revealAnimationSize < 0) {
    revealAnimationSpeed *= -1; // Reverse direction
  }

  cursor(); // Bring back the mouse cursor so they can close the tab
}
Line-by-line explanation (13 lines)

🔧 Subcomponents:

conditional Circle Bounce Logic if (revealAnimationSize > 200 || revealAnimationSize < 0) { revealAnimationSpeed *= -1; // Reverse direction }

Makes the expanding circle bounce back and forth between 0 and 200 pixels by reversing the animation speed when boundaries are hit

background(revealColor); // Cheerful yellow background
Fills the canvas with gold/yellow (#FFD700) to create a bright, cheerful contrast with the crash screen.
fill(revealTextColor);
Sets the text color to black so text is visible on the yellow background.
textSize(revealFontSize);
Sets the font size to 48 pixels - much larger than previous messages to make the reveal feel impactful.
text("APRIL FOOLS!", width / 2, height / 2 - 100);
Displays the main reveal message at the top center of the screen.
text("You've been pranked!", width / 2, height / 2);
Displays the secondary message in the center of the screen.
noFill();
Disables fill for the next shape, so only the stroke (outline) of the circle will be drawn.
stroke(revealTextColor);
Sets the circle's outline color to black.
strokeWeight(5);
Sets the circle's outline thickness to 5 pixels.
ellipse(width / 2, height / 2 + 100, revealAnimationSize, revealAnimationSize);
Draws a circle at the bottom center of the screen with diameter equal to revealAnimationSize, creating the bouncing effect.
revealAnimationSize += revealAnimationSpeed;
Increases the circle's size by 5 pixels each frame (the value of revealAnimationSpeed), making it expand.
if (revealAnimationSize > 200 || revealAnimationSize < 0) {
Checks if the circle has grown too large (> 200) or shrunk too small (< 0).
revealAnimationSpeed *= -1; // Reverse direction
Flips the sign of revealAnimationSpeed, causing the circle to shrink or expand in the opposite direction.
cursor(); // Bring back the mouse cursor so they can close the tab
Restores the mouse cursor (which was hidden in setup) so the user can interact with the browser to close the tab.

windowResized()

windowResized() is a special p5.js function that p5 calls automatically whenever the browser window is resized. Without it, the canvas would stay the same size and not fill the window. This ensures the prank experience remains full-screen no matter how the user resizes their browser.

function windowResized() {
  resizeCanvas(windowWidth, windowHeight);
}
Line-by-line explanation (1 lines)
resizeCanvas(windowWidth, windowHeight);
Resizes the p5.js canvas to match the new browser window size when the user resizes their window.

📦 Key Variables

STATE_INSTALLING number

A constant (0) that represents the first phase of the prank - the fake software installation screen

const STATE_INSTALLING = 0;
STATE_CRASHED number

A constant (1) that represents the second phase of the prank - the blue screen crash

const STATE_CRASHED = 1;
STATE_REVEAL number

A constant (2) that represents the third phase of the prank - the cheerful 'You've been pranked!' reveal

const STATE_REVEAL = 2;
currentState number

Tracks which of the three states the prank is currently in - determines which drawing function runs each frame

let currentState = STATE_INSTALLING;
messages array

An array of funny strings displayed one at a time during the installation phase to build suspense

let messages = ["Initializing prank subsystem...", "Compiling humor modules..."];
currentMessageIndex number

Tracks which message from the messages array is currently being displayed - increments every 2 seconds

let currentMessageIndex = 0;
messageDisplayTime number

How long each message displays on screen in milliseconds (2000 = 2 seconds) - can be tuned to speed up or slow down the installation

let messageDisplayTime = 2000;
lastMessageChangeTime number

Stores the timestamp (in milliseconds) of when the last message was changed - used to calculate elapsed time

let lastMessageChangeTime = 0;
loadingProgress number

A decimal value between 0 and 1 representing the fill percentage of the green loading bar

let loadingProgress = 0;
loadingSpeed number

How much loadingProgress increases each frame (0.005 means very slow filling) - can be tuned

let loadingSpeed = 0.005;
crashDelay number

How many milliseconds the blue crash screen displays before automatically transitioning to the reveal (3000 = 3 seconds) - can be tuned

let crashDelay = 3000;
crashStartTime number

Stores the timestamp when the crash state begins - used to calculate how long the crash screen has been displayed

let crashStartTime = 0;
crashScreenColor string

The hex color code for the blue screen background (#0000AA - classic blue screen of death color)

let crashScreenColor = '#0000AA';
crashScreenTextColor string

The hex color code for text on the crash screen (#FFFFFF - white)

let crashScreenTextColor = '#FFFFFF';
revealColor string

The hex color code for the background of the reveal screen (#FFD700 - gold/yellow) - creates cheerful contrast

let revealColor = '#FFD700';
revealTextColor string

The hex color code for text on the reveal screen (#000000 - black) - visible on the gold background

let revealTextColor = '#000000';
loadingBarColor string

The hex color code for the green progress bar (#00FF00 - bright green)

let loadingBarColor = '#00FF00';
messageColor string

The hex color code for installation messages (#FFFFFF - white) - visible on black background

let messageColor = '#FFFFFF';
messageFontSize number

Font size for the installation messages in pixels

let messageFontSize = 32;
crashFontSize number

Font size for the crash screen messages in pixels

let crashFontSize = 24;
revealFontSize number

Font size for the reveal screen messages in pixels - larger than other fonts to emphasize the punchline

let revealFontSize = 48;
revealAnimationSize number

The current diameter of the pulsing circle in the reveal screen - grows and shrinks between 0 and 200 pixels

let revealAnimationSize = 0;
revealAnimationSpeed number

How many pixels per frame the animation circle grows (positive) or shrinks (negative) - can be tuned

let revealAnimationSpeed = 5;

🔧 Potential Improvements (6)

Here are some ways this code could be enhanced:

BUG drawCrashedState()

The revealSound variable is never initialized or created, so calling revealSound.play() will cause a runtime error.

💡 In setup(), add: revealSound = createOscillator(); or load an audio file with loadSound(). Alternatively, remove the sound line if no audio is available.

STYLE Global scope

Many magic numbers (like 2000 for messageDisplayTime, 30 for barHeight, 200 for circle max size) are scattered throughout the code making the sketch hard to tweak

💡 Define all animation timing and sizing values as constants at the top (const BAR_HEIGHT = 30, const MAX_CIRCLE_SIZE = 200, etc.) so they're easy to find and adjust.

STYLE Color definitions

Colors are defined as hex strings spread throughout the sketch with comments, making them inconsistent in format

💡 Use p5.js color objects or an object literal: const colors = { crash: color(0, 0, 170), reveal: color(255, 215, 0) } for cleaner, more maintainable code.

PERFORMANCE draw loop - all three state functions

Each state function recalculates bar dimensions (barWidth, barHeight, barX, barY) every single frame even though they're static

💡 Calculate these once in setup() or as constants instead of in the draw loop to reduce unnecessary computation.

FEATURE drawInstallingState()

The progress bar always fills to completion independent of message count - if messages array is shorter or longer, the bar and messages fall out of sync

💡 Calculate loading progress based on currentMessageIndex / messages.length so the bar always reaches 100% when the last message appears.

STYLE messages array

Messages are hardcoded in the script, making it inflexible if someone wants to customize the prank without editing code

💡 Consider storing messages in a separate data file or allowing them to be passed in as a parameter so the prank can be easily customized.

🔄 Code Flow

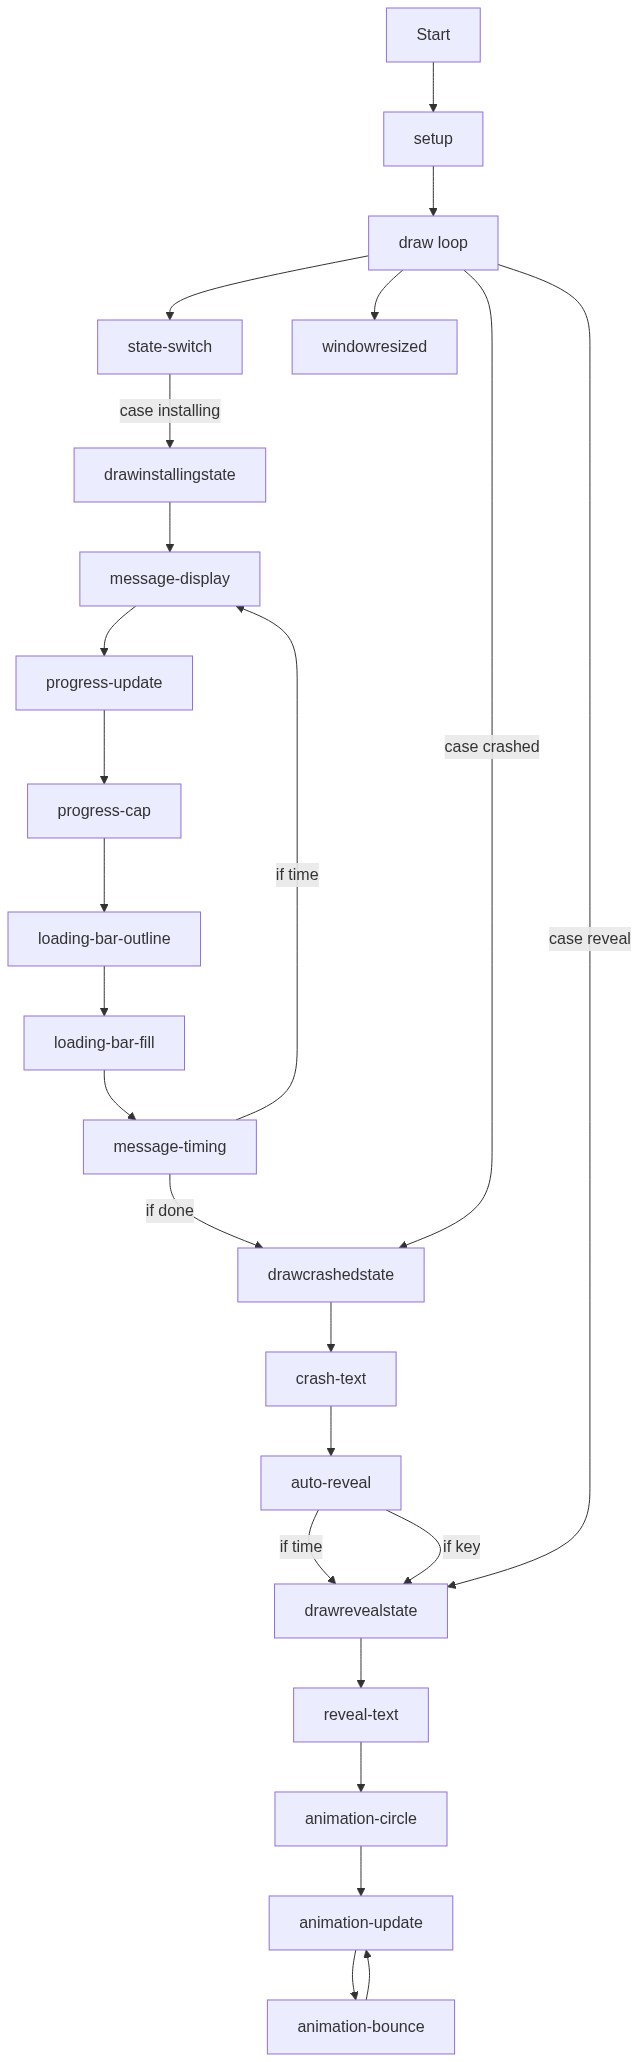
Code flow showing setup, draw, drawinstallingstate, drawcrashedstate, drawrevealstate, windowresized

💡 Click on function names in the diagram to jump to their code

graph TD start[Start] --> setup[setup] setup --> draw[draw loop] draw --> state-switch[state-switch] click setup href "#fn-setup" click draw href "#fn-draw" click state-switch href "#sub-state-switch" state-switch --> drawinstallingstate[drawinstallingstate] state-switch --> drawcrashedstate[drawcrashedstate] state-switch --> drawrevealstate[drawrevealstate] drawinstallingstate --> message-display[message-display] drawinstallingstate --> loading-bar-draw[loading-bar-draw] drawinstallingstate --> message-timer[message-timer] click drawinstallingstate href "#fn-drawinstallingstate" click message-display href "#sub-message-display" click loading-bar-draw href "#sub-loading-bar-draw" click message-timer href "#sub-message-timer" drawcrashedstate --> transition-logic[transition-logic] click drawcrashedstate href "#fn-drawcrashedstate" click transition-logic href "#sub-transition-logic" drawrevealstate --> animation-logic[animation-logic] click drawrevealstate href "#fn-drawrevealstate" click animation-logic href "#sub-animation-logic" windowresized[windowresized] click windowresized href "#fn-windowresized"

❓ Frequently Asked Questions

What visual experience does the 'pronk' sketch provide?

The 'pronk' sketch creates a humorous visual experience that mimics a dramatic software installation with a fake blue screen error, followed by a vibrant animation revealing the prank.

How can users interact with the 'pronk' sketch?

Users can interact with the sketch by pressing keys during the crash screen, which may influence the timing of the reveal.

What creative coding concepts are showcased in the 'pronk' sketch?

The sketch demonstrates concepts such as state management, timed animations, and suspense-building through sequential messages to enhance the comedic effect.

Preview

pronk - p5.js creative coding sketch preview
Sketch Preview
Code flow diagram showing the structure of pronk - Code flow showing setup, draw, drawinstallingstate, drawcrashedstate, drawrevealstate, windowresized
Code Flow Diagram