reverse platform

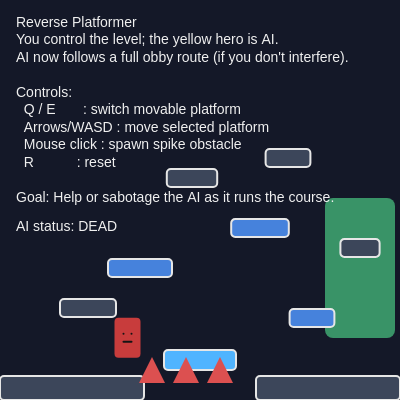
This sketch creates an interactive reverse platformer game where you control the level itself rather than the character. An AI-controlled yellow hero automatically navigates through a scripted obstacle course following waypoints, while you manipulate movable platforms and place spike hazards to either help or sabotage its progress.

🧪 Try This!

Experiment with the code by making these changes:

  1. Make spikes bigger
  2. Double the number of waypoints — Add 6 more waypoints (duplicate the existing ones with slight variations) so the AI must visit twice as many checkpoints.
  3. Speed up the AI — Increase AI_SPEED so the hero dashes through the level much faster—makes sabotage harder.
  4. Give the AI super jumping power — Increase AI_JUMP so the hero can reach much higher platforms, making it harder to sabotage with low obstacles.
  5. Add a second AI character — Create another AIPlayer instance that follows the same waypoints in parallel, racing the first one.
Prefer the full editor? Open it there →

📖 About This Sketch

This sketch inverts the classic platformer formula: instead of controlling a jumping character, you control the level. A yellow AI hero walks across the screen following a predetermined path of waypoints, and you can move platforms and click to spawn spikes to either assist or sabotage its journey. The visual result is mesmerizing—watching the AI adapt to your environmental changes teaches you how pathfinding, collision detection, and AI decision-making work together in real time.

The code is organized around two main classes: Platform (static or movable boxes) and AIPlayer (the yellow hero with physics, jump logic, and waypoint-following behavior). The draw loop continuously updates the AI's position based on gravity and its thinking logic, checks collisions with all platforms and hazards, and renders everything onscreen. By studying it you will learn object-oriented game design, AI steering behaviors, axis-aligned collision detection, and how to build interactive systems where multiple entities interact believably.

⚙️ How It Works

  1. When the sketch loads, setup() calls resetGame() which creates a level with 10 platforms (some static, some movable), a goal zone on the right, an AI character on the left, a spike pit in the center, and 6 waypoints the AI will try to reach in order.
  2. Every frame, draw() calls handlePlatformControl() to move the selected platform based on arrow keys or WASD, then updates the AI by calling ai.update().
  3. Inside AI.update(), the think() method decides whether to jump based on three rules: jump to reach higher waypoints, jump to avoid falling into gaps, and jump to clear low walls in front.
  4. After deciding the jump, physics integrates gravity and velocity, moving the AI horizontally then vertically, with collision detection pushing the AI out of platforms each time.
  5. The AI checks if it has collided with spikes (dies if so), fallen off the world, or reached the goal zone (wins if so).
  6. updateWaypointProgress() advances the AI to the next waypoint once it gets close enough to the current one; after the last waypoint it heads straight for the goal.
  7. You control the level by pressing Q/E to switch which movable platform is selected (shown in light blue), arrow/WASD keys to move it, and clicking to spawn spike obstacles that will kill the AI on contact.

🎓 Concepts You'll Learn

Object-oriented programming (classes)Physics simulation (gravity, velocity, collision)AI pathfinding and waypoint followingCollision detection (AABB)Game state managementEvent handling (keyboard, mouse)Conditional logic for decision-making

📝 Code Breakdown

setup()

setup() runs once when the sketch launches. It prepares the canvas and initializes the game state.

function setup() {
  createCanvas(windowWidth, windowHeight);
  resetGame();
}
Line-by-line explanation (2 lines)
createCanvas(windowWidth, windowHeight);
Creates a canvas that fills the entire browser window—the game board where everything is drawn.
resetGame();
Calls the resetGame() function to initialize all platforms, spikes, the AI, and waypoints for the first time.

resetGame()

resetGame() is the level constructor. It runs when the sketch first loads and every time you press R. By modifying platform positions, spike counts, and waypoint coordinates here, you can design entirely new levels and AI paths. The indices in comments (index 0, index 6, etc.) are critical: waypoints reference these platform indices so the AI knows which platforms are important checkpoints.

🔬 The waypoints define the exact coordinates the AI tries to visit in order. What happens if you swap waypoints 0 and 1 by copying the second waypoint's coordinates into the first push call? Does the AI still complete the same path?

  // 0: Jump from left ground up to the static platform above it (index 6)
  waypoints.push({ x: platforms[6].x, y: platforms[6].y });

  // 1: Run off that platform and drop back down to left ground near the gap
  waypoints.push({
    x: leftGround.x + leftGround.w * 0.35,
    y: leftGround.y
  });
function resetGame() {
  platforms = [];
  spikes = [];
  waypoints = [];

  const groundH = 24;
  const groundY = height - groundH / 2;

  // --- Main ground segments ---
  const groundW = width * 0.36;

  // Left ground
  platforms.push(new Platform(width * 0.18, groundY, groundW, groundH, false));
  // Right ground
  platforms.push(new Platform(width * 0.82, groundY, groundW, groundH, false));

  // --- Movable platforms (you control these) ---

  // Movable bridge across the center gap (ground level)
  platforms.push(new Platform(width * 0.5, groundY, width * 0.18, 20, true));

  const movableW = width * 0.16;
  const movableH = 18;

  // Extra movable platform above the left side of the gap
  platforms.push(new Platform(width * 0.35, groundY - 120, movableW, movableH, true));

  // Extra movable platform higher in the middle
  platforms.push(new Platform(width * 0.65, groundY - 160, movableW * 0.9, movableH, true));

  // Extra movable platform over the right side
  platforms.push(new Platform(width * 0.78, groundY - 70, movableW * 0.7, movableH, true));

  // --- Static platforms for alternate routes / decoration ---

  const smallW = width * 0.14;
  const smallH = 18;

  // Above left ground
  platforms.push(new Platform(width * 0.22, groundY - 80, smallW, smallH, false));

  // High middle platform
  platforms.push(new Platform(width * 0.48, groundY - 210, smallW * 0.9, smallH, false));

  // Very high right‑middle platform
  platforms.push(new Platform(width * 0.72, groundY - 230, smallW * 0.8, smallH, false));

  // Floating platform near the goal side
  platforms.push(new Platform(width * 0.9, groundY - 140, smallW * 0.7, smallH, false));

  // Select the first movable platform (in case we add more later)
  selectedPlatformIndex = platforms.findIndex(p => p.movable);
  if (selectedPlatformIndex === -1) selectedPlatformIndex = 0;

  // Goal zone on the right side (tall so the AI can touch it from ground or platforms)
  goal = {
    x: width * 0.9,
    y: groundY - 120,
    w: 70,
    h: 140
  };

  // AI starts on left ground, walking to the right
  ai = new AIPlayer(width * 0.1, groundY - 40);

  // --- Built‑in spikes: a deadly pit in the center gap ---
  // (You can still add more spikes with the mouse.)

  const spikeW = 26;
  const spikeH = 26;

  const pitY = height - 30;
  for (let x = width * 0.38; x <= width * 0.62; x += 34) {
    spikes.push({ x, y: pitY, w: spikeW, h: spikeH });
  }

  // --- Scripted obby path (waypoints) the AI will try to follow ---
  // Indices in platforms[] noted above.

  const leftGround = platforms[0];
  const rightGround = platforms[1];

  // 0: Jump from left ground up to the static platform above it (index 6)
  waypoints.push({ x: platforms[6].x, y: platforms[6].y });

  // 1: Run off that platform and drop back down to left ground near the gap
  waypoints.push({
    x: leftGround.x + leftGround.w * 0.35,
    y: leftGround.y
  });

  // 2: Cross the center on the movable bridge (index 2)
  waypoints.push({ x: platforms[2].x, y: platforms[2].y });

  // 3: Reach mid-right section of the right ground
  waypoints.push({
    x: rightGround.x - rightGround.w * 0.35,
    y: rightGround.y
  });

  // 4: Jump up to the movable platform over the right side (index 5)
  waypoints.push({ x: platforms[5].x, y: platforms[5].y });

  // 5: Jump again to the floating platform near the goal (index 9)
  waypoints.push({ x: platforms[9].x, y: platforms[9].y });

  // After waypoint 5, the AI just heads for the goal rectangle.
}

Line-by-line explanation (8 lines)

🔧 Subcomponents:

for-loop and object creation Platform Layout platforms.push(new Platform(...));

Builds the 10-platform level structure—2 ground pieces, 4 movable bridges, 4 static platforms

for-loop Spike Pit Generation for (let x = width * 0.38; x <= width * 0.62; x += 34) {

Creates a row of spike hazards in the center gap that the AI must avoid or you must help it cross

array push operations Waypoint Path waypoints.push({ x: platforms[6].x, y: platforms[6].y });

Defines the 6-point route the AI will navigate, one waypoint per platform it should reach

platforms = [];
Clears the old platforms array so we start fresh when resetting.
spikes = [];
Clears the spikes array, removing any obstacles the player previously placed.
waypoints = [];
Clears the waypoints array so we can build a new AI path.
const groundH = 24;
Defines the height of the ground platforms in pixels—thin but visible.
const groundY = height - groundH / 2;
Calculates the Y position of the ground so it sits at the bottom of the canvas, accounting for center-based rendering.
selectedPlatformIndex = platforms.findIndex(p => p.movable);
Finds the first movable platform and selects it so the player can control it immediately.
goal = { x: width * 0.9, y: groundY - 120, w: 70, h: 140 };
Creates the goal zone as an object with position and size; the AI wins by reaching this rectangle.
ai = new AIPlayer(width * 0.1, groundY - 40);
Spawns the yellow AI character on the left side of the level, just above the left ground.

draw()

draw() is the heartbeat of the sketch, running 60 times per second. Every frame it clears the old image, updates all game logic, and redraws everything fresh. The order matters: we update the AI before drawing so it moves to its new position before we render it. This is the core animation loop pattern used in virtually all interactive p5.js sketches.

🔬 This loop draws every platform. What happens if you add a condition before the display() call, like if (i < 5) to only draw the first 5 platforms? Will the AI still collide with hidden platforms?

  // Draw platforms
  for (let i = 0; i < platforms.length; i++) {
    platforms[i].display(i === selectedPlatformIndex);
  }
function draw() {
  background(20, 24, 40);

  handlePlatformControl();

  // Update AI logic & physics
  ai.update(platforms, spikes, goal);

  // Draw goal
  drawGoal();

  // Draw platforms
  for (let i = 0; i < platforms.length; i++) {
    platforms[i].display(i === selectedPlatformIndex);
  }

  // Draw spikes
  drawSpikes();

  // Draw AI
  ai.display();

  // HUD / instructions
  drawHUD();
}
Line-by-line explanation (9 lines)

🔧 Subcomponents:

function call Frame Clear background(20, 24, 40);

Erases the previous frame with a dark blue color so motion appears smooth

method call AI Physics & Logic ai.update(platforms, spikes, goal);

Updates the AI's position, applies gravity, checks collisions, and decides when to jump

for-loop Platform Rendering for (let i = 0; i < platforms.length; i++) {

Draws each platform, highlighting the selected one in light blue

background(20, 24, 40);
Clears the canvas every frame by painting it dark blue—this prevents ghosting and makes animation smooth.
handlePlatformControl();
Checks which keys are pressed and moves the selected platform accordingly (arrow keys or WASD).
ai.update(platforms, spikes, goal);
Updates the AI's physics, collision detection, jump logic, and waypoint progression for this frame.
drawGoal();
Draws the green goal rectangle on the right side.
for (let i = 0; i < platforms.length; i++) {
Loops through every platform and calls its display() method, passing whether it is the currently selected one.
platforms[i].display(i === selectedPlatformIndex);
The display() method receives a boolean: true if this platform is selected (draw it bright blue), false otherwise (draw it dark blue).
drawSpikes();
Renders all spike obstacles on the canvas as red triangles.
ai.display();
Draws the AI character, coloring it yellow (running), green (won), or red (dead) based on its state.
drawHUD();
Displays the on-screen text: controls, instructions, and the AI's current status.

handlePlatformControl()

handlePlatformControl() is called every frame and checks which keys are pressed using keyIsDown(), a p5.js function that returns true if a key is currently being held (not just tapped). This allows smooth, continuous movement. The constrain() function clamps a value between a minimum and maximum, ensuring the platform never leaves the canvas—a common safety pattern in interactive sketches.

function handlePlatformControl() {
  const p = platforms[selectedPlatformIndex];
  if (!p || !p.movable) return;

  const speed = 5;

  // Arrow keys or WASD for moving the selected platform
  if (keyIsDown(LEFT_ARROW) || keyIsDown(65)) { // A
    p.x -= speed;
  }
  if (keyIsDown(RIGHT_ARROW) || keyIsDown(68)) { // D
    p.x += speed;
  }
  if (keyIsDown(UP_ARROW) || keyIsDown(87)) { // W
    p.y -= speed;
  }
  if (keyIsDown(DOWN_ARROW) || keyIsDown(83)) { // S
    p.y += speed;
  }

  // Constrain inside the canvas
  p.x = constrain(p.x, p.w / 2, width - p.w / 2);
  p.y = constrain(p.y, 80, height - 40);
}
Line-by-line explanation (7 lines)

🔧 Subcomponents:

conditional Validation Check if (!p || !p.movable) return;

Exits early if the selected platform doesn't exist or is not movable—prevents errors

multiple conditionals Keyboard Input Polling if (keyIsDown(LEFT_ARROW) || keyIsDown(65)) {

Checks if arrow keys or WASD letters are currently pressed and moves the platform accordingly

constrain calls Canvas Boundary Constraint p.x = constrain(p.x, p.w / 2, width - p.w / 2);

Prevents the platform from moving off the left or right edge of the canvas

const p = platforms[selectedPlatformIndex];
Gets a reference to the currently selected platform so we can move it.
if (!p || !p.movable) return;
Safety check: if the selected platform doesn't exist or is marked static (not movable), exit early and do nothing.
const speed = 5;
Defines how many pixels per frame the platform moves when a key is pressed—increase for faster control, decrease for finer adjustments.
if (keyIsDown(LEFT_ARROW) || keyIsDown(65)) { // A
Checks if the left arrow key OR the A key is being held down (65 is the key code for 'A').
p.x -= speed;
Moves the platform left by subtracting 5 from its x coordinate.
p.x = constrain(p.x, p.w / 2, width - p.w / 2);
Clamps the platform's x position so its left edge stays at least p.w/2 from the left canvas edge and its right edge stays at least p.w/2 from the right edge—keeping it fully visible.
p.y = constrain(p.y, 80, height - 40);
Prevents the platform from moving too high (within 80 pixels of the top, leaving room for the HUD) or too low (within 40 pixels of the bottom).

keyPressed()

keyPressed() is a p5.js event function that fires once per key press (unlike keyIsDown() in handlePlatformControl() which checks continuous holding). The key variable is automatically set by p5.js to the character of the pressed key. The cycling logic with wrap-around (resetting to 0 or platforms.length - 1) is a common pattern for toggling between options in a circular list.

🔬 These two blocks cycle through platforms with Q and E. What if you only allowed cycling through movable platforms? Try adding && platforms[selectedPlatformIndex].movable to each wrap-around check—will you skip over static platforms?

  if (key === 'q' || key === 'Q') {
    selectedPlatformIndex--;
    if (selectedPlatformIndex < 0) {
      selectedPlatformIndex = platforms.length - 1;
    }
  } else if (key === 'e' || key === 'E') {
    selectedPlatformIndex++;
    if (selectedPlatformIndex >= platforms.length) {
      selectedPlatformIndex = 0;
    }
  }
function keyPressed() {
  // Switch which platform is selected (cycles through all movable ones)
  if (key === 'q' || key === 'Q') {
    selectedPlatformIndex--;
    if (selectedPlatformIndex < 0) {
      selectedPlatformIndex = platforms.length - 1;
    }
  } else if (key === 'e' || key === 'E') {
    selectedPlatformIndex++;
    if (selectedPlatformIndex >= platforms.length) {
      selectedPlatformIndex = 0;
    }
  }

  // Reset
  if (key === 'r' || key === 'R') {
    resetGame();
  }
}
Line-by-line explanation (8 lines)

🔧 Subcomponents:

conditional with wrap-around Select Previous Platform (Q) if (key === 'q' || key === 'Q') { selectedPlatformIndex--; if (selectedPlatformIndex < 0) { selectedPlatformIndex = platforms.length - 1; } }

Moves selection to the previous platform, wrapping to the last platform if already at index 0

conditional with wrap-around Select Next Platform (E) else if (key === 'e' || key === 'E') { selectedPlatformIndex++; if (selectedPlatformIndex >= platforms.length) { selectedPlatformIndex = 0; } }

Moves selection to the next platform, wrapping to the first platform if already at the last index

conditional Reset Game (R) if (key === 'r' || key === 'R') { resetGame(); }

Resets the entire level when R is pressed

function keyPressed() {
This function is called by p5.js every time a key is pressed (not held, but just tapped once).
if (key === 'q' || key === 'Q') {
Checks if the pressed key is 'q' or 'Q' (either lowercase or uppercase).
selectedPlatformIndex--;
Decrements the index, moving backwards through the platform list.
if (selectedPlatformIndex < 0) { selectedPlatformIndex = platforms.length - 1; }
If the index goes below 0, wrap it to the last platform—creating a circular cycle.
else if (key === 'e' || key === 'E') {
Checks if the pressed key is 'e' or 'E'.
selectedPlatformIndex++;
Increments the index, moving forwards through the platform list.
if (selectedPlatformIndex >= platforms.length) { selectedPlatformIndex = 0; }
If the index goes past the last platform, wrap it back to 0—completing the circular cycle.
if (key === 'r' || key === 'R') { resetGame(); }
Checks if 'r' or 'R' was pressed and resets the entire game, clearing all spikes and restoring platforms to their default positions.

mousePressed()

mousePressed() is a p5.js event function called once per mouse click. The mouseX and mouseY variables are updated automatically by p5.js to the current mouse position. This function lets the player dynamically add obstacles to sabotage or test the AI's pathfinding in real time.

function mousePressed() {
  // Spawn a spike obstacle where you click
  // (avoid very top so you don't cover the HUD)
  if (mouseY > 60) {
    spikes.push({
      x: mouseX,
      y: mouseY,
      w: 26,
      h: 26
    });
  }
}
Line-by-line explanation (3 lines)

🔧 Subcomponents:

conditional HUD Exclusion Zone if (mouseY > 60) {

Prevents spike creation near the top of the canvas where the HUD text is displayed

object literal push Spike Instantiation spikes.push({ x: mouseX, y: mouseY, w: 26, h: 26 });

Adds a new spike obstacle at the mouse's current position with fixed dimensions

function mousePressed() {
This p5.js function is called once each time the mouse button is clicked.
if (mouseY > 60) {
Checks if the click happened below y=60 (avoiding the top area where the HUD instructions are drawn).
spikes.push({ x: mouseX, y: mouseY, w: 26, h: 26 });
Creates a new spike object with the click position (mouseX, mouseY) and fixed dimensions (26×26 pixels), then adds it to the spikes array.

drawGoal()

drawGoal() is a simple rendering helper that visualizes the goal zone as a semi-transparent green rectangle. The push/pop pattern is a best practice in p5.js: push() saves state, you make local changes, and pop() restores everything so you don't accidentally affect other drawings. The alpha channel (160) makes it semi-transparent so you can see through it to platforms beneath.

function drawGoal() {
  push();
  rectMode(CENTER);
  noStroke();
  fill(80, 220, 140, 160);
  rect(goal.x, goal.y, goal.w, goal.h, 8);
  pop();
}
Line-by-line explanation (6 lines)
push();
Saves the current drawing settings (colors, stroke, etc.) so changes here don't affect the rest of the sketch.
rectMode(CENTER);
Sets rectangle drawing mode to center-based, so the position given is the center, not the top-left corner.
noStroke();
Removes any stroke/outline, drawing only the filled rectangle.
fill(80, 220, 140, 160);
Sets the fill color to green (RGB: 80, 220, 140) with 160 alpha transparency (semi-transparent).
rect(goal.x, goal.y, goal.w, goal.h, 8);
Draws the goal rectangle at the stored goal position and size, with corners rounded to an 8-pixel radius.
pop();
Restores the drawing settings saved by push(), so the next drawing calls use the original settings.

drawSpikes()

drawSpikes() demonstrates custom shape drawing using beginShape(), vertex(), and endShape(). The translate() function repositions the coordinate system so that drawing from (0,0) places geometry at the spike's actual position. This is cleaner than calculating absolute coordinates for each vertex. Using for-of (for (let s of spikes)) is modern JavaScript syntax that's more readable than traditional indexed loops.

🔬 This draws an upward-pointing triangle. What happens if you swap the first two vertices (change the order of the vertex calls) so the spike points downward instead of upward?

    fill(220, 80, 80);
    beginShape();
    vertex(-s.w / 2, s.h / 2);
    vertex(0, -s.h / 2);
    vertex(s.w / 2, s.h / 2);
    endShape(CLOSE);
function drawSpikes() {
  noStroke();
  for (let s of spikes) {
    push();
    translate(s.x, s.y);
    fill(220, 80, 80);
    beginShape();
    vertex(-s.w / 2, s.h / 2);
    vertex(0, -s.h / 2);
    vertex(s.w / 2, s.h / 2);
    endShape(CLOSE);
    pop();
  }
}
Line-by-line explanation (11 lines)

🔧 Subcomponents:

for-of-loop Spike Rendering Loop for (let s of spikes) {

Iterates through every spike obstacle and draws it as a red triangle

beginShape/endShape block Triangle Shape beginShape(); vertex(-s.w / 2, s.h / 2); vertex(0, -s.h / 2); vertex(s.w / 2, s.h / 2); endShape(CLOSE);

Creates a triangle pointing upward (the spike point) using three vertices

noStroke();
Removes outlines so spikes are solid filled shapes without borders.
for (let s of spikes) {
Loops through every spike object in the spikes array using for-of syntax (convenient and clean).
push();
Saves drawing state before the coordinate transformation.
translate(s.x, s.y);
Moves the origin (0,0) to the spike's center position, making it easier to draw a centered triangle.
fill(220, 80, 80);
Sets the fill color to red.
beginShape();
Starts defining a custom shape using vertices.
vertex(-s.w / 2, s.h / 2);
First vertex: bottom-left corner of the spike (negative x, positive y from the translated origin).
vertex(0, -s.h / 2);
Second vertex: top point of the spike (directly above the origin).
vertex(s.w / 2, s.h / 2);
Third vertex: bottom-right corner of the spike (positive x, positive y from the translated origin).
endShape(CLOSE);
Finishes the shape and connects the last vertex back to the first, creating a closed triangle.
pop();
Restores the previous drawing state and coordinate system.

drawHUD()

drawHUD() (Heads-Up Display) is a common game term for on-screen information and instructions. String concatenation with + allows building a long, readable instructions text. The ternary-like if-else-if chain for status is a clean way to pick one message from several options based on the AI's state. Calling push() and pop() around all these text settings isolates the changes so they don't affect other parts of the sketch.

function drawHUD() {
  push();
  fill(240);
  noStroke();
  textSize(14);
  textAlign(LEFT, TOP);
  text(
    "Reverse Platformer\n" +
    "You control the level; the yellow hero is AI.\n" +
    "AI now follows a full obby route (if you don't interfere).\n\n" +
    "Controls:\n" +
    "  Q / E       : switch movable platform\n" +
    "  Arrows/WASD : move selected platform\n" +
    "  Mouse click : spawn spike obstacle\n" +
    "  R           : reset\n\n" +
    "Goal: Help or sabotage the AI as it runs the course.",
    16,
    16
  );

  // Status
  let status = "";
  if (!ai.alive) status = "AI status: DEAD";
  else if (ai.reachedGoal) status = "AI status: REACHED GOAL!";
  else status = "AI status: RUNNING";

  text(status, 16, 220);
  pop();
}
Line-by-line explanation (11 lines)

🔧 Subcomponents:

multi-line string and text call Game Instructions text("Reverse Platformer\n" + ... + "Goal: Help or sabotage the AI as it runs the course.", 16, 16);

Displays the title, game concept, and control scheme in the top-left corner

if-else chain AI Status Display if (!ai.alive) status = "AI status: DEAD"; else if (ai.reachedGoal) status = "AI status: REACHED GOAL!"; else status = "AI status: RUNNING";

Updates the status text based on the AI's current state

push();
Saves the current drawing state (colors, text settings) before changing them.
fill(240);
Sets the text color to light gray.
noStroke();
Ensures no outline is drawn on text.
textSize(14);
Sets the font size to 14 pixels.
textAlign(LEFT, TOP);
Aligns text to the left and top of the given position (16, 16).
text("Reverse Platformer\n" + ... + "Goal: Help or sabotage the AI as it runs the course.", 16, 16);
Draws the multi-line instructions string at position (16, 16) in the top-left corner. \n creates line breaks.
if (!ai.alive) status = "AI status: DEAD";
If the AI is not alive, set the status message to indicate it died.
else if (ai.reachedGoal) status = "AI status: REACHED GOAL!";
Otherwise, if the AI reached the goal, display a victory message.
else status = "AI status: RUNNING";
Otherwise, the AI is still in progress.
text(status, 16, 220);
Draws the status message at position (16, 220), which is below the main instructions.
pop();
Restores the drawing state to what it was before drawHUD() was called.

rectsOverlap(a, b)

rectsOverlap() implements axis-aligned bounding-box (AABB) collision detection, the simplest and most efficient collision test for rectangular objects. It works by checking if the distance between centers is less than the sum of half-sizes in both dimensions. This function is called throughout the sketch: to detect if the AI hit a platform, if the AI touched spikes, and if the AI reached the goal. Understanding this function is crucial to understanding how the game mechanics work.

function rectsOverlap(a, b) {
  const halfW = a.w / 2 + b.w / 2;
  const halfH = a.h / 2 + b.h / 2;
  return (
    Math.abs(a.x - b.x) < halfW &&
    Math.abs(a.y - b.y) < halfH
  );
}
Line-by-line explanation (6 lines)

🔧 Subcomponents:

calculation Combined Half-Width const halfW = a.w / 2 + b.w / 2;

Calculates the maximum horizontal distance between centers before rectangles stop overlapping

calculation Combined Half-Height const halfH = a.h / 2 + b.h / 2;

Calculates the maximum vertical distance between centers before rectangles stop overlapping

boolean expression Overlap Test return Math.abs(a.x - b.x) < halfW && Math.abs(a.y - b.y) < halfH;

Returns true only if both horizontal and vertical distances are within the limits (meaning rectangles overlap)

function rectsOverlap(a, b) {
Defines a helper function that takes two rectangle objects (a and b) and returns true if they overlap.
const halfW = a.w / 2 + b.w / 2;
Calculates the sum of half-widths: if both rectangles are centered and their centers are closer than this distance, they must overlap horizontally.
const halfH = a.h / 2 + b.h / 2;
Calculates the sum of half-heights: if their centers are closer than this distance, they overlap vertically.
Math.abs(a.x - b.x) < halfW
Checks if the horizontal distance between the centers is less than the combined half-width (overlap on x-axis).
Math.abs(a.y - b.y) < halfH
Checks if the vertical distance between the centers is less than the combined half-height (overlap on y-axis).
return ( Math.abs(a.x - b.x) < halfW && Math.abs(a.y - b.y) < halfH );
Returns true only if BOTH conditions are true (both x and y axes overlap). This is axis-aligned bounding-box (AABB) collision detection.

class Platform

The Platform class encapsulates all the data and behavior a platform needs: its position, size, movability, and how to draw itself. Using a class keeps the code organized and makes it easy to create many platforms with consistent behavior. The display() method uses color as visual feedback to show the player which platform is selected—a key usability pattern in interactive sketches.

class Platform {
  constructor(x, y, w, h, movable) {
    this.x = x;
    this.y = y;
    this.w = w;
    this.h = h;
    this.movable = movable;
  }

  display(isSelected) {
    rectMode(CENTER);
    stroke(230);
    strokeWeight(2);
    if (this.movable) {
      if (isSelected) {
        fill(80, 180, 255);
      } else {
        fill(70, 130, 220);
      }
    } else {
      fill(60, 70, 90);
    }
    rect(this.x, this.y, this.w, this.h, 4);
  }
}
Line-by-line explanation (12 lines)

🔧 Subcomponents:

constructor method Platform Constructor constructor(x, y, w, h, movable) { this.x = x; this.y = y; this.w = w; this.h = h; this.movable = movable; }

Initializes a new platform with position, size, and movability flag

instance method Display Method display(isSelected) { ... }

Renders the platform, changing color based on whether it is selected and whether it is movable

if-else chain Color Logic if (this.movable) { if (isSelected) { fill(80, 180, 255); } else { fill(70, 130, 220); } } else { fill(60, 70, 90); }

Determines the fill color: bright blue for selected movables, darker blue for unselected movables, dark gray for static platforms

class Platform {
Defines a Platform class using ES6 class syntax—a blueprint for creating platform objects.
constructor(x, y, w, h, movable) {
The constructor method runs once when a new Platform is created with 'new Platform(...)'.
this.x = x;
Stores the x position passed in as a property of this platform object.
this.movable = movable;
Stores a boolean: true if the player can control this platform, false if it is static.
display(isSelected) {
A method that draws the platform. It receives a boolean indicating whether this is the currently selected platform.
rectMode(CENTER);
Sets rectangle mode to CENTER so the x, y coordinates represent the center of the rectangle.
stroke(230);
Sets the outline color to light gray.
strokeWeight(2);
Sets the outline thickness to 2 pixels.
if (this.movable) {
Checks if this platform is movable (the player can control it).
if (isSelected) { fill(80, 180, 255); } else { fill(70, 130, 220); }
If movable and selected, use bright cyan-blue; if movable but not selected, use darker blue.
} else { fill(60, 70, 90); }
If not movable (static), use dark gray to visually distinguish it from player-controlled platforms.
rect(this.x, this.y, this.w, this.h, 4);
Draws a rounded rectangle at the platform's position and size; the 4 is the corner radius in pixels.

class AIPlayer

The AIPlayer class is the most complex part of this sketch because it implements multiple interacting systems: physics (gravity, velocity, position), collision detection (overlapping rectangles), decision-making (the think() method with three jump rules), and waypoint following (tracking progress toward goals). The think() method is the AI's 'brain'—three separate rules make its behavior feel intelligent while remaining deterministic and fun to sabotage. The resolveCollisions() method is key to making the AI stick to platforms realistically. By tweaking the constants (ascendVerticalThreshold, ascendHorizontalRange, aheadDist, etc.), you can make the AI more or less skilled at navigating obstacles.

🔬 This is Rule 1: jump toward higher waypoints. If you change ascendVerticalThreshold from 12 to 50, the AI only jumps if the target is much higher. What happens—does the AI miss some waypoints or become more conservative about jumping?

    const ascendVerticalThreshold = 12;
    const ascendHorizontalRange = 45;

    if (!goingDown && dyUp > ascendVerticalThreshold && Math.abs(dx) < ascendHorizontalRange) {
      this.jump();
      return;
    }

🔬 This is Rule 2: the AI checks if there's solid ground ahead by casting a sensor 70% of its width forward. What happens if you change aheadDist to this.w * 0.3 (closer) or this.w * 1.5 (farther)? Does the AI detect gaps sooner or later?

      const aheadDist = this.w * 0.7;
      const footX = this.x + dir * aheadDist;
      const footY = this.y + this.h / 2 + 2;

      let groundAhead = false;
      for (let p of platforms) {
        const withinX = footX > p.x - p.w / 2 && footX < p.x + p.w / 2;
        const platformTop = p.y - p.h / 2;
        if (
          withinX &&
          footY <= platformTop + 4 &&
          footY + 24 >= platformTop
        ) {
          groundAhead = true;
          break;
        }
      }
class AIPlayer {
  constructor(x, y) {
    this.x = x;
    this.y = y;
    this.prevX = x;
    this.prevY = y;
    this.vx = 0;
    this.vy = 0;
    this.w = 26;
    this.h = 40;
    this.onGround = false;
    this.alive = true;
    this.reachedGoal = false;
    this.wpIndex = 0;
  }

  update(platforms, spikes, goal) {
    if (!this.alive || this.reachedGoal) return;

    this.prevX = this.x;
    this.prevY = this.y;

    this.think(platforms, goal);
    this.vy += GRAVITY;

    this.x += this.vx;
    this.resolveCollisions(platforms, "x");

    this.y += this.vy;
    this.onGround = false;
    this.resolveCollisions(platforms, "y");

    for (let s of spikes) {
      if (rectsOverlap(this, s)) {
        this.alive = false;
      }
    }

    if (this.y - this.h / 2 > height + 200) {
      this.alive = false;
    }

    if (rectsOverlap(this, goal)) {
      this.reachedGoal = true;
    }

    if (this.alive && !this.reachedGoal) {
      this.updateWaypointProgress();
    }
  }

  think(platforms, goal) {
    const hasWaypoint = this.wpIndex < waypoints.length;
    const target = hasWaypoint ? waypoints[this.wpIndex] : goal;

    const dir = 1;
    this.vx = dir * AI_SPEED;

    if (!hasWaypoint && this.x > goal.x - goal.w) {
      this.vx *= 0.7;
    }

    if (!this.onGround) return;

    const dx = target.x - this.x;
    const dyUp = this.y - target.y;
    const goingDown = target.y > this.y + 25;

    const ascendVerticalThreshold = 12;
    const ascendHorizontalRange = 45;

    if (!goingDown && dyUp > ascendVerticalThreshold && Math.abs(dx) < ascendHorizontalRange) {
      this.jump();
      return;
    }

    if (!goingDown) {
      const aheadDist = this.w * 0.7;
      const footX = this.x + dir * aheadDist;
      const footY = this.y + this.h / 2 + 2;

      let groundAhead = false;
      for (let p of platforms) {
        const withinX = footX > p.x - p.w / 2 && footX < p.x + p.w / 2;
        const platformTop = p.y - p.h / 2;
        if (
          withinX &&
          footY <= platformTop + 4 &&
          footY + 24 >= platformTop
        ) {
          groundAhead = true;
          break;
        }
      }

      if (!groundAhead) {
        this.jump();
        return;
      }
    }

    if (!goingDown) {
      const sensorX = this.x + dir * (this.w / 2 + 2);
      const sensorTop = this.y - this.h / 4;
      const sensorBottom = this.y + this.h / 4;
      let wallAhead = false;

      for (let p of platforms) {
        const withinY =
          sensorBottom > p.y - p.h / 2 && sensorTop < p.y + p.h / 2;
        const withinX =
          sensorX > p.x - p.w / 2 && sensorX < p.x + p.w / 2;
        if (withinX && withinY && p.y >= this.y) {
          wallAhead = true;
          break;
        }
      }

      if (wallAhead) {
        this.jump();
      }
    }
  }

  updateWaypointProgress() {
    if (this.wpIndex >= waypoints.length) return;

    const target = waypoints[this.wpIndex];
    const dx = Math.abs(this.x - target.x);
    const dy = Math.abs(this.y - target.y);

    const reachX = 45;
    const reachY = 45;

    if (dx < reachX && dy < reachY && this.onGround) {
      this.wpIndex++;
    }
  }

  jump() {
    if (this.onGround) {
      this.vy = -AI_JUMP;
      this.onGround = false;
    }
  }

  resolveCollisions(platforms, axis) {
    for (let p of platforms) {
      if (!rectsOverlap(this, p)) continue;

      if (axis === "y") {
        if (
          this.vy > 0 &&
          this.prevY + this.h / 2 <= p.y - p.h / 2
        ) {
          this.y = p.y - p.h / 2 - this.h / 2;
          this.vy = 0;
          this.onGround = true;
        }
        else if (
          this.vy < 0 &&
          this.prevY - this.h / 2 >= p.y + p.h / 2
        ) {
          this.y = p.y + p.h / 2 + this.h / 2;
          this.vy = 0;
        }
      } else if (axis === "x") {
        if (
          this.vx > 0 &&
          this.prevX + this.w / 2 <= p.x - p.w / 2
        ) {
          this.x = p.x - p.w / 2 - this.w / 2;
          this.vx = 0;
        }
        else if (
          this.vx < 0 &&
          this.prevX - this.w / 2 >= p.x + p.w / 2
        ) {
          this.x = p.x + p.w / 2 + this.w / 2;
          this.vx = 0;
        }
      }
    }
  }

  display() {
    push();
    rectMode(CENTER);
    noStroke();
    if (!this.alive) {
      fill(200, 60, 60);
    } else if (this.reachedGoal) {
      fill(80, 230, 120);
    } else {
      fill(250, 220, 120);
    }
    rect(this.x, this.y, this.w, this.h, 4);

    stroke(20);
    strokeWeight(2);
    point(this.x - 4, this.y - 4);
    point(this.x + 4, this.y - 4);
    line(this.x - 4, this.y + 4, this.x + 4, this.y + 4);
    pop();
  }
}
Line-by-line explanation (28 lines)

🔧 Subcomponents:

constructor method AI Initialization constructor(x, y) { ... }

Creates a new AI character at the given position with zero velocity and alive/goal-tracking flags

instance method Physics & State Update update(platforms, spikes, goal) { ... }

Called every frame to update the AI's position via physics, detect collisions and hazards, and track goal/waypoint progress

instance method Decision Logic think(platforms, goal) { ... }

Implements the AI's jumping strategy based on three rules: climb higher waypoints, avoid gaps, and clear walls

instance method Waypoint Advancement updateWaypointProgress() { ... }

Checks if the AI is close enough to the current waypoint and advances to the next one if so

instance method Jump Execution jump() { ... }

Applies an upward impulse (negative vy) if the AI is touching ground

instance method Collision Detection & Response resolveCollisions(platforms, axis) { ... }

Moves the AI out of platforms when they overlap, separately for x and y axes

instance method Rendering display() { ... }

Draws the AI as a colored rectangle with a simple face; color reflects its state (alive, dead, or won)

class AIPlayer {
Defines the AIPlayer class—the yellow hero character with physics, decision logic, and collision detection.
constructor(x, y) {
The constructor runs when a new AIPlayer is created, initializing position, velocity, size, and state flags.
this.prevX = x; this.prevY = y;
Stores the previous position before each update—used in collision detection to determine the direction of impact.
this.vx = 0; this.vy = 0;
Initializes velocity to zero; the AI will start moving and falling once update() is called.
this.wpIndex = 0;
Tracks which waypoint the AI is currently targeting (0 is the first).
if (!this.alive || this.reachedGoal) return;
Early exit: if the AI is dead or reached the goal, skip all updates this frame.
this.prevX = this.x; this.prevY = this.y;
Updates the previous position at the start of each frame for collision detection.
this.think(platforms, goal);
Calls the think() method to decide if the AI should jump based on the current target.
this.vy += GRAVITY;
Applies gravity: increases downward velocity every frame (simulating falling).
this.x += this.vx; this.resolveCollisions(platforms, "x");
Moves the AI horizontally, then checks and resolves any collisions along the x-axis.
this.y += this.vy; this.onGround = false; this.resolveCollisions(platforms, "y");
Moves vertically, resets onGround (will be set to true if a collision is found), then resolves y-axis collisions.
for (let s of spikes) { if (rectsOverlap(this, s)) { this.alive = false; } }
Checks all spikes; if any overlap with the AI, the AI dies (alive = false).
if (this.y - this.h / 2 > height + 200) { this.alive = false; }
Falls off the world check: if the AI's bottom goes way below the canvas, it dies.
if (rectsOverlap(this, goal)) { this.reachedGoal = true; }
Checks if the AI overlaps the goal zone; if so, marks the game as won.
const target = hasWaypoint ? waypoints[this.wpIndex] : goal;
If there are remaining waypoints, target the current waypoint; otherwise, target the final goal.
const dir = 1; this.vx = dir * AI_SPEED;
Always moves to the right (dir = 1) at a constant horizontal speed.
if (!this.onGround) return;
Only attempt to jump if the AI is touching a platform (onGround = true). Otherwise, return early.
const dyUp = this.y - target.y;
Positive if the target is above the AI; used to detect when to climb.
if (!goingDown && dyUp > ascendVerticalThreshold && Math.abs(dx) < ascendHorizontalRange) { this.jump(); return; }
Rule 1: Jump upward to reach a higher waypoint that is close horizontally (within 45 pixels).
let groundAhead = false; for (let p of platforms) { ... } if (!groundAhead) { this.jump(); return; }
Rule 2: Check if there is solid ground ahead (within 70 pixels horizontally). If not, jump to avoid falling into a gap.
let wallAhead = false; for (let p of platforms) { ... } if (wallAhead) { this.jump(); }
Rule 3: Check if there is a wall-like platform directly in front at the AI's shoulder height. If so, jump to clear it.
if (dx < reachX && dy < reachY && this.onGround) { this.wpIndex++; }
Once the AI gets within 45 pixels of the current waypoint on the ground, advance to the next waypoint.
if (this.onGround) { this.vy = -AI_JUMP; this.onGround = false; }
Jump only if grounded: set vy to a negative value (upward) and mark the AI as airborne.
if (!rectsOverlap(this, p)) continue;
Early continue: skip this platform if it doesn't overlap with the AI.
if (this.vy > 0 && this.prevY + this.h / 2 <= p.y - p.h / 2) { ... this.onGround = true; }
Landing on top of a platform: the AI was above it last frame and is moving downward, so set onGround = true.
else if (this.vy < 0 && this.prevY - this.h / 2 >= p.y + p.h / 2) { ... this.vy = 0; }
Hitting the underside of a platform: the AI was below it last frame and moving upward, so stop the jump.
if (!this.alive) { fill(200, 60, 60); } else if (this.reachedGoal) { fill(80, 230, 120); } else { fill(250, 220, 120); }
Color the AI based on state: red if dead, green if won, yellow if running.
point(this.x - 4, this.y - 4); point(this.x + 4, this.y - 4); line(this.x - 4, this.y + 4, this.x + 4, this.y + 4);
Draws a simple face: two eyes as points and a mouth as a horizontal line.

📦 Key Variables

platforms array

Stores all Platform objects (both static and movable) that make up the level.

let platforms = [];
spikes array

Stores all spike hazard objects that the AI must avoid.

let spikes = [];
ai object (AIPlayer instance)

The single AIPlayer instance—the yellow hero character.

let ai;
goal object

The goal zone that the AI must reach to win; has x, y, w, h properties.

let goal;
selectedPlatformIndex number

Index into the platforms array indicating which platform the player currently controls.

let selectedPlatformIndex = 0;
waypoints array of objects

The scripted path the AI tries to follow; each object has x and y properties.

let waypoints = [];
GRAVITY number

Constant that controls how fast the AI falls each frame (pixels/frame²).

const GRAVITY = 0.7;
AI_SPEED number

Constant horizontal walking speed of the AI (pixels per frame).

const AI_SPEED = 2.5;
AI_JUMP number

Constant upward impulse applied when the AI jumps (negative vy).

const AI_JUMP = 13;

🔧 Potential Improvements (5)

Here are some ways this code could be enhanced:

BUG resolveCollisions() method in AIPlayer class

The AI can get stuck inside platforms if multiple platforms overlap in certain ways, because collision resolution only pushes the AI out along one axis at a time.

💡 Add a maximum iteration limit or use continuous collision detection (CCD) to detect and resolve collisions before the AI enters platforms, rather than after. Alternatively, increase the prevX/prevY tracking distance to catch deep penetrations.

PERFORMANCE think() method gap-detection and wall-detection loops

Every frame, the think() method loops through all platforms twice (gap detection and wall detection), even when the AI is already airborne or in the middle of a jump. This is inefficient on large numbers of platforms.

💡 Cache platform data in a spatial partitioning structure (e.g., grid) or only perform collision checks on nearby platforms using distance checks first. You could also exit the check entirely if the AI is falling significantly.

STYLE resetGame() function

Platform creation is verbose with many similar push() calls; it could be more maintainable.

💡 Consider refactoring platform creation into a helper function that takes a layout configuration object, making it easier to adjust the level design and add new platforms without repeating code.

FEATURE Waypoint system

Waypoints are hardcoded in resetGame() and the AI's jump rules use magic numbers (ascendVerticalThreshold, ascendHorizontalRange, etc.). This makes level design and AI difficulty inflexible.

💡 Expose waypoint definitions and AI parameters as a configuration object, allowing easy creation of multiple difficulty levels or level variants without rewriting code. This would turn the sketch into a game engine.

FEATURE Input handling

The selected platform can be moved off-canvas despite constrain() calls if you mash keys repeatedly or the platform is already at a boundary.

💡 Apply constrain() every frame before drawing, not just during handlePlatformControl(), to catch edge cases. Alternatively, add visual guides or snap-to-grid behavior to prevent accidental off-canvas movement.

🔄 Code Flow

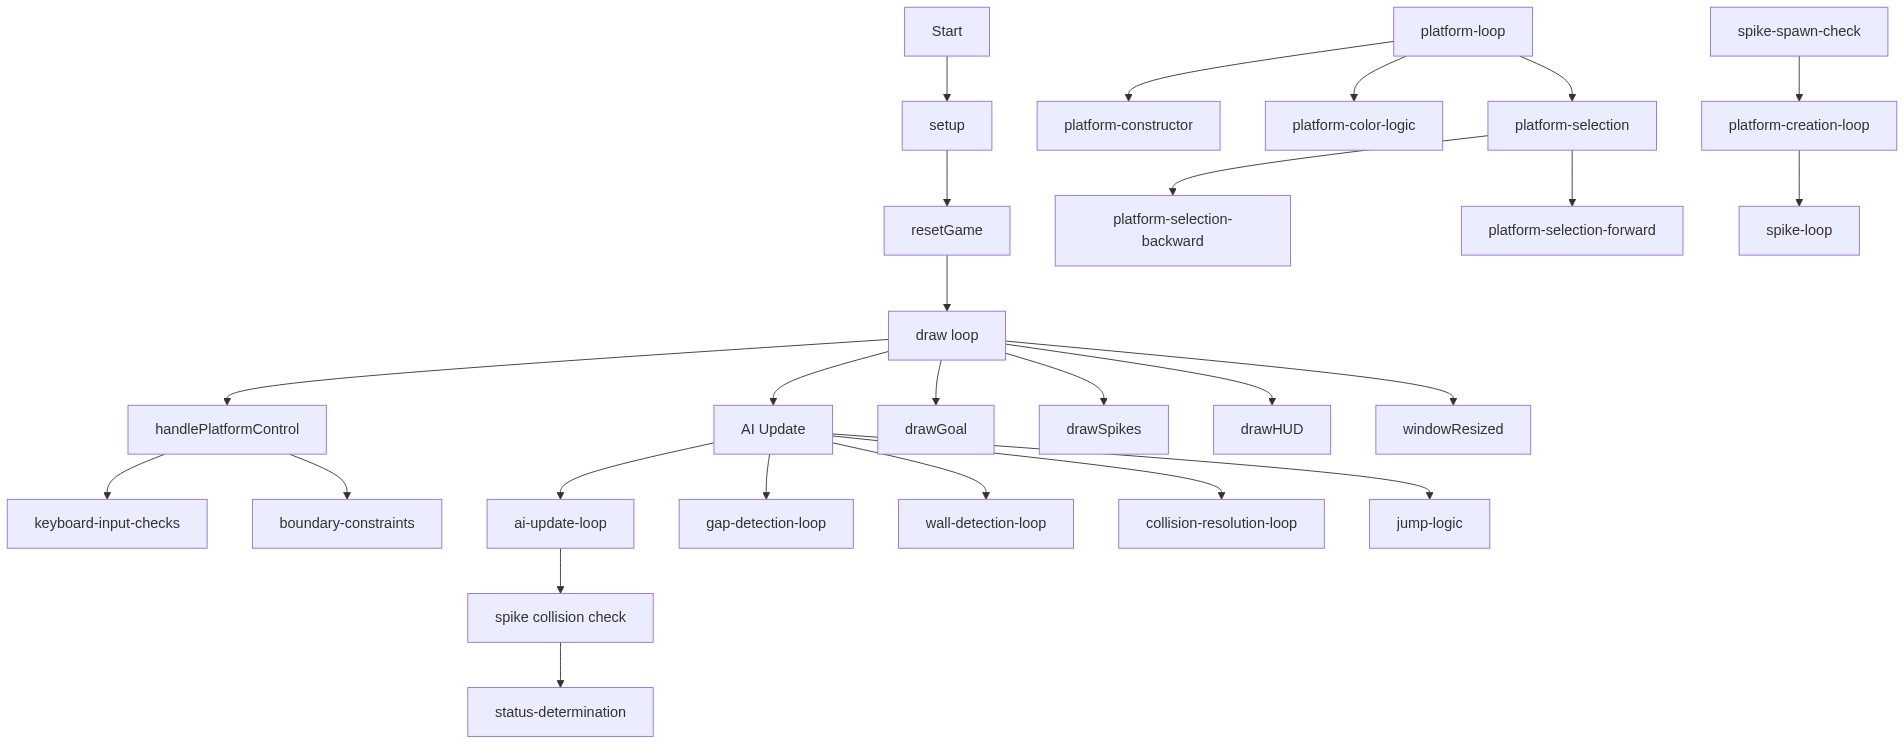
Code flow showing setup, resetgame, draw, handleplatformcontrol, keypressed, mousepressed, drawgoal, drawspikes, drawhud, rectsoverlap, platform, aiplayer

💡 Click on function names in the diagram to jump to their code

graph TD start[Start] --> setup[setup] setup --> resetgame[resetGame] resetgame --> draw[draw loop] draw --> background-clear[Frame Clear] draw --> ai-update[AI Physics & Logic] draw --> platform-render-loop[Platform Rendering] draw --> spike-loop[Spike Rendering Loop] draw --> drawgoal[Draw Goal] draw --> drawhud[Draw HUD] click setup href "#fn-setup" click resetgame href "#fn-resetgame" click draw href "#fn-draw" click background-clear href "#sub-background-clear" click ai-update href "#sub-ai-update" click platform-render-loop href "#sub-platform-render-loop" click spike-loop href "#sub-spike-loop" click drawgoal href "#fn-drawgoal" click drawhud href "#fn-drawhud" background-clear --> y-boundary-check[HUD Exclusion Zone] background-clear --> background-clear click y-boundary-check href "#sub-y-boundary-check" ai-update --> ai-think[Decision Logic] ai-update --> collision-resolution[Collision Detection & Response] ai-update --> waypoint-progress[Waypoint Advancement] click ai-think href "#sub-ai-think" click collision-resolution href "#sub-collision-resolution" click waypoint-progress href "#sub-waypoint-progress" platform-render-loop --> platform-creation[Platform Layout] platform-render-loop --> selected-platform-lookup[Validation Check] click platform-creation href "#sub-platform-creation" click selected-platform-lookup href "#sub-selected-platform-lookup" spike-loop --> spike-pit-creation[Spike Pit Generation] spike-loop --> spike-creation[Spike Instantiation] click spike-pit-creation href "#sub-spike-pit-creation" click spike-creation href "#sub-spike-creation" handleplatformcontrol[handlePlatformControl] --> input-polling[Keyboard Input Polling] input-polling --> platform-select-prev[Select Previous Platform (Q)] input-polling --> platform-select-next[Select Next Platform (E)] input-polling --> boundary-clamping[Canvas Boundary Constraint] click handleplatformcontrol href "#fn-handleplatformcontrol" click input-polling href "#sub-input-polling" click platform-select-prev href "#sub-platform-select-prev" click platform-select-next href "#sub-platform-select-next" click boundary-clamping href "#sub-boundary-clamping" keypressed[keyPressed] --> reset-on-r[Reset Game (R)] click keypressed href "#fn-keypressed" click reset-on-r href "#sub-reset-on-r" mousepressed[mousePressed] --> spike-creation click mousepressed href "#fn-mousepressed" drawgoal --> instructions-text[Game Instructions] drawgoal --> status-conditional[AI Status Display] click instructions-text href "#sub-instructions-text" click status-conditional href "#sub-status-conditional" platform-creation --> constructor[Platform Constructor] platform-creation --> display-method[Display Method] platform-creation --> color-selection[Color Logic] click constructor href "#sub-constructor" click display-method href "#sub-display-method" click color-selection href "#sub-color-selection" ai-constructor[AI Initialization] --> ai-update click ai-constructor href "#sub-ai-constructor" triangle-geometry[Triangle Shape] --> spike-creation click triangle-geometry href "#sub-triangle-geometry" halfwidth-calc[Combined Half-Width] --> overlap-test[Overlap Test] halfheight-calc[Combined Half-Height] --> overlap-test click halfwidth-calc href "#sub-halfwidth-calc" click halfheight-calc href "#sub-halfheight-calc" click overlap-test href "#sub-overlap-test"

❓ Frequently Asked Questions

What visual elements can I expect to see in the Reverse Platformer sketch?

The sketch features a dynamically generated landscape with ground segments and movable platforms, alongside obstacles like spikes that can be placed by the user.

How can I interact with the Reverse Platformer sketch?

Users can select and move platforms using the Q and E keys, navigate the selected platform with arrow keys or WASD, spawn spike obstacles with mouse clicks, and reset the level with the R key.

What creative coding concept is demonstrated in this p5.js sketch?

This sketch showcases the concept of player control over the environment, allowing users to manipulate platforms to guide an AI character through a custom obstacle course.

Preview

reverse platform - p5.js creative coding sketch preview
Sketch Preview
Code flow diagram showing the structure of reverse platform - Code flow showing setup, resetgame, draw, handleplatformcontrol, keypressed, mousepressed, drawgoal, drawspikes, drawhud, rectsoverlap, platform, aiplayer
Code Flow Diagram