roblox trash

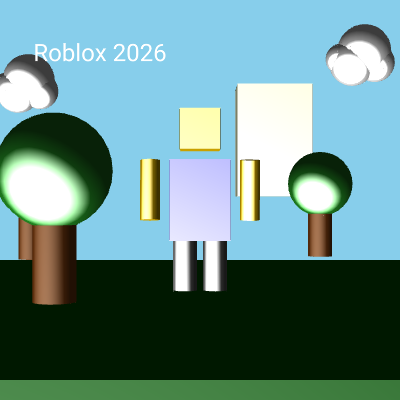
This sketch creates a playful 3D Roblox-style scene using WebGL. It features a blocky character with waving arms standing on a ground plane, surrounded by trees, clouds, and colorful buildings, all rendered in a low-poly aesthetic with interactive camera controls.

🧪 Try This!

Experiment with the code by making these changes:

  1. Make the character glow red
  2. Speed up the arm wave — Increase the 0.05 multiplier in the arm rotation to 0.15, making the arms flail three times faster.
  3. Brighten the entire scene — Increase the ambient light from 60 to 150 to wash out shadows and make everything brighter and more cheerful.
  4. Paint the sky sunset orange — Replace the sky-blue background with warm orange-red to simulate sunset lighting across the entire scene.
  5. Make clouds rainbow — Add a simple color cycle to the cloud fill to make them shift through rainbow colors each frame.
Prefer the full editor? Open it there →

📖 About This Sketch

This sketch constructs a full 3D scene inspired by the Roblox game engine using p5.js's WebGL mode. It demonstrates how to combine cylinders, boxes, and spheres to build recognizable objects like a humanoid character, trees, clouds, and buildings, then positions them in space using translate(), rotate(), and specularMaterial() for realistic plastic-like shading. The character's arms wave continuously, and the entire scene rotates freely under the mouse—a foundation for interactive 3D worlds.

The code is organized into scene-building functions (drawGround, drawCharacter, drawTrees, drawClouds, drawBuildings) that you can read and modify independently, plus helper functions for single instances (drawTree, drawCloud, drawBuilding). By studying it, you will learn how p5.js's 3D primitives combine into complex shapes, how lighting and materials create depth, and how orbitControl() lets users explore 3D space.

⚙️ How It Works

  1. preload() loads a modern Roboto font from a CDN so text renders cleanly in the 3D canvas
  2. setup() creates a full-screen WebGL canvas, disables outlines, and configures text formatting
  3. draw() clears the background with sky blue and sets up lighting: an ambient light and a directional light simulating sunlight from the top-right
  4. orbitControl() reads mouse movement so the user can drag to rotate the camera around the scene—try dragging!
  5. The scene draws in layers: ground (a thick green box), the character (yellow head, blue body, yellow arms with waving animation via sin(frameCount), grey legs), trees at four positions, three clouds made of overlapping spheres, and three buildings with random pastel colors
  6. Finally, drawUI() switches to 2D orthographic mode and draws 'Roblox 2026' text in the top-left corner, then switches back to 3D

🎓 Concepts You'll Learn

WebGL 3D rendering3D transforms (translate, rotate, scale)3D primitives (box, cylinder, sphere)Lighting and materialsCamera controls with orbitControl()Frame-based animation with sin() and frameCountpush/pop state management2D/3D mode switching

📝 Code Breakdown

preload()

preload() runs before setup() and is perfect for loading assets (fonts, images, sounds) that the sketch needs immediately. Without preload(), text might render with a fallback system font.

function preload() {
  // Load a modern font for the "Roblox 2026" text
  // Using Fontsource CDN for reliable WEBGL font loading
  robotoFont = loadFont('https://cdn.jsdelivr.net/fontsource/fonts/roboto@latest/latin-400-normal.woff');
}
Line-by-line explanation (1 lines)
robotoFont = loadFont('https://cdn.jsdelivr.net/fontsource/fonts/roboto@latest/latin-400-normal.woff');
Loads a web font from a CDN (Fontsource) and stores it in robotoFont so it's ready before setup() runs. preload() waits for this to finish before calling setup().

setup()

setup() runs once when the sketch starts. Use it to initialize your canvas and global settings that won't change during the sketch.

function setup() {
  createCanvas(windowWidth, windowHeight, WEBGL); // Create a 3D canvas using WEBGL mode
  noStroke(); // Disable outlines for cleaner shapes
  textFont(robotoFont); // Set the loaded font
  textSize(24); // Set a base text size
  textAlign(CENTER, CENTER); // Center text
}
Line-by-line explanation (5 lines)
createCanvas(windowWidth, windowHeight, WEBGL);
Creates a canvas that fills the entire browser window using WebGL mode for 3D rendering. WEBGL unlocks 3D functions like box(), cylinder(), sphere(), and lighting.
noStroke();
Removes black outlines from all shapes so the scene looks smoother and more polished.
textFont(robotoFont);
Tells p5.js to use the Roboto font loaded in preload() for all text drawn after this line.
textSize(24);
Sets the font size to 24 pixels—this is the default size for text unless you change it later.
textAlign(CENTER, CENTER);
Centers text horizontally and vertically around its position, so text() will place text at the exact point you specify.

draw()

draw() runs 60 times per second (by default). It clears the canvas, updates the 3D scene based on time and input, and renders everything. In WebGL mode, you must call lighting functions every frame.

🔬 What happens if you swap these two lines' order, or comment out the directionalLight entirely? How do shadows change?

  ambientLight(60); // General ambient light
  directionalLight(255, 255, 255, 0.5, -1, -0.7); // "Sun" from top-front-right

🔬 These render in order. What if you call drawCharacter() first? Will the character render on top of the ground, or disappear behind it?

  drawGround();
  drawCharacter();
  drawTrees();
  drawClouds();
  drawBuildings();
function draw() {
  background(135, 206, 235); // Sky blue background

  orbitControl(); // Allow user to rotate the camera by dragging the mouse

  // --- Lighting ---
  ambientLight(60); // General ambient light
  directionalLight(255, 255, 255, 0.5, -1, -0.7); // "Sun" from top-front-right

  // --- Scene Elements ---
  drawGround();
  drawCharacter();
  drawTrees();
  drawClouds();
  drawBuildings();

  // --- UI Overlay (for "Roblox 2026" text) ---
  drawUI();
}
Line-by-line explanation (5 lines)

🔧 Subcomponents:

calculation Lighting Configuration ambientLight(60); directionalLight(255, 255, 255, 0.5, -1, -0.7);

Sets up a two-light system: ambient light for overall brightness and directional light simulating sunlight

function-calls Scene Rendering Pipeline drawGround(); drawCharacter(); drawTrees(); drawClouds(); drawBuildings();

Calls all scene-building functions in order to render the complete 3D world

background(135, 206, 235);
Clears the canvas each frame with a sky-blue color (RGB: 135, 206, 235). This removes the previous frame so you see smooth animation instead of trails.
orbitControl();
Enables interactive mouse control: drag the mouse to rotate the camera around the scene. This is built into p5.js and requires no setup—just call it once per draw() in WebGL mode.
ambientLight(60);
Adds general ambient light (brightness 60) that illuminates all surfaces equally, preventing pitch-black shadows. Think of it as indoor lighting with no specific direction.
directionalLight(255, 255, 255, 0.5, -1, -0.7);
Adds a white directional light simulating sunlight from direction (0.5, -1, -0.7). The three numbers at the end are x, y, z direction vectors pointing toward the light source. This creates shadows and depth.
drawGround(); drawCharacter(); drawTrees(); drawClouds(); drawBuildings();
Calls five functions that each draw a piece of the scene. The order matters: ground renders first (behind), then character, then trees/clouds/buildings (foreground). Finally drawUI() switches to 2D to overlay text.

drawGround()

drawGround() is a simple helper that uses push()/pop() to isolate its changes. This is a pattern you'll use in every function: save state, make changes, restore state.

function drawGround() {
  push();
  fill(0, 100, 0); // Green color for the ground
  specularMaterial(200); // Slightly shiny ground
  translate(0, 100, 0); // Move the ground down so the character stands on it
  box(800, 20, 800); // Create a larger, thicker box for the ground
  pop();
}
Line-by-line explanation (6 lines)
push();
Saves the current transformation state (position, rotation, fill color, etc.) so changes inside this function don't affect other functions.
fill(0, 100, 0);
Sets the fill color to dark green (RGB: 0, 100, 0). All shapes drawn after this line are green until fill() is called again or pop() restores the previous state.
specularMaterial(200);
Makes the ground shiny like plastic with brightness 200. Higher values create shinier surfaces that reflect light brightly; lower values are duller. This interacts with lighting to create 3D depth.
translate(0, 100, 0);
Moves the ground 100 pixels down in the y-axis. In WebGL, y increases downward, so this positions the ground below the character's feet.
box(800, 20, 800);
Draws a rectangular box (width: 800, height: 20, depth: 800). It's large and flat, forming a ground plane the character stands on.
pop();
Restores the saved state from push(), undoing all changes (color, material, position) so they don't leak into the next function call.

drawCharacter()

drawCharacter() assembles a humanoid from basic 3D primitives: boxes for the head and body, cylinders for arms and legs. The arms use sin(frameCount) to animate smoothly. Study how push()/pop() isolate each body part's color and position.

🔬 This whole block draws the left arm. What if you change rotateX to rotateY? Will the arm wave forward/backward instead of up/down?

  // Left Arm
  push();
  fill(255, 204, 0); // Yellow skin color
  specularMaterial(200);
  translate(-50, -10, 0); // Position arm to the left of the body
  rotateX(sin(frameCount * 0.05) * 0.1); // Simple waving animation
  cylinder(10, 60); // Create the left arm cylinder
  pop();
function drawCharacter() {
  push();
  translate(0, 0, 0); // Keep character centered horizontally

  // Head
  push();
  fill(255, 204, 0); // Yellow skin color
  specularMaterial(200); // Shiny plastic-like material
  translate(0, -70, 0); // Position head above the body
  box(40); // Create the head box
  pop();

  // Body
  fill(0, 0, 255); // Blue shirt color
  specularMaterial(200);
  box(60, 80, 40); // Create the main body box

  // Left Arm
  push();
  fill(255, 204, 0); // Yellow skin color
  specularMaterial(200);
  translate(-50, -10, 0); // Position arm to the left of the body
  rotateX(sin(frameCount * 0.05) * 0.1); // Simple waving animation
  cylinder(10, 60); // Create the left arm cylinder
  pop();

  // Right Arm
  push();
  fill(255, 204, 0); // Yellow skin color
  specularMaterial(200);
  translate(50, -10, 0); // Position arm to the right of the body
  rotateX(sin(frameCount * 0.05 + PI) * 0.1); // Simple waving animation (opposite phase)
  cylinder(10, 60); // Create the right arm cylinder
  pop();

  // Left Leg
  push();
  fill(100, 100, 100); // Grey pants color
  specularMaterial(200);
  translate(-15, 60, 0); // Position leg to the left and below the body
  cylinder(12, 80); // Create the left leg cylinder
  pop();

  // Right Leg
  push();
  fill(100, 100, 100); // Grey pants color
  specularMaterial(200);
  translate(15, 60, 0); // Position leg to the right and below the body
  cylinder(12, 80); // Create the right leg cylinder
  pop();

  pop();
}

Line-by-line explanation (6 lines)

🔧 Subcomponents:

calculation Head translate(0, -70, 0); box(40);

Positions and draws a yellow cube above the body to form the head

calculation Body box(60, 80, 40);

Draws the main blue torso in the center

calculation Left Arm Wave rotateX(sin(frameCount * 0.05) * 0.1);

Animates the left arm waving by rotating it based on frameCount

calculation Right Arm Wave rotateX(sin(frameCount * 0.05 + PI) * 0.1);

Animates the right arm waving in opposite phase (PI offset) for a coordinated wave

push(); translate(0, 0, 0);
Saves state and positions the character at the origin (center). The translate(0, 0, 0) is actually redundant but clarifies intent.
fill(255, 204, 0); specularMaterial(200); translate(0, -70, 0); box(40);
Colors the head yellow, makes it shiny, moves it 70 pixels up (negative y), and draws a 40×40×40 cube. This sits atop the body.
fill(0, 0, 255); specularMaterial(200); box(60, 80, 40);
Colors the body blue and draws a 60×80×40 box centered at the origin. This is the main torso all other parts attach to.
translate(-50, -10, 0); rotateX(sin(frameCount * 0.05) * 0.1); cylinder(10, 60);
Moves the left arm 50 pixels left and 10 pixels up, rotates it by sin(frameCount * 0.05) * 0.1 radians (oscillates between ±0.1), then draws a 10-radius, 60-tall cylinder. sin() oscillates between -1 and 1 as frameCount increases, creating a smooth wave.
rotateX(sin(frameCount * 0.05 + PI) * 0.1);
The right arm uses sin(frameCount * 0.05 + PI) instead of sin(frameCount * 0.05). Adding PI shifts the sine wave by 180 degrees, so the right arm waves opposite the left arm (when left swings up, right swings down).
cylinder(12, 80);
Draws a cylinder for legs: radius 12, height 80. Cylinders are better than boxes for limbs because they look more natural and organic.

drawTrees()

drawTrees() is a simple orchestrator function that places tree instances. It calls drawTree() with hardcoded positions. You could enhance this by looping over an array of positions instead.

function drawTrees() {
  drawTree(-200, 10, -150);
  drawTree(150, 10, -200);
  drawTree(250, 10, 100);
  drawTree(-100, 10, 250);
}
Line-by-line explanation (1 lines)
drawTree(-200, 10, -150); drawTree(150, 10, -200); drawTree(250, 10, 100); drawTree(-100, 10, 250);
Calls drawTree() four times with different (x, y, z) positions, placing trees at four corners of the scene. Each drawTree() call renders one tree at the specified location.

drawTree(x, y, z)

drawTree(x, y, z) is a reusable function that builds a tree at any location. By parameterizing position, you can call it multiple times with different arguments, avoiding code duplication.

function drawTree(x, y, z) {
  push();
  translate(x, y, z);

  // Trunk
  push();
  fill(139, 69, 19); // Brown trunk color
  specularMaterial(50);
  translate(0, 30, 0);
  cylinder(15, 60);
  pop();

  // Leaves
  push();
  fill(34, 139, 34); // Forest green leaves
  specularMaterial(200);
  translate(0, -30, 0);
  sphere(40);
  pop();

  pop();
}
Line-by-line explanation (4 lines)

🔧 Subcomponents:

calculation Trunk cylinder(15, 60);

Draws a brown cylinder forming the tree's trunk

calculation Leaves sphere(40);

Draws a green sphere on top of the trunk forming the foliage

translate(x, y, z);
Moves the tree to the position (x, y, z). All subsequent shapes are drawn relative to this point, so one drawTree() function works for any location.
translate(0, 30, 0); cylinder(15, 60);
Moves the trunk 30 pixels down in the y-axis and draws a brown cylinder (radius 15, height 60). The offset ensures the trunk connects to the leaves.
translate(0, -30, 0); sphere(40);
Moves 30 pixels up (opposite of the trunk) and draws a green sphere (radius 40). This sits on top of the trunk, forming natural foliage.
fill(34, 139, 34); specularMaterial(200);
Colors the leaves forest green (RGB: 34, 139, 34) and makes them shiny. Shiny leaves reflect light realistically.

drawClouds()

drawClouds() is an orchestrator like drawTrees(). It positions cloud instances in the scene by calling drawCloud() with hardcoded coordinates.

function drawClouds() {
  drawCloud(-250, -150, -300);
  drawCloud(200, -180, -250);
  drawCloud(-100, -200, 150);
}
Line-by-line explanation (1 lines)
drawCloud(-250, -150, -300); drawCloud(200, -180, -250); drawCloud(-100, -200, 150);
Calls drawCloud() three times at different positions to scatter clouds across the sky (negative y values place them high up).

drawCloud(x, y, z)

drawCloud(x, y, z) demonstrates a design pattern: combining multiple simple shapes (spheres) at overlapping positions creates complex, organic forms. This is a foundational technique in 3D modeling.

function drawCloud(x, y, z) {
  push();
  translate(x, y, z);
  fill(255); // White color for clouds
  specularMaterial(255); // Very shiny, bright clouds

  // Combine multiple spheres to create a cloud shape
  sphere(30);
  translate(30, 0, 0);
  sphere(25);
  translate(-15, -15, 0);
  sphere(35);
  translate(-30, 10, 0);
  sphere(20);

  pop();
}
Line-by-line explanation (3 lines)

🔧 Subcomponents:

calculation Sphere Composition sphere(30); translate(30, 0, 0); sphere(25); translate(-15, -15, 0); sphere(35); translate(-30, 10, 0); sphere(20);

Combines four overlapping spheres of different sizes at different positions to create a fluffy cloud silhouette

fill(255); specularMaterial(255);
Colors the cloud white (255, 255, 255 when only one argument is given) and makes it very shiny (255 specular brightness). White + high shininess creates a bright, fluffy appearance.
sphere(30); translate(30, 0, 0); sphere(25);
Draws a white sphere (radius 30), moves 30 pixels right, then draws another sphere (radius 25). The overlapping spheres fuse visually into one cloud puff.
translate(-15, -15, 0); sphere(35); translate(-30, 10, 0); sphere(20);
Continues chaining: moves to a new position and draws sphere(35), then again for sphere(20). Each translate() is relative to the previous position, building up the cloud's organic shape.

drawBuildings()

drawBuildings() is another orchestrator that places building instances by calling drawBuilding() with hardcoded parameters.

function drawBuildings() {
  drawBuilding(300, -50, 200, 80, 120, 60);
  drawBuilding(-350, -20, 100, 60, 90, 50);
  drawBuilding(100, -80, -300, 100, 150, 70);
}
Line-by-line explanation (1 lines)
drawBuilding(300, -50, 200, 80, 120, 60); drawBuilding(-350, -20, 100, 60, 90, 50); drawBuilding(100, -80, -300, 100, 150, 70);
Calls drawBuilding() three times, each with a position (x, y, z) and dimensions (width, height, depth). This scatters buildings around the scene with different sizes.

drawBuilding(x, y, z, w, h, d)

drawBuilding(x, y, z, w, h, d) parameterizes both position and size, making it fully reusable. The random color injection adds visual variety with minimal code.

function drawBuilding(x, y, z, w, h, d) {
  push();
  translate(x, y, z);
  fill(random(150, 250), random(150, 250), random(150, 250)); // Random light color
  specularMaterial(150);
  box(w, h, d);
  pop();
}
Line-by-line explanation (3 lines)
translate(x, y, z);
Moves the building to the specified position in 3D space.
fill(random(150, 250), random(150, 250), random(150, 250));
Generates a random light color by picking random RGB values between 150 and 250. Each call produces a different pastel color, making each building unique. random(150, 250) picks a float between 150 and 250.
box(w, h, d);
Draws a rectangular building with width w, height h, and depth d. The dimensions are passed as parameters, so one function builds any-sized building.

drawUI()

drawUI() demonstrates switching between 3D and 2D modes mid-sketch: ortho() + noLights() prepare for flat, well-lit 2D drawing, and pop() restores 3D mode. This is essential for heads-up displays, menus, and text overlays.

function drawUI() {
  push();
  ortho(); // Switch to orthographic projection for UI elements
  noLights(); // Disable lighting for flat UI text
  fill(255); // White text color
  text('Roblox 2026', -width / 2 + 100, -height / 2 + 50); // Position text in top-left
  pop();
}
Line-by-line explanation (4 lines)
ortho();
Switches from 3D perspective mode to 2D orthographic mode. This flattens the 3D coordinate system so text renders clearly without perspective distortion. Necessary for UI overlays on 3D scenes.
noLights();
Disables all lighting (ambientLight and directionalLight) so text renders with pure fill color, not affected by 3D shadows or reflections. Text should be flat and readable.
fill(255);
Sets the text color to white (RGB: 255, 255, 255). Every character drawn after this is white.
text('Roblox 2026', -width / 2 + 100, -height / 2 + 50);
Draws the text 'Roblox 2026' at screen position (-width/2 + 100, -height/2 + 50). In ortho mode, the origin is the center; -width/2 is the left edge, so -width/2 + 100 places it 100 pixels from the left. -height/2 + 50 is 50 pixels from the top.

windowResized()

windowResized() is a special p5.js function that p5 calls automatically when the browser window is resized. Use it to adjust canvas size and any projection settings. Not all sketches need it, but responsive sketches (like this one) should include it.

function windowResized() {
  resizeCanvas(windowWidth, windowHeight);
  // Re-center orthographic projection after resize
  ortho();
}
Line-by-line explanation (2 lines)
resizeCanvas(windowWidth, windowHeight);
Resizes the canvas to match the current browser window dimensions. This is called automatically whenever the user resizes their browser window (thanks to p5.js).
ortho();
Re-applies orthographic projection after the resize. This ensures UI text positioning stays correct after the canvas is resized. Without this, text might jump around.

📦 Key Variables

robotoFont font object

Stores the loaded Roboto font so it can be used by textFont() to render the 'Roblox 2026' text with a modern typeface instead of the browser's default.

let robotoFont;

🔧 Potential Improvements (4)

Here are some ways this code could be enhanced:

BUG drawBuilding()

The random() function is called in fill() every frame, generating different random colors each frame for the same building. This causes buildings to flicker with color changes instead of maintaining a stable color.

💡 Pre-compute building colors in setup() and store them in an array, or pass color as a parameter to drawBuilding(). Example: pass a color parameter and call fill(color[0], color[1], color[2]) instead of fill(random(...), random(...), random(...)).

PERFORMANCE draw()

Lighting functions (ambientLight, directionalLight) are called every frame. While this is necessary in p5.js WebGL, they could be optimized by caching light calculations if the scene doesn't move or rotate based on time (though orbitControl makes this moot).

💡 This is acceptable for the current sketch. If performance becomes an issue with many more objects, consider deferring light updates until the user stops moving the camera.

STYLE preload()

The font is loaded from a CDN URL. If the network is slow or the CDN is down, the text will render in a fallback font with no error message.

💡 Add error handling: robotoFont = loadFont('https://...', null, () => console.warn('Font failed to load')). Or check if robotoFont is valid before using it in drawUI().

FEATURE drawTrees() and drawBuildings()

Tree and building positions are hardcoded in function calls. The scene lacks a data-driven approach, making it hard to add more trees/buildings or modify their layout.

💡 Create arrays to store positions and properties: let trees = [{x: -200, y: 10, z: -150}, ...]; Then loop: trees.forEach(t => drawTree(t.x, t.y, t.z)).

🔄 Code Flow

Code flow showing preload, setup, draw, drawground, drawcharacter, drawtrees, drawtree, drawclouds, drawcloud, drawbuildings, drawbuilding, drawui, windowresized

💡 Click on function names in the diagram to jump to their code

graph TD start[Start] --> setup[setup] setup --> draw[draw loop] draw --> lightingsetup[Lighting Configuration] draw --> scenrendering[Scene Rendering Pipeline] draw --> drawground[drawGround] draw --> drawcharacter[drawCharacter] draw --> drawtrees[drawTrees] draw --> drawclouds[drawClouds] draw --> drawbuildings[drawBuildings] draw --> drawui[drawUI] lightingsetup -->|Sets up lights| draw click setup href "#fn-setup" click draw href "#fn-draw" click lightingsetup href "#sub-lighting-setup" click scenrendering href "#sub-scene-rendering" click drawground href "#fn-drawground" click drawcharacter href "#fn-drawcharacter" click drawtrees href "#fn-drawtrees" click drawclouds href "#fn-drawclouds" click drawbuildings href "#fn-drawbuildings" click drawui href "#fn-drawui" drawcharacter --> characterhead[Head] drawcharacter --> characterbody[Body] drawcharacter --> leftarmanimation[Left Arm Wave] drawcharacter --> rightarmanimation[Right Arm Wave] characterhead -->|Draws head| drawcharacter characterbody -->|Draws body| drawcharacter leftarmanimation -->|Animates left arm| drawcharacter rightarmanimation -->|Animates right arm| drawcharacter click characterhead href "#sub-character-head" click characterbody href "#sub-character-body" click leftarmanimation href "#sub-left-arm-animation" click rightarmanimation href "#sub-right-arm-animation" drawtrees --> drawtree[drawTree] drawtree --> treeTrunk[Trunk] drawtree --> treeLeaves[Leaves] treeTrunk -->|Draws trunk| drawtree treeLeaves -->|Draws leaves| drawtree click drawtree href "#fn-drawtree" click treeTrunk href "#sub-tree-trunk" click treeLeaves href "#sub-tree-leaves" drawclouds --> drawcloud[drawCloud] drawcloud --> cloudcomposition[Sphere Composition] cloudcomposition -->|Creates cloud shape| drawcloud click drawcloud href "#fn-drawcloud" click cloudcomposition href "#sub-cloud-composition" drawbuildings --> drawbuilding[drawBuilding] drawbuilding -->|Draws building| drawbuildings click drawbuilding href "#fn-drawbuilding" windowresized[windowResized] -->|Adjusts canvas| setup click windowresized href "#fn-windowresized"

❓ Frequently Asked Questions

What visuals can I expect from the 'roblox trash' p5.js sketch?

The sketch creates a colorful 3D scene featuring a Roblox-like character, trees, clouds, and buildings set against a sky blue background.

How can I interact with the 'roblox trash' sketch?

Users can rotate the camera view by dragging the mouse, allowing them to explore the 3D environment from different angles.

What creative coding techniques are demonstrated in this p5.js sketch?

The sketch showcases 3D rendering using WEBGL, ambient and directional lighting effects, and the integration of custom fonts for text display.

Preview

roblox trash - p5.js creative coding sketch preview
Sketch Preview
Code flow diagram showing the structure of roblox trash - Code flow showing preload, setup, draw, drawground, drawcharacter, drawtrees, drawtree, drawclouds, drawcloud, drawbuildings, drawbuilding, drawui, windowresized
Code Flow Diagram