robux clicker (Remix)

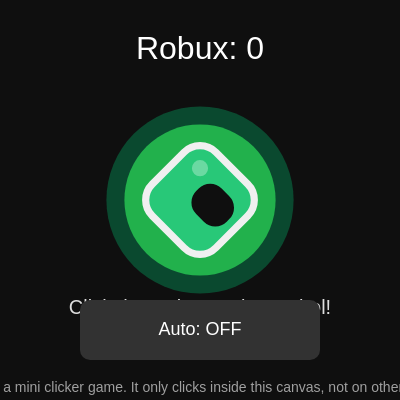
This sketch creates an addictive clicker game inspired by Roblox currency (Robux). Click a glowing green symbol to earn points manually, or toggle an auto-clicker that generates massive points automatically. The dark interface, hover effects, and responsive counter create an engaging mini-game experience.

🧪 Try This!

Experiment with the code by making these changes:

  1. Triple your manual click value — Each click on the main button will instantly award 3 times more points, making manual clicking feel more rewarding
  2. Make the button glow larger on hover — Increase the hover scale effect so the button grows more dramatically when your mouse is near it
  3. Recolor the main symbol to blue — Changes the green Robux symbol to a bright blue color using the fill RGB values
  4. Slow down auto-clicking — Reduce the auto-clicker rate so it generates points more slowly when enabled
  5. Make the auto-button bigger
Prefer the full editor? Open it there →

📖 About This Sketch

This sketch builds a playable clicker game right in your browser using p5.js. The visual centerpiece is a glowing green Robux-inspired symbol that responds to mouse clicks with instant score increases. A toggle button at the bottom activates an auto-clicker that generates staggering point values automatically. Together, these elements create a satisfying game loop powered by mouse interaction, state management, and real-time UI updates.

The code is organized around three core ideas: the draw loop that updates and renders the game state sixty times per second, the mousePressed() function that handles both the main clicker and the auto-toggle, and the drawRobuxSymbol() helper that creates the distinctive game button. By studying this sketch you will learn how to build interactive UI elements with hover effects, track game state across frames, and use p5.js transforms to create polished visual feedback.

⚙️ How It Works

  1. When the sketch loads, setup() initializes a full-screen canvas and prepares text alignment. The robux counter and autoEnabled flag are set to their starting values (0 and false).
  2. Every frame, draw() first checks if auto-clicking is enabled—if so, it calculates how many milliseconds have passed and multiplies the auto-rate by that time delta to add enormous points to the robux total.
  3. The draw loop then calculates positions for the main Robux button (centered) and the auto-toggle button (bottom) based on the current canvas size, supporting responsive design.
  4. The main button uses dist() to detect whether the mouse is hovering over it, and applies a subtle scale transform to provide visual feedback. drawRobuxSymbol() renders the distinctive green diamond shape with an off-center cutout.
  5. The auto-toggle button checks if the mouse is within its rectangular bounds and highlights itself accordingly. Its label displays the current state and the auto-rate value.
  6. mousePressed() determines which button was clicked by testing geometric collision—if the main button was hit, it adds points; if the auto button was hit, it toggles auto-clicking and resets the timing.
  7. windowResized() keeps the canvas full-screen whenever the browser window changes size.

🎓 Concepts You'll Learn

Mouse interaction and collision detectionGame state managementResponsive canvas and layoutTransform stacking with push/popReal-time UI updatesTime-delta calculations for frame-rate independence

📝 Code Breakdown

setup()

setup() runs once when the sketch starts. Here we initialize the full-screen canvas and configure text alignment so all our text displays centered without extra math.

function setup() {
  createCanvas(windowWidth, windowHeight);
  textAlign(CENTER, CENTER);
}
Line-by-line explanation (2 lines)
createCanvas(windowWidth, windowHeight);
Creates a canvas that fills the entire browser window, making the game fullscreen and responsive
textAlign(CENTER, CENTER);
Sets all future text to be centered both horizontally and vertically around its position

draw()

draw() runs 60 times per second and is where all animation and interaction happen. The key insight here is the time-delta calculation for auto-clicking: instead of adding a fixed amount every frame, we calculate actual milliseconds elapsed so the game generates points at the same rate regardless of frame rate.

function draw() {
  background(15);

  // --- Auto-clicker logic (per millisecond) ---
  if (autoEnabled) {
    const now = millis();
    const delta = now - lastAutoTime; // how many ms since last update

    if (delta >= 1) {
      // add per ms * number of ms that passed
      robux += perClick * autoPerMs * delta;
      lastAutoTime = now;
    }
  }

  // --- Layout values ---
  const mainRadius = min(width, height) * 0.18;
  const mainX = width / 2;
  const mainY = height / 2;

  const autoBtnW = 240;
  const autoBtnH = 60;
  const autoBtnX = width / 2 - autoBtnW / 2;
  const autoBtnY = height - autoBtnH - 40;

  // --- Top text: Robux counter ---
  fill(255);
  textSize(32);
  text("Robux: " + floor(robux), width / 2, 50);

  // --- Main Robux-style button ---
  const d = dist(mouseX, mouseY, mainX, mainY);
  const hoverMain = d < mainRadius;

  push();
  translate(mainX, mainY);
  const scaleHover = hoverMain ? 1.08 : 1;
  scale(scaleHover);

  noStroke();
  // outer glow
  fill(0, 200, 120, 80);
  ellipse(0, 0, mainRadius * 2.6, mainRadius * 2.6);
  // main circle
  fill(34, 177, 76);
  ellipse(0, 0, mainRadius * 2.1, mainRadius * 2.1);

  // draw a Robux-inspired symbol
  drawRobuxSymbol(0, 0, mainRadius * 1.25);

  pop();

  // "Click!" label under main button
  fill(220);
  textSize(20);
  text("Click the Robux-style symbol!", width / 2, mainY + mainRadius * 1.5);

  // --- Auto-clicker toggle button ---
  const hoverAuto =
    mouseX > autoBtnX &&
    mouseX < autoBtnX + autoBtnW &&
    mouseY > autoBtnY &&
    mouseY < autoBtnY + autoBtnH;

  noStroke();
  if (autoEnabled) {
    fill(46, 204, 113);
  } else if (hoverAuto) {
    fill(80);
  } else {
    fill(50);
  }
  rect(autoBtnX, autoBtnY, autoBtnW, autoBtnH, 10);

  fill(255);
  textSize(18);
  const autoLabel = autoEnabled
    ? "Auto: ON (" + autoPerMs + "/ms)"
    : "Auto: OFF";
  text(autoLabel, width / 2, autoBtnY + autoBtnH / 2);

  // --- Small hint text ---
  fill(160);
  textSize(14);
  text(
    "This is a mini clicker game. It only clicks inside this canvas, not on other apps.",
    width / 2,
    height - 12
  );
}

Line-by-line explanation (12 lines)

🔧 Subcomponents:

conditional Auto-Clicker Time Delta Calculation if (autoEnabled) { const now = millis(); const delta = now - lastAutoTime; if (delta >= 1) { robux += perClick * autoPerMs * delta; lastAutoTime = now; } }

Calculates elapsed time and adds auto-generated points based on milliseconds passed since last frame, making the auto-clicker frame-rate independent

conditional Main Button Hover Detection const d = dist(mouseX, mouseY, mainX, mainY); const hoverMain = d < mainRadius; const scaleHover = hoverMain ? 1.08 : 1; scale(scaleHover);

Detects when the mouse is over the main button using distance calculation and applies a scale transform for visual feedback

conditional Auto Button Hover Detection const hoverAuto = mouseX > autoBtnX && mouseX < autoBtnX + autoBtnW && mouseY > autoBtnY && mouseY < autoBtnY + autoBtnH;

Checks if the mouse is within the rectangular bounds of the auto-toggle button

conditional Auto Button State Coloring if (autoEnabled) { fill(46, 204, 113); } else if (hoverAuto) { fill(80); } else { fill(50); }

Changes button color based on whether auto is enabled (bright green), hovering (medium gray), or idle (dark gray)

background(15);
Clears the canvas with a nearly-black color (RGB 15) on every frame, creating a dark background
const now = millis();
Gets the current time in milliseconds since the sketch started
const delta = now - lastAutoTime;
Calculates how many milliseconds have passed since the last auto-click update
robux += perClick * autoPerMs * delta;
Adds points to the total: multiply the auto-rate per millisecond by the number of milliseconds that passed, then multiply by the per-click value
lastAutoTime = now;
Records the current time so the next frame can calculate how much time has elapsed
const mainRadius = min(width, height) * 0.18;
Calculates the button size as 18% of the smaller window dimension, keeping the button proportional on any screen size
const d = dist(mouseX, mouseY, mainX, mainY);
Uses p5.js dist() function to calculate the distance from the mouse to the center of the main button
const hoverMain = d < mainRadius;
Sets hoverMain to true if the mouse is close enough to the button center (within its radius)
const scaleHover = hoverMain ? 1.08 : 1;
If hovering, scale factor is 1.08 (8% larger); otherwise it is 1 (normal size)
scale(scaleHover);
Applies the calculated scale transform, making the button grow slightly when you hover over it
text("Robux: " + floor(robux), width / 2, 50);
Displays the current robux total at the top of the screen, using floor() to remove decimal places
const autoLabel = autoEnabled ? "Auto: ON (" + autoPerMs + "/ms)" : "Auto: OFF";
Creates a label string that shows either 'Auto: ON' with the rate or 'Auto: OFF' depending on the current state

drawRobuxSymbol()

This helper function demonstrates how p5.js transforms (translate, rotate, push/pop) let you build complex shapes by stacking simple primitives. The diamond effect comes from a 45-degree rotation, and the symbol's personality comes from the asymmetric off-center cutout. This pattern—creating game UI elements by layering shapes with transforms—is used everywhere in creative coding.

function drawRobuxSymbol(cx, cy, size) {
  push();
  translate(cx, cy);

  // Base rotation similar to the Robux "diamond" look
  rotate(PI / 4);

  rectMode(CENTER);
  strokeWeight(size * 0.08);
  stroke(240);
  fill(40, 200, 120);

  const outerSize = size;
  const cornerRadius = outerSize * 0.25;

  // Outer diamond (body)
  rect(0, 0, outerSize, outerSize, cornerRadius);

  // Inner "hole" – off-center, slightly rectangular so it's not identical
  noStroke();
  fill(15); // matches background to look like a cutout

  const innerW = outerSize * 0.48;
  const innerH = outerSize * 0.40;
  const offsetX = outerSize * 0.14; // off-center horizontally
  const offsetY = -outerSize * 0.06; // slight vertical offset

  rect(offsetX, offsetY, innerW, innerH, outerSize * 0.18);

  // Optional: tiny highlight to make it feel more "gamey" and less like the real logo
  fill(255, 255, 255, 80);
  const highlightSize = outerSize * 0.18;
  const hiOffset = outerSize * -0.25;
  ellipse(hiOffset, hiOffset, highlightSize, highlightSize);

  pop();
}
Line-by-line explanation (15 lines)

🔧 Subcomponents:

calculation Outer Diamond Shape rect(0, 0, outerSize, outerSize, cornerRadius);

Draws the main body of the Robux symbol as a rotated rounded square

calculation Inner Cutout rect(offsetX, offsetY, innerW, innerH, outerSize * 0.18);

Creates the distinctive off-center hole by drawing a rectangle filled with the background color

calculation Shine Highlight ellipse(hiOffset, hiOffset, highlightSize, highlightSize);

Adds a small semi-transparent white circle in the corner to create a glossy, gamified appearance

push();
Saves the current transformation state so changes don't affect the rest of the sketch
translate(cx, cy);
Moves the origin (0, 0) to the center point of the symbol, making rotation and positioning easier
rotate(PI / 4);
Rotates the entire symbol 45 degrees (π/4 radians), creating the diamond orientation
rectMode(CENTER);
Changes rectangle drawing mode so that rect() positions from the center instead of the top-left corner
stroke(240);
Sets the outline color to a light gray (RGB 240), making the symbol's edge visible
fill(40, 200, 120);
Sets the fill color to a bright green, matching the Robux aesthetic
const cornerRadius = outerSize * 0.25;
Calculates rounded corner radius as 25% of the symbol size, making the diamond feel smooth and polished
rect(0, 0, outerSize, outerSize, cornerRadius);
Draws the outer green diamond shape with rounded corners at the center
fill(15);
Changes fill color to nearly-black (matching the background) to create the illusion of a cutout
const offsetX = outerSize * 0.14;
Moves the inner hole 14% to the right, keeping it off-center and visually interesting
const offsetY = -outerSize * 0.06;
Moves the inner hole slightly up (negative Y), adding asymmetry to the design
rect(offsetX, offsetY, innerW, innerH, outerSize * 0.18);
Draws the off-center rectangular cutout, making the symbol look like the distinctive Robux shape
fill(255, 255, 255, 80);
Sets fill to white with 80 alpha (semi-transparent) for a subtle shine effect
ellipse(hiOffset, hiOffset, highlightSize, highlightSize);
Adds a small semi-transparent white circle in the top-left corner, giving the button a glossy, game-like appearance
pop();
Restores the previous transformation state so the rest of the sketch is not affected by the rotation and translation

mousePressed()

mousePressed() is called automatically by p5.js every time the mouse button is clicked. Here it handles two distinct collision checks: distance-based collision for the circular main button, and rectangular bounds-checking for the auto-toggle button. The `return` statement is crucial—it prevents a single click from being processed by both buttons.

🔬 This block uses dist() to detect clicks on the circular main button. What happens if you change the condition from `d < mainRadius` to `d < mainRadius * 2`? Does the clickable area grow?

  // Check click on main Robux-style button
  const d = dist(mouseX, mouseY, mainX, mainY);
  if (d < mainRadius) {
    robux += perClick;
    return; // don't also toggle auto in same click
  }
function mousePressed() {
  const mainRadius = min(width, height) * 0.18;
  const mainX = width / 2;
  const mainY = height / 2;

  const autoBtnW = 240;
  const autoBtnH = 60;
  const autoBtnX = width / 2 - autoBtnW / 2;
  const autoBtnY = height - autoBtnH - 40;

  // Check click on main Robux-style button
  const d = dist(mouseX, mouseY, mainX, mainY);
  if (d < mainRadius) {
    robux += perClick;
    return; // don't also toggle auto in same click
  }

  // Check click on auto-clicker button
  const insideAuto =
    mouseX > autoBtnX &&
    mouseX < autoBtnX + autoBtnW &&
    mouseY > autoBtnY &&
    mouseY < autoBtnY + autoBtnH;

  if (insideAuto) {
    autoEnabled = !autoEnabled;
    lastAutoTime = millis(); // reset timer when toggled
  }
}
Line-by-line explanation (8 lines)

🔧 Subcomponents:

conditional Main Button Click Detection const d = dist(mouseX, mouseY, mainX, mainY); if (d < mainRadius) { robux += perClick; return; }

Checks if the click was on the main symbol using distance calculation and awards points if so

conditional Auto Button Click Detection const insideAuto = mouseX > autoBtnX && mouseX < autoBtnX + autoBtnW && mouseY > autoBtnY && mouseY < autoBtnY + autoBtnH; if (insideAuto) { autoEnabled = !autoEnabled; lastAutoTime = millis(); }

Checks if the click was within the auto-toggle button rectangle and toggles auto-clicking state if so

const mainRadius = min(width, height) * 0.18;
Recalculates the button radius here (same as in draw) to ensure collision detection matches the visual button size
const d = dist(mouseX, mouseY, mainX, mainY);
Calculates the distance from where the mouse clicked to the center of the main button
if (d < mainRadius) {
If the click distance is less than the button radius, the click was on the button
robux += perClick;
Awards points equal to perClick (typically 1) for clicking the main button
return;
Exits the function early to prevent the auto-button from also being toggled in the same click
const insideAuto = mouseX > autoBtnX && mouseX < autoBtnX + autoBtnW && mouseY > autoBtnY && mouseY < autoBtnY + autoBtnH;
Checks if the mouse click is inside the rectangular bounds of the auto-toggle button using four comparisons
autoEnabled = !autoEnabled;
Flips the autoEnabled state from true to false or false to true, toggling auto-clicking on and off
lastAutoTime = millis();
Records the current time so the auto-clicker starts its delta calculation fresh when toggled

windowResized()

p5.js calls windowResized() automatically whenever the browser window changes size. This function ensures the game adapts smoothly to any screen size by updating the canvas dimensions. Without it, the canvas would stay fixed and look broken on window resize.

function windowResized() {
  resizeCanvas(windowWidth, windowHeight);
}
Line-by-line explanation (1 lines)
resizeCanvas(windowWidth, windowHeight);
Automatically adjusts the canvas size whenever the browser window is resized, keeping the game fullscreen and responsive

📦 Key Variables

robux number

Stores the current total points earned in the game through both manual clicks and auto-clicking

let robux = 0;
perClick number

The base value in points awarded for each manual click on the main button

let perClick = 1;
autoEnabled boolean

Tracks whether the auto-clicker is currently active (true) or inactive (false)

let autoEnabled = false;
autoPerMs number

The rate at which auto-clicking generates points, measured per millisecond when auto is enabled

let autoPerMs = 99999999999999999;
lastAutoTime number

Records the timestamp (in milliseconds) of the last auto-click update, used to calculate time delta for frame-rate independence

let lastAutoTime = 0;

🔧 Potential Improvements (4)

Here are some ways this code could be enhanced:

BUG draw() - auto-clicker logic

When autoEnabled is toggled on, lastAutoTime is not initialized in draw(), so the first delta calculation might be very large, causing a massive point spike

💡 Initialize lastAutoTime = millis() in the autoEnabled check: move the `lastAutoTime = millis()` line from mousePressed() into draw() right when `if (autoEnabled)` becomes true for the first time, or ensure it's set at sketch start

PERFORMANCE draw() - layout calculations

mainRadius, mainX, mainY, autoBtnW, autoBtnH, autoBtnX, autoBtnY are recalculated every single frame even though most don't change (canvas size only changes rarely)

💡 Move static layout calculations outside draw() or into a helper function, and only recalculate them in windowResized(). This reduces unnecessary math every frame.

STYLE mousePressed()

Layout values (mainRadius, mainX, mainY, autoBtnW, etc.) are recalculated identically in both draw() and mousePressed(), violating DRY (Don't Repeat Yourself) principle

💡 Extract layout calculations into a single helper function getLayout() that both draw() and mousePressed() call, eliminating duplication

FEATURE draw() - robux display

Large numbers become hard to read (e.g., 99999999999999999 is visually overwhelming) and would benefit from abbreviation

💡 Create a helper function formatNumber(num) that returns abbreviated strings like '999M' or '999B' for very large numbers, improving readability

🔄 Code Flow

Code flow showing setup, draw, drawrobuxsymbol, mousepressed, windowresized

💡 Click on function names in the diagram to jump to their code

graph TD start[Start] --> setup[setup] setup --> draw[draw loop] draw --> auto-clicker-logic[Auto-Clicker Time Delta Calculation] draw --> main-button-hover[Main Button Hover Detection] draw --> auto-button-hover[Auto Button Hover Detection] draw --> auto-button-coloring[Auto Button State Coloring] draw --> drawrobuxsymbol[drawrobuxsymbol] drawrobuxsymbol --> outer-diamond[Outer Diamond Shape] drawrobuxsymbol --> inner-cutout[Inner Cutout] drawrobuxsymbol --> highlight[Shine Highlight] draw --> mousepressed[mousepressed] mousepressed --> main-button-click[Main Button Click Detection] mousepressed --> auto-button-click[Auto Button Click Detection] click setup href "#fn-setup" click draw href "#fn-draw" click auto-clicker-logic href "#sub-auto-clicker-logic" click main-button-hover href "#sub-main-button-hover" click auto-button-hover href "#sub-auto-button-hover" click auto-button-coloring href "#sub-auto-button-coloring" click drawrobuxsymbol href "#fn-drawrobuxsymbol" click outer-diamond href "#sub-outer-diamond" click inner-cutout href "#sub-inner-cutout" click highlight href "#sub-highlight" click mousepressed href "#fn-mousepressed" click main-button-click href "#sub-main-button-click" click auto-button-click href "#sub-auto-button-click"

❓ Frequently Asked Questions

What visual elements are featured in the robux clicker sketch?

The sketch showcases a sleek dark background with a glowing green Robux-style symbol, hover effects, and a live counter displaying the total points.

How can users interact with the robux clicker game?

Users can click the glowing symbol to earn points or activate an auto-clicker button to accumulate points automatically.

What coding concepts are demonstrated in the robux clicker sketch?

This sketch illustrates interactive graphics and real-time updates using p5.js, particularly through mouse events and dynamic rendering.

Preview

robux clicker (Remix) - p5.js creative coding sketch preview
Sketch Preview
Code flow diagram showing the structure of robux clicker (Remix) - Code flow showing setup, draw, drawrobuxsymbol, mousepressed, windowresized
Code Flow Diagram