
Room

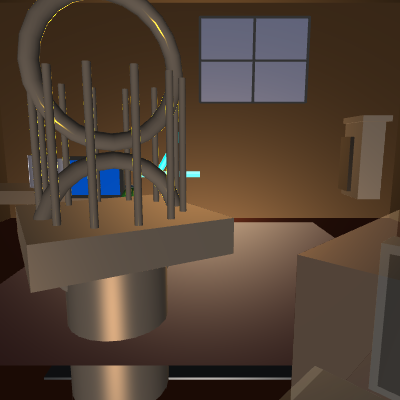
This sketch creates an immersive 3D room rendered in WebGL, filled with furniture, lab equipment, and decorative objects lit with warm, dramatic directional and point lights. You control a first-person camera by clicking and dragging to pan and tilt your head, and scrolling to zoom in and out through the lived-in space.

🧪 Try This!

Experiment with the code by making these changes:

  1. Change the fireplace color to cool blue — The fireplace currently glows warm orange; change it to cool cyan or blue for a sci-fi effect
  2. Make the room darker by reducing ambient light — Lowering the ambient light makes the room dimmer and more mysterious, emphasizing shadows
  3. Increase camera zoom sensitivity to move faster through space — The mouse wheel zoom multiplier controls how quickly you zoom in/out—increase it for snappier movement
  4. Change the floor color from mahogany to cool grey — Switching from warm red-brown to neutral grey shifts the room's emotional tone
  5. Make the chair recline more steeply — The backrest recline angle (PI/10) controls comfort—increase it for a deeper recline
Prefer the full editor? Open it there →

📖 About This Sketch

This sketch creates an interactive 3D room exploration experience using p5.js WebGL rendering. The scene includes a comfortable armchair, Victorian laboratory desk, fireplace with glowing embers, birdcage with a crow feather, computer setup, and carefully placed decorative objects. Warm directional lights and point lights from the reading lamp and fireplace cast realistic shadows and create a cozy, lived-in atmosphere. The main p5.js techniques powering this are WEBGL canvas rendering, 3D transformations (translate, rotate, scale), lighting (ambientLight, directionalLight, pointLight), material properties (specularMaterial, shininess, emissiveMaterial), and interactive camera control (createCamera, pan, tilt, setPosition).

The code is organized into a setup() function that initializes the WebGL canvas and camera, a draw() function that runs lighting and renders all objects each frame, and individual drawing functions for each major element (drawRoom, drawComfyChair, drawBirdcage, drawComputer, drawLaboratoryElements, drawFireplace, drawLivedInDetails, drawTrapdoor). You will learn how to structure large 3D scenes, layer transformations with push/pop, apply realistic materials and lighting, and respond to mouse and touch input to control a first-person camera.

⚙️ How It Works

  1. When the sketch loads, setup() creates a WEBGL canvas at full window size, initializes a perspective camera positioned at eye level (Y = -50) roughly 300 pixels away (Z = 300), and focuses the camera on the center of the room (0, 0, 0).
  2. Every frame, draw() clears the background with a dark color and sets up the lighting: a soft ambient light to prevent total darkness, two directional lights (one warm overhead, one from behind to suggest a window), and point lights from the reading lamp and fireplace that cast localized illumination.
  3. The room structure is drawn with a floor (mahogany wood), ceiling, and four thick walls (dark stained wood) using boxes and planes. A window on the back wall shows a semi-transparent blue sky.
  4. All furniture and decorative objects are drawn relative to a translate(0, 50, 0) offset, placing them above the floor. Each object uses push/pop to isolate its transformations, translate and rotateY to position and angle it, and fill() plus specularMaterial/shininess to give it realistic appearance.
  5. Mouse dragging calls cam.pan() and cam.tilt() to rotate the camera horizontally and vertically (first-person head movement), while the mouse wheel adjusts zoomLevel and updates cam.setPosition() to move closer or farther from the scene.
  6. The result is a freely explorable 3D space where you move your viewpoint like a person standing in the room, with lighting and material properties creating depth and realism.

🎓 Concepts You'll Learn

WebGL 3D renderingCamera control and transformation3D lighting (ambient, directional, point lights)Material properties (specular, shininess, emissive)Push/pop transformation isolationInteractive mouse and touch input3D geometric shapes (box, sphere, cylinder, cone, plane)Coordinate system and perspective

📝 Code Breakdown

setup()

setup() runs once when the sketch starts. For 3D scenes, use createCanvas with WEBGL, configure perspective for depth perception, and initialize the camera position and direction. The camera is the viewer's eye in the 3D world.

function setup() {
  // Create a WebGL canvas for 3D rendering
  createCanvas(windowWidth, windowHeight, WEBGL);

  // Set up a perspective camera
  // For more on perspective(): https://p5js.org/reference/#/p5/perspective
  perspective(PI / 3.0, width / height, 0.1, 1000);

  // Initialize camera controls
  cam = createCamera();
  cam.setPosition(0, -50, zoomLevel); // CRITICAL FIX: Set initial camera Y to eye level (-50)
  cam.lookAt(0, 0, 0); // Look towards the center of the scene

  // Disable stroke for most objects for a cleaner look
  noStroke();
}
Line-by-line explanation (6 lines)

🔧 Subcomponents:

function-call WebGL Canvas Creation createCanvas(windowWidth, windowHeight, WEBGL);

Creates a full-window canvas with WebGL rendering enabled, which is required for 3D shapes and lighting

function-call Perspective Camera Setup perspective(PI / 3.0, width / height, 0.1, 1000);

Configures perspective projection with a 60-degree field of view, proper aspect ratio, and near/far clipping planes

function-call Camera Position and Direction cam.setPosition(0, -50, zoomLevel); cam.lookAt(0, 0, 0);

Places the camera at eye level (-50 on Y-axis) and points it toward the center, establishing the first-person viewpoint

createCanvas(windowWidth, windowHeight, WEBGL);
Creates a canvas that fills the entire window using WEBGL rendering mode, which enables 3D shapes, lighting, and materials—essential for this 3D room
perspective(PI / 3.0, width / height, 0.1, 1000);
Sets up perspective projection: PI/3.0 (60°) is the field of view, width/height maintains correct proportions, and 0.1 to 1000 define which distances are visible (near and far clipping planes)
cam = createCamera();
Creates a camera object that you can control with pan(), tilt(), and setPosition() for interactive first-person navigation
cam.setPosition(0, -50, zoomLevel);
Places the camera at the center X and Z (0, 0), slightly above the floor on Y (-50 for eye level), and zoomLevel pixels back (starting at 300)
cam.lookAt(0, 0, 0);
Points the camera toward the origin (0, 0, 0), the center of the room, so you start looking into the scene
noStroke();
Disables outlines on all shapes, giving them a smoother, more realistic appearance
draw()

draw() runs 60 times per second in p5.js. For 3D scenes, lighting must be set every frame. The combination of ambient, directional, and point lights creates realistic, dynamic illumination that reacts to object materials (specularMaterial, shininess). Calling all drawing functions here ensures objects are rendered in the correct order and respond to the active lights.

🔬 These two directional lights create the room's main illumination. What happens if you swap their direction vectors? For example, change the first light's direction to (0, 0, 1) and the second to (0, -0.5, -1)? How does the room's lighting feel different?

  directionalLight(200, 190, 180, 0, -0.5, -1); // Main light source from top-front, slightly warmer
  directionalLight(255, 230, 180, 0, 0, 1); // Warm sunlight coming from the back (through the window)
function draw() {
  // Clear the background with a dark, muted color
  background(40);

  // Set up lighting for the 3D scene (defined here so it's always active)
  // For more on lighting: https://p5js.org/reference/#/p5/lighting
  ambientLight(70); // Slightly brighter overall soft light to illuminate darker wood
  directionalLight(200, 190, 180, 0, -0.5, -1); // Main light source from top-front, slightly warmer
  directionalLight(255, 230, 180, 0, 0, 1); // Warm sunlight coming from the back (through the window)
  // pointLight(100, 100, 100, -200, -200, 200); // This was a placeholder, now specific lights below

  // Apply camera pan and tilt (simulating head movement)
  // CRITICAL FIX: Apply rotation directly to the camera, not the global scene.
  // Use relative changes for pan/tilt.
  // The mouseDragged and touchMoved functions now directly call cam.pan() and cam.tilt().

  // Update camera position for zoom (Z-axis movement)
  // CRITICAL FIX: Maintain fixed eye-level Y position (-50)
  cam.setPosition(0, -50, zoomLevel); // Maintain eye level, zoom affects Z

  // Draw the room structure (now includes thick walls and ceiling)
  drawRoom();

  // Draw the furniture and main elements
  push();
  translate(0, 50, 0); // Move everything up slightly from the floor
  drawComfyChair();
  drawBirdcage();
  drawComputer();
  drawLaboratoryElements();
  drawTrapdoor(); // Draw the complex trapdoor
  drawLivedInDetails(); // New: Add lived-in details
  drawFireplace(); // New: Add the fireplace
  pop();
}
Line-by-line explanation (9 lines)

🔧 Subcomponents:

function-call Lighting Configuration ambientLight(70); directionalLight(200, 190, 180, 0, -0.5, -1); directionalLight(255, 230, 180, 0, 0, 1);

Sets up three light sources: soft ambient light for overall illumination, a warm directional light from above-front, and a backlight from the window to create depth and realism

function-call Camera Position Update cam.setPosition(0, -50, zoomLevel);

Keeps the camera at eye level while allowing the zoom level variable to control distance from the scene

function-call Object Rendering drawRoom(); push(); translate(0, 50, 0); drawComfyChair(); drawBirdcage(); drawComputer(); drawLaboratoryElements(); drawTrapdoor(); drawLivedInDetails(); drawFireplace(); pop();

Calls all drawing functions in order, with furniture offset 50 units up from the global origin to sit on the floor

background(40);
Clears the canvas with a dark grey (40 on RGB scale), erasing the previous frame and providing a neutral starting point
ambientLight(70);
Adds a soft, directionless light with brightness 70—this ensures every surface in the room receives some illumination even without direct light
directionalLight(200, 190, 180, 0, -0.5, -1);
Creates a warm light (RGB 200,190,180) coming from direction (0, -0.5, -1), which points from above-right toward below-left, simulating overhead room lighting
directionalLight(255, 230, 180, 0, 0, 1);
Adds a second warm light from direction (0, 0, 1), coming from behind the room (suggesting sunlight through a window), creating backlighting
cam.setPosition(0, -50, zoomLevel);
Updates the camera position every frame: keeps eye level at Y=-50, keeps it centered at X=0 and Z=0, and moves toward/away based on zoomLevel (controlled by mouse wheel)
drawRoom();
Renders the floor, ceiling, and walls—the basic container of the scene
push();
Saves the current transformation state (identity) before applying the global offset
translate(0, 50, 0);
Moves all furniture 50 units up on the Y-axis so they sit naturally on the floor (which is at Y=100 in world coordinates)
pop();
Restores the transformation state, ensuring the offset doesn't affect subsequent draws (though none follow in this sketch)

mouseDragged()

mouseDragged() is called every frame while the mouse button is held down. Using pmouseX and pmouseY (previous mouse position) lets you calculate smooth, frame-independent motion. The camera pan() and tilt() methods handle the actual rotation, simulating natural head movement in a first-person view.

🔬 Try removing the negative sign from the tilt line: change it to cam.tilt((mouseY - pmouseY) * 0.005). Now drag your mouse around—how does the vertical feel? Why is the negative sign important?

  cam.pan((mouseX - pmouseX) * 0.005); // Rotate around camera's Y-axis (horizontal)
  cam.tilt(-(mouseY - pmouseY) * 0.005); // Rotate around camera's X-axis (vertical), negative for natural mouse Y
function mouseDragged() {
  // CRITICAL FIX: Use cam.pan() and cam.tilt() for first-person rotation
  cam.pan((mouseX - pmouseX) * 0.005); // Rotate around camera's Y-axis (horizontal)
  cam.tilt(-(mouseY - pmouseY) * 0.005); // Rotate around camera's X-axis (vertical), negative for natural mouse Y
}
Line-by-line explanation (2 lines)

🔧 Subcomponents:

function-call Horizontal Camera Rotation cam.pan((mouseX - pmouseX) * 0.005);

Rotates the camera left/right based on how far the mouse moved horizontally—moving right pans right, moving left pans left

function-call Vertical Camera Rotation cam.tilt(-(mouseY - pmouseY) * 0.005);

Rotates the camera up/down based on mouse vertical movement, negated to match intuitive behavior (moving mouse up tilts camera up)

cam.pan((mouseX - pmouseX) * 0.005);
mouseX - pmouseX is the change in mouse X position since last frame; multiplied by 0.005 to convert pixels to a small rotation angle, then cam.pan() applies it as a horizontal rotation
cam.tilt(-(mouseY - pmouseY) * 0.005);
mouseY - pmouseY is the change in mouse Y position; the negative sign reverses it so moving the mouse DOWN tilts the camera DOWN (natural behavior), and the 0.005 scalar controls rotation sensitivity

touchMoved()

touchMoved() is called when fingers move on the screen. The touches array contains all active touch points. By checking touches.length, you can differentiate single-touch (camera control) from multi-touch (reserved for future features). Returning false prevents default browser behavior, ensuring your interaction takes precedence.

function touchMoved() {
  // Only rotate if one finger is used (to avoid conflict with pinch zoom if implemented later)
  if (touches.length === 1) {
    // CRITICAL FIX: Use cam.pan() and cam.tilt() for first-person rotation
    cam.pan((touches[0].x - pmouseX) * 0.005); // Rotate around camera's Y-axis (horizontal)
    cam.tilt(-(touches[0].y - pmouseY) * 0.005); // Rotate around camera's X-axis (vertical), negative for natural touch Y
    return false; // Prevent default scrolling/zooming behavior
  }
}
Line-by-line explanation (4 lines)

🔧 Subcomponents:

conditional Single Touch Validation if (touches.length === 1) {

Ensures camera control only works with one finger, preventing conflicts with future pinch-zoom gestures

function-call Touch Horizontal Rotation cam.pan((touches[0].x - pmouseX) * 0.005);

Rotates camera left/right using the first touch's X position relative to the previous mouse position

function-call Touch Vertical Rotation cam.tilt(-(touches[0].y - pmouseY) * 0.005);

Rotates camera up/down using the first touch's Y position, negated for natural feel

if (touches.length === 1) {
Checks whether exactly one finger is touching the screen; if true, proceed with camera control (if more than one finger, multi-touch gestures are reserved for future pinch-zoom)
cam.pan((touches[0].x - pmouseX) * 0.005);
touches[0] is the first (and only) touch; .x is its horizontal position; compared to pmouseX (previous mouse X) it calculates the touch movement distance, scaled by 0.005 for rotation
cam.tilt(-(touches[0].y - pmouseY) * 0.005);
touches[0].y is the vertical position of the touch, compared to pmouseY; negated so moving the finger down tilts the view down (intuitive)
return false;
Prevents the browser's default touch behavior (scrolling, zooming the page), so your gesture only controls the camera

mouseWheel(event)

mouseWheel(event) is triggered by the mouse scroll wheel. event.deltaY tells you the direction and magnitude of the scroll. Multiplying by a sensitivity factor and clamping the result between reasonable bounds creates smooth, user-friendly zoom. Returning false prevents unwanted browser behavior.

function mouseWheel(event) {
  // Adjust zoom level based on wheel direction
  // event.deltaY is positive when scrolling down (zoom out), negative when scrolling up (zoom in)
  zoomLevel += event.deltaY * 0.5;

  // Clamp zoom level to reasonable bounds
  zoomLevel = constrain(zoomLevel, 100, 800); // Adjust min/max as needed

  // Prevent default page scrolling
  return false;
}
Line-by-line explanation (3 lines)

🔧 Subcomponents:

calculation Zoom Level Update zoomLevel += event.deltaY * 0.5;

Increases or decreases zoom distance: scrolling down (positive deltaY) zooms out, scrolling up (negative deltaY) zooms in

function-call Zoom Limit Enforcement zoomLevel = constrain(zoomLevel, 100, 800);

Prevents zooming too close (100) or too far (800), keeping the experience comfortable

zoomLevel += event.deltaY * 0.5;
event.deltaY is positive when you scroll down and negative when you scroll up; multiplied by 0.5 so the zoom feels neither too fast nor too slow
zoomLevel = constrain(zoomLevel, 100, 800);
constrain() clamps the zoom value between 100 (minimum, closest you can get) and 800 (maximum, farthest away), preventing extreme zoom levels
return false;
Stops the browser's default scroll-page behavior, so only the camera zoom changes

drawRoom()

drawRoom() creates the five surfaces enclosing the space: floor, ceiling, and four walls. Each surface is built with basic 3D shapes (plane for flat surfaces, box for thick walls) and positioned using translate and rotate. The material properties (specularMaterial, shininess) make the floor and walls reflect light realistically. The back wall includes a window to break up the monotony and suggest an exterior world.

🔬 The back wall is positioned using 'wallThickness / 2' to avoid Z-fighting. What happens if you change this to just -400 (removing the offset)? Can you see visual glitches where the window meets the wall?

  // Walls
  let wallYCenter = -100; // Vertical center for walls

  // Back wall (with window and wall decor)
  push();
  translate(0, wallYCenter, -400 + wallThickness / 2); // Position back face at z = -400
  box(800, wallHeight, wallThickness); // width, height, depth
function drawRoom() {
  // Floor
  push();
  translate(0, 100, 0); // Position floor at y=100
  rotateX(PI / 2); // Rotate to make it horizontal
  fill(100, 40, 20); // Warm mahogany red-brown
  specularMaterial(150, 70, 50); // Polished wood specularity
  shininess(50); // Medium shininess for polished wood
  plane(800, 800); // Floor plane
  pop();

  // Walls and Ceiling (antique wood stain)
  fill(70, 50, 30); // Deep, warm wood stain color
  specularMaterial(80, 60, 40); // Subtle specularity for stained wood
  shininess(10); // Less shiny than the floor

  // Ceiling
  push();
  translate(0, -300, 0); // Position ceiling at y=-300
  rotateX(PI / 2); // Rotate to make it horizontal
  plane(800, 800); // Ceiling plane
  pop();

  // Walls
  let wallYCenter = -100; // Vertical center for walls

  // Back wall (with window and wall decor)
  push();
  translate(0, wallYCenter, -400 + wallThickness / 2); // Position back face at z = -400
  box(800, wallHeight, wallThickness); // width, height, depth
  // Add a window to the back wall
  push();
  translate(100, -100, wallThickness / 2 + 2); // Window on inner face of wall, plus Z-fighting offset
  fill(150, 180, 255, 150); // Semi-transparent blue for sky through window
  plane(200, 150);
  // Window frame
  noFill();
  stroke(50);
  strokeWeight(5);
  rectMode(CENTER);
  rect(0, 0, 200, 150); // Frame
  line(-100, 0, 100, 0); // Horizontal pane
  line(0, -75, 0, 75); // Vertical pane
  noStroke();
  pop();
  pop();

  // Left wall
  push();
  translate(-400 + wallThickness / 2, wallYCenter, 0); // Position inner face at x = -400
  box(wallThickness, wallHeight, 800); // width, height, depth
  pop();

  // Right wall
  push();
  translate(400 - wallThickness / 2, wallYCenter, 0); // Position inner face at x = 400
  box(wallThickness, wallHeight, 800); // width, height, depth
  pop();

  // Front wall (for completeness, even though camera often looks into the room)
  push();
  translate(0, wallYCenter, 400 - wallThickness / 2); // Position inner face at z = 400
  box(800, wallHeight, wallThickness); // width, height, depth
  pop();
}
Line-by-line explanation (9 lines)

🔧 Subcomponents:

geometry Floor Plane push(); translate(0, 100, 0); rotateX(PI / 2); fill(100, 40, 20); specularMaterial(150, 70, 50); shininess(50); plane(800, 800);

Creates a large mahogany floor at Y=100 with polished wood reflectivity

geometry Ceiling Plane push(); translate(0, -300, 0); rotateX(PI / 2); plane(800, 800);

Draws a ceiling at Y=-300 with the same wood stain color as walls

geometry Back Wall with Window push(); translate(0, wallYCenter, -400 + wallThickness / 2); box(800, wallHeight, wallThickness);

Creates the back wall (rear boundary) with an embedded window showing blue sky

geometry Left Wall push(); translate(-400 + wallThickness / 2, wallYCenter, 0); box(wallThickness, wallHeight, 800);

Creates the left side wall of the room

geometry Right Wall push(); translate(400 - wallThickness / 2, wallYCenter, 0); box(wallThickness, wallHeight, 800);

Creates the right side wall of the room

translate(0, 100, 0); // Position floor at y=100
Moves the floor to Y=100 so it sits at the bottom boundary of the room; furniture is offset +50, so it sits at Y=50 relative to the origin (Y=100 absolute)
rotateX(PI / 2); // Rotate to make it horizontal
plane() by default is vertical; rotating 90° around the X-axis makes it horizontal (lying flat)
fill(100, 40, 20); // Warm mahogany red-brown
Sets the floor's color to a warm reddish-brown (mahogany), with emphasis on the red channel (100) and less green/blue
specularMaterial(150, 70, 50); // Polished wood specularity
Defines which light wavelengths are reflected as shine; here, more red and green, creating a warm highlight on shiny surfaces
shininess(50); // Medium shininess for polished wood
Controls how focused the shine/highlight is: 50 is moderate (polished wood), low values are duller, high values are mirror-like
let wallYCenter = -100; // Vertical center for walls
All walls are positioned around Y=-100, which is vertically centered between the floor (Y=100) and ceiling (Y=-300), keeping them balanced
translate(0, wallYCenter, -400 + wallThickness / 2);
Positions the back wall at Z=-400 (far boundary), offsetting by half the wall thickness so the inner face is exactly at -400, preventing Z-fighting
fill(150, 180, 255, 150); // Semi-transparent blue for sky through window
The window pane is semi-transparent blue (the fourth value 150 is alpha/transparency), simulating a view through to sky
noStroke();
Removes outlines, making the overall room look cleaner and less cartoon-like

drawComfyChair()

drawComfyChair() demonstrates how to build complex objects from simple boxes. Each part (seat, back, armrests, legs) is positioned relative to the chair's origin using translate and rotate, then drawn as a box. The use of push/pop isolates transformations so each part moves independently. The red color suggests velvet upholstery, while the wood-colored legs ground the furniture in realism.

function drawComfyChair() {
  push();
  translate(-250, 0, 200); // Position chair in the foreground-left
  rotateY(PI / 8); // Angle chair slightly towards the center
  fill(150, 70, 70); // Deep red fabric color

  // Seat
  box(150, 30, 150);

  // Backrest
  push();
  translate(0, -60, -60);
  rotateX(PI / 10); // Slightly reclined
  box(150, 100, 30);
  pop();

  // Armrests
  push();
  translate(-70, -30, 0);
  box(20, 60, 150);
  pop();
  push();
  translate(70, -30, 0);
  box(20, 60, 150);
  pop();

  // Legs (simplified)
  fill(90, 80, 70); // Dark wood color
  push();
  translate(-60, 30, -60);
  box(10, 30, 10);
  pop();
  push();
  translate(60, 30, -60);
  box(10, 30, 10);
  pop();
  push();
  translate(-60, 30, 60);
  box(10, 30, 10);
  pop();
  push();
  translate(60, 30, 60);
  box(10, 30, 10);
  pop();

  pop();
}
Line-by-line explanation (6 lines)

🔧 Subcomponents:

geometry Seat Cushion box(150, 30, 150);

Creates the main seating surface of the chair

geometry Reclined Backrest push(); translate(0, -60, -60); rotateX(PI / 10); box(150, 100, 30);

Builds the chair back at an angle for a reclined, comfortable appearance

geometry Left Armrest push(); translate(-70, -30, 0); box(20, 60, 150);

Creates the left arm of the chair for comfort and visual balance

for-loop Four Chair Legs for (let i = 0; i < 4; i++) { [leg placement] }

Places four wooden legs at the corners to support the seat

translate(-250, 0, 200); // Position chair in the foreground-left
Moves the chair to the left side of the room (X=-250) and toward the front (Z=200)
rotateY(PI / 8); // Angle chair slightly towards the center
Rotates the chair 22.5° around its vertical axis, aiming it toward the room's center for a lived-in look
fill(150, 70, 70); // Deep red fabric color
Sets the seat, backrest, and armrests to a rich, warm red (deep burgundy)
translate(0, -60, -60);
Moves the backrest up (-60 Y) and back (-60 Z) relative to the seat, positioning it behind
rotateX(PI / 10); // Slightly reclined
Tilts the backrest 18° to suggest a relaxed, reclined posture
fill(90, 80, 70); // Dark wood color
Switches to a dark brown for the legs, contrasting with the red fabric and suggesting wood construction

drawBirdcage()

drawBirdcage() combines several 3D techniques: simple shapes for the pedestal, torus for cylindrical rings, loops to distribute bars, and bezier curves for the feather. The golden material and high shininess make the cage appear precious and ornate. The crow's feather adds narrative detail—a small story within the scene.

🔬 This loop creates 12 bars (12 = number of bars, 360°/12 = 30° spacing). What happens if you change the loop condition to i < 6 or i < 24? How does the cage's density change?

  // Vertical bars
  for (let i = 0; i < 12; i++) {
    push();
    rotateY(i * TWO_PI / 12);
    translate(40, -45, 0);
    cylinder(2, 80);
    pop();
  }
function drawBirdcage() {
  push();
  translate(-50, -50, 100); // Position birdcage on a table/pedestal
  rotateY(PI / 6); // Slightly angled

  // Pedestal/Table
  fill(120, 110, 100); // Muted grey for a dusty look
  box(100, 20, 100); // Tabletop
  push();
  translate(0, 60, 0);
  cylinder(30, 100); // Pedestal leg
  pop();

  // Birdcage structure
  // For specularMaterial(): https://p5js.org/reference/#/p5/specularMaterial
  specularMaterial(255, 200, 0); // Gilded gold color
  shininess(100); // Make it shiny

  // Base and top rings
  torus(40, 5, 24, 16);
  push();
  translate(0, -90, 0);
  torus(40, 5, 24, 16);
  pop();

  // Vertical bars
  for (let i = 0; i < 12; i++) {
    push();
    rotateY(i * TWO_PI / 12);
    translate(40, -45, 0);
    cylinder(2, 80);
    pop();
  }

  // Crow's feather inside
  push();
  translate(0, -40, 0); // Position inside the cage
  rotateX(PI / 2); // Make it lie flat
  rotateZ(PI / 4); // Slightly angled
  fill(30); // Dark color for crow's feather
  shininess(10); // Less shiny
  specularMaterial(30);

  // Simplified feather shape
  beginShape();
  vertex(-20, 0, 0);
  bezierVertex(-15, -15, 15, -15, 20, 0, 0);
  bezierVertex(15, 15, -15, 15, -20, 0, 0);
  endShape(CLOSE);
  pop();

  pop();
}
Line-by-line explanation (9 lines)

🔧 Subcomponents:

geometry Pedestal and Tabletop box(100, 20, 100); // Tabletop push(); translate(0, 60, 0); cylinder(30, 100);

Creates the base on which the birdcage sits

geometry Top and Bottom Cage Rings torus(40, 5, 24, 16); push(); translate(0, -90, 0); torus(40, 5, 24, 16);

Creates gilded circular rings that form the top and bottom of the cage

for-loop Vertical Cage Bars for (let i = 0; i < 12; i++) { push(); rotateY(i * TWO_PI / 12); translate(40, -45, 0); cylinder(2, 80); pop(); }

Distributes 12 thin bars evenly around the cage's circumference

geometry Crow's Feather beginShape(); vertex(-20, 0, 0); bezierVertex(-15, -15, 15, -15, 20, 0, 0); bezierVertex(15, 15, -15, 15, -20, 0, 0); endShape(CLOSE);

Uses bezier curves to create an organic feather silhouette inside the cage

translate(-50, -50, 100); // Position birdcage on a table/pedestal
Places the birdcage to the left-front of the room, elevated (-50 Y relative to the +50 offset from draw())
rotateY(PI / 6); // Slightly angled
Rotates the cage 30° so you see it from a corner angle rather than head-on
specularMaterial(255, 200, 0); // Gilded gold color
Sets the reflective highlight color to golden yellow, making the cage appear shiny like polished brass or gold
shininess(100); // Make it shiny
100 is quite shiny; the highlight will be bright and focused, like polished metal
torus(40, 5, 24, 16);
A torus (donut shape) with major radius 40 (distance from center to tube center) and minor radius 5 (tube thickness), creating a smooth ring
for (let i = 0; i < 12; i++) {
Loops 12 times to create 12 bars evenly distributed around the cage
rotateY(i * TWO_PI / 12);
Rotates each bar: TWO_PI / 12 = 30°, so each iteration rotates 30° more around the Y-axis, distributing bars evenly
translate(40, -45, 0);
Moves each bar outward (X=40) and up (-45 Y) so it connects the two rings
beginShape(); vertex(-20, 0, 0); bezierVertex(-15, -15, 15, -15, 20, 0, 0); bezierVertex(15, 15, -15, 15, -20, 0, 0); endShape(CLOSE);
Draws a feather using bezier curves: starts at the left (-20,0), curves up and right using control points, then curves back down, creating an organic leaf shape

drawComputer()

drawComputer() builds a practical office setup from simple shapes. The monitor, keyboard, and mouse are each positioned relative to each other using translate. The dusty appearance comes from desaturated colors and low shininess, suggesting neglect. The transparent dust cloud is a creative use of transparency to add atmospheric detail without obscuring the objects.

function drawComputer() {
  push();
  translate(150, 0, 150); // Position computer in a corner
  rotateY(-PI / 4); // Angle it

  // Monitor
  fill(100); // Dark grey for monitor casing
  box(120, 90, 20); // Monitor casing
  push();
  translate(0, 0, 11);
  fill(40); // Darker grey for screen
  plane(110, 80); // Screen
  pop();

  // Stand (simplified)
  push();
  translate(0, 50, 0);
  cylinder(10, 50);
  pop();

  // Keyboard (dusty, slightly desaturated)
  push();
  translate(-40, 30, 60);
  fill(80, 75, 70); // Desaturated dark grey
  shininess(5); // Less shiny
  box(80, 10, 40);
  pop();

  // Mouse (dusty)
  push();
  translate(40, 30, 60);
  fill(80, 75, 70);
  shininess(5);
  sphere(10);
  pop();

  // Apply a subtle fill for dust cloud, using a box for volumetric effect
  fill(255, 250, 240, 50); // Very slight off-white transparency, direct fill
  box(150, 100, 150); // A "dust cloud" box over the computer
  pop();
}
Line-by-line explanation (6 lines)

🔧 Subcomponents:

geometry Monitor Casing and Screen box(120, 90, 20); // Monitor casing push(); translate(0, 0, 11); fill(40); plane(110, 80);

Creates the monitor's bezel and slightly inset screen display

geometry Monitor Stand push(); translate(0, 50, 0); cylinder(10, 50);

Supports the monitor with a cylindrical pedestal

geometry Keyboard push(); translate(-40, 30, 60); fill(80, 75, 70); shininess(5); box(80, 10, 40);

Represents a dusty keyboard in front of the monitor

geometry Mouse push(); translate(40, 30, 60); fill(80, 75, 70); shininess(5); sphere(10);

A dusty spherical mouse next to the keyboard

geometry Dust Cloud Volumetric Effect fill(255, 250, 240, 50); box(150, 100, 150);

Creates a subtle semi-transparent haze over the computer, suggesting neglect and dust accumulation

translate(150, 0, 150); // Position computer in a corner
Places the computer at the right-front corner of the room
rotateY(-PI / 4); // Angle it
Rotates 45° so the monitor faces partially toward the viewer rather than straight ahead
translate(0, 0, 11);
Moves the screen plane slightly forward (Z=11) so it sits on the monitor surface without Z-fighting
fill(80, 75, 70); // Desaturated dark grey
A muted grey with equal RGB values (roughly equal amounts of red, green, blue), making it look dusty and worn
shininess(5); // Less shiny
Very low shininess (5) means the dust-covered surface reflects almost no sharp highlights; it looks matte and neglected
fill(255, 250, 240, 50); // Very slight off-white transparency
Off-white with alpha 50 (half transparent) creates a subtle, almost invisible dust layer

drawLaboratoryElements()

drawLaboratoryElements() combines three design eras (Victorian, futuristic, modern) in one space, creating visual interest and storytelling. The semi-transparent beakers with glossy material appear to contain liquid. The emissive panel glows without external light. The potted plant adds a living, humanizing touch to a technical laboratory. This function demonstrates material variety: wood (matte), glass (glossy), and emissive materials (self-illuminating).

function drawLaboratoryElements() {
  push();
  translate(-150, -20, -250); // Position lab elements against the back-left wall

  // Victorian elements: wooden desk, beakers
  push();
  translate(-100, 0, 0);
  fill(90, 80, 70); // Dark wood desk
  box(200, 20, 100); // Desk tabletop
  push();
  translate(0, 50, 0);
  cylinder(5, 100); // Desk legs
  translate(80, 0, 40);
  cylinder(5, 100);
  translate(-160, 0, 0);
  cylinder(5, 100);
  pop();

  // Glass beakers
  push();
  translate(0, -30, 0);
  fill(180, 200, 255, 100); // Semi-transparent blue for liquid
  specularMaterial(200, 200, 255); // Glossy glass
  shininess(80);
  cylinder(20, 60); // Beaker
  translate(40, 0, 0);
  cylinder(15, 50); // Smaller beaker
  translate(40, 0, 0);
  sphere(15); // Round flask
  pop();
  pop();

  // Futuristic elements: glowing panel, energy tube
  push();
  translate(100, -30, 0);
  fill(0, 255, 255); // Cyan glow
  emissiveMaterial(0, 255, 255); // Emissive for glowing effect
  shininess(0); // No shine
  box(100, 5, 50); // Glowing panel
  push();
  translate(0, -30, 0);
  rotateZ(PI / 6);
  cylinder(5, 80); // Energy tube
  pop();
  pop();

  // Modern elements: sleek monitor, plant
  push();
  translate(0, -30, 50); // Position in front of Victorian desk
  fill(50); // Dark grey for modern monitor
  specularMaterial(100);
  shininess(50);
  box(80, 60, 10); // Modern monitor
  push();
  translate(0, 0, 6);
  fill(0, 100, 255); // Blue for screen display
  plane(70, 50);
  pop();

  // Small potted plant (modern touch)
  push();
  translate(50, 30, 0);
  fill(120, 80, 50); // Brown pot
  cylinder(10, 20);
  fill(50, 150, 50); // Green leaves
  sphere(15);
  pop();
  pop();

  pop();
}
Line-by-line explanation (7 lines)

🔧 Subcomponents:

geometry Victorian Wooden Desk push(); translate(-100, 0, 0); fill(90, 80, 70); box(200, 20, 100);

Creates a dark wood desk surface as the centerpiece of the Victorian laboratory area

geometry Glass Laboratory Beakers fill(180, 200, 255, 100); specularMaterial(200, 200, 255); shininess(80); cylinder(20, 60); translate(40, 0, 0); cylinder(15, 50); translate(40, 0, 0); sphere(15);

Creates three glassware items with transparent blue liquid and high shine to simulate glass

geometry Glowing Futuristic Panel fill(0, 255, 255); emissiveMaterial(0, 255, 255); shininess(0); box(100, 5, 50);

Creates a self-luminous cyan panel suggesting advanced technology

geometry Modern Monitor with Plant fill(50); specularMaterial(100); shininess(50); box(80, 60, 10);

Represents a contemporary sleek monitor next to a potted plant

translate(-150, -20, -250); // Position lab elements against the back-left wall
Places the entire laboratory setup in the back-left corner of the room
fill(90, 80, 70); // Dark wood desk
Sets a muted brown color suggesting antique wood
fill(180, 200, 255, 100); // Semi-transparent blue for liquid
Light blue with alpha=100 (half transparent) makes the beakers appear to contain liquid you can partially see through
specularMaterial(200, 200, 255); // Glossy glass
Nearly white specularity reflects light as a bright blue tint, appropriate for glass with blue liquid inside
shininess(80);
High shininess (80) creates sharp, bright highlights, making the glass look polished and reflective
emissiveMaterial(0, 255, 255); // Emissive for glowing effect
Bright cyan emissive material makes the panel glow from within, independent of lighting
shininess(0); // No shine
0 shininess means no reflection highlight; the glow is purely emissive, not reflective

drawTrapdoor()

drawTrapdoor() creates an intricate sci-fi access panel embedded in the floor. It combines structural elements (panels and locks) with interactive-looking components (scanner and keypad) and decorative touches (emissive lines). The repetition of locks and decorative bars is achieved through loops, demonstrating how loops create complex structures efficiently. The mix of materials (matte metal, glowing cyan, emissive decorations) makes the trapdoor visually compelling and mysterious.

🔬 The code manually creates locks in all four corners. What if you converted this to a loop that places locks at all four corners automatically? Try writing a for-loop that iterates through corner positions.

  // Mechanical locks (4 corners)
  fill(80);
  specularMaterial(120);
  shininess(20);
  let lockSize = 15;
  let lockOffset = 60;
  // Top-left
  push();
  translate(-lockOffset, -lockOffset, 7);
  cylinder(5, lockSize);
  translate(0, lockSize/2 + 2, 0);
  box(lockSize, 4, lockSize);
  pop();
function drawTrapdoor() {
  push();
  translate(0, 51, 0); // Position slightly above the floor to prevent Z-fighting
  rotateX(PI / 2); // Make it horizontal
  // Main trapdoor panel
  fill(50, 55, 60); // Dark, reinforced metal look
  specularMaterial(150);
  shininess(30);
  box(200, 200, 5); // Large square panel, very thin

  // Central hatch
  push();
  translate(0, 0, 3); // Slightly raised from the main panel
  fill(40, 45, 50);
  box(160, 160, 2); // Smaller hatch panel
  pop();

  // Biometric scanner (glowing sphere)
  push();
  translate(-70, -70, 7); // Position on the hatch
  emissiveMaterial(0, 200, 255); // Cyan glow
  sphere(10);
  pop();

  // Keypad
  push();
  translate(70, -70, 7); // Position on the hatch
  fill(70);
  box(40, 60, 3); // Keypad base
  // Buttons (simplified)
  fill(100);
  for (let i = 0; i < 10; i++) {
    push();
    let row = floor(i / 3);
    let col = i % 3;
    if (i === 9) { // 0 button at the bottom center
      translate(0, 20, 2);
    } else {
      translate(-10 + col * 10, -20 + row * 10, 2);
    }
    box(8, 8, 1);
    pop();
  }
  pop();

  // Mechanical locks (4 corners)
  fill(80);
  specularMaterial(120);
  shininess(20);
  let lockSize = 15;
  let lockOffset = 60;
  // Top-left
  push();
  translate(-lockOffset, -lockOffset, 7);
  cylinder(5, lockSize);
  translate(0, lockSize/2 + 2, 0);
  box(lockSize, 4, lockSize);
  pop();
  // Top-right
  push();
  translate(lockOffset, -lockOffset, 7);
  cylinder(5, lockSize);
  translate(0, lockSize/2 + 2, 0);
  box(lockSize, 4, lockSize);
  pop();
  // Bottom-left
  push();
  translate(-lockOffset, lockOffset, 7);
  cylinder(5, lockSize);
  translate(0, lockSize/2 + 2, 0);
  box(lockSize, 4, lockSize);
  pop();
  // Bottom-right
  push();
  translate(lockOffset, lockOffset, 7);
  cylinder(5, lockSize);
  translate(0, lockSize/2 + 2, 0);
  box(lockSize, 4, lockSize);
  pop();

  // Intricate decorative lines (emissive for effect)
  push();
  emissiveMaterial(100, 100, 100); // Subtle white glow
  translate(0, 0, 7);
  for (let i = 0; i < 4; i++) {
    push();
    rotateZ(i * PI / 2);
    translate(75, 0, 0);
    box(10, 2, 2);
    translate(0, 5, 0);
    box(10, 2, 2);
    translate(0, -10, 0);
    box(10, 2, 2);
    pop();
  }
  pop();

  pop();
}
Line-by-line explanation (6 lines)

🔧 Subcomponents:

geometry Main Trapdoor Panel box(200, 200, 5);

The large metal base of the trapdoor

geometry Central Hatch push(); translate(0, 0, 3); fill(40, 45, 50); box(160, 160, 2);

A smaller raised panel in the center

geometry Glowing Biometric Scanner push(); translate(-70, -70, 7); emissiveMaterial(0, 200, 255); sphere(10);

A cyan glowing sphere representing a sci-fi scanner

geometry Keypad with Buttons fill(70); box(40, 60, 3); fill(100); for (let i = 0; i < 10; i++) { ... box(8, 8, 1); ... }

A security keypad with 10 buttons in 3-3-3-1 layout

geometry Four Corner Locks for (let corner = 0; corner < 4; corner++) { ... cylinder(...); box(...); ... }

Places heavy cylindrical locks at each corner

for-loop Decorative Emissive Lines for (let i = 0; i < 4; i++) { ... box(...); box(...); box(...); ... }

Four sets of glowing decorative bars arranged in cross patterns

translate(0, 51, 0); // Position slightly above the floor to prevent Z-fighting
Places the trapdoor slightly above Y=50 (floor level) so it doesn't visually conflict with the floor plane
rotateX(PI / 2); // Make it horizontal
Rotates 90° so the box becomes a horizontal platform instead of a vertical wall
emissiveMaterial(0, 200, 255); // Cyan glow
Makes the biometric scanner emit bright cyan light, suggesting active technology
let row = floor(i / 3);
Calculates which row (0, 1, 2, or special) the button belongs to by dividing button index by 3
let col = i % 3;
Calculates which column (0, 1, or 2) the button is in using modulo (remainder after division)
if (i === 9) { translate(0, 20, 2); } else { translate(-10 + col * 10, -20 + row * 10, 2); }
Special handling: buttons 0–8 are in a 3×3 grid; button 9 (0) is placed at the bottom center

drawLivedInDetails()

drawLivedInDetails() fills the room with narrative elements that suggest a real person inhabits and uses the space. The side table with teacup and reading lamp creates a cozy corner. The notebook and pen on the lab desk suggest active work. The wall art and globe add intellectual flavor. Wall-mounted decor is tilted slightly for realism. The reading lamp's point light contributes to the overall warm, intimate lighting. Each object is small but meaningful, transforming the space from sterile to lived-in.

function drawLivedInDetails() {
  push();
  // Side table next to comfy chair
  push();
  translate(-150, 0, 150); // Positioned further back and to the right of the chair
  rotateY(PI / 4); // Angled differently for a better fit
  fill(90, 80, 70); // Dark wood
  box(60, 40, 60); // Tabletop
  translate(0, 30, 0);
  cylinder(10, 60); // Leg
  pop();

  // Reading lamp on side table
  push();
  translate(-150, -40, 150); // On side table
  rotateY(PI / 4); // Same angle as table
  fill(180, 170, 160); // Metal
  cylinder(5, 50); // Stem
  translate(0, -30, 0);
  fill(255, 240, 220); // Shade interior
  cone(20, 30); // Shade
  // CRITICAL FIX: Add a pointLight here to cast light
  pointLight(255, 240, 220, 0, -30, 0); // Light source at the bulb's position
  // Removed emissiveMaterial from the sphere as pointLight will illuminate it
  fill(255, 240, 220); // Bulb color
  sphere(10); // Light bulb
  pop();

  // Teacup on side table
  push();
  translate(-150, -10, 150); // On side table
  rotateY(PI / 4); // Same angle as table
  fill(240); // White porcelain
  cylinder(15, 20); // Cup body
  translate(20, 0, 0);
  sphere(5); // Handle (simplified)
  pop();

  // Rug
  push();
  translate(0, 5, 0); // Slightly above floor to prevent Z-fighting
  rotateX(PI / 2);
  fill(120, 60, 60); // Deep red pattern
  shininess(10);
  specularMaterial(100);
  plane(300, 300);
  pop();

  // Notebook and pen on laboratory desk
  push();
  translate(-250, -10, -250); // On lab desk
  rotateY(PI / 6);
  fill(150, 140, 130); // Grey notebook
  box(50, 5, 70);
  translate(0, 5, 0);
  fill(30); // Pen
  cylinder(2, 40);
  rotateX(PI / 2);
  translate(0, 0, 20);
  cone(3, 10); // Pen tip
  pop();

  // Wall decor (painting)
  push();
  translate(200, -150, -398); // On back wall, slightly forward
  rotateZ(PI / 60); // Slightly askew
  fill(120, 100, 80); // Frame
  box(100, 120, 5);
  translate(0, 0, 3);
  fill(180, 200, 180); // Painting itself (placeholder)
  plane(80, 100);
  pop();

  // Wall decor (scientific diagram)
  push();
  translate(-200, -150, -398); // On back wall, opposite painting
  rotateZ(-PI / 60); // Slightly askew
  fill(150, 140, 120); // Frame
  box(90, 110, 5);
  translate(0, 0, 3);
  fill(230, 220, 200); // Diagram paper
  plane(70, 90);
  // Simple diagram lines
  stroke(50);
  strokeWeight(2);
  line(-30, -30, 30, 30);
  line(-30, 30, 30, -30);
  pop();

  // Small antique globe on laboratory desk
  push();
  translate(-120, -10, -280); // On lab desk, slightly to the right of the notebook
  fill(100, 150, 200); // Blue for water
  sphere(20);
  push();
  rotateX(PI / 2);
  fill(100, 80, 60); // Brown for stand
  cylinder(5, 50);
  pop();
  pop();

  pop();
}
Line-by-line explanation (8 lines)

🔧 Subcomponents:

geometry Side Table fill(90, 80, 70); box(60, 40, 60); translate(0, 30, 0); cylinder(10, 60);

Creates a small dark wood table next to the armchair

geometry Reading Lamp with Point Light fill(180, 170, 160); cylinder(5, 50); translate(0, -30, 0); fill(255, 240, 220); cone(20, 30); pointLight(255, 240, 220, 0, -30, 0); fill(255, 240, 220); sphere(10);

Creates a desk lamp with a warm point light that illuminates nearby objects

geometry Teacup fill(240); cylinder(15, 20); translate(20, 0, 0); sphere(5);

A white porcelain cup with handle on the side table

geometry Room Rug fill(120, 60, 60); shininess(10); specularMaterial(100); plane(300, 300);

A large deep red rug covering much of the floor

geometry Notebook and Pen fill(150, 140, 130); box(50, 5, 70); translate(0, 5, 0); fill(30); cylinder(2, 40); rotateX(PI / 2); translate(0, 0, 20); cone(3, 10);

Writing instruments on the lab desk suggesting active use

geometry Wall Decor: Painting and Diagram fill(120, 100, 80); box(100, 120, 5); translate(0, 0, 3); fill(180, 200, 180); plane(80, 100);

Framed artwork and scientific diagrams on the back wall

geometry Antique Globe fill(100, 150, 200); sphere(20); push(); rotateX(PI / 2); fill(100, 80, 60); cylinder(5, 50);

A globe on the lab desk suggesting intellectual curiosity

translate(-150, 0, 150); // Positioned further back and to the right of the chair
Places the side table next to the armchair, forming a cozy reading nook
pointLight(255, 240, 220, 0, -30, 0); // Light source at the bulb's position
Creates a warm yellow-white light source from the lamp, which will illuminate nearby objects in the scene
fill(240); // White porcelain
Very bright fill (240 out of 255) gives the cup a clean, pure white appearance
fill(120, 60, 60); // Deep red pattern
A warm burgundy red emphasizing the red channel much more than green/blue, creating a rich, oriental-rug appearance
fill(150, 140, 130); // Grey notebook
Slightly warmer grey (more red than blue) suggests aged paper or a beige cover
cone(3, 10); // Pen tip
A small cone represents the ballpoint tip of the pen, giving it detail
rotateZ(PI / 60); // Slightly askew
Rotates the painting 3° to suggest it's hung naturally, not perfectly straight—a lived-in detail
line(-30, -30, 30, 30);
Draws a diagonal line on the diagram frame, creating a simple X pattern

drawFireplace()

drawFireplace() adds warmth and ambiance to the room—both visually and literally through its point light. The flickering animation uses sin() and frameCount to create organic, lifelike motion rather than mechanical patterns. The fireColor object is created once and modified with setAlpha(), demonstrating how color objects can be tweaked dynamically. The fireplace is positioned against the back wall and emits warm orange light that blends with the directional lighting to create a cozy scene. This is a masterclass in using lighting, animation, and positioning to create atmosphere.

🔬 The fire uses sin(frameCount * 0.1) to create a smooth, continuous flicker. What happens if you change the range in map() from (0.8, 1.2) to (0.5, 1.5)? How does the intensity of the flicker change?

  let fireColor = color(255, 100, 0); // Base orange fire color
  let flickerIntensity = map(sin(frameCount * 0.1), -1, 1, 0.8, 1.2); // Subtle flicker
  fireColor.setAlpha(150 * flickerIntensity); // Apply flicker to transparency
  fill(fireColor);
function drawFireplace() {
  push();
  translate(300, -70, -398); // Against the right wall, slightly forward to avoid Z-fighting
  rotateY(-PI / 2); // Rotate to face the room

  // Main mantelpiece structure
  fill(120, 110, 100); // Grey stone/marble
  box(180, 140, 40); // Base and sides

  // Mantel top
  push();
  translate(0, -70, 0);
  box(200, 10, 50);
  pop();

  // Firebox opening
  push();
  translate(0, 10, 22); // Slightly recessed
  fill(30); // Dark interior
  box(120, 100, 10);
  pop();

  // Firebox interior (glowing embers)
  push();
  translate(0, 20, 18); // Further recessed
  let fireColor = color(255, 100, 0); // Base orange fire color
  let flickerIntensity = map(sin(frameCount * 0.1), -1, 1, 0.8, 1.2); // Subtle flicker
  fireColor.setAlpha(150 * flickerIntensity); // Apply flicker to transparency
  fill(fireColor); // Use direct fill for embers
  // CRITICAL FIX: Add a pointLight here to cast light from the fireplace
  pointLight(255, 100, 0, 0, 20, 18); // Light source at the embers' position
  // Removed emissiveMaterial from the box as pointLight will illuminate it
  box(100, 80, 10);
  pop();

  pop();
}
Line-by-line explanation (7 lines)

🔧 Subcomponents:

geometry Fireplace Mantel fill(120, 110, 100); box(180, 140, 40);

Creates the main body of the fireplace structure

geometry Mantel Top Shelf push(); translate(0, -70, 0); box(200, 10, 50);

Adds a horizontal shelf on top of the mantel for decoration

geometry Firebox Opening push(); translate(0, 10, 22); fill(30); box(120, 100, 10);

Creates the dark rectangular opening of the fireplace

geometry Glowing Embers with Animation let fireColor = color(255, 100, 0); let flickerIntensity = map(sin(frameCount * 0.1), -1, 1, 0.8, 1.2); fireColor.setAlpha(150 * flickerIntensity); fill(fireColor); pointLight(255, 100, 0, 0, 20, 18); box(100, 80, 10);

Creates an animated, glowing representation of fire with flickering intensity

translate(300, -70, -398); // Against the right wall, slightly forward to avoid Z-fighting
Places the fireplace on the right side of the room, against the back wall, with a small Z offset to prevent visual artifacts
rotateY(-PI / 2); // Rotate to face the room
Rotates 90° counterclockwise (from above) so the fireplace front faces into the room
fill(120, 110, 100); // Grey stone/marble
Neutral grey stone color suggests a classical, elegant fireplace
let fireColor = color(255, 100, 0); // Base orange fire color
Creates an orange color object that will be modified with flicker animation
let flickerIntensity = map(sin(frameCount * 0.1), -1, 1, 0.8, 1.2);
Uses sin(frameCount * 0.1) to create a smooth oscillation that repeats every 63 frames; maps the result (-1 to 1) to (0.8 to 1.2) so the fire brightness pulses subtly
fireColor.setAlpha(150 * flickerIntensity);
Applies the flicker to the alpha (transparency): at min flicker (0.8), alpha = 120; at max (1.2), alpha = 180, creating a breathing effect
pointLight(255, 100, 0, 0, 20, 18);
Emits an orange point light from the fireplace embers (0, 20, 18), illuminating nearby objects and the room with warm firelight

windowResized()

windowResized() is a built-in p5.js function called whenever the browser window is resized. For 3D scenes with perspective projection, it's important to re-call perspective() with the new width/height ratio to maintain correct proportions. Without this, the 3D view would stretch or squash when resizing.

function windowResized() {
  resizeCanvas(windowWidth, windowHeight);
  // Re-adjust camera perspective if needed
  perspective(PI / 3.0, width / height, 0.1, 1000);
}
Line-by-line explanation (2 lines)

🔧 Subcomponents:

function-call Canvas Resize resizeCanvas(windowWidth, windowHeight);

Updates the canvas to match the new window dimensions

function-call Perspective Update perspective(PI / 3.0, width / height, 0.1, 1000);

Recomputes the perspective projection with the new aspect ratio

resizeCanvas(windowWidth, windowHeight);
Expands or shrinks the canvas to fill the window whenever the browser window is resized
perspective(PI / 3.0, width / height, 0.1, 1000);
Recalculates the camera's perspective matrix with the updated aspect ratio (width / height) so the 3D view doesn't become distorted

📦 Key Variables

cam object

The p5.Camera object that controls the viewer's position and direction in the 3D room—allows first-person pan, tilt, and zoom

let cam = createCamera();
rotX number

Stores horizontal rotation (pan) of the camera—currently unused as camera control is done via cam.pan()

let rotX = 0;
rotY number

Stores vertical rotation (tilt) of the camera—currently unused as camera control is done via cam.tilt()

let rotY = 0;
zoomLevel number

Controls the camera's distance from the origin (100–800 pixels)—higher values move the camera farther away (zoom out)

let zoomLevel = 300;
wallThickness number

Defines how thick the room's walls are in 3D space—affects visual solidity of the enclosure

let wallThickness = 20;
wallHeight number

The vertical extent of all four walls—controls the perceived ceiling height

let wallHeight = 400;

🔧 Potential Improvements (6)

Here are some ways this code could be enhanced:

PERFORMANCE draw()

Lighting is recalculated every frame even though it never changes—wasteful for static lighting

💡 Move ambientLight() and the two directionalLight() calls to setup() where they run only once. If the lights should animate, keep them in draw() but consider caching the color values.

STYLE drawLaboratoryElements()

Multiple manual translate calls for desk legs create repetitive code

💡 Use a loop to place desk legs at four positions, reducing code duplication and making the desk easier to modify.

STYLE drawTrapdoor()

Four mechanical locks are created with nearly identical code, copied four times

💡 Convert the lock placement to a loop using trigonometry (cos/sin) to position locks at corners, reducing code to 1/4 its current length and making changes easier.

BUG touchMoved()

Uses pmouseX/pmouseY for touch input, but these are updated after touchMoved() is called, causing one-frame lag in touch responsiveness

💡 Store previous touch position explicitly: store touches[0].x and touches[0].y at the end of the function, then use those stored values for comparison in the next frame.

FEATURE draw()

No visual feedback that the scene is interactive or that camera control is possible

💡 Add a subtle on-screen instruction (using text()) in the top-left corner: 'Drag to look | Scroll to zoom'. Use the time-based fadeout to make it disappear after a few seconds of interaction.

PERFORMANCE drawFireplace()

Creates a new color object and recalculates sin() every frame even for static objects

💡 Move non-animating objects (mantel, firebox opening) out of the loop; only recalculate fireColor and flicker for the animated embers box.

🔄 Code Flow

Code flow showing setup, draw, mousedragged, touchmoved, mousewheel, drawroom, drawcomfychair, drawbirdcage, drawcomputer, drawlaboratoryelements, drawtrapdoor, drawlivednindetails, drawfireplace, windowresized

💡 Click on function names in the diagram to jump to their code

graph TD start[Start] --> setup[setup] setup --> webgl-canvas[WebGL Canvas Creation] setup --> perspective-setup[Perspective Camera Setup] setup --> camera-init[Camera Position and Direction] setup --> lighting-setup[Lighting Configuration] setup --> draw[draw loop] click setup href "#fn-setup" click webgl-canvas href "#sub-webgl-canvas" click perspective-setup href "#sub-perspective-setup" click camera-init href "#sub-camera-init" click lighting-setup href "#sub-lighting-setup" draw --> lighting-setup[Lighting Configuration] draw --> camera-update[Camera Position Update] draw --> rendering-calls[Object Rendering] rendering-calls --> drawroom[drawRoom] rendering-calls --> drawcomfychair[drawComfyChair] rendering-calls --> drawbirdcage[drawBirdcage] rendering-calls --> drawcomputer[drawComputer] rendering-calls --> drawlaboratoryelements[drawLaboratoryElements] rendering-calls --> drawtrapdoor[drawTrapdoor] rendering-calls --> drawlivednindetails[drawLivedInDetails] rendering-calls --> drawfireplace[drawFireplace] click draw href "#fn-draw" click camera-update href "#sub-camera-update" click rendering-calls href "#sub-rendering-calls" drawroom --> floor-drawing[Floor Plane] drawroom --> ceiling-drawing[Ceiling Plane] drawroom --> back-wall[Back Wall with Window] drawroom --> left-wall[Left Wall] drawroom --> right-wall[Right Wall] click drawroom href "#fn-drawroom" click floor-drawing href "#sub-floor-drawing" click ceiling-drawing href "#sub-ceiling-drawing" click back-wall href "#sub-back-wall" click left-wall href "#sub-left-wall" click right-wall href "#sub-right-wall" drawcomfychair --> seat-box[Seat Cushion] drawcomfychair --> backrest-assembly[Reclined Backrest] drawcomfychair --> armrest-left[Left Armrest] drawcomfychair --> legs-assembly[Four Chair Legs] click drawcomfychair href "#fn-drawcomfychair" click seat-box href "#sub-seat-box" click backrest-assembly href "#sub-backrest-assembly" click armrest-left href "#sub-armrest-left" click legs-assembly href "#sub-legs-assembly" drawbirdcage --> pedestal-table[Pedestal and Tabletop] drawbirdcage --> cage-rings[Top and Bottom Cage Rings] drawbirdcage --> cage-bars[Vertical Cage Bars] drawbirdcage --> feather-shape[Crow's Feather] click drawbirdcage href "#fn-drawbirdcage" click pedestal-table href "#sub-pedestal-table" click cage-rings href "#sub-cage-rings" click cage-bars href "#sub-cage-bars" click feather-shape href "#sub-feather-shape" drawcomputer --> monitor-casing[Monitor Casing and Screen] drawcomputer --> monitor-stand[Monitor Stand] drawcomputer --> keyboard-obj[Keyboard] drawcomputer --> mouse-obj[Mouse] drawcomputer --> dust-cloud[Dust Cloud Volumetric Effect] click drawcomputer href "#fn-drawcomputer" click monitor-casing href "#sub-monitor-casing" click monitor-stand href "#sub-monitor-stand" click keyboard-obj href "#sub-keyboard-obj" click mouse-obj href "#sub-mouse-obj" click dust-cloud href "#sub-dust-cloud" drawlaboratoryelements --> victorian-desk[Victorian Wooden Desk] drawlaboratoryelements --> glass-beakers[Glass Laboratory Beakers] drawlaboratoryelements --> futuristic-panel[Glowing Futuristic Panel] drawlaboratoryelements --> modern-monitor[Modern Monitor with Plant] click drawlaboratoryelements href "#fn-drawlaboratoryelements" click victorian-desk href "#sub-victorian-desk" click glass-beakers href "#sub-glass-beakers" click futuristic-panel href "#sub-futuristic-panel" click modern-monitor href "#sub-modern-monitor" drawtrapdoor --> main-panel[Main Trapdoor Panel] drawtrapdoor --> hatch-center[Central Hatch] drawtrapdoor --> biometric[Glowing Biometric Scanner] drawtrapdoor --> keypad-base[Keypad with Buttons] drawtrapdoor --> mechanical-locks[Four Corner Locks] drawtrapdoor --> decorative-lines[Decorative Emissive Lines] click drawtrapdoor href "#fn-drawtrapdoor" click main-panel href "#sub-main-panel" click hatch-center href "#sub-hatch-center" click biometric href "#sub-biometric" click keypad-base href "#sub-keypad-base" click mechanical-locks href "#sub-mechanical-locks" click decorative-lines href "#sub-decorative-lines" drawlivednindetails --> side-table[Side Table] drawlivednindetails --> reading-lamp[Reading Lamp with Point Light] drawlivednindetails --> teacup[Teacup] drawlivednindetails --> rug[Room Rug] drawlivednindetails --> notebook-pen[Notebook and Pen] drawlivednindetails --> paintings-diagrams[Wall Decor: Painting and Diagram] drawlivednindetails --> globe[Antique Globe] click drawlivednindetails href "#fn-drawlivednindetails" click side-table href "#sub-side-table" click reading-lamp href "#sub-reading-lamp" click teacup href "#sub-teacup" click rug href "#sub-rug" click notebook-pen href "#sub-notebook-pen" click paintings-diagrams href "#sub-paintings-diagrams" click globe href "#sub-globe" drawfireplace --> mantel-structure[Fireplace Mantel] drawfireplace --> mantel-top[Mantel Top Shelf] drawfireplace --> firebox-opening[Firebox Opening] drawfireplace --> glowing-embers[Glowing Embers with Animation] click drawfireplace href "#fn-drawfireplace" click mantel-structure href "#sub-mantel-structure" click mantel-top href "#sub-mantel-top" click firebox-opening href "#sub-firebox-opening" click glowing-embers href "#sub-glowing-embers" draw --> mousedragged[mouseDragged] draw --> touchmoved[touchMoved] draw --> mousewheel[mouseWheel] mousedragged --> horizontal-pan[Horizontal Camera Rotation] mousedragged --> vertical-tilt[Vertical Camera Rotation] click mousedragged href "#fn-mousedragged" click horizontal-pan href "#sub-horizontal-pan" click vertical-tilt href "#sub-vertical-tilt" touchmoved --> single-touch-check[Single Touch Validation] touchmoved --> touch-pan[Touch Horizontal Rotation] touchmoved --> touch-tilt[Touch Vertical Rotation] click touchmoved href "#fn-touchmoved" click single-touch-check href "#sub-single-touch-check" click touch-pan href "#sub-touch-pan" click touch-tilt href "#sub-touch-tilt" mousewheel --> zoom-adjustment[Zoom Level Update] mousewheel --> zoom-clamping[Zoom Limit Enforcement] click mousewheel href "#fn-mousewheel" click zoom-adjustment href "#sub-zoom-adjustment" click zoom-clamping href "#sub-zoom-clamping" windowresized --> canvas-resize[Canvas Resize] windowresized --> perspective-update[Perspective Update] click windowresized href "#fn-windowresized" click canvas-resize href "#sub-canvas-resize" click perspective-update href "#sub-perspective-update"

❓ Frequently Asked Questions

What visual elements can I expect to see in the Room sketch?

The sketch creates a cozy 3D room featuring a comfy chair, fireplace, computer, and lab gear, all illuminated with warm, dramatic lighting.

How do I interact with the Room sketch to explore the environment?

Users can click and drag the mouse to pan the camera, allowing for a first-person viewpoint exploration of the room.

What creative coding techniques are demonstrated in the Room sketch?

The sketch showcases 3D rendering in p5.js, camera manipulation for navigation, and dynamic lighting to enhance the atmosphere.

Preview

Room - p5.js creative coding sketch preview
Sketch Preview
Code flow diagram showing the structure of Room - Code flow showing setup, draw, mousedragged, touchmoved, mousewheel, drawroom, drawcomfychair, drawbirdcage, drawcomputer, drawlaboratoryelements, drawtrapdoor, drawlivednindetails, drawfireplace, windowresized
Code Flow Diagram