sensor ultrasonico

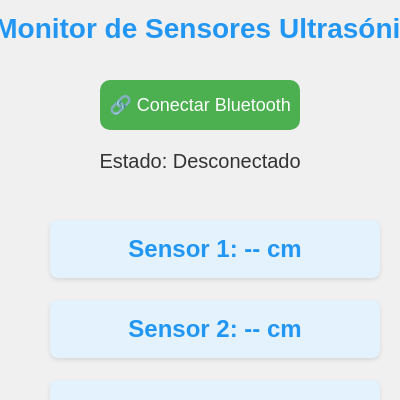
This sketch creates a real-time web dashboard that receives distance measurements from 4 ultrasonic sensors via Bluetooth (HC-05/HC-06 module connected to Arduino). The dashboard displays color-coded distance readings—green for far, yellow for medium, red for close—and manages the wireless connection state with a visual connection indicator.

🧪 Try This!

Experiment with the code by making these changes:

  1. Change the far distance threshold — Objects are only colored green when farther than 100cm; increase this to 150cm so green appears less often
  2. Add a fourth color zone — The current three zones (green/yellow/red) work well, but adding an orange zone for very far objects makes the feedback even clearer
  3. Add emoji to sensor displays — Display a distance emoji (📏, 🔍, 📡) next to each sensor reading to make it more visual
  4. Change button text for disconnect — When connected, the button shows '🔌 Desconectar'; customize this message
  5. Make the connection indicator bigger — The green dot is 15×15 pixels; increase it to 30×30 to make it more prominent when connected
Prefer the full editor? Open it there →

📖 About This Sketch

This sketch builds a live sensor monitoring dashboard that connects to Arduino hardware via Bluetooth wireless communication. Four ultrasonic distance sensors transmit their readings through an HC-05 or HC-06 Bluetooth module, and this web app receives and displays each measurement with color-coded backgrounds—green when objects are far (>100cm), yellow when medium (50-100cm), and red when close (<50cm). It demonstrates three major techniques: the Web Bluetooth API for wireless device communication, asynchronous JavaScript for handling connection events, and dynamic HTML element styling for real-time visual feedback.

The code is organized around two main flows: setup and draw handle the canvas and UI layout, while toggleBluetooth, connectBluetooth, and handleData manage the Bluetooth lifecycle. A critical piece is the buffer system that collects partial data packets and reassembles complete lines before parsing—this teaches how streaming data often arrives in chunks. By studying this sketch, you will learn how to bridge hardware sensors and web browsers, parse CSV formatted sensor data, and build responsive interfaces that react to changing conditions.

⚙️ How It Works

  1. When the sketch loads, setup() creates the canvas, constructs a styled connection button, displays a status label, and creates four distance display boxes—one for each sensor. These HTML elements use p5.js createDiv() and are styled with CSS properties for a polished dashboard appearance.
  2. The draw() function runs every frame, drawing a title and a small green indicator dot that appears only when Bluetooth is connected, providing instant visual feedback about connection state.
  3. When the user clicks the button, toggleBluetooth() determines whether to connect or disconnect. If disconnected, connectBluetooth() uses the Web Bluetooth API (navigator.bluetooth.requestDevice) to search for HC-05/HC-06 modules advertising the standard UART service UUID.
  4. Once a device is found and selected by the user, the sketch connects to its GATT server, retrieves the UART service and characteristic, and starts listening for notifications. Every time the Arduino sends data, handleData() is triggered automatically.
  5. handleData() receives incoming data as binary values, decodes it as UTF-8 text, and appends it to a buffer. Because Bluetooth packets may arrive incomplete or bundled together, the buffer splits on newlines and processes only complete lines, leaving partial data for the next packet.
  6. processLine() parses the CSV format (four comma-separated numbers like '45,120,78,95'), converts each to an integer, and stores it in the distances array. It then calls getColorForDistance() to determine the background color based on the measurement, updates the corresponding sensor label with the new reading and color, and displays the distance in centimeters.
  7. disconnect() breaks the Bluetooth connection, resets the UI to disconnected appearance, clears all sensor displays to dashes, and empties the buffer. windowResized() repositions all UI elements if the browser window changes size.

🎓 Concepts You'll Learn

Web Bluetooth APIAsynchronous programming (async/await)Data streaming and bufferingCSV parsingEvent listenersDOM manipulationConditional color coding

📝 Code Breakdown

setup()

setup() runs once when the page loads. It prepares all UI elements—button, status text, and sensor displays—by creating them and applying styles. Every element gets positioned near the center of the screen (width/2) and is pushed into arrays or stored as globals so they can be updated later in draw() or event handlers.

function setup() {
  createCanvas(windowWidth, windowHeight);
  textAlign(CENTER, CENTER);
  
  // Botón conectar
  connectBtn = createButton('🔗 Conectar Bluetooth');
  connectBtn.position(width/2 - 100, 80);
  connectBtn.size(200, 50);
  connectBtn.mousePressed(toggleBluetooth);
  connectBtn.style('font-size', '18px');
  connectBtn.style('border-radius', '10px');
  connectBtn.style('background-color', '#4CAF50');
  connectBtn.style('color', 'white');
  connectBtn.style('border', 'none');
  connectBtn.style('cursor', 'pointer');
  
  // Estado
  statusLabel = createDiv('Estado: Desconectado');
  statusLabel.position(width/2 - 150, 150);
  statusLabel.style('font-size', '20px');
  statusLabel.style('color', '#333');
  statusLabel.style('text-align', 'center');
  statusLabel.style('width', '300px');
  
  // Labels de distancias
  for (let i = 0; i < 4; i++) {
    let label = createDiv(`Sensor ${i+1}: -- cm`);
    label.position(width/2 - 150, 220 + i * 80);
    label.style('font-size', '24px');
    label.style('font-weight', 'bold');
    label.style('color', '#2196F3');
    label.style('background-color', '#E3F2FD');
    label.style('padding', '15px');
    label.style('border-radius', '8px');
    label.style('width', '300px');
    label.style('text-align', 'center');
    label.style('box-shadow', '0 2px 4px rgba(0,0,0,0.1)');
    distanceLabels.push(label);
  }
}
Line-by-line explanation (9 lines)

🔧 Subcomponents:

function-call Create Connect Button connectBtn = createButton('🔗 Conectar Bluetooth');

Creates an interactive button that will trigger toggleBluetooth() when clicked

loop Style Button Properties connectBtn.style('font-size', '18px');

Sets visual properties of the button (font size, colors, border, cursor)

function-call Create Status Label statusLabel = createDiv('Estado: Desconectado');

Displays current connection state and error messages to the user

for-loop Create Four Sensor Display Boxes for (let i = 0; i < 4; i++) {

Creates and styles four identical display boxes—one for each ultrasonic sensor

createCanvas(windowWidth, windowHeight);
Creates a canvas that fills the entire browser window; p5.js will draw the title and connection indicator here
textAlign(CENTER, CENTER);
Centers all text both horizontally and vertically, used for the title drawn in draw()
connectBtn = createButton('🔗 Conectar Bluetooth');
Creates a clickable button with Bluetooth emoji; mousePressed attaches toggleBluetooth() as its callback
connectBtn.position(width/2 - 100, 80);
Centers the button horizontally and places it 80 pixels from the top
connectBtn.mousePressed(toggleBluetooth);
When clicked, the button calls toggleBluetooth() to initiate or end Bluetooth connection
connectBtn.style('background-color', '#4CAF50');
Sets button background to green; will change to red (#f44336) after connection
statusLabel = createDiv('Estado: Desconectado');
Creates a text box that displays connection status and error messages; updates dynamically
for (let i = 0; i < 4; i++) {
Loops four times to create one display box for each of the four ultrasonic sensors
distanceLabels.push(label);
Adds each newly created sensor display to the distanceLabels array so it can be updated later
draw()

draw() runs 60 times per second (the animation loop). Since this sketch has no moving elements—only UI elements managed by p5.js's createDiv()—draw() mainly maintains the canvas background and draws the title and connection dot. The conditional 'if (connected)' creates a visual state machine: the green dot appears when connected, disappears when disconnected, giving the user instant feedback.

function draw() {
  background(240);
  
  // Título
  fill(33, 150, 243);
  textSize(28);
  textStyle(BOLD);
  text('📡 Monitor de Sensores Ultrasónicos', width/2, 30);
  
  // Indicador de conexión
  if (connected) {
    fill(76, 175, 80);
    noStroke();
    ellipse(width/2 - 180, 160, 15, 15);
  }
}
Line-by-line explanation (9 lines)

🔧 Subcomponents:

function-call Clear Background background(240);

Repaints the canvas with a light gray each frame, erasing the previous frame's content

calculation Draw Title Text text('📡 Monitor de Sensores Ultrasónicos', width/2, 30);

Displays the dashboard title centered at the top in blue and bold

conditional Draw Connection Indicator if (connected) {

Only draws the green connection dot when Bluetooth is actively connected

background(240);
Fills the canvas with light gray (240 in grayscale) each frame, clearing any previous drawings
fill(33, 150, 243);
Sets the color for all subsequent shapes to blue (RGB values); used for the title text
textSize(28);
Makes the title text large at 28 pixels tall
textStyle(BOLD);
Makes the title text bold/thick for emphasis
text('📡 Monitor de Sensores Ultrasónicos', width/2, 30);
Draws the title string centered horizontally (width/2) and 30 pixels from the top
if (connected) {
Only executes the next lines if the connected boolean is true, meaning Bluetooth is active
fill(76, 175, 80);
Changes fill color to green, used for the connection indicator dot
noStroke();
Removes the outline around shapes so the indicator dot is a solid green circle
ellipse(width/2 - 180, 160, 15, 15);
Draws a 15×15 pixel green circle to the left of the status label, indicating active connection

toggleBluetooth()

toggleBluetooth() is a dispatcher function bound to the button's click event. It checks the current connection state and routes to either disconnect() or connectBluetooth(). The 'async' keyword is required because connectBluetooth() uses 'await' to pause and wait for asynchronous Bluetooth operations to finish.

async function toggleBluetooth() {
  if (connected) {
    disconnect();
  } else {
    await connectBluetooth();
  }
}
Line-by-line explanation (3 lines)

🔧 Subcomponents:

conditional Connection State Check if (connected) {

Determines whether to disconnect an existing connection or initiate a new connection

async function toggleBluetooth() {
The 'async' keyword marks this function as asynchronous, allowing it to use 'await' for Web Bluetooth operations
if (connected) {
Checks the current connection state: if true, we're connected and should disconnect; if false, we should connect
await connectBluetooth();
The 'await' pauses this function until connectBluetooth() completes, waiting for the user to select a device and the connection to establish

connectBluetooth()

connectBluetooth() is the heart of the Web Bluetooth workflow: request a device, connect to its GATT server, retrieve the service and characteristic UUIDs specific to HC-05/HC-06, start listening for notifications, and attach an event listener. Each 'await' pauses the function until a Bluetooth operation completes. The try/catch block ensures errors are caught and reported to the user instead of crashing the app. This pattern is reusable for any Bluetooth device that supports the UART service.

🔬 This code asks the browser to show only HC-05/HC-06 devices in the picker. What happens if you remove the 'filters' line entirely? You'll see ALL Bluetooth devices—though only HC-05/HC-06 will work with this sketch. Try it in a browser that has multiple Bluetooth devices nearby.

    device = await navigator.bluetooth.requestDevice({
      filters: [
        { services: ['0000ffe0-0000-1000-8000-00805f9b34fb'] } // Servicio UART HC-05/HC-06
      ],
      optionalServices: ['0000ffe0-0000-1000-8000-00805f9b34fb']
    });
async function connectBluetooth() {
  try {
    console.log('Buscando dispositivos Bluetooth...');
    statusLabel.html('Estado: Buscando dispositivos...');
    
    // Solicitar dispositivo Bluetooth
    // IMPORTANTE: HC-05/HC-06 usa el servicio UART estándar
    device = await navigator.bluetooth.requestDevice({
      filters: [
        { services: ['0000ffe0-0000-1000-8000-00805f9b34fb'] } // Servicio UART HC-05/HC-06
      ],
      optionalServices: ['0000ffe0-0000-1000-8000-00805f9b34fb']
    });
    
    console.log('Dispositivo encontrado:', device.name);
    statusLabel.html(`Estado: Conectando a ${device.name}...`);
    
    // Conectar al servidor GATT
    const server = await device.gatt.connect();
    console.log('Conectado al servidor GATT');
    
    // Obtener servicio
    const service = await server.getPrimaryService('0000ffe0-0000-1000-8000-00805f9b34fb');
    
    // Obtener característica (UUID del HC-05/HC-06)
    characteristic = await service.getCharacteristic('0000ffe1-0000-1000-8000-00805f9b34fb');
    
    // Suscribirse a notificaciones
    await characteristic.startNotifications();
    characteristic.addEventListener('characteristicvaluechanged', handleData);
    
    connected = true;
    connectBtn.html('🔌 Desconectar');
    connectBtn.style('background-color', '#f44336');
    statusLabel.html(`Estado: Conectado a ${device.name}`);
    
    console.log('Listo para recibir datos');
    
  } catch (error) {
    console.error('Error de conexión:', error);
    statusLabel.html(`Estado: Error - ${error.message}`);
    
    // Mensaje de ayuda si no hay Web Bluetooth
    if (!navigator.bluetooth) {
      statusLabel.html('Estado: ⚠️ Tu navegador no soporta Web Bluetooth. Usa Chrome/Edge en Android.');
    }
  }
}
Line-by-line explanation (14 lines)

🔧 Subcomponents:

function-call Request Bluetooth Device device = await navigator.bluetooth.requestDevice({

Asks the browser to open a Bluetooth device picker dialog; only returns when the user selects a device

function-call Connect to GATT Server const server = await device.gatt.connect();

Establishes a connection to the device's GATT server, which exposes services and characteristics

function-call Get UART Service const service = await server.getPrimaryService('0000ffe0-0000-1000-8000-00805f9b34fb');

Retrieves the UART service UUID that HC-05/HC-06 modules use for serial communication

function-call Get UART Characteristic characteristic = await service.getCharacteristic('0000ffe1-0000-1000-8000-00805f9b34fb');

Retrieves the specific characteristic that will send and receive data

function-call Enable Notifications await characteristic.startNotifications();

Subscribes to data changes; the device will now push data whenever available

function-call Attach Event Listener characteristic.addEventListener('characteristicvaluechanged', handleData);

Registers handleData() as a callback; it will fire every time new data arrives from the Bluetooth device

conditional Error Handling } catch (error) {

Catches any connection failures and displays a helpful error message

async function connectBluetooth() {
An async function that handles all steps of Bluetooth connection
statusLabel.html('Estado: Buscando dispositivos...');
Updates the on-screen status text so the user knows the app is searching for devices
device = await navigator.bluetooth.requestDevice({
Pauses the function and opens the system Bluetooth picker dialog; only resumes when user selects a device
{ services: ['0000ffe0-0000-1000-8000-00805f9b34fb'] }
This UUID is the standard UART service that HC-05 and HC-06 Bluetooth modules advertise; filtering by this ensures only compatible devices appear
const server = await device.gatt.connect();
Connects to the device's GATT server; GATT is the protocol Bluetooth uses to expose data via services and characteristics
const service = await server.getPrimaryService('0000ffe0-0000-1000-8000-00805f9b34fb');
Retrieves the UART service object from the GATT server
characteristic = await service.getCharacteristic('0000ffe1-0000-1000-8000-00805f9b34fb');
Retrieves the data characteristic from the service; this is stored globally so handleData() and disconnect() can use it
await characteristic.startNotifications();
Enables push notifications so the browser automatically receives data when the device sends it
characteristic.addEventListener('characteristicvaluechanged', handleData);
Registers handleData() to fire automatically every time a notification arrives with new data
connected = true;
Sets the global connected flag to true; this causes draw() to show the green indicator dot and toggleBluetooth() to disconnect next click
connectBtn.html('🔌 Desconectar');
Changes the button text to indicate that clicking it will now disconnect
connectBtn.style('background-color', '#f44336');
Changes the button color to red to signal that a connection is active and can be terminated
} catch (error) {
Catches any error during connection (device picker cancelled, connection failed, etc.)
statusLabel.html(`Estado: Error - ${error.message}`);
Displays the error message on screen so the user knows what went wrong

handleData()

handleData() is called every time a Bluetooth notification arrives with new data. The critical insight here is the buffering pattern: Bluetooth packets don't align with line boundaries, so a single Bluetooth notification might contain half a line, multiple complete lines, or a line split across two notifications. By accumulating in a buffer and only processing complete lines (those ending in newline), you ensure CSV parsing always receives valid data. This pattern is essential for any streaming protocol in web development.

🔬 This is the core buffering logic: it assumes data ends with a newline, but what if your Arduino sends multiple lines in one packet or no newline at all? Add a console.log() to see what 'lines' contains. Try: console.log('Lines:', lines); right after the split(). This will help you debug if Arduino data isn't parsing correctly.

  // Buscar líneas completas (terminadas en \n)
  let lines = buffer.split('\n');
  
  // Procesar todas las líneas completas
  for (let i = 0; i < lines.length - 1; i++) {
    processLine(lines[i].trim());
  }
  
  // Guardar la línea incompleta en el buffer
  buffer = lines[lines.length - 1];
function handleData(event) {
  // Leer datos del buffer
  const value = event.target.value;
  const decoder = new TextDecoder('utf-8');
  const text = decoder.decode(value);
  
  // Agregar al buffer
  buffer += text;
  
  // Buscar líneas completas (terminadas en \n)
  let lines = buffer.split('\n');
  
  // Procesar todas las líneas completas
  for (let i = 0; i < lines.length - 1; i++) {
    processLine(lines[i].trim());
  }
  
  // Guardar la línea incompleta en el buffer
  buffer = lines[lines.length - 1];
}
Line-by-line explanation (8 lines)

🔧 Subcomponents:

function-call Decode Binary to Text const text = decoder.decode(value);

Converts binary data from Bluetooth into readable UTF-8 text

calculation Append to Buffer buffer += text;

Accumulates incoming text fragments so partial lines can be reassembled

function-call Split on Newlines let lines = buffer.split('\n');

Separates complete lines from incomplete ones using the newline character as a delimiter

for-loop Process Complete Lines for (let i = 0; i < lines.length - 1; i++) {

Iterates through all complete lines and calls processLine() for each one

const value = event.target.value;
Extracts the binary data that arrived from the Bluetooth device
const decoder = new TextDecoder('utf-8');
Creates a decoder that will convert binary bytes into UTF-8 text characters
const text = decoder.decode(value);
Converts the binary Bluetooth packet into human-readable text
buffer += text;
Appends the newly decoded text to the global buffer string, accumulating data until we have complete lines
let lines = buffer.split('\n');
Splits the buffer on newline characters to separate complete lines from any partial line at the end
for (let i = 0; i < lines.length - 1; i++) {
Loops through all complete lines (up to but NOT including the last element, which may be incomplete)
processLine(lines[i].trim());
Calls processLine() for each complete line after removing leading/trailing whitespace with trim()
buffer = lines[lines.length - 1];
Saves the last (potentially incomplete) line back into the buffer, ready to be combined with the next incoming packet

processLine()

processLine() is the parsing engine: it receives a complete line of CSV text and converts it into sensor readings displayed on screen. The function is defensive—it checks for empty lines, validates that we have 4 values, and ensures each value successfully converts to an integer. Only after all checks pass do we update the UI. This defensive coding pattern prevents crashes from malformed Arduino data and makes debugging easier.

function processLine(line) {
  if (line === '') return;
  
  console.log('Línea recibida:', line);
  
  // Parsear CSV: "d1,d2,d3,d4"
  let values = line.split(',');
  
  if (values.length >= 4) {
    for (let i = 0; i < 4; i++) {
      let dist = parseInt(values[i]);
      if (!isNaN(dist)) {
        distances[i] = dist;
        
        // Actualizar label con color según distancia
        let color = getColorForDistance(dist);
        distanceLabels[i].html(`Sensor ${i+1}: ${dist} cm`);
        distanceLabels[i].style('background-color', color);
      }
    }
  }
}
Line-by-line explanation (10 lines)

🔧 Subcomponents:

conditional Empty Line Check if (line === '') return;

Exits early if the line is blank, avoiding unnecessary parsing

function-call Split CSV Format let values = line.split(',');

Splits the comma-separated values into an array of four distance strings

conditional Data Validation if (values.length >= 4) {

Ensures we received at least 4 values before attempting to parse them

for-loop Parse Each Sensor Distance for (let i = 0; i < 4; i++) {

Loops through each of the four sensor readings

calculation Update Display and Color distanceLabels[i].html(`Sensor ${i+1}: ${dist} cm`);

Updates the on-screen display box with the new distance value

if (line === '') return;
If the line is empty, exit immediately—no need to process it
console.log('Línea recibida:', line);
Logs each line to the browser console for debugging; you can open DevTools (F12) to see incoming data
let values = line.split(',');
Splits the CSV string (e.g., '45,120,78,95') into an array of strings: ['45', '120', '78', '95']
if (values.length >= 4) {
Checks that we have at least 4 values before proceeding; prevents crashes if data is malformed
let dist = parseInt(values[i]);
Converts the string value (e.g., '45') to an integer (45) for calculation and comparison
if (!isNaN(dist)) {
Ensures the conversion succeeded; isNaN returns true if parseInt failed (e.g., if the string was 'abc')
distances[i] = dist;
Stores the distance in the global distances array for potential later use
let color = getColorForDistance(dist);
Calls getColorForDistance() to determine the background color (green/yellow/red) based on distance
distanceLabels[i].html(`Sensor ${i+1}: ${dist} cm`);
Updates the display box's text to show 'Sensor 1: 45 cm' etc. using template literals with backticks
distanceLabels[i].style('background-color', color);
Changes the display box's background color to the color returned by getColorForDistance()

getColorForDistance()

getColorForDistance() is a simple but powerful decision tree: it takes a single number and returns one of four colors based on thresholds. This is a common pattern in sensor apps—converting raw numbers into meaningful visual feedback. The thresholds (50, 100) are 'tunables' you should experiment with based on your sensor's range and your application's needs. Extending this function to add more color zones or integrate sound alerts is a natural next step.

function getColorForDistance(dist) {
  // Verde: > 100 cm (lejos)
  // Amarillo: 50-100 cm (medio)
  // Rojo: < 50 cm (cerca)
  if (dist > 100) return '#C8E6C9'; // Verde claro
  if (dist > 50) return '#FFF9C4';  // Amarillo claro
  return '#FFCDD2';                  // Rojo claro
}
Line-by-line explanation (4 lines)

🔧 Subcomponents:

conditional Far Distance Check if (dist > 100) return '#C8E6C9';

Returns light green for distances greater than 100cm (safe/far)

conditional Medium Distance Check if (dist > 50) return '#FFF9C4';

Returns light yellow for distances between 50-100cm (caution/medium)

calculation Close Distance Default return '#FFCDD2';

Returns light red for distances 50cm or less (alert/close)

function getColorForDistance(dist) {
Takes a single distance value and returns a hex color code representing danger level
if (dist > 100) return '#C8E6C9';
If distance is greater than 100cm, return light green—object is far away, no danger
if (dist > 50) return '#FFF9C4';
If distance is 50-100cm, return light yellow—object is getting closer, caution
return '#FFCDD2';
Otherwise (distance 50cm or less), return light red—object is very close, alert

disconnect()

disconnect() is the cleanup function called when the user clicks the button while connected. It reverses the state changes made in connectBluetooth(): it breaks the Bluetooth connection, resets all UI elements to their initial appearance, and clears the buffer. Notice it checks 'if (device && device.gatt.connected)' before calling disconnect—this defensive check prevents errors if disconnect() is called in an unexpected state. Always include these defensive checks when working with external hardware.

function disconnect() {
  if (device && device.gatt.connected) {
    device.gatt.disconnect();
  }
  
  connected = false;
  connectBtn.html('🔗 Conectar Bluetooth');
  connectBtn.style('background-color', '#4CAF50');
  statusLabel.html('Estado: Desconectado');
  
  for (let i = 0; i < 4; i++) {
    distanceLabels[i].html(`Sensor ${i+1}: -- cm`);
    distanceLabels[i].style('background-color', '#E3F2FD');
  }
  
  buffer = '';
  console.log('Desconectado');
}
Line-by-line explanation (10 lines)

🔧 Subcomponents:

conditional Break GATT Connection if (device && device.gatt.connected) {

Safely checks that a device exists and is connected before attempting to disconnect

calculation Reset Connection Flag connected = false;

Sets the global flag to false so the UI and toggleBluetooth() know we're disconnected

calculation Reset Button Appearance connectBtn.html('🔗 Conectar Bluetooth');

Changes button text and color back to the disconnected state

for-loop Reset All Sensor Displays for (let i = 0; i < 4; i++) {

Loops through all four sensor boxes and resets them to show dashes and default color

calculation Clear Data Buffer buffer = '';

Empties the buffer so any partial data from the disconnected session is discarded

if (device && device.gatt.connected) {
Checks two conditions: does the device exist, AND is it currently connected? Only disconnect if both are true
device.gatt.disconnect();
Breaks the Bluetooth connection; the device will no longer send notifications
connected = false;
Updates the global connection state so draw() will hide the green indicator and toggleBluetooth() will connect next time
connectBtn.html('🔗 Conectar Bluetooth');
Changes the button label back to 'Conectar' instead of 'Desconectar'
connectBtn.style('background-color', '#4CAF50');
Changes the button color back to green to indicate it's ready to make a new connection
statusLabel.html('Estado: Desconectado');
Updates the status text on screen to show we're no longer connected
for (let i = 0; i < 4; i++) {
Loops through all four sensor display boxes to reset them
distanceLabels[i].html(`Sensor ${i+1}: -- cm`);
Replaces the distance number with dashes (--) to indicate no data
distanceLabels[i].style('background-color', '#E3F2FD');
Resets the background color to the default light blue, removing any green/yellow/red warning colors
buffer = '';
Clears the data buffer so any partial lines from before disconnection are discarded

windowResized()

windowResized() is a p5.js lifecycle function that fires automatically whenever the browser window is resized. Without it, all the UI elements would stay in their original positions and become misaligned. By recalculating positions using width/2 and windowWidth/windowHeight, we keep all elements centered and responsive. This is essential for modern web apps that need to work on phones (portrait), tablets (landscape), and desktops (various sizes).

function windowResized() {
  resizeCanvas(windowWidth, windowHeight);
  
  // Reposicionar elementos
  connectBtn.position(width/2 - 100, 80);
  statusLabel.position(width/2 - 150, 150);
  
  for (let i = 0; i < 4; i++) {
    distanceLabels[i].position(width/2 - 150, 220 + i * 80);
  }
}
Line-by-line explanation (6 lines)

🔧 Subcomponents:

function-call Resize Canvas resizeCanvas(windowWidth, windowHeight);

Stretches the p5.js canvas to match the browser window's new dimensions

calculation Reposition Button connectBtn.position(width/2 - 100, 80);

Moves the button to stay centered horizontally after window resize

for-loop Reposition Sensor Boxes for (let i = 0; i < 4; i++) {

Loops through all sensor boxes and repositions them to stay centered

function windowResized() {
A special p5.js function that p5 automatically calls whenever the browser window is resized
resizeCanvas(windowWidth, windowHeight);
Stretches the p5.js canvas to fill the new window size
connectBtn.position(width/2 - 100, 80);
Recalculates the button position to keep it centered horizontally in the new window width
statusLabel.position(width/2 - 150, 150);
Recalculates the status label position to keep it centered
for (let i = 0; i < 4; i++) {
Loops through all four sensor display boxes
distanceLabels[i].position(width/2 - 150, 220 + i * 80);
Recalculates each sensor box position to keep it centered and properly spaced

📦 Key Variables

device object

Stores the Bluetooth device object returned by navigator.bluetooth.requestDevice(); used to access the GATT server and connection state

let device;
characteristic object

Stores the UART characteristic object that delivers data notifications from the Bluetooth device

let characteristic;
connected boolean

Tracks whether Bluetooth is currently connected (true) or disconnected (false); controls UI appearance and button behavior

let connected = false;
distances array

An array of four numbers storing the most recent distance readings from sensors 1-4; updated whenever new CSV data arrives

let distances = [0, 0, 0, 0];
buffer string

Accumulates incoming Bluetooth data fragments; reassembles complete lines since packets may arrive incomplete or bundled

let buffer = '';
connectBtn object

Stores the p5.js button element; used to change its text and color based on connection state

let connectBtn;
statusLabel object

Stores the p5.js text label that displays connection status and error messages to the user

let statusLabel;
distanceLabels array

An array of four p5.js div elements, one for each sensor; updated to display distances and change color based on proximity

let distanceLabels = [];

🔧 Potential Improvements (6)

Here are some ways this code could be enhanced:

BUG connectBluetooth()

If the user cancels the device picker dialog, the 'cancelled' error is caught but not specifically handled, making it unclear that the user cancelled vs. a real connection error

💡 Add a check: catch (error) { if (error.name === 'NotFoundError') { statusLabel.html('Cancelled'); } else { /* handle real error */ } }

PERFORMANCE handleData()

Every incoming Bluetooth packet (even if it contains no newlines) is stored in the global buffer variable, which grows unbounded if packets arrive without newlines or if the Arduino stops sending complete lines

💡 Add a buffer size limit: if (buffer.length > 1000) buffer = ''; to prevent memory leaks in long-running sessions

STYLE processLine()

The CSV format is hardcoded to expect exactly 4 sensors; if you add a fifth sensor, the code doesn't scale automatically

💡 Use values.forEach((val, i) => { ... }) instead of a fixed loop, or store the sensor count as a constant: const NUM_SENSORS = 4;

FEATURE handleData()

Malformed or out-of-range readings (e.g., distance > 400cm or negative) are accepted and displayed without validation or warning

💡 Add range checking in processLine(): if (dist < 0 || dist > 400) { console.warn('Out of range'); return; } to reject impossible readings

BUG disconnect()

The characteristicvaluechanged event listener attached in connectBluetooth() is never removed, so if the user reconnects, handleData() may fire twice

💡 In disconnect(), add: characteristic.removeEventListener('characteristicvaluechanged', handleData); before breaking the connection

STYLE setup()

Color values are hardcoded throughout the sketch (#4CAF50, #f44336, #2196F3, etc.); if you want to rebrand, you must find and change each one

💡 Define color constants at the top: const COLOR_CONNECTED = '#4CAF50'; const COLOR_DISCONNECTED = '#f44336'; and reuse them

🔄 Code Flow

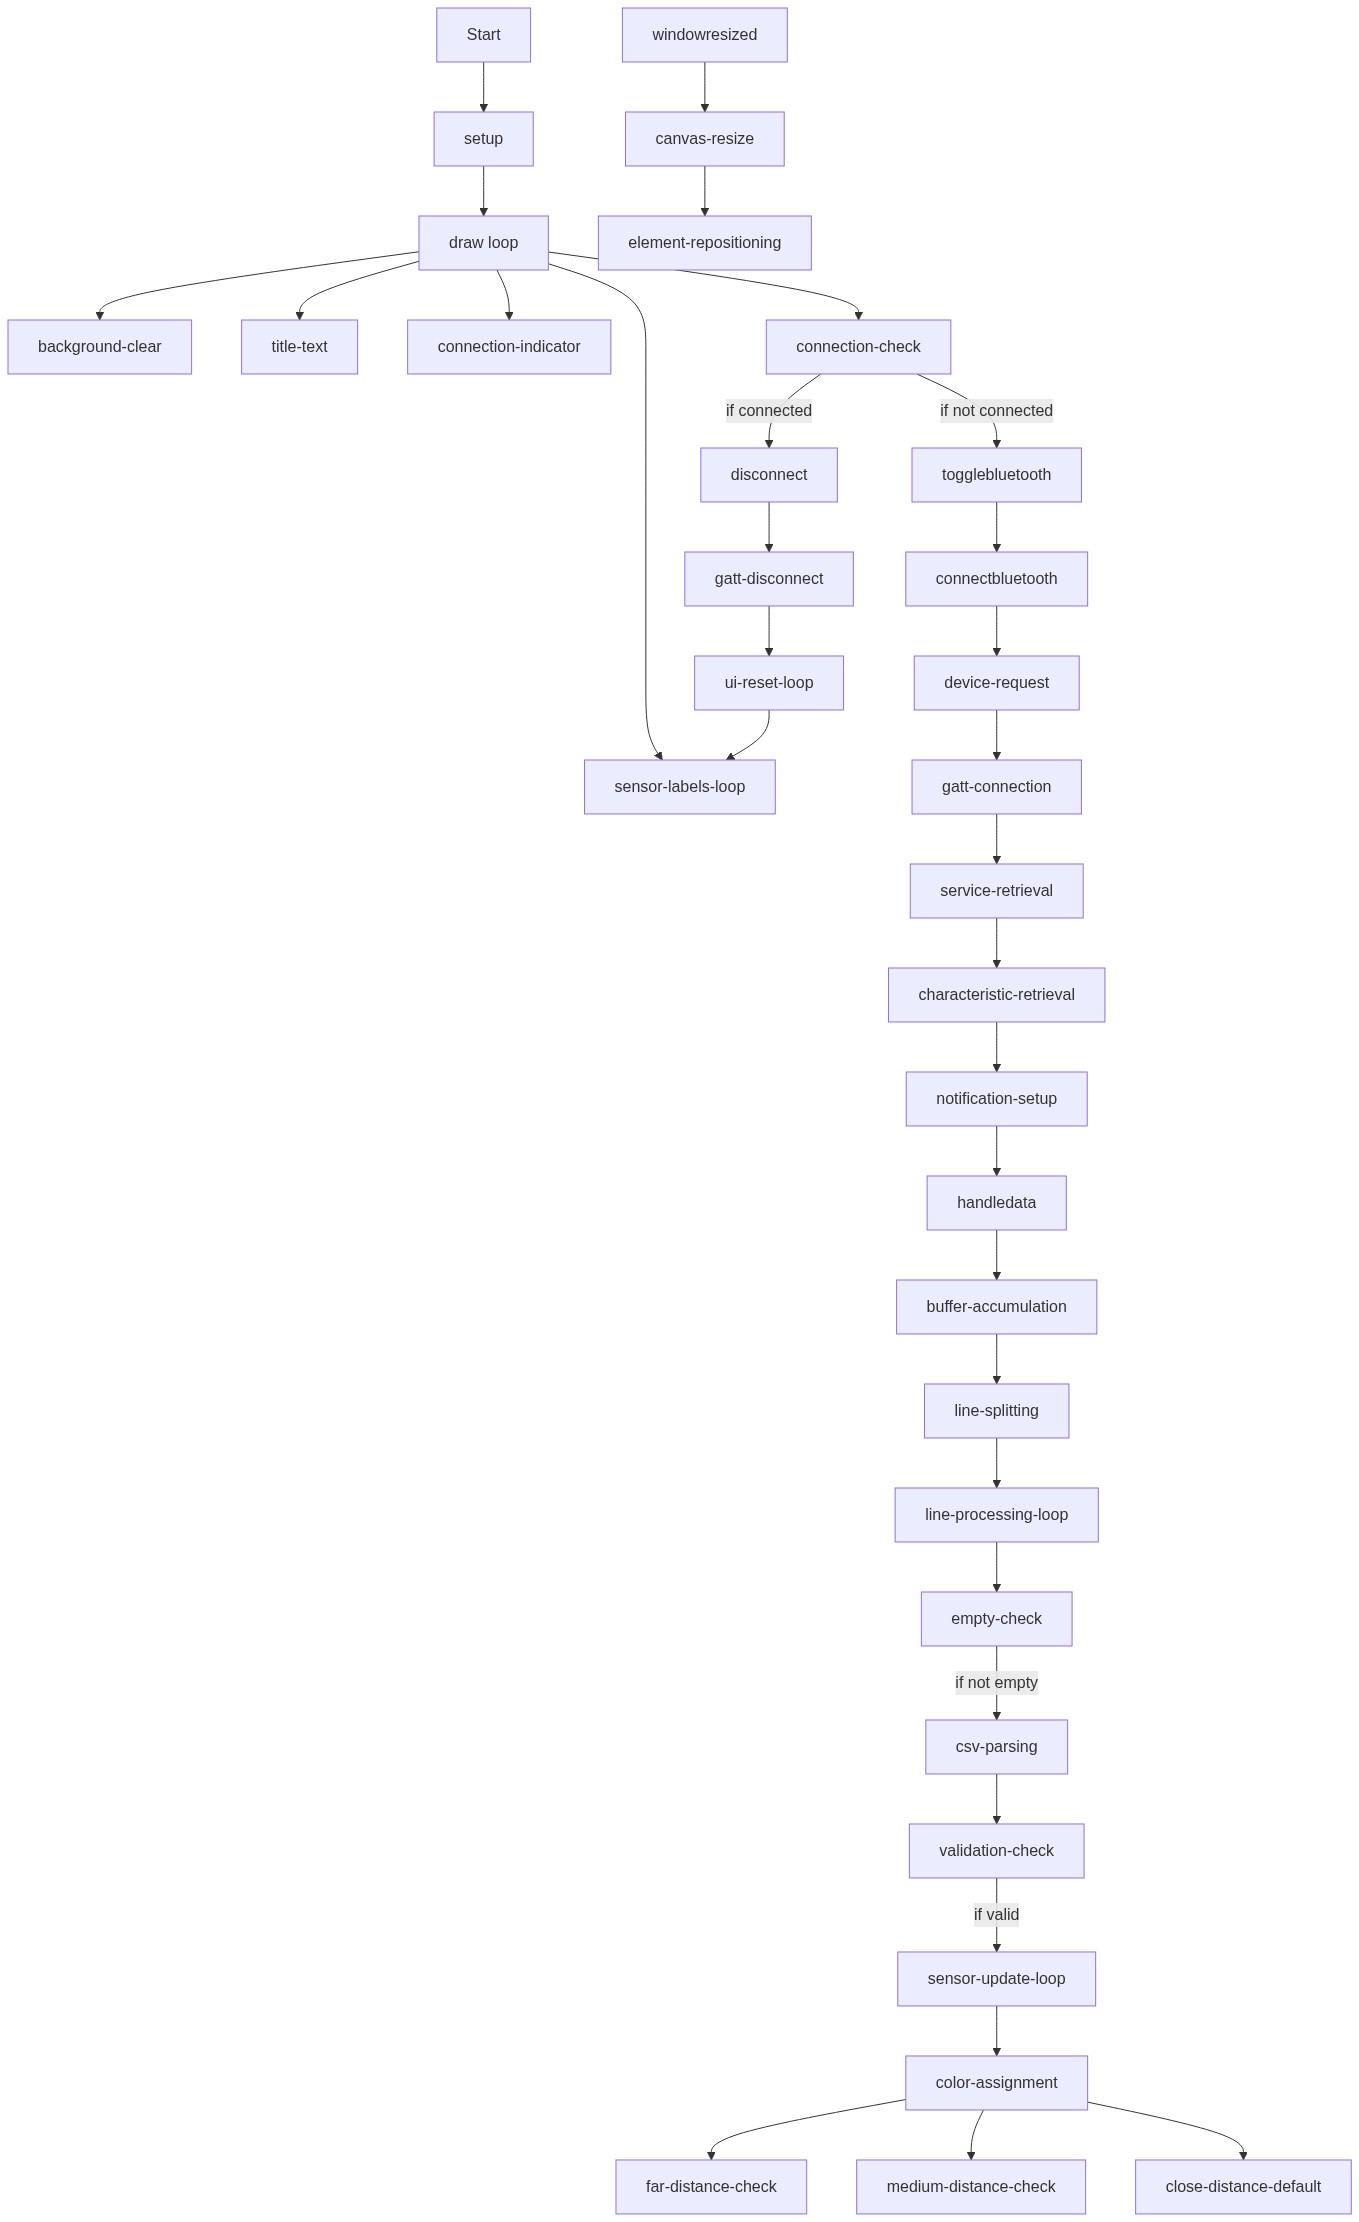
Code flow showing setup, draw, togglebluetooth, connectbluetooth, handledata, processline, getcolorfordistance, disconnect, windowresized

💡 Click on function names in the diagram to jump to their code

graph TD start[Start] --> setup[setup] setup --> draw[draw loop] draw --> background-clear[Clear Background] draw --> draw-title[Draw Title Text] draw --> connection-indicator[Draw Connection Indicator] draw --> sensor-loop[Create Four Sensor Display Boxes] connection-indicator -->|if connected| draw connection-indicator -->|if not connected| draw click setup href "#fn-setup" click draw href "#fn-draw" click background-clear href "#sub-background-clear" click draw-title href "#sub-draw-title" click connection-indicator href "#sub-connection-indicator" click sensor-loop href "#sub-sensor-loop" setup --> create-button[Create Connect Button] setup --> style-button[Style Button Properties] setup --> create-status[Create Status Label] click create-button href "#sub-create-button" click style-button href "#sub-style-button" click create-status href "#sub-create-status" togglebluetooth[toggleBluetooth] --> connected-check[Connection State Check] connected-check -->|if connected| disconnect[disconnect] connected-check -->|if not connected| connectbluetooth[connectBluetooth] click togglebluetooth href "#fn-togglebluetooth" click disconnect href "#fn-disconnect" click connectbluetooth href "#fn-connectbluetooth" connectbluetooth --> request-device[Request Bluetooth Device] request-device --> gatt-connect[Connect to GATT Server] gatt-connect --> get-service[Get UART Service] get-service --> get-characteristic[Get UART Characteristic] get-characteristic --> start-notifications[Enable Notifications] start-notifications --> add-listener[Attach Event Listener] click request-device href "#sub-request-device" click gatt-connect href "#sub-gatt-connect" click get-service href "#sub-get-service" click get-characteristic href "#sub-get-characteristic" click start-notifications href "#sub-start-notifications" click add-listener href "#sub-add-listener" handledata[handleData] --> decode-data[Decode Binary to Text] decode-data --> buffer-append[Append to Buffer] buffer-append --> split-lines[Split on Newlines] split-lines --> process-loop[Process Complete Lines] process-loop -->|for each line| empty-check[Empty Line Check] empty-check -->|if not empty| csv-parse[Split CSV Format] csv-parse --> validation-check[Data Validation] validation-check -->|if valid| parse-loop[Parse Each Sensor Distance] parse-loop --> update-ui[Update Display and Color] update-ui --> far-check[Far Distance Check] update-ui --> medium-check[Medium Distance Check] update-ui --> close-default[Close Distance Default] click handledata href "#fn-handledata" click decode-data href "#sub-decode-data" click buffer-append href "#sub-buffer-append" click split-lines href "#sub-split-lines" click process-loop href "#sub-process-loop" click empty-check href "#sub-empty-check" click csv-parse href "#sub-csv-parse" click validation-check href "#sub-validation-check" click parse-loop href "#sub-parse-loop" click update-ui href "#sub-update-ui" click far-check href "#sub-far-check" click medium-check href "#sub-medium-check" click close-default href "#sub-close-default" disconnect --> gatt-disconnect[Break GATT Connection] gatt-disconnect --> reset-flags[Reset Connection Flag] reset-flags --> reset-button[Reset Button Appearance] reset-button --> reset-displays[Reset All Sensor Displays] reset-displays --> clear-buffer[Clear Data Buffer] click gatt-disconnect href "#sub-gatt-disconnect" click reset-flags href "#sub-reset-flags" click reset-button href "#sub-reset-button" click reset-displays href "#sub-reset-displays" click clear-buffer href "#sub-clear-buffer" windowresized[windowResized] --> canvas-resize[Resize Canvas] canvas-resize --> reposition-button[Reposition Button] reposition-button --> reposition-elements[Reposition Sensor Boxes] click windowresized href "#fn-windowresized" click canvas-resize href "#sub-canvas-resize" click reposition-button href "#sub-reposition-button" click reposition-elements href "#sub-reposition-elements"

❓ Frequently Asked Questions

What visual elements does the sensor ultrasonico sketch display?

The sketch displays a title and multiple distance labels for ultrasonic sensors, along with a Bluetooth connection button and a status indicator.

How can users interact with the sensor ultrasonico sketch?

Users can interact with the sketch by clicking the Bluetooth connection button to initiate a connection and view real-time distance readings from the sensors.

What creative coding concept is demonstrated in the sensor ultrasonico sketch?

This sketch demonstrates the integration of Bluetooth connectivity with real-time data visualization, showcasing how to receive and display sensor data dynamically.

Preview

sensor ultrasonico - p5.js creative coding sketch preview
Sketch Preview
Code flow diagram showing the structure of sensor ultrasonico - Code flow showing setup, draw, togglebluetooth, connectbluetooth, handledata, processline, getcolorfordistance, disconnect, windowresized
Code Flow Diagram