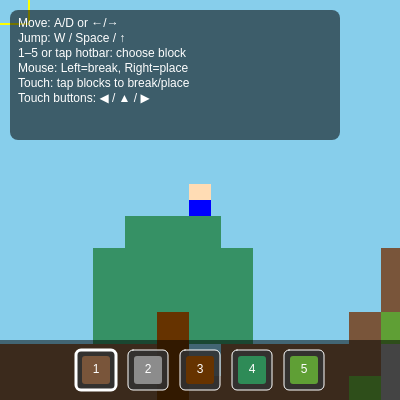
Simple MineCraft Cline

This sketch is a playable side-scrolling Minecraft-style sandbox built entirely in p5.js: a Perlin-noise-generated world of grass, dirt, stone, wood and leaves that you can walk across, jump on, dig into, and rebuild block by block using a five-slot hotbar. It supports keyboard, mouse, and on-screen touch controls, and gives audio feedback for jumping, placing, breaking, and selecting blocks using p5.sound oscillators and noise.

🧪 Try This!

Experiment with the code by making these changes:

  1. Floatier low-gravity jumps — Lowering GRAVITY makes the player fall slower and jumps feel much higher and slower, like moon gravity.
  2. Speed-run mode — Doubling MOVE_SPEED makes the player zip across the world much faster.
  3. Switch to a night sky — background() is called every frame in draw() - changing its color instantly changes the whole scene's mood.
Prefer the full editor? Open it there →

📖 About This Sketch

This sketch builds a playable, side-scrolling 2D Minecraft clone entirely in p5.js: a Perlin-noise-generated terrain of grass, dirt, stone, wood and leaves that you can dig into and rebuild block by block. It feels alive because noise() drives organic height variation, trees are scattered probabilistically across the landscape, and a smooth-following camera lets you explore a world 200 tiles wide. The key p5.js techniques on display are 2D arrays used as a tile grid, noise() for terrain generation, AABB (axis-aligned bounding box) collision detection for player physics, and viewport culling so only the tiles currently visible on screen are ever drawn.

The code is organized into clear sections: world generation (initWorld), player physics (updatePlayer, updateCamera), rendering (drawWorld, drawPlayer, drawUI), input handling for keyboard, mouse, and touch, and a small procedural audio system built from p5.sound oscillators and noise generators. Studying it teaches how to convert between pixel coordinates and grid coordinates, how to build a scrolling camera that stays centered on a moving character, and how small helper functions like isSolidTile and rectsOverlap keep tangled collision logic readable.

⚙️ How It Works

  1. When the sketch loads, setup() creates a full-window canvas, seeds Perlin noise, and calls initWorld() to build the 200x60 tile grid and place the player standing on top of the generated terrain.
  2. Every frame, draw() paints the sky background, then calls handleInput() to read the keyboard and touch-button state, updatePlayer() to apply gravity and resolve collisions against solid tiles, and updateCamera() to keep the player roughly centered on screen.
  3. drawWorld() only loops over the small range of tiles that are currently visible on screen (based on cameraX and cameraY), coloring each one by its block type - this keeps performance smooth even though the underlying world array is huge.
  4. Clicking or tapping a tile calls handleWorldTap(), which either clears that tile to AIR (breaking a block, with a crunchy noise sound) or writes the currently selected hotbar block into it (placing, with a blip sound), as long as doing so wouldn't overlap the player's own body.
  5. The hotbar at the bottom of the screen shows five block types; pressing number keys 1-5 or tapping a slot updates selectedIndex, and drawUI() draws a thicker border around whichever slot is active.
  6. On touch devices, drawTouchControls() renders on-screen left/right/jump buttons; touchStarted, touchEnded, and handleTouches translate finger positions into the same touchControls flags that handleInput() reads, so touch and keyboard share one movement code path.

🎓 Concepts You'll Learn

2D tile-grid world representationPerlin noise terrain generationAABB collision detectionSide-scrolling camera with clampingViewport/frustum culling for performanceScreen-to-grid coordinate conversionProcedural audio synthesis with envelopesUnified input handling across keyboard, mouse and touch

📝 Code Breakdown

initAudioContext()

Browsers require a user gesture (click, tap, or keypress) before allowing audio to play. This function is called from keyPressed, mousePressed, and touchStarted to satisfy that requirement exactly once.

function initAudioContext() {
  if (!audioInitialized) {
    userStartAudio(); // p5.sound helper to resume AudioContext
    audioInitialized = true;
  }
}
Line-by-line explanation (3 lines)
if (!audioInitialized) {
Only runs once - browsers block audio until a user interacts with the page, so this guard prevents repeated calls.
userStartAudio();
A p5.sound helper that resumes/unlocks the browser's AudioContext, required before any sound can play.
audioInitialized = true;
Flips the flag so playTone() and other sound functions know it's now safe to make noise.

playTone()

This is a small reusable synth: every sound effect in the game (jump, place, select) is just playTone() called with different frequency, waveform, and envelope timings, which is a common pattern for lightweight procedural audio.

function playTone(freq, type = 'sine', vol = 0.3, attack = 0.01, decay = 0.15) {
  if (!audioInitialized) return;
  const osc = new p5.Oscillator(type);
  osc.freq(freq);
  osc.amp(0);
  osc.start();
  // Fade in quickly
  osc.amp(vol, attack);
  // Then fade out to 0
  osc.amp(0, decay, attack);
  // Stop after envelope is done
  osc.stop(attack + decay + 0.05);
}
Line-by-line explanation (7 lines)
if (!audioInitialized) return;
Bails out silently if audio hasn't been unlocked yet.
const osc = new p5.Oscillator(type);
Creates a new sound wave generator - 'sine', 'square', or 'triangle' change the tone's timbre.
osc.freq(freq);
Sets the pitch of the tone in Hertz.
osc.amp(0); osc.start();
Starts the oscillator silently (volume 0) so the fade-in isn't a jarring click.
osc.amp(vol, attack);
Ramps the volume up to vol over 'attack' seconds - a quick fade-in.
osc.amp(0, decay, attack);
Schedules a fade-out to silence over 'decay' seconds, starting after the attack finishes.
osc.stop(attack + decay + 0.05);
Stops and disposes of the oscillator once the envelope has fully finished playing.

playJumpSound()

Wrapping playTone() calls in named functions like this keeps the game logic readable - updatePlayer just calls playJumpSound() without knowing the synth details.

function playJumpSound() {
  // Chunky square jump
  playTone(330, 'square', 0.35, 0.01, 0.2);
}
Line-by-line explanation (1 lines)
playTone(330, 'square', 0.35, 0.01, 0.2);
Plays a 330Hz square wave - the harsher waveform gives jumping a chunky, retro-game feel.

playBlockPlaceSound()

Using a different waveform and frequency than the jump sound helps each action feel distinct even though they share the same underlying playTone() engine.

function playBlockPlaceSound() {
  // Soft high triangle blip
  playTone(550, 'triangle', 0.25, 0.005, 0.12);
}
Line-by-line explanation (1 lines)
playTone(550, 'triangle', 0.25, 0.005, 0.12);
Plays a higher-pitched triangle wave with a fast attack, giving block placement a soft, snappy blip.

playSelectSound()

This tiny UI sound only plays when the selected slot actually changes, giving feedback without being annoying if you tap the same slot repeatedly.

function playSelectSound() {
  // Short UI bleep
  playTone(880, 'sine', 0.2, 0.005, 0.08);
}
Line-by-line explanation (1 lines)
playTone(880, 'sine', 0.2, 0.005, 0.08);
A short, high, smooth sine bleep confirms that the hotbar selection changed.

playBlockBreakSound()

Unlike the tone-based sounds, breaking uses filtered noise instead of a pitched oscillator, which is a common trick for making percussive or crunchy sound effects.

function playBlockBreakSound() {
  if (!audioInitialized) return;
  // Short noisy crunch
  const n = new p5.Noise('brown');
  n.amp(0);
  n.start();
  n.amp(0.4, 0.01);        // quick fade in
  n.amp(0, 0.25, 0.02);    // fade out
  n.stop(0.4);
}
Line-by-line explanation (5 lines)
const n = new p5.Noise('brown');
Brown noise sounds deeper and duller than white noise, closer to a real crunch or thud.
n.amp(0); n.start();
Starts the noise generator silently so it can be faded in smoothly.
n.amp(0.4, 0.01);
Fades the noise up to volume 0.4 very quickly, creating an instant crunch.
n.amp(0, 0.25, 0.02);
Fades the noise back down to silence over a quarter second, starting after a short delay.
n.stop(0.4);
Stops the noise node after the envelope finishes so it doesn't keep running in the background.

setup()

setup() runs once when the sketch starts. Here it wires together canvas creation, world generation, and touch detection before the first draw() call ever happens.

function setup() {
  createCanvas(windowWidth, windowHeight); // https://p5js.org/reference/#/p5/createCanvas
  noiseSeed(floor(random(100000)));
  initWorld();

  // Detect touch device
  isTouchDevice = 'ontouchstart' in window || navigator.maxTouchPoints > 0;
}
Line-by-line explanation (4 lines)
createCanvas(windowWidth, windowHeight);
Makes the canvas fill the entire browser window.
noiseSeed(floor(random(100000)));
Picks a random seed so noise() produces a different terrain layout every time the page loads.
initWorld();
Builds the tile grid, generates terrain and trees, and positions the player on top of the ground.
isTouchDevice = 'ontouchstart' in window || navigator.maxTouchPoints > 0;
Detects whether the browser supports touch input so on-screen buttons only appear on phones/tablets.

draw()

draw() is the heartbeat of every p5.js sketch, running ~60 times per second. Here it deliberately separates update logic (input, physics, camera) from rendering logic (world, player, UI), a good pattern to imitate in your own games.

🔬 This is the drawing order for each frame. What happens visually if you move drawPlayer() to AFTER drawCursorHighlight()? Does the player ever get hidden behind the highlight?

  drawWorld();
  drawPlayer();
  drawCursorHighlight();
function draw() {
  background(135, 206, 235); // sky blue

  handleInput();
  updatePlayer();
  updateCamera();

  drawWorld();
  drawPlayer();
  drawCursorHighlight();

  if (isTouchDevice) {
    drawTouchControls(); // on‑screen buttons (◀ ▶ ▲)
  }

  drawUI();
}
Line-by-line explanation (9 lines)
background(135, 206, 235); // sky blue
Repaints the whole canvas sky-blue every frame, erasing the previous frame.
handleInput();
Reads keyboard and touch-button state and sets the player's horizontal velocity.
updatePlayer();
Applies gravity and moves the player, resolving collisions with solid tiles.
updateCamera();
Recalculates cameraX/cameraY so the view follows the player.
drawWorld();
Draws only the tiles currently visible on screen.
drawPlayer();
Draws the player's body as two colored rectangles.
drawCursorHighlight();
Draws a yellow outline around the tile under the mouse, showing what would be edited.
if (isTouchDevice) { drawTouchControls(); }
Only draws the on-screen ◀ ▶ ▲ buttons on touch devices, keeping desktop screens clean.
drawUI();
Draws the hotbar and instructions panel on top of everything else.

windowResized()

windowResized() is a special p5.js callback that fires automatically on resize events - you never call it yourself, p5.js does.

function windowResized() {
  resizeCanvas(windowWidth, windowHeight); // https://p5js.org/reference/#/p5/resizeCanvas
}
Line-by-line explanation (1 lines)
resizeCanvas(windowWidth, windowHeight);
Automatically called by p5.js whenever the browser window changes size, keeping the canvas filling the screen.

initWorld()

initWorld() is the procedural generation heart of the game. It shows a classic pattern: use noise() to get smooth randomness for terrain height, then layer deterministic rules (stone below, dirt above that, grass on top) and sprinkle in pure random() chance for features like trees.

🔬 The 0.12 controls how 'zoomed in' the noise is along x. What happens to the terrain's bumpiness if you change 0.12 to 0.02 (smoother, wider hills) or 0.5 (jagged, spiky terrain)?

    let h = floor(noise(x * 0.12) * 10) + baseHeight;
    h = constrain(h, 12, WORLD_HEIGHT - 6);
function initWorld() {
  world = new Array(WORLD_WIDTH);
  for (let x = 0; x < WORLD_WIDTH; x++) {
    world[x] = new Array(WORLD_HEIGHT).fill(AIR);
  }

  const baseHeight = 30;
  for (let x = 0; x < WORLD_WIDTH; x++) {
    // Generate terrain with Perlin noise
    // https://p5js.org/reference/#/p5/noise
    let h = floor(noise(x * 0.12) * 10) + baseHeight;
    h = constrain(h, 12, WORLD_HEIGHT - 6);

    // Stone underground
    for (let y = h; y < WORLD_HEIGHT; y++) {
      world[x][y] = STONE;
    }

    // Dirt and grass surface
    if (h - 1 >= 0) world[x][h - 1] = GRASS;
    if (h - 2 >= 0) world[x][h - 2] = DIRT;
    if (h - 3 >= 0) world[x][h - 3] = DIRT;

    // Random trees
    if (random() < 0.08 && h - 4 > 0) {
      const trunkHeight = 4;
      for (let t = 0; t < trunkHeight; t++) {
        const ty = h - 2 - t;
        if (ty >= 0) world[x][ty] = WOOD;
      }

      // Leaves ball
      const leafY = h - 2 - trunkHeight;
      for (let lx = -2; lx <= 2; lx++) {
        for (let ly = -2; ly <= 1; ly++) {
          const tx = x + lx;
          const ty = leafY + ly;
          if (tx >= 0 && tx < WORLD_WIDTH && ty >= 0 && ty < WORLD_HEIGHT) {
            if (dist(lx, ly, 0, 0) < 2.6 && world[tx][ty] === AIR) {
              world[tx][ty] = LEAVES;
            }
          }
        }
      }
    }
  }

  // Spawn player near center, on top of terrain
  const spawnX = floor(WORLD_WIDTH / 2);
  let spawnY = 0;
  for (let y = 0; y < WORLD_HEIGHT; y++) {
    if (world[spawnX][y] !== AIR) {
      spawnY = y - 1;
      break;
    }
  }
  player.x = spawnX * TILE_SIZE;
  player.y = spawnY * TILE_SIZE - player.h;
}
Line-by-line explanation (14 lines)

🔧 Subcomponents:

for-loop Grid allocation world[x] = new Array(WORLD_HEIGHT).fill(AIR);

Creates each column of the 2D world array and fills it with empty (AIR) tiles before terrain is carved into it.

calculation Terrain height from noise let h = floor(noise(x * 0.12) * 10) + baseHeight;

Uses Perlin noise, sampled along x, to pick a smoothly varying surface height for every column.

conditional Random tree placement if (random() < 0.08 && h - 4 > 0) {

Gives each column an 8% chance of growing a tree trunk and a rounded leaf canopy on top of the terrain.

for-loop Leaf canopy shape if (dist(lx, ly, 0, 0) < 2.6 && world[tx][ty] === AIR) {

Fills a roughly circular area above the trunk with leaves, only where the tile is still empty.

world = new Array(WORLD_WIDTH);
Creates the outer array that will hold one sub-array (column) per x position.
world[x] = new Array(WORLD_HEIGHT).fill(AIR);
Each column is its own array of tiles, initially all AIR (empty sky).
let h = floor(noise(x * 0.12) * 10) + baseHeight;
noise() returns a smooth value between 0 and 1; scaling and adding baseHeight turns it into a rolling hill height for this column.
h = constrain(h, 12, WORLD_HEIGHT - 6);
Keeps the terrain height within safe bounds so hills never go above the sky or below the world floor.
for (let y = h; y < WORLD_HEIGHT; y++) { world[x][y] = STONE; }
Fills everything from the surface height downward with stone, forming the underground.
if (h - 1 >= 0) world[x][h - 1] = GRASS;
Replaces the very top tile with grass so the terrain has a green surface layer.
if (h - 2 >= 0) world[x][h - 2] = DIRT;
Puts a dirt layer just under the grass, mimicking real Minecraft strata.
if (random() < 0.08 && h - 4 > 0) {
Randomly decides, per column, whether a tree should grow here.
for (let t = 0; t < trunkHeight; t++) { ... world[x][ty] = WOOD; }
Stacks four wood tiles vertically to form the tree trunk.
if (dist(lx, ly, 0, 0) < 2.6 && world[tx][ty] === AIR) { world[tx][ty] = LEAVES; }
Checks the distance from the trunk's top to decide if a nearby tile falls inside a circular leaf canopy, only overwriting empty air.
const spawnX = floor(WORLD_WIDTH / 2);
Chooses the middle column of the world as the player's spawn column.
if (world[spawnX][y] !== AIR) { spawnY = y - 1; break; }
Scans downward from the sky until it finds the first solid tile, then spawns the player just above it.
player.x = spawnX * TILE_SIZE;
Converts the spawn column (a tile index) into an actual pixel x-coordinate.
player.y = spawnY * TILE_SIZE - player.h;
Positions the player's top edge so their feet rest exactly on the ground tile.

handleInput()

This function is the single place where keyboard and touch input get merged into the same player.vx/vy variables, which is why the rest of the physics code (updatePlayer) doesn't need to know or care where the input came from.

function handleInput() {
  player.vx = 0;

  // Keyboard (A / D / arrows)
  if (keyIsDown(65) || keyIsDown(LEFT_ARROW) || touchControls.left) {
    player.vx = -MOVE_SPEED;
  }
  if (keyIsDown(68) || keyIsDown(RIGHT_ARROW) || touchControls.right) {
    player.vx = MOVE_SPEED;
  }

  // Touch jump button
  if (touchControls.jump && player.onGround) {
    player.vy = -JUMP_SPEED;
    player.onGround = false;
    playJumpSound();
    touchControls.jump = false; // single jump per tap
  }
}
Line-by-line explanation (5 lines)

🔧 Subcomponents:

conditional Move left check if (keyIsDown(65) || keyIsDown(LEFT_ARROW) || touchControls.left) {

Sets negative horizontal velocity if the A key, left arrow, or the touch-left button is active.

conditional Touch jump check if (touchControls.jump && player.onGround) {

Triggers a jump from the on-screen touch button, but only if the player is currently standing on solid ground.

player.vx = 0;
Resets horizontal velocity every frame so the player doesn't drift when no keys are held.
if (keyIsDown(65) || keyIsDown(LEFT_ARROW) || touchControls.left) {
65 is the keycode for 'A'; checks keyboard OR the touch-left flag so both input methods work identically.
player.vx = -MOVE_SPEED;
Negative velocity moves the player toward the left edge of the world.
if (touchControls.jump && player.onGround) {
Only allows a jump if the touch button was tapped AND the player is currently touching the ground (prevents double/air jumps).
touchControls.jump = false;
Immediately clears the jump flag so holding the button doesn't cause repeated jumps every frame.

keyPressed()

keyPressed() is a p5.js callback that fires once per key press (not continuously like keyIsDown), making it ideal for discrete actions like jumping once or switching hotbar slots, as opposed to continuous movement which is handled in handleInput().

function keyPressed() {
  initAudioContext(); // unlock audio on first key press

  // Jump: space, W, or up arrow
  if ((key === ' ' || key === 'w' || key === 'W' || keyCode === UP_ARROW) && player.onGround) {
    player.vy = -JUMP_SPEED;
    player.onGround = false;
    playJumpSound();
  }

  // Select hotbar slot 1–5
  if (key >= '1' && key <= '5') {
    let idx = int(key) - 1;
    if (idx >= 0 && idx < inventory.length) {
      if (selectedIndex !== idx) {
        selectedIndex = idx;
        playSelectSound();
      } else {
        selectedIndex = idx;
      }
    }
  }
}
Line-by-line explanation (4 lines)

🔧 Subcomponents:

conditional Jump key check if ((key === ' ' || key === 'w' || key === 'W' || keyCode === UP_ARROW) && player.onGround) {

Lets Space, W, or the Up arrow trigger a jump, but only while standing on the ground.

conditional Hotbar number selection if (key >= '1' && key <= '5') {

Maps number keys 1 through 5 directly onto the five inventory slots.

initAudioContext();
Unlocks the browser's audio system on the very first keypress of the session.
if ((key === ' ' || key === 'w' || key === 'W' || keyCode === UP_ARROW) && player.onGround) {
Checks several different key names for the same jump action, and requires the player to be grounded first.
if (key >= '1' && key <= '5') {
Compares the pressed key character directly against '1' through '5' since number keys compare correctly as strings.
let idx = int(key) - 1;
Converts the character '1'-'5' to a number and subtracts 1 to get a zero-based array index.

updatePlayer()

This function is a classic tile-based platformer collision resolver: it moves one axis at a time (first X, then Y), checking the row/column of tiles the player's bounding box would overlap, and snapping the player back to the tile boundary on collision. Separating X and Y resolution like this avoids many tricky corner-case bugs.

🔬 What happens to the feel of jumping if you change the terminal velocity cap (18) to something very small, like 4? Does the player float down like a feather?

  player.vy += GRAVITY;
  player.vy = min(player.vy, 18);
  player.onGround = false;
function updatePlayer() {
  // Gravity
  player.vy += GRAVITY;
  player.vy = min(player.vy, 18);
  player.onGround = false;

  // Horizontal movement + collisions
  let newX = player.x + player.vx;
  newX = constrain(newX, 0, WORLD_WIDTH * TILE_SIZE - player.w);

  if (player.vx > 0) {
    const right = newX + player.w;
    const top = player.y;
    const bottom = player.y + player.h - 1;
    const tileRight = floor(right / TILE_SIZE);
    for (let ty = floor(top / TILE_SIZE); ty <= floor(bottom / TILE_SIZE); ty++) {
      if (isSolidTile(tileRight, ty)) {
        newX = tileRight * TILE_SIZE - player.w;
        player.vx = 0;
        break;
      }
    }
  } else if (player.vx < 0) {
    const left = newX;
    const top = player.y;
    const bottom = player.y + player.h - 1;
    const tileLeft = floor(left / TILE_SIZE);
    for (let ty = floor(top / TILE_SIZE); ty <= floor(bottom / TILE_SIZE); ty++) {
      if (isSolidTile(tileLeft, ty)) {
        newX = (tileLeft + 1) * TILE_SIZE;
        player.vx = 0;
        break;
      }
    }
  }
  player.x = newX;

  // Vertical movement + collisions
  let newY = player.y + player.vy;

  if (player.vy > 0) {
    // Falling
    let bottom = newY + player.h;
    if (bottom >= WORLD_HEIGHT * TILE_SIZE) {
      // Invisible floor at bottom of world
      newY = WORLD_HEIGHT * TILE_SIZE - player.h;
      player.vy = 0;
      player.onGround = true;
    } else {
      const left = player.x;
      const right = player.x + player.w - 1;
      const tileBottom = floor(bottom / TILE_SIZE);
      for (let tx = floor(left / TILE_SIZE); tx <= floor(right / TILE_SIZE); tx++) {
        if (isSolidTile(tx, tileBottom)) {
          newY = tileBottom * TILE_SIZE - player.h;
          player.vy = 0;
          player.onGround = true;
          break;
        }
      }
    }
  } else if (player.vy < 0) {
    // Moving up (jumping)
    let top = newY;
    if (top <= 0) {
      newY = 0;
      player.vy = 0;
    } else {
      const left = player.x;
      const right = player.x + player.w - 1;
      const tileTop = floor(top / TILE_SIZE);
      for (let tx = floor(left / TILE_SIZE); tx <= floor(right / TILE_SIZE); tx++) {
        if (isSolidTile(tx, tileTop)) {
          newY = (tileTop + 1) * TILE_SIZE;
          player.vy = 0;
          break;
        }
      }
    }
  }

  player.y = newY;
}
Line-by-line explanation (12 lines)

🔧 Subcomponents:

calculation Gravity accumulation player.vy += GRAVITY;

Continuously accelerates the player downward each frame, just like real gravity, capped at a terminal velocity of 18.

conditional Horizontal wall collision if (player.vx > 0) {

Checks the column of tiles the player would move into and stops horizontal movement at the wall's edge instead of passing through it.

conditional Ground collision while falling if (player.vy > 0) {

Checks the row of tiles below the player's feet and snaps the player to stand on top of the first solid tile found.

conditional Ceiling collision while jumping } else if (player.vy < 0) {

Checks tiles above the player's head while jumping and stops upward movement if a solid ceiling tile is hit.

player.vy += GRAVITY;
Adds a constant downward acceleration to vertical velocity every frame, simulating gravity.
player.vy = min(player.vy, 18);
Caps fall speed at 18 pixels/frame so the player never falls fast enough to tunnel through thin floors.
player.onGround = false;
Assumes the player is airborne by default; it gets set back to true only if a ground collision is found below.
let newX = player.x + player.vx;
Calculates where the player WOULD be horizontally if nothing blocked them.
newX = constrain(newX, 0, WORLD_WIDTH * TILE_SIZE - player.w);
Clamps the position so the player can never leave the left or right edge of the entire world.
const tileRight = floor(right / TILE_SIZE);
Converts the player's rightmost pixel edge into a tile column index to check for collisions.
for (let ty = floor(top / TILE_SIZE); ty <= floor(bottom / TILE_SIZE); ty++) {
Loops over every tile row the player's body overlaps vertically, checking each for solidity.
newX = tileRight * TILE_SIZE - player.w;
If a solid tile is found, snaps the player's x position so they sit flush against the wall instead of overlapping it.
let newY = player.y + player.vy;
Calculates the player's tentative new vertical position before collision checks.
if (bottom >= WORLD_HEIGHT * TILE_SIZE) {
Special case: if the player would fall past the bottom of the entire world, stop them on an invisible floor instead of falling forever.
newY = tileBottom * TILE_SIZE - player.h;
Snaps the player's feet to rest exactly on top of the ground tile found below them.
if (top <= 0) { newY = 0; player.vy = 0; }
Prevents the player from jumping above the top of the world (the sky ceiling).

updateCamera()

This is a standard 'clamped follow camera' - the camera always tries to center on the player, but constrain() stops it from ever showing area outside the actual world bounds, which is why the camera stops scrolling once you approach the map edges.

function updateCamera() {
  // Center camera on player horizontally
  const targetX = player.x + player.w / 2 - width / 2;
  const maxCamX = max(0, WORLD_WIDTH * TILE_SIZE - width);
  cameraX = constrain(targetX, 0, maxCamX);

  // Center camera on player vertically
  const targetY = player.y + player.h / 2 - height / 2;
  const maxCamY = max(0, WORLD_HEIGHT * TILE_SIZE - height);
  cameraY = constrain(targetY, 0, maxCamY);
}
Line-by-line explanation (5 lines)
const targetX = player.x + player.w / 2 - width / 2;
Calculates where the camera would need to be so the player's horizontal center lines up with the middle of the screen.
const maxCamX = max(0, WORLD_WIDTH * TILE_SIZE - width);
Works out the furthest the camera can scroll right before showing empty space past the edge of the world.
cameraX = constrain(targetX, 0, maxCamX);
Clamps the camera so it never scrolls past the world's left or right boundary, even if the player is near an edge.
const targetY = player.y + player.h / 2 - height / 2;
Same centering logic as above, but for the vertical axis.
cameraY = constrain(targetY, 0, maxCamY);
Keeps the camera from scrolling above the sky or below the bottom of the world vertically.

isInWorld()

A tiny but critical bounds-check helper - almost every function that touches the world array calls this first to avoid crashing with an 'undefined' error when looking outside the grid.

function isInWorld(tx, ty) {
  return tx >= 0 && tx < WORLD_WIDTH && ty >= 0 && ty < WORLD_HEIGHT;
}
Line-by-line explanation (1 lines)
return tx >= 0 && tx < WORLD_WIDTH && ty >= 0 && ty < WORLD_HEIGHT;
Returns true only if both the tile column (tx) and row (ty) fall inside the bounds of the world array, preventing out-of-bounds array access.

isSolid()

Having a single source of truth for 'what counts as solid' means you could later make certain blocks (like leaves or water) non-solid by editing just this one function.

function isSolid(blockId) {
  // All non-air blocks are solid (you can stand on leaves)
  return blockId !== AIR;
}
Line-by-line explanation (1 lines)
return blockId !== AIR;
Every block type except AIR counts as solid for collision purposes, including leaves - simple but effective.

isSolidTile()

This combines the bounds check (isInWorld) with the solidity check (isSolid) into one convenient function that updatePlayer() calls repeatedly during collision resolution.

function isSolidTile(tx, ty) {
  if (!isInWorld(tx, ty)) return false;
  return isSolid(world[tx][ty]);
}
Line-by-line explanation (2 lines)
if (!isInWorld(tx, ty)) return false;
Tiles outside the world are treated as empty air (not solid), so the player can't collide with 'nothing'.
return isSolid(world[tx][ty]);
Looks up the block at that grid position and checks whether it's solid.

drawWorld()

This function demonstrates viewport culling, a core performance technique in any game with a large world: instead of drawing every tile every frame, only compute and render what the camera can actually see.

🔬 This loop only draws tiles inside the visible camera window. What do you think would happen to performance (and the frame rate) if you removed the culling and looped from 0 to WORLD_WIDTH/WORLD_HEIGHT instead?

  for (let x = startCol; x <= endCol; x++) {
    for (let y = startRow; y <= endRow; y++) {
      const block = world[x][y];
      if (block === AIR) continue;
function drawWorld() {
  noStroke();

  // Horizontal culling based on cameraX
  let startCol = floor(cameraX / TILE_SIZE);
  let endCol = startCol + floor(width / TILE_SIZE) + 2;
  startCol = max(0, startCol);
  endCol = min(WORLD_WIDTH - 1, endCol);

  // Vertical culling based on cameraY
  let startRow = floor(cameraY / TILE_SIZE);
  let endRow = startRow + floor(height / TILE_SIZE) + 2;
  startRow = max(0, startRow);
  endRow = min(WORLD_HEIGHT - 1, endRow);

  for (let x = startCol; x <= endCol; x++) {
    for (let y = startRow; y <= endRow; y++) {
      const block = world[x][y];
      if (block === AIR) continue;

      const sx = x * TILE_SIZE - cameraX;
      const sy = y * TILE_SIZE - cameraY;

      switch (block) {
        case GRASS:  fill(95, 159, 53);      break;
        case DIRT:   fill(121, 85, 58);      break;
        case STONE:  fill(140);              break;
        case WOOD:   fill(102, 51, 0);       break;
        case LEAVES: fill(46, 139, 87, 230); break;
      }
      rect(sx, sy, TILE_SIZE, TILE_SIZE);
    }
  }
}
Line-by-line explanation (7 lines)

🔧 Subcomponents:

calculation Visible tile range calculation let endCol = startCol + floor(width / TILE_SIZE) + 2;

Figures out exactly which tile columns and rows are on screen so the loop below never wastes time drawing off-screen tiles.

for-loop Visible tile drawing loop for (let x = startCol; x <= endCol; x++) {

Iterates only over the small visible window of the world, drawing each non-air tile as a colored rectangle.

switch-case Block color lookup switch (block) {

Chooses a fill color based on the block type ID before drawing its rectangle.

let startCol = floor(cameraX / TILE_SIZE);
Converts the camera's pixel position into the first tile column visible on screen.
let endCol = startCol + floor(width / TILE_SIZE) + 2;
Adds enough columns to cover the full screen width, plus 2 extra so tiles at the edge don't pop in abruptly.
startCol = max(0, startCol); endCol = min(WORLD_WIDTH - 1, endCol);
Clamps the range so the loop never tries to read tiles outside the world array.
if (block === AIR) continue;
Skips drawing anything for empty tiles, saving a rect() call for most of the sky area.
const sx = x * TILE_SIZE - cameraX;
Converts the tile's world-grid x position into a screen pixel position by subtracting the camera offset.
switch (block) { case GRASS: fill(95, 159, 53); break; ... }
Picks a distinct RGB fill color for each block type before drawing its square.
rect(sx, sy, TILE_SIZE, TILE_SIZE);
Draws the actual tile square at its calculated screen position.

drawPlayer()

The player is drawn with just two stacked rectangles - a simple but effective way to represent a character before investing in sprite art or more detailed shapes.

function drawPlayer() {
  push();
  const sx = player.x - cameraX;
  const sy = player.y - cameraY;

  noStroke();
  // Body
  fill(255, 220, 180);
  rect(sx, sy, player.w, player.h);
  // Pants
  fill(0, 0, 255);
  rect(sx, sy + player.h / 2, player.w, player.h / 2);
  pop();
}
Line-by-line explanation (5 lines)
push();
Saves the current drawing style settings so changes here don't leak into other drawing functions.
const sx = player.x - cameraX;
Converts the player's world position into a screen position by subtracting the camera offset - the same trick used for tiles.
fill(255, 220, 180); rect(sx, sy, player.w, player.h);
Draws a skin-toned rectangle for the upper body/head area.
fill(0, 0, 255); rect(sx, sy + player.h / 2, player.w, player.h / 2);
Draws a blue rectangle over the lower half to look like pants.
pop();
Restores the previous drawing style, keeping this function's changes isolated.

drawCursorHighlight()

This function is a great example of converting screen-space mouse coordinates into world-space grid coordinates, a transformation needed anywhere a camera scrolls independently of the mouse.

function drawCursorHighlight() {
  // Convert screen mouse to world tile coords (include both camera axes)
  const tileX = floor((mouseX + cameraX) / TILE_SIZE);
  const tileY = floor((mouseY + cameraY) / TILE_SIZE);

  if (!isInWorld(tileX, tileY)) return;
  // Don't highlight over UI
  if (mouseY > height - UI_BAR_H) return;

  const sx = tileX * TILE_SIZE - cameraX;
  const sy = tileY * TILE_SIZE - cameraY;

  noFill();
  stroke(255, 255, 0);
  strokeWeight(2);
  rect(sx, sy, TILE_SIZE, TILE_SIZE);
}
Line-by-line explanation (4 lines)
const tileX = floor((mouseX + cameraX) / TILE_SIZE);
Converts the mouse's screen position into a world tile coordinate by adding back the camera offset before dividing by tile size.
if (!isInWorld(tileX, tileY)) return;
Skips drawing if the mouse points outside the actual world grid.
if (mouseY > height - UI_BAR_H) return;
Hides the highlight while the mouse is hovering over the bottom hotbar UI, so it doesn't overlap the interface.
stroke(255, 255, 0); strokeWeight(2); rect(sx, sy, TILE_SIZE, TILE_SIZE);
Draws a yellow outlined square (no fill) around the tile the mouse is currently pointing at.

drawUI()

drawUI() shows how to build simple game UI purely with rect() and text() - no HTML elements needed. The pattern of calculating a totalW then centering with startX is reusable anywhere you need to lay out a row of evenly-spaced icons.

function drawUI() {
  push();

  const barH = UI_BAR_H;
  noStroke();
  fill(0, 0, 0, 130);
  rect(0, height - barH, width, barH);

  const slots = inventory.length;
  const slotSize = 40;
  const gap = 12;
  const totalW = slots * slotSize + (slots - 1) * gap;
  const startX = (width - totalW) / 2;
  const startY = height - barH + (barH - slotSize) / 2;

  textAlign(CENTER, CENTER);
  textSize(12);

  for (let i = 0; i < slots; i++) {
    const x = startX + i * (slotSize + gap);
    const y = startY;

    // Slot background
    stroke(255);
    strokeWeight(i === selectedIndex ? 3 : 1);
    fill(50, 50, 50, 220);
    rect(x, y, slotSize, slotSize, 5);

    // Block preview
    const blockId = inventory[i];
    const c = getBlockColor(blockId);
    if (blockId !== AIR) {
      noStroke();
      if (c.length === 1) fill(c[0]);
      else fill(c[0], c[1], c[2]);
      rect(x + 6, y + 6, slotSize - 12, slotSize - 12, 3);
    }

    // Slot number
    fill(255);
    noStroke();
    text(i + 1, x + slotSize / 2, y + slotSize / 2);
  }

  // Instructions panel (top-left)
  const panelW = 330;
  const panelH = 130;
  fill(0, 0, 0, 140);
  rect(10, 10, panelW, panelH, 8);
  fill(255);
  textAlign(LEFT, TOP);
  text(
    "Move: A/D or ←/→\n" +
    "Jump: W / Space / ↑\n" +
    "1–5 or tap hotbar: choose block\n" +
    "Mouse: Left=break, Right=place\n" +
    "Touch: tap blocks to break/place\n" +
    "Touch buttons: ◀ / ▲ / ▶",
    18,
    18
  );

  pop();
}
Line-by-line explanation (8 lines)

🔧 Subcomponents:

for-loop Hotbar slot drawing loop for (let i = 0; i < slots; i++) {

Draws each of the five inventory slots side by side, highlighting whichever one is currently selected.

conditional Selected slot border strokeWeight(i === selectedIndex ? 3 : 1);

Gives the active hotbar slot a thicker border so the player can see which block they'll place.

fill(0, 0, 0, 130); rect(0, height - barH, width, barH);
Draws a semi-transparent black bar across the bottom of the screen behind the hotbar icons.
const totalW = slots * slotSize + (slots - 1) * gap;
Calculates the total width of all 5 slots plus the gaps between them, so they can be centered as a group.
const startX = (width - totalW) / 2;
Centers the whole hotbar horizontally on screen regardless of canvas width.
strokeWeight(i === selectedIndex ? 3 : 1);
Uses a ternary to give the selected slot a bold 3px border while others get a thin 1px border.
const c = getBlockColor(blockId);
Looks up the RGB color to preview for whichever block this slot holds.
if (c.length === 1) fill(c[0]); else fill(c[0], c[1], c[2]);
Handles both single-value grayscale colors (like stone) and full RGB colors uniformly.
text(i + 1, x + slotSize / 2, y + slotSize / 2);
Draws the slot number (1-5) centered inside each slot square.
fill(0, 0, 0, 140); rect(10, 10, panelW, panelH, 8);
Draws a rounded semi-transparent panel in the top-left corner as a backdrop for the instructions text.

getBlockColor()

This function duplicates the same colors used in drawWorld()'s switch statement, just packaged as arrays instead of direct fill() calls - useful wherever a color value (not just an immediate draw call) is needed, like the hotbar preview.

function getBlockColor(id) {
  switch (id) {
    case GRASS:  return [95, 159, 53];
    case DIRT:   return [121, 85, 58];
    case STONE:  return [140];
    case WOOD:   return [102, 51, 0];
    case LEAVES: return [46, 139, 87];
    default:     return [0];
  }
}
Line-by-line explanation (3 lines)

🔧 Subcomponents:

switch-case Block ID to color lookup switch (id) {

Maps each block type constant to an array of RGB values (or a single grayscale value) used for the hotbar preview icons.

case GRASS: return [95, 159, 53];
Returns a 3-value RGB array for green grass.
case STONE: return [140];
Returns a single-value array for stone, since fill(140) applies the same value to R, G, and B for a gray color.
default: return [0];
Falls back to black if given an unrecognized or AIR block ID.

rectsOverlap()

This is the classic AABB (axis-aligned bounding box) overlap test used throughout 2D game development. It's used here to stop the player from placing a block directly on top of themselves.

function rectsOverlap(x1, y1, w1, h1, x2, y2, w2, h2) {
  return !(
    x1 + w1 <= x2 ||
    x1 >= x2 + w2 ||
    y1 + h1 <= y2 ||
    y1 >= y2 + h2
  );
}
Line-by-line explanation (3 lines)
x1 + w1 <= x2 || x1 >= x2 + w2
Checks whether rectangle 1 is entirely to the left or entirely to the right of rectangle 2 - if so, they can't overlap.
y1 + h1 <= y2 || y1 >= y2 + h2
Same check for the vertical axis - entirely above or entirely below means no overlap.
return !( ... )
The rectangles overlap if NONE of those 'definitely separate' conditions are true, so the whole expression is negated.

handleHotbarClick()

This function is shared between mousePressed() and touchStarted(), demonstrating how to write one reusable hit-test function that works for multiple input methods instead of duplicating logic.

function handleHotbarClick(px, py) {
  const barH = UI_BAR_H;
  const slots = inventory.length;
  const slotSize = 40;
  const gap = 12;
  const totalW = slots * slotSize + (slots - 1) * gap;
  const startX = (width - totalW) / 2;
  const startY = height - barH + (barH - slotSize) / 2;

  for (let i = 0; i < slots; i++) {
    const x = startX + i * (slotSize + gap);
    const y = startY;
    if (px >= x && px <= x + slotSize && py >= y && py <= y + slotSize) {
      if (selectedIndex !== i) {
        selectedIndex = i;
        playSelectSound();
      } else {
        selectedIndex = i;
      }
      return true;
    }
  }
  return false;
}
Line-by-line explanation (3 lines)

🔧 Subcomponents:

for-loop Slot hit-testing loop if (px >= x && px <= x + slotSize && py >= y && py <= y + slotSize) {

Checks whether the clicked/tapped point falls inside each hotbar slot's rectangle to determine which one was selected.

if (px >= x && px <= x + slotSize && py >= y && py <= y + slotSize) {
A simple point-in-rectangle test: is the click/tap position within this slot's bounding box?
if (selectedIndex !== i) { selectedIndex = i; playSelectSound(); }
Only plays the selection sound if the slot actually changed, avoiding repeated blips for taps on the already-active slot.
return true;
Signals that a slot was successfully clicked, stopping the search early.

mousePressed()

mousePressed() is a p5.js callback fired once per click. Note this game uses right-click to place blocks - that's handled inside handleWorldTap() based on whether the tapped tile is empty or occupied, not by checking which mouse button was pressed.

function mousePressed() {
  initAudioContext(); // unlock audio on first mouse click

  // On touch devices, prevent double-handling (touch + mouse)
  if (touches && touches.length > 0) return;

  // If clicking on the hotbar, just select slot
  if (mouseY > height - UI_BAR_H) {
    handleHotbarClick(mouseX, mouseY);
    return;
  }

  // World edit with mouse
  handleWorldTap(mouseX, mouseY);
}
Line-by-line explanation (3 lines)
if (touches && touches.length > 0) return;
On touch devices, a tap can also fire a synthetic mouse event; this guard skips mousePressed if a real touch is already being handled to avoid double actions.
if (mouseY > height - UI_BAR_H) { handleHotbarClick(mouseX, mouseY); return; }
If the click is inside the bottom UI bar area, treat it as a hotbar selection instead of a world edit.
handleWorldTap(mouseX, mouseY);
Otherwise, treats the click as an attempt to break or place a block at that screen position.

drawTouchControls()

This function purely renders the touch buttons based on the touchControls state object; the actual logic for detecting presses lives in handleTouches(), keeping drawing and logic cleanly separated.

function drawTouchControls() {
  if (!isTouchDevice) return;

  push();

  const btnSize = 70;
  const margin = 20;
  const bottomY = height - 80 - margin; // Above hotbar

  textAlign(CENTER, CENTER);
  textSize(32);

  // Left button
  const leftX = margin;
  fill(touchControls.left ? 'rgba(255,255,255,0.6)' : 'rgba(255,255,255,0.3)');
  stroke(255);
  strokeWeight(2);
  rect(leftX, bottomY - btnSize, btnSize, btnSize, 10);
  fill(255);
  noStroke();
  text('◀', leftX + btnSize / 2, bottomY - btnSize / 2);

  // Right button
  const rightX = margin + btnSize + 10;
  fill(touchControls.right ? 'rgba(255,255,255,0.6)' : 'rgba(255,255,255,0.3)');
  stroke(255);
  strokeWeight(2);
  rect(rightX, bottomY - btnSize, btnSize, btnSize, 10);
  fill(255);
  noStroke();
  text('▶', rightX + btnSize / 2, bottomY - btnSize / 2);

  // Jump button (right side)
  const jumpX = width - margin - btnSize;
  fill(touchControls.jump ? 'rgba(255,255,255,0.6)' : 'rgba(255,255,255,0.3)');
  stroke(255);
  strokeWeight(2);
  rect(jumpX, bottomY - btnSize, btnSize, btnSize, 10);
  fill(255);
  noStroke();
  text('▲', jumpX + btnSize / 2, bottomY - btnSize / 2);

  pop();
}
Line-by-line explanation (4 lines)

🔧 Subcomponents:

calculation Left button rendering fill(touchControls.left ? 'rgba(255,255,255,0.6)' : 'rgba(255,255,255,0.3)');

Brightens the button's fill color while it's actively being pressed, giving visual feedback.

if (!isTouchDevice) return;
Skips drawing entirely on non-touch devices like desktop computers with a mouse.
const bottomY = height - 80 - margin; // Above hotbar
Positions the button row just above the bottom hotbar so they don't overlap.
fill(touchControls.left ? 'rgba(255,255,255,0.6)' : 'rgba(255,255,255,0.3)');
Uses a ternary to make the button brighter (more opaque) while actively pressed, and dimmer when idle.
text('◀', leftX + btnSize / 2, bottomY - btnSize / 2);
Draws the arrow glyph centered inside the button rectangle.

touchStarted()

touchStarted() is a p5.js callback that fires whenever one or more fingers first touch the screen. This implementation loops through every simultaneous touch point (multi-touch), a detail easy to miss if you only test with a single finger.

function touchStarted() {
  initAudioContext(); // unlock audio on first touch

  if (!touches || touches.length === 0) return false;

  // Update button states
  handleTouches(touches, true);

  for (let t of touches) {
    const tx = t.x;
    const ty = t.y;

    // 1) Hotbar area: tap to select block
    if (ty > height - UI_BAR_H) {
      handleHotbarClick(tx, ty);
      continue;
    }

    // 2) Inside any control button? (already handled via handleTouches)
    if (isInTouchButton(tx, ty)) {
      continue; // don't treat as world tap
    }

    // 3) World tap: break/place
    handleWorldTap(tx, ty);
  }

  // Prevent default scrolling / zooming
  return false;
}
Line-by-line explanation (6 lines)

🔧 Subcomponents:

for-loop Multi-touch processing loop for (let t of touches) {

Handles every simultaneous finger touch, routing each one to hotbar selection, control buttons, or world editing depending on where it landed.

if (!touches || touches.length === 0) return false;
Safety check in case this fires with no active touches recorded.
handleTouches(touches, true);
Updates the touchControls left/right/jump flags based on all current touch positions.
if (ty > height - UI_BAR_H) { handleHotbarClick(tx, ty); continue; }
If this particular touch landed on the hotbar, treat it as a slot selection and skip world-editing logic for it.
if (isInTouchButton(tx, ty)) { continue; }
Skips world-tap logic if the touch landed on a movement/jump button instead of the game world.
handleWorldTap(tx, ty);
Otherwise treats this touch as an attempt to break or place a block.
return false;
Returning false tells the browser to prevent its default touch behavior (like scrolling or zooming the page).

touchEnded()

This handles the tricky case where a player is holding two buttons at once (say, left + jump) and lifts only one finger - it resets everything and rebuilds the state from whatever touches remain.

function touchEnded() {
  // Reset controls, then re-check active touches for held directions
  touchControls.left = false;
  touchControls.right = false;
  handleTouches(touches, false);
  return false;
}
Line-by-line explanation (3 lines)
touchControls.left = false; touchControls.right = false;
Resets movement flags first, since a finger just lifted off the screen.
handleTouches(touches, false);
Re-checks any remaining touches (if the player still has another finger down) to correctly restore movement flags for multi-touch.
return false;
Prevents default touch-end browser behavior.

handleTouches()

This function recalculates the entire touchControls state from the current list of touches every time it's called, which is simpler and less error-prone than trying to track individual touch IDs across frames.

function handleTouches(touchList, isStart) {
  const btnSize = 70;
  const margin = 20;
  const bottomY = height - 80 - margin;

  touchControls.left = false;
  touchControls.right = false;

  for (let t of touchList) {
    const tx = t.x;
    const ty = t.y;

    // Left button
    if (
      tx >= margin &&
      tx <= margin + btnSize &&
      ty >= bottomY - btnSize &&
      ty <= bottomY
    ) {
      touchControls.left = true;
    }

    // Right button
    if (
      tx >= margin + btnSize + 10 &&
      tx <= margin + btnSize * 2 + 10 &&
      ty >= bottomY - btnSize &&
      ty <= bottomY
    ) {
      touchControls.right = true;
    }

    // Jump button (only on touch start)
    const jumpX = width - margin - btnSize;
    if (
      tx >= jumpX &&
      tx <= jumpX + btnSize &&
      ty >= bottomY - btnSize &&
      ty <= bottomY &&
      isStart
    ) {
      touchControls.jump = true;
    }
  }
}
Line-by-line explanation (3 lines)

🔧 Subcomponents:

for-loop Touch point to button mapping for (let t of touchList) {

Tests every active touch point against the left, right, and jump button rectangles to determine which controls should be active.

touchControls.left = false; touchControls.right = false;
Resets these two flags before re-evaluating them from scratch based on current touches.
if (tx >= margin && tx <= margin + btnSize && ty >= bottomY - btnSize && ty <= bottomY) {
A point-in-rectangle test to see if this touch falls within the left button's screen area.
&& isStart) { touchControls.jump = true; }
The jump flag is only ever set true on a fresh touch start (not on every held-touch check), since jump should be a single action, not held continuously like walking.

isInTouchButton()

This function exists purely so touchStarted() can tell the difference between 'the player tapped a movement button' versus 'the player tapped the game world to break/place a block' at the same screen location.

function isInTouchButton(tx, ty) {
  const btnSize = 70;
  const margin = 20;
  const bottomY = height - 80 - margin;

  const leftX = margin;
  const rightX = margin + btnSize + 10;
  const jumpX = width - margin - btnSize;

  const inRect = (x, y, w, h) =>
    tx >= x && tx <= x + w && ty >= y && ty <= y + h;

  if (inRect(leftX, bottomY - btnSize, btnSize, btnSize)) return true;
  if (inRect(rightX, bottomY - btnSize, btnSize, btnSize)) return true;
  if (inRect(jumpX, bottomY - btnSize, btnSize, btnSize)) return true;

  return false;
}
Line-by-line explanation (2 lines)
const inRect = (x, y, w, h) => tx >= x && tx <= x + w && ty >= y && ty <= y + h;
Defines a small reusable arrow function for point-in-rectangle testing, avoiding repeating the same comparison three times.
if (inRect(leftX, bottomY - btnSize, btnSize, btnSize)) return true;
Checks the touch point against the left button's rectangle using the helper function.

handleWorldTap()

This is the core game-loop action of the sandbox: converting a click/tap into a grid coordinate and mutating the world array directly. Because drawWorld() reads straight from this same array every frame, changes appear instantly without any extra bookkeeping.

🔬 This is the exact spot where a tile gets destroyed. What happens if you also print the coordinates with console.log(tileX, tileY) right before setting it to AIR - could that help you debug placement bugs?

  if (world[tileX][tileY] !== AIR) {
    // Break block
    world[tileX][tileY] = AIR;
    playBlockBreakSound();
  } else {
function handleWorldTap(px, py) {
  const tileX = floor((px + cameraX) / TILE_SIZE);
  const tileY = floor((py + cameraY) / TILE_SIZE);
  if (!isInWorld(tileX, tileY)) return;

  if (world[tileX][tileY] !== AIR) {
    // Break block
    world[tileX][tileY] = AIR;
    playBlockBreakSound();
  } else {
    // Place selected block
    const blockId = inventory[selectedIndex];
    if (blockId !== AIR) {
      const bx = tileX * TILE_SIZE;
      const by = tileY * TILE_SIZE;
      if (!rectsOverlap(bx, by, TILE_SIZE, TILE_SIZE, player.x, player.y, player.w, player.h)) {
        world[tileX][tileY] = blockId;
        playBlockPlaceSound();
      }
    }
  }
}
Line-by-line explanation (6 lines)

🔧 Subcomponents:

conditional Break vs place decision if (world[tileX][tileY] !== AIR) {

Decides whether the tapped tile should be broken (if occupied) or a new block placed (if empty).

conditional Prevent placing on player if (!rectsOverlap(bx, by, TILE_SIZE, TILE_SIZE, player.x, player.y, player.w, player.h)) {

Stops the player from placing a block directly on top of themselves, which would otherwise trap them inside a wall.

const tileX = floor((px + cameraX) / TILE_SIZE);
Converts the tapped/clicked screen position into a world tile column, accounting for how far the camera has scrolled.
if (!isInWorld(tileX, tileY)) return;
Ignores taps outside the world grid.
if (world[tileX][tileY] !== AIR) { world[tileX][tileY] = AIR; playBlockBreakSound(); }
If the tapped tile has a block, clear it to AIR (breaking it) and play the crunch sound.
const blockId = inventory[selectedIndex];
Looks up which block type is currently selected in the hotbar.
if (!rectsOverlap(bx, by, TILE_SIZE, TILE_SIZE, player.x, player.y, player.w, player.h)) {
Only allows placing the block if doing so wouldn't overlap the player's own bounding box.
world[tileX][tileY] = blockId; playBlockPlaceSound();
Writes the new block into the world array and plays the placement sound.

📦 Key Variables

touchControls object

Tracks whether the on-screen left, right, and jump touch buttons are currently pressed, shared between input handling and rendering.

let touchControls = { left: false, right: false, jump: false };
isTouchDevice boolean

Detected once in setup() to decide whether to render on-screen touch buttons.

let isTouchDevice = false;
TILE_SIZE number

The pixel width/height of every square tile in the world grid.

const TILE_SIZE = 32;
WORLD_WIDTH number

How many tile columns wide the entire generated world is.

const WORLD_WIDTH = 200;
WORLD_HEIGHT number

How many tile rows tall the world is, from sky to bedrock.

const WORLD_HEIGHT = 60;
UI_BAR_H number

The height in pixels of the bottom UI bar that holds the hotbar and touch controls.

const UI_BAR_H = 60;
Block ID constants (AIR, GRASS, DIRT, STONE, WOOD, LEAVES) number

Named numeric IDs used throughout world, inventory, and drawing code instead of magic numbers, making the code far more readable.

const AIR = 0; const GRASS = 1; // ...etc
world array

The main 2D array (world[x][y]) storing which block ID occupies every tile position in the game.

let world;
player object

Stores the player's position, size, velocity, and ground-contact state used by physics and rendering.

let player = { x: 0, y: 0, w: 22, h: 32, vx: 0, vy: 0, onGround: false };
cameraX number

The horizontal pixel offset used to convert world coordinates to screen coordinates for scrolling.

let cameraX = 0;
cameraY number

The vertical pixel offset used to convert world coordinates to screen coordinates for scrolling.

let cameraY = 0;
inventory array

The five block types available in the hotbar, in slot order.

let inventory = [DIRT, STONE, WOOD, LEAVES, GRASS];
selectedIndex number

Which hotbar slot (0-4) is currently active and will be placed when the player taps an empty tile.

let selectedIndex = 0;
GRAVITY number

Constant downward acceleration applied to the player's vertical velocity every frame.

const GRAVITY = 0.8;
MOVE_SPEED number

Constant horizontal speed the player moves at while a direction is held.

const MOVE_SPEED = 3;
JUMP_SPEED number

The upward velocity applied the instant the player jumps.

const JUMP_SPEED = 12;
audioInitialized boolean

Tracks whether the browser's AudioContext has been unlocked by a user gesture yet, gating all sound playback.

let audioInitialized = false;

🔧 Potential Improvements (4)

Here are some ways this code could be enhanced:

PERFORMANCE playTone() and playBlockBreakSound()

Every call creates a brand-new p5.Oscillator or p5.Noise object that is stopped but never explicitly disposed, so playing lots of sounds (rapid block breaking) could accumulate audio nodes and hurt performance over a long play session.

💡 Create a small pool of reusable oscillator/noise objects at startup and reuse them, or explicitly call .dispose() after .stop() if p5.sound supports it, instead of allocating new ones on every single sound effect.

FEATURE handleWorldTap()

The player can break or place blocks anywhere currently visible on screen, regardless of how far away the tile is from the player - there's no build/reach limit like in real Minecraft.

💡 Add a distance check using dist() between the player's center and the tapped tile, and ignore the tap if it's beyond a reasonable reach radius (e.g. 5 tiles).

STYLE drawTouchControls(), handleTouches(), isInTouchButton()

The button layout constants (btnSize = 70, margin = 20, bottomY calculation) are duplicated identically across three separate functions, so changing the button layout requires editing the same numbers in multiple places.

💡 Define a single shared object like const TOUCH_LAYOUT = { btnSize: 70, margin: 20 } at the top of the file and reference it from all three functions to keep the layout consistent and easy to tweak.

BUG initWorld()

Tree generation only checks 'if (dist(lx, ly, 0, 0) < 2.6 && world[tx][ty] === AIR)' for leaves, but doesn't guard against trees generating too close to the world's left/right edges beyond the bounds check, and dense forests near WORLD_WIDTH boundaries can produce lopsided or clipped tree canopies.

💡 Consider skipping tree spawning within a few columns of x = 0 and x = WORLD_WIDTH - 1 so canopies are never visually cut off at the world's edges.

🔄 Code Flow

Code flow showing initaudiocontext, playtone, playjumpsound, playblockplacesound, playselectsound, playblockbreaksound, setup, draw, windowresized, initworld, handleinput, keypressed, updateplayer, updatecamera, isinworld, issolid, issolidtile, drawworld, drawplayer, drawcursorhighlight, drawui, getblockcolor, rectsoverlap, handlehotbarclick, mousepressed, drawtouchcontrols, touchstarted, touchended, handletouches, isintouchbutton, handleworldtap

💡 Click on function names in the diagram to jump to their code

graph TD start[Start] --> setup[setup] setup --> draw[draw loop] draw --> handleinput[handleinput] draw --> updatecamera[updatecamera] draw --> drawworld[drawworld] draw --> drawplayer[drawplayer] draw --> drawui[drawui] draw --> drawcursorhighlight[drawcursorhighlight] handleinput --> left-check[left-check] handleinput --> jump-check[jump-check] handleinput --> jump-key[jump-key] handleinput --> hotbar-key[hotbar-key] updateplayer --> horizontal-collision[horizontal-collision] updateplayer --> vertical-fall-collision[vertical-fall-collision] updateplayer --> vertical-jump-collision[vertical-jump-collision] updateplayer --> gravity-apply[gravity-apply] drawworld --> cull-range[cull-range] drawworld --> tile-loop[tile-loop] tile-loop --> block-color-switch[block-color-switch] drawui --> hotbar-loop[hotbar-loop] hotbar-loop --> selected-highlight[selected-highlight] hotbar-loop --> slot-hit-test[slot-hit-test] drawui --> left-button-draw[left-button-draw] drawcursorhighlight --> touch-loop[touch-loop] touch-loop --> touch-region-loop[touch-region-loop] touch-region-loop --> break-or-place[break-or-place] break-or-place --> player-overlap-guard[player-overlap-guard] click setup href "#fn-setup" click draw href "#fn-draw" click handleinput href "#fn-handleinput" click updatecamera href "#fn-updatecamera" click drawworld href "#fn-drawworld" click drawplayer href "#fn-drawplayer" click drawui href "#fn-drawui" click drawcursorhighlight href "#fn-drawcursorhighlight" click left-check href "#sub-left-check" click jump-check href "#sub-jump-check" click jump-key href "#sub-jump-key" click hotbar-key href "#sub-hotbar-key" click horizontal-collision href "#sub-horizontal-collision" click vertical-fall-collision href "#sub-vertical-fall-collision" click vertical-jump-collision href "#sub-vertical-jump-collision" click gravity-apply href "#sub-gravity-apply" click cull-range href "#sub-cull-range" click tile-loop href "#sub-tile-loop" click block-color-switch href "#sub-block-color-switch" click hotbar-loop href "#sub-hotbar-loop" click selected-highlight href "#sub-selected-highlight" click slot-hit-test href "#sub-slot-hit-test" click left-button-draw href "#sub-left-button-draw" click touch-loop href "#sub-touch-loop" click touch-region-loop href "#sub-touch-region-loop" click break-or-place href "#sub-break-or-place" click player-overlap-guard href "#sub-player-overlap-guard"

Preview

Simple MineCraft Cline - p5.js creative coding sketch preview
Sketch Preview
Code flow diagram showing the structure of Simple MineCraft Cline - Code flow showing initaudiocontext, playtone, playjumpsound, playblockplacesound, playselectsound, playblockbreaksound, setup, draw, windowresized, initworld, handleinput, keypressed, updateplayer, updatecamera, isinworld, issolid, issolidtile, drawworld, drawplayer, drawcursorhighlight, drawui, getblockcolor, rectsoverlap, handlehotbarclick, mousepressed, drawtouchcontrols, touchstarted, touchended, handletouches, isintouchbutton, handleworldtap
Code Flow Diagram