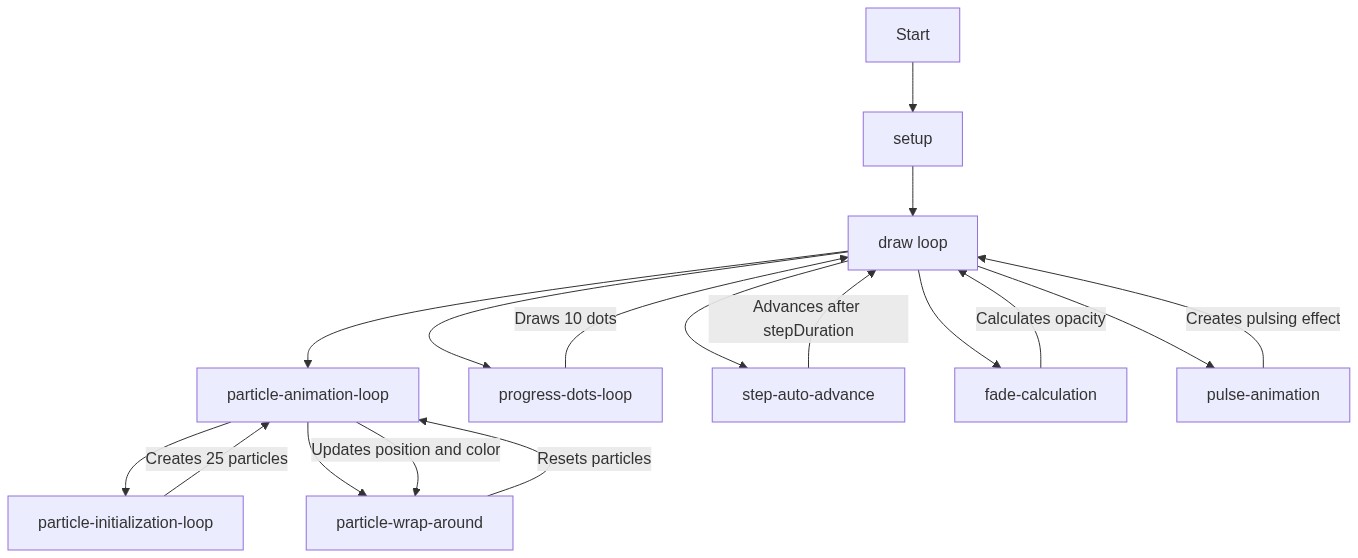
Sketch 2026-01-15 05:42

This sketch creates an interactive onboarding experience with animated floating particles, pulsing step indicators, and auto-advancing instructional panels. Users can tap to skip steps or swipe to navigate through 10 different instruction screens with smooth fade transitions.

๐ŸŽ“ Concepts You'll Learn

Animation loopParticle systemsHSB color modeResponsive designText renderingFade transitionsProgress indicatorsUser interactionTrigonometric animationArray iteration

๐Ÿ”„ Code Flow

Code flow showing preload, setup, draw, mousepressed, windowresized

๐Ÿ’ก Click on function names in the diagram to jump to their code

graph TD start[Start] --> setup[setup] setup --> draw[draw loop] draw --> particleanimationloop[particle-animation-loop] draw --> progressdotsloop[progress-dots-loop] draw --> stepautoadvance[step-auto-advance] draw --> fadecalculation[fade-calculation] draw --> pulseanimation[pulse-animation] particleanimationloop --> particleinitializationloop[particle-initialization-loop] particleanimationloop --> particlewraparound[particle-wrap-around] particleinitializationloop -->|Creates 25 particles| particleanimationloop particleanimationloop -->|Updates position and color| particlewraparound particlewraparound -->|Resets particles| particleanimationloop stepautoadvance -->|Advances after stepDuration| draw fadecalculation -->|Calculates opacity| draw pulseanimation -->|Creates pulsing effect| draw progressdotsloop -->|Draws 10 dots| draw click setup href "#fn-setup" click draw href "#fn-draw" click particleinitializationloop href "#sub-particle-initialization-loop" click particleanimationloop href "#sub-particle-animation-loop" click particlewraparound href "#sub-particle-wrap-around" click stepautoadvance href "#sub-step-auto-advance" click fadecalculation href "#sub-fade-calculation" click pulseanimation href "#sub-pulse-animation" click progressdotsloop href "#sub-progress-dots-loop"

๐Ÿ“ Code Breakdown

preload()

preload() runs before setup() and is used to load external resources like fonts, images, and sounds. This ensures they're available when you need them in setup() and draw().

function preload() {
  robotoFont = loadFont('https://unpkg.com/@fontsource/roboto@latest/files/roboto-latin-400-normal.woff');
}

Line by Line:

robotoFont = loadFont('https://unpkg.com/@fontsource/roboto@latest/files/roboto-latin-400-normal.woff')
Loads the Roboto font from a CDN before setup() runs, ensuring the font is ready to use for text rendering

setup()

setup() runs once when the sketch starts. It's where you initialize the canvas, set drawing modes, and create initial data structures like the particles array.

function setup() {
  createCanvas(windowWidth, windowHeight);
  textFont(robotoFont);
  colorMode(HSB, 360, 100, 100, 100);
  noStroke();
  
  // Create floating particles for subtle background animation
  for (let i = 0; i < 25; i++) {
    particles.push({
      x: random(width),
      y: random(height),
      size: random(4, 10),
      speed: random(0.2, 0.8),
      hue: random(360)
    });
  }
}

๐Ÿ”ง Subcomponents:

for-loop Particle Creation Loop for (let i = 0; i < 25; i++) { particles.push({...}) }

Creates 25 particle objects with random positions, sizes, speeds, and colors, storing them in the particles array

Line by Line:

createCanvas(windowWidth, windowHeight)
Creates a canvas that fills the entire window, making the sketch responsive to window size
textFont(robotoFont)
Sets the Roboto font loaded in preload() as the font for all text rendering
colorMode(HSB, 360, 100, 100, 100)
Switches from RGB to HSB (Hue, Saturation, Brightness) color mode with ranges 0-360 for hue and 0-100 for saturation/brightness/alpha
noStroke()
Disables outlines on all shapes, so only filled shapes will be drawn
for (let i = 0; i < 25; i++) {
Loops 25 times to create 25 particles
particles.push({x: random(width), y: random(height), size: random(4, 10), speed: random(0.2, 0.8), hue: random(360)})
Creates a particle object with random x/y position across the canvas, random size between 4-10 pixels, random upward speed, and random hue color

draw()

draw() runs 60 times per second, continuously updating and redrawing everything. This sketch demonstrates particle animation, step progression with timers, fade transitions, responsive text sizing, and progress indicators.

function draw() {
  // Dark gradient background
  background(240, 25, 10);
  
  // Animate floating particles
  for (let p of particles) {
    p.y -= p.speed;
    if (p.y < -20) {
      p.y = height + 20;
      p.x = random(width);
    }
    p.hue = (p.hue + 0.3) % 360;
    fill(p.hue, 50, 70, 15);
    circle(p.x, p.y, p.size);
  }
  
  // Auto-advance steps
  stepTimer++;
  if (stepTimer >= stepDuration) {
    stepTimer = 0;
    step = (step + 1) % instructions.length;
  }
  
  let current = instructions[step];
  let progress = stepTimer / stepDuration;
  
  // Smooth fade in/out
  let alpha = progress < 0.15 ? map(progress, 0, 0.15, 0, 100) :
              progress > 0.85 ? map(progress, 0.85, 1, 100, 0) : 100;
  
  let centerY = height / 2;
  
  // Animated step number with gentle pulse
  let pulse = 1 + sin(frameCount * 0.08) * 0.08;
  let iconSize = 50 * pulse;
  
  // Draw circular badge with step number
  fill(280, 60, 90, alpha * 0.9);
  circle(width / 2, centerY - 50, iconSize);
  
  // Step number inside circle
  fill(0, 0, 100, alpha);
  textSize(24 * pulse);
  textAlign(CENTER, CENTER);
  text(step + 1, width / 2, centerY - 50);
  
  // Title - responsive size
  textSize(min(26, width / 15));
  fill(280, 70, 100, alpha);
  text(current.title, width / 2, centerY + 15);
  
  // Description - responsive size
  textSize(min(16, width / 24));
  fill(0, 0, 75, alpha * 0.85);
  text(current.desc, width / 2, centerY + 50);
  
  // Progress indicator dots
  let dotSpacing = 14;
  let dotsWidth = (instructions.length - 1) * dotSpacing;
  let dotsX = (width - dotsWidth) / 2;
  
  for (let i = 0; i < instructions.length; i++) {
    let isActive = i === step;
    fill(isActive ? color(280, 70, 100) : color(0, 0, 30));
    circle(dotsX + i * dotSpacing, height - 35, isActive ? 7 : 4);
  }
  
  // Swipe hint
  textSize(11);
  fill(0, 0, 45, 50);
  text("Tap to skip ยท Swipe panels to navigate", width / 2, height - 60);
}

๐Ÿ”ง Subcomponents:

for-loop Particle Animation Loop for (let p of particles) { p.y -= p.speed; ... circle(p.x, p.y, p.size); }

Updates each particle's position, color, and draws it on screen each frame

conditional Particle Wrap-Around if (p.y < -20) { p.y = height + 20; p.x = random(width); }

Resets particles to the bottom when they float off the top of the screen

conditional Auto-Advance Steps if (stepTimer >= stepDuration) { stepTimer = 0; step = (step + 1) % instructions.length; }

Automatically advances to the next instruction panel after stepDuration frames

calculation Fade In/Out Alpha let alpha = progress < 0.15 ? map(progress, 0, 0.15, 0, 100) : progress > 0.85 ? map(progress, 0.85, 1, 100, 0) : 100

Calculates opacity for smooth fade-in at start and fade-out at end of each step

calculation Pulse Effect let pulse = 1 + sin(frameCount * 0.08) * 0.08

Creates a gentle pulsing animation using sine wave, scaling between 0.92 and 1.08

for-loop Progress Indicator Dots for (let i = 0; i < instructions.length; i++) { ... circle(dotsX + i * dotSpacing, height - 35, isActive ? 7 : 4); }

Draws 10 dots at the bottom showing progress, with the current step's dot larger and brighter

Line by Line:

background(240, 25, 10)
Fills the canvas with a dark color (hue 240=blue, 25% saturation, 10% brightness) each frame
for (let p of particles) {
Loops through each particle object in the particles array
p.y -= p.speed
Moves each particle upward by subtracting its speed from its y position
if (p.y < -20) {
Checks if particle has moved above the visible canvas
p.y = height + 20
Resets particle to bottom of screen when it goes off top
p.x = random(width)
Gives the reset particle a new random horizontal position
p.hue = (p.hue + 0.3) % 360
Gradually shifts the particle's hue by 0.3 degrees each frame, wrapping back to 0 at 360
fill(p.hue, 50, 70, 15)
Sets the fill color using HSB mode with the particle's hue, 50% saturation, 70% brightness, and 15% transparency
circle(p.x, p.y, p.size)
Draws a circle at the particle's current position with its size
stepTimer++
Increments the timer that tracks how long the current step has been displayed
if (stepTimer >= stepDuration) {
Checks if enough frames have passed to advance to the next instruction
step = (step + 1) % instructions.length
Advances to the next step, wrapping back to 0 after the last instruction
let progress = stepTimer / stepDuration
Calculates progress as a decimal from 0 to 1 representing how far through the current step we are
let alpha = progress < 0.15 ? map(progress, 0, 0.15, 0, 100) : progress > 0.85 ? map(progress, 0.85, 1, 100, 0) : 100
Creates fade-in during first 15% of step and fade-out during last 15%, full opacity in middle
let pulse = 1 + sin(frameCount * 0.08) * 0.08
Uses sine wave to create smooth pulsing effect that oscillates between 0.92 and 1.08
let iconSize = 50 * pulse
Scales the circular badge size based on the pulse value, making it grow and shrink smoothly
fill(280, 60, 90, alpha * 0.9)
Sets fill to purple (hue 280) with reduced alpha for the circular badge
circle(width / 2, centerY - 50, iconSize)
Draws the pulsing circular badge centered horizontally and above the center vertically
fill(0, 0, 100, alpha)
Sets fill to white (0 saturation, 100 brightness) for the step number text
textSize(24 * pulse)
Scales the text size based on pulse, making the number grow and shrink with the badge
text(step + 1, width / 2, centerY - 50)
Draws the current step number (1-10) centered in the badge
textSize(min(26, width / 15))
Sets title text size to either 26 or 1/15th of window width, whichever is smaller (responsive)
text(current.title, width / 2, centerY + 15)
Draws the current instruction's title centered below the badge
textSize(min(16, width / 24))
Sets description text size to either 16 or 1/24th of window width, whichever is smaller
text(current.desc, width / 2, centerY + 50)
Draws the current instruction's description centered below the title
let dotSpacing = 14
Sets the horizontal distance between progress indicator dots to 14 pixels
let dotsWidth = (instructions.length - 1) * dotSpacing
Calculates total width needed for all dots (9 gaps ร— 14 pixels)
let dotsX = (width - dotsWidth) / 2
Calculates starting x position to center all dots horizontally
for (let i = 0; i < instructions.length; i++) {
Loops through all 10 instruction steps to draw a dot for each
let isActive = i === step
Determines if this dot represents the current step
fill(isActive ? color(280, 70, 100) : color(0, 0, 30))
Uses bright purple for active dot, dark gray for inactive dots
circle(dotsX + i * dotSpacing, height - 35, isActive ? 7 : 4)
Draws a larger (7px) dot for current step, smaller (4px) dots for others

mousePressed()

mousePressed() is called once whenever the user clicks or taps. This sketch uses it to let users skip to the next instruction by tapping anywhere on the screen.

function mousePressed() {
  step = (step + 1) % instructions.length;
  stepTimer = 0;
}

Line by Line:

step = (step + 1) % instructions.length
Advances to the next instruction step, wrapping back to 0 after the last step (modulo operator %)
stepTimer = 0
Resets the timer to 0, starting the fade-in animation for the new step immediately

windowResized()

windowResized() is called automatically whenever the browser window is resized. This is essential for mobile-friendly sketches that need to adapt to different screen sizes and orientations.

function windowResized() {
  resizeCanvas(windowWidth, windowHeight);
}

Line by Line:

resizeCanvas(windowWidth, windowHeight)
Automatically resizes the canvas to match the new window dimensions when the user resizes their browser or rotates their device

๐Ÿ“ฆ Key Variables

robotoFont p5.Font object

Stores the loaded Roboto font to be used for all text rendering in the sketch

let robotoFont;
particles array of objects

Stores all 25 floating particle objects, each with x, y, size, speed, and hue properties for background animation

let particles = [];
step number

Tracks which instruction panel is currently being displayed (0-9)

let step = 0;
stepTimer number

Counts frames elapsed for the current step, used to auto-advance and calculate fade transitions

let stepTimer = 0;
stepDuration number

Number of frames each instruction displays before auto-advancing (225 frames โ‰ˆ 3.75 seconds at 60fps)

let stepDuration = 225;
instructions array of objects

Contains 10 instruction panels, each with a title and description for the onboarding experience

let instructions = [{title: '...', desc: '...'}, ...];

๐Ÿงช Try This!

Experiment with the code by making these changes:

  1. Change stepDuration from 225 to 100 to make the instructions advance much faster, then to 500 to make them advance slower
  2. Modify the particle creation loop (line 20) to create 50 particles instead of 25 to fill the background with more animation
  3. Change the pulse animation on line 55 from `sin(frameCount * 0.08)` to `sin(frameCount * 0.2)` to make the badge pulse faster
  4. Modify line 37 to change particle colors: try `fill(p.hue, 80, 90, 25)` to make particles more saturated and visible
  5. Change the fade timing on line 50: try `progress < 0.5` instead of `progress < 0.15` to make fade-in last longer
  6. Modify line 73 to change the progress dots color: try `fill(isActive ? color(0, 100, 100) : color(0, 0, 50))` for red active dots
  7. Change the circle size for the badge on line 54 from 50 to 80 to make it larger, and adjust the text size accordingly
Open in Editor & Experiment โ†’

๐Ÿ”ง Potential Improvements

Here are some ways this code could be enhanced:

BUG draw() - particle animation loop (line 32)

Particles wrap around instantly when they go off-screen, creating visible jumps. The wrap-around position should account for particle size to prevent partial visibility.

๐Ÿ’ก Change line 32 from `if (p.y < -20)` to `if (p.y < -p.size)` to account for particle radius, ensuring particles fully exit before resetting

PERFORMANCE draw() - color creation (line 68, 72, 76)

Creating new color objects with `color()` function on every frame is unnecessary and slightly inefficient

๐Ÿ’ก Pre-calculate the color values or use HSB values directly in fill() calls. For example, line 68 could be `fill(280, 70, 100, alpha)` instead of `fill(isActive ? color(280, 70, 100) : color(0, 0, 30))`

STYLE draw() - text alignment (line 60)

textAlign(CENTER, CENTER) is set only before the step number, but subsequent text calls don't reset it, potentially affecting text positioning if code is modified

๐Ÿ’ก Add textAlign(CENTER, CENTER) before each text() call, or set it once in setup() if all text should be centered

FEATURE mousePressed() function (line 84)

The sketch mentions 'Swipe panels to navigate' in the hint text (line 81) but swipe functionality is not implemented, only tap/click

๐Ÿ’ก Add touch event listeners for swipe detection using touchStartX/touchEndX variables and calculate swipe direction to advance/go back through steps

BUG setup() - particle initialization (line 20)

Particles can be created with very small speeds (0.2) making them nearly stationary, reducing visual interest in the background

๐Ÿ’ก Increase minimum speed from 0.2 to 0.5, or change to `random(0.5, 1.2)` to ensure more noticeable particle movement

Preview

Sketch 2026-01-15 05:42 - p5.js creative coding sketch preview
Sketch Preview
Code flow diagram showing the structure of Sketch 2026-01-15 05:42 - Code flow showing preload, setup, draw, mousepressed, windowresized
Code Flow Diagram