Sketch 2026-02-13 23:51

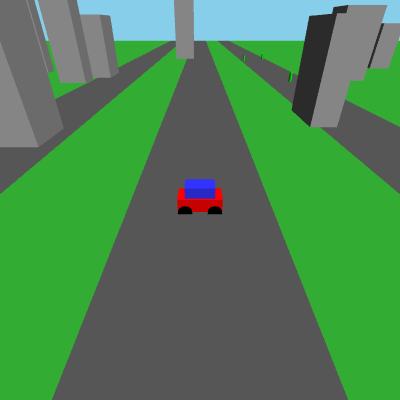
This sketch builds a mini GTA-style open-world prototype entirely with three.js, using p5.js only as a bootstrapper for setup/preload and a synthetic gunshot sound. A drivable car, a first-person on-foot character with a gun, and 50 wandering NPCs populate a procedurally scattered city of boxy buildings and roads, and pressing 'E' swaps you between driving the car and walking around shooting NPCs with raycasting.

🧪 Try This!

Experiment with the code by making these changes:

  1. Turbo-charge the car — Raising carMaxSpeed lets the car reach a much higher top speed when you hold W, making driving feel dramatically faster.
  2. Full-auto gun — Lowering the shooting cooldown lets you fire far more rapidly by holding down the mouse button repeatedly.
  3. Give NPCs a different color — Changing the NPC material color instantly recolors all 50 pedestrian cylinders in the world.
Prefer the full editor? Open it there →

📖 About This Sketch

This sketch is a small open-world game prototype where you drive a car around a procedurally scattered city, then hop out and walk around in first-person to shoot NPCs with a raycast-based gun. It's built almost entirely in three.js - p5.js is only used to preload a synthetic gunshot sound and to kick off the three.js render loop - so it's a great example of how the two libraries can coexist in one project. Key techniques on display include three.js scene/camera/renderer setup, THREE.Group for building composite models like the car and player, quaternion-based movement so the car and player always move in the direction they're facing, and THREE.Raycaster for pixel-perfect hit detection when shooting.

The code is organized around one big state machine variable, playerState, that flips between 'driving' and 'onFoot' whenever the 'E' key is pressed, swapping which mesh is visible and which camera behavior runs inside the animate() loop. Helper functions like createEnvironment(), createCar(), createPlayer(), and createGun() each build one piece of the 3D scene using primitive geometries (boxes, cylinders, planes), while onKeyDown/onKeyUp track which keys are currently held so animate() can read them every frame. By studying this file you'll learn how to structure a persistent render loop, how to fake acceleration/deceleration/turning with simple arithmetic, and how raycasting turns a 2D mouse click into a 3D hit test against a list of objects.

⚙️ How It Works

  1. When the page loads, preload() creates a silent p5.Oscillator standing in for a gunshot sample, then setup() hides the default p5 canvas and calls initThreeJS(), which builds the scene, camera, renderer, lights, ground, roads, 50 random buildings, 50 random NPCs, the car, and the first-person player + gun, then starts the animate() loop.
  2. Every frame, animate() checks the keys object (filled in by onKeyDown/onKeyUp) to update either the car's speed/rotation or the player's walking movement depending on playerState, then repositions the camera to follow whichever one is active before calling renderer.render(scene, camera).
  3. While driving, W/S accelerate and brake/reverse the car and A/D turn it, with the camera locked in a chase-cam offset behind and above the car; the car's rotation is applied via quaternions so 'forward' always means the direction the car is currently facing.
  4. Pressing 'E' toggles playerState: it copies position/rotation between the car and player groups, swaps their visibility, shows or hides the gun and crosshair, and stops the car dead so it doesn't roll away while you're on foot.
  5. While on foot, the camera sits at the player's eye height and looks in the direction the player is facing (first-person), and clicking the left mouse button calls shoot(), which fires a ray from the exact center of the screen through the 3D world.
  6. shoot() checks that ray against every NPC mesh in the npcs array; the first NPC it hits is removed from the scene and array (with its geometry/material disposed to avoid memory leaks), and short-lived flash/spark meshes are added and then removed via setTimeout for visual feedback.

🎓 Concepts You'll Learn

three.js scene graph & THREE.Group compositionPerspective camera follow behaviorQuaternion-based forward-vector movementRaycasting for hit detectionKeyboard input state trackingFinite state machine (driving vs on-foot)Procedural placement with rejection sampling (do/while loops)

📝 Code Breakdown

preload()

preload() is a special p5.js function that runs once before setup(), guaranteeing assets are ready. Here it's repurposed to warm up a synthetic sound generator instead of loading a file, avoiding network dependency issues.

function preload() {
  // IMPORTANT: External sound URLs have proven unreliable.
  // Falling back to a synthetic gunshot sound using p5.Oscillator
  // to guarantee sound playback without external server dependencies.
  gunshotSound = new p5.Oscillator('triangle');
  gunshotSound.freq(3000); // High frequency for a sharp sound
  gunshotSound.amp(0.5);   // Initial amplitude
  gunshotSound.start();    // Start the oscillator (but with 0 volume initially)
  gunshotSound.amp(0, 0);  // Set amplitude to 0 immediately after starting
}
Line-by-line explanation (5 lines)
gunshotSound = new p5.Oscillator('triangle');
Creates a p5.sound oscillator using a triangle waveform, which sounds sharper than a sine wave - this stands in for a real gunshot sample.
gunshotSound.freq(3000);
Sets the oscillator's pitch to 3000Hz, a high frequency chosen to sound like a sharp crack rather than a musical tone.
gunshotSound.amp(0.5);
Sets the base volume (amplitude) the oscillator will use once triggered.
gunshotSound.start();
Actually starts the oscillator generating sound - it needs to be running continuously so it can be instantly modulated later with no startup lag.
gunshotSound.amp(0, 0);
Immediately drops the volume to 0 with no fade, so the oscillator is silent until shoot() ramps the amplitude up again.

setup()

setup() runs once when the sketch starts. In a hybrid p5.js/three.js project like this one, its main job is to disable p5's own rendering and hand control over to a separate three.js pipeline.

function setup() {
  // Create a p5.js canvas, but immediately hide it, as three.js will create its own
  createCanvas(windowWidth, windowHeight);
  noCanvas(); // Hide the p5.js canvas

  // Get the crosshair DOM element
  crosshairElement = document.getElementById('crosshair');
  crosshairElement.style.display = 'none'; // Initially hidden

  // --- three.js Initialization ---
  initThreeJS();
  animate(); // Start the three.js animation loop

  // Initialize mouse coordinates for raycasting
  mouse.x = 0; // Center of screen
  mouse.y = 0; // Center of screen
}
Line-by-line explanation (6 lines)
createCanvas(windowWidth, windowHeight);
Creates the default p5 canvas so p5.js functions don't error out, even though it won't actually be shown.
noCanvas();
Immediately removes/hides the p5 canvas from the page since three.js will render everything into its own WebGL canvas.
crosshairElement = document.getElementById('crosshair');
Grabs the HTML crosshair div by ID so its visibility can be toggled later from JavaScript.
initThreeJS();
Calls the big setup function that builds the entire three.js scene: camera, lights, environment, car, player, and gun.
animate();
Kicks off the three.js render loop for the first time - after this, animate() keeps calling itself via requestAnimationFrame every frame.
mouse.x = 0;
Sets the raycasting mouse coordinate to the exact center of the screen (three.js normalized coordinates run from -1 to 1), since this game always shoots from the crosshair, not the literal cursor position.

initThreeJS()

This function is the classic three.js boilerplate: Scene, Camera, Renderer, Lights, then populate the scene. Keeping it as one function makes it easy to see the full initialization order at a glance.

function initThreeJS() {
  // 1. Scene
  scene = new THREE.Scene();
  scene.background = new THREE.Color(0x87ceeb); // Sky blue background

  // 2. Camera
  camera = new THREE.PerspectiveCamera(75, window.innerWidth / window.innerHeight, 0.1, 1000);
  camera.position.set(0, 10, 20); // Initial camera position

  // 3. Renderer
  renderer = new THREE.WebGLRenderer({ antialias: true });
  renderer.setSize(window.innerWidth, window.innerHeight);
  renderer.setPixelRatio(window.devicePixelRatio); // Handle retina displays
  renderer.domElement.id = 'threejs-canvas'; // Add an ID for CSS styling
  document.body.appendChild(renderer.domElement);

  // 4. OrbitControls (for debugging camera, remove or comment out for game-like experience)
  // controls = new THREE.OrbitControls(camera, renderer.domElement);
  // controls.enableDamping = true; // Smooth camera movement
  // controls.dampingFactor = 0.05;
  // controls.screenSpacePanning = false;
  // controls.maxPolarAngle = Math.PI / 2; // Prevent camera from going below ground

  // 5. Lighting
  const ambientLight = new THREE.AmbientLight(0x404040); // Soft white light
  scene.add(ambientLight);

  const directionalLight = new THREE.DirectionalLight(0xffffff, 1); // White directional light
  directionalLight.position.set(5, 10, 7);
  directionalLight.castShadow = true; // Enable shadows
  directionalLight.shadow.mapSize.width = 1024; // Default 512
  directionalLight.shadow.mapSize.height = 1024; // Default 512
  directionalLight.shadow.camera.near = 0.5; // Default 0.5
  directionalLight.shadow.camera.far = 500; // Default 500
  directionalLight.shadow.camera.left = -200;
  directionalLight.shadow.camera.right = 200;
  directionalLight.shadow.camera.top = 200;
  directionalLight.shadow.camera.bottom = -200;
  scene.add(directionalLight);

  // 6. Create Environment (Ground & Buildings & NPCs)
  createEnvironment();

  // 7. Create Car
  createCar();

  // 8. Create On-Foot Player and Gun
  createPlayer();
  createGun(); // Create the gun and attach it to the player's view

  // 9. Position player at car's initial position
  player.position.copy(car.position);
  player.visible = false; // Player is initially driving

  // 10. Add Keyboard and Mouse Event Listeners for Car & Player Control
  document.addEventListener('keydown', onKeyDown);
  document.addEventListener('keyup', onKeyUp);
  document.addEventListener('mousedown', onMouseDown); // For shooting
}
Line-by-line explanation (14 lines)

🔧 Subcomponents:

calculation Scene, Camera, Renderer Setup scene = new THREE.Scene();

Creates the core three.js objects needed to render anything at all.

calculation Ambient + Directional Lighting const directionalLight = new THREE.DirectionalLight(0xffffff, 1);

Adds soft ambient light plus a shadow-casting directional light so buildings and characters look three-dimensional.

scene = new THREE.Scene();
Creates the container that will hold every 3D object - ground, buildings, car, player, NPCs.
scene.background = new THREE.Color(0x87ceeb); // Sky blue background
Fills empty space behind all objects with a solid sky-blue color.
camera = new THREE.PerspectiveCamera(75, window.innerWidth / window.innerHeight, 0.1, 1000);
Creates the viewpoint: 75-degree field of view, matched to the window's aspect ratio, rendering anything between 0.1 and 1000 units away.
renderer = new THREE.WebGLRenderer({ antialias: true });
Creates the WebGL renderer that actually draws pixels, with antialiasing turned on to smooth jagged edges.
document.body.appendChild(renderer.domElement);
Inserts the three.js canvas into the page so it becomes visible (replacing the hidden p5 canvas).
directionalLight.castShadow = true; // Enable shadows
Turns on shadow casting for this light, which along with each mesh's castShadow/receiveShadow flags produces cast shadows from buildings and characters.
createEnvironment();
Builds the ground, roads, buildings, and NPCs by calling a dedicated helper function.
createCar();
Builds the drivable car model out of boxes and cylinders.
createPlayer();
Builds the on-foot player character model.
createGun();
Builds the gun mesh and attaches it directly to the camera so it always appears in the same spot on screen (first-person view).
player.position.copy(car.position);
Starts the player character at the same spot as the car, so switching modes doesn't teleport you somewhere unexpected.
player.visible = false; // Player is initially driving
Hides the player mesh at the start since the game begins in driving mode.
document.addEventListener('keydown', onKeyDown);
Registers a listener so every key press updates the keys object and checks for the 'E' toggle.
document.addEventListener('mousedown', onMouseDown); // For shooting
Registers a listener so left mouse clicks trigger the shoot() logic while on foot.

createEnvironment()

This function shows a common procedural generation trick: use a do-while loop to keep rerolling a random value until it satisfies a constraint (here, staying off the road), a technique called rejection sampling.

🔬 This loop controls how many buildings spawn and how tall/wide they can be. What happens if you change the loop limit from 50 to 200, or change 'Math.random() * 20 + 5' to 'Math.random() * 60 + 5' for much taller skyscrapers?

  for (let i = 0; i < 50; i++) {
    const height = Math.random() * 20 + 5;
    const width = Math.random() * 5 + 3;
    const depth = Math.random() * 5 + 3;
function createEnvironment() {
  // Ground Plane (Roads and Grass)
  const groundGeometry = new THREE.PlaneGeometry(500, 500);
  const groundMaterial = new THREE.MeshLambertMaterial({ color: 0x33aa33 }); // Green for grass
  const ground = new THREE.Mesh(groundGeometry, groundMaterial);
  ground.rotation.x = -Math.PI / 2; // Rotate to be flat
  ground.position.y = -0.5; // Slightly below buildings
  ground.receiveShadow = true;
  scene.add(ground);

  // Roads (simple texture or color)
  const roadGeometry = new THREE.PlaneGeometry(10, 500); // Long strip for a road
  const roadMaterial = new THREE.MeshLambertMaterial({ color: 0x555555 }); // Grey for road

  const road1 = new THREE.Mesh(roadGeometry, roadMaterial);
  road1.rotation.x = -Math.PI / 2;
  road1.position.y = -0.49; // Slightly above ground
  road1.position.x = 0;
  road1.receiveShadow = true;
  scene.add(road1);

  const road2 = new THREE.Mesh(roadGeometry, roadMaterial);
  road2.rotation.x = -Math.PI / 2;
  road2.position.y = -0.49;
  road2.position.x = 20; // Another road
  road2.receiveShadow = true;
  scene.add(road2);

  const road3 = new THREE.Mesh(roadGeometry, roadMaterial);
  road3.rotation.x = -Math.PI / 2;
  road3.position.y = -0.49;
  road3.position.x = -20; // Another road
  road3.receiveShadow = true;
  scene.add(road3);

  // Simple Cube Buildings
  const buildingMaterial = new THREE.MeshLambertMaterial({ color: 0xaaaaaa }); // Grey buildings
  for (let i = 0; i < 50; i++) {
    const height = Math.random() * 20 + 5;
    const width = Math.random() * 5 + 3;
    const depth = Math.random() * 5 + 3;
    const buildingGeometry = new THREE.BoxGeometry(width, height, depth);
    const building = new THREE.Mesh(buildingGeometry, buildingMaterial);

    // Random position, avoiding the main road
    let x, z;
    do {
      x = (Math.random() * 200 - 100);
      z = (Math.random() * 200 - 100);
    } while (x > -5 && x < 5); // Avoid main road at x=0

    building.position.set(x, height / 2, z);
    building.castShadow = true;
    building.receiveShadow = true;
    scene.add(building);
  }

  // NPCs (People) - Simple cylinders
  const npcMaterial = new THREE.MeshLambertMaterial({ color: 0x00ff00 }); // Green for people
  for (let i = 0; i < 50; i++) {
    const npcHeight = 1.8;
    const npcRadius = 0.3;
    const npcGeometry = new THREE.CylinderGeometry(npcRadius, npcRadius, npcHeight, 16);
    const npc = new THREE.Mesh(npcGeometry, npcMaterial);

    // Random position, avoiding roads and buildings
    let x, z;
    do {
      x = (Math.random() * 200 - 100);
      z = (Math.random() * 200 - 100);
    } while (x > -10 && x < 10); // Avoid main roads

    npc.position.set(x, npcHeight / 2, z);
    npc.castShadow = true;
    npc.receiveShadow = true;
    scene.add(npc);
    npcs.push(npc); // Add to NPCs array for shooting detection
  }
}
Line-by-line explanation (8 lines)

🔧 Subcomponents:

for-loop Random Building Generator for (let i = 0; i < 50; i++) {

Creates 50 buildings with randomized height/width/depth and randomized positions, using a do-while loop to reroll positions that land on the road.

for-loop Random NPC Generator for (let i = 0; i < 50; i++) {

Creates 50 cylinder-shaped NPCs at random positions away from the roads, and pushes each one into the shared npcs array used by the shooting raycaster.

const ground = new THREE.Mesh(groundGeometry, groundMaterial);
Combines the flat plane shape with the green grass material to make one drawable mesh.
ground.rotation.x = -Math.PI / 2; // Rotate to be flat
Planes are vertical by default in three.js, so this rotates it 90 degrees to lie flat like a floor.
const road1 = new THREE.Mesh(roadGeometry, roadMaterial);
Builds one long grey strip mesh representing a road, reusing the same geometry/material as the other roads.
road1.position.y = -0.49; // Slightly above ground
Places the road just above the grass plane to avoid z-fighting (flickering overlapping surfaces).
for (let i = 0; i < 50; i++) {
Loops 50 times to generate 50 separate buildings, each with its own random size.
const height = Math.random() * 20 + 5;
Picks a random building height between 5 and 25 units tall.
do { x = (Math.random() * 200 - 100); z = (Math.random() * 200 - 100); } while (x > -5 && x < 5); // Avoid main road at x=0
Keeps rerolling a random x/z position until it lands outside the central road strip, preventing buildings from spawning in the middle of the road.
npcs.push(npc); // Add to NPCs array for shooting detection
Adds this NPC mesh to the global npcs array, which the raycaster in shoot() checks against to detect hits.

createCar()

This function demonstrates composing a complex model from simple primitives grouped together with THREE.Group, a pattern used constantly in three.js instead of loading pre-made 3D models.

🔬 This loop places one wheel per entry in wheelPositions. What happens visually if you comment out 'wheel.rotation.x = Math.PI / 2;' so the wheels stay upright cylinders instead of lying flat?

  wheelPositions.forEach(pos => {
    const wheel = new THREE.Mesh(wheelGeometry, wheelMaterial);
    wheel.position.set(pos.x, pos.y, pos.z);
    wheel.rotation.x = Math.PI / 2; // Rotate to be vertical
    wheel.castShadow = true;
    wheel.receiveShadow = true;
    car.add(wheel);
  });
function createCar() {
  car = new THREE.Group(); // Use a Group to hold car parts

  const bodyGeometry = new THREE.BoxGeometry(3, 1, 1.5);
  const bodyMaterial = new THREE.MeshLambertMaterial({ color: 0xff0000 }); // Red car body
  const carBody = new THREE.Mesh(bodyGeometry, bodyMaterial);
  carBody.castShadow = true;
  carBody.receiveShadow = true;
  car.add(carBody);

  const cabinGeometry = new THREE.BoxGeometry(2, 0.8, 1.2);
  const cabinMaterial = new THREE.MeshLambertMaterial({ color: 0x3333ff }); // Blue cabin
  const carCabin = new THREE.Mesh(cabinGeometry, cabinMaterial);
  carCabin.position.set(0, 0.9, 0); // Position above body
  carCabin.castShadow = true;
  carCabin.receiveShadow = true;
  car.add(carCabin);

  // Wheels (simple cylinders)
  const wheelGeometry = new THREE.CylinderGeometry(0.5, 0.5, 0.4, 16);
  const wheelMaterial = new THREE.MeshLambertMaterial({ color: 0x000000 }); // Black wheels

  const wheelPositions = [
    { x: -1, y: -0.5, z: 0.8 },
    { x: 1, y: -0.5, z: 0.8 },
    { x: -1, y: -0.5, z: -0.8 },
    { x: 1, y: -0.5, z: -0.8 },
  ];

  wheelPositions.forEach(pos => {
    const wheel = new THREE.Mesh(wheelGeometry, wheelMaterial);
    wheel.position.set(pos.x, pos.y, pos.z);
    wheel.rotation.x = Math.PI / 2; // Rotate to be vertical
    wheel.castShadow = true;
    wheel.receiveShadow = true;
    car.add(wheel);
  });

  scene.add(car);
}
Line-by-line explanation (6 lines)

🔧 Subcomponents:

for-loop Wheel Placement Loop wheelPositions.forEach(pos => {

Iterates over 4 predefined corner coordinates to place a wheel mesh at each corner of the car body.

car = new THREE.Group(); // Use a Group to hold car parts
A Group lets multiple meshes (body, cabin, wheels) move and rotate together as one unit - move the group and every child moves with it.
const carBody = new THREE.Mesh(bodyGeometry, bodyMaterial);
Combines the box shape and red material into the main car body mesh.
carCabin.position.set(0, 0.9, 0); // Position above body
Moves the cabin box up so it sits on top of the body instead of overlapping it.
const wheelPositions = [ { x: -1, y: -0.5, z: 0.8 }, { x: 1, y: -0.5, z: 0.8 }, { x: -1, y: -0.5, z: -0.8 }, { x: 1, y: -0.5, z: -0.8 }, ];
An array of four x/y/z coordinates, one for each corner of the car, used to place the wheels symmetrically.
wheel.rotation.x = Math.PI / 2; // Rotate to be vertical
Cylinders stand upright by default, so this rotates each wheel 90 degrees to lie on its side like a real wheel.
scene.add(car);
Adds the fully assembled car group (body + cabin + 4 wheels) into the scene so it's actually rendered.

createPlayer()

Even though you never actually see this cylinder body in first-person view (the camera is inside it), it's still useful for tracking the player's position and rotation, and could be shown in a third-person camera mode.

function createPlayer() {
  player = new THREE.Group(); // Player group for movement and rotation

  const bodyGeometry = new THREE.CylinderGeometry(0.5, 0.5, 1.8, 16);
  const bodyMaterial = new THREE.MeshLambertMaterial({ color: 0x00ff00 }); // Green player body
  const playerBody = new THREE.Mesh(bodyGeometry, bodyMaterial);
  playerBody.position.y = 0.9; // Half height to stand on ground
  playerBody.castShadow = true;
  playerBody.receiveShadow = true;
  player.add(playerBody);

  scene.add(player);
}
Line-by-line explanation (4 lines)
player = new THREE.Group(); // Player group for movement and rotation
Wraps the player's body mesh in a Group so position/rotation changes in animate() move the whole character consistently.
const bodyGeometry = new THREE.CylinderGeometry(0.5, 0.5, 1.8, 16);
A simple cylinder 1.8 units tall stands in for a human body shape.
playerBody.position.y = 0.9; // Half height to stand on ground
Since the cylinder's origin is at its center, it's shifted up by half its height so its base touches the ground instead of poking through it.
scene.add(player);
Adds the player group to the scene - though it starts invisible since the game begins in driving mode.

createGun()

Attaching an object to the camera (camera.add(...)) instead of the scene is the standard three.js technique for HUD-like first-person elements such as weapons or viewmodels.

function createGun() {
  const gunGeometry = new THREE.CylinderGeometry(0.1, 0.2, 0.8, 8);
  const gunMaterial = new THREE.MeshLambertMaterial({ color: 0x333333 }); // Grey gun
  gun = new THREE.Mesh(gunGeometry, gunMaterial);
  gun.position.set(0.5, -0.3, -1); // Position relative to camera (first-person view)
  gun.rotation.x = Math.PI / 2; // Point forward
  gun.castShadow = true;
  gun.receiveShadow = true;
  gun.visible = false; // Gun is initially hidden (player is driving)
  camera.add(gun); // Attach gun directly to the camera for first-person view
}
Line-by-line explanation (4 lines)
gun.position.set(0.5, -0.3, -1); // Position relative to camera (first-person view)
Positions the gun slightly right, slightly down, and in front of the camera - because it's a child of the camera, these coordinates are relative to the view, not the world.
gun.rotation.x = Math.PI / 2; // Point forward
Rotates the cylinder so its length points forward into the screen like a gun barrel instead of standing upright.
gun.visible = false; // Gun is initially hidden (player is driving)
Hides the gun at start since the game begins in driving mode where you shouldn't see a first-person weapon.
camera.add(gun); // Attach gun directly to the camera for first-person view
This is the key trick for first-person weapons: by making the gun a CHILD of the camera object, it automatically follows every camera movement and rotation without any extra code.

onKeyDown()

This is a hand-rolled finite state machine: playerState holds one of two string values, and this function is the only place that transitions between them, keeping all the mode-switching logic in one predictable spot.

function onKeyDown(event) {
  keys[event.key.toLowerCase()] = true;

  // Toggle player state with 'e' key
  if (event.key.toLowerCase() === 'e') {
    if (playerState === 'driving') {
      playerState = 'onFoot';
      player.position.copy(car.position); // Move player to car's position
      player.rotation.copy(car.rotation); // Match player rotation to car
      car.visible = false; // Hide the car
      gun.visible = true; // Show the gun
      carSpeed = 0; // Stop the car
      if (crosshairElement) crosshairElement.style.display = 'block'; // Show crosshair
    } else {
      playerState = 'driving';
      car.position.copy(player.position); // Move car to player's position
      car.rotation.copy(player.rotation); // Match car rotation to player
      car.visible = true; // Show the car
      gun.visible = false; // Hide the gun
      if (crosshairElement) crosshairElement.style.display = 'none'; // Hide crosshair
    }
  }
}
Line-by-line explanation (6 lines)

🔧 Subcomponents:

conditional Driving/On-Foot Toggle if (event.key.toLowerCase() === 'e') {

Swaps playerState between 'driving' and 'onFoot', syncing position/rotation between the car and player and toggling visibility of the car, gun, and crosshair.

keys[event.key.toLowerCase()] = true;
Records that this key is currently held down, using the lowercase key name as the object property (so 'W' and 'w' behave the same).
if (event.key.toLowerCase() === 'e') {
Checks specifically for the 'E' key to trigger the driving/walking swap.
player.position.copy(car.position); // Move player to car's position
When exiting the car, teleports the player character to exactly where the car currently is, so you 'get out' at the car's location.
car.visible = false; // Hide the car
Hides the car mesh instead of removing it from the scene, so it can be shown again instantly later without rebuilding it.
carSpeed = 0; // Stop the car
Resets the car's speed to zero so it doesn't keep drifting forward while you're walking around off-screen.
if (crosshairElement) crosshairElement.style.display = 'block'; // Show crosshair
Shows the aiming crosshair DOM element only when on foot, since you don't need it while driving.

onKeyUp()

Together, onKeyDown and onKeyUp implement the standard 'input state' pattern used in almost every game: instead of reacting only to single key press events, you maintain a running record of which keys are currently held so movement can be checked every single frame in the render loop.

function onKeyUp(event) {
  keys[event.key.toLowerCase()] = false;
}
Line-by-line explanation (1 lines)
keys[event.key.toLowerCase()] = false;
Marks the released key as no longer held, so animate()'s input checks (like keys['w']) stop responding to it.

onMouseDown()

This cooldown pattern - storing a timestamp and comparing elapsed time - is a lightweight, frame-rate-independent way to rate-limit actions, much more reliable than counting frames.

function onMouseDown(event) {
  if (playerState === 'onFoot' && event.button === 0) { // Left mouse button
    const currentTime = Date.now();
    if (currentTime - lastShotTime > shootingCooldown) {
      lastShotTime = currentTime;
      shoot();
    }
  }
}
Line-by-line explanation (4 lines)

🔧 Subcomponents:

conditional Fire Rate Cooldown Check if (currentTime - lastShotTime > shootingCooldown) {

Prevents shoot() from firing again until shootingCooldown milliseconds have passed since the last shot.

if (playerState === 'onFoot' && event.button === 0) { // Left mouse button
Only allows shooting while walking (not while driving) and only responds to the left mouse button (button 0).
const currentTime = Date.now();
Gets the current time in milliseconds to compare against the last shot's timestamp.
if (currentTime - lastShotTime > shootingCooldown) {
Only allows a new shot if enough time has passed since the last one, implementing a fire-rate limit.
lastShotTime = currentTime;
Records this shot's timestamp so the next click can be checked against it.

shoot()

raycaster.intersectObjects() is the core tool three.js provides for mouse-picking and hit detection - it takes a list of candidate meshes and returns which ones a ray passes through, sorted by distance, which is exactly what a hitscan shooting mechanic needs.

🔬 This is the actual hit test. What happens if you shoot intersects[0] vs. checking all of `intersects` to remove every NPC the ray passes through in one shot (a piercing bullet)?

  const intersects = raycaster.intersectObjects(npcs);

  if (intersects.length > 0) {
    // Hit an NPC!
    const hitNpc = intersects[0].object;
    console.log('Hit NPC:', hitNpc);
function shoot() {
  // Update the picking ray with the camera and mouse position
  // For center of screen, mouse coordinates are (0, 0)
  raycaster.setFromCamera(mouse, camera);

  // Play gunshot sound
  if (gunshotSound) {
    // If it's a synthetic oscillator, re-trigger it
    if (gunshotSound instanceof p5.Oscillator) {
      gunshotSound.amp(0, 0.01); // Quick decay
      gunshotSound.amp(0.5, 0.05); // Attack
      gunshotSound.amp(0.2, 0.05); // Decay to a lower amp
      gunshotSound.amp(0, 0.2); // Release
    } else {
      // If it's a loaded sound file, play it
      gunshotSound.play();
    }
  }

  // Calculate objects intersecting the picking ray
  const intersects = raycaster.intersectObjects(npcs);

  if (intersects.length > 0) {
    // Hit an NPC!
    const hitNpc = intersects[0].object;
    console.log('Hit NPC:', hitNpc);

    // Remove NPC from scene and array
    scene.remove(hitNpc);
    npcs = npcs.filter(npc => npc !== hitNpc);

    // Dispose of geometry and material to prevent memory leaks
    hitNpc.geometry.dispose();
    hitNpc.material.dispose();

    // Optional: Add a temporary visual effect at the hit point
    const hitEffectGeometry = new THREE.SphereGeometry(0.1, 8, 8);
    const hitEffectMaterial = new THREE.MeshBasicMaterial({ color: 0xffff00 });
    const hitEffect = new THREE.Mesh(hitEffectGeometry, hitEffectMaterial);
    hitEffect.position.copy(intersects[0].point);
    scene.add(hitEffect);

    // Remove hit effect after a short delay
    setTimeout(() => {
      scene.remove(hitEffect);
      hitEffect.geometry.dispose();
      hitEffect.material.dispose();
    }, 100);
  }

  // Optional: Add a temporary flash at the gun barrel
  const gunFlashGeometry = new THREE.CylinderGeometry(0.1, 0.2, 0.2, 8);
  const gunFlashMaterial = new THREE.MeshBasicMaterial({ color: 0xffa500 }); // Orange flash
  const gunFlash = new THREE.Mesh(gunFlashGeometry, gunFlashMaterial);
  gunFlash.position.copy(gun.position);
  gunFlash.position.z -= 0.5; // Slightly in front of gun barrel
  gunFlash.rotation.x = Math.PI / 2;
  camera.add(gunFlash); // Add to camera to move with view

  setTimeout(() => {
    camera.remove(gunFlash);
    gunFlash.geometry.dispose();
    gunFlash.material.dispose();
  }, 50);
}
Line-by-line explanation (10 lines)

🔧 Subcomponents:

conditional NPC Hit Detection if (intersects.length > 0) {

If the ray intersects any NPC, removes the closest hit NPC from the scene and array, disposes its resources, and spawns a temporary yellow spark effect.

conditional Sound Type Branch if (gunshotSound instanceof p5.Oscillator) {

Plays the gunshot differently depending on whether it's a synthetic oscillator (ramping amplitude) or a loaded sound file (calling .play()).

raycaster.setFromCamera(mouse, camera);
Casts an invisible ray from the camera through the given screen coordinate (here, always the center, since mouse is fixed at 0,0) out into the 3D world.
gunshotSound.amp(0, 0.01); // Quick decay
Ramps the oscillator's volume to 0 over 0.01 seconds - the start of a fake percussive envelope.
const intersects = raycaster.intersectObjects(npcs);
Tests the ray against every mesh in the npcs array and returns a sorted list of hits (closest first).
const hitNpc = intersects[0].object;
Takes the first (nearest) object the ray hit - this is the NPC that got shot.
scene.remove(hitNpc);
Removes the hit NPC's mesh from the scene so it's no longer rendered.
npcs = npcs.filter(npc => npc !== hitNpc);
Rebuilds the npcs array without the one that was just shot, so future shots can't hit it again.
hitNpc.geometry.dispose();
Frees the GPU memory used by this NPC's geometry - important because removing a mesh from the scene doesn't automatically free its resources.
hitEffect.position.copy(intersects[0].point);
Positions the little yellow spark sphere exactly where the ray hit the NPC in 3D space, using the intersection data.
setTimeout(() => { scene.remove(hitEffect); hitEffect.geometry.dispose(); hitEffect.material.dispose(); }, 100);
After 100 milliseconds, removes the hit spark and frees its resources, making it a brief flash rather than a permanent object.
camera.add(gunFlash); // Add to camera to move with view
Attaches the muzzle flash to the camera (like the gun itself) so it appears in a fixed spot in front of the view regardless of where the player is looking.

animate()

animate() is the heartbeat of the whole sketch - by calling requestAnimationFrame(animate) at the top, it creates a self-perpetuating loop that runs roughly 60 times per second, reading input, updating physics-like state, and rendering, which is the standard pattern for real-time three.js applications (as opposed to p5's built-in draw() loop).

🔬 The `(carSpeed > 0 ? 1 : -1)` part flips turning direction when reversing, so steering feels natural in reverse (like a real car). What happens if you delete that ternary and always turn the same way regardless of forward/reverse?

      if (keys['a']) { // Turn left
        car.rotation.y += carTurnSpeed * (carSpeed > 0 ? 1 : -1);
      }
      if (keys['d']) { // Turn right
        car.rotation.y -= carTurnSpeed * (carSpeed > 0 ? 1 : -1);
      }
function animate() {
  requestAnimationFrame(animate);

  if (playerState === 'driving') {
    // --- Car Controls ---
    // Update car speed based on input
    if (keys['w']) { // Accelerate
      carSpeed += carAcceleration;
      carSpeed = Math.min(carSpeed, carMaxSpeed);
    } else if (keys['s']) { // Brake/Reverse
      if (carSpeed > 0) {
        carSpeed -= carBrakeDeceleration;
        carSpeed = Math.max(carSpeed, 0);
      } else {
        carSpeed -= carAcceleration / 2; // Reverse slower
        carSpeed = Math.max(carSpeed, -carMaxSpeed / 2);
      }
    } else { // Decelerate if no input
      if (carSpeed > 0) {
        carSpeed -= carDeceleration;
        carSpeed = Math.max(carSpeed, 0);
      } else if (carSpeed < 0) {
        carSpeed += carDeceleration;
        carSpeed = Math.min(carSpeed, 0);
      }
    }

    // Update car rotation based on input and speed
    if (carSpeed !== 0) {
      if (keys['a']) { // Turn left
        car.rotation.y += carTurnSpeed * (carSpeed > 0 ? 1 : -1);
      }
      if (keys['d']) { // Turn right
        car.rotation.y -= carTurnSpeed * (carSpeed > 0 ? 1 : -1);
      }
    }

    // Move car based on speed and rotation
    const forwardVector = new THREE.Vector3(0, 0, -1); // Car's local forward direction
    forwardVector.applyQuaternion(car.quaternion); // Apply car's rotation
    car.position.addScaledVector(forwardVector, carSpeed);

    // Keep car on the ground
    car.position.y = 0;

    // Update camera to follow the car
    const cameraOffset = new THREE.Vector3(0, 10, 15); // Offset from the car
    const rotatedOffset = cameraOffset.clone().applyQuaternion(car.quaternion); // Apply car's rotation to offset
    camera.position.copy(car.position).add(rotatedOffset);
    camera.lookAt(car.position); // Always look at the car

  } else if (playerState === 'onFoot') {
    // --- On-Foot Controls ---
    // Move player based on input
    const playerForwardVector = new THREE.Vector3(0, 0, -1);
    playerForwardVector.applyQuaternion(player.quaternion);
    const playerRightVector = new THREE.Vector3(1, 0, 0);
    playerRightVector.applyQuaternion(player.quaternion);

    if (keys['w']) { // Move forward
      player.position.addScaledVector(playerForwardVector, playerSpeed);
    }
    if (keys['s']) { // Move backward
      player.position.addScaledVector(playerForwardVector, -playerSpeed);
    }
    if (keys['a']) { // Turn left
      player.rotation.y += playerTurnSpeed;
    }
    if (keys['d']) { // Turn right
      player.rotation.y -= playerTurnSpeed;
    }

    // Keep player on the ground
    player.position.y = 0;

    // Update camera to follow the player (first-person view)
    const playerCameraOffset = new THREE.Vector3(0, 1.6, 0); // Eye level offset
    const rotatedPlayerOffset = playerCameraOffset.clone().applyQuaternion(player.quaternion);
    camera.position.copy(player.position).add(rotatedPlayerOffset);
    camera.lookAt(player.position.clone().add(playerForwardVector.multiplyScalar(10))); // Look in player's forward direction
  }

  // If OrbitControls are enabled, update them
  // if (controls) controls.update(); // Only required if controls.enableDamping is set to true

  renderer.render(scene, camera);
}
Line-by-line explanation (11 lines)

🔧 Subcomponents:

conditional Driving Mode Logic if (playerState === 'driving') {

Handles car acceleration/braking/turning input, moves the car along its facing direction, and positions a chase camera behind it.

conditional On-Foot Mode Logic } else if (playerState === 'onFoot') {

Handles WASD walking/turning for the player and positions a first-person camera at eye height looking in the player's facing direction.

conditional Car Speed Update if (keys['w']) { // Accelerate

Increases speed while W is held (clamped to max speed), decelerates or reverses on S, and coasts to a stop with no input.

requestAnimationFrame(animate);
Schedules this same function to run again on the next screen refresh, creating a continuous render loop - this line makes the whole game 'tick'.
if (keys['w']) { // Accelerate
Checks the shared keys input-state object to see if W is currently held, and if so, increases carSpeed.
carSpeed = Math.min(carSpeed, carMaxSpeed);
Clamps the speed so it never exceeds the defined maximum, no matter how long W is held.
const forwardVector = new THREE.Vector3(0, 0, -1); // Car's local forward direction
Defines 'forward' in the car's own local space (negative Z, by three.js convention) before it's been rotated to match the car's current facing.
forwardVector.applyQuaternion(car.quaternion); // Apply car's rotation
Rotates that local forward vector by the car's current rotation (stored as a quaternion), turning it into a world-space direction that matches wherever the car is currently facing.
car.position.addScaledVector(forwardVector, carSpeed);
Moves the car along its rotated forward direction by an amount proportional to carSpeed - this is what actually makes the car drive forward or backward.
const cameraOffset = new THREE.Vector3(0, 10, 15); // Offset from the car
Defines how far above and behind the car the chase camera should sit, in the car's local space.
camera.position.copy(car.position).add(rotatedOffset);
Places the camera at the car's position plus the rotated offset, so it always trails behind the car no matter which way it's turned.
camera.lookAt(car.position); // Always look at the car
Orients the camera to always point directly at the car, keeping it centered in view.
camera.lookAt(player.position.clone().add(playerForwardVector.multiplyScalar(10))); // Look in player's forward direction
For the first-person view, points the camera 10 units ahead of the player in the direction they're facing, rather than at the player itself.
renderer.render(scene, camera);
The actual draw call - tells three.js to render the entire scene from the current camera's viewpoint into the canvas, once per frame.

draw()

p5.js still calls draw() automatically every frame in the background, but since noCanvas() was called in setup(), there's nothing for it to draw - it's kept here only because p5.js expects the function to exist.

function draw() {
  // three.js handles rendering via its animate() loop
}
Line-by-line explanation (1 lines)
// three.js handles rendering via its animate() loop
This p5.js function is left intentionally empty because all rendering happens through three.js's own animate()/requestAnimationFrame loop instead.

windowResized()

windowResized() is a p5.js lifecycle function that fires automatically whenever the browser window changes size, making it a convenient hook for keeping a three.js renderer and camera in sync with the viewport even though p5 isn't doing the actual rendering.

function windowResized() {
  // Update three.js camera aspect and renderer size
  if (camera && renderer) {
    camera.aspect = window.innerWidth / window.innerHeight;
    camera.updateProjectionMatrix();
    renderer.setSize(window.innerWidth, window.innerHeight);
  }
  // p5.js resizeCanvas would go here if we were using it for rendering
}
Line-by-line explanation (3 lines)
camera.aspect = window.innerWidth / window.innerHeight;
Updates the camera's aspect ratio to match the new window dimensions, preventing the scene from looking stretched or squashed.
camera.updateProjectionMatrix();
Three.js caches projection calculations, so this forces the camera to recompute them after aspect or field-of-view properties change.
renderer.setSize(window.innerWidth, window.innerHeight);
Resizes the actual WebGL canvas to fill the new window size.

📦 Key Variables

scene object

The three.js Scene object that holds every 3D mesh, light, and object in the game world.

let scene, camera, renderer, car, controls;
camera object

The three.js PerspectiveCamera representing the player's viewpoint; repositioned every frame to follow either the car or the on-foot player.

let scene, camera, renderer, car, controls;
renderer object

The THREE.WebGLRenderer that draws the scene from the camera's perspective into an HTML canvas each frame.

let scene, camera, renderer, car, controls;
car object

A THREE.Group containing the car's body, cabin, and four wheels, moved and rotated together as one unit while driving.

let scene, camera, renderer, car, controls;
keys object

A dictionary tracking which keyboard keys are currently held down (true/false), read every frame in animate() to drive movement.

let keys = {};
carSpeed number

The car's current forward/backward speed, increased by acceleration input and decayed by deceleration/braking each frame.

let carSpeed = 0;
carAcceleration number

How much carSpeed increases per frame while the accelerate key is held.

const carAcceleration = 0.05;
carDeceleration number

How much carSpeed naturally decays per frame when no input is given, simulating friction/drag.

const carDeceleration = 0.02;
carMaxSpeed number

The upper limit carSpeed is clamped to, capping how fast the car can drive.

const carMaxSpeed = 5;
carTurnSpeed number

How many radians per frame the car rotates when turning left/right.

const carTurnSpeed = 0.03;
carBrakeDeceleration number

How sharply carSpeed decreases per frame when the brake key is held, used instead of the slower natural deceleration.

const carBrakeDeceleration = 0.1;
player object

A THREE.Group representing the on-foot character's body and position/rotation, used as the anchor for the first-person camera.

let player;
gun object

The gun mesh attached directly to the camera so it renders in a fixed first-person position and can be hidden/shown by mode.

let gun;
npcs array

Holds every NPC mesh currently in the scene; the shoot() function raycasts against this array and removes entries when NPCs are hit.

let npcs = [];
playerState string

The core state machine flag, either 'driving' or 'onFoot', controlling which control scheme and camera behavior animate() runs.

let playerState = 'driving';
playerSpeed number

How fast the on-foot player moves forward/backward per frame while walking.

const playerSpeed = 0.5;
playerTurnSpeed number

How many radians per frame the player's view rotates when turning left/right on foot.

const playerTurnSpeed = 0.05;
shootingCooldown number

Minimum milliseconds required between shots, preventing the gun from firing faster than this rate.

const shootingCooldown = 300; // milliseconds
lastShotTime number

Timestamp (in milliseconds) of the last shot fired, compared against shootingCooldown to enforce fire-rate limiting.

let lastShotTime = 0;
raycaster object

A reusable THREE.Raycaster instance used to cast a ray from the camera through the crosshair to detect which NPC was shot.

const raycaster = new THREE.Raycaster();
mouse object

A THREE.Vector2 holding normalized screen coordinates for raycasting; fixed at (0,0), the exact center of the screen, since shots always fire from the crosshair.

const mouse = new THREE.Vector2();
gunshotSound object

A p5.Oscillator used as a synthetic gunshot sound effect, triggered via quick amplitude ramps in shoot().

let gunshotSound;
crosshairElement object

Reference to the HTML crosshair div, shown while on foot and hidden while driving.

let crosshairElement;

🔧 Potential Improvements (5)

Here are some ways this code could be enhanced:

BUG onKeyDown()

Browsers repeatedly fire the 'keydown' event while a key is held (key repeat), so holding 'E' down for more than a fraction of a second can toggle playerState back and forth many times unintentionally.

💡 Ignore repeated events with 'if (event.repeat) return;' at the top of onKeyDown, or track an 'ePressed' boolean set on keydown and cleared on keyup so the toggle only fires once per physical press.

PERFORMANCE animate()

Several new THREE.Vector3 objects (forwardVector, cameraOffset, playerForwardVector, playerRightVector, playerCameraOffset) are allocated from scratch every single frame, which creates unnecessary garbage-collection pressure in a loop running ~60 times per second.

💡 Declare these vectors once as module-level variables and reuse them each frame by calling .set()/.copy() instead of 'new THREE.Vector3(...)' every time.

BUG animate() car/building collision

The car and player can drive/walk straight through buildings and each other since no collision detection exists between the car/player and the building meshes.

💡 Add a simple bounding-box or bounding-sphere check (THREE.Box3.intersectsBox or distance checks) against nearby buildings before applying position updates, and block movement when a collision is detected.

STYLE createEnvironment()

Building and NPC counts (50), road positions (0, 20, -20), and road-avoidance thresholds are hard-coded 'magic numbers' scattered through the function, making the city hard to tune or extend.

💡 Extract these into named constants at the top of the file (e.g. NUM_BUILDINGS, NUM_NPCS, ROAD_X_POSITIONS, ROAD_AVOID_MARGIN) so the world's scale can be adjusted in one place.

FEATURE createEnvironment() NPCs

NPCs are completely static and never move, which makes the city feel lifeless once you're walking around on foot.

💡 Give each NPC a small random walk/patrol behavior in animate() (e.g. wander within a radius using simplex noise or simple random direction changes) so the world feels alive.

🔄 Code Flow

Code flow showing preload, setup, initthreejs, createenvironment, createcar, createplayer, creategun, onkeydown, onkeyup, onmousedown, shoot, animate, draw, windowresized

💡 Click on function names in the diagram to jump to their code

graph TD start[Start] --> setup[setup] setup --> draw[draw loop] draw --> animate[animate] animate --> onkeydown[onkeydown] animate --> onkeyup[onkeyup] animate --> onmousedown[onmousedown] animate --> windowresized[windowresized] animate --> driving-branch[driving-branch] animate --> onfoot-branch[onfoot-branch] animate --> cooldown-check[cooldown-check] animate --> hit-check[hit-check] animate --> sound-branch[sound-branch] click setup href "#fn-setup" click draw href "#fn-draw" click animate href "#fn-animate" click onkeydown href "#fn-onkeydown" click onkeyup href "#fn-onkeyup" click onmousedown href "#fn-onmousedown" click windowresized href "#fn-windowresized" click driving-branch href "#sub-driving-branch" click onfoot-branch href "#sub-onfoot-branch" click cooldown-check href "#sub-cooldown-check" click hit-check href "#sub-hit-check" click sound-branch href "#sub-sound-branch" setup --> initthreejs[initthreejs] initthreejs --> scene-setup[scene-setup] scene-setup --> lighting-setup[lighting-setup] lighting-setup --> building-loop[building-loop] building-loop --> createenvironment[createenvironment] createenvironment --> npc-loop[npc-loop] npc-loop --> createcar[createcar] createcar --> wheel-foreach[wheel-foreach] createcar --> createplayer[createplayer] createplayer --> creategun[creategun] click initthreejs href "#fn-initthreejs" click scene-setup href "#sub-scene-setup" click lighting-setup href "#sub-lighting-setup" click building-loop href "#sub-building-loop" click createenvironment href "#fn-createenvironment" click npc-loop href "#sub-npc-loop" click createcar href "#fn-createcar" click wheel-foreach href "#sub-wheel-foreach" click createplayer href "#fn-createplayer" click creategun href "#fn-creategun" driving-branch --> speed-input[speed-input] speed-input --> driving-branch onfoot-branch --> speed-input cooldown-check --> shoot[shoot] shoot --> hit-check hit-check --> sound-branch sound-branch --> shoot cooldown-check --> shoot state-toggle --> driving-branch state-toggle --> onfoot-branch click speed-input href "#sub-speed-input" click shoot href "#fn-shoot" click state-toggle href "#sub-state-toggle"

❓ Frequently Asked Questions

What visual experience does the p5.js sketch titled 'Sketch 2026-02-13 23:51' offer?

This sketch creates a 3D environment where users can control a car and a player character, featuring dynamic scenes with NPCs and engaging visuals.

How can users interact with the 'Sketch 2026-02-13 23:51' creative coding project?

Users can navigate the environment by driving a car or walking on foot, utilizing keyboard controls to accelerate, turn, and shoot at NPCs.

What creative coding techniques are showcased in 'Sketch 2026-02-13 23:51'?

The sketch demonstrates integration of p5.js with three.js for 3D graphics, along with sound synthesis for interactive audio experiences.

Preview

Sketch 2026-02-13 23:51 - p5.js creative coding sketch preview
Sketch Preview
Code flow diagram showing the structure of Sketch 2026-02-13 23:51 - Code flow showing preload, setup, initthreejs, createenvironment, createcar, createplayer, creategun, onkeydown, onkeyup, onmousedown, shoot, animate, draw, windowresized
Code Flow Diagram