Sketch 2026-02-15 20:14

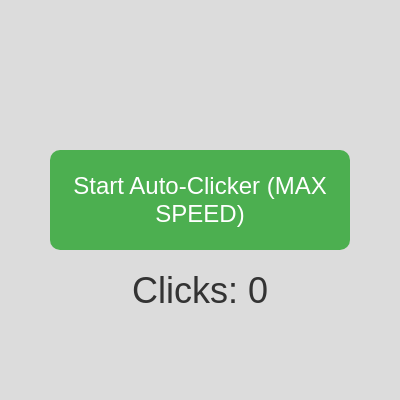
This sketch creates an interactive auto-clicker that rapidly increments a click counter on screen while playing rapid beep sounds. Clicking the big green button starts a high-speed interval that fires as fast as the browser allows, demonstrating setInterval timing, DOM manipulation, and p5.sound audio feedback.

🧪 Try This!

Experiment with the code by making these changes:

  1. Slow down the clicking — The interval controls how often autoClick() fires; increasing it from 1ms makes clicks slower and less frantic
  2. Make the beep much quieter — The first argument to amp() is the peak volume; lowering it from 0.5 makes each beep much fainter
  3. Change the button to blue when running — The hex color code controls what the button looks like; this makes active mode blue instead of red for a different visual feel
  4. Make the beep sound higher-pitched — Higher frequencies produce squeakier tones; changing 440 to 800 makes the beep much higher and more attention-grabbing
Prefer the full editor? Open it there →

📖 About This Sketch

This sketch builds a satisfying auto-clicker that fires clicks as fast as your browser can handle. Every click increments a counter, updates the text on screen, and triggers a quick beep sound. It demonstrates three powerful p5.js and web dev techniques: setInterval for rapid-fire automation, DOM manipulation to update HTML elements outside the canvas, and p5.sound to play audio feedback without any audio files.

The code is organized into a setup() function that builds the button and audio oscillator, a toggleAutoClicker() function that starts and stops the interval, and an autoClick() function that does the real work—incrementing the counter, updating the display, and playing the beep. By studying this sketch you will learn how to use JavaScript's timer functions alongside p5.js, trigger sounds in response to events, and create interactive UI elements that feel responsive.

⚙️ How It Works

  1. When the sketch loads, setup() creates a canvas, initializes a p5.Oscillator with a 440Hz sine wave (the musical note A4), and builds a big green button and a counter display using createButton() and createP().
  2. When you click the button, toggleAutoClicker() is called. If the auto-clicker is off, it starts a setInterval that calls autoClick() every 1 millisecond (though the browser typically caps this at 4ms minimum).
  3. Every time autoClick() fires, it increments clickCount by 1 and updates the on-screen counter using counterDisplay.html() to change the text inside the p5.js paragraph element.
  4. Simultaneously, autoClick() plays a brief beep by setting the oscillator's amplitude to 0.5 for 0.05 seconds, then fading it back to 0 over 0.1 seconds, creating a quick 'tick' sound effect.
  5. Clicking the button again calls toggleAutoClicker() to stop the interval, change the button text back to green, and reset the isAutoClicking flag.
  6. The windowResized() function keeps the button and counter centered if the window is resized, ensuring they stay visible and positioned correctly.

🎓 Concepts You'll Learn

Event handling (mousePressed callbacks)DOM manipulation (createButton, createP, .html())setInterval and timer functionsp5.sound oscillators and amplitude envelopesState management (isAutoClicking flag)Responsive UI (windowResized)

📝 Code Breakdown

setup()

setup() runs once when the sketch starts and is the perfect place to initialize your canvas, create UI elements, and prepare audio. Everything you create here (buttons, paragraphs, audio) persists until you destroy it or the page reloads.

function setup() {
  createCanvas(windowWidth, windowHeight);
  background(220);

  // Setup a simple sine wave oscillator for the click sound
  clickSound = new p5.Oscillator();
  clickSound.setType('sine');
  clickSound.freq(440); // Standard A4 note
  clickSound.amp(0);   // Start with zero volume
  clickSound.start();

  // Create the button to toggle the auto-clicker
  clickButton = createButton('Start Auto-Clicker (MAX SPEED)');
  clickButton.position(width / 2 - 150, height / 2 - 50);
  clickButton.size(300, 100);
  clickButton.mousePressed(toggleAutoClicker); // Attach the toggle function
  clickButton.style('font-size', '24px');
  clickButton.style('background-color', '#4CAF50'); // Green color
  clickButton.style('color', 'white');
  clickButton.style('border', 'none');
  clickButton.style('border-radius', '10px');
  clickButton.style('cursor', 'pointer');

  // Create a paragraph element to display the click count
  counterDisplay = createP('Clicks: 0');
  counterDisplay.position(width / 2 - 100, height / 2 + 70);
  counterDisplay.style('font-size', '36px');
  counterDisplay.style('text-align', 'center');
  counterDisplay.style('width', '200px');
  counterDisplay.style('color', '#333'); // Dark text color
}
Line-by-line explanation (16 lines)

🔧 Subcomponents:

calculation Audio Oscillator Initialization clickSound = new p5.Oscillator(); clickSound.setType('sine'); clickSound.freq(440); clickSound.amp(0); clickSound.start();

Creates and configures the audio oscillator that will generate beep sounds, starting silent so no noise plays until autoClick() triggers it

calculation Button Creation and Styling clickButton = createButton('Start Auto-Clicker (MAX SPEED)'); clickButton.position(width / 2 - 150, height / 2 - 50); clickButton.size(300, 100); clickButton.mousePressed(toggleAutoClicker);

Creates an interactive button, positions it centered on the canvas, sizes it large for easy clicking, and links it to the toggleAutoClicker function so pressing it starts or stops the auto-clicker

createCanvas(windowWidth, windowHeight);
Creates a canvas that fills the entire browser window, making the sketch responsive to different screen sizes
background(220);
Fills the canvas with light gray (220 brightness in grayscale), providing a clean background
clickSound = new p5.Oscillator();
Creates a new oscillator object from the p5.sound library, which will generate the beep sounds
clickSound.setType('sine');
Sets the oscillator to produce a smooth sine wave, which sounds like a clean, pure tone
clickSound.freq(440);
Sets the oscillator frequency to 440 Hz, which is the musical note A4 (a standard test tone)
clickSound.amp(0);
Sets the volume to 0 (silent) initially, so the oscillator plays without making sound until we turn it up in autoClick()
clickSound.start();
Starts the oscillator running, even though it's silent; this is necessary before we can adjust its amplitude later
clickButton = createButton('Start Auto-Clicker (MAX SPEED)');
Creates a button element with the given text, storing it in the clickButton variable so we can style and control it
clickButton.position(width / 2 - 150, height / 2 - 50);
Positions the button in the center of the canvas horizontally and slightly above center vertically (subtracting 150 and 50 to account for the button's size)
clickButton.size(300, 100);
Makes the button 300 pixels wide and 100 pixels tall, creating a large, easy-to-click target
clickButton.mousePressed(toggleAutoClicker);
Attaches the toggleAutoClicker function to the button so it runs whenever the button is clicked
clickButton.style('font-size', '24px');
Makes the button text large and readable at 24 pixels
clickButton.style('background-color', '#4CAF50');
Sets the button background to a friendly green color (hex #4CAF50)
counterDisplay = createP('Clicks: 0');
Creates an HTML paragraph element to display the click counter, starting with the text 'Clicks: 0'
counterDisplay.position(width / 2 - 100, height / 2 + 70);
Positions the counter display below the button, centered horizontally
counterDisplay.style('font-size', '36px');
Makes the counter text large and highly visible at 36 pixels
draw()

In this sketch, draw() is intentionally left empty because the animation and updates are driven by setInterval, not the p5.js animation loop. This is an important lesson: not every sketch needs a busy draw() function. Sometimes timers and event handlers do all the work.

function draw() {
  // The autoClick function updates the DOM element and plays sound,
  // so we don't need to do much in draw() itself for this sketch.
  // The background is set once in setup().
}
Line-by-line explanation (2 lines)
// The autoClick function updates the DOM element and plays sound,
This comment explains that most of the work happens in autoClick(), not in draw()
// so we don't need to do much in draw() itself for this sketch.
Since autoClick() is called by setInterval (not by the draw loop), draw() can remain mostly empty

autoClick()

autoClick() is the heart of the sketch—it runs hundreds of times per second when the auto-clicker is active. Notice it does three things: updates a number (clickCount), updates the UI (counterDisplay.html), and triggers feedback (sound). This pattern—data → display → user feedback—is essential for responsive interactive sketches.

🔬 These two lines create the beep envelope: attack then decay. What happens if you remove the decay line so the beep doesn't fade out? Or swap the times so the attack is slow (0.3 seconds) and decay is quick (0.01)?

  clickSound.amp(0.5, 0.05);
  clickSound.amp(0, 0.1, frameCount + 5);
// Function to perform a single "click" action
function autoClick() {
  clickCount++;
  counterDisplay.html('Clicks: ' + clickCount); // Update the DOM paragraph element

  // Play a short click sound: attack to 0.5 volume over 0.05 seconds,
  // then decay to 0 volume over 0.1 seconds.
  // This sound playback is relatively quick and should not significantly
  // impact performance at high click rates.
  clickSound.amp(0.5, 0.05);
  clickSound.amp(0, 0.1, frameCount + 5); // Decay happens after 5 frames (approx 0.08s)

  // Optional: Add a subtle visual flash on the canvas for feedback
  // This might slow down performance if the interval is extremely low.
  // For this sketch, the DOM update and sound are sufficient feedback.
}
Line-by-line explanation (4 lines)

🔧 Subcomponents:

calculation Increment Click Counter clickCount++;

Adds 1 to the click count every time this function is called

calculation Update On-Screen Counter counterDisplay.html('Clicks: ' + clickCount);

Changes the text inside the paragraph element to show the new click count

calculation Beep Attack Phase clickSound.amp(0.5, 0.05);

Rapidly raises the volume to 0.5 over 0.05 seconds, creating the 'attack' of the beep

calculation Beep Decay Phase clickSound.amp(0, 0.1, frameCount + 5);

Lowers the volume back to 0 over 0.1 seconds, ending the beep with a smooth fade-out

clickCount++;
Increments the global clickCount variable by 1—this is the core action that happens on every click
counterDisplay.html('Clicks: ' + clickCount);
Updates the paragraph element's text to show the new click count; .html() replaces the text content of any p5.js DOM element
clickSound.amp(0.5, 0.05);
Sets the oscillator's volume to 0.5 (halfway), ramping up over 0.05 seconds—this creates the immediate 'tick' sound of the click
clickSound.amp(0, 0.1, frameCount + 5);
Schedules the volume to fade back to 0 over 0.1 seconds, starting after 5 more frames; this creates the tail of the beep so it doesn't sound abrupt

toggleAutoClicker()

toggleAutoClicker() is a state-management function—it tracks whether the auto-clicker is on or off using the isAutoClicking boolean flag. Every time you click the button, it flips the state and updates the UI to reflect it. This pattern (a flag controlling what the button does) is fundamental to interactive p5.js sketches with start/stop buttons.

// Function to start or stop the auto-clicker
function toggleAutoClicker() {
  if (isAutoClicking) {
    // If auto-clicking, stop it
    clearInterval(autoClickerInterval); // Clear the interval
    autoClickerInterval = null;
    clickButton.html('Start Auto-Clicker (MAX SPEED)');
    clickButton.style('background-color', '#4CAF50'); // Green
    isAutoClicking = false;
  } else {
    // If not auto-clicking, start it
    // Set an interval to call autoClick() every 1 millisecond.
    // The browser will likely cap this at its minimum (typically 4ms).
    // This will result in 250 clicks/second if the browser allows 4ms.
    // Be cautious, as very low intervals can make the browser unresponsive.
    autoClickerInterval = setInterval(autoClick, 1);
    clickButton.html('Stop Auto-Clicker');
    clickButton.style('background-color', '#f44336'); // Red
    isAutoClicking = true;
  }
}
Line-by-line explanation (10 lines)

🔧 Subcomponents:

conditional Stop Auto-Clicker Branch if (isAutoClicking) { clearInterval(autoClickerInterval); autoClickerInterval = null; clickButton.html('Start Auto-Clicker (MAX SPEED)'); clickButton.style('background-color', '#4CAF50'); isAutoClicking = false; }

If the auto-clicker is already running, stop it: clear the interval, reset the button text and color to green, and set the flag to false

conditional Start Auto-Clicker Branch } else { autoClickerInterval = setInterval(autoClick, 1); clickButton.html('Stop Auto-Clicker'); clickButton.style('background-color', '#f44336'); isAutoClicking = true; }

If the auto-clicker is not running, start it: create an interval that calls autoClick() every 1ms, change the button to red with 'Stop' text, and set the flag to true

if (isAutoClicking) {
Checks whether the auto-clicker is currently active; if true, the next block will stop it
clearInterval(autoClickerInterval);
Stops the interval from running, preventing autoClick() from being called anymore
autoClickerInterval = null;
Sets the interval variable to null to clear the reference, marking it as stopped
clickButton.html('Start Auto-Clicker (MAX SPEED)');
Changes the button text back to 'Start' to invite the user to restart it
clickButton.style('background-color', '#4CAF50');
Changes the button back to green to signal that it is stopped and ready to be started again
isAutoClicking = false;
Updates the flag to false so the next click knows the auto-clicker is off
autoClickerInterval = setInterval(autoClick, 1);
Starts a new interval that calls autoClick() every 1 millisecond (though browsers typically cap this at 4ms minimum)
clickButton.html('Stop Auto-Clicker');
Changes the button text to 'Stop' to give the user clear feedback that the auto-clicker is now running
clickButton.style('background-color', '#f44336');
Changes the button to red to visually signal that the auto-clicker is active and clicking rapidly
isAutoClicking = true;
Updates the flag to true so the next click will stop the auto-clicker instead of starting another one

windowResized()

windowResized() is a special p5.js function that automatically runs whenever the browser window is resized. By updating the canvas size and repositioning UI elements inside it, we ensure the sketch stays centered and readable at any window size. This is essential for responsive, user-friendly sketches.

// Called when the browser window (or preview panel) is resized
function windowResized() {
  resizeCanvas(windowWidth, windowHeight);
  // Re-position button and counter display to stay centered
  clickButton.position(width / 2 - 150, height / 2 - 50);
  counterDisplay.position(width / 2 - 100, height / 2 + 70);
}
Line-by-line explanation (3 lines)

🔧 Subcomponents:

calculation Canvas Resizing resizeCanvas(windowWidth, windowHeight);

Adjusts the canvas size to match the new window dimensions

calculation UI Element Repositioning clickButton.position(width / 2 - 150, height / 2 - 50); counterDisplay.position(width / 2 - 100, height / 2 + 70);

Moves the button and counter to their new centered positions based on the new canvas size

resizeCanvas(windowWidth, windowHeight);
p5.js automatically calls this function when the window is resized; this line stretches the canvas to fill the new window size
clickButton.position(width / 2 - 150, height / 2 - 50);
Re-centers the button horizontally and slightly above center vertically based on the new canvas dimensions (width and height have updated)
counterDisplay.position(width / 2 - 100, height / 2 + 70);
Re-centers the counter display below the button using the new canvas dimensions

📦 Key Variables

clickCount number

Tracks the total number of clicks that have been performed since the sketch started; incremented by 1 every time autoClick() is called

let clickCount = 0;
autoClickerInterval object

Stores the interval ID returned by setInterval(); used later to stop the auto-clicker with clearInterval()

let autoClickerInterval;
clickSound object

Holds the p5.Oscillator object that generates the beep sound; initialized in setup() and its amplitude is controlled in autoClick()

let clickSound;
clickButton object

Stores the p5.js button element created with createButton(); used to attach the toggle function and change its styling

let clickButton;
counterDisplay object

Stores the p5.js paragraph element created with createP(); updated with .html() to show the current click count

let counterDisplay;
isAutoClicking boolean

Boolean flag that tracks whether the auto-clicker is currently running; toggles between true and false in toggleAutoClicker()

let isAutoClicking = false;

🔧 Potential Improvements (4)

Here are some ways this code could be enhanced:

BUG toggleAutoClicker()

The interval is set to 1ms, but browsers cap it at ~4ms minimum, making the actual click rate inconsistent across browsers and machines

💡 Set a more realistic interval like 10ms or 50ms, or add a comment explaining that the browser will enforce the minimum: autoClickerInterval = setInterval(autoClick, 10); // Browser caps at ~4ms

PERFORMANCE autoClick()

Calling counterDisplay.html() every frame is slower than directly manipulating textContent; at 250+ clicks per second, DOM updates can become a bottleneck

💡 Cache the textContent directly: counterDisplay.elt.textContent = 'Clicks: ' + clickCount; (using .elt to access the underlying HTML element)

STYLE setup()

Button styling is done with multiple .style() calls, which is verbose and hard to maintain

💡 Use a single CSS file or consolidate styles: clickButton.class('start-button'); and define all styles in a <style> block or external stylesheet

FEATURE Global scope

There is no way to reset the click counter—users must reload the page to start fresh

💡 Add a reset button that calls clickCount = 0; counterDisplay.html('Clicks: 0');, giving users control over their session

🔄 Code Flow

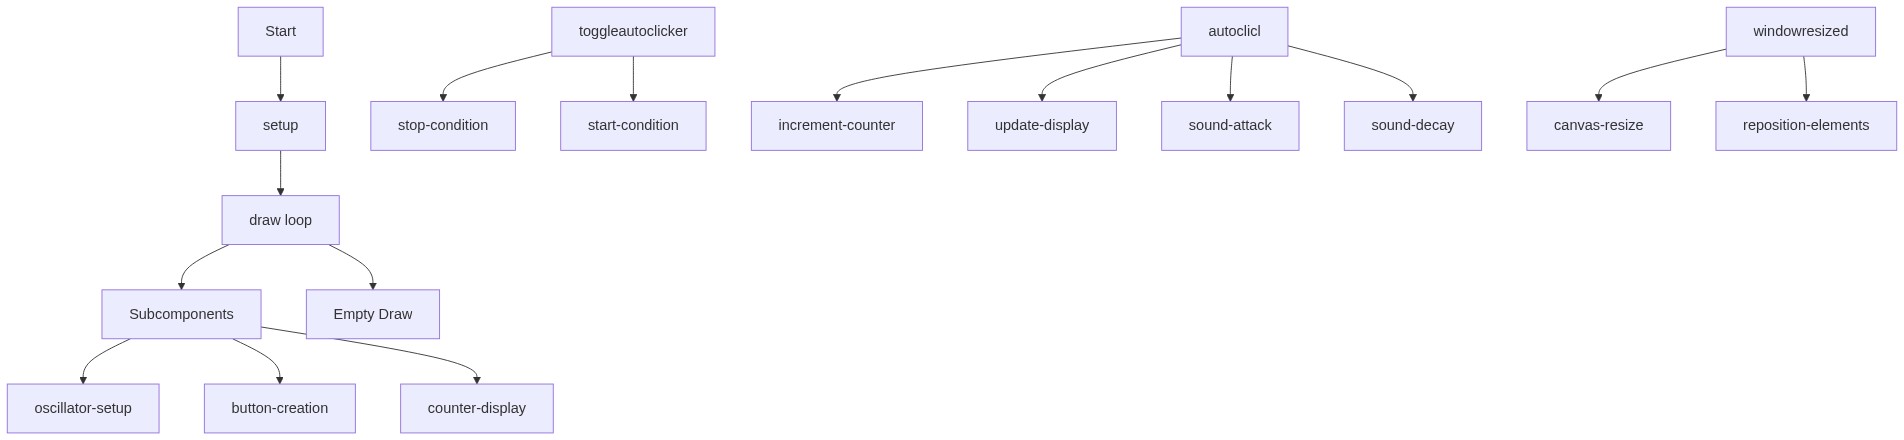
Code flow showing setup, draw, autoclickclick, toggleautoclicker, windowresized

💡 Click on function names in the diagram to jump to their code

graph TD start[Start] --> setup[setup] setup --> draw[draw loop] draw --> autoclickclick[autoClick] draw --> toggleautoclicker[toggleAutoClicker] draw --> windowresized[windowResized] click setup href "#fn-setup" click draw href "#fn-draw" click autoclickclick href "#fn-autoclickclick" click toggleautoclicker href "#fn-toggleautoclicker" click windowresized href "#fn-windowresized" setup --> oscillator-setup[Audio Oscillator Initialization] setup --> button-styling[Button Creation and Styling] click oscillator-setup href "#sub-oscillator-setup" click button-styling href "#sub-button-styling" toggleautoclicker --> stop-condition[Stop Auto-Clicker Branch] toggleautoclicker --> start-condition[Start Auto-Clicker Branch] click stop-condition href "#sub-stop-condition" click start-condition href "#sub-start-condition" autoclickclick --> increment-counter[Increment Click Counter] autoclickclick --> update-display[Update On-Screen Counter] autoclickclick --> sound-attack[Beep Attack Phase] autoclickclick --> sound-decay[Beep Decay Phase] click increment-counter href "#sub-increment-counter" click update-display href "#sub-update-display" click sound-attack href "#sub-sound-attack" click sound-decay href "#sub-sound-decay" windowresized --> canvas-resize[Canvas Resizing] windowresized --> reposition-ui[UI Element Repositioning] click canvas-resize href "#sub-canvas-resize" click reposition-ui href "#sub-reposition-ui"

❓ Frequently Asked Questions

What visual elements can I expect in the p5.js sketch titled 'Sketch 2026-02-15 20:14'?

This sketch features a large, friendly button centered on the screen, accompanied by a real-time click counter that updates with each button press.

How can I interact with the auto-clicker in this sketch?

Users can start the rapid-fire auto-clicker by clicking the button labeled 'Start Auto-Clicker (MAX SPEED)', which triggers a series of simulated clicks and sounds.

What creative coding concept does this p5.js sketch illustrate?

The sketch demonstrates the concept of creating an interactive auto-clicker that integrates sound feedback, showcasing event handling and real-time updates in a browser environment.

Preview

Sketch 2026-02-15 20:14 - p5.js creative coding sketch preview
Sketch Preview
Code flow diagram showing the structure of Sketch 2026-02-15 20:14 - Code flow showing setup, draw, autoclickclick, toggleautoclicker, windowresized
Code Flow Diagram