
Sketch 2026-02-22 19:32

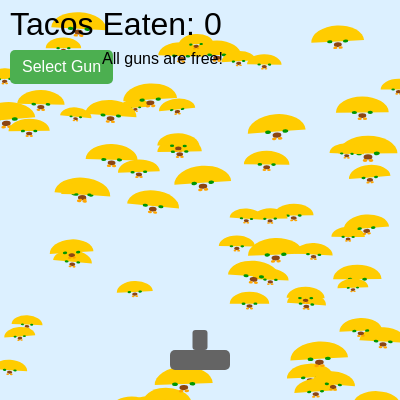
This is an interactive arcade-style game where players control a gun at the bottom of the screen to shoot falling tacos while avoiding bones and garlic. The game features a scoring system, multiple gun upgrades with different firing patterns, and a game-over state triggered by hitting bad items.

🧪 Try This!

Experiment with the code by making these changes:

  1. Change the background color — Altering the RGB values in the background() call at the top of draw() changes the sky color instantly—try dark blues for night or orange for sunset.
  2. Make the score worth more per taco — Changing the score increment from 1 to 5 or 10 makes progression feel faster and rewards the player more generously.
  3. Make tacos bigger — Increasing the taco size range from 30-60 to 50-100 makes them easier targets but more visually prominent.
  4. Add a third bad enemy type — Create a new Chili class that inherits from EnemyItem with emoji '🌶️'; add it to draw() like bones and garlics to introduce a new challenge.
  5. Make bullets travel faster — Increasing the minimum bullet speed from 10 to 15 or 20 makes all guns respond faster and gameplay feel snappier.
Prefer the full editor? Open it there →

📖 About This Sketch

This sketch creates a fast-paced arcade game where tacos rain from the sky and you shoot them with an upgradeable gun. Bones and garlic fall alongside the tacos—hit them and you lose. The game combines several core p5.js techniques: the draw loop for continuous animation, arrays to manage dozens of falling objects and bullets, collision detection to determine hits, and interactive UI buttons for selecting gun upgrades. It's an excellent study in game architecture.

The code is organized into a setup() function that initializes the canvas and UI, a draw() function that handles all game logic and rendering each frame, and five custom classes (Taco, Bone, Garlic, Bullet, and the base EnemyItem class) that encapsulate the behavior of each game object. By reading it you will learn how to manage multiple game states, how arrays enable you to track and update many objects at once, and how a class-based architecture makes complex games maintainable.

⚙️ How It Works

  1. When the sketch loads, setup() creates a responsive canvas, initializes arrays to hold 100 tacos, 19 bones, and 19 garlics, and creates UI buttons for selecting guns and restarting. It also applies the properties of the starting gun (Basic Blaster).
  2. Every frame, draw() clears the canvas and checks the game state. If the game is playing, it updates and displays all falling objects (tacos, bones, garlics) and all bullets, moving them downward or upward respectively.
  3. When the player touches or clicks (via touchStarted()), a bullet is created at the gun's position. The bullet type and count depend on the currently equipped gun—Basic Blaster fires one, Double Barrel fires two, Ultimate fires three.
  4. Collision detection runs every frame: bullets are tested against each taco (good—adds to score), each bone (bad—ends game), and each garlic (bad—ends game). When a bullet hits a taco, the taco is marked eaten and resets to the top; when a bullet hits a bone or garlic, gameOver() is called.
  5. Clicking the Select Gun button opens a shop overlay displaying all five available guns. Players can equip any gun for free, which changes the gun's visual size, bullet speed, and firing pattern.
  6. If the player hits a bone or garlic, the game transitions to a 'gameOver' state, the restart button appears, and clicking it calls restartGame() to reset all objects and return to playing.

🎓 Concepts You'll Learn

Game state managementCollision detectionClasses and object-oriented designArray iteration and manipulationEvent handling (touch/click)Conditional logicInheritance

📝 Code Breakdown

setup()

setup() runs once when the sketch starts. It initializes the canvas, sets starting variable values, and creates all the UI elements (buttons, displays, containers) that the player will interact with. Everything you set up here persists throughout the game.

function setup() {
  // Create a responsive canvas
  createCanvas(windowWidth, windowHeight);
  
  // Initialize gun position *after* createCanvas() to use width and height
  gunX = width / 2;
  gunY = height - gunHeight - 20; // Position gun above the bottom of the screen

  // Initialize all game elements
  initializeGameElements();

  // Create Upgrade Button (now opens the shop to select guns)
  upgradeButton = createButton('Select Gun'); // Changed button text
  upgradeButton.position(10, 50);
  console.log('Upgrade button created and positioned:', upgradeButton.x, upgradeButton.y);
  upgradeButton.mousePressed(openShop);
  upgradeButton.style('font-size', '16px');
  upgradeButton.style('padding', '8px 12px');
  upgradeButton.style('background-color', '#4CAF50');
  upgradeButton.style('color', 'white');
  upgradeButton.style('border', 'none');
  upgradeButton.style('border-radius', '5px');
  upgradeButton.style('cursor', 'pointer');

  // Create Upgrade Cost Display (now just a general info div)
  upgradeCostDisplay = createDiv('All guns are free!'); // Info text
  upgradeCostDisplay.position(upgradeButton.x + upgradeButton.width + 10, 50);
  upgradeCostDisplay.style('font-size', '16px');
  upgradeCostDisplay.style('color', 'black');
  // updateUpgradeButtonState() is no longer needed here as button is always active

  // Create Upgrade Shop Container (initially hidden)
  shopContainer = createDiv('');
  shopContainer.id('shop-container'); // Add an ID for CSS styling
  shopContainer.style('display', 'none'); // Initially hidden
  shopContainer.style('position', 'absolute');
  shopContainer.style('left', '50%');
  shopContainer.style('top', '50%');
  shopContainer.style('transform', 'translate(-50%, -50%)');
  shopContainer.style('background-color', 'white');
  shopContainer.style('border', '2px solid black');
  shopContainer.style('padding', '20px');
  shopContainer.style('z-index', '1000'); // Ensure it's on top of the canvas
  shopContainer.style('width', '80%');
  shopContainer.style('max-width', '500px');
  shopContainer.style('box-shadow', '0 0 10px rgba(0,0,0,0.5)');
  shopContainer.style('border-radius', '10px');
  shopContainer.style('text-align', 'center');
  shopContainer.style('font-family', 'sans-serif');
  console.log('Shop container created and hidden.');

  // Add shop title
  shopContainer.html('<h2>Taco Shooter Guns</h2>', true); // Changed title

  // Add close button (X) at the top
  let closeXButton = createButton('X');
  closeXButton.parent(shopContainer);
  closeXButton.position(10, 10);
  closeXButton.style('font-size', '18px');
  closeXButton.style('background', 'none');
  closeXButton.style('border', 'none');
  closeXButton.style('cursor', 'pointer');
  closeXButton.style('font-weight', 'bold');
  closeXButton.style('color', '#333');
  closeXButton.mousePressed(closeShop);

  // Add a more prominent "Close Shop" button at the bottom
  closeShopButton = createButton('Close Shop');
  closeShopButton.parent(shopContainer);
  closeShopButton.style('margin-top', '20px'); // Add some space
  closeShopButton.style('font-size', '16px');
  closeShopButton.style('padding', '8px 12px');
  closeShopButton.style('background-color', '#DC3545'); // Red color
  closeShopButton.style('color', 'white');
  closeShopButton.style('border', 'none');
  closeShopButton.style('border-radius', '5px');
  closeShopButton.style('cursor', 'pointer');
  closeShopButton.mousePressed(closeShop);

  // Create Restart Button (initially hidden)
  restartButton = createButton('Restart Game');
  restartButton.position(width / 2 - 75, height / 2 + 50);
  restartButton.mousePressed(restartGame);
  restartButton.hide(); // Hidden at start
  restartButton.style('font-size', '20px');
  restartButton.style('padding', '10px 20px');
  restartButton.style('background-color', '#007BFF');
  restartButton.style('color', 'white');
  restartButton.style('border', 'none');
  restartButton.style('border-radius', '5px');
  restartButton.style('cursor', 'pointer');

  // Add gun listings (will be populated dynamically)
  populateShop();
  // Apply initial gun properties (Basic Blaster)
  applyGunProperties(1);
}
Line-by-line explanation (10 lines)

🔧 Subcomponents:

initialization Canvas Setup createCanvas(windowWidth, windowHeight);

Creates a responsive canvas that fills the entire window

calculation Gun Position gunX = width / 2; gunY = height - gunHeight - 20;

Centers the gun horizontally and positions it near the bottom of the screen

initialization Button Creation and Styling upgradeButton = createButton('Select Gun');

Creates the UI button that opens the gun shop

initialization Shop Container Setup shopContainer = createDiv('');

Creates a hidden overlay div that will display available guns

createCanvas(windowWidth, windowHeight);
Creates a canvas that fills the entire browser window; windowWidth and windowHeight are p5.js variables that contain the current window dimensions
gunX = width / 2;
Sets the gun's horizontal position to the center of the canvas (width is half the canvas width)
gunY = height - gunHeight - 20;
Positions the gun near the bottom of the canvas, accounting for the gun's height and a 20-pixel margin from the edge
initializeGameElements();
Calls a helper function that populates the tacos, bones, and garlics arrays with new objects
upgradeButton = createButton('Select Gun');
Creates a clickable button with the text 'Select Gun' that will open the gun shop when clicked
upgradeButton.mousePressed(openShop);
Registers the openShop() function to be called whenever the upgrade button is clicked
shopContainer = createDiv('');
Creates an invisible div element that will contain the gun shop; it is initially hidden with display: none
shopContainer.style('display', 'none');
Sets the shop to be invisible when the game starts; it will be shown when the player clicks Select Gun
populateShop();
Calls a helper function that fills the shop container with gun listings and equip buttons
applyGunProperties(1);
Applies the properties of gun level 1 (Basic Blaster) to the global bullet and gun variables
initializeGameElements()

initializeGameElements() is the 'reset' function called both when the game first starts and when the player clicks Restart Game. It clears all arrays and recreates them with fresh objects, effectively starting a new game from scratch.

🔬 This loop creates 100 tacos. What happens if you change numTacos in the loop condition to 50? How would that change the game difficulty?

  // Initialize tacos
  for (let i = 0; i < numTacos; i++) {
    tacos.push(new Taco());
  }
function initializeGameElements() {
  tacos = [];
  bullets = [];
  bones = [];
  garlics = [];
  score = 0;
  autoShopOpened = false;
  gunLevel = 1; // Reset gun to level 1 on restart
  applyGunProperties(1); // Apply properties for level 1
  gunX = width / 2; // Reset gun position
  console.log('initializeGameElements() called.');

  // Initialize tacos
  for (let i = 0; i < numTacos; i++) {
    tacos.push(new Taco());
  }

  // Initialize bones
  for (let i = 0; i < numBones; i++) {
    bones.push(new Bone());
  }

  // Initialize garlics
  for (let i = 0; i < numGarlics; i++) {
    garlics.push(new Garlic());
  }
}
Line-by-line explanation (10 lines)

🔧 Subcomponents:

initialization Array Resets tacos = []; bullets = []; bones = []; garlics = [];

Clears all game object arrays to prepare for a fresh game

for-loop Taco Initialization Loop for (let i = 0; i < numTacos; i++) { tacos.push(new Taco()); }

Creates 100 new Taco objects and adds them to the tacos array

for-loop Bone Initialization Loop for (let i = 0; i < numBones; i++) { bones.push(new Bone()); }

Creates 19 new Bone objects and adds them to the bones array

for-loop Garlic Initialization Loop for (let i = 0; i < numGarlics; i++) { garlics.push(new Garlic()); }

Creates 19 new Garlic objects and adds them to the garlics array

tacos = [];
Resets the tacos array to empty, discarding any tacos from the previous game
bullets = [];
Clears all bullets from the previous game
bones = [];
Clears all bones from the previous game
garlics = [];
Clears all garlics from the previous game
score = 0;
Resets the score back to zero at the start of a new game
autoShopOpened = false;
Resets the flag that tracks whether the shop auto-opened at score 50, so it can trigger again on the next game
gunLevel = 1;
Resets the currently equipped gun back to level 1 (Basic Blaster) on restart
applyGunProperties(1);
Applies the properties (bullet speed, width, height) of the level 1 gun
for (let i = 0; i < numTacos; i++) {
Loops 100 times (the value of numTacos), creating a new Taco object each iteration
tacos.push(new Taco());
Creates a new Taco object and adds it to the end of the tacos array using push()

draw()

draw() is the heart of every p5.js sketch—it runs 60 times per second. Each frame, it clears the background, updates all game objects, checks for collisions, and draws everything. The if-else structure handling gameState is a common pattern: use state variables to control what happens each frame.

🔬 The gun changes color based on gunLevel. What happens if you add a third condition like 'else if (gunLevel === 3) { fill(0, 0, 255); }' to make the Double Barrel gun blue?

    // Draw the gun
    if (gunLevel >= 5) {
      fill(255, 215, 0); // Gold color for ultimate gun
    } else {
      fill(100); // Grey color for other guns
    }
function draw() {
  background(220, 240, 255); // Light blue sky background

  if (gameState === 'playing') {
    // Update and display each taco
    for (let taco of tacos) {
      taco.fall();
      taco.show();
    }

    // Update and display bones
    for (let i = bones.length - 1; i >= 0; i--) {
      let bone = bones[i];
      bone.fall();
      bone.show();
      if (bone.isOffScreen()) { // Bone reached bottom
        // Removed gameOver() call here
        bones.splice(i, 1); // Just remove it from the array
      }
    }

    // Update and display garlics
    for (let i = garlics.length - 1; i >= 0; i--) {
      let garlic = garlics[i];
      garlic.fall();
      garlic.show();
      if (garlic.isOffScreen()) { // Garlic reached bottom
        // Removed gameOver() call here
        garlics.splice(i, 1); // Just remove it from the array
      }
    }

    // Update and display bullets
    for (let i = bullets.length - 1; i >= 0; i--) {
      let bullet = bullets[i];
      bullet.update();
      bullet.show();

      // Remove bullets that go off-screen
      if (bullet.y < -bullet.h) {
        bullets.splice(i, 1);
      }
    }

    // Collision detection: bullets vs tacos
    for (let i = bullets.length - 1; i >= 0; i--) {
      let bullet = bullets[i];
      for (let j = tacos.length - 1; j >= 0; j--) {
        let taco = tacos[j];

        if (taco.hitsBullet(bullet)) {
          taco.eaten = true; // Mark taco as eaten, it will reset in its fall() method
          score++; // Increment the score!
          bullets.splice(i, 1); // Remove the bullet
          break; // Bullet can only hit one taco, move to next bullet
        }
      }
    }

    // Collision detection: bullets vs bones
    for (let i = bullets.length - 1; i >= 0; i--) {
      let bullet = bullets[i];
      for (let j = bones.length - 1; j >= 0; j--) {
        let bone = bones[j];

        if (bone.hitsBullet(bullet)) {
          gameOver(); // Hit a bone! Game Over!
          return;
        }
      }
    }

    // Collision detection: bullets vs garlics
    for (let i = bullets.length - 1; i >= 0; i--) {
      let bullet = bullets[i];
      for (let j = garlics.length - 1; j >= 0; j--) {
        let garlic = garlics[j];

        if (garlic.hitsBullet(bullet)) {
          gameOver(); // Hit a garlic! Game Over!
          return;
        }
      }
    }

    // Draw the gun
    if (gunLevel >= 5) {
      fill(255, 215, 0); // Gold color for ultimate gun
    } else {
      fill(100); // Grey color for other guns
    }
    noStroke();
    rectMode(CENTER);
    rect(gunX, gunY, gunWidth, gunHeight, 5); // Rounded rectangle for the gun base
    // Gun barrel - adjust offset based on current gunHeight
    rect(gunX, gunY - gunHeight / 2 - 10, gunWidth / 4, 20, 3);
    
    // Display the score
    fill(0); // Black color for text
    textSize(32); // Set text size
    textAlign(LEFT, TOP); // Align text to the top-left
    text(`Tacos Eaten: ${score}`, 10, 10); // Display the score at (10, 10)

    // Auto-open shop when score reaches 50 for the first time
    if (score >= 50 && !autoShopOpened && shopContainer.style('display') === 'none') {
      console.log('Score reached 50! Auto-opening shop...');
      openShop();
      autoShopOpened = true; // Set flag to true to prevent re-opening
    }
  } else if (gameState === 'gameOver') {
    // Game Over screen
    fill(0, 150); // Semi-transparent black background
    rectMode(CORNER);
    rect(0, 0, width, height);

    fill(255);
    textSize(64);
    textAlign(CENTER, CENTER);
    text('GAME OVER!', width / 2, height / 2 - 50);

    textSize(32);
    text(`Tacos Eaten: ${score}`, width / 2, height / 2);

    restartButton.show(); // Show restart button
  }
}
Line-by-line explanation (36 lines)

🔧 Subcomponents:

for-loop Taco Update Loop for (let taco of tacos) { taco.fall(); taco.show(); }

Updates position and draws each falling taco every frame

for-loop Bone Update Loop for (let i = bones.length - 1; i >= 0; i--) { let bone = bones[i]; bone.fall(); bone.show(); if (bone.isOffScreen()) { bones.splice(i, 1); } }

Updates, draws, and removes off-screen bones

for-loop Garlic Update Loop for (let i = garlics.length - 1; i >= 0; i--) { let garlic = garlics[i]; garlic.fall(); garlic.show(); if (garlic.isOffScreen()) { garlics.splice(i, 1); } }

Updates, draws, and removes off-screen garlics

for-loop Bullet Update Loop for (let i = bullets.length - 1; i >= 0; i--) { let bullet = bullets[i]; bullet.update(); bullet.show(); if (bullet.y < -bullet.h) { bullets.splice(i, 1); } }

Updates, draws, and removes bullets that have left the top of the screen

nested-loop Bullet-Taco Collision Detection for (let i = bullets.length - 1; i >= 0; i--) { let bullet = bullets[i]; for (let j = tacos.length - 1; j >= 0; j--) { let taco = tacos[j]; if (taco.hitsBullet(bullet)) { taco.eaten = true; score++; bullets.splice(i, 1); break; } } }

Checks if any bullet hits any taco; if so, increments score and removes the bullet

nested-loop Bullet-Bone Collision Detection for (let i = bullets.length - 1; i >= 0; i--) { let bullet = bullets[i]; for (let j = bones.length - 1; j >= 0; j--) { let bone = bones[j]; if (bone.hitsBullet(bullet)) { gameOver(); return; } } }

Checks if any bullet hits any bone; if so, ends the game

nested-loop Bullet-Garlic Collision Detection for (let i = bullets.length - 1; i >= 0; i--) { let bullet = bullets[i]; for (let j = garlics.length - 1; j >= 0; j--) { let garlic = garlics[j]; if (garlic.hitsBullet(bullet)) { gameOver(); return; } } }

Checks if any bullet hits any garlic; if so, ends the game

conditional Gun Rendering if (gunLevel >= 5) { fill(255, 215, 0); } else { fill(100); } noStroke(); rectMode(CENTER); rect(gunX, gunY, gunWidth, gunHeight, 5); rect(gunX, gunY - gunHeight / 2 - 10, gunWidth / 4, 20, 3);

Draws the gun at the bottom of the screen, with gold color if it's the Ultimate gun, grey otherwise

text-rendering Score Text Display fill(0); textSize(32); textAlign(LEFT, TOP); text(`Tacos Eaten: ${score}`, 10, 10);

Displays the current score at the top-left of the screen

conditional Auto-Open Shop at Score 50 if (score >= 50 && !autoShopOpened && shopContainer.style('display') === 'none') { console.log('Score reached 50! Auto-opening shop...'); openShop(); autoShopOpened = true; }

Automatically opens the gun shop when the player reaches a score of 50 for the first time

conditional Game Over Screen } else if (gameState === 'gameOver') { fill(0, 150); rectMode(CORNER); rect(0, 0, width, height); fill(255); textSize(64); textAlign(CENTER, CENTER); text('GAME OVER!', width / 2, height / 2 - 50); textSize(32); text(`Tacos Eaten: ${score}`, width / 2, height / 2); restartButton.show(); }

Displays the game over screen with a semi-transparent overlay and the final score

background(220, 240, 255);
Clears the canvas and fills it with a light blue color (RGB: 220, 240, 255) each frame, erasing the previous frame's drawings
if (gameState === 'playing') {
Checks whether the game is currently in the 'playing' state; if true, game logic runs; if false (gameState is 'gameOver'), the game over screen displays instead
for (let taco of tacos) {
Loops through each taco in the tacos array; 'of' is shorthand for iterating over all elements
taco.fall();
Calls the fall() method on the taco, which updates its y position (moves it downward)
taco.show();
Calls the show() method on the taco, which draws it on the canvas at its current position
for (let i = bones.length - 1; i >= 0; i--) {
Loops through the bones array backwards (from last element to first); looping backwards is necessary because we may remove items with splice() during the loop
if (bone.isOffScreen()) {
Checks if the bone has fallen below the bottom of the canvas
bones.splice(i, 1);
Removes the bone at index i from the bones array; the second argument (1) means remove 1 item
for (let i = bullets.length - 1; i >= 0; i--) {
Loops through bullets backwards, allowing safe removal of bullets during iteration
if (bullet.y < -bullet.h) {
Checks if the bullet has gone completely off the top of the screen (its y position plus its height is above 0)
if (taco.hitsBullet(bullet)) {
Calls the hitsBullet() method on the taco to check if it collides with the bullet; returns true if they overlap
taco.eaten = true;
Marks the taco as eaten, which signals the taco to reset itself on the next fall() call
score++;
Adds 1 to the score variable, incrementing the player's points
bullets.splice(i, 1);
Removes the bullet from the bullets array after it has hit a taco
break;
Exits the inner taco loop, ensuring each bullet only removes one taco
if (bone.hitsBullet(bullet)) {
Checks if the bullet collides with the bone
gameOver();
Calls the gameOver() function, which ends the game and transitions to the game over screen
return;
Exits the draw() function early, preventing further game logic from running this frame
if (gunLevel >= 5) {
Checks if the current gun level is 5 or higher (the Ultimate Taco Cannon)
fill(255, 215, 0);
Sets the fill color to gold (RGB: 255, 215, 0) for the Ultimate gun's appearance
fill(100);
Sets the fill color to dark grey (RGB: 100, 100, 100) for non-ultimate guns
rectMode(CENTER);
Sets the origin point for rect() to its center rather than its top-left corner
rect(gunX, gunY, gunWidth, gunHeight, 5);
Draws the gun as a rounded rectangle at position (gunX, gunY) with dimensions gunWidth × gunHeight and 5-pixel corner radius
rect(gunX, gunY - gunHeight / 2 - 10, gunWidth / 4, 20, 3);
Draws the gun barrel above the gun base; positioned at an offset and with reduced width to look like a barrel
fill(0);
Sets the fill color to black (RGB: 0, 0, 0) for text rendering
textSize(32);
Sets the font size to 32 pixels for the score display
textAlign(LEFT, TOP);
Aligns text to the left horizontally and to the top vertically
text(`Tacos Eaten: ${score}`, 10, 10);
Displays the score text at position (10, 10); ${score} is a template literal that inserts the current score value
if (score >= 50 && !autoShopOpened && shopContainer.style('display') === 'none') {
Checks three conditions: score is at least 50, the shop hasn't been auto-opened yet, and the shop is currently hidden
openShop();
Calls openShop() to display the gun selection menu
autoShopOpened = true;
Sets the flag to true, preventing the shop from being auto-opened again in future frames
fill(0, 150);
Sets the fill color to semi-transparent black (RGB: 0, 0, 0 with alpha 150/255)
rect(0, 0, width, height);
Draws a semi-transparent black rectangle covering the entire canvas
textSize(64);
Sets the font size to 64 pixels for the 'GAME OVER!' text
text('GAME OVER!', width / 2, height / 2 - 50);
Displays 'GAME OVER!' text centered horizontally and slightly above center vertically
restartButton.show();
Makes the restart button visible so the player can click it to start a new game

touchStarted()

touchStarted() is p5.js's cross-platform input handler—it works for both mouse clicks and touch events on mobile devices. The function checks game state and button positions before firing, a common pattern for preventing unintended actions. The different gun firing patterns use simple math (offsets like gunX ± 10) to position bullets.

function touchStarted() {
  if (gameState === 'playing') {
    // Check if the touch is not on the upgrade button AND the shop is closed
    if (shopContainer.style('display') === 'none' &&
        (mouseX < upgradeButton.x || mouseX > upgradeButton.x + upgradeButton.width ||
        mouseY < upgradeButton.y || mouseY > upgradeButton.y + upgradeButton.height)) {
      
      // Shoot bullets based on the current gun's properties
      let currentGun = guns.find(g => g.level === gunLevel);
      if (currentGun) {
        if (currentGun.level === 1 || currentGun.level === 2 || currentGun.level === 4) {
          // Single shot guns
          bullets.push(new Bullet(gunX, gunY - gunHeight, bulletSpeed, bulletWidth, bulletHeight));
        } else if (currentGun.level === 3) {
          // Double shot gun
          bullets.push(new Bullet(gunX - 10, gunY - gunHeight, bulletSpeed, bulletWidth, bulletHeight));
          bullets.push(new Bullet(gunX + 10, gunY - gunHeight, bulletSpeed, bulletWidth, bulletHeight));
        } else if (currentGun.level >= 5) { // Level 5 (Ultimate Taco Cannon)
          // Triple shot gun
          bullets.push(new Bullet(gunX - 20, gunY - gunHeight, bulletSpeed, bulletWidth, bulletHeight));
          bullets.push(new Bullet(gunX, gunY - gunHeight, bulletSpeed, bulletWidth, bulletHeight));
          bullets.push(new Bullet(gunX + 20, gunY - gunHeight, bulletSpeed, bulletWidth, bulletHeight));
        }
      }
    }
  }
  return false; // Prevent default browser touch behavior (like scrolling)
}
Line-by-line explanation (16 lines)

🔧 Subcomponents:

conditional Game State Validation if (gameState === 'playing') {

Ensures bullets can only be shot during active gameplay, not during game over

conditional Shop and Button Hit Detection if (shopContainer.style('display') === 'none' && (mouseX < upgradeButton.x || mouseX > upgradeButton.x + upgradeButton.width || mouseY < upgradeButton.y || mouseY > upgradeButton.y + upgradeButton.height)) {

Prevents shooting when the shop is open or when clicking on the Select Gun button

calculation Current Gun Lookup let currentGun = guns.find(g => g.level === gunLevel);

Finds the gun object matching the currently equipped gunLevel

conditional Single Shot Gun Fire if (currentGun.level === 1 || currentGun.level === 2 || currentGun.level === 4) { bullets.push(new Bullet(gunX, gunY - gunHeight, bulletSpeed, bulletWidth, bulletHeight)); }

Fires one bullet from the gun's center for Basic Blaster, Rapid Fire, and Precision Laser

conditional Double Shot Gun Fire } else if (currentGun.level === 3) { bullets.push(new Bullet(gunX - 10, gunY - gunHeight, bulletSpeed, bulletWidth, bulletHeight)); bullets.push(new Bullet(gunX + 10, gunY - gunHeight, bulletSpeed, bulletWidth, bulletHeight)); }

Fires two bullets 10 pixels left and right of the gun's center for the Double Barrel Shotgun

conditional Triple Shot Gun Fire } else if (currentGun.level >= 5) { bullets.push(new Bullet(gunX - 20, gunY - gunHeight, bulletSpeed, bulletWidth, bulletHeight)); bullets.push(new Bullet(gunX, gunY - gunHeight, bulletSpeed, bulletWidth, bulletHeight)); bullets.push(new Bullet(gunX + 20, gunY - gunHeight, bulletSpeed, bulletWidth, bulletHeight)); }

Fires three bullets (left, center, right) for the Ultimate Taco Cannon

function touchStarted() {
touchStarted() is a p5.js function that is called whenever the player touches the screen or clicks the mouse; it works for both touch and mouse input
if (gameState === 'playing') {
Only allows shooting during active gameplay; shooting is disabled when gameState is 'gameOver'
if (shopContainer.style('display') === 'none' &&
Checks that the shop is currently hidden before allowing shooting
(mouseX < upgradeButton.x || mouseX > upgradeButton.x + upgradeButton.width ||
Checks that the mouse position is outside the horizontal bounds of the upgrade button (either to the left or right)
mouseY < upgradeButton.y || mouseY > upgradeButton.y + upgradeButton.height)) {
Checks that the mouse position is outside the vertical bounds of the upgrade button (either above or below); if all conditions are true, shooting is allowed
let currentGun = guns.find(g => g.level === gunLevel);
Uses the find() method to search the guns array and return the gun object whose level matches the current gunLevel variable
if (currentGun.level === 1 || currentGun.level === 2 || currentGun.level === 4) {
Checks if the gun is a single-shot gun (Basic Blaster, Rapid Fire, or Precision Laser)
bullets.push(new Bullet(gunX, gunY - gunHeight, bulletSpeed, bulletWidth, bulletHeight));
Creates a new Bullet object and adds it to the bullets array; positioned at (gunX, gunY - gunHeight) which is above the gun's center, with the current bullet properties
} else if (currentGun.level === 3) {
Checks if the gun is level 3, the Double Barrel Shotgun
bullets.push(new Bullet(gunX - 10, gunY - gunHeight, bulletSpeed, bulletWidth, bulletHeight));
Creates the left bullet of the pair, offset 10 pixels to the left of the gun's center
bullets.push(new Bullet(gunX + 10, gunY - gunHeight, bulletSpeed, bulletWidth, bulletHeight));
Creates the right bullet of the pair, offset 10 pixels to the right of the gun's center
} else if (currentGun.level >= 5) {
Checks if the gun is level 5 or higher (the Ultimate Taco Cannon)
bullets.push(new Bullet(gunX - 20, gunY - gunHeight, bulletSpeed, bulletWidth, bulletHeight));
Creates the left bullet of the triple shot, offset 20 pixels to the left
bullets.push(new Bullet(gunX, gunY - gunHeight, bulletSpeed, bulletWidth, bulletHeight));
Creates the center bullet of the triple shot, directly above the gun
bullets.push(new Bullet(gunX + 20, gunY - gunHeight, bulletSpeed, bulletWidth, bulletHeight));
Creates the right bullet of the triple shot, offset 20 pixels to the right
return false;
Returns false to prevent the default browser behavior (like scrolling) when the user touches or clicks the screen

openShop()

openShop() is a simple state manager that coordinates the visibility of multiple UI elements. When the shop opens, it hides the other buttons and populates itself with fresh content. This pattern (coordinating visibility of related UI elements) appears frequently in interactive sketches.

function openShop() {
  if (gameState === 'playing') { // Only open shop if game is playing
    console.log('openShop() called. Making shop visible.');
    shopContainer.style('display', 'block');
    populateShop(); // Refresh listings every time shop opens
    upgradeButton.style('display', 'none'); // Hide upgrade button when shop is open
    upgradeCostDisplay.style('display', 'none'); // Hide info display
  }
}
Line-by-line explanation (6 lines)

🔧 Subcomponents:

conditional Game State Check if (gameState === 'playing') {

Ensures the shop can only open during active gameplay

styling Shop Display Toggle shopContainer.style('display', 'block');

Makes the shop container visible by changing its CSS display property from 'none' to 'block'

function-call Populate Shop populateShop();

Calls the helper function that dynamically creates gun listing elements and buttons inside the shop

styling Hide UI Elements upgradeButton.style('display', 'none'); upgradeCostDisplay.style('display', 'none');

Hides the Select Gun button and info text while the shop is open to avoid clutter

if (gameState === 'playing') {
Checks that the game is in the 'playing' state; the shop will not open if gameState is 'gameOver'
console.log('openShop() called. Making shop visible.');
Prints a message to the browser console for debugging; helps you verify when the shop opens
shopContainer.style('display', 'block');
Changes the shop's CSS display property from 'none' (invisible) to 'block' (visible and takes up space)
populateShop();
Calls the populateShop() helper function to fill the shop with current gun listings
upgradeButton.style('display', 'none');
Hides the 'Select Gun' button while the shop is open
upgradeCostDisplay.style('display', 'none');
Hides the 'All guns are free!' info text while the shop is open

closeShop()

closeShop() is the inverse of openShop(). Together, they form a toggle pattern: opening hides UI elements A and shows B, closing does the opposite. This keeps the screen uncluttered.

function closeShop() {
  shopContainer.style('display', 'none');
  upgradeButton.style('display', 'block'); // Show upgrade button
  upgradeCostDisplay.style('display', 'block'); // Show info display
  // updateUpgradeButtonState() is not called here as button is always active
}
Line-by-line explanation (3 lines)

🔧 Subcomponents:

styling Hide Shop shopContainer.style('display', 'none');

Makes the shop container invisible

styling Show UI Buttons upgradeButton.style('display', 'block'); upgradeCostDisplay.style('display', 'block');

Restores the Select Gun button and info text visibility

shopContainer.style('display', 'none');
Changes the shop's display to 'none', making it invisible but still in memory
upgradeButton.style('display', 'block');
Makes the Select Gun button visible again
upgradeCostDisplay.style('display', 'block');
Makes the info text visible again

populateShop()

populateShop() is a dynamic UI builder. It clears old listings before creating new ones—a common pattern when refreshing UI based on game state. The template literals (${...}) make it easy to insert dynamic values into HTML. Notice how it uses data attributes to link buttons to their gun levels.

🔬 Each gun gets a card with a border. What happens if you change 'border', '1px solid #ddd' to 'border', '3px solid #333' to make the borders thicker and darker?

  for (let gunData of guns) {
    let gunDiv = createDiv('');
    gunDiv.parent(listingsDiv);
    gunDiv.style('display', 'flex');
    gunDiv.style('align-items', 'center');
    gunDiv.style('justify-content', 'space-between');
    gunDiv.style('border', '1px solid #ddd');
    gunDiv.style('padding', '10px 15px');
    gunDiv.style('border-radius', '5px');
function populateShop() {
  // Clear previous listings
  let currentListingDiv = shopContainer.elt.querySelector('#gun-listings');
  if (currentListingDiv) {
    currentListingDiv.remove();
  }

  let listingsDiv = createDiv('');
  listingsDiv.id('gun-listings');
  listingsDiv.parent(shopContainer);
  listingsDiv.style('margin-top', '30px');
  listingsDiv.style('display', 'flex');
  listingsDiv.style('flex-direction', 'column');
  listingsDiv.style('gap', '15px');

  for (let gunData of guns) {
    let gunDiv = createDiv('');
    gunDiv.parent(listingsDiv);
    gunDiv.style('display', 'flex');
    gunDiv.style('align-items', 'center');
    gunDiv.style('justify-content', 'space-between');
    gunDiv.style('border', '1px solid #ddd');
    gunDiv.style('padding', '10px 15px');
    gunDiv.style('border-radius', '5px');
    gunDiv.style('background-color', gunData.level === gunLevel ? '#e0ffe0' : '#fff'); // Highlight currently equipped gun

    let infoDiv = createDiv('');
    infoDiv.parent(gunDiv);
    infoDiv.style('text-align', 'left');
    infoDiv.style('flex-grow', '1');

    infoDiv.html(`
      <h3>${gunData.name} (Level ${gunData.level})</h3>
      <p>${gunData.description}</p>
      <p>Cost: Free</p> <!-- Cost is always free -->
    `);

    let actionDiv = createDiv('');
    actionDiv.parent(gunDiv);
    actionDiv.style('margin-left', '15px');

    if (gunData.level === gunLevel) {
      // Currently equipped
      actionDiv.html('<span style="color: green; font-weight: bold;">EQUIPPED</span>');
    } else {
      // If not equipped, offer to equip it. Since all are free, this also implicitly "unlocks" them.
      let equipButton = createButton('Equip');
      equipButton.parent(actionDiv);
      equipButton.style('font-size', '14px');
      equipButton.style('padding', '5px 10px');
      equipButton.style('background-color', '#007BFF');
      equipButton.style('color', 'white');
      equipButton.style('border', 'none');
      equipButton.style('border-radius', '5px');
      equipButton.style('cursor', 'pointer');
      equipButton.attribute('data-level', gunData.level); // Store level in data attribute
      equipButton.mousePressed(equipGun); // Renamed from buyGun
    }
  }
}
Line-by-line explanation (19 lines)

🔧 Subcomponents:

conditional Clear Previous Listings let currentListingDiv = shopContainer.elt.querySelector('#gun-listings'); if (currentListingDiv) { currentListingDiv.remove(); }

Removes the old gun listing div if it exists, preventing duplicate listings when the shop is refreshed

initialization Create Listings Container let listingsDiv = createDiv(''); listingsDiv.id('gun-listings'); listingsDiv.parent(shopContainer);

Creates a new flex container that will hold all the gun listing cards

for-loop Gun Listing Loop for (let gunData of guns) {

Iterates through the guns array to create a UI card for each gun

initialization Gun Card Creation let gunDiv = createDiv(''); gunDiv.parent(listingsDiv); gunDiv.style('display', 'flex'); gunDiv.style('align-items', 'center'); gunDiv.style('justify-content', 'space-between');

Creates a flex card for each gun, arranging info on left and action button on right

conditional Highlight Currently Equipped Gun gunDiv.style('background-color', gunData.level === gunLevel ? '#e0ffe0' : '#fff');

Colors the currently equipped gun's card green so players can see which gun is active

initialization Gun Info Display infoDiv.html(` <h3>${gunData.name} (Level ${gunData.level})</h3> <p>${gunData.description}</p> <p>Cost: Free</p> `);

Displays the gun's name, level, description, and cost using template literals to insert dynamic values

conditional Action Button or Equipped Label if (gunData.level === gunLevel) { actionDiv.html('<span style="color: green; font-weight: bold;">EQUIPPED</span>'); } else { let equipButton = createButton('Equip'); equipButton.parent(actionDiv); equipButton.attribute('data-level', gunData.level); equipButton.mousePressed(equipGun); }

Shows 'EQUIPPED' text for the current gun, or an 'Equip' button for other guns

let currentListingDiv = shopContainer.elt.querySelector('#gun-listings');
Searches for an element with id 'gun-listings' inside the shop container; .elt accesses the raw HTML element from the p5.Renderer object
if (currentListingDiv) {
Checks if a previous listings div was found
currentListingDiv.remove();
Removes the old listings div from the DOM, clearing space for new listings
let listingsDiv = createDiv('');
Creates a new, empty div to hold the gun listings
listingsDiv.id('gun-listings');
Assigns the id 'gun-listings' to this div so it can be found and removed later
listingsDiv.parent(shopContainer);
Makes the shop container the parent of the listings div, nesting it inside
listingsDiv.style('display', 'flex');
Sets up the listings container to use flexbox layout
listingsDiv.style('flex-direction', 'column');
Stacks gun cards vertically (one per row)
for (let gunData of guns) {
Loops through each gun object in the guns array
let gunDiv = createDiv('');
Creates a new div for this gun's card
gunDiv.style('display', 'flex');
Sets the gun card to use flexbox layout, arranging its children horizontally
gunDiv.style('justify-content', 'space-between');
Spaces children apart (info on left, action button on right) with maximum space between them
gunDiv.style('background-color', gunData.level === gunLevel ? '#e0ffe0' : '#fff');
Uses a ternary operator to color the card light green if it's the current gun, white otherwise
infoDiv.html(` <h3>${gunData.name} (Level ${gunData.level})</h3> <p>${gunData.description}</p> <p>Cost: Free</p> `);
Sets the HTML content of infoDiv using a template literal; ${...} inserts dynamic values like the gun's name and description
if (gunData.level === gunLevel) {
Checks if this gun is the currently equipped one
actionDiv.html('<span style="color: green; font-weight: bold;">EQUIPPED</span>');
Displays 'EQUIPPED' text in green for the current gun
let equipButton = createButton('Equip');
Creates a clickable button for guns that are not currently equipped
equipButton.attribute('data-level', gunData.level);
Stores the gun's level number in a data attribute so equipGun() can retrieve it later
equipButton.mousePressed(equipGun);
Registers the equipGun() function to be called when this button is clicked

equipGun()

equipGun() is called when the player clicks an 'Equip' button. It uses 'this' to refer to the button that triggered it, retrieves the gun level from the button's data attribute, and then updates the global state. The function finishes by refreshing the UI to show the change immediately.

function equipGun() { // Renamed from buyGun
  let selectedLevel = int(this.attribute('data-level'));
  let selectedGun = guns.find(g => g.level === selectedLevel);

  if (selectedGun) { // No score check needed, as all guns are free
    // Add to unlockedGuns if not already owned
    if (!unlockedGuns.includes(selectedLevel)) {
      unlockedGuns.push(selectedLevel);
    }
    gunLevel = selectedLevel; // Set as currently equipped

    // Apply gun properties
    applyGunProperties(gunLevel);

    // Update shop display
    populateShop(); // Refresh shop to show "EQUIPPED" and updated state
  } else {
    console.log("Error: Selected gun data not found.");
  }
}
Line-by-line explanation (9 lines)

🔧 Subcomponents:

calculation Extract Gun Level let selectedLevel = int(this.attribute('data-level'));

Retrieves the gun level from the button's data attribute and converts it to an integer

calculation Find Gun Object let selectedGun = guns.find(g => g.level === selectedLevel);

Searches the guns array for a gun matching the selected level

conditional Add to Unlocked Guns if (!unlockedGuns.includes(selectedLevel)) { unlockedGuns.push(selectedLevel); }

Adds the gun to the player's inventory if not already owned

assignment Set as Equipped gunLevel = selectedLevel;

Updates gunLevel to the selected gun, making it the active weapon

function-call Apply Gun Properties applyGunProperties(gunLevel);

Updates bullet speed, size, and gun appearance based on the new gun

function-call Refresh Shop Display populateShop();

Rebuilds the shop UI to show the updated equipped state and green highlight

let selectedLevel = int(this.attribute('data-level'));
Gets the 'data-level' attribute from the button that was clicked (stored as a string) and converts it to an integer with int()
let selectedGun = guns.find(g => g.level === selectedLevel);
Uses the find() method to search the guns array; find() returns the first gun object where g.level === selectedLevel, or undefined if none match
if (selectedGun) {
Checks that the gun was found; if selectedGun is undefined, this block is skipped and an error is logged
if (!unlockedGuns.includes(selectedLevel)) {
Checks if the gun level is NOT already in the unlockedGuns array; the ! means 'not'
unlockedGuns.push(selectedLevel);
Adds the gun level to the unlockedGuns array, recording that the player now owns this gun
gunLevel = selectedLevel;
Sets the global gunLevel variable to the selected level, making this gun the currently equipped one
applyGunProperties(gunLevel);
Calls applyGunProperties() to update all bullet and gun properties based on the new gun's stats
populateShop();
Refreshes the shop display so the newly equipped gun shows 'EQUIPPED' and its card is highlighted green
console.log("Error: Selected gun data not found.");
Prints an error message to the console if the gun lookup failed, helping with debugging

applyGunProperties()

applyGunProperties() is a simple 'setter' function that copies data from a gun object in the guns array to global variables. This pattern—storing all properties in one central array and applying them to globals when needed—makes it easy to add new guns without changing code elsewhere.

function applyGunProperties(level) {
  let gunData = guns.find(g => g.level === level);
  if (gunData) {
    bulletSpeed = gunData.bulletSpeed;
    bulletWidth = gunData.bulletWidth;
    bulletHeight = gunData.bulletHeight;
    gunWidth = gunData.gunWidth;
    gunHeight = gunData.gunHeight;
  }
}
Line-by-line explanation (8 lines)

🔧 Subcomponents:

calculation Find Gun Data let gunData = guns.find(g => g.level === level);

Searches for the gun with the given level in the guns array

assignment Apply Gun Stats to Globals bulletSpeed = gunData.bulletSpeed; bulletWidth = gunData.bulletWidth; bulletHeight = gunData.bulletHeight; gunWidth = gunData.gunWidth; gunHeight = gunData.gunHeight;

Copies all properties from the selected gun object to global variables

function applyGunProperties(level) {
Defines a helper function that takes a gun level as a parameter
let gunData = guns.find(g => g.level === level);
Searches the guns array for a gun matching the passed level
if (gunData) {
Only applies properties if the gun was found
bulletSpeed = gunData.bulletSpeed;
Updates the global bulletSpeed variable with the gun's bullet speed stat
bulletWidth = gunData.bulletWidth;
Updates the global bulletWidth variable with the gun's bullet width stat
bulletHeight = gunData.bulletHeight;
Updates the global bulletHeight variable with the gun's bullet height stat
gunWidth = gunData.gunWidth;
Updates the global gunWidth variable, changing the gun's visual size on screen
gunHeight = gunData.gunHeight;
Updates the global gunHeight variable, which also affects where bullets spawn relative to the gun

gameOver()

gameOver() is a state-transition function. It changes gameState from 'playing' to 'gameOver', which the draw loop checks to decide what to draw each frame. The if-guard at the start prevents the function from running multiple times, a safety measure called a 'state guard'.

function gameOver() {
  if (gameState === 'playing') {
    gameState = 'gameOver';
    upgradeButton.hide();
    upgradeCostDisplay.hide();
    shopContainer.style('display', 'none'); // Ensure shop is closed
    closeShopButton.hide(); // Hide shop close button if shop was open
    restartButton.show();
  }
}
Line-by-line explanation (7 lines)

🔧 Subcomponents:

conditional State Validation if (gameState === 'playing') {

Prevents gameOver() from being called multiple times in a single game

assignment Update Game State gameState = 'gameOver';

Changes the game state to 'gameOver', which stops game logic in the draw loop

styling Hide In-Game UI upgradeButton.hide(); upgradeCostDisplay.hide(); shopContainer.style('display', 'none'); closeShopButton.hide();

Hides all game UI elements to make room for the game over screen

styling Show Restart Button restartButton.show();

Displays the Restart Game button so the player can start a new game

if (gameState === 'playing') {
Checks that the game is currently playing before ending it; prevents calling gameOver() multiple times
gameState = 'gameOver';
Changes the game state to 'gameOver', which will make the draw loop skip game logic and show the game over screen instead
upgradeButton.hide();
Hides the Select Gun button using p5.js's hide() method
upgradeCostDisplay.hide();
Hides the 'All guns are free!' info text
shopContainer.style('display', 'none');
Ensures the shop is closed by setting its display to 'none'
closeShopButton.hide();
Hides the Close Shop button in case it was visible
restartButton.show();
Shows the Restart Game button so the player can restart

restartGame()

restartGame() is the inverse of gameOver(). It restores UI elements, resets game state, and reinitializes all game objects. It's a clean reset that leaves the player ready to play again.

function restartGame() {
  restartButton.hide();
  upgradeButton.show();
  upgradeCostDisplay.show();
  initializeGameElements(); // Reset all game-specific elements
  gameState = 'playing';
  populateShop(); // Refresh shop in case any state changes affected it
}
Line-by-line explanation (6 lines)

🔧 Subcomponents:

styling Hide Restart Button restartButton.hide();

Hides the restart button now that the game is restarting

styling Show Game UI upgradeButton.show(); upgradeCostDisplay.show();

Restores the Select Gun button and info text

function-call Reinitialize Game Elements initializeGameElements();

Calls initializeGameElements() to reset all tacos, bones, garlics, score, and gun properties

assignment Reset Game State gameState = 'playing';

Changes the game state back to 'playing' so draw() executes game logic again

restartButton.hide();
Hides the restart button now that the game is restarting
upgradeButton.show();
Shows the Select Gun button again
upgradeCostDisplay.show();
Shows the info text again
initializeGameElements();
Calls the helper function that clears and repopulates all game object arrays and resets the score to 0
gameState = 'playing';
Changes the game state back to 'playing' so the draw loop will execute game logic instead of showing the game over screen
populateShop();
Refreshes the shop display to ensure all state changes are reflected

Taco

The Taco class is a good example of object-oriented design. Each taco is an independent object with its own position, speed, and size. The reset() method is particularly clever—it lets tacos be recycled by simply resetting their properties rather than creating entirely new objects, which is more efficient.

class Taco {
  constructor() {
    this.reset(); // Call reset to set initial properties
  }

  // Reset taco to a new starting position at the top
  reset() {
    this.x = random(width);
    this.y = random(-height, 0); // Start off-screen at the top
    this.speed = random(2, 5);
    this.rotation = random(-0.1, 0.1); // Slight random rotation
    this.tacoWidth = random(30, 60);
    this.tacoHeight = this.tacoWidth * 0.6;
    this.eaten = false; // Add an 'eaten' flag
  }

  // Update taco's position
  fall() {
    if (this.eaten) {
      // If eaten, reset it immediately to simulate a new taco
      this.reset();
      return; // Stop further falling logic for this frame
    }
    this.y += this.speed;
    
    // If taco goes off-screen, reset it to the top
    if (this.y > height + this.tacoHeight) {
      this.reset();
    }
  }

  // Display the taco
  show() {
    if (this.eaten) return; // Don't draw if eaten

    push(); // Save current drawing style
    translate(this.x, this.y);
    rotate(this.rotation); // Apply rotation

    // Taco shell (semicircle)
    fill(255, 204, 0); // Yellow/orange for taco shell
    noStroke();
    arc(0, 0, this.tacoWidth, this.tacoHeight, PI, TWO_PI);

    // Some toppings (simplified)
    fill(0, 150, 0); // Lettuce (green dots)
    ellipse(-this.tacoWidth * 0.15, 0, this.tacoWidth * 0.1, this.tacoHeight * 0.1);
    ellipse(this.tacoWidth * 0.15, 0, this.tacoWidth * 0.1, this.tacoHeight * 0.1);

    fill(139, 69, 19); // Meat/beans (brown dots)
    ellipse(0, this.tacoHeight * 0.1, this.tacoWidth * 0.15, this.tacoHeight * 0.15);

    fill(255, 165, 0); // Cheese (orange dots)
    ellipse(-this.tacoWidth * 0.05, this.tacoHeight * 0.2, this.tacoWidth * 0.08, this.tacoHeight * 0.08);
    ellipse(this.tacoWidth * 0.05, this.tacoHeight * 0.2, this.tacoWidth * 0.08, this.tacoHeight * 0.08);

    pop(); // Restore previous drawing style
  }

  // Check if a bullet hits this taco
  hitsBullet(bullet) {
    if (this.eaten) return false;

    // Simple circular collision around the taco's center
    let d = dist(bullet.x, bullet.y, this.x, this.y);
    return d < (this.tacoWidth / 2 + bullet.w / 2);
  }
}
Line-by-line explanation (22 lines)

🔧 Subcomponents:

initialization Constructor constructor() { this.reset(); }

Initializes a new Taco by calling reset() to set all properties

initialization Reset Method reset() { this.x = random(width); this.y = random(-height, 0); this.speed = random(2, 5); this.rotation = random(-0.1, 0.1); this.tacoWidth = random(30, 60); this.tacoHeight = this.tacoWidth * 0.6; this.eaten = false; }

Sets all properties to random values, allowing tacos to be recycled with new positions and sizes

calculation Fall Method fall() { if (this.eaten) { this.reset(); return; } this.y += this.speed; if (this.y > height + this.tacoHeight) { this.reset(); } }

Updates the taco's position and resets it if eaten or if it goes off-screen

rendering Show Method show() { if (this.eaten) return; push(); translate(this.x, this.y); rotate(this.rotation); // ... arc and ellipse drawing code ... pop(); }

Draws the taco with its shell, lettuce, meat, and cheese toppings

collision Hits Bullet Method hitsBullet(bullet) { if (this.eaten) return false; let d = dist(bullet.x, bullet.y, this.x, this.y); return d < (this.tacoWidth / 2 + bullet.w / 2); }

Uses distance-based collision detection to check if a bullet hits the taco

class Taco {
Defines the Taco class, a blueprint for creating taco objects
this.reset();
Calls reset() inside the constructor to initialize all properties when a new Taco is created
this.x = random(width);
Assigns a random x position across the full width of the canvas
this.y = random(-height, 0);
Assigns a random y position between -height and 0, placing the taco off-screen above the canvas
this.speed = random(2, 5);
Assigns a random falling speed between 2 and 5 pixels per frame
this.rotation = random(-0.1, 0.1);
Assigns a small random rotation between -0.1 and 0.1 radians, making tacos spin slightly
this.tacoWidth = random(30, 60);
Assigns a random width between 30 and 60 pixels
this.tacoHeight = this.tacoWidth * 0.6;
Sets height to 60% of the width, maintaining a realistic taco proportion
if (this.eaten) {
Checks if the taco has been marked as eaten
this.y += this.speed;
Increases the taco's y position by its speed, moving it downward
if (this.y > height + this.tacoHeight) {
Checks if the taco has fallen completely off the bottom of the screen
push();
Saves the current drawing state (colors, transformations, etc.) so they can be restored later
translate(this.x, this.y);
Moves the origin of the coordinate system to the taco's position, so all drawing commands after this are relative to the taco
rotate(this.rotation);
Rotates the coordinate system by the taco's rotation amount, making the taco spin
arc(0, 0, this.tacoWidth, this.tacoHeight, PI, TWO_PI);
Draws a yellow semicircle (arc from PI to TWO_PI) representing the taco shell
fill(0, 150, 0);
Sets the fill color to green for lettuce
ellipse(-this.tacoWidth * 0.15, 0, this.tacoWidth * 0.1, this.tacoHeight * 0.1);
Draws a green ellipse (lettuce) on the left side of the taco, scaled relative to the taco's size
fill(139, 69, 19);
Sets the fill color to brown for meat/beans
fill(255, 165, 0);
Sets the fill color to orange for cheese
pop();
Restores the drawing state saved by push(), undoing all transformations and color changes
let d = dist(bullet.x, bullet.y, this.x, this.y);
Uses p5.js's dist() function to calculate the Euclidean distance between the bullet and the taco center
return d < (this.tacoWidth / 2 + bullet.w / 2);
Returns true if the distance is less than the sum of the taco's and bullet's radii, indicating a collision

EnemyItem

EnemyItem is a base class (parent class) that defines common behavior for bad falling items. Both Bone and Garlic inherit from it, which means they both get fall(), show(), hitsBullet(), and isOffScreen() methods without redefining them. This is inheritance in action—it reduces code duplication.

class EnemyItem {
  constructor(emojiChar) {
    this.emojiChar = emojiChar;
    this.reset();
  }

  reset() {
    this.x = random(width);
    this.y = random(-height, 0);
    this.speed = random(3, 6); // Slightly faster than tacos
    this.size = random(40, 70); // Size of the emoji text
  }

  fall() {
    this.y += this.speed;
  }

  show() {
    push();
    textSize(this.size);
    textAlign(CENTER, CENTER); // Center emoji text
    text(this.emojiChar, this.x, this.y);
    pop();
  }

  hitsBullet(bullet) {
    // Simple circular collision around the emoji's center
    let d = dist(bullet.x, bullet.y, this.x, this.y);
    return d < (this.size / 2 + bullet.w / 2);
  }

  isOffScreen() {
    return this.y > height + this.size / 2;
  }
}
Line-by-line explanation (13 lines)

🔧 Subcomponents:

initialization Constructor constructor(emojiChar) { this.emojiChar = emojiChar; this.reset(); }

Initializes an EnemyItem with an emoji character and calls reset() to set position and size

initialization Reset Method reset() { this.x = random(width); this.y = random(-height, 0); this.speed = random(3, 6); this.size = random(40, 70); }

Resets position and size to random values, allowing enemies to be recycled

calculation Fall Method fall() { this.y += this.speed; }

Updates vertical position by moving downward

rendering Show Method show() { push(); textSize(this.size); textAlign(CENTER, CENTER); text(this.emojiChar, this.x, this.y); pop(); }

Draws the emoji at its current position with its size

collision Hits Bullet Method hitsBullet(bullet) { let d = dist(bullet.x, bullet.y, this.x, this.y); return d < (this.size / 2 + bullet.w / 2); }

Checks if a bullet collides with the enemy using circular collision detection

calculation Is Off-Screen Method isOffScreen() { return this.y > height + this.size / 2; }

Returns true if the enemy has fallen completely off the bottom of the screen

class EnemyItem {
Defines the EnemyItem base class, which will be inherited by Bone and Garlic
constructor(emojiChar) {
The constructor takes an emojiChar parameter (a string like '🦴' or '🧄')
this.emojiChar = emojiChar;
Stores the emoji character as a property so it can be drawn later
this.y = random(-height, 0);
Positions the enemy off-screen above the top, so it falls in from above
this.speed = random(3, 6);
Enemies fall slightly faster than tacos (2-5 pixels), making them slightly harder to avoid
this.size = random(40, 70);
Sets a random text size for the emoji between 40 and 70 pixels
this.y += this.speed;
Increments the y position by the enemy's speed, moving it downward
textSize(this.size);
Sets the text drawing size to the emoji's size before drawing
textAlign(CENTER, CENTER);
Aligns the emoji text to be centered both horizontally and vertically at the given position
text(this.emojiChar, this.x, this.y);
Draws the emoji character at position (x, y) on the canvas
let d = dist(bullet.x, bullet.y, this.x, this.y);
Calculates the distance between the bullet and the enemy center
return d < (this.size / 2 + bullet.w / 2);
Returns true if the distance is less than the sum of the enemy's and bullet's radii
return this.y > height + this.size / 2;
Returns true if the enemy has fallen completely off the bottom of the screen

Bone

Bone is one of the shortest classes in the sketch—it's only 5 lines. By extending EnemyItem, it inherits fall(), show(), hitsBullet(), and isOffScreen() without having to redefine them. The only thing Bone needs to customize is which emoji it uses. This is the power of inheritance.

class Bone extends EnemyItem {
  constructor() {
    super('🦴');
  }
}
Line-by-line explanation (3 lines)

🔧 Subcomponents:

inheritance Class Inheritance class Bone extends EnemyItem {

Declares that Bone inherits all methods and properties from EnemyItem

initialization Super Constructor Call super('🦴');

Calls the parent class constructor with the bone emoji

class Bone extends EnemyItem {
Declares a Bone class that inherits from EnemyItem, meaning it gets all EnemyItem methods for free
constructor() {
Defines the constructor for Bone, which takes no parameters
super('🦴');
Calls the parent class constructor and passes '🦴' as the emojiChar, so bones are displayed with a bone emoji

Garlic

Garlic is identical to Bone in structure—it just passes a different emoji to the parent constructor. This demonstrates how inheritance lets you create multiple similar types (bones, garlics, and any other enemies) with minimal code.

class Garlic extends EnemyItem {
  constructor() {
    super('🧄');
  }
}
Line-by-line explanation (2 lines)

🔧 Subcomponents:

inheritance Class Inheritance class Garlic extends EnemyItem {

Declares that Garlic inherits all methods from EnemyItem

initialization Super Constructor Call super('🧄');

Calls the parent constructor with the garlic emoji

class Garlic extends EnemyItem {
Declares a Garlic class that inherits from EnemyItem
super('🧄');
Calls the parent constructor with the garlic emoji '🧄', making garlics display as garlic emoji

Bullet

The Bullet class is very simple—it just stores position, speed, and size, then updates position and draws itself. Notice that update() decreases y (moving upward), the opposite of how tacos and enemies increase y (moving downward).

class Bullet {
  constructor(x, y, speed, w, h) {
    this.x = x;
    this.y = y;
    this.speed = speed;
    this.w = w;
    this.h = h;
  }

  update() {
    this.y -= this.speed;
  }

  show() {
    fill(255, 0, 0); // Red color for bullet
    noStroke();
    rectMode(CENTER);
    rect(this.x, this.y, this.w, this.h);
  }
}
Line-by-line explanation (11 lines)

🔧 Subcomponents:

initialization Constructor constructor(x, y, speed, w, h) { this.x = x; this.y = y; this.speed = speed; this.w = w; this.h = h; }

Initializes a bullet at a given position with a speed and size

calculation Update Method update() { this.y -= this.speed; }

Moves the bullet upward by decreasing its y position

rendering Show Method show() { fill(255, 0, 0); noStroke(); rectMode(CENTER); rect(this.x, this.y, this.w, this.h); }

Draws a red rectangle representing the bullet

constructor(x, y, speed, w, h) {
Takes five parameters: x (horizontal position), y (vertical position), speed (upward movement), w (width), and h (height)
this.x = x;
Stores the initial x position
this.y = y;
Stores the initial y position (where the bullet is fired from)
this.speed = speed;
Stores the bullet's upward speed in pixels per frame
this.w = w;
Stores the bullet's width
this.h = h;
Stores the bullet's height
this.y -= this.speed;
Decreases the y position by the speed, moving the bullet upward (in p5.js, smaller y values are higher on screen)
fill(255, 0, 0);
Sets the fill color to red (RGB: 255, 0, 0)
noStroke();
Disables the outline, so the rectangle is filled but not bordered
rectMode(CENTER);
Sets the origin of rect() to its center, so the rectangle is drawn around the given position
rect(this.x, this.y, this.w, this.h);
Draws a red rectangle at the bullet's position with the bullet's width and height

windowResized()

windowResized() is called automatically by p5.js whenever the window is resized. It's essential for making sketches responsive. This sketch repositions every UI element and even refreshes the shop if needed to maintain a good appearance at any window size.

function windowResized() {
  resizeCanvas(windowWidth, windowHeight);
  // Re-initialize gun position when window resizes, using the *current* gunHeight
  gunY = height - gunHeight - 20;
  // Re-position buttons/displays
  upgradeButton.position(10, 50);
  upgradeCostDisplay.position(upgradeButton.x + upgradeButton.width + 10, 50);
  // Re-center shop container
  shopContainer.style('left', '50%');
  shopContainer.style('top', '50%');
  shopContainer.style('transform', 'translate(-50%, -50%)');
  // Re-position restart button
  restartButton.position(width / 2 - 75, height / 2 + 50);
  // Refresh shop if open
  if (shopContainer.style('display') === 'block') {
    populateShop();
  }
}
Line-by-line explanation (10 lines)

🔧 Subcomponents:

sizing Resize Canvas resizeCanvas(windowWidth, windowHeight);

Adjusts the canvas size to match the new window dimensions

styling Reposition UI Elements gunY = height - gunHeight - 20; upgradeButton.position(10, 50); // ... more repositioning ...

Recalculates positions of all UI elements based on new canvas size

conditional Refresh Open Shop if (shopContainer.style('display') === 'block') { populateShop(); }

Refreshes the shop layout if it's currently open, ensuring it displays correctly at the new size

function windowResized() {
windowResized() is a p5.js built-in function that is called automatically whenever the browser window is resized
resizeCanvas(windowWidth, windowHeight);
Resizes the p5.js canvas to match the current window width and height
gunY = height - gunHeight - 20;
Recalculates the gun's y position based on the new canvas height
upgradeButton.position(10, 50);
Repositions the Select Gun button to a fixed position in the top-left area
upgradeCostDisplay.position(upgradeButton.x + upgradeButton.width + 10, 50);
Repositions the info text to appear just to the right of the upgrade button
shopContainer.style('left', '50%');
Centers the shop horizontally by setting left to 50% of the window width
shopContainer.style('transform', 'translate(-50%, -50%)');
Uses CSS transform to center the shop both horizontally and vertically
restartButton.position(width / 2 - 75, height / 2 + 50);
Repositions the restart button to be centered horizontally and slightly below center vertically
if (shopContainer.style('display') === 'block') {
Checks if the shop is currently visible
populateShop();
Refreshes the shop's gun listings, which may have shifted due to the window resize

📦 Key Variables

tacos array

Stores all Taco objects currently in the game; managed in draw() to update and display them each frame

let tacos = [];
numTacos number

Constant that determines how many tacos are created at game start; set to 100

const numTacos = 100;
score number

Tracks the player's score; incremented each time a taco is hit, reset to 0 on game restart

let score = 0;
bones array

Stores all Bone objects (bad enemies) currently falling; hitting a bone ends the game

let bones = [];
numBones number

Constant that determines how many bones are created at game start; set to 19

const numBones = 19;
garlics array

Stores all Garlic objects (bad enemies) currently falling; hitting a garlic ends the game

let garlics = [];
numGarlics number

Constant that determines how many garlics are created at game start; set to 19

const numGarlics = 19;
bullets array

Stores all Bullet objects currently in flight; bullets are removed when they hit a target or go off-screen

let bullets = [];
gunWidth number

The width of the gun sprite in pixels; changes based on the equipped gun level

let gunWidth = 60;
gunHeight number

The height of the gun sprite in pixels; affects where bullets spawn and the gun's visual size

let gunHeight = 20;
gunX number

The horizontal position of the gun; centered on the canvas during setup

let gunX;
gunY number

The vertical position of the gun; set near the bottom of the canvas and updated when the window is resized

let gunY;
bulletSpeed number

How fast bullets travel upward in pixels per frame; changed by gun upgrades

let bulletSpeed = 10;
bulletWidth number

The width of bullets in pixels; changed by gun upgrades

let bulletWidth = 8;
bulletHeight number

The height of bullets in pixels; changed by gun upgrades

let bulletHeight = 20;
gameState string

Tracks whether the game is 'playing' or 'gameOver'; controls which logic runs in draw()

let gameState = 'playing';
restartButton p5.Renderer

A p5.js button element that appears when the game ends; clicking it calls restartGame()

let restartButton;
gunLevel number

The level of the currently equipped gun (1-5); determines firing pattern and bullet properties

let gunLevel = 1;
unlockedGuns array

An array of gun levels the player owns; all guns are free, so this grows as the player equips them

let unlockedGuns = [1];
upgradeButton p5.Renderer

A p5.js button element that opens the gun shop when clicked

let upgradeButton;
upgradeCostDisplay p5.Renderer

A p5.js div element displaying 'All guns are free!' to inform players there's no cost

let upgradeCostDisplay;
shopContainer p5.Renderer

A p5.js div element that holds the gun shop overlay; hidden by default and shown when Select Gun is clicked

let shopContainer;
closeShopButton p5.Renderer

A p5.js button element inside the shop that closes it when clicked

let closeShopButton;
autoShopOpened boolean

A flag that tracks whether the shop has auto-opened at score 50; prevents the shop from repeatedly opening

let autoShopOpened = false;
guns array

An array of gun objects, each containing level, name, cost, and ballistic properties (speed, width, height, etc.)

const guns = [{ level: 1, name: "Basic Blaster", ... }, ...];

🔧 Potential Improvements (6)

Here are some ways this code could be enhanced:

BUG touchEnded() function

The touchEnded() function has a comment '// ... (bullet creation logic) ...' but no actual code, making it non-functional. It should mirror the shooting logic from touchStarted().

💡 Replace the placeholder comment with the actual bullet creation code from touchStarted(), or rename it to clarify that it's unused.

PERFORMANCE draw() - collision detection nested loops

Collision detection uses three separate nested loops (bullets vs tacos, bullets vs bones, bullets vs garlics), each iterating through potentially hundreds of objects every frame. With numTacos=100, numBones=19, numGarlics=19, this is ~8000+ checks per frame.

💡 Consider spatial partitioning (divide the canvas into a grid) or using a quadtree to reduce collision checks, especially if you plan to scale up object counts.

STYLE guns array definition

All guns have cost: 0 and similar comments saying 'Cost is always free', making the cost field redundant. The guns array could be slightly simpler without this.

💡 Remove the cost field entirely from the guns array definition, as it serves no purpose in the current game design. Update any references accordingly.

FEATURE Game mechanics

Bones and garlics are removed when they fall off-screen (spliced out) without any game consequence, whereas the original code might have intended to end the game if they reach the bottom. This makes the game easier than perhaps intended.

💡 Consider adding a miss counter or lives system: when a bad enemy reaches the bottom, decrement lives; when lives reach 0, end the game. This would increase difficulty and realism.

BUG windowResized() function

If the window is resized while the game over screen is showing, gunX is not recalculated. This could lead to the gun drawing in the wrong position if the player resizes the window during game over.

💡 Add gunX = width / 2; to the windowResized() function to ensure the gun's horizontal position is always centered, even during game over.

STYLE Multiple functions

Several functions like populateShop() and draw() are quite long and handle multiple concerns, making them harder to read and maintain.

💡 Break large functions into smaller, focused helper functions. For example, extract bullet-taco collision detection into its own function, or extract the shop UI creation logic into separate functions.

🔄 Code Flow

Code flow showing setup, initializegameelements, draw, touchstarted, openshop, closeshop, populateshop, equipgun, applyggunproperties, gameover, restartgame, taco, enemyitem, bone, garlic, bullet, windowresized

💡 Click on function names in the diagram to jump to their code

graph TD start[Start] --> setup[setup] setup --> canvas-creation[Canvas Setup] setup --> gun-positioning[Gun Position] setup --> button-creation[Button Creation] setup --> shop-initialization[Shop Container Setup] setup --> array-reset[Array Resets] array-reset --> taco-loop[Taco Initialization Loop] array-reset --> bone-loop[Bone Initialization Loop] array-reset --> garlic-loop[Garlic Initialization Loop] setup --> draw[draw loop] click setup href "#fn-setup" click canvas-creation href "#sub-canvas-creation" click gun-positioning href "#sub-gun-positioning" click button-creation href "#sub-button-creation" click shop-initialization href "#sub-shop-initialization" click array-reset href "#sub-array-reset" click taco-loop href "#sub-taco-loop" click bone-loop href "#sub-bone-loop" click garlic-loop href "#sub-garlic-loop" draw --> taco-update-loop[Taco Update Loop] draw --> bone-update-loop[Bone Update Loop] draw --> garlic-update-loop[Garlic Update Loop] draw --> bullet-update-loop[Bullet Update Loop] draw --> bullet-taco-collision[Bullet-Taco Collision Detection] draw --> bullet-bone-collision[Bullet-Bone Collision Detection] draw --> bullet-garlic-collision[Bullet-Garlic Collision Detection] draw --> gun-drawing[Gun Rendering] draw --> score-display[Score Text Display] draw --> auto-shop-trigger[Auto-Open Shop at Score 50] draw --> game-over-state[Game Over Screen] draw --> game-state-check[Game State Validation] draw --> button-check[Shop and Button Hit Detection] click draw href "#fn-draw" click taco-update-loop href "#sub-taco-update-loop" click bone-update-loop href "#sub-bone-update-loop" click garlic-update-loop href "#sub-garlic-update-loop" click bullet-update-loop href "#sub-bullet-update-loop" click bullet-taco-collision href "#sub-bullet-taco-collision" click bullet-bone-collision href "#sub-bullet-bone-collision" click bullet-garlic-collision href "#sub-bullet-garlic-collision" click gun-drawing href "#sub-gun-drawing" click score-display href "#sub-score-display" click auto-shop-trigger href "#sub-auto-shop-trigger" click game-over-state href "#sub-game-over-state" click game-state-check href "#sub-game-state-check" click button-check href "#sub-button-check" touchstarted[touchStarted] --> game-state-validation[Game State Check] touchstarted --> single-shot-branch[Single Shot Gun Fire] touchstarted --> double-shot-branch[Double Shot Gun Fire] touchstarted --> triple-shot-branch[Triple Shot Gun Fire] click touchstarted href "#fn-touchstarted" click game-state-validation href "#sub-game-state-validation" click single-shot-branch href "#sub-single-shot-branch" click double-shot-branch href "#sub-double-shot-branch" click triple-shot-branch href "#sub-triple-shot-branch" openshop[openShop] --> shop-visibility[Shop Display Toggle] openshop --> ui-hide[Hide UI Elements] openshop --> shop-population[Populate Shop] click openshop href "#fn-openshop" click shop-visibility href "#sub-shop-visibility" click ui-hide href "#sub-ui-hide" click shop-population href "#sub-shop-population" closeshop[closeShop] --> hide-shop[Hide Shop] closeshop --> show-buttons[Show UI Buttons] click closeshop href "#fn-closeshop" click hide-shop href "#sub-hide-shop" click show-buttons href "#sub-show-buttons" populateshop[populateShop] --> clear-old-listings[Clear Previous Listings] populateshop --> create-listings-container[Create Listings Container] populateshop --> gun-loop[Gun Listing Loop] click populateshop href "#fn-populateshop" click clear-old-listings href "#sub-clear-old-listings" click create-listings-container href "#sub-create-listings-container" click gun-loop href "#sub-gun-loop" equipgun[equipGun] --> get-level[Extract Gun Level] equipgun --> find-gun[Find Gun Object] equipgun --> add-to-inventory[Add to Unlocked Guns] equipgun --> set-equipped[Set as Equipped] equipgun --> apply-properties[Apply Gun Properties] equipgun --> refresh-shop[Refresh Shop Display] click equipgun href "#fn-equipgun" click get-level href "#sub-get-level" click find-gun href "#sub-find-gun" click add-to-inventory href "#sub-add-to-inventory" click set-equipped href "#sub-set-equipped" click apply-properties href "#sub-apply-properties" click refresh-shop href "#sub-refresh-shop" gameover[gameOver] --> state-check[State Validation] gameover --> change-state[Update Game State] gameover --> hide-ui[Hide In-Game UI] gameover --> show-restart[Show Restart Button] click gameover href "#fn-gameover" click state-check href "#sub-state-check" click change-state href "#sub-change-state" click hide-ui href "#sub-hide-ui" click show-restart href "#sub-show-restart" restartgame[restartGame] --> hide-restart-btn[Hide Restart Button] restartgame --> show-game-ui[Show Game UI] restartgame --> reset-elements[Reinitialize Game Elements] restartgame --> reset-state[Reset Game State] click restartgame href "#fn-restartgame" click hide-restart-btn href "#sub-hide-restart-btn" click show-game-ui href "#sub-show-game-ui" click reset-elements href "#sub-reset-elements" click reset-state href "#sub-reset-state" taco[Taco] --> constructor[Constructor] taco --> reset-method[Reset Method] taco --> fall-method[Fall Method] taco --> show-method[Show Method] taco --> hitsbullet-method[Hits Bullet Method] click taco href "#fn-taco" click constructor href "#sub-constructor" click reset-method href "#sub-reset-method" click fall-method href "#sub-fall-method" click show-method href "#sub-show-method" click hitsbullet-method href "#sub-hitsbullet-method" enemyitem[EnemyItem] --> constructor[Constructor] enemyitem --> reset[Reset Method] enemyitem --> fall[Fall Method] enemyitem --> show[Show Method] enemyitem --> hitsbullet[Hits Bullet Method] enemyitem --> isoffscreen[Is Off-Screen Method] click enemyitem href "#fn-enemyitem" click constructor href "#sub-constructor" click reset href "#sub-reset" click fall href "#sub-fall" click show href "#sub-show" click hitsbullet href "#sub-hitsbullet" click isoffscreen href "#sub-isoffscreen" bone[Bone] --> extends[Class Inheritance] bone --> super-call[Super Constructor Call] click bone href "#fn-bone" click extends href "#sub-extends" click super-call href "#sub-super-call" garlic[Garlic] --> extends[Class Inheritance] garlic --> super-call[Super Constructor Call] click garlic href "#fn-garlic" click extends href "#sub-extends" click super-call href "#sub-super-call" bullet[Bullet] --> constructor[Constructor] bullet --> update[Update Method] bullet --> show[Show Method] click bullet href "#fn-bullet" click constructor href "#sub-constructor" click update href "#sub-update" click show href "#sub-show" windowresized[windowResized] --> resize-canvas[Resize Canvas] windowresized --> reposition-elements[Reposition UI Elements] windowresized --> refresh-shop[Refresh Open Shop] click windowresized href "#fn-windowresized" click resize-canvas href "#sub-resize-canvas" click reposition-elements href "#sub-reposition-elements" click refresh-shop href "#sub-refresh-shop"

❓ Frequently Asked Questions

What visual elements can I expect to see in the Sketch 2026-02-22 19:32?

This sketch features an engaging visual display of tacos, bones, and garlics, alongside a gun that the player uses to shoot the tacos.

How can I interact with the taco shooting game in this sketch?

Users can control the gun to shoot tacos while avoiding bones and garlics, with options to upgrade their weapon as they progress.

What creative coding concepts are highlighted in this p5.js sketch?

The sketch demonstrates object-oriented programming through the use of arrays to manage multiple game elements like tacos, enemies, and bullets, as well as an upgrade system for the player's gun.

Preview

Sketch 2026-02-22 19:32 - p5.js creative coding sketch preview
Sketch Preview
Code flow diagram showing the structure of Sketch 2026-02-22 19:32 - Code flow showing setup, initializegameelements, draw, touchstarted, openshop, closeshop, populateshop, equipgun, applyggunproperties, gameover, restartgame, taco, enemyitem, bone, garlic, bullet, windowresized
Code Flow Diagram