Sketch 2026-02-22 23:12

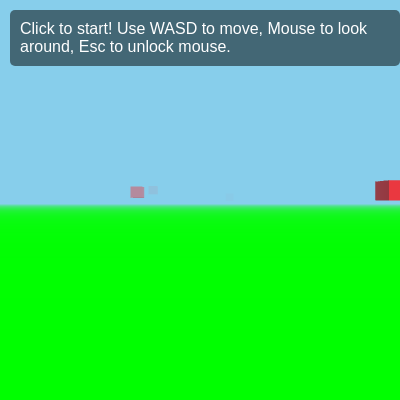
This sketch creates a 3D first-person shooter game using Three.js inside p5.js. Players navigate a 3D environment with WASD keys, aim with the mouse, and click to shoot red target boxes that reposition when hit, with a score tracker for each successful shot.

🧪 Try This!

Experiment with the code by making these changes:

  1. Make boxes glow neon green — Change the target box material color from red to bright green—instantly visible and adds sci-fi aesthetics
  2. Triple the player's movement speed — Change PLAYER_SPEED so you zip around the map much faster—useful for testing or arcade-style gameplay
  3. Increase gravity for floatier movement — Reduce the gravity multiplier in animate() to make the player float longer and fall more slowly—like the moon
  4. Spawn boxes closer to the player — Shrink the spawn range from 900 to 300 so boxes appear near you, concentrating the action
  5. Double the number of targets — More boxes means more shooting—change the loop count to create a busier, harder game
Prefer the full editor? Open it there →

📖 About This Sketch

This sketch is a fully playable 3D first-person shooter game built by combining Three.js (for 3D graphics) with p5.js (for structure). You navigate a green ground plane with WASD keys while your mouse aims a camera. Click to shoot red boxes that flash blue when hit and teleport to random locations—each hit increments your score. It demonstrates raycasting (firing invisible rays to detect collisions), camera-relative movement, pointer lock for immersive controls, and game state management.

The code is organized into a setup() function that initializes the Three.js scene, lighting, and controls, plus an animate() function that runs 60 times per second to handle movement physics and rendering. Event listeners capture keyboard and mouse input, while helper functions translate that input into camera movement and shooting. By studying it, you will learn how Three.js games integrate physics, collision detection, and interactive input—concepts that power thousands of games.

⚙️ How It Works

  1. When the sketch loads, setup() creates a Three.js scene with a sky-blue background, a large green ground plane, 20 red target boxes scattered randomly across the environment, and lighting to make objects visible. It also initializes PointerLockControls, which locks the mouse pointer to the window for FPS-style camera control.
  2. The animate() function runs continuously. On each frame it updates the player's velocity based on which WASD keys are held, applies gravity to make the player fall, moves the camera based on that velocity, and re-renders the entire scene with the camera's new position and angle.
  3. When you press W, A, S, or D, onKeyDown() sets movement flags to true; when you release the key, onKeyUp() sets them to false. The animate() function reads these flags and adjusts velocity accordingly.
  4. When you click the mouse (while pointer-locked), onMouseDown() uses a raycaster—an invisible ray fired from the camera through the center of the screen—to detect which boxes it hits. If a box is hit, it flashes blue, reappears at a random location, and the score increments.
  5. The camera stays 10 pixels above the ground (player height), preventing you from falling through the world. Gravity is applied every frame but is counteracted when you land, keeping the player grounded.

🎓 Concepts You'll Learn

Three.js scene, camera, and rendererPointerLockControls and FPS movementRaycasting and collision detectionVelocity and physics simulationEvent listeners for keyboard and mouse inputGame state management and score tracking

📝 Code Breakdown

setup()

setup() runs once when the sketch loads and is where all initialization happens. It creates the scene, camera, renderer, lighting, and spawns the boxes. The setTimeout delay is crucial—it ensures Three.js libraries are fully loaded before trying to use PointerLockControls.

🔬 This creates the box shape and red color. What happens if you change 0xff0000 (red) to 0xffff00 (yellow) or 0x00ff00 (green)?

    // Target Boxes
    const boxGeometry = new THREE.BoxGeometry(20, 20, 20);
    const boxMaterial = new THREE.MeshLambertMaterial({ color: 0xff0000 }); // Red targets
function setup() {
  // Tell p5.js not to create its default canvas, as three.js will create its own
  noCanvas();

  // Get score and instruction elements from HTML
  scoreContainer = document.getElementById('score-container'); // Get the score container
  instructionsElement = document.getElementById('instructions-container'); // Get the instructions container
  scoreElement = document.getElementById('score');

  // Defer three.js setup to ensure scripts are fully loaded and PointerLockControls is defined
  setTimeout(() => {
    // --- three.js Scene Setup ---
    scene = new THREE.Scene();
    scene.background = new THREE.Color(0x87ceeb); // Sky blue background
    scene.fog = new THREE.Fog(0x87ceeb, 0, 750); // Simple fog

    camera = new THREE.PerspectiveCamera(75, windowWidth / windowHeight, 1, 1000);
    camera.position.y = 10; // Player height

    renderer = new THREE.WebGLRenderer({ antialias: true });
    renderer.setPixelRatio(window.devicePixelRatio);
    renderer.setSize(windowWidth, windowHeight);
    document.body.appendChild(renderer.domElement); // Add three.js canvas to the body

    // --- PointerLockControls for FPS movement ---
    // This line is now inside the setTimeout, which helps resolve the constructor error
    controls = new THREE.PointerLockControls(camera, renderer.domElement);
    scene.add(controls.getObject()); // Add camera object to the scene

    // Instructions for the user
    instructionsElement.addEventListener('click', function () {
      controls.lock(); // Lock the mouse when clicking on instructions
    });

    controls.addEventListener('lock', function () {
      instructionsElement.style.display = 'none';
      scoreContainer.style.display = 'block'; // Show score container
    });

    controls.addEventListener('unlock', function () {
      instructionsElement.style.display = 'block';
      scoreContainer.style.display = 'none'; // Hide score container
    });

    // --- Event Listeners for Movement ---
    document.addEventListener('keydown', onKeyDown);
    document.addEventListener('keyup', onKeyUp);

    // --- Raycaster for Shooting ---
    raycaster = new THREE.Raycaster();
    document.addEventListener('mousedown', onMouseDown); // Listen for mouse click (shooting)

    // --- Add Objects to Scene ---
    // Ground
    const floorGeometry = new THREE.PlaneGeometry(2000, 2000, 100, 100);
    floorGeometry.rotateX(-Math.PI / 2); // Rotate to be horizontal
    const floorMaterial = new THREE.MeshBasicMaterial({ color: 0x00ff00, wireframe: false }); // Green ground
    const floor = new THREE.Mesh(floorGeometry, floorMaterial);
    scene.add(floor);

    // Target Boxes
    const boxGeometry = new THREE.BoxGeometry(20, 20, 20);
    const boxMaterial = new THREE.MeshLambertMaterial({ color: 0xff0000 }); // Red targets
    for (let i = 0; i < 20; i++) {
      const box = new THREE.Mesh(boxGeometry, boxMaterial);
      box.position.x = random(-900, 900);
      box.position.y = random(10, 50); // Vary height
      box.position.z = random(-900, 900);
      scene.add(box);
      boxes.push(box);
    }

    // Simple Ambient Light
    const ambientLight = new THREE.AmbientLight(0xffffff, 0.6);
    scene.add(ambientLight);

    // Simple Directional Light
    const directionalLight = new THREE.DirectionalLight(0xffffff, 0.8);
    directionalLight.position.set(100, 100, 100);
    scene.add(directionalLight);

    // Start the three.js animation loop
    animate();
  }, 0); // 0ms delay ensures this block runs after all scripts are processed
}
Line-by-line explanation (20 lines)

🔧 Subcomponents:

calculation Scene Initialization scene = new THREE.Scene(); scene.background = new THREE.Color(0x87ceeb); scene.fog = new THREE.Fog(0x87ceeb, 0, 750);

Creates the 3D scene, sets sky blue background color, and adds fog for depth effect

calculation Camera Setup camera = new THREE.PerspectiveCamera(75, windowWidth / windowHeight, 1, 1000); camera.position.y = 10;

Creates a perspective camera with 75-degree field of view and positions it 10 units above ground (player height)

for-loop Target Box Spawning for (let i = 0; i < 20; i++) { const box = new THREE.Mesh(boxGeometry, boxMaterial); box.position.x = random(-900, 900); box.position.y = random(10, 50); box.position.z = random(-900, 900); scene.add(box); boxes.push(box); }

Creates 20 red target boxes at random locations across the map and stores them in the boxes array for later collision detection

calculation Lighting Configuration const ambientLight = new THREE.AmbientLight(0xffffff, 0.6); scene.add(ambientLight); const directionalLight = new THREE.DirectionalLight(0xffffff, 0.8); directionalLight.position.set(100, 100, 100); scene.add(directionalLight);

Adds ambient light (global brightness) and directional light (sun-like light from above) so objects are visible and have shadows

noCanvas();
Tells p5.js not to create a default 2D canvas—Three.js will create its own 3D canvas instead
scoreContainer = document.getElementById('score-container');
Grabs the HTML element that holds the score display so we can show/hide it when the pointer is locked/unlocked
setTimeout(() => { ... }, 0);
Delays the Three.js initialization by 0 milliseconds to ensure all external scripts (like PointerLockControls) are fully loaded before we try to use them
scene = new THREE.Scene();
Creates an empty 3D scene—the container for all objects, lights, and the camera
scene.background = new THREE.Color(0x87ceeb);
Sets the background color to sky blue (hex color 0x87ceeb) so the scene doesn't appear black
scene.fog = new THREE.Fog(0x87ceeb, 0, 750);
Adds fog that gradually hides objects far away, making distant boxes fade into the sky for a realistic distance effect
camera = new THREE.PerspectiveCamera(75, windowWidth / windowHeight, 1, 1000);
Creates a camera with a 75-degree field of view (how wide you can see), correct aspect ratio for the window, near clipping plane at 1 unit, and far at 1000 units
camera.position.y = 10;
Sets the camera 10 units above ground, simulating an average player height so you're not looking from the ground up
renderer = new THREE.WebGLRenderer({ antialias: true });
Creates a WebGL renderer that will actually draw the 3D scene; antialias smooths jagged edges
renderer.setSize(windowWidth, windowHeight);
Makes the renderer canvas fill the entire window so the game is fullscreen
document.body.appendChild(renderer.domElement);
Adds the Three.js canvas to the HTML page so it's visible
controls = new THREE.PointerLockControls(camera, renderer.domElement);
Creates FPS controls that let the mouse look around and locks the pointer to the window for immersive gameplay
scene.add(controls.getObject());
Adds the camera (inside the controls object) to the scene so it can move and rotate within the 3D world
instructionsElement.addEventListener('click', function () { controls.lock(); });
When the player clicks on the instructions text, lock the mouse pointer and hide the instructions, showing the score instead
for (let i = 0; i < 20; i++) {
Loop 20 times to create 20 target boxes
box.position.x = random(-900, 900);
Position the box randomly between -900 and 900 units on the X axis (left-right), spread across the map
box.position.y = random(10, 50);
Position the box at a random height between 10 and 50 units so boxes don't all sit at the same level
box.position.z = random(-900, 900);
Position the box randomly between -900 and 900 units on the Z axis (forward-backward)
scene.add(box);
Adds the box to the 3D scene so it's rendered and visible
boxes.push(box);
Stores the box in the boxes array so we can later check if the raycast hit any of them
animate()

animate() is the heart of the game—it runs 60 times per second and updates every aspect of the world: physics (gravity, friction), player movement (responding to key presses), and finally rendering. Understanding delta time is crucial: it scales all changes so the game plays at the same speed regardless of frame rate.

🔬 These three lines apply friction and gravity. What happens if you remove the friction lines (the first two) and only leave gravity? The player will slide forever without slowing down—try it!

  const delta = (performance.now() - prevTime) / 1000;

  velocity.x -= velocity.x * 10.0 * delta;
  velocity.z -= velocity.z * 10.0 * delta;
  velocity.y -= GRAVITY * 100.0 * delta;

🔬 This stops you at the ground. What if you change 10 to 50? You'll float much higher above the ground—try it and see where you stand relative to the boxes.

  if (controls.getObject().position.y < 10) {
    velocity.y = 0;
    controls.getObject().position.y = 10; // Keep player above ground
  }
function animate() {
  requestAnimationFrame(animate);

  const delta = (performance.now() - prevTime) / 1000;

  velocity.x -= velocity.x * 10.0 * delta;
  velocity.z -= velocity.z * 10.0 * delta;
  velocity.y -= GRAVITY * 100.0 * delta; // Apply gravity

  direction.z = Number(moveForward) - Number(moveBackward);
  direction.x = Number(moveRight) - Number(moveLeft);
  direction.normalize(); // Ensure constant speed in all directions

  if (moveForward || moveBackward) velocity.z -= direction.z * PLAYER_SPEED * delta;
  if (moveLeft || moveRight) velocity.x -= direction.x * PLAYER_SPEED * delta;

  // Move the camera object based on velocity
  controls.moveRight(-velocity.x * delta);
  controls.moveForward(-velocity.z * delta);

  controls.getObject().position.y += (velocity.y * delta); // Apply vertical velocity

  if (controls.getObject().position.y < 10) {
    velocity.y = 0;
    controls.getObject().position.y = 10; // Keep player above ground
  }

  prevTime = performance.now();

  renderer.render(scene, camera);
}
Line-by-line explanation (18 lines)

🔧 Subcomponents:

calculation Friction and Drag velocity.x -= velocity.x * 10.0 * delta; velocity.z -= velocity.z * 10.0 * delta;

Gradually reduces velocity on the X and Z axes (horizontal), simulating friction/air resistance so the player doesn't slide forever

calculation Gravity Physics velocity.y -= GRAVITY * 100.0 * delta;

Pulls the player downward by decreasing Y velocity each frame, making the player fall toward the ground

calculation Movement Direction direction.z = Number(moveForward) - Number(moveBackward); direction.x = Number(moveRight) - Number(moveLeft); direction.normalize();

Converts boolean movement flags (true/false) into a direction vector, normalized so diagonal movement isn't faster than straight movement

conditional Velocity Application if (moveForward || moveBackward) velocity.z -= direction.z * PLAYER_SPEED * delta; if (moveLeft || moveRight) velocity.x -= direction.x * PLAYER_SPEED * delta;

Only updates velocity when movement keys are pressed, applying player speed in the direction the player wants to move

conditional Ground Collision Check if (controls.getObject().position.y < 10) { velocity.y = 0; controls.getObject().position.y = 10;

Stops the player from falling through the ground by checking if they've dropped below height 10 and resetting both position and vertical velocity

requestAnimationFrame(animate);
Tells the browser to call animate() again on the next frame (~60 times per second), creating the animation loop
const delta = (performance.now() - prevTime) / 1000;
Calculates how much time passed since the last frame in seconds—used to scale movement so it's consistent regardless of frame rate
velocity.x -= velocity.x * 10.0 * delta;
Applies friction to horizontal X velocity by multiplying it by a damping factor (10.0), slowing the player's left-right slide
velocity.z -= velocity.z * 10.0 * delta;
Applies friction to forward-backward Z velocity, slowing the player's forward/backward slide
velocity.y -= GRAVITY * 100.0 * delta;
Decreases Y velocity (upward is positive, downward is negative) to simulate falling—the larger the gravity constant, the faster you fall
direction.z = Number(moveForward) - Number(moveBackward);
Converts movement flags to a number: if moveForward is true, direction.z = 1; if moveBackward is true, direction.z = -1; if both are false, direction.z = 0
direction.x = Number(moveRight) - Number(moveLeft);
Same logic but for left-right: 1 if moving right, -1 if moving left, 0 if neither
direction.normalize();
Scales the direction vector so its length is exactly 1, ensuring diagonal movement (e.g., forward + right) isn't faster than pure forward
if (moveForward || moveBackward) velocity.z -= direction.z * PLAYER_SPEED * delta;
If forward or backward is pressed, update Z velocity by the player speed—negative sign because Three.js uses -Z as forward
if (moveLeft || moveRight) velocity.x -= direction.x * PLAYER_SPEED * delta;
If left or right is pressed, update X velocity by the player speed
controls.moveRight(-velocity.x * delta);
Moves the camera right by the X velocity (negative because moving right increases X, but we're storing it as negative in velocity)
controls.moveForward(-velocity.z * delta);
Moves the camera forward by the Z velocity
controls.getObject().position.y += (velocity.y * delta);
Updates the camera's height (Y position) by the vertical velocity, making the player fall or rise
if (controls.getObject().position.y < 10) {
Checks if the player has fallen below the ground (Y < 10, the player height we set in setup)
velocity.y = 0;
Sets vertical velocity to 0 so the player stops falling once they hit the ground
controls.getObject().position.y = 10;
Clamps the player's height to exactly 10 so they can't go below the ground
prevTime = performance.now();
Records the current time so we can calculate delta time on the next frame
renderer.render(scene, camera);
Actually draws the entire 3D scene to the screen from the camera's viewpoint

draw()

draw() is required by p5.js but is completely empty in this sketch. All rendering is done by Three.js's renderer.render() call inside animate(). You could add 2D p5.js drawing here if you created a separate 2D canvas, but for a pure 3D game, it stays empty.

function draw() {
  // Any 2D p5.js drawing could go here if you created a separate p5 canvas
  // For this sketch, three.js handles all rendering
}
Line-by-line explanation (2 lines)
// Any 2D p5.js drawing could go here if you created a separate p5 canvas
p5.js expects a draw() function even if it's empty—this is a stub that explains why it's not doing anything
// For this sketch, three.js handles all rendering
Since we called noCanvas() in setup(), p5.js has no 2D canvas to draw to, and Three.js handles all the 3D rendering instead

onKeyDown(event)

onKeyDown() is an event listener called every time a key is pressed. It doesn't directly move the player—it just sets flags that animate() reads each frame. This design lets you hold multiple keys at once (e.g., W + D to move forward and right diagonally).

🔬 This maps both W and Up Arrow to the same action. What if you added another case like 'KeyI' on a new line before the second case? Both would trigger forward movement. Try it with a different key like 'KeyR'!

    case 'ArrowUp':
    case 'KeyW':
      moveForward = true;
      break;
function onKeyDown(event) {
  switch (event.code) {
    case 'ArrowUp':
    case 'KeyW':
      moveForward = true;
      break;
    case 'ArrowLeft':
    case 'KeyA':
      moveLeft = true;
      break;
    case 'ArrowDown':
    case 'KeyS':
      moveBackward = true;
      break;
    case 'ArrowRight':
    case 'KeyD':
      moveRight = true;
      break;
  }
}
Line-by-line explanation (5 lines)

🔧 Subcomponents:

switch-case Forward Movement Keys case 'ArrowUp': case 'KeyW': moveForward = true;

When W or Up Arrow is pressed, set moveForward to true so animate() knows to move the player forward

switch-case Left Movement Keys case 'ArrowLeft': case 'KeyA': moveLeft = true;

When A or Left Arrow is pressed, set moveLeft to true

switch-case Backward Movement Keys case 'ArrowDown': case 'KeyS': moveBackward = true;

When S or Down Arrow is pressed, set moveBackward to true

switch-case Right Movement Keys case 'ArrowRight': case 'KeyD': moveRight = true;

When D or Right Arrow is pressed, set moveRight to true

function onKeyDown(event) {
This function is called by the browser whenever a key is pressed; event contains information about which key
switch (event.code) {
Uses a switch statement to check which key was pressed by its code (e.g., 'KeyW', 'ArrowUp')
case 'ArrowUp': case 'KeyW':
Both cases do the same thing, so if either Up Arrow or W is pressed, the code falls through to set moveForward = true
moveForward = true;
Sets the moveForward flag to true, which animate() will see on the next frame and use to accelerate the player forward
break;
Exits the switch statement so we don't accidentally run code for other cases

onKeyUp(event)

onKeyUp() mirrors onKeyDown()—when a key is released, it sets the corresponding movement flag to false. Combined with friction in animate(), this creates realistic movement where you continue sliding briefly after releasing a key.

function onKeyUp(event) {
  switch (event.code) {
    case 'ArrowUp':
    case 'KeyW':
      moveForward = false;
      break;
    case 'ArrowLeft':
    case 'KeyA':
      moveLeft = false;
      break;
    case 'ArrowDown':
    case 'KeyS':
      moveBackward = false;
      break;
    case 'ArrowRight':
    case 'KeyD':
      moveRight = false;
      break;
  }
}
Line-by-line explanation (3 lines)
function onKeyUp(event) {
This function is called by the browser whenever a key is released
switch (event.code) {
Checks which key was released
moveForward = false;
Sets moveForward to false so animate() stops accelerating the player forward (but they keep sliding due to velocity)

onMouseDown(event)

onMouseDown() is the core of the shooting mechanic. It uses raycasting—a technique borrowed from graphics and games—to fire an invisible ray from the camera through the center of the screen and check what 3D objects it intersects. This is more efficient than checking the distance from the player to every box on every click. The color flash provides satisfying feedback, and repositioning keeps the game dynamic.

🔬 These lines move the box to a random location after being hit. What if you change the ranges? If you change 900 to 200, boxes will only spawn close to the origin. Try it and see how it changes gameplay difficulty!

      // Reposition the target
      hitObject.position.x = random(-900, 900);
      hitObject.position.y = random(10, 50);
      hitObject.position.z = random(-900, 900);
function onMouseDown(event) {
  if (controls.isLocked) {
    // Set raycaster origin to camera position and direction to camera's forward vector
    raycaster.setFromCamera({ x: 0, y: 0 }, camera);

    // Calculate objects intersecting the ray
    const intersects = raycaster.intersectObjects(boxes);

    if (intersects.length > 0) {
      // First intersected object is the target
      const hitObject = intersects[0].object;

      // Change target color and reposition it
      hitObject.material.color.set(0x0000ff); // Blue when hit
      setTimeout(() => {
        hitObject.material.color.set(0xff0000); // Reset to red after a short delay
      }, 200);

      // Reposition the target
      hitObject.position.x = random(-900, 900);
      hitObject.position.y = random(10, 50);
      hitObject.position.z = random(-900, 900);

      score++;
      scoreElement.textContent = score;
    }
  }
}
Line-by-line explanation (14 lines)

🔧 Subcomponents:

conditional Pointer Lock Verification if (controls.isLocked) {

Only allows shooting when the mouse is locked to the game, preventing accidental clicks on UI elements

calculation Raycast Firing raycaster.setFromCamera({ x: 0, y: 0 }, camera); const intersects = raycaster.intersectObjects(boxes);

Fires an invisible ray from the camera through the center of the screen and detects which boxes it hits

conditional Hit Detection if (intersects.length > 0) {

Checks if the ray hit any boxes; if it did, intersects will have at least one element

calculation Color Flash Effect hitObject.material.color.set(0x0000ff); setTimeout(() => { hitObject.material.color.set(0xff0000); }, 200);

Changes the hit box to blue instantly, then back to red after 200 milliseconds to give visual feedback

calculation Target Repositioning hitObject.position.x = random(-900, 900); hitObject.position.y = random(10, 50); hitObject.position.z = random(-900, 900);

Moves the hit box to a new random location so the player has to hunt it down again

calculation Score Increment score++; scoreElement.textContent = score;

Increases the score by 1 and updates the HTML display so the player sees their new score

function onMouseDown(event) {
Called by the browser when the mouse button is clicked
if (controls.isLocked) {
Only proceed if the mouse pointer is locked to the window (game is active); prevents clicks when the pointer is unlocked
raycaster.setFromCamera({ x: 0, y: 0 }, camera);
Sets up the raycaster to fire from the camera through the center of the screen ({ x: 0, y: 0 } is the center in normalized coordinates)
const intersects = raycaster.intersectObjects(boxes);
Casts the ray and checks which boxes it passes through, storing all hits in the intersects array (closest first)
if (intersects.length > 0) {
Checks if the ray hit any boxes—if intersects is not empty, the shot is a hit
const hitObject = intersects[0].object;
Gets the first (closest) object hit by the ray—this is the box the player actually shot at
hitObject.material.color.set(0x0000ff);
Instantly changes the hit box's color to blue to provide visual feedback that it was hit
setTimeout(() => { ... }, 200);
Waits 200 milliseconds, then runs the code inside to change the box back to red—creating a brief blue flash effect
hitObject.material.color.set(0xff0000);
Changes the box back to its original red color after the flash
hitObject.position.x = random(-900, 900);
Moves the box to a new random X position
hitObject.position.y = random(10, 50);
Moves the box to a new random height
hitObject.position.z = random(-900, 900);
Moves the box to a new random Z position—now the player has to find and shoot it again
score++;
Increments the score variable by 1
scoreElement.textContent = score;
Updates the HTML text to display the new score so the player sees it change on screen

random(min, max)

This is a helper function. p5.js has a global random() function, but since we're using Three.js directly (and p5.js isn't handling the main rendering), we define our own to avoid conflicts. It's a classic pattern for generating random numbers in a specific range.

function random(min, max) {
  return Math.random() * (max - min) + min;
}
Line-by-line explanation (2 lines)
function random(min, max) {
Custom random function that takes a minimum and maximum value and returns a random number in that range
return Math.random() * (max - min) + min;
Math.random() generates a number 0 to 1, multiply by the range size (max - min), then add min to shift it into the desired range

windowResized()

windowResized() ensures the game looks correct when the window is resized—without it, the 3D perspective would break. It's automatically called by p5.js whenever the window size changes, so you don't need to manually add a resize listener.

function windowResized() {
  camera.aspect = windowWidth / windowHeight;
  camera.updateProjectionMatrix();
  renderer.setSize(windowWidth, windowHeight);
}
Line-by-line explanation (4 lines)
function windowResized() {
p5.js calls this automatically whenever the browser window is resized
camera.aspect = windowWidth / windowHeight;
Updates the camera's aspect ratio to match the new window size so objects don't stretch or squash
camera.updateProjectionMatrix();
Tells Three.js to recalculate the camera's projection matrix using the new aspect ratio
renderer.setSize(windowWidth, windowHeight);
Resizes the Three.js renderer canvas to fill the entire window again

📦 Key Variables

scene THREE.Scene

Stores the 3D scene—the container for all objects, lights, and the camera that make up the game world

let scene;
camera THREE.PerspectiveCamera

The viewpoint from which the player sees the 3D world—its position and angle determine what's on screen

let camera;
renderer THREE.WebGLRenderer

Draws the 3D scene to an HTML canvas each frame—it's the engine that converts 3D data into pixels on screen

let renderer;
controls THREE.PointerLockControls

Handles FPS camera control—allows the mouse to look around and moves the camera through the scene

let controls;
raycaster THREE.Raycaster

Fires invisible rays from the camera to detect collisions (used for shooting), returning which objects were hit

let raycaster;
moveForward boolean

Tracks whether the forward key (W or Up Arrow) is currently pressed, used by animate() to move the player forward

let moveForward = false;
moveBackward boolean

Tracks whether the backward key (S or Down Arrow) is currently pressed

let moveBackward = false;
moveLeft boolean

Tracks whether the left key (A or Left Arrow) is currently pressed

let moveLeft = false;
moveRight boolean

Tracks whether the right key (D or Right Arrow) is currently pressed

let moveRight = false;
velocity THREE.Vector3

Stores the player's current speed and direction as a 3D vector—updated each frame and used to move the camera

let velocity = new THREE.Vector3();
direction THREE.Vector3

Stores the direction the player wants to move (based on key presses), used to update velocity in the correct direction

let direction = new THREE.Vector3();
boxes array

Stores all 20 target box objects so we can check for collisions when shooting and reposition them when hit

let boxes = [];
score number

Tracks how many targets the player has successfully shot, incremented each hit

let score = 0;
scoreElement HTMLElement

A reference to the HTML element that displays the score on screen, updated whenever the player hits a target

let scoreElement;
instructionsElement HTMLElement

A reference to the HTML element showing instructions, hidden when the pointer is locked and shown when unlocked

let instructionsElement;
scoreContainer HTMLElement

A reference to the HTML container that wraps the score display, shown when the pointer is locked and hidden otherwise

let scoreContainer;
prevTime number

Records the timestamp of the previous frame, used to calculate delta time (time elapsed) each frame for physics updates

let prevTime = performance.now();
PLAYER_SPEED number

A constant that controls how fast the player accelerates and moves when keys are pressed (higher = faster movement)

const PLAYER_SPEED = 100.0;
GRAVITY number

A constant that controls how fast gravity pulls the player down, making them fall toward the ground

const GRAVITY = 9.8;

🔧 Potential Improvements (6)

Here are some ways this code could be enhanced:

BUG animate() function

prevTime is declared at the bottom of the file, which could cause issues if animate() is called before setup() completes. If setup() runs late, prevTime might be undefined when animate() first runs.

💡 Declare prevTime at the top with other globals and initialize it in setup() inside the setTimeout: `prevTime = performance.now();` right before calling animate().

BUG onMouseDown() function

The raycaster is fired from { x: 0, y: 0 }, which represents the screen center in normalized coordinates. However, on some systems with pointer lock, this assumes a fixed screen center and could miss if the screen layout changes.

💡 Consider validating that controls.isLocked returns true before firing to double-check the pointer is actually locked, or add logging to debug if shots are consistently missing.

PERFORMANCE animate() function

The friction calculation (velocity.x -= velocity.x * 10.0 * delta) is applied every frame even when no keys are pressed, adding unnecessary computation. The velocity values get very close to zero but never quite reach it.

💡 Add a threshold check: `if (Math.abs(velocity.x) > 0.01) { velocity.x -= ... }` to stop updating friction when velocity is negligible.

FEATURE onMouseDown() function

Currently, all boxes respond to being hit the same way (color flash and reposition). There's no visual distinction between boxes—they're all identical red cubes.

💡 Add variety by randomly assigning point values or sizes to boxes, or make some boxes worth more and harder to hit. This would make the game more engaging.

FEATURE setup() function

The game has no end condition, difficulty scaling, or time limit. Players can play indefinitely with no challenge curve.

💡 Add a timer that counts down or counts up, or spawn boxes faster as the score increases, or add a lives system so missed boxes deduct points.

STYLE Global variables and setup()

Magic numbers (like 100.0 for gravity scale, 200 for color flash delay, 10 for player height, 900 for spawn range) are scattered throughout the code without clear explanation.

💡 Define them as named constants at the top: `const BOX_SPAWN_RANGE = 900;`, `const COLOR_FLASH_DURATION = 200;`, `const PLAYER_HEIGHT = 10;` for better readability and easier tuning.

🔄 Code Flow

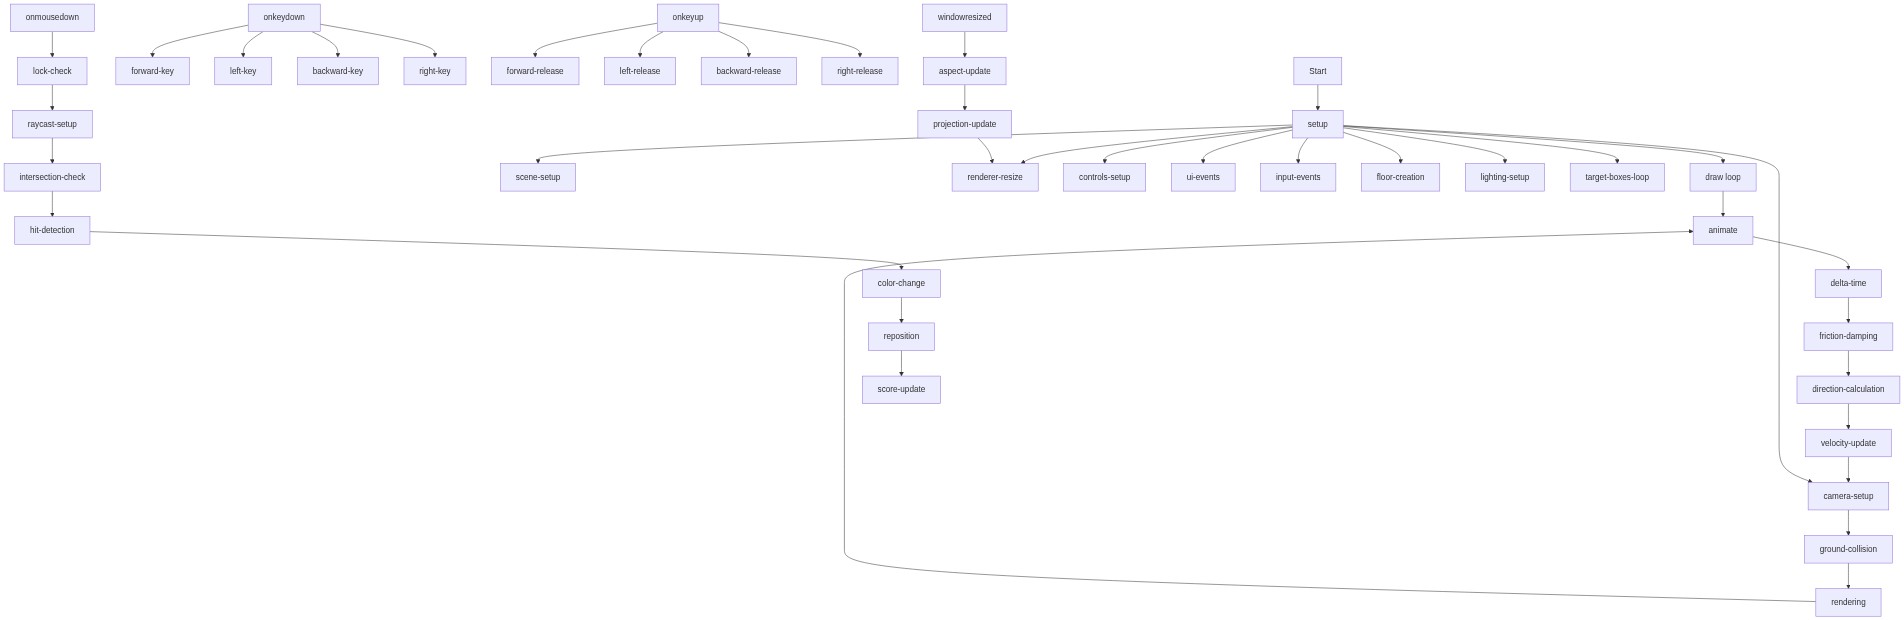
Code flow showing setup, animate, draw, onkeydown, onkeyup, onmousedown, random, windowresized

💡 Click on function names in the diagram to jump to their code

graph TD start[Start] --> setup[setup] setup --> sceneinit[Scene Initialization] setup --> camerainit[Camera Setup] setup --> boxspawnloop[Target Box Spawning] setup --> lightingsetup[Lighting Configuration] setup --> draw[draw loop] click setup href "#fn-setup" click sceneinit href "#sub-scene-init" click camerainit href "#sub-camera-init" click boxspawnloop href "#sub-box-spawn-loop" click lightingsetup href "#sub-lighting-setup" draw --> animate[animate] animate --> frictionapplication[Friction and Drag] animate --> gravityapplication[Gravity Physics] animate --> directioncalculation[Movement Direction] animate --> velocityupdate[Velocity Application] animate --> groundcollision[Ground Collision Check] click animate href "#fn-animate" click frictionapplication href "#sub-friction-application" click gravityapplication href "#sub-gravity-application" click directioncalculation href "#sub-direction-calculation" click velocityupdate href "#sub-velocity-update" click groundcollision href "#sub-ground-collision" animate --> onkeydown[onKeyDown] onkeydown --> forwardkeys[Forward Movement Keys] onkeydown --> leftkeys[Left Movement Keys] onkeydown --> backwardkeys[Backward Movement Keys] onkeydown --> rightkeys[Right Movement Keys] click onkeydown href "#fn-onkeydown" click forwardkeys href "#sub-forward-keys" click leftkeys href "#sub-left-keys" click backwardkeys href "#sub-backward-keys" click rightkeys href "#sub-right-keys" animate --> onkeyup[onKeyUp] click onkeyup href "#fn-onkeyup" animate --> onmousedown[onMouseDown] onmousedown --> pointerlockcheck[Pointer Lock Verification] pointerlockcheck --> raycastfire[Raycast Firing] raycastfire --> hitdetection[Hit Detection] hitdetection --> colorflash[Color Flash Effect] hitdetection --> boxreposition[Target Repositioning] hitdetection --> scoreupdate[Score Increment] click onmousedown href "#fn-onmousedown" click pointerlockcheck href "#sub-pointer-lock-check" click raycastfire href "#sub-raycast-fire" click hitdetection href "#sub-hit-detection" click colorflash href "#sub-color-flash" click boxreposition href "#sub-box-reposition" click scoreupdate href "#sub-score-update" setup --> windowresized[windowResized] click windowresized href "#fn-windowresized"

❓ Frequently Asked Questions

What visuals can I expect to see in the p5.js Sketch 2026-02-22 23:12?

This sketch creates a 3D scene with a sky blue background and fog, where users can navigate through an environment populated with target boxes.

How do users interact with the Sketch 2026-02-22 23:12?

Users can move around the 3D space using keyboard controls, allowing them to explore the environment and collect boxes to increase their score.

What creative coding concepts are demonstrated in this sketch?

The sketch showcases the integration of three.js with p5.js to create an interactive 3D environment, highlighting concepts like object manipulation, camera controls, and real-time rendering.

Preview

Sketch 2026-02-22 23:12 - p5.js creative coding sketch preview
Sketch Preview
Code flow diagram showing the structure of Sketch 2026-02-22 23:12 - Code flow showing setup, animate, draw, onkeydown, onkeyup, onmousedown, random, windowresized
Code Flow Diagram