Sketch 2026-02-23 03:27

This sketch simulates a supply drop coordination game where you shoot a flare, triggering an airplane to fly across the screen and release supply packages. Multiple vehicles then race to collect the supplies on the ground, creating a dynamic chain reaction of events across the canvas.

🧪 Try This!

Experiment with the code by making these changes:

  1. Change the ground color — Modify the RGB values in drawGround() to make the ground brown, yellow, or any color you choose.
  2. Make airplanes fly twice as fast — Double the airplane's horizontal speed to make it cross the screen in half the time.
  3. Increase the number of vehicles per drop — Spawn more vehicles for each supply package, creating more competition and chaos on the ground.
  4. Make the flare bigger — Increase the flare size to make it more visible when it rises.
  5. Change the flare color to blue — Modify the RGB fill color in updateFlare() from orange (255, 100, 0) to a cool blue.
  6. Make supplies drop from the start of the screen — Change where airplanes release their supplies from halfway to the very beginning.
Prefer the full editor? Open it there →

📖 About This Sketch

This sketch creates an animated supply drop sequence triggered by clicking a button. When you shoot a flare upward, it triggers an airplane to fly across the screen. The airplane releases a supply package with a parachute, and multiple emoji vehicles (police cars, ambulances, fire trucks, etc.) race across the ground to collect it. The sketch demonstrates array management, object state tracking, and coordinated multi-system animation—three of the most powerful patterns in interactive coding.

The code is organized around four main systems: the flare gun (triggered by user input), airplanes (spawned after flares), supply drops (spawned by airplanes), and vehicles (spawned by supply drops). Each system manages its own array of objects, updates their positions and states every frame, and removes objects when they leave the canvas or are collected. By studying this sketch, you'll learn how to create sophisticated interactive systems by connecting simple, reusable object types.

⚙️ How It Works

  1. When the sketch loads, setup() creates a responsive canvas sized to fit the window and positions the flare gun in the bottom-right corner. It also calculates all animation speeds and object sizes as percentages of canvas width and height, making the sketch adapt to any screen size.
  2. Every frame, draw() clears the background and renders the ground, gun, and all active objects. Three for-loops iterate backward through the airplanes, supply drops, and vehicles arrays, updating and drawing each object.
  3. When you click the 'Shoot Flare' button, triggerFlareSequence() activates the flare, which moves upward each frame. The flare is drawn with three nested circles to create a glowing effect.
  4. When the flare reaches its peak at the top of the screen, it deactivates and spawns a new airplane object positioned off-screen to the right, adding it to the airplanes array.
  5. updateAirplane() moves each airplane leftward each frame. When the airplane reaches the midpoint of the screen, it drops a supply package (a new object with parachute and crate graphics) and spawns 2–5 vehicles at random ground positions, each assigned to chase that specific drop.
  6. updateSupplyDrop() moves packages downward. updateVehicle() steers each vehicle horizontally toward its assigned drop's x position. When a vehicle reaches the drop and the drop has landed on the ground, the vehicle marks both itself and the drop as collected, then drives off-screen to the right.

🎓 Concepts You'll Learn

Array managementObject state trackingResponsive canvas designAnimation loopsCollision detection (distance-based)Event triggering between systemsRemoval of off-screen objects

📝 Code Breakdown

setup()

setup() runs once when the sketch starts. The key pattern here is multiplying width and height by percentages (0.15, 0.8, etc.) to make every position and size responsive—when the window resizes, all these values automatically scale. This is the foundation of responsive design in p5.js.

function setup() {
  createCanvas(windowWidth, windowHeight);
  // Tip: Use windowWidth/windowHeight for responsive canvas

  // Initialize positions and sizes relative to canvas dimensions
  // This makes the sketch responsive to different screen sizes, including your tablet
  gunW = width * 0.15; // Gun width is 15% of canvas width
  gunH = height * 0.2; // Gun height is 20% of canvas height
  gunX = width * 0.8; // Gun is positioned 80% from the left
  gunY = height * 0.9; // Gun is positioned 90% from the top (on the ground)

  flareSize = width * 0.02; // Flare size is 2% of canvas width
  flareSpeed = height * 0.01; // Flare moves up by 1% of canvas height per frame

  airplaneSpeed = width * 0.005; // Airplane moves horizontally by 0.5% of canvas width per frame
  supplyDropSpeed = height * 0.003; // Supply drop falls by 0.3% of canvas height per frame

  vehicleSpeedBase = width * 0.003; // Base speed for vehicles
  vehicleSize = width * 0.04; // Size of vehicle emojis

  // Create and position the flare button
  flareButton = createButton('Shoot Flare');
  flareButton.position(width * 0.05, height * 0.05); // Position top-left
  flareButton.style('font-size', '16px');
  flareButton.style('padding', '10px 20px');
  flareButton.style('background-color', '#ff5733'); // Orange-red color
  flareButton.style('color', 'white');
  flareButton.style('border', 'none');
  flareButton.style('border-radius', '5px');
  flareButton.mousePressed(triggerFlareSequence); // Attach trigger function to button press
  flareButton.touchStarted(triggerFlareSequence); // Also work on touch devices
}
Line-by-line explanation (14 lines)

🔧 Subcomponents:

calculation Responsive Canvas Setup createCanvas(windowWidth, windowHeight);

Creates a canvas that fills the entire window, enabling the sketch to adapt to any screen size

calculation Gun Position Initialization gunX = width * 0.8;

Positions the gun 80% from the left edge, anchoring it to the bottom-right regardless of window size

calculation Speed Initialization airplaneSpeed = width * 0.005;

Scales animation speeds based on canvas width, ensuring motion feels consistent on large and small screens

calculation Button Setup flareButton = createButton('Shoot Flare');

Creates an interactive button that triggers the flare sequence when clicked or touched

createCanvas(windowWidth, windowHeight);
Creates a canvas that matches the full window size, allowing the sketch to scale responsively to tablets, phones, and desktops
gunW = width * 0.15;
Sets gun width to 15% of canvas width, so it scales proportionally when the window resizes
gunH = height * 0.2;
Sets gun height to 20% of canvas height
gunX = width * 0.8;
Positions gun 80% from the left edge, placing it on the right side of the canvas
gunY = height * 0.9;
Positions gun at 90% down from the top, keeping it near the ground
flareSize = width * 0.02;
Flare diameter is 2% of canvas width, making it visible but not overwhelming
flareSpeed = height * 0.01;
Flare moves upward by 1% of canvas height per frame, creating a smooth, screen-size-aware ascent
airplaneSpeed = width * 0.005;
Airplane moves left by 0.5% of canvas width per frame—half the flare speed—making it slower and more watchable
supplyDropSpeed = height * 0.003;
Supply packages fall by 0.3% of canvas height per frame, slower than the flare, giving vehicles time to react
vehicleSpeedBase = width * 0.003;
Vehicles move by 0.3% of canvas width per frame, same speed as the drop falls, creating tension
flareButton = createButton('Shoot Flare');
Creates a clickable button labeled 'Shoot Flare'
flareButton.position(width * 0.05, height * 0.05);
Positions the button 5% from the left and top, placing it in the top-left corner
flareButton.mousePressed(triggerFlareSequence);
Attaches the triggerFlareSequence function to the button, so clicking it starts the supply drop sequence
flareButton.touchStarted(triggerFlareSequence);
Also attaches the trigger function to touch events, making the button work on tablets and phones
draw()

draw() is called 60 times per second by p5.js. The background() call at the start erases everything, then we redraw all objects at their new positions. The three backward for-loops are the heartbeat of the sketch—they animate every airplane, drop, and vehicle by updating their positions and removing those that leave the screen or complete their task.

🔬 This loop draws and updates every airplane every frame. What happens if you comment out the updateAirplane() line so airplanes stop moving?

  for (let i = airplanes.length - 1; i >= 0; i--) {
    let airplane = airplanes[i];
    drawAirplane(airplane);
    updateAirplane(airplane, i);
  }
function draw() {
  background(135, 206, 235); // Sky blue background

  drawGround();
  drawFlareGun();

  // Update and draw the flare if active
  if (flareActive) {
    updateFlare();
  }

  // Update and draw all active airplanes
  for (let i = airplanes.length - 1; i >= 0; i--) {
    let airplane = airplanes[i];
    drawAirplane(airplane);
    updateAirplane(airplane, i);
  }

  // Update and draw all active supply drops
  for (let i = supplyDrops.length - 1; i >= 0; i--) {
    let supplyDrop = supplyDrops[i];
    drawSupplyDrop(supplyDrop);
    updateSupplyDrop(supplyDrop, i);
  }

  // Update and draw all active vehicles
  for (let i = vehicles.length - 1; i >= 0; i--) {
    let vehicle = vehicles[i];
    drawVehicle(vehicle);
    updateVehicle(vehicle, i);
  }
}
Line-by-line explanation (11 lines)

🔧 Subcomponents:

conditional Flare Update Conditional if (flareActive) { updateFlare(); }

Only updates the flare when it is actively rising, preventing unnecessary calculations when inactive

for-loop Airplane Update Loop for (let i = airplanes.length - 1; i >= 0; i--) { let airplane = airplanes[i]; drawAirplane(airplane); updateAirplane(airplane, i); }

Iterates through all airplanes backwards, drawing and updating each one, and removing those that fly off-screen

for-loop Supply Drop Update Loop for (let i = supplyDrops.length - 1; i >= 0; i--) { let supplyDrop = supplyDrops[i]; drawSupplyDrop(supplyDrop); updateSupplyDrop(supplyDrop, i); }

Iterates through all supply drops backwards, drawing and updating each one, and removing those that land or are collected

for-loop Vehicle Update Loop for (let i = vehicles.length - 1; i >= 0; i--) { let vehicle = vehicles[i]; drawVehicle(vehicle); updateVehicle(vehicle, i); }

Iterates through all vehicles backwards, drawing and updating each one, removing those that drive off-screen

background(135, 206, 235);
Clears the canvas every frame with a sky-blue color (RGB: 135, 206, 235), erasing all previously drawn objects so they appear to move rather than trail
drawGround();
Calls the drawGround() function to redraw the green ground strip at the bottom of the canvas
drawFlareGun();
Calls the drawFlareGun() function to redraw the gun in its fixed position
if (flareActive) {
Checks whether the flare is currently active (rising)
updateFlare();
If the flare is active, moves it upward and checks if it has reached its peak
for (let i = airplanes.length - 1; i >= 0; i--) {
Loops through the airplanes array backwards (from the last element to the first). Backwards iteration is important because we may remove items during the loop.
let airplane = airplanes[i];
Stores a reference to the current airplane object for cleaner code
drawAirplane(airplane);
Draws the airplane at its current position
updateAirplane(airplane, i);
Updates the airplane's position and handles supply drop creation and off-screen removal
for (let i = supplyDrops.length - 1; i >= 0; i--) {
Loops through supply drops backwards, same pattern as airplanes
for (let i = vehicles.length - 1; i >= 0; i--) {
Loops through vehicles backwards, same pattern as airplanes and supply drops

drawGround()

This simple function draws a green strip at the bottom of the canvas where vehicles run and supplies land. The responsive design (height * 0.9 and height * 0.1) ensures the ground always occupies the same proportion of the screen, regardless of window size.

function drawGround() {
  fill(0, 100, 0); // Green ground
  noStroke();
  rect(0, height * 0.9, width, height * 0.1); // Covers the bottom 10% of the canvas
}
Line-by-line explanation (3 lines)
fill(0, 100, 0);
Sets the fill color to green (RGB: 0, 100, 0), which will color all shapes drawn next
noStroke();
Removes the outline stroke, so the rectangle is drawn without a border
rect(0, height * 0.9, width, height * 0.1);
Draws a rectangle starting at the left edge (x=0) at 90% down the canvas (y=height*0.9), spanning the full width and covering the bottom 10% of the canvas

drawFlareGun()

drawFlareGun() draws a simple three-part gun: body, barrel, and handle. Each part uses fill() to set its color and rect() to draw it. Notice how all positions are expressed as multiples of gunX, gunY, gunW, and gunH—this keeps the gun proportional and responsive across all screen sizes.

function drawFlareGun() {
  fill(100); // Gray gun body
  rect(gunX, gunY, gunW, gunH);

  fill(150); // Lighter gray barrel
  rect(gunX + gunW * 0.2, gunY - gunH * 0.3, gunW * 0.6, gunH * 0.5);

  fill(50); // Darker gray handle
  rect(gunX + gunW * 0.1, gunY + gunH * 0.8, gunW * 0.4, gunH * 0.2);
}
Line-by-line explanation (6 lines)
fill(100);
Sets fill color to medium gray (RGB: 100, 100, 100)
rect(gunX, gunY, gunW, gunH);
Draws the main body of the gun using the position (gunX, gunY) and size (gunW, gunH) initialized in setup()
fill(150);
Sets fill color to lighter gray
rect(gunX + gunW * 0.2, gunY - gunH * 0.3, gunW * 0.6, gunH * 0.5);
Draws the barrel, offset 20% from the left edge of the gun body, extending upward (negative y offset), with dimensions 60% of gun width and 50% of gun height
fill(50);
Sets fill color to dark gray
rect(gunX + gunW * 0.1, gunY + gunH * 0.8, gunW * 0.4, gunH * 0.2);
Draws the handle, offset 10% from the left and positioned 80% down the gun body, with dimensions 40% of gun width and 20% of gun height

triggerFlareSequence()

This function is called when the button is clicked or touched. The if (!flareActive) guard is a common pattern in game design—it prevents players from spamming the button and ensures each action completes before the next one begins. Without this guard, multiple flares would rise simultaneously, creating chaos.

🔬 This guard prevents rapid-fire. What happens if you remove the if statement so players can shoot multiple flares at once?

  if (!flareActive) {
    flareActive = true;
    flareX = gunX + gunW * 0.5; // Flare starts from the middle of the gun barrel
    flareY = gunY - gunH * 0.3; // Flare starts from the top of the gun barrel
  }
function triggerFlareSequence() {
  // Only allow shooting if a flare is not currently active
  // This prevents spamming flares too quickly, but allows multiple airplanes/supply drops
  if (!flareActive) {
    flareActive = true;
    flareX = gunX + gunW * 0.5; // Flare starts from the middle of the gun barrel
    flareY = gunY - gunH * 0.3; // Flare starts from the top of the gun barrel
  }
}
Line-by-line explanation (4 lines)

🔧 Subcomponents:

conditional Flare Active Guard if (!flareActive) {

Prevents shooting a new flare while one is already rising, avoiding rapid-fire spam

if (!flareActive) {
Checks whether a flare is NOT currently active. The ! operator means 'not', so this only allows firing if flareActive is false
flareActive = true;
Sets flareActive to true, marking that a flare is now rising
flareX = gunX + gunW * 0.5;
Positions the flare at the horizontal center of the gun barrel (50% along the barrel's width)
flareY = gunY - gunH * 0.3;
Positions the flare at the top of the gun barrel (0.3 gun heights above the gun's base)

updateFlare()

updateFlare() moves the flare upward and draws its glow effect. The nested loop creates a simple visual illusion of light emanating outward—three circles of the same center but different sizes and opacities. When the flare reaches the peak, it spawns an airplane and deactivates itself, triggering the next phase of the supply drop chain.

🔬 This loop draws the glow effect with three concentric circles. What happens if you change the fill color from (255, 100, 0) to (0, 255, 0) to make the flare glow green?

  // Flare visual effect (a glowing circle)
  noStroke();
  for (let i = 0; i < 3; i++) {
    fill(255, 100, 0, map(i, 0, 2, 80, 20)); // Orange-red color with decreasing opacity for glow
    ellipse(flareX, flareY, flareSize + i * flareSize * 0.5); // Larger ellipses for glow
  }
function updateFlare() {
  flareY -= flareSpeed; // Move flare upwards

  // Flare visual effect (a glowing circle)
  noStroke();
  for (let i = 0; i < 3; i++) {
    fill(255, 100, 0, map(i, 0, 2, 80, 20)); // Orange-red color with decreasing opacity for glow
    ellipse(flareX, flareY, flareSize + i * flareSize * 0.5); // Larger ellipses for glow
  }

  // Check if flare has reached its peak
  if (flareY < height * 0.1) {
    flareActive = false; // Deactivate flare

    // Create a new airplane object and add it to the airplanes array
    let newAirplane = {
      x: width + width * 0.1, // Airplane starts off-screen to the right
      y: height * 0.15, // Airplane flies at 15% from the top
      hasDropped: false // Flag to ensure it only drops one supply
    };
    airplanes.push(newAirplane);
  }
}
Line-by-line explanation (12 lines)

🔧 Subcomponents:

calculation Flare Upward Movement flareY -= flareSpeed;

Decreases the flare's y position each frame, moving it upward on the canvas

for-loop Glow Effect Loop for (let i = 0; i < 3; i++) { fill(255, 100, 0, map(i, 0, 2, 80, 20)); ellipse(flareX, flareY, flareSize + i * flareSize * 0.5); }

Draws three nested circles of decreasing opacity to create a glowing effect around the flare

conditional Peak Detection and Airplane Spawn if (flareY < height * 0.1) {

When the flare reaches the top 10% of the screen, triggers the airplane spawn and deactivates the flare

flareY -= flareSpeed;
Subtracts flareSpeed from flareY each frame, moving the flare upward (smaller y = higher on screen)
noStroke();
Disables stroke so the ellipses are drawn without outlines
for (let i = 0; i < 3; i++) {
Loops 3 times (i = 0, 1, 2) to draw three ellipses of increasing size
fill(255, 100, 0, map(i, 0, 2, 80, 20));
Sets fill to orange-red (RGB: 255, 100, 0) with alpha opacity that decreases from 80 to 20 as i increases, creating the fade-out glow effect
ellipse(flareX, flareY, flareSize + i * flareSize * 0.5);
Draws a circle centered at (flareX, flareY) with diameter increasing each iteration: flareSize, flareSize*1.5, flareSize*2
if (flareY < height * 0.1) {
Checks if the flare has risen above the top 10% of the screen, marking its peak
flareActive = false;
Deactivates the flare, stopping its upward movement and preventing it from being drawn next frame
let newAirplane = {
Creates a new airplane object with three properties
x: width + width * 0.1,
Positions the airplane off-screen to the right, beyond the visible canvas
y: height * 0.15,
Sets the airplane's flight altitude to 15% down from the top of the canvas
hasDropped: false
Initializes a flag to track whether this airplane has already dropped its supply (it starts false)
airplanes.push(newAirplane);
Adds the new airplane object to the airplanes array, making it part of the simulation

drawAirplane()

drawAirplane() constructs a simple airplane shape using primitives: a polygon for the fuselage, two rectangles for wings, and a triangle with a rectangle for the tail. By using vertices with offsets calculated from width and height percentages, the airplane scales responsively with the canvas.

function drawAirplane(airplane) {
  fill(180, 180, 180); // Silver gray airplane
  noStroke();

  // Main body of the airplane (simple polygon)
  beginShape();
  vertex(airplane.x, airplane.y);
  vertex(airplane.x + width * 0.05, airplane.y - height * 0.015);
  vertex(airplane.x + width * 0.15, airplane.y - height * 0.015);
  vertex(airplane.x + width * 0.2, airplane.y);
  vertex(airplane.x + width * 0.15, airplane.y + height * 0.015);
  vertex(airplane.x + width * 0.05, airplane.y + height * 0.015);
  endShape(CLOSE);

  // Wings
  rect(airplane.x + width * 0.08, airplane.y - height * 0.04, width * 0.04, height * 0.08); // Right wing
  rect(airplane.x + width * 0.08, airplane.y - height * 0.04, -width * 0.04, height * 0.08); // Left wing (negative width to draw left)

  // Tail
  triangle(
    airplane.x + width * 0.2, airplane.y,
    airplane.x + width * 0.22, airplane.y - height * 0.015,
    airplane.x + width * 0.22, airplane.y + height * 0.015
  );
  rect(airplane.x + width * 0.21, airplane.y - height * 0.03, width * 0.01, height * 0.03); // Vertical tail fin
}
Line-by-line explanation (14 lines)

🔧 Subcomponents:

calculation Airplane Body Shape beginShape();

Starts drawing a polygon to form the main fuselage of the airplane

calculation Airplane Wings rect(airplane.x + width * 0.08, airplane.y - height * 0.04, width * 0.04, height * 0.08);

Draws two wing rectangles (one to the right and one to the left of the fuselage)

calculation Airplane Tail triangle(

Draws the triangular tail fin at the rear of the airplane

fill(180, 180, 180);
Sets the fill color to light gray (RGB: 180, 180, 180), giving the airplane a realistic metal appearance
noStroke();
Disables stroke so all airplane parts are drawn without outlines
beginShape();
Starts drawing a custom polygon shape for the airplane's body
vertex(airplane.x, airplane.y);
Adds the first vertex at the airplane's center position, forming the nose of the fuselage
vertex(airplane.x + width * 0.05, airplane.y - height * 0.015);
Adds a vertex above and to the right of the nose, beginning the top edge of the body
vertex(airplane.x + width * 0.15, airplane.y - height * 0.015);
Extends the top edge further back
vertex(airplane.x + width * 0.2, airplane.y);
Moves back to center height at the rear, forming a point where top and bottom meet
vertex(airplane.x + width * 0.15, airplane.y + height * 0.015);
Creates the bottom edge by moving down and back to the left
vertex(airplane.x + width * 0.05, airplane.y + height * 0.015);
Completes the bottom edge back to the front
endShape(CLOSE);
Closes the polygon by connecting the last vertex back to the first, completing the fuselage
rect(airplane.x + width * 0.08, airplane.y - height * 0.04, width * 0.04, height * 0.08);
Draws the right wing as a rectangle above the fuselage
rect(airplane.x + width * 0.08, airplane.y - height * 0.04, -width * 0.04, height * 0.08);
Draws the left wing as a rectangle. The negative width causes it to extend to the left instead of right
triangle(
Starts drawing the tail fin as a triangle
rect(airplane.x + width * 0.21, airplane.y - height * 0.03, width * 0.01, height * 0.03);
Draws a small vertical rectangle to form the tail's stabilizer fin

updateAirplane()

updateAirplane() is where the airplane moves and the critical handoff happens: airplane → supply drop → vehicles. The hasDropped flag ensures supplies are released only once. The splice() call at the end demonstrates garbage collection—removing objects from arrays when they're no longer needed frees memory and improves performance.

🔬 This block triggers when the airplane reaches the drop point. What happens if you change airplaneDropXRatio to 0.25 or 0.75 in setup() to change where supplies are released?

  if (airplane.x < width * airplaneDropXRatio && !airplane.hasDropped) {
    airplane.hasDropped = true; // Mark airplane as having dropped its supply

    // Create a new supply drop object and add it to the supplyDrops array
    let newSupplyDrop = {
      x: airplane.x + width * 0.1, // Drop from middle of airplane
      y: airplane.y + height * 0.02, // Start just below airplane
      size: width * 0.05, // Supply drop size is 5% of canvas width
      collected: false // Flag to track if it's been collected by a vehicle
    };
    supplyDrops.push(newSupplyDrop);

    // Spawn vehicles to chase this new supply drop
    spawnVehiclesForDrop(newSupplyDrop);
  }
function updateAirplane(airplane, index) {
  airplane.x -= airplaneSpeed; // Move airplane to the left

  // When airplane is roughly halfway across and hasn't dropped yet, release drop
  if (airplane.x < width * airplaneDropXRatio && !airplane.hasDropped) {
    airplane.hasDropped = true; // Mark airplane as having dropped its supply

    // Create a new supply drop object and add it to the supplyDrops array
    let newSupplyDrop = {
      x: airplane.x + width * 0.1, // Drop from middle of airplane
      y: airplane.y + height * 0.02, // Start just below airplane
      size: width * 0.05, // Supply drop size is 5% of canvas width
      collected: false // Flag to track if it's been collected by a vehicle
    };
    supplyDrops.push(newSupplyDrop);

    // Spawn vehicles to chase this new supply drop
    spawnVehiclesForDrop(newSupplyDrop);
  }

  // Check if airplane has flown off-screen to the left
  if (airplane.x < -width * 0.2) {
    airplanes.splice(index, 1); // Remove airplane from the array
  }
}
Line-by-line explanation (12 lines)

🔧 Subcomponents:

calculation Airplane Leftward Movement airplane.x -= airplaneSpeed;

Decreases airplane's x position each frame, moving it across the screen from right to left

conditional Supply Drop Trigger if (airplane.x < width * airplaneDropXRatio && !airplane.hasDropped) {

When airplane reaches the midpoint and hasn't dropped yet, spawns a supply package and vehicles

conditional Off-Screen Cleanup if (airplane.x < -width * 0.2) {

Removes the airplane from the array once it has completely left the visible canvas

airplane.x -= airplaneSpeed;
Subtracts airplaneSpeed from the airplane's x position, moving it leftward each frame
if (airplane.x < width * airplaneDropXRatio && !airplane.hasDropped) {
Checks two conditions: (1) airplane has passed the drop point (default 50% across screen), and (2) it hasn't already dropped (!airplane.hasDropped)
airplane.hasDropped = true;
Sets the hasDropped flag to true, preventing this airplane from dropping multiple times
let newSupplyDrop = {
Creates a new supply drop object with four properties
x: airplane.x + width * 0.1,
Positions the drop slightly ahead of the airplane's current position
y: airplane.y + height * 0.02,
Positions the drop just below the airplane's flight altitude
size: width * 0.05,
Sets the drop's diameter to 5% of canvas width, matching the responsive design
collected: false
Initializes the collected flag to false—no vehicle has claimed it yet
supplyDrops.push(newSupplyDrop);
Adds the new drop to the supplyDrops array, making it visible and interactive
spawnVehiclesForDrop(newSupplyDrop);
Calls the spawnVehiclesForDrop() function to create 2-5 vehicles that will chase this specific drop
if (airplane.x < -width * 0.2) {
Checks if the airplane has moved beyond the left edge of the screen (0.2 canvas widths off-screen)
airplanes.splice(index, 1);
Removes the airplane from the airplanes array using splice(), cleaning up memory

drawSupplyDrop()

drawSupplyDrop() renders a complete supply package: parachute dome, connecting ropes, and crate. The collected guard at the start prevents drawing once a vehicle has claimed the drop. Notice rectMode(CENTER)—this is a small but important detail that makes positioning the crate relative to the parachute easier and more intuitive.

function drawSupplyDrop(supplyDrop) {
  if (supplyDrop.collected) return; // Don't draw if collected

  fill(200, 200, 200); // Light gray parachute dome
  noStroke();
  arc(supplyDrop.x, supplyDrop.y, supplyDrop.size * 1.5, supplyDrop.size * 1, PI, TWO_PI); // Arc for parachute

  stroke(0); // Black lines for parachute ropes
  line(supplyDrop.x - supplyDrop.size * 0.3, supplyDrop.y, supplyDrop.x - supplyDrop.size * 0.2, supplyDrop.y + supplyDrop.size * 0.2);
  line(supplyDrop.x + supplyDrop.size * 0.3, supplyDrop.y, supplyDrop.x + supplyDrop.size * 0.2, supplyDrop.y + supplyDrop.size * 0.2);

  fill(150, 75, 0); // Brown box for supply crate
  stroke(0);
  rectMode(CENTER); // Draw rectangle from its center
  rect(supplyDrop.x, supplyDrop.y + supplyDrop.size * 0.4, supplyDrop.size * 0.8, supplyDrop.size * 0.8);
  rectMode(CORNER); // Reset rectMode to default
}
Line-by-line explanation (11 lines)

🔧 Subcomponents:

conditional Collected Guard if (supplyDrop.collected) return;

Prevents rendering the supply drop once a vehicle has collected it

calculation Parachute Drawing arc(supplyDrop.x, supplyDrop.y, supplyDrop.size * 1.5, supplyDrop.size * 1, PI, TWO_PI);

Draws the semicircular parachute dome

if (supplyDrop.collected) return;
If the drop has been collected, exits the function immediately without drawing it, making it disappear when a vehicle claims it
fill(200, 200, 200);
Sets fill color to light gray for the parachute
noStroke();
Removes stroke so the parachute has no outline
arc(supplyDrop.x, supplyDrop.y, supplyDrop.size * 1.5, supplyDrop.size * 1, PI, TWO_PI);
Draws an arc (semicircle) representing the parachute dome, starting at angle PI (180°) and ending at TWO_PI (360°), forming the upper half
stroke(0);
Sets stroke color to black for the parachute ropes
line(supplyDrop.x - supplyDrop.size * 0.3, supplyDrop.y, supplyDrop.x - supplyDrop.size * 0.2, supplyDrop.y + supplyDrop.size * 0.2);
Draws the left rope from the left edge of the parachute down to the left edge of the crate below
line(supplyDrop.x + supplyDrop.size * 0.3, supplyDrop.y, supplyDrop.x + supplyDrop.size * 0.2, supplyDrop.y + supplyDrop.size * 0.2);
Draws the right rope from the right edge of the parachute down to the right edge of the crate
fill(150, 75, 0);
Sets fill color to brown for the supply crate
rectMode(CENTER);
Changes rectangle drawing mode so that coordinates specify the rectangle's center instead of its top-left corner
rect(supplyDrop.x, supplyDrop.y + supplyDrop.size * 0.4, supplyDrop.size * 0.8, supplyDrop.size * 0.8);
Draws a brown square representing the supply crate, positioned 0.4 sizes below the parachute center
rectMode(CORNER);
Resets rectMode to default (CORNER) so other rectangles in the sketch draw correctly

updateSupplyDrop()

updateSupplyDrop() handles the drop's lifecycle. If collected, it removes the drop immediately. Otherwise, it falls downward each frame. If the drop reaches the ground without being collected, it removes itself. This function is a complete state machine in miniature: three outcomes (collected, falling, landed) managed with two conditional checks.

function updateSupplyDrop(supplyDrop, index) {
  if (supplyDrop.collected) {
    supplyDrops.splice(index, 1); // Remove if collected
    return;
  }

  supplyDrop.y += supplyDropSpeed; // Move supply drop downwards

  // Check if supply drop has hit the ground
  if (supplyDrop.y > height * 0.9) {
    supplyDrops.splice(index, 1); // Remove if it lands without being collected
  }
}
Line-by-line explanation (6 lines)

🔧 Subcomponents:

conditional Collected Removal if (supplyDrop.collected) { supplyDrops.splice(index, 1); return; }

Removes collected supplies from the array and exits the function

conditional Ground Collision Cleanup if (supplyDrop.y > height * 0.9) {

Removes supplies that land without being collected, clearing unclaimed packages

if (supplyDrop.collected) {
Checks if the drop has been collected by a vehicle
supplyDrops.splice(index, 1);
Removes the drop from the supplyDrops array, cleaning it from memory
return;
Exits the function immediately, skipping the movement and ground-check code below
supplyDrop.y += supplyDropSpeed;
Increases the drop's y position, moving it downward each frame, simulating gravity
if (supplyDrop.y > height * 0.9) {
Checks if the drop has fallen past the ground level (90% down the canvas)
supplyDrops.splice(index, 1);
Removes the unclaimed drop from the array, cleaning up the canvas

spawnVehiclesForDrop()

spawnVehiclesForDrop() demonstrates object creation and array management. Each vehicle is a custom object with properties that link it to a specific drop. The random() variation in speed creates natural-looking variation—some vehicles arrive faster, others slower, making the scene feel alive. This function is the bridge between supply drops and vehicles, binding them together.

🔬 This loop spawns 2-5 random vehicles per drop. What happens if you change count to a fixed number like 10 so exactly 10 vehicles always spawn?

  let count = floor(random(vehicleCountPerDrop.min, vehicleCountPerDrop.max + 1));
  for (let i = 0; i < count; i++) {
    let type = random(vehicleTypes);
function spawnVehiclesForDrop(drop) {
  let count = floor(random(vehicleCountPerDrop.min, vehicleCountPerDrop.max + 1));
  for (let i = 0; i < count; i++) {
    let type = random(vehicleTypes);
    let newVehicle = {
      x: random(width), // Start from a random x position on the ground
      y: height * 0.9,
      type: type,
      speed: vehicleSpeedBase * random(0.8, 1.2), // Slightly varied speed
      targetDrop: drop, // Assign this supply drop as its target
      collected: false // Flag to track if it has collected a drop
    };
    vehicles.push(newVehicle);
  }
}
Line-by-line explanation (11 lines)

🔧 Subcomponents:

calculation Random Vehicle Count let count = floor(random(vehicleCountPerDrop.min, vehicleCountPerDrop.max + 1));

Determines how many vehicles spawn for this drop (2-5 by default)

for-loop Vehicle Spawn Loop for (let i = 0; i < count; i++) {

Loops the specified number of times, creating and adding each vehicle to the array

let count = floor(random(vehicleCountPerDrop.min, vehicleCountPerDrop.max + 1));
Generates a random integer between vehicleCountPerDrop.min and vehicleCountPerDrop.max (inclusive). floor() converts the decimal result to a whole number. The +1 ensures the max value is included.
for (let i = 0; i < count; i++) {
Loops count times, creating that many vehicle objects
let type = random(vehicleTypes);
Picks a random emoji from the vehicleTypes array (police, ambulance, fire truck, etc.)
let newVehicle = {
Creates a new vehicle object with six properties
x: random(width),
Sets the vehicle's starting x position to a random location across the full canvas width
y: height * 0.9,
Places the vehicle on the ground level
type: type,
Stores the randomly selected emoji for this vehicle
speed: vehicleSpeedBase * random(0.8, 1.2),
Sets the vehicle's speed to the base speed plus a random variation of 0.8 to 1.2 times, making each vehicle slightly different
targetDrop: drop,
Assigns the current supply drop as the vehicle's target—this vehicle will chase this specific drop
collected: false
Initializes a flag to track if this vehicle has collected its assigned drop (starts false)
vehicles.push(newVehicle);
Adds the new vehicle object to the vehicles array, making it part of the active simulation

drawVehicle()

drawVehicle() is elegantly simple: it uses p5.js's text() function to render emoji directly. The textAlign(CENTER, CENTER) and position adjustment (y - vehicleSize / 2) ensure emojis appear centered and grounded. This demonstrates a powerful p5.js shortcut: using text and emoji can replace hundreds of lines of vector drawing code.

function drawVehicle(vehicle) {
  // Vehicle is always drawn, even if collected, for drive-off animation.

  // Use text() to draw the emoji for the vehicle
  textSize(vehicleSize);
  textAlign(CENTER, CENTER);
  noStroke();
  fill(0); // Black color for emoji text
  text(vehicle.type, vehicle.x, vehicle.y - vehicleSize / 2); // Position emoji above the ground
}
Line-by-line explanation (5 lines)
textSize(vehicleSize);
Sets the text size to vehicleSize (4% of canvas width), making emoji scale responsively
textAlign(CENTER, CENTER);
Aligns text horizontally and vertically at its center, so coordinates specify the emoji's center point
noStroke();
Removes text outline
fill(0);
Sets the text color to black (RGB: 0, 0, 0)
text(vehicle.type, vehicle.x, vehicle.y - vehicleSize / 2);
Draws the vehicle's emoji at its x position and slightly above ground level (y - vehicleSize/2 positions it visually on the ground)

updateVehicle()

updateVehicle() is the most complex function because vehicles have multiple states: chasing, collected, and departed. The function handles state transitions elegantly. If a vehicle's assigned drop is taken by another vehicle, it gives up instead of competing indefinitely. The abs() function measures horizontal distance to detect when the vehicle reaches the drop, and the y-coordinate check ensures the drop has actually landed before collection succeeds.

🔬 This block steers the vehicle toward the drop's x position. What happens if you add 10 to the x position changes to make vehicles overshoot?

  // Move vehicle towards the target drop's x position
  if (vehicle.x < vehicle.targetDrop.x) {
    vehicle.x += vehicle.speed;
  } else if (vehicle.x > vehicle.targetDrop.x) {
    vehicle.x -= vehicle.speed;
  }
function updateVehicle(vehicle, index) {
  if (vehicle.collected) {
    // If collected, drive off-screen (e.g., to the right)
    vehicle.x += vehicleSpeedBase * 2;
    if (vehicle.x > width + vehicleSize) {
      vehicles.splice(index, 1); // Remove from array once off-screen
    }
    return;
  }

  // If the target drop is no longer valid (e.g., landed and removed, or collected by another vehicle),
  // then the vehicle gives up and drives off.
  if (!vehicle.targetDrop || vehicle.targetDrop.collected) {
    vehicle.collected = true;
    return;
  }

  // Move vehicle towards the target drop's x position
  if (vehicle.x < vehicle.targetDrop.x) {
    vehicle.x += vehicle.speed;
  } else if (vehicle.x > vehicle.targetDrop.x) {
    vehicle.x -= vehicle.speed;
  }

  // Keep vehicle on the ground
  vehicle.y = height * 0.9;

  // Check for collection: if the vehicle is close to the drop's x position
  // AND the drop has landed on the ground.
  if (abs(vehicle.x - vehicle.targetDrop.x) < vehicleSize / 2 && vehicle.targetDrop.y > height * 0.9 - vehicleSize / 2) {
    vehicle.collected = true; // Mark vehicle as having collected
    vehicle.targetDrop.collected = true; // Mark the drop as collected
    // The drop will be removed in updateSupplyDrop() on the next frame
  }
}
Line-by-line explanation (15 lines)

🔧 Subcomponents:

conditional Post-Collection Drive-Off if (vehicle.collected) {

After collecting, moves the vehicle off-screen and removes it from the array

conditional Target Validation if (!vehicle.targetDrop || vehicle.targetDrop.collected) {

If the assigned drop is invalid or taken by another vehicle, the vehicle gives up and drives off

conditional Approach Logic if (vehicle.x < vehicle.targetDrop.x) {

Steers the vehicle left or right to approach the drop horizontally

conditional Collection Check if (abs(vehicle.x - vehicle.targetDrop.x) < vehicleSize / 2 && vehicle.targetDrop.y > height * 0.9 - vehicleSize / 2) {

Detects when vehicle reaches the drop and drop has landed, triggering collection

if (vehicle.collected) {
Checks if the vehicle has already collected a drop
vehicle.x += vehicleSpeedBase * 2;
Moves the vehicle to the right at double base speed, creating a quick drive-off animation
if (vehicle.x > width + vehicleSize) {
Checks if the vehicle has left the visible canvas
vehicles.splice(index, 1);
Removes the vehicle from the vehicles array, cleaning up memory
return;
Exits the function early, skipping the rest of the code
if (!vehicle.targetDrop || vehicle.targetDrop.collected) {
Checks if the target drop is invalid (removed) or already collected by another vehicle. The ! operator means 'not'.
vehicle.collected = true;
Marks the vehicle as collected (even though it didn't actually collect this drop), triggering the drive-off sequence
if (vehicle.x < vehicle.targetDrop.x) {
Checks if the vehicle is to the left of its target drop
vehicle.x += vehicle.speed;
Moves the vehicle rightward toward the drop
} else if (vehicle.x > vehicle.targetDrop.x) {
Checks if the vehicle is to the right of its target drop
vehicle.x -= vehicle.speed;
Moves the vehicle leftward toward the drop
vehicle.y = height * 0.9;
Keeps the vehicle locked to ground level every frame
if (abs(vehicle.x - vehicle.targetDrop.x) < vehicleSize / 2 && vehicle.targetDrop.y > height * 0.9 - vehicleSize / 2) {
Checks two conditions: (1) vehicle is within vehicleSize/2 pixels of the drop horizontally (collision check), and (2) the drop has landed on the ground. Both must be true to collect.
vehicle.collected = true;
Marks the vehicle as having collected, triggering the drive-off animation
vehicle.targetDrop.collected = true;
Also marks the drop as collected so drawSupplyDrop() won't render it and updateSupplyDrop() will remove it

mousePressed()

mousePressed() is a p5.js event handler that fires whenever the user clicks. In this sketch, button clicks are handled by the flareButton object instead, making mousePressed() unnecessary. This function is left as a stub in case you want to add custom interaction later, such as keyboard shortcuts or alternative fire mechanisms.

function mousePressed() {
  // Removed: shootBullet();
  // userStartAudio(); // Uncomment if you add sound effects later
}
Line-by-line explanation (1 lines)
function mousePressed() {
This function is called automatically by p5.js whenever the mouse is pressed, but it currently does nothing because bullet functionality has been removed

touchStarted()

touchStarted() is a p5.js event handler for touch input, enabling mobile and tablet support. Like mousePressed(), it is a stub left for future expansion. The commented-out return false would prevent default touch behaviors like scrolling, useful if you add custom touch interactions.

function touchStarted() {
  // Removed: shootBullet();
  // userStartAudio(); // Uncomment if you add sound effects later
  // Removed: return false; // Prevent default touch behavior (e.g., scrolling) on the canvas
}
Line-by-line explanation (1 lines)
function touchStarted() {
This function is called automatically by p5.js when the user touches the canvas (on tablets or phones), but it currently does nothing because bullet functionality has been removed

windowResized()

windowResized() is called automatically by p5.js whenever the window size changes. By recalculating all position and size variables here, the sketch remains responsive and beautiful on any screen. Notice that existing airplanes, drops, and vehicles are not modified—only the global parameters are recalculated. This elegant design means all future objects automatically use the new dimensions.

function windowResized() {
  resizeCanvas(windowWidth, windowHeight);
  // Recalculate all positions and sizes to maintain responsiveness
  gunW = width * 0.15;
  gunH = height * 0.2;
  gunX = width * 0.8;
  gunY = height * 0.9;

  flareSize = width * 0.02;
  flareSpeed = height * 0.01;

  airplaneSpeed = width * 0.005;
  supplyDropSpeed = height * 0.003;

  vehicleSpeedBase = width * 0.003;
  vehicleSize = width * 0.04;

  // Removed: Bullet properties recalculation
  // Removed: bulletSize = width * 0.05; // Recalculate bullet size to match supply drop size
  // Removed: bulletSpeed = width * 0.02; // Recalculate bullet speed

  // Reposition the flare button
  flareButton.position(width * 0.05, height * 0.05);

  // Existing airplanes, supply drops, and vehicles will automatically scale
  // because their update logic uses width/height for calculations.
  // No need to explicitly re-position existing objects.
}
Line-by-line explanation (12 lines)

🔧 Subcomponents:

calculation Canvas Resize resizeCanvas(windowWidth, windowHeight);

Resizes the canvas to match the new window dimensions whenever the browser window is resized

calculation Parameter Recalculation gunW = width * 0.15;

Recalculates all position and size variables as percentages of the new canvas dimensions

resizeCanvas(windowWidth, windowHeight);
Automatically called by p5.js when the window size changes, this resizes the canvas to match the new window dimensions
gunW = width * 0.15;
Recalculates gun width as 15% of the new canvas width
gunH = height * 0.2;
Recalculates gun height as 20% of the new canvas height
gunX = width * 0.8;
Recalculates gun x position to stay at 80% from the left
gunY = height * 0.9;
Recalculates gun y position to stay at 90% from the top
flareSize = width * 0.02;
Recalculates flare size as 2% of new canvas width
flareSpeed = height * 0.01;
Recalculates flare speed as 1% of new canvas height per frame
airplaneSpeed = width * 0.005;
Recalculates airplane speed as 0.5% of new canvas width per frame
supplyDropSpeed = height * 0.003;
Recalculates drop speed as 0.3% of new canvas height per frame
vehicleSpeedBase = width * 0.003;
Recalculates vehicle base speed as 0.3% of new canvas width per frame
vehicleSize = width * 0.04;
Recalculates vehicle emoji size as 4% of new canvas width
flareButton.position(width * 0.05, height * 0.05);
Repositions the button to maintain its relative position in the top-left corner of the resized canvas

📦 Key Variables

flareActive boolean

Tracks whether a flare is currently rising; prevents rapid-fire by allowing only one flare at a time

let flareActive = false;
airplanes array

Stores all active airplane objects, each with x, y, and hasDropped properties

let airplanes = [];
supplyDrops array

Stores all active supply drop objects, each with x, y, size, and collected properties

let supplyDrops = [];
vehicles array

Stores all active vehicle objects, each with x, y, type, speed, targetDrop, and collected properties

let vehicles = [];
flareX number

Stores the horizontal position of the flare while it is rising

let flareX;
flareY number

Stores the vertical position of the flare while it is rising

let flareY;
flareSize number

Diameter of the flare in pixels; set to 2% of canvas width for responsive sizing

let flareSize;
flareSpeed number

How many pixels the flare moves upward per frame; set to 1% of canvas height

let flareSpeed;
airplaneSpeed number

How many pixels airplanes move leftward per frame; set to 0.5% of canvas width

let airplaneSpeed;
airplaneDropXRatio number

The horizontal position (as a ratio of canvas width) where airplanes release their supply; default 0.5 means halfway across

let airplaneDropXRatio = 0.5;
supplyDropSpeed number

How many pixels supply drops fall downward per frame; set to 0.3% of canvas height

let supplyDropSpeed;
gunX number

Horizontal position of the flare gun; set to 80% from the left in setup()

let gunX;
gunY number

Vertical position of the flare gun; set to 90% down the canvas (near the ground)

let gunY;
gunW number

Width of the flare gun; set to 15% of canvas width for responsive sizing

let gunW;
gunH number

Height of the flare gun; set to 20% of canvas height for responsive sizing

let gunH;
vehicleTypes array

Array of emoji strings representing different vehicle types that can spawn

let vehicleTypes = ['🚔', '🚓', '🛺', '🚚', '🚑', '🚒', '🚲', '🚖', '🦼'];
vehicleSpeedBase number

Base speed for all vehicles; set to 0.3% of canvas width per frame

let vehicleSpeedBase;
vehicleSize number

Size of vehicle emoji text; set to 4% of canvas width for responsive scaling

let vehicleSize;
vehicleCountPerDrop object

Object with min and max properties defining how many vehicles spawn per supply drop

let vehicleCountPerDrop = { min: 2, max: 5 };
flareButton object

p5.js button element that triggers the flare sequence when clicked or touched

let flareButton;

🔧 Potential Improvements (4)

Here are some ways this code could be enhanced:

BUG updateVehicle() collection detection

The collection distance threshold uses vehicleSize / 2, but if the drop's crate is offset from its center (at supplyDrop.y + supplyDrop.size * 0.4), the collision box doesn't align perfectly with the visual crate, potentially allowing collection before the vehicle visually touches it

💡 Store the actual crate position (supplyDrop.x, supplyDrop.y + supplyDrop.size * 0.4) in the drop object and use that for collection distance calculations instead of just (supplyDrop.x, supplyDrop.y)

PERFORMANCE draw() loop

Airplanes, supply drops, and vehicles are iterated backward for safe removal during loops, which is correct, but the sketch creates many vehicle objects (potentially 50+ per flare). If the user clicks rapidly, memory usage could spike without bound

💡 Add a check in triggerFlareSequence() to limit the maximum number of simultaneous airplanes (e.g., if (airplanes.length < 3) before allowing a new flare) to cap memory usage

STYLE update functions

The three update functions (updateAirplane, updateSupplyDrop, updateVehicle) each have their own cleanup logic (splice), which is correct but scattered. Magic numbers like height * 0.9 (ground level) appear in multiple functions

💡 Define a constant GROUND_Y = height * 0.9 at the top of the code to centralize the ground position and make it easier to adjust later

FEATURE windowResized()

When the window is resized, existing vehicles may end up off-screen or in incorrect positions if their coordinates were calculated based on the old canvas width. For example, a vehicle at x=100 (25% of a 400px canvas) would be at 25% of a new 800px canvas (200px), warping its position

💡 Store each vehicle's position as a ratio (targetX = 0.25) rather than a fixed pixel value, or recalculate existing vehicle positions in windowResized() to maintain their screen percentage

🔄 Code Flow

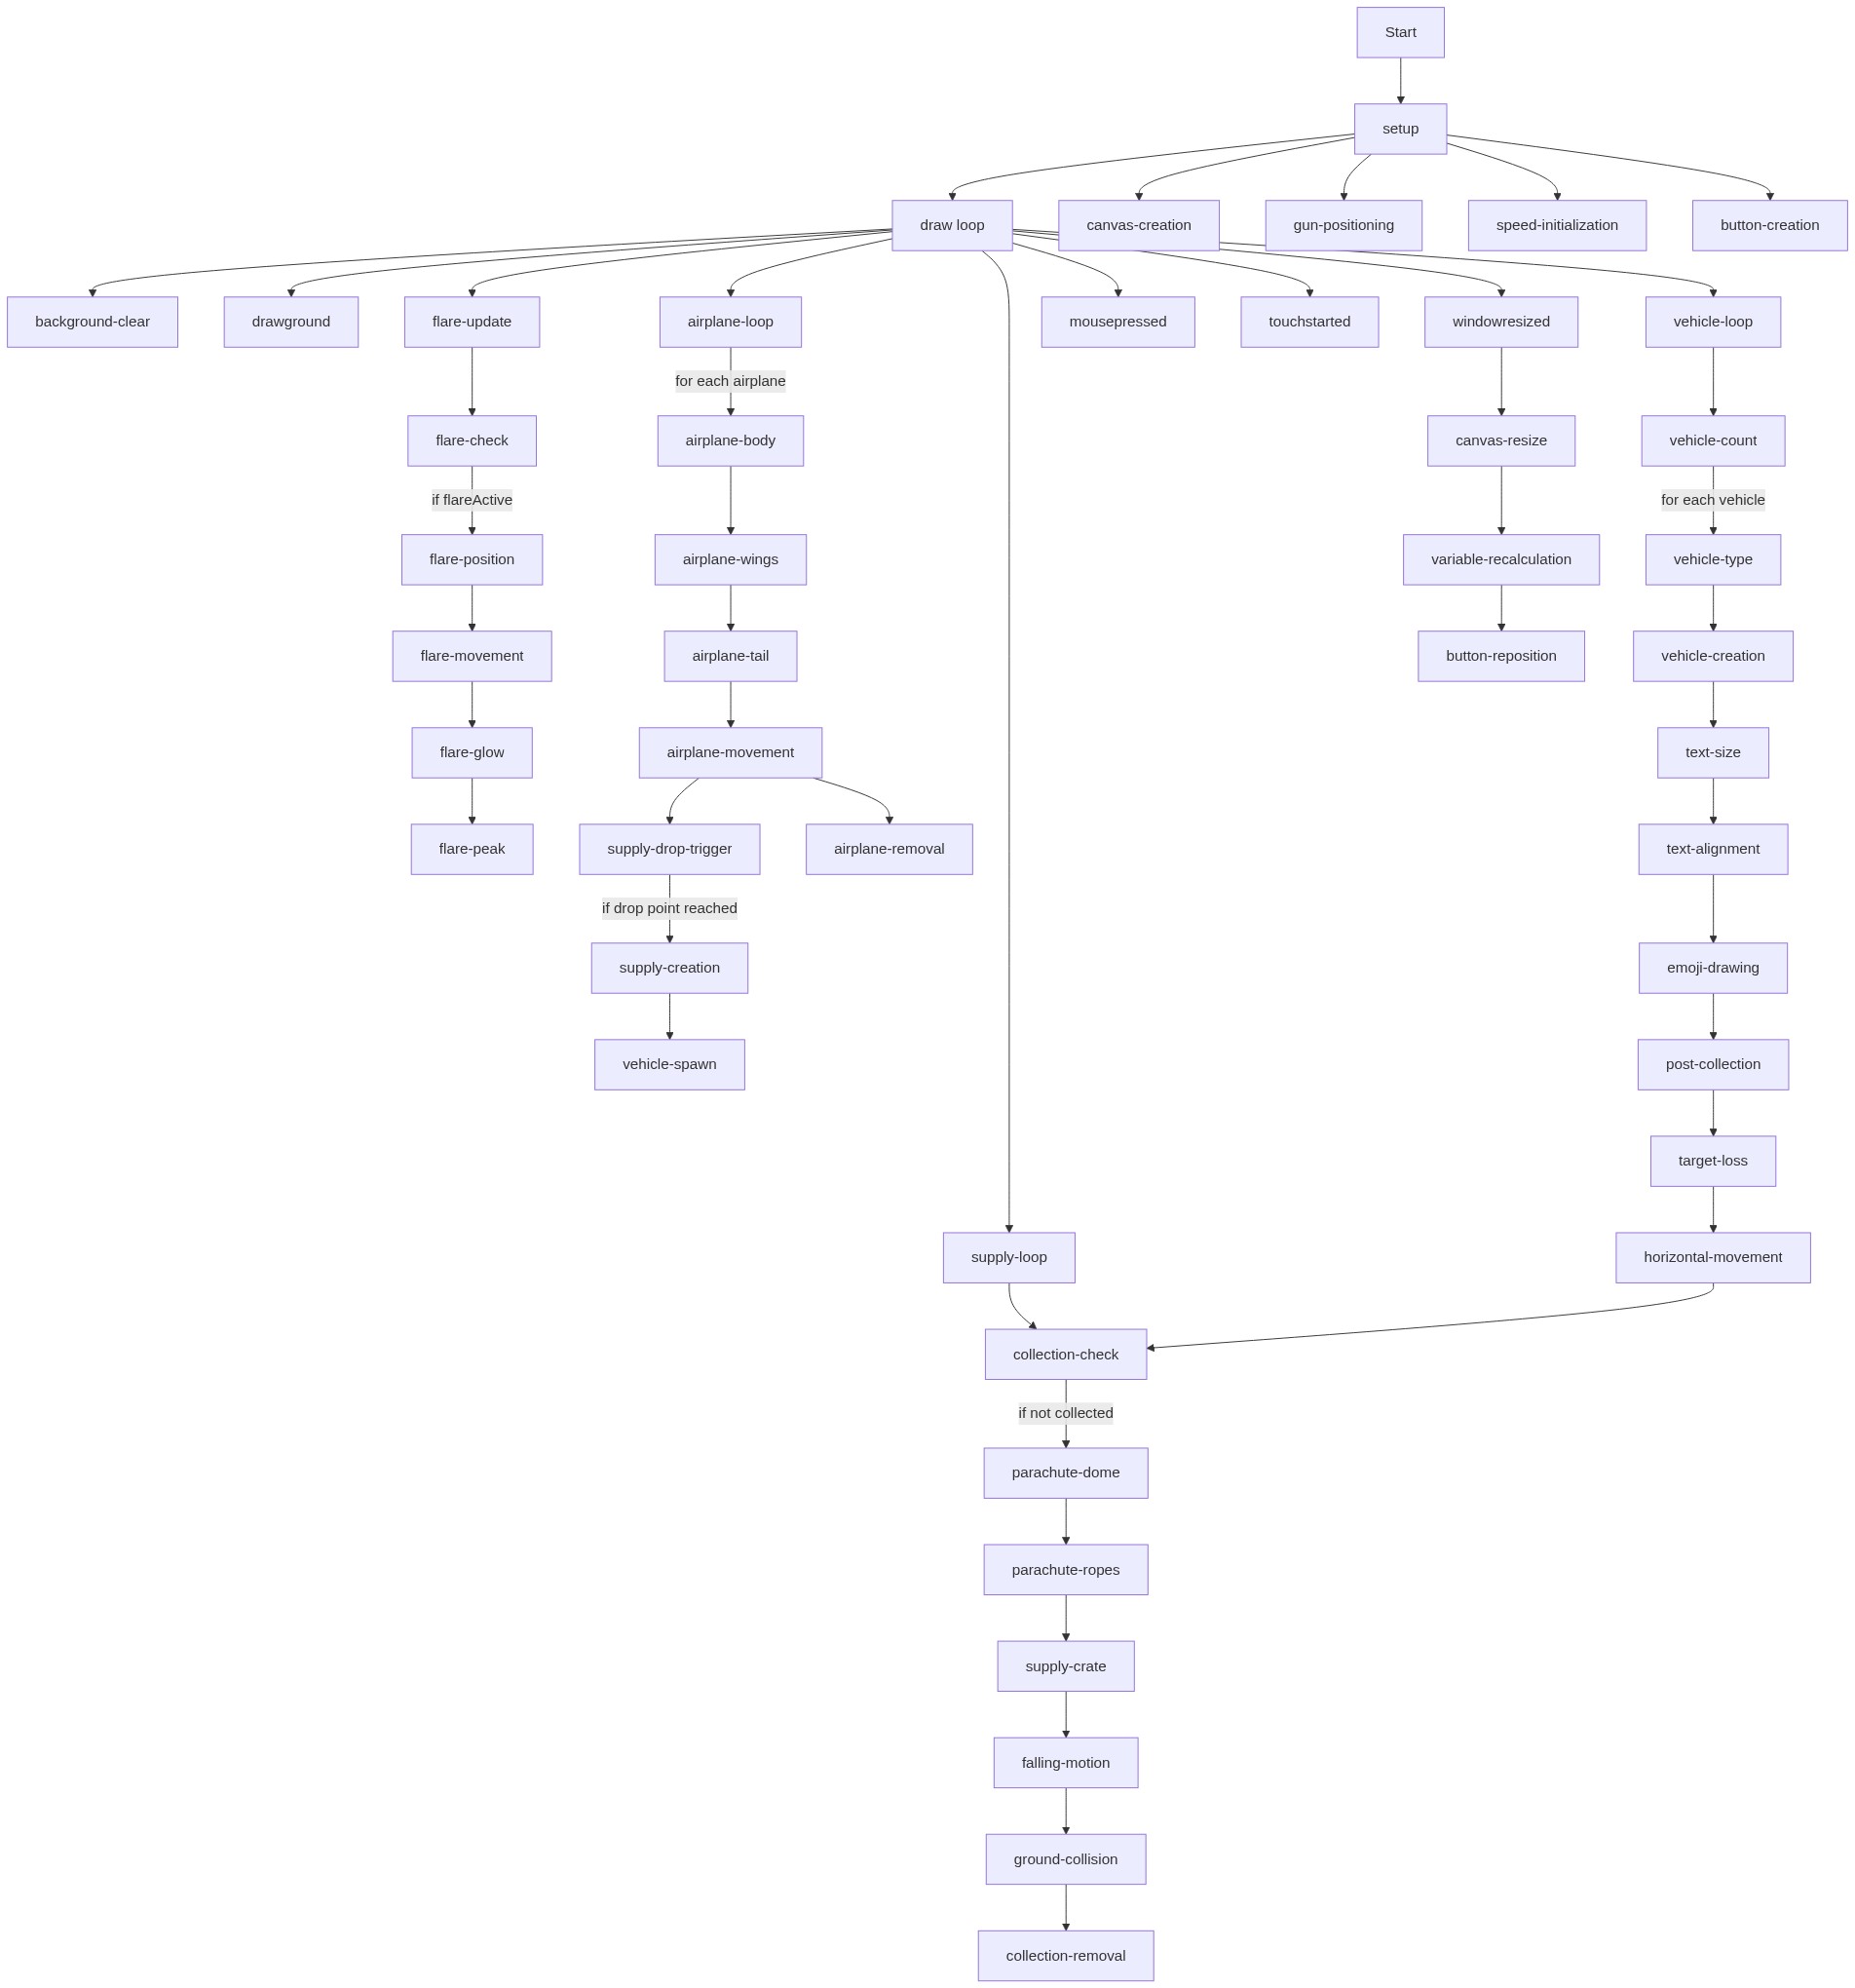
Code flow showing setup, draw, drawground, drawflaregun, triggerflaresequence, updateflare, drawairplane, updateairplane, drawsupplydrop, updatesupplydrop, spawnvehiclesfordrop, drawvehicle, updatevehicle, mousepressed, touchstarted, windowresized

💡 Click on function names in the diagram to jump to their code

graph TD start[Start] --> setup[setup] setup --> draw[draw loop] draw --> drawground[drawground] draw --> drawflaregun[drawflaregun] draw --> airplane-loop[airplane-loop] draw --> supply-drop-loop[supply-drop-loop] draw --> vehicle-loop[vehicle-loop] drawground --> canvas-creation[canvas-creation] drawground --> gun-positioning[gun-positioning] drawflaregun --> gun-positioning drawflaregun --> flare-loop[flare-loop] flare-loop --> flare-guard[flare-guard] flare-guard --> flare-movement[flare-movement] flare-movement --> glow-effect[glow-effect] glow-effect --> peak-detection[peak-detection] airplane-loop --> updateairplane[updateairplane] updateairplane --> airplane-body[airplane-body] updateairplane --> airplane-wings[airplane-wings] updateairplane --> airplane-tail[airplane-tail] updateairplane --> airplane-movement[airplane-movement] airplane-movement --> drop-trigger[drop-trigger] drop-trigger --> cleanup[cleanup] supply-drop-loop --> updatesupplydrop[updatesupplydrop] updatesupplydrop --> collected-guard[collected-guard] updatesupplydrop --> parachute-draw[parachute-draw] updatesupplydrop --> collected-removal[collected-removal] updatesupplydrop --> ground-cleanup[ground-cleanup] vehicle-loop --> updatevehicle[updatevehicle] updatevehicle --> vehicle-count[vehicle-count] vehicle-count --> spawn-loop[spawn-loop] spawn-loop --> post-collection[post-collection] post-collection --> target-validation[target-validation] target-validation --> approach-logic[approach-logic] approach-logic --> collection-check[collection-check] click setup href "#fn-setup" click draw href "#fn-draw" click drawground href "#fn-drawground" click drawflaregun href "#fn-drawflaregun" click airplane-loop href "#sub-airplane-loop" click supply-drop-loop href "#sub-supply-drop-loop" click vehicle-loop href "#sub-vehicle-loop" click canvas-creation href "#sub-canvas-creation" click gun-positioning href "#sub-gun-positioning" click flare-loop href "#sub-flare-loop" click flare-guard href "#sub-flare-guard" click flare-movement href "#sub-flare-movement" click glow-effect href "#sub-glow-effect" click peak-detection href "#sub-peak-detection" click updateairplane href "#fn-updateairplane" click airplane-body href "#sub-airplane-body" click airplane-wings href "#sub-airplane-wings" click airplane-tail href "#sub-airplane-tail" click airplane-movement href "#sub-airplane-movement" click drop-trigger href "#sub-drop-trigger" click cleanup href "#sub-cleanup" click updatesupplydrop href "#fn-updatesupplydrop" click collected-guard href "#sub-collected-guard" click parachute-draw href "#sub-parachute-draw" click collected-removal href "#sub-collected-removal" click ground-cleanup href "#sub-ground-cleanup" click updatevehicle href "#fn-updatevehicle" click vehicle-count href "#sub-vehicle-count" click spawn-loop href "#sub-spawn-loop" click post-collection href "#sub-post-collection" click target-validation href "#sub-target-validation" click approach-logic href "#sub-approach-logic" click collection-check href "#sub-collection-check"

❓ Frequently Asked Questions

What visual elements are present in the p5.js sketch titled 'Sketch 2026-02-23 03:27'?

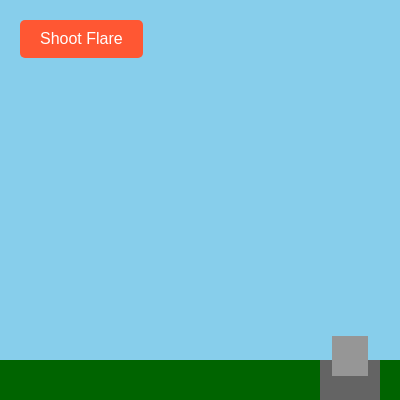
The sketch features airplanes, supply drops, and various vehicles represented by emojis, creating a dynamic scene with flares and movement across the canvas.

How can users interact with the sketch to influence the visuals?

Users can click a flare button to shoot flares, triggering the sequence of airplanes and supply drops on the canvas.

What creative coding concepts does this p5.js sketch illustrate?

This sketch demonstrates responsive design, procedural generation of objects, and the use of state variables to control animations and interactions.

Preview

Sketch 2026-02-23 03:27 - p5.js creative coding sketch preview
Sketch Preview
Code flow diagram showing the structure of Sketch 2026-02-23 03:27 - Code flow showing setup, draw, drawground, drawflaregun, triggerflaresequence, updateflare, drawairplane, updateairplane, drawsupplydrop, updatesupplydrop, spawnvehiclesfordrop, drawvehicle, updatevehicle, mousepressed, touchstarted, windowresized
Code Flow Diagram