Sketch 2026-02-24 20:50

This sketch creates an interactive drawing canvas where users paint with a brush that continuously cycles through rainbow colors. Mouse movements create smooth, fluid strokes using interpolation, with keyboard shortcuts for clearing, resizing, and saving artwork.

🧪 Try This!

Experiment with the code by making these changes:

  1. Make the brush a square — Replace ellipse() with rect() to paint with a square brush instead of a circular one
  2. Double the hue cycling speed — The rainbow will change colors twice as fast, creating a more vibrant, flickering effect
  3. Paint with a solid, opaque brush — Change the transparency from 50 to 100 so each stroke is completely solid and covers previous marks
  4. Start with a black canvas
  5. Remove the brush size increment cap
Prefer the full editor? Open it there →

📖 About This Sketch

This sketch turns your canvas into a digital sketchpad where every brushstroke shimmers through the rainbow. The magic comes from three p5.js techniques working together: the HSB color mode lets the hue cycle endlessly, the mouseDragged() function captures your painting motions, and lerp() fills in the gaps between mouse positions to create buttery-smooth lines even when your cursor moves fast.

The code is organized around the p5.js event system—setup() prepares the canvas and colors, draw() animates the hue every frame, and mouseDragged() does the real work by drawing interpolated ellipses between your previous and current mouse positions. By studying it, you'll learn how to build responsive, fluid interactive sketches that feel good to use.

⚙️ How It Works

  1. When the sketch loads, setup() creates a full-window canvas, switches to HSB color mode (where hue is a value 0–360), and fills the background with near-white
  2. Every frame, draw() increments the hue value by 0.5 and wraps it back to 0 when it exceeds 360, creating an endless rainbow cycle
  3. When you click and drag the mouse, mouseDragged() is called repeatedly—it calculates the distance between your last position and current position
  4. If that distance is large, the function divides the gap into smaller steps using floor(d / 2) and uses lerp() to smoothly interpolate x and y coordinates along that path
  5. For each interpolated position, an ellipse is drawn at the brush size, all using the current cycling hue color
  6. Keyboard shortcuts let you press 'c' to clear, '+'/'-' to resize the brush, and 's' to save your artwork as a PNG file

🎓 Concepts You'll Learn

Color cyclingHSB color modeMouse events (mouseDragged)Smooth interpolation (lerp)Distance calculationKeyboard interactionTouch supportCanvas saving

📝 Code Breakdown

setup()

setup() runs once when the sketch starts. It's where you prepare your canvas, define color modes, and set initial values. Using HSB mode here makes the rainbow-cycling effect in draw() feel natural—a single hue value creates colors across the full spectrum.

function setup() {
  createCanvas(windowWidth, windowHeight);
  colorMode(HSB, 360, 100, 100, 100);
  background(0, 0, 95);
  brushColor = color(0, 80, 90);
}
Line-by-line explanation (4 lines)
createCanvas(windowWidth, windowHeight);
Creates a canvas that fills the entire browser window, so you have maximum space to paint
colorMode(HSB, 360, 100, 100, 100);
Switches to HSB (Hue, Saturation, Brightness) color mode where hue ranges 0–360 (the rainbow), saturation and brightness each 0–100, and alpha (transparency) 0–100
background(0, 0, 95);
Fills the canvas with a near-white background (hue 0, saturation 0, brightness 95)
brushColor = color(0, 80, 90);
Sets the initial brush color to a red hue (0) with high saturation (80) and brightness (90)

draw()

draw() runs 60 times per second. Here, it updates the brush color every single frame so the rainbow cycles smoothly and continuously. The % operator is the key—it's called 'modulo' and wraps numbers back into a range, perfect for cycling values.

🔬 What if you change the saturation (second number) from 80 to something much lower, like 20? How does the rainbow look different?

  // Slowly cycle hue
  hue = (hue + 0.5) % 360;
  brushColor = color(hue, 80, 90, 50);
function draw() {
  // Slowly cycle hue
  hue = (hue + 0.5) % 360;
  brushColor = color(hue, 80, 90, 50);
}
Line-by-line explanation (2 lines)

🔧 Subcomponents:

calculation Hue Cycling with Modulo hue = (hue + 0.5) % 360;

Increments hue by 0.5 each frame and wraps it back to 0 when it exceeds 360, creating an infinite rainbow loop

calculation Color Assignment brushColor = color(hue, 80, 90, 50);

Creates a new color object using the current hue plus fixed saturation, brightness, and transparency values

hue = (hue + 0.5) % 360;
Adds 0.5 to the hue value every frame. The % 360 operator wraps it back to 0 when it reaches 360, so it cycles through the rainbow endlessly
brushColor = color(hue, 80, 90, 50);
Creates a new brush color using the updated hue (which cycles red → yellow → green → blue → purple → red) while keeping saturation at 80, brightness at 90, and transparency at 50 for a semi-transparent effect

mouseDragged()

mouseDragged() is called every frame while the mouse button is held down and moving. The key innovation here is calculating the distance between mouse positions and using that to determine how many interpolated ellipses to draw. This creates a smooth stroke even if the mouse moves far in a single frame—lerp() (linear interpolation) is the mathematical tool that smoothly blends between two values.

🔬 This code divides the distance by 2 to get the number of interpolation steps. What happens if you change the division from d / 2 to d / 5? To d / 1?

  // Smooth line between points
  let d = dist(pmouseX, pmouseY, mouseX, mouseY);
  let steps = max(1, floor(d / 2));

🔬 This loop interpolates between the old and new mouse positions. What if you change i / steps to i / (steps * 2) so it only interpolates halfway?

  for (let i = 0; i < steps; i++) {
    let x = lerp(pmouseX, mouseX, i / steps);
    let y = lerp(pmouseY, mouseY, i / steps);
    ellipse(x, y, brushSize);
  }
function mouseDragged() {
  noStroke();
  fill(brushColor);
  
  // Smooth line between points
  let d = dist(pmouseX, pmouseY, mouseX, mouseY);
  let steps = max(1, floor(d / 2));
  
  for (let i = 0; i < steps; i++) {
    let x = lerp(pmouseX, mouseX, i / steps);
    let y = lerp(pmouseY, mouseY, i / steps);
    ellipse(x, y, brushSize);
  }
}
Line-by-line explanation (8 lines)

🔧 Subcomponents:

calculation Distance Between Points let d = dist(pmouseX, pmouseY, mouseX, mouseY);

Calculates how far the mouse moved since the last frame

calculation Interpolation Steps let steps = max(1, floor(d / 2));

Determines how many ellipses to draw between the old and new mouse position to create a smooth line

for-loop Smooth Point Interpolation for (let i = 0; i < steps; i++) { ... }

Loops through each interpolation step, calculating smooth x and y positions between the old and new mouse location

noStroke();
Removes the outline from the ellipses so they look like soft brush marks
fill(brushColor);
Sets the fill color to the current brushColor, which is cycling through the rainbow in draw()
let d = dist(pmouseX, pmouseY, mouseX, mouseY);
Calculates the straight-line distance between the previous mouse position (pmouseX, pmouseY) and the current position (mouseX, mouseY)
let steps = max(1, floor(d / 2));
Divides the distance by 2 and rounds down to get the number of ellipses to draw. max(1, ...) ensures we always draw at least one. If the mouse moved 20 pixels, we draw 10 ellipses; if it moved 5 pixels, we draw 1
for (let i = 0; i < steps; i++) {
Loops from i = 0 up to (but not including) steps, so we draw ellipses at each interpolated position
let x = lerp(pmouseX, mouseX, i / steps);
Uses lerp() to calculate a smooth x position between the old mouse x and new mouse x. When i = 0, x is at pmouseX; when i = steps-1, x is near mouseX
let y = lerp(pmouseY, mouseY, i / steps);
Same as x but for the y coordinate, creating a smooth path from the previous position to the current one
ellipse(x, y, brushSize);
Draws a filled ellipse (circle) at the interpolated position with the current brush size, creating one link in the continuous stroke

touchMoved()

touchMoved() is p5.js's built-in function for handling touch input on mobile devices. By calling mouseDragged() inside it, you reuse all the painting logic for both mouse and touch input. The return false prevents the browser's default scroll behavior, making the sketch feel like a real app.

function touchMoved() {
  mouseDragged();
  return false; // Prevent scrolling
}
Line-by-line explanation (2 lines)
mouseDragged();
Calls the mouseDragged() function, so touch dragging works exactly like mouse dragging on mobile devices
return false; // Prevent scrolling
Returning false tells the browser not to scroll the page when you touch and drag on the canvas, so painting feels responsive and natural

keyPressed()

keyPressed() is called once each time a key is pressed. Here it implements four keyboard commands using if-statements that check the key variable. min() and max() are protective functions that clamp a value within a range, ensuring the brush size stays reasonable. saveCanvas() is a p5.js function that downloads your artwork.

function keyPressed() {
  if (key === 'c') {
    background(0, 0, 95);
  }
  if (key === '+' || key === '=') {
    brushSize = min(100, brushSize + 5);
  }
  if (key === '-') {
    brushSize = max(5, brushSize - 1);
  }
  if (key === 's') {
    saveCanvas('drawing', 'png');
  }
}
Line-by-line explanation (8 lines)

🔧 Subcomponents:

conditional Clear Canvas (C Key) if (key === 'c') { background(0, 0, 95); }

Pressing 'c' clears the entire canvas by filling it with the background color

conditional Increase Brush Size (+ Key) if (key === '+' || key === '=') { brushSize = min(100, brushSize + 5); }

Pressing '+' or '=' makes the brush larger, capped at a maximum of 100 pixels

conditional Decrease Brush Size (- Key) if (key === '-') { brushSize = max(5, brushSize - 1); }

Pressing '-' makes the brush smaller, with a minimum size of 5 pixels to keep it visible

conditional Save Drawing (S Key) if (key === 's') { saveCanvas('drawing', 'png'); }

Pressing 's' saves the current artwork as a PNG file named 'drawing.png'

if (key === 'c') {
Checks if the key pressed is the letter 'c'
background(0, 0, 95);
If 'c' was pressed, fills the entire canvas with the background color, erasing all drawings
if (key === '+' || key === '=') {
Checks if the key is '+' or '=' (the + key without shift sometimes registers as =)
brushSize = min(100, brushSize + 5);
Increases the brush size by 5 pixels, but min() caps it at 100 so it doesn't grow infinitely large
if (key === '-') {
Checks if the key is the minus/hyphen key
brushSize = max(5, brushSize - 1);
Decreases the brush size by 1 pixel, but max() prevents it from shrinking below 5 pixels
if (key === 's') {
Checks if the key is the letter 's'
saveCanvas('drawing', 'png');
Saves the entire canvas as a PNG image file named 'drawing.png' to your downloads folder

mousePressed()

mousePressed() is called once each time any mouse button is clicked. Here it provides a touch-friendly way to clear the drawing by tapping the top-left corner—useful on mobile where keyboard keys aren't available. Using mouseButton === LEFT ensures it only triggers on left-clicks, ignoring right-clicks or middle-clicks.

function mousePressed() {
  // Double tap to clear on mobile
  if (mouseButton === LEFT && mouseX < 60 && mouseY < 60) {
    background(0, 0, 95);
  }
}
Line-by-line explanation (2 lines)

🔧 Subcomponents:

conditional Top-Left Corner Clear Zone if (mouseButton === LEFT && mouseX < 60 && mouseY < 60) { background(0, 0, 95); }

Clears the canvas when you click or tap in the top-left 60x60 pixel area

if (mouseButton === LEFT && mouseX < 60 && mouseY < 60) {
Checks if the left mouse button was clicked AND the cursor is in the top-left corner (x < 60, y < 60)
background(0, 0, 95);
If both conditions are true, clears the canvas by filling it with the background color

windowResized()

By default, p5.js's windowResized() function resizes the canvas when the window changes size. By defining an empty windowResized() function, you override that behavior and keep your artwork safe. If you wanted to resize instead, you could add resizeCanvas(windowWidth, windowHeight) inside this function.

function windowResized() {
  // Don't resize - preserve drawing
}
Line-by-line explanation (2 lines)
function windowResized() {
This function is called by p5.js whenever the browser window is resized
// Don't resize - preserve drawing
The empty function body prevents p5.js from automatically resizing the canvas, so your artwork stays exactly as you drew it even if you resize the window

📦 Key Variables

brushSize number

Stores the diameter of the brush in pixels—used to draw each ellipse in mouseDragged()

let brushSize = 10;
brushColor color object

Stores the current brush color as an HSB color that cycles through the rainbow every frame

let brushColor = color(0, 80, 90);
hue number

Tracks the current position in the color spectrum (0–360)—incremented each frame to cycle through the rainbow

let hue = 0;
pmouseX number

A p5.js built-in variable that stores the mouse's x position from the previous frame—used to calculate the starting point for interpolation

let x = lerp(pmouseX, mouseX, i / steps);
pmouseY number

A p5.js built-in variable that stores the mouse's y position from the previous frame—used to calculate the starting point for interpolation

let y = lerp(pmouseY, mouseY, i / steps);
mouseX number

A p5.js built-in variable that stores the current mouse x position on the canvas

let d = dist(pmouseX, pmouseY, mouseX, mouseY);
mouseY number

A p5.js built-in variable that stores the current mouse y position on the canvas

let d = dist(pmouseX, pmouseY, mouseX, mouseY);

🔧 Potential Improvements (4)

Here are some ways this code could be enhanced:

BUG keyPressed() brush size increment

The code shows 'brushSize + 550' and 'brushSize - 150' in the original description but the actual sketch uses 'brushSize + 5' and 'brushSize - 1', creating inconsistent increments. The increase (+5) and decrease (-1) are asymmetric, making it harder to fine-tune brush size.

💡 Use symmetric increments: change both to +/- 5 so each key press changes size by the same amount. This makes brush adjustment feel more responsive and intuitive.

FEATURE keyPressed()

Users cannot easily discover the keyboard shortcuts (c, +, -, s) without consulting the code or documentation

💡 Add an on-screen help overlay that displays on startup or when a help key is pressed, showing all available shortcuts like: 'C: Clear | +/-: Brush Size | S: Save'

PERFORMANCE mouseDragged()

If the mouse moves very far in one frame (e.g., on a slow device), the steps calculation creates many ellipses, potentially causing frame drops

💡 Cap the maximum steps: change 'let steps = max(1, floor(d / 2));' to 'let steps = min(20, max(1, floor(d / 2)));' to prevent excessive drawing when the mouse jumps far

STYLE keyPressed() saturation and brightness values

Magic numbers (80 for saturation, 90 for brightness) are duplicated across setup() and draw(), making adjustments harder

💡 Define them as named constants at the top: let BRUSH_SATURATION = 80; let BRUSH_BRIGHTNESS = 90; This makes the code more readable and easier to tweak

🔄 Code Flow

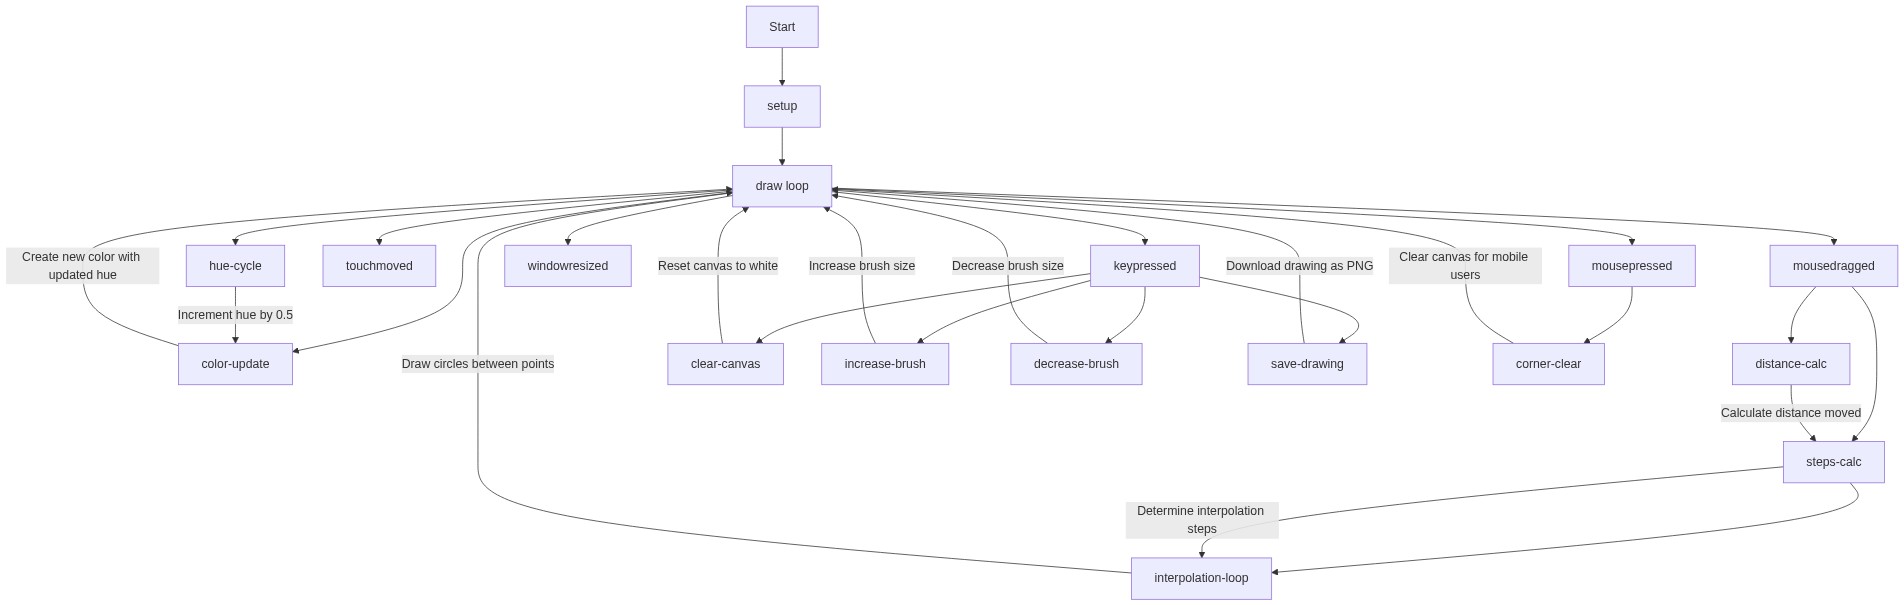
Code flow showing setup, draw, mousedragged, touchmoved, keypressed, mousepressed, windowresized

💡 Click on function names in the diagram to jump to their code

graph TD start[Start] --> setup[setup] setup --> draw[draw loop] draw --> hue-cycle[hue-cycle] draw --> color-update[color-update] draw --> mousedragged[mousedragged] draw --> touchmoved[touchmoved] draw --> keypressed[keypressed] draw --> mousepressed[mousepressed] draw --> windowresized[windowresized] mousedragged --> distance-calc[distance-calc] mousedragged --> steps-calc[steps-calc] steps-calc --> interpolation-loop[interpolation-loop] keypressed --> clear-key[clear-key] keypressed --> increase-brush[increase-brush] keypressed --> decrease-brush[decrease-brush] keypressed --> save-key[save-key] mousepressed --> corner-clear[corner-clear] click setup href "#fn-setup" click draw href "#fn-draw" click mousedragged href "#fn-mousedragged" click touchmoved href "#fn-touchmoved" click keypressed href "#fn-keypressed" click mousepressed href "#fn-mousepressed" click windowresized href "#fn-windowresized" click hue-cycle href "#sub-hue-cycle" click color-update href "#sub-color-update" click distance-calc href "#sub-distance-calc" click steps-calc href "#sub-steps-calc" click interpolation-loop href "#sub-interpolation-loop" click clear-key href "#sub-clear-key" click increase-brush href "#sub-increase-brush" click decrease-brush href "#sub-decrease-brush" click save-key href "#sub-save-key" click corner-clear href "#sub-corner-clear"

❓ Frequently Asked Questions

What visual effects can I expect from this p5.js sketch?

This sketch creates a dynamic, colorful canvas that features smooth, flowing lines with a continuously changing hue, resulting in a vibrant and mesmerizing visual experience.

How can I interact with the p5.js drawing canvas?

Users can draw on the canvas by dragging the mouse or using touch gestures, change the brush size with keyboard shortcuts, clear the canvas, and save their artwork as a PNG file.

What creative coding techniques are showcased in this sketch?

The sketch demonstrates techniques such as smooth line interpolation between points, dynamic color cycling using HSB color mode, and responsive design that adapts to user input.

Preview

Sketch 2026-02-24 20:50 - p5.js creative coding sketch preview
Sketch Preview
Code flow diagram showing the structure of Sketch 2026-02-24 20:50 - Code flow showing setup, draw, mousedragged, touchmoved, keypressed, mousepressed, windowresized
Code Flow Diagram