
Sketch 2026-03-01 14:38

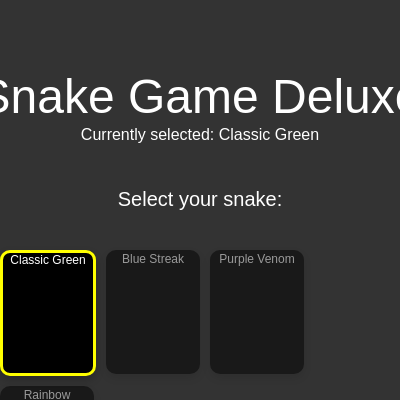
This sketch builds a full 'Snake Game Deluxe' with a start menu, character-skin selection, classic grid-based snake movement, and a persistent unlock system stored in the browser's localStorage. Players steer a snake with arrow keys to eat food and raise their score, while reaching score milestones unlocks new colored snake skins that persist between visits.

🧪 Try This!

Experiment with the code by making these changes:

  1. Speed up the snake — Lowering moveInterval makes the snake take its next logical step sooner, so it visibly moves faster across the grid.
  2. Make the grid chunkier — Increasing scale makes every grid cell (and therefore the snake and food) bigger, giving the whole game a blockier, lower-resolution look.
  3. Change the food's color — The fill() call right before drawing the food circle sets its color - swap the RGB values for an instantly different-colored food item.
Prefer the full editor? Open it there →

📖 About This Sketch

This sketch recreates the classic Snake game but wraps it in a full mini-app: a start menu built from HTML DOM elements, a character-selection screen showing procedurally generated skin thumbnails, real-time score tracking, and a game-over screen. Under the hood it relies on p5.js staples like createVector for grid positions, lerp() for interpolated smooth motion between grid steps, createGraphics() to draw thumbnail images offscreen, and the browser's localStorage API to remember which skins you've unlocked across page reloads.

The code is organized around a simple state machine (gameMode) that switches between START_MENU, GAME_PLAYING, and GAME_OVER_SCREEN, with a dedicated function handling each screen. Movement logic lives inside a Snake class and food logic inside a Food class, so by studying this sketch you'll learn how to combine classes, DOM UI elements, and p5's draw loop into one cohesive interactive game, plus how to decouple 'logical' game speed from the 60fps render loop using a frame-counting timer.

⚙️ How It Works

  1. When the page loads, preload() fetches a placeholder JSON (just to test that loading works), then setup() creates a canvas sized to the window, loads any previously unlocked characters from localStorage, generates a small thumbnail image for every character skin using createGraphics(), and builds the start menu's DOM buttons.
  2. While gameMode is START_MENU, displayStartMenu() shows the title text and highlights whichever skin thumbnail is currently selected; clicking a thumbnail calls selectCharacter() and clicking 'Start Game' hides the menu and calls resetGame() to place a fresh snake and food.
  3. During GAME_PLAYING, draw() calls playGame() every frame: a moveTimer counts up to moveInterval (6 frames) before actually shifting the snake one grid cell, which keeps logical movement at a fixed 10 steps/second while still rendering at 60fps for smoothness.
  4. Snake.display() uses lerp() to interpolate each segment's drawn position between its previous and current grid cell based on how far through the current move interval the game is, which is what makes the snake glide instead of jump.
  5. Every frame playGame() also checks snake.hitsWall() and snake.hitsSelf(); if either is true the game switches to GAME_OVER_SCREEN, and checkAndSaveUnlocks() compares the final score against each character's unlockScore, unlocking new skins and saving them to localStorage.
  6. Pressing SPACE on the game-over screen returns gameMode to START_MENU, where the (possibly updated) character selector is shown again, ready to play another round.

🎓 Concepts You'll Learn

Game state machines (switch/case)Grid-based movement with p5.VectorInterpolated animation with lerp()DOM manipulation (createDiv, createButton)localStorage persistenceClasses and object-oriented designDecoupling logic speed from frame rate

📝 Code Breakdown

preload()

preload() runs once before setup() and pauses the sketch until every asset inside it (images, sounds, JSON, fonts) has finished loading. It's the right place for loadImage/loadSound/loadJSON calls, but it should only load things you actually need - here it's fetching an unrelated test JSON that adds a network dependency for no gameplay benefit.

function preload() {
  // IMPORTANT: All loadSound calls are commented out for debugging.
  // This sketch should display the start menu if p5.js is loading correctly.

  // foodEatenSound = loadSound('244983_3260272-lq.ogg'); // Example: Replace with your uploaded filename
  // gameOverSound = loadSound('469956_5136979-lq.ogg'); // Example: Replace with your uploaded filename

  // Let's load a tiny, known-good JSON to check preload functionality
  // This JSON is just {"hello": "world"}
  // If this line fails, then your entire p5.js setup is broken.
  dummyData = loadJSON('https://jsonplaceholder.typicode.com/todos/1');

  // If using external images for characters, load them here
  // e.g., characters[0].image = loadImage('assets/classic_snake.png');
}
Line-by-line explanation (2 lines)
dummyData = loadJSON('https://jsonplaceholder.typicode.com/todos/1');
Fetches a small JSON file from a public test API just to confirm that preload() and asynchronous loading are working correctly before the game starts - it's a debugging leftover, not part of gameplay
// foodEatenSound = loadSound('244983_3260272-lq.ogg');
Sound loading is commented out, so foodEatenSound stays undefined - this is why the .play() calls elsewhere never actually make noise
setup()

setup() runs once when the sketch starts, after preload() finishes. It's the right place to size your canvas, set one-time configuration like frameRate, and build any DOM UI elements you need before the first draw() call.

🔬 This loop draws every skin thumbnail at 80x80 pixels. What happens visually if you change the createGraphics(80, 80) size to something much smaller like createGraphics(30, 30) - do the thumbnails in the menu shrink too, or does something else happen since skinImage.resize(80, 80) is called later?

  for (let i = 0; i < characters.length; i++) {
    let char = characters[i];
    char.image = createGraphics(80, 80); // Create a small off-screen canvas for each skin
    char.image.background(char.color); // Fill with character color
function setup() {
  console.log("Dummy data loaded:", dummyData); // Check if dummy data loaded. If this doesn't appear, setup() isn't reached.
  createCanvas(floor(windowWidth / scale) * scale, floor(windowHeight / scale) * scale);
  frameRate(60); // Smoother drawing

  // Load unlocked characters from local storage
  loadUnlockedCharacters();

  // Generate character skin images programmatically
  for (let i = 0; i < characters.length; i++) {
    let char = characters[i];
    char.image = createGraphics(80, 80); // Create a small off-screen canvas for each skin
    char.image.background(char.color); // Fill with character color
    char.image.noFill();
    char.image.stroke(255);
    char.image.strokeWeight(2);
    char.image.rect(10, 10, 60, 60, 5); // Add a simple border/design
    char.image.fill(255);
    char.image.textSize(10);
    char.image.textAlign(CENTER, CENTER);
    char.image.noStroke();
    char.image.text(char.name.split(' ')[0], 40, 40); // Display first word of name
  }

  // Create UI elements for the start menu
  createStartMenuUI();

  // IMPORTANT: Allow audio to start on user interaction
  // This is required by most browsers to prevent autoplay
  userStartAudio(); // Still call this, but it won't affect preload if no sounds are loaded
}
Line-by-line explanation (5 lines)

🔧 Subcomponents:

for-loop Generate Skin Thumbnails for (let i = 0; i < characters.length; i++) {

Creates a small offscreen graphics buffer for each character and draws a colored square with its name on it, used as the thumbnail image in the menu

createCanvas(floor(windowWidth / scale) * scale, floor(windowHeight / scale) * scale);
Makes the canvas fill the browser window, but rounds the width/height down to the nearest multiple of scale so the grid lines up perfectly with no partial cells
frameRate(60); // Smoother drawing
Tells p5 to call draw() 60 times per second, which is faster than the snake actually needs to move - this extra speed is used for smooth interpolated animation
loadUnlockedCharacters();
Reads any previously saved unlock progress from the browser's localStorage so unlocked skins persist between visits
char.image = createGraphics(80, 80); // Create a small off-screen canvas for each skin
createGraphics makes a separate, invisible canvas you can draw on independently - here it's used to pre-render each character's thumbnail icon
createStartMenuUI();
Builds all the HTML button/div elements needed for the character-select start screen

draw()

draw() runs continuously at the frame rate set in setup() (60 times per second here). Using a switch statement on a 'gameMode' variable is a classic and very reusable pattern for building any multi-screen game or app in p5.js.

🔬 This switch statement is the entire game's state machine. What do you think happens if you comment out the 'case GAME_OVER_SCREEN:' block entirely - can you still see the game-over text, and can you still press SPACE to get back to the menu?

  switch (gameMode) {
    case START_MENU:
      displayStartMenu();
      break;
    case GAME_PLAYING:
      playGame();
      break;
    case GAME_OVER_SCREEN:
      displayGameOver();
      break;
  }
function draw() {
  background(51);

  switch (gameMode) {
    case START_MENU:
      displayStartMenu();
      break;
    case GAME_PLAYING:
      playGame();
      break;
    case GAME_OVER_SCREEN:
      displayGameOver();
      break;
  }
}
Line-by-line explanation (4 lines)

🔧 Subcomponents:

switch-case Game Mode Switch switch (gameMode) {

Chooses which screen to render each frame based on the current gameMode state (menu, playing, or game over)

background(51);
Repaints the whole canvas with a dark gray color every frame, erasing whatever was drawn last frame so nothing smears or leaves trails
switch (gameMode) {
Checks the value of the gameMode variable and jumps to the matching case below - this is the entire state machine driving the game
case START_MENU: displayStartMenu(); break;
If we're in the menu state, draw the menu text and let the DOM buttons handle interaction
case GAME_PLAYING: playGame(); break;
If we're actively playing, run all the snake movement, collision, and scoring logic for this frame

createStartMenuUI()

This function shows how p5.js can create and style regular HTML elements (createDiv, createButton) alongside canvas drawing - useful whenever you want clickable menus, forms, or text inputs that are easier to build in HTML/CSS than by hand-drawing hit-boxes on the canvas.

🔬 This ternary makes locked skins semi-transparent. What happens if you change 0.5 to 0.1, or remove the condition entirely so every skin (even unlocked ones) gets dimmed?

    skinDiv.style('cursor', char.unlocked ? 'pointer' : 'not-allowed');
    skinDiv.style('opacity', char.unlocked ? 1 : 0.5); // Grey out locked characters
function createStartMenuUI() {
  // Remove existing UI elements if any
  if (startButton) startButton.remove();
  characterSelectButtons.forEach(btn => btn.remove());
  characterSelectButtons = [];

  // Create a container for the character skins
  let charSelectorContainer = createDiv();
  charSelectorContainer.position(width / 2 - (characters.length * 100) / 2, height / 2 + 50);
  charSelectorContainer.style('display', 'flex');
  charSelectorContainer.style('gap', '10px'); // Space between skins
  charSelectorContainer.style('flex-wrap', 'wrap'); // Allow wrapping if too many characters

  // Create character selection divs with images
  for (let i = 0; i < characters.length; i++) {
    let char = characters[i];

    let skinDiv = createDiv();
    skinDiv.size(90, 120); // Larger size to accommodate image and name
    skinDiv.style('background-color', 'black');
    skinDiv.style('border-radius', '10px');
    skinDiv.style('border', '2px solid black');
    skinDiv.style('box-shadow', '0 4px 8px 0 rgba(0,0,0,0.2)');
    skinDiv.style('display', 'flex');
    skinDiv.style('flex-direction', 'column');
    skinDiv.style('align-items', 'center');
    skinDiv.style('justify-content', 'space-around');
    skinDiv.style('cursor', char.unlocked ? 'pointer' : 'not-allowed');
    skinDiv.style('opacity', char.unlocked ? 1 : 0.5); // Grey out locked characters
    skinDiv.attribute('disabled', !char.unlocked); // Disable for interaction

    // Add the generated image to the div
    let skinImage = char.image.get(); // Get the p5.Image object from createGraphics
    skinImage.resize(80, 80); // Ensure consistent size
    skinDiv.child(skinImage);

    // Add the character name below the image
    let skinName = createDiv(char.name);
    skinName.style('color', 'white');
    skinName.style('font-size', '12px');
    skinName.style('text-align', 'center');
    skinDiv.child(skinName);

    skinDiv.mousePressed(() => selectCharacter(i));
    if (!char.unlocked) {
      skinDiv.style('filter', 'grayscale(100%)'); // Visually grey out locked skins
    }

    characterSelectButtons.push(skinDiv); // Store the div for hiding/showing
    charSelectorContainer.child(skinDiv); // Add the div to the container
  }

  // Create Start Game button
  startButton = createButton('Start Game');
  // Position the start button relative to the new character selector container
  startButton.position(width / 2 - 75, charSelectorContainer.position().y + charSelectorContainer.size().height + 30);
  startButton.size(150, 50);
  startButton.mousePressed(startGame);
  startButton.style('background-color', 'green');
  startButton.style('color', 'white');
  startButton.style('border-radius', '10px');
  startButton.style('border', 'none');
  startButton.style('font-size', '20px');
  startButton.style('cursor', 'pointer');
}
Line-by-line explanation (8 lines)

🔧 Subcomponents:

for-loop Build Skin Thumbnail Buttons for (let i = 0; i < characters.length; i++) {

Creates one clickable div per character, filled with its generated thumbnail image and name, and wires up a click handler to select it

if (startButton) startButton.remove();
Deletes the old Start Game button from the page (if one exists) before building a fresh one, preventing duplicate buttons piling up
characterSelectButtons.forEach(btn => btn.remove());
Removes every old character-thumbnail div from the page so the menu can be rebuilt cleanly, e.g. after a new unlock
let charSelectorContainer = createDiv();
Creates a plain HTML <div> that will hold all the character thumbnails, using p5's DOM helper functions
charSelectorContainer.style('display', 'flex');
Uses CSS flexbox so the thumbnails line up in a row automatically instead of stacking vertically
let skinImage = char.image.get(); // Get the p5.Image object from createGraphics
Converts the offscreen graphics buffer created in setup() into a regular image that can be inserted into an HTML div
skinDiv.mousePressed(() => selectCharacter(i));
Attaches a click handler to this thumbnail so clicking it calls selectCharacter with this character's index
startButton = createButton('Start Game');
Creates a real HTML <button> element labeled 'Start Game'
startButton.mousePressed(startGame);
Wires the button up so clicking it calls the startGame() function

displayStartMenu()

This function mixes canvas text drawing (text(), fill(), textSize()) with styling of the DOM elements created earlier - a common pattern when your UI needs both freeform canvas graphics and interactive HTML controls in the same screen.

🔬 This loop highlights only the selected skin with yellow. What happens if you change '3px solid yellow' to '3px solid red', or make the border much thicker like '8px solid yellow'?

  characterSelectButtons.forEach((btn, i) => {
    if (i === selectedCharacterIndex) {
      btn.style('border', '3px solid yellow'); // Highlight selected skin
    } else {
      btn.style('border', '2px solid black');
    }
  });
function displayStartMenu() {
  // Show UI elements
  startButton.show();
  characterSelectButtons.forEach(btn => btn.show());

  fill(255);
  textAlign(CENTER, CENTER);
  textSize(48);
  text("Snake Game Deluxe", width / 2, height / 2 - 100);

  textSize(20);
  text("Select your snake:", width / 2, height / 2);

  // Indicate selected character with a yellow border on the skin div
  characterSelectButtons.forEach((btn, i) => {
    if (i === selectedCharacterIndex) {
      btn.style('border', '3px solid yellow'); // Highlight selected skin
    } else {
      btn.style('border', '2px solid black');
    }
  });

  // Display unlock requirements
  textSize(16);
  noStroke();
  fill(255);
  let char = characters[selectedCharacterIndex];
  if (!char.unlocked) {
    text(`Unlock at score ${char.unlockScore}`, width / 2, characterSelectButtons[0].position().y + characterSelectButtons[0].size().height + 10);
  } else {
    text(`Currently selected: ${char.name}`, width / 2, characterSelectButtons[0].position().y + characterSelectButtons[0].size().height + 10);
  }
}
Line-by-line explanation (4 lines)

🔧 Subcomponents:

for-loop Highlight Selected Skin characterSelectButtons.forEach((btn, i) => {

Loops through every thumbnail div and gives the currently selected one a yellow border while others stay black-bordered

conditional Unlock Requirement Text if (!char.unlocked) {

Shows either the score needed to unlock the selected character or a confirmation that it's currently selected

startButton.show();
Makes sure the Start Game DOM button is visible - it may have been hidden by startGame() or displayGameOver() logic
text("Snake Game Deluxe", width / 2, height / 2 - 100);
Draws the big title text centered horizontally and slightly above the vertical middle of the canvas
if (i === selectedCharacterIndex) { btn.style('border', '3px solid yellow'); // Highlight selected skin } else { btn.style('border', '2px solid black'); }
Compares each thumbnail's index to the globally tracked selectedCharacterIndex to decide whether to draw a yellow highlight border
let char = characters[selectedCharacterIndex];
Looks up the full data object for whichever character is currently selected, so its name/unlockScore can be displayed below

selectCharacter()

This is a simple guard-clause pattern: check a condition before making a change, which stops invalid states (like selecting a locked character) from ever happening.

function selectCharacter(index) {
  if (characters[index].unlocked) {
    selectedCharacterIndex = index;
    // Visually update skin borders (handled in displayStartMenu for continuous highlight)
  }
}
Line-by-line explanation (2 lines)

🔧 Subcomponents:

conditional Unlocked Check if (characters[index].unlocked) {

Prevents the player from selecting a character skin that hasn't been unlocked yet

if (characters[index].unlocked) {
Only allows the selection to change if the clicked character's unlocked flag is true
selectedCharacterIndex = index;
Updates the global variable that tracks which character skin is currently chosen for gameplay

startGame()

This function is the bridge between the menu state and the playing state - it's a good example of how a single button click can trigger cleanup of old UI and initialization of new game state.

function startGame() {
  // Hide UI elements
  startButton.hide();
  characterSelectButtons.forEach(btn => btn.hide());
  resetGame();
  gameMode = GAME_PLAYING;
  userStartAudio(); // Ensure audio starts when game begins
}
Line-by-line explanation (4 lines)
startButton.hide();
Hides the Start Game DOM button since it isn't needed once gameplay begins
characterSelectButtons.forEach(btn => btn.hide());
Hides every character thumbnail div, clearing the screen for gameplay
resetGame();
Resets score, snake, and food to fresh starting values for a new round
gameMode = GAME_PLAYING;
Switches the state machine so draw() now runs playGame() instead of displayStartMenu()

playGame()

playGame() is the heartbeat of the actual gameplay - it demonstrates the very common 'accumulator timer' pattern for running logic at a fixed rate that's slower than your render frame rate, which keeps animation smooth while keeping game difficulty consistent regardless of the device's frame rate.

function playGame() {
  // Logical snake movement (every moveInterval frames)
  moveTimer++;
  if (moveTimer >= moveInterval) {
    if (snake.eats(food)) {
      score++;
      food.placeRandom();
      // foodEatenSound.play(); // Play sound when food is eaten (will be undefined if not loaded)
    }
    snake.update();
    moveTimer = 0; // Reset timer
  }

  snake.display(moveTimer / moveInterval); // Pass interpolation factor
  food.display();

  if (snake.hitsWall() || snake.hitsSelf()) {
    gameOver = true;
    // gameOverSound.play(); // Play sound when game is over (will be undefined if not loaded)
    checkAndSaveUnlocks(); // Check for new unlocks and save
    gameMode = GAME_OVER_SCREEN;
  }

  displayScore();
}
Line-by-line explanation (9 lines)

🔧 Subcomponents:

conditional Logical Move Step if (moveTimer >= moveInterval) {

Only advances the snake's grid position once every moveInterval frames, decoupling logical speed from the 60fps render loop

conditional Food Eaten Check if (snake.eats(food)) {

Increases the score and relocates the food when the snake's head lands on the food's grid cell

conditional Game Over Check if (snake.hitsWall() || snake.hitsSelf()) {

Ends the game and triggers the unlock check when the snake collides with a wall or itself

moveTimer++;
Counts up by one every frame (60 times per second) to track how long since the snake last moved
if (moveTimer >= moveInterval) {
Once enough frames have passed (6 by default), it's time for the snake to actually take its next logical step
if (snake.eats(food)) {
Checks whether the snake's head is exactly on top of the food's grid cell
score++;
Increments the score by one point every time food is eaten
food.placeRandom();
Moves the food to a new random grid cell after it's eaten
snake.update();
Advances the snake one cell in its current direction
snake.display(moveTimer / moveInterval); // Pass interpolation factor
Draws the snake, passing a fraction between 0 and 1 representing progress toward the next logical move, used to smoothly slide segments between grid cells
if (snake.hitsWall() || snake.hitsSelf()) {
Checks both possible ways to lose the game: hitting the canvas edge or hitting the snake's own body
checkAndSaveUnlocks(); // Check for new unlocks and save
Compares the final score against every character's unlock threshold and saves any newly unlocked skins

displayScore()

A tiny, focused function like this is good practice: it does exactly one job (draw the score) so it's easy to call from playGame() every frame without cluttering that function's logic.

function displayScore() {
  fill(255);
  textSize(16);
  textAlign(LEFT, TOP);
  text("Score: " + score, 10, 10);
}
Line-by-line explanation (3 lines)
fill(255);
Sets the text color to white before drawing
textAlign(LEFT, TOP);
Anchors the text so it's positioned relative to its top-left corner, matching the (10, 10) coordinates given below
text("Score: " + score, 10, 10);
Draws the current score in the top-left corner of the canvas, concatenating the score number onto the label string

displayGameOver()

displayGameOver() is called every frame while gameMode is GAME_OVER_SCREEN, showing a static summary screen until the player presses SPACE, which is handled separately inside keyPressed().

function displayGameOver() {
  fill(255);
  textAlign(CENTER, CENTER);
  textSize(48); // Adjusted size for longer text
  text("RETURN TO LOBBY", width / 2, height / 2 - 50); // Changed text
  textSize(32);
  text("Score: " + score, width / 2, height / 2 + 10);
  textSize(24);
  text("Press SPACE to return to Lobby", width / 2, height / 2 + 70); // Changed instruction
}
Line-by-line explanation (4 lines)
textAlign(CENTER, CENTER);
Centers all following text both horizontally and vertically around the given coordinates
text("RETURN TO LOBBY", width / 2, height / 2 - 50); // Changed text
Draws the big header text centered on screen, slightly above the middle
text("Score: " + score, width / 2, height / 2 + 10);
Displays the final score the player achieved before dying
text("Press SPACE to return to Lobby", width / 2, height / 2 + 70);
Reminds the player which key returns them to the start menu, handled inside keyPressed()

checkAndSaveUnlocks()

This function demonstrates a common 'check thresholds and persist changes' pattern used in almost every game with achievements or unlockables - loop through possible rewards, check a condition, and only write to storage if something actually changed.

🔬 What happens if you remove the '!characters[i].unlocked &&' part of the condition - would already-unlocked characters cause any visible problems, or does the code handle re-unlocking gracefully?

    if (!characters[i].unlocked && score >= characters[i].unlockScore) {
      characters[i].unlocked = true;
      newUnlock = true;
      console.log(`Unlocked new character: ${characters[i].name}!`);
    }
function checkAndSaveUnlocks() {
  let newUnlock = false;
  for (let i = 0; i < characters.length; i++) {
    if (!characters[i].unlocked && score >= characters[i].unlockScore) {
      characters[i].unlocked = true;
      newUnlock = true;
      console.log(`Unlocked new character: ${characters[i].name}!`);
    }
  }
  if (newUnlock) {
    saveUnlockedCharacters(); // Save to local storage
    createStartMenuUI(); // Recreate UI to update button states
  }
}
Line-by-line explanation (4 lines)

🔧 Subcomponents:

for-loop Check Every Character's Score Threshold for (let i = 0; i < characters.length; i++) {

Loops through all characters and unlocks any whose score requirement has now been met

let newUnlock = false;
A flag that starts false and gets set to true only if at least one new character gets unlocked this round
if (!characters[i].unlocked && score >= characters[i].unlockScore) {
Only unlocks a character if it isn't already unlocked AND the player's final score meets or exceeds its requirement
characters[i].unlocked = true;
Flips this character's unlocked flag to true, permanently (for this session) making it selectable
if (newUnlock) { saveUnlockedCharacters(); // Save to local storage createStartMenuUI(); // Recreate UI to update button states }
Only bothers saving to localStorage and rebuilding the menu UI if something actually changed, avoiding unnecessary work

resetGame()

resetGame() centralizes all the state that needs to go back to its initial values, which is called both when starting a fresh game and (as a side effect) whenever the window is resized during gameplay.

function resetGame() {
  gameOver = false;
  score = 0;
  direction = createVector(1, 0);
  snake = new Snake();
  food = new Food();
  food.placeRandom();
  moveTimer = 0; // Reset movement timer
}
Line-by-line explanation (3 lines)
direction = createVector(1, 0);
Resets the snake's movement direction to 'right' using a p5.Vector, since (1, 0) means +1 on the x-axis and 0 on the y-axis
snake = new Snake();
Creates a brand new Snake object, replacing any previous one, placing a single-segment snake in the center of the grid
food = new Food(); food.placeRandom();
Creates a new Food object and immediately moves it to a random grid cell so there's food ready to eat at the start

keyPressed()

keyPressed() is a p5.js built-in callback that fires once every time any key goes down. Checking keyCode against p5's named constants (LEFT_ARROW, RIGHT_ARROW, etc.) is the standard way to handle arrow-key input.

🔬 The 'direction.x !== 1' check stops the snake reversing into itself. What happens if you remove that check entirely and just let LEFT_ARROW always set direction to (-1, 0)?

    if (keyCode === LEFT_ARROW && direction.x !== 1) {
      direction = createVector(-1, 0);
    } else if (keyCode === RIGHT_ARROW && direction.x !== -1) {
      direction = createVector(1, 0);
    }
function keyPressed() {
  if (gameMode === GAME_PLAYING) {
    if (keyCode === LEFT_ARROW && direction.x !== 1) {
      direction = createVector(-1, 0);
    } else if (keyCode === RIGHT_ARROW && direction.x !== -1) {
      direction = createVector(1, 0);
    } else if (keyCode === UP_ARROW && direction.y !== 1) {
      direction = createVector(0, -1);
    } else if (keyCode === DOWN_ARROW && direction.y !== -1) {
      direction = createVector(0, 1);
    }
  } else if (gameMode === GAME_OVER_SCREEN) {
    if (key === ' ') {
      gameMode = START_MENU;
      // UI elements will be shown in displayStartMenu
    }
  }
  return false;
}
Line-by-line explanation (4 lines)

🔧 Subcomponents:

conditional Arrow Key Direction Change if (keyCode === LEFT_ARROW && direction.x !== 1) {

Changes the snake's movement direction based on arrow keys, while blocking 180-degree reversals that would cause instant self-collision

conditional Return to Menu on Space if (key === ' ') {

Lets the player press SPACE on the game-over screen to go back to the start menu

if (keyCode === LEFT_ARROW && direction.x !== 1) {
Only turns the snake left if it isn't currently moving right (direction.x !== 1) - this prevents the snake from being able to instantly reverse into itself
direction = createVector(-1, 0);
Sets a new direction vector pointing left (-1 on the x-axis)
if (key === ' ') {
Checks if the pressed key was the spacebar, using p5's 'key' variable which holds the character typed
return false;
Prevents the browser's default behavior for arrow keys and spacebar (like scrolling the page), which is important since those keys normally scroll web pages

windowResized()

windowResized() is a p5.js callback fired automatically whenever the browser window changes size, letting you keep your canvas and UI responsive to different screen sizes.

function windowResized() {
  resizeCanvas(floor(windowWidth / scale) * scale, floor(windowHeight / scale) * scale);
  if (gameMode === START_MENU) {
    createStartMenuUI(); // Recreate UI elements to match new canvas size
  } else {
    resetGame(); // Restart game on resize if not in menu
  }
}
Line-by-line explanation (3 lines)

🔧 Subcomponents:

conditional Menu vs Game Resize Handling if (gameMode === START_MENU) {

Rebuilds the menu UI if resizing happens on the menu screen, or restarts the game entirely if resizing happens mid-play

resizeCanvas(floor(windowWidth / scale) * scale, floor(windowHeight / scale) * scale);
Resizes the canvas to match the new browser window size, again rounding to a multiple of scale so the grid stays aligned
createStartMenuUI(); // Recreate UI elements to match new canvas size
Rebuilds all the menu's DOM elements since their positions were calculated based on the old canvas size
resetGame(); // Restart game on resize if not in menu
If the player was mid-game when they resized the window, the whole game state is reset rather than trying to reposition an in-progress snake

saveUnlockedCharacters()

localStorage lets you save small amounts of data directly in the visitor's browser, persisting even after they close the tab - perfect for save games, high scores, or unlock progress without needing a server.

function saveUnlockedCharacters() {
  let unlockedStatus = characters.map(char => char.unlocked);
  localStorage.setItem('snakeUnlockedCharacters', JSON.stringify(unlockedStatus));
}
Line-by-line explanation (2 lines)
let unlockedStatus = characters.map(char => char.unlocked);
Builds a simple array of true/false values, one per character, extracting just the unlocked flag from each full character object
localStorage.setItem('snakeUnlockedCharacters', JSON.stringify(unlockedStatus));
Converts that array into a JSON text string and stores it in the browser's localStorage under a named key, so it survives page reloads

loadUnlockedCharacters()

This is the mirror function to saveUnlockedCharacters() - together they form a simple save/load system. Note the safety check (i < unlockedStatus.length) which prevents crashes if you later add more characters than were saved in an old localStorage entry.

function loadUnlockedCharacters() {
  let savedStatus = localStorage.getItem('snakeUnlockedCharacters');
  if (savedStatus) {
    let unlockedStatus = JSON.parse(savedStatus);
    for (let i = 0; i < characters.length; i++) {
      if (i < unlockedStatus.length) {
        characters[i].unlocked = unlockedStatus[i];
      }
    }
  }
}
Line-by-line explanation (4 lines)

🔧 Subcomponents:

for-loop Apply Saved Unlock Flags for (let i = 0; i < characters.length; i++) {

Copies each saved true/false unlock value back onto the matching character object

let savedStatus = localStorage.getItem('snakeUnlockedCharacters');
Attempts to read back the previously saved JSON string from localStorage - returns null if nothing was ever saved
if (savedStatus) {
Only proceeds if there actually is saved data, avoiding errors when a player visits for the very first time
let unlockedStatus = JSON.parse(savedStatus);
Converts the saved JSON text back into a real JavaScript array of true/false values
if (i < unlockedStatus.length) { characters[i].unlocked = unlockedStatus[i]; }
Safely applies each saved flag only if the saved array actually has that many entries, protecting against errors if the characters list has since grown

Snake constructor()

The constructor runs once when 'new Snake()' is called, setting up the initial array-based data structure that represents every segment of the snake's body.

  constructor() {
    this.body = [];
    this.body[0] = createVector(floor(width / 2 / scale), floor(height / 2 / scale));
    this.len = 1;
    this.prevHeadPos = this.body[0].copy(); // Store previous head position for interpolation
  }
Line-by-line explanation (3 lines)
this.body = [];
Starts the snake's body as an empty array of grid positions, which will hold one p5.Vector per segment
this.body[0] = createVector(floor(width / 2 / scale), floor(height / 2 / scale));
Places the single starting segment at the center of the grid, converting pixel dimensions into grid cell coordinates by dividing by scale
this.prevHeadPos = this.body[0].copy(); // Store previous head position for interpolation
Copies the head's starting position into a separate variable used later to smoothly animate movement between grid cells

Snake.update()

This is the classic 'shift and push' snake movement algorithm: remove the tail, add a new head. Notice that grow() (defined below) is never called from anywhere else in the sketch, so as written the snake's length never actually increases.

🔬 this.body.shift() removes the tail before the new head is added, which is why the snake never grows even after eating. What do you think would happen visually if you removed the this.body.shift() line?

    this.body.shift();
    head.x += direction.x;
    head.y += direction.y;
    this.body.push(head);
  update() {
    let head = this.body[this.body.length - 1].copy();
    this.prevHeadPos = head.copy(); // Save current head position as previous
    this.body.shift();
    head.x += direction.x;
    head.y += direction.y;
    this.body.push(head);
  }
Line-by-line explanation (5 lines)
let head = this.body[this.body.length - 1].copy();
Grabs a copy of the current head position (the last element in the body array) so we can modify it without affecting the original
this.prevHeadPos = head.copy(); // Save current head position as previous
Remembers where the head was before moving, so display() can later interpolate smoothly from this position to the new one
this.body.shift();
Removes the oldest segment (the tail) from the front of the array - this is what keeps the snake the same length every step
head.x += direction.x; head.y += direction.y;
Moves the head copy one grid cell in whichever direction the player is currently pressing
this.body.push(head);
Adds the newly moved head onto the end of the body array, becoming the new front of the snake

Snake.display()

This function is the key to why the snake looks smooth despite only actually moving 10 times per second: by interpolating each segment's pixel position between its old and new grid cell using lerp(), the visible motion appears continuous even though the underlying logic is chunky and grid-based.

🔬 interpolationFactor smoothly slides the head between grid cells. What happens visually if you hardcode interpolationFactor to always be 1 (skip lerp entirely) - does the snake still look smooth or does it start snapping between cells?

      if (i === this.body.length - 1) { // Head segment
        // Interpolate between previous head position and current head position
        x = lerp(this.prevHeadPos.x * scale, segment.x * scale, interpolationFactor);
        y = lerp(this.prevHeadPos.y * scale, segment.y * scale, interpolationFactor);
      }
  display(interpolationFactor) {
    fill(characters[selectedCharacterIndex].color); // Use selected character's color

    // Draw snake segments with interpolation for smoother movement
    for (let i = 0; i < this.body.length; i++) {
      let segment = this.body[i];
      let x, y;

      if (i === this.body.length - 1) { // Head segment
        // Interpolate between previous head position and current head position
        x = lerp(this.prevHeadPos.x * scale, segment.x * scale, interpolationFactor);
        y = lerp(this.prevHeadPos.y * scale, segment.y * scale, interpolationFactor);
      } else { // Body segments
        // Body segments follow the segment in front of them with a slight delay
        // This makes the tail look like it's dragging
        let nextSegment = this.body[i + 1];
        x = lerp(segment.x * scale, nextSegment.x * scale, interpolationFactor);
        y = lerp(segment.y * scale, nextSegment.y * scale, interpolationFactor);
      }
      
      // Draw rounded rectangle for snake segment
      rect(x, y, scale, scale, scale * 0.2); // Rounded corners
    }
  }
Line-by-line explanation (4 lines)

🔧 Subcomponents:

for-loop Draw Every Segment for (let i = 0; i < this.body.length; i++) {

Iterates over every body segment (including the head) and computes an interpolated draw position for smooth motion

conditional Head vs Body Interpolation if (i === this.body.length - 1) { // Head segment

Uses a different interpolation source for the head (previous vs current head position) than for body segments (which follow the segment ahead of them)

fill(characters[selectedCharacterIndex].color); // Use selected character's color
Looks up whichever character skin the player picked in the menu and uses its RGB color array to fill all snake segments
x = lerp(this.prevHeadPos.x * scale, segment.x * scale, interpolationFactor);
lerp() blends smoothly between the head's previous pixel position and its new pixel position, based on how far through the current move interval we are (0 = just started, 1 = fully arrived)
let nextSegment = this.body[i + 1];
For any non-head segment, looks at the segment just ahead of it in the array to know where it's animating toward
rect(x, y, scale, scale, scale * 0.2); // Rounded corners
Draws each segment as a square the size of one grid cell, with slightly rounded corners for a nicer look

Snake.eats()

Because both the snake and food positions are always whole numbers on the same grid, exact equality comparison is enough to detect a collision - no distance math or bounding boxes needed.

  eats(food) {
    let head = this.body[this.body.length - 1];
    return (head.x === food.pos.x && head.y === food.pos.y);
  }
Line-by-line explanation (2 lines)
let head = this.body[this.body.length - 1];
Gets the snake's current head position, which is always the last element in the body array
return (head.x === food.pos.x && head.y === food.pos.y);
Returns true only if the head's grid coordinates exactly match the food's grid coordinates - simple grid-based collision detection

Snake.grow()

This method is designed to lengthen the snake when it eats, but nothing in playGame() ever calls snake.grow() - so as the code stands today, the snake's visible length never actually increases even though the score does.

  grow() {
    let head = this.body[this.body.length - 1].copy();
    this.len++;
    this.body.push(head);
  }
Line-by-line explanation (3 lines)
let head = this.body[this.body.length - 1].copy();
Copies the current head position so it can be duplicated at the end of the body array
this.len++;
Increments the tracked snake length counter
this.body.push(head);
Adds an extra copy of the head segment onto the body array, which would normally make the snake one segment longer

Snake.hitsWall()

This function performs boundary/collision detection entirely in grid-coordinate space rather than pixel space, which keeps the math simple since scale doesn't need to be applied until drawing.

  hitsWall() {
    let head = this.body[this.body.length - 1];
    return (head.x < 0 || head.x >= width / scale || head.y < 0 || head.y >= height / scale);
  }
Line-by-line explanation (1 lines)

🔧 Subcomponents:

conditional Boundary Check return (head.x < 0 || head.x >= width / scale || head.y < 0 || head.y >= height / scale);

Checks all four edges of the grid at once to see if the snake's head has moved outside the playable area

return (head.x < 0 || head.x >= width / scale || head.y < 0 || head.y >= height / scale);
Converts the canvas's pixel width/height into grid-cell counts (dividing by scale) and checks if the head's grid coordinates fall outside the 0 to max-1 range on either axis

Snake.hitsSelf()

This is a straightforward O(n) linear search through the snake's own body array - fine for a snake game where body length stays small, though it would need optimizing (e.g. a Set of occupied cells) for a much longer snake.

🔬 Since the snake currently never grows (see Snake.update and Snake.grow), this loop only ever checks a body array of length 1, so it can never actually return true. What do you think would need to change elsewhere in the code for self-collision to ever trigger?

    for (let i = 0; i < this.body.length - 1; i++) {
      if (head.x === this.body[i].x && head.y === this.body[i].y) {
        return true;
      }
    }
  hitsSelf() {
    let head = this.body[this.body.length - 1];
    for (let i = 0; i < this.body.length - 1; i++) {
      if (head.x === this.body[i].x && head.y === this.body[i].y) {
        return true;
      }
    }
    return false;
  }
Line-by-line explanation (3 lines)

🔧 Subcomponents:

for-loop Check Head Against Every Body Segment for (let i = 0; i < this.body.length - 1; i++) {

Compares the head's position to every other body segment (excluding the head itself) to detect self-collision

for (let i = 0; i < this.body.length - 1; i++) {
Loops through every body segment except the last one (the head itself), since comparing the head to itself would always be a false 'collision'
if (head.x === this.body[i].x && head.y === this.body[i].y) { return true; }
As soon as any body segment's coordinates exactly match the head's, we know the snake has run into itself and immediately return true
return false;
If the loop finishes without finding any match, the snake hasn't collided with itself

Food constructor()

Keeping the food's position as a p5.Vector (rather than two separate x/y numbers) makes it easy to pass around and compare against the snake's head position, which is also a vector.

  constructor() {
    this.pos = createVector();
  }
Line-by-line explanation (1 lines)
this.pos = createVector();
Initializes the food's grid position as a p5.Vector defaulting to (0, 0), which gets overwritten as soon as placeRandom() is called

Food.placeRandom()

random(cols) returns a random decimal number between 0 and cols, so floor() is needed to snap it to a whole grid cell index - a very common p5.js pattern whenever you need random integer positions on a grid.

  placeRandom() {
    let cols = floor(width / scale);
    let rows = floor(height / scale);
    this.pos = createVector(floor(random(cols)), floor(random(rows)));
  }
Line-by-line explanation (3 lines)
let cols = floor(width / scale);
Calculates how many grid columns fit across the canvas width
let rows = floor(height / scale);
Calculates how many grid rows fit down the canvas height
this.pos = createVector(floor(random(cols)), floor(random(rows)));
Picks a random whole-number column and row within the grid bounds and stores them as the food's new position - note it doesn't check whether that cell is currently occupied by the snake

Food.display()

The '+ scale / 2' offset here is an important detail: without it, the circle would be drawn from the top-left corner of the grid cell instead of centered inside it, making it look misaligned with the snake's rectangles.

  display() {
    fill(255, 0, 100); // Red color for food
    // Draw food as a circle
    circle(this.pos.x * scale + scale / 2, this.pos.y * scale + scale / 2, scale * 0.8);
  }
Line-by-line explanation (2 lines)
fill(255, 0, 100); // Red color for food
Sets the fill color to a reddish-pink for the food circle
circle(this.pos.x * scale + scale / 2, this.pos.y * scale + scale / 2, scale * 0.8);
Converts the food's grid coordinates into pixel coordinates by multiplying by scale, then adds scale/2 to center the circle within its grid cell rather than drawing it from the corner

📦 Key Variables

snake object

Holds the current Snake instance controlling body segments, movement, and collision logic

let snake;
food object

Holds the current Food instance tracking where the edible item is on the grid

let food;
scale number

The pixel size of one grid cell - used to convert between grid coordinates and pixel coordinates everywhere in the sketch

const scale = 20;
score number

Tracks how many food items the player has eaten in the current round

let score = 0;
direction object

A p5.Vector representing which way the snake is currently heading (e.g. (1,0) for right)

let direction;
gameOver boolean

Flags whether the current round has ended due to a collision

let gameOver = false;
gameMode number

Tracks which screen/state the app is in (menu, playing, or game over) and drives the switch statement in draw()

let gameMode = START_MENU;
characters array

Stores all playable snake skins, each with a name, color, unlock score threshold, unlocked flag, and generated thumbnail image

let characters = [ { name: "Classic Green", color: [0, 255, 0], unlockScore: 0, unlocked: true, image: null } ];
selectedCharacterIndex number

Index into the characters array indicating which skin the player has chosen to play with

let selectedCharacterIndex = 0;
characterSelectButtons array

Stores references to the DOM divs used as clickable character thumbnails so they can be shown, hidden, or restyled

let characterSelectButtons = [];
startButton object

Reference to the DOM 'Start Game' button element so it can be shown, hidden, or repositioned

let startButton;
moveTimer number

Counts frames since the snake's last logical move, used to trigger movement every moveInterval frames

let moveTimer = 0;
moveInterval number

Number of draw() frames between each logical snake movement step, controlling gameplay speed

const moveInterval = 6;
foodEatenSound object

Intended to hold a p5.SoundFile played when food is eaten, but stays undefined since loadSound is commented out

let foodEatenSound;
gameOverSound object

Intended to hold a p5.SoundFile played on game over, but stays undefined since loadSound is commented out

let gameOverSound;
dummyData object

Stores a test JSON response fetched in preload(), used only to verify that preload/loading works correctly

let dummyData;

🔧 Potential Improvements (4)

Here are some ways this code could be enhanced:

BUG Snake.update() and playGame()

The snake never actually grows when it eats food: playGame() only increments score and calls food.placeRandom() when food is eaten, but never calls snake.grow(). Meanwhile Snake.update() always shifts the tail before pushing a new head, keeping body length fixed at 1 forever.

💡 Call snake.grow() inside the 'if (snake.eats(food))' block in playGame(), and change Snake.update() to skip the this.body.shift() call on the frame the snake just grew (e.g. track a 'growPending' flag) so eating food actually lengthens the visible snake.

PERFORMANCE preload()

preload() fetches an unrelated placeholder JSON from a public external API purely as a debugging test. This adds an unnecessary network dependency - if that third-party endpoint is slow, blocked, or down, the whole sketch could hang or fail to reach setup().

💡 Remove the loadJSON('https://jsonplaceholder.typicode.com/todos/1') call once debugging is finished, since preload() should only load assets the game actually needs (images, sounds, fonts).

BUG windowResized()

If the player resizes the browser window while gameMode is GAME_PLAYING, windowResized() calls resetGame(), instantly wiping out their current score and progress without warning.

💡 Consider only resizing the canvas and letting the snake/food positions clamp or rescale to the new grid size, instead of fully resetting the game state - or at least show a confirmation/pause instead of silently restarting.

STYLE Global scope

foodEatenSound and gameOverSound are declared and referenced in commented-out .play() calls, but since loadSound is never actually called, these variables are dead code that could confuse future readers.

💡 Either fully implement sound loading and playback, or remove the unused sound variables and comments to keep the codebase focused on what's actually implemented.

🔄 Code Flow

Code flow showing preload, setup, draw, createstartmenuui, displaystartmenu, selectcharacter, startgame, playgame, displayscore, displaygameover, checkandsaveunlocks, resetgame, keypressed, windowresized, saveunlockedcharacters, loadunlockedcharacters, snakeconstructor, snakeupdate, snakedisplay, snakeeats, snakegrow, snakehitswall, snakehitsself, foodconstructor, foodplacerandom, fooddisplay

💡 Click on function names in the diagram to jump to their code

graph TD start[Start] --> setup[setup] setup --> setup-skin-gen-loop[Generate Skin Thumbnails] setup-skin-gen-loop --> draw[draw loop] click setup href "#fn-setup" click setup-skin-gen-loop href "#sub-setup-skin-gen-loop" draw --> draw-switch[Game Mode Switch] draw-switch --> skin-div-loop[Build Skin Thumbnail Buttons] skin-div-loop --> highlight-loop[Highlight Selected Skin] highlight-loop --> unlock-text-conditional[Unlock Requirement Text] unlock-text-conditional --> unlock-check[Unlocked Check] unlock-check --> move-timer-conditional[Logical Move Step] move-timer-conditional --> eat-check[Food Eaten Check] eat-check --> collision-check[Game Over Check] collision-check --> unlock-loop[Check Every Character's Score Threshold] unlock-loop --> direction-conditional[Arrow Key Direction Change] direction-conditional --> gameover-conditional[Return to Menu on Space] gameover-conditional --> resize-conditional[Menu vs Game Resize Handling] resize-conditional --> draw click draw href "#fn-draw" click draw-switch href "#sub-draw-switch" click skin-div-loop href "#sub-skin-div-loop" click highlight-loop href "#sub-highlight-loop" click unlock-text-conditional href "#sub-unlock-text-conditional" click unlock-check href "#sub-unlock-check" click move-timer-conditional href "#sub-move-timer-conditional" click eat-check href "#sub-eat-check" click collision-check href "#sub-collision-check" click unlock-loop href "#sub-unlock-loop" click direction-conditional href "#sub-direction-conditional" click gameover-conditional href "#sub-gameover-conditional" click resize-conditional href "#sub-resize-conditional" playgame[playgame] --> displayscore[displayscore] displayscore --> playgame click playgame href "#fn-playgame" click displayscore href "#fn-displayscore" displaygameover[displaygameover] --> displaygameover click displaygameover href "#fn-displaygameover" keypressed[keypressed] --> keypressed click keypressed href "#fn-keypressed" windowresized[windowresized] --> windowresized click windowresized href "#fn-windowresized" saveunlockedcharacters[saveunlockedcharacters] --> saveunlockedcharacters click saveunlockedcharacters href "#fn-saveunlockedcharacters" loadunlockedcharacters[loadunlockedcharacters] --> load-loop[Apply Saved Unlock Flags] load-loop --> loadunlockedcharacters click loadunlockedcharacters href "#fn-loadunlockedcharacters" click load-loop href "#sub-load-loop" snakeconstructor[snakeconstructor] --> snakeupdate[snakeupdate] snakeupdate --> snakedisplay[snakedisplay] snakedisplay --> snakeeats[snakeeats] snakeeats --> snakehitswall[snakehitswall] snakehitswall --> snakehitsself[snakehitsself] click snakeconstructor href "#fn-snakeconstructor" click snakeupdate href "#fn-snakeupdate" click snakedisplay href "#fn-snakedisplay" click snakeeats href "#fn-snakeeats" click snakehitswall href "#fn-snakehitswall" click snakehitsself href "#fn-snakehitsself" foodconstructor[foodconstructor] --> foodplacerandom[foodplacerandom] foodplacerandom --> fooddisplay[fooddisplay] click foodconstructor href "#fn-foodconstructor" click foodplacerandom href "#fn-foodplacerandom" click fooddisplay href "#fn-fooddisplay"

❓ Frequently Asked Questions

What visual elements are present in the p5.js sketch titled 'Sketch 2026-03-01 14:38'?

The sketch features a classic snake game interface with a grid-based layout, colorful snake characters, and food items that the snake consumes.

How can users interact with the snake game in this sketch?

Users can select different snake characters, start the game, and control the snake's movement using keyboard inputs.

What creative coding concepts does this p5.js sketch showcase?

This sketch demonstrates game state management, character selection mechanics, and the use of sound effects to enhance user experience.

Preview

Sketch 2026-03-01 14:38 - p5.js creative coding sketch preview
Sketch Preview
Code flow diagram showing the structure of Sketch 2026-03-01 14:38 - Code flow showing preload, setup, draw, createstartmenuui, displaystartmenu, selectcharacter, startgame, playgame, displayscore, displaygameover, checkandsaveunlocks, resetgame, keypressed, windowresized, saveunlockedcharacters, loadunlockedcharacters, snakeconstructor, snakeupdate, snakedisplay, snakeeats, snakegrow, snakehitswall, snakehitsself, foodconstructor, foodplacerandom, fooddisplay
Code Flow Diagram