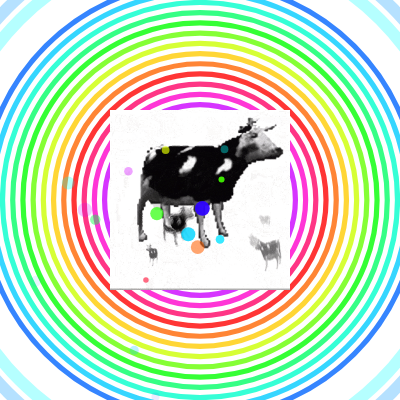
function setup() {
  createCanvas(windowWidth, windowHeight);
  // Tip: Use windowWidth/windowHeight for responsive canvas

  // Set image drawing mode to CENTER so we can position the GIF by its center
  imageMode(CENTER);

  // Switch to HSB color mode for easier rainbow gradients
  // Hue: 0-360 (rainbow spectrum)
  // Saturation: 0-100 (how vibrant the color is)
  // Brightness: 0-100 (how light/dark the color is)
  // Alpha: 0-100 (transparency)
  colorMode(HSB, 360, 100, 100, 100);
}
Line-by-line explanation (3 lines)
🔧 Subcomponents:
function-call
Create responsive canvas
createCanvas(windowWidth, windowHeight);
Creates a canvas that fills the entire browser window and responds to resizing
function-call
Set image anchor point
imageMode(CENTER);
Positions images by their center instead of their top-left corner, making centering the GIF easy
function-call
Switch to HSB color mode
colorMode(HSB, 360, 100, 100, 100);
Changes color representation from RGB to HSB, where hue (0-360) cycles through the rainbow spectrum
createCanvas(windowWidth, windowHeight);- Creates a canvas as wide and tall as the browser window, making the animation fill the entire screen.
imageMode(CENTER);- By default, image() positions images by their top-left corner. CENTER mode positions by the center, so the GIF displays correctly when placed at width/2, height/2.
colorMode(HSB, 360, 100, 100, 100);- Switches from RGB (red-green-blue) to HSB (hue-saturation-brightness). In HSB, hue ranges 0-360 and naturally represents colors as a rainbow wheel, making rainbow effects intuitive.
🔬 This loop manages all pulses: it updates them, draws them, and removes them when dead. What happens if you comment out the isDead() check and splice line? Hint: pulses never disappear.
  for (let i = rainbowPulses.length - 1; i >= 0; i--) {
    rainbowPulses[i].update();
    rainbowPulses[i].display();
    if (rainbowPulses[i].isDead()) {
      rainbowPulses.splice(i, 1);
    }
  }
🔬 Notice this loop counts backward (i--) instead of forward. Why? What breaks if you change it to i++ and why does backward iteration matter when removing items?
  for (let i = particles.length - 1; i >= 0; i--) {
    particles[i].update(); // Move the particle
    particles[i].display(); // Draw the particle

    // If a particle has lived its full lifespan, remove it from the array
    if (particles[i].isDead()) {
      particles.splice(i, 1); // Remove one element at index i
    }
  }
function draw() {
  background(0, 0, 100); // White background in HSB (Hue 0, Saturation 0, Brightness 100)

  // --- Rainbow Ring Pulses ---
  // Add new rainbow pulses periodically
  if (frameCount % 60 === 0) { // Create a new pulse every 60 frames (approx. 1 second)
    let p = new RainbowPulse(width / 2, height / 2);
    rainbowPulses.push(p);
  }

  // Update and display all existing rainbow pulses
  // Loop backwards to safely remove pulses when they "die"
  for (let i = rainbowPulses.length - 1; i >= 0; i--) {
    rainbowPulses[i].update();
    rainbowPulses[i].display();
    if (rainbowPulses[i].isDead()) {
      rainbowPulses.splice(i, 1);
    }
  }

  // Calculate GIF position and size (centered and slightly scaled down)
  let gifX = width / 2;
  let gifY = height / 2;
  let gifWidth = gif.width * 0.7; // Scale down to 70%
  let gifHeight = gif.height * 0.7;

  // Display the GIF centered on the canvas
  image(gif, gifX, gifY, gifWidth, gifHeight);

  // --- Particle System ---
  // Add new particles periodically
  // We'll add one new particle every 5 frames
  if (frameCount % 5 === 0) {
    let p = new Particle(gifX, gifY); // Create a new particle at the GIF's center
    particles.push(p); // Add it to our particles array
  }

  // Update and display all existing particles
  // Loop backwards to safely remove particles when they "die"
  for (let i = particles.length - 1; i >= 0; i--) {
    particles[i].update(); // Move the particle
    particles[i].display(); // Draw the particle

    // If a particle has lived its full lifespan, remove it from the array
    if (particles[i].isDead()) {
      particles.splice(i, 1); // Remove one element at index i
    }
  }
}
Line-by-line explanation (21 lines)
🔧 Subcomponents:
conditional
Create rainbow pulses periodically
if (frameCount % 60 === 0) {
Triggers once every 60 frames to spawn a new RainbowPulse object and add it to the array
for-loop
Update and display all pulses
for (let i = rainbowPulses.length - 1; i >= 0; i--) {
Iterates backward through the pulse array so dead pulses can be safely removed during iteration
conditional
Create particles periodically
if (frameCount % 5 === 0) {
Triggers once every 5 frames to spawn a new Particle object at the GIF's center
for-loop
Update and display all particles
for (let i = particles.length - 1; i >= 0; i--) {
Iterates backward through the particle array, updating each particle and removing dead ones
background(0, 0, 100);- Clears the canvas with a white background every frame in HSB mode (Hue is irrelevant, Saturation 0, Brightness 100 = white).
if (frameCount % 60 === 0) {- Checks if the current frame number is divisible by 60. This happens once per second at 60 FPS, triggering a new rainbow pulse.
let p = new RainbowPulse(width / 2, height / 2);- Creates a new RainbowPulse object at the canvas center (width/2, height/2).
rainbowPulses.push(p);- Adds the new pulse to the rainbowPulses array so it will be updated and displayed each subsequent frame.
for (let i = rainbowPulses.length - 1; i >= 0; i--) {- Loops backward through the pulse array (from last to first). Backward iteration allows safe removal of dead pulses without skipping elements.
rainbowPulses[i].update();- Calls the update() method on the current pulse, decreasing its lifespan and calculating expansion.
rainbowPulses[i].display();- Calls the display() method on the current pulse, drawing its rainbow rings on screen.
if (rainbowPulses[i].isDead()) {- Checks if the pulse has outlived its lifespan (isDead() returns true when lifespan < 0).
rainbowPulses.splice(i, 1);- Removes the dead pulse from the array—splice(i, 1) removes 1 element starting at index i.
let gifX = width / 2;- Calculates the horizontal center of the canvas for the GIF position.
let gifY = height / 2;- Calculates the vertical center of the canvas for the GIF position.
let gifWidth = gif.width * 0.7;- Scales the GIF's width down to 70% of its original size so it fits nicely on screen.
image(gif, gifX, gifY, gifWidth, gifHeight);- Draws the GIF at the center position with the scaled width and height. The GIF animates automatically.
if (frameCount % 5 === 0) {- Checks if the frame number is divisible by 5. This triggers every 5 frames, creating a steady stream of new particles.
let p = new Particle(gifX, gifY);- Creates a new Particle object at the GIF's center position.
particles.push(p);- Adds the new particle to the particles array so it will be updated and displayed each subsequent frame.
for (let i = particles.length - 1; i >= 0; i--) {- Loops backward through the particle array to update and display all particles, and safely remove dead ones.
particles[i].update();- Calls update() on the current particle, moving it and decreasing its lifespan.
particles[i].display();- Calls display() on the current particle, drawing it as a colored circle with transparency based on remaining lifespan.
if (particles[i].isDead()) {- Checks if the particle's lifespan has expired.
particles.splice(i, 1);- Removes the dead particle from the array to prevent memory buildup.
🔬 These two lines create outward motion: a random direction and a random speed. What happens if you remove the mult() line or change it to mult(0)?
    this.vel = p5.Vector.random2D(); // Random direction for initial movement
    this.vel.mult(random(1, 3)); // Random speed (1 to 3 pixels per frame)
class Particle {
  constructor(x, y) {
    this.pos = createVector(x, y); // Position of the particle
    this.vel = p5.Vector.random2D(); // Random direction for initial movement
    this.vel.mult(random(1, 3)); // Random speed (1 to 3 pixels per frame)
    this.acc = createVector(0, 0); // Acceleration (not used in this simple example, but good practice)
    this.lifespan = 255; // Lifespan of the particle (used for alpha/fading)
    this.size = random(5, 15); // Random size for the particle
    // Random bright color for each particle in HSB mode (full saturation, full brightness)
    this.color = color(random(360), 100, 100);
  }

  update() {
    this.vel.add(this.acc); // Apply acceleration to velocity
    this.pos.add(this.vel); // Apply velocity to position
    this.acc.mult(0); // Reset acceleration

    // Decrease lifespan, causing the particle to fade out
    this.lifespan -= random(1, 5); // Decrease lifespan by a random amount each frame
  }

  display() {
    noStroke(); // No border for the particles
    // Set the fill color, using the current lifespan as the alpha (transparency) value
    // Since lifespan is 0-255, we need to map it to 0-100 for HSB alpha
    this.color.setAlpha(map(this.lifespan, 0, 255, 0, 100));
    fill(this.color);
    ellipse(this.pos.x, this.pos.y, this.size); // Draw the particle as a circle
  }

  // Check if the particle's lifespan is over
  isDead() {
    return this.lifespan < 0;
  }
}
Line-by-line explanation (17 lines)
🔧 Subcomponents:
function-call
Initialize particle properties
constructor(x, y) {
Sets up position, velocity, color, size, and lifespan for each new particle
function-call
Update particle physics and lifespan
update() {
Moves the particle and decreases its lifespan each frame
function-call
Draw particle with fading alpha
display() {
Renders the particle as a circle with transparency based on remaining lifespan
function-call
Check if particle should be removed
isDead() {
Returns true when lifespan drops below zero, signaling the particle is done
constructor(x, y) {- The constructor method runs when a new Particle is created. It takes x and y coordinates and initializes all properties.
this.pos = createVector(x, y);- Creates a p5.Vector to store the particle's position. Vectors make movement math elegant and intuitive.
this.vel = p5.Vector.random2D();- Creates a random direction vector (unit vector pointing in a random direction). Later we multiply it by a random speed.
this.vel.mult(random(1, 3));- Scales the velocity vector by a random number between 1 and 3, giving each particle a unique speed while maintaining a random direction.
this.acc = createVector(0, 0);- Initializes acceleration to zero. Acceleration is reset each frame (see update()) for a simple velocity-based physics model.
this.lifespan = 255;- Sets the particle's lifespan to 255. As this value decreases each frame, the particle fades out and eventually dies.
this.size = random(5, 15);- Gives each particle a random diameter between 5 and 15 pixels for visual variety.
this.color = color(random(360), 100, 100);- Assigns a random color in HSB mode: hue ranges 0-360 (full rainbow), saturation 100 (fully vibrant), brightness 100 (fully bright).
this.vel.add(this.acc);- Adds acceleration to velocity (in this sketch, acceleration stays zero, but this line demonstrates proper physics structure).
this.pos.add(this.vel);- Adds velocity to position, moving the particle each frame. The particle moves outward because vel was set to a random direction.
this.acc.mult(0);- Resets acceleration to zero for the next frame—a common pattern in physics simulations.
this.lifespan -= random(1, 5);- Decreases lifespan by 1 to 5 each frame, causing particles to fade and eventually disappear. The randomness makes fading irregular and organic.
noStroke();- Disables the outline for particles so they appear as solid, borderless circles.
this.color.setAlpha(map(this.lifespan, 0, 255, 0, 100));- Maps the lifespan (0–255) to HSB alpha (0–100) and applies it to the color, making particles fade as their lifespan decreases.
fill(this.color);- Sets the fill color to the particle's color with the newly mapped alpha, so subsequent shapes are drawn with transparency.
ellipse(this.pos.x, this.pos.y, this.size);- Draws the particle as a circle at its current position with its size diameter.
return this.lifespan < 0;- Returns true if the particle's lifespan has fallen below zero, signaling that it should be removed from the array.
🔬 This code calculates each ring's hue (color) and radius (size). What happens if you comment out the 'ringRadius +=' line so all rings stay concentric instead of spreading outward?
      let ringHue = (this.startHue + i * (360 / this.numRings)) % 360;

      // Calculate the radius for this ring, expanding from the center
      // The outermost ring will reach maxRadius when lifespan is 0
      let ringRadius = this.maxRadius * expansionFactor;
      // Add a slight offset for concentric spacing
      ringRadius += i * (this.ringThickness + 5); // Spacing adjusted by thickness
class RainbowPulse {
  constructor(x, y) {
    this.pos = createVector(x, y); // Center of the pulse
    this.lifespan = 120; // How long the pulse lives (frames)
    this.maxRadius = min(width, height) * 0.9; // Max radius for the outermost ring
    this.startHue = frameCount % 360; // Starting hue for the first ring, cycling through the rainbow
    this.numRings = 15; // Number of concentric rings in this pulse
    this.ringThickness = random(5, 15); // Random thickness for the rings
  }

  update() {
    this.lifespan--; // Decrease lifespan each frame
  }

  display() {
    noFill(); // Rings should not be filled
    strokeWeight(this.ringThickness); // Set the thickness for all rings

    // Calculate the current expansion factor based on lifespan
    let expansionFactor = map(this.lifespan, 120, 0, 0, 1); // 0 to 1 as it expands

    // Loop through each ring
    for (let i = 0; i < this.numRings; i++) {
      // Calculate hue for this specific ring, cycling through the rainbow
      let ringHue = (this.startHue + i * (360 / this.numRings)) % 360;

      // Calculate the radius for this ring, expanding from the center
      // The outermost ring will reach maxRadius when lifespan is 0
      let ringRadius = this.maxRadius * expansionFactor;
      // Add a slight offset for concentric spacing
      ringRadius += i * (this.ringThickness + 5); // Spacing adjusted by thickness

      // Calculate alpha (transparency) for fading out
      // Fade from 100 to 0 over its lifespan
      let alpha = map(this.lifespan, 120, 0, 100, 0);

      // Set the stroke color (hue, saturation 100, brightness 100, alpha)
      stroke(ringHue, 100, 100, alpha);

      // Draw the ellipse as a ring (ellipse() uses diameter, so radius * 2)
      ellipse(this.pos.x, this.pos.y, ringRadius * 2);
    }
  }

  // Check if the pulse's lifespan is over
  isDead() {
    return this.lifespan < 0;
  }
}
Line-by-line explanation (19 lines)
🔧 Subcomponents:
function-call
Initialize pulse properties
constructor(x, y) {
Sets up center position, lifespan, ring count, and initial hue for the rainbow pulse
function-call
Decrease pulse lifespan
update() {
Decreases lifespan by 1 each frame, causing the expansion to slow and eventually stop
for-loop
Draw concentric rainbow rings
for (let i = 0; i < this.numRings; i++) {
Loops through 15 rings, calculating expanding radius and rainbow hue for each
function-call
Check if pulse should be removed
isDead() {
Returns true when lifespan drops below zero
constructor(x, y) {- The constructor runs when a new RainbowPulse is created at position (x, y).
this.pos = createVector(x, y);- Stores the center position where the pulse radiates outward from.
this.lifespan = 120;- Sets the pulse to live for 120 frames (~2 seconds at 60 FPS). As lifespan counts down, the rings expand.
this.maxRadius = min(width, height) * 0.9;- Calculates the maximum radius the outermost ring can reach—90% of the smaller of width or height, ensuring the pulse fits on screen.
this.startHue = frameCount % 360;- Sets the starting hue based on the current frame count modulo 360, cycling through rainbow colors so each new pulse starts at a different hue.
this.numRings = 15;- Specifies that each pulse will draw 15 concentric rings, creating a dense rainbow effect.
this.ringThickness = random(5, 15);- Gives each pulse a random ring thickness between 5 and 15 pixels, adding visual variety.
this.lifespan--;- Decreases the lifespan by 1 each frame. When it reaches 0, the pulse stops expanding and fades.
noFill();- Ensures rings are drawn as outlines only, not filled, so you see circular rings rather than filled disks.
strokeWeight(this.ringThickness);- Sets the line thickness for all rings to the ringThickness value determined during construction.
let expansionFactor = map(this.lifespan, 120, 0, 0, 1);- Maps lifespan from 120–0 to 0–1. When lifespan is 120 (just born), expansionFactor is 0. When lifespan is 0 (about to die), expansionFactor is 1, making rings expand completely.
for (let i = 0; i < this.numRings; i++) {- Loops through each of the 15 rings, calculating and drawing each one individually.
let ringHue = (this.startHue + i * (360 / this.numRings)) % 360;- Calculates the hue for each ring by spacing hues evenly across the rainbow. Ring 0 is the starting hue, ring 1 is offset by 24° (360/15), etc. The modulo operator wraps hue back to 0 if it exceeds 360.
let ringRadius = this.maxRadius * expansionFactor;- Scales the max radius by the expansion factor, so the rings start small and grow to maxRadius as the pulse ages.
ringRadius += i * (this.ringThickness + 5);- Adds offset spacing so rings don't overlap—each ring is spaced outward by its thickness plus 5 pixels.
let alpha = map(this.lifespan, 120, 0, 100, 0);- Maps lifespan to alpha, so fresh pulses (lifespan 120) are fully opaque (alpha 100) and dying pulses (lifespan 0) are transparent (alpha 0).
stroke(ringHue, 100, 100, alpha);- Sets the stroke color in HSB: the calculated ringHue, full saturation (100), full brightness (100), and the mapped alpha for fading.
ellipse(this.pos.x, this.pos.y, ringRadius * 2);- Draws a circle (ellipse with equal width/height) at the pulse center with diameter ringRadius * 2. The stroke color and thickness create the visible ring.
return this.lifespan < 0;- Returns true when lifespan falls below zero, indicating the pulse is dead and should be removed from the array.