Sketch 2026-03-16 15:35

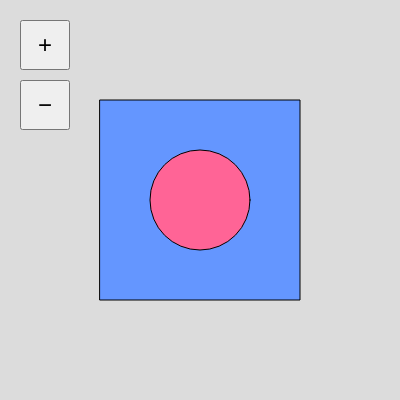
This sketch creates an interactive zoom interface where users can zoom in and out of canvas content using on-screen buttons. It demonstrates coordinate transformation techniques using translate() and scale() to create a centered zoom effect that keeps the canvas content anchored at its center point.

🧪 Try This!

Experiment with the code by making these changes:

  1. Change the button positions — The buttons are hardcoded to 20, 20 and 20, 80—adjust these to move them to another corner or stack them horizontally instead of vertically
  2. Make zoom multiply instead of add — Currently, clicking zoom buttons adds a fixed increment—change it to multiply by a percentage for exponential zoom that feels faster at high zoom levels
  3. Draw different content — The blue rectangle and pink circle are placeholders—replace them with your own shapes or custom drawing
  4. Set a maximum zoom level — Currently you can zoom infinitely—add a cap to prevent the zoom from getting too extreme
Prefer the full editor? Open it there →

📖 About This Sketch

This sketch builds an interactive zoom interface where clicking '+' and '−' buttons zoom a rectangle and circle in and out of view. What makes it compelling is that the zoom happens around the center of the canvas—a common pattern in mapping apps, image editors, and data visualizations. The sketch uses three key p5.js techniques: the translate() function to shift the coordinate system, scale() to enlarge or shrink everything, and push()/pop() to isolate transformations so they don't affect other code.

The code is organized into a setup() function that creates the canvas and buttons, a draw() function that applies transformations and draws content, and a helper function createZoomButtons() that sets up the interactive controls. By studying it, you will learn how to stack transformations (translate, then scale, then translate again) to achieve smooth centered zoom, and how p5.js buttons can trigger changes to sketch variables.

⚙️ How It Works

  1. When the sketch loads, setup() creates a full-window canvas, sets zoomLevel to 1 (normal size), and builds two buttons labeled '+' and '−' in the top-left corner
  2. Every frame, draw() clears the background and enters a push() block to safely apply transformations
  3. Inside the push block, translate(width/2, height/2) shifts the origin to the center of the canvas
  4. scale(zoomLevel) enlarges or shrinks all subsequent drawing by the zoom factor—if zoomLevel is 2, everything is twice as large
  5. translate(-width/2, -height/2) shifts the origin back, which centers the zoom effect around the middle of the canvas rather than the top-left corner
  6. A blue rectangle and pink circle are drawn—they grow and shrink as zoomLevel changes
  7. pop() restores the coordinate system, and clicking the buttons increases or decreases zoomLevel

🎓 Concepts You'll Learn

Coordinate transformationtranslate() functionscale() functionpush() and pop()Interactive buttonsResponsive canvas

📝 Code Breakdown

setup()

setup() runs once when the sketch starts. It is the right place to initialize your canvas, set variables, and create UI elements like buttons that should only exist once.

function setup() {
  canvas = createCanvas(windowWidth, windowHeight);
  canvas.position(0, 0);
  canvas.style('display', 'block');
  
  // Optional: create zoom buttons on top of canvas
  createZoomButtons();
}
Line-by-line explanation (4 lines)

🔧 Subcomponents:

calculation Canvas Setup canvas = createCanvas(windowWidth, windowHeight);

Creates a canvas that fills the entire browser window

function-call Zoom Button Initialization createZoomButtons();

Calls the helper function to build the zoom control buttons

canvas = createCanvas(windowWidth, windowHeight);
Creates a canvas as wide and tall as the browser window, storing the canvas object in a variable so we can resize it later
canvas.position(0, 0);
Positions the canvas at the top-left corner of the page (0, 0), covering the entire viewport
canvas.style('display', 'block');
Ensures the canvas displays as a block element, preventing extra spacing that inline elements can cause
createZoomButtons();
Calls the function that builds the zoom in/out buttons above the canvas
draw()

draw() runs 60 times per second, creating animation and interactivity. The push()/pop() pattern protects other code from transformation side effects—a critical technique in complex sketches. Notice how the three translate/scale calls work together: the first translate moves to center, scale() zooms around that center, and the second translate undoes the first so coordinates map back to the canvas.

🔬 These three lines are the secret to centered zoom. What happens if you remove the second translate(-width/2, -height/2)? Does the zoom still center, or does it zoom from the top-left corner?

  translate(width / 2, height / 2);
  scale(zoomLevel);
  translate(-width / 2, -height / 2);

🔬 Right now a rectangle and circle are drawn. What if you add more shapes—like another rect() or a triangle()—inside this block? Will they zoom with the others?

  fill(100, 150, 255);
  rect(width/4, height/4, width/2, height/2);
  fill(255, 100, 150);
  ellipse(width/2, height/2, 100, 100);
function draw() {
  background(220);
  
  // Apply zoom
  push();
  translate(width / 2, height / 2);
  scale(zoomLevel);
  translate(-width / 2, -height / 2);
  
  // Example content to zoom
  fill(100, 150, 255);
  rect(width/4, height/4, width/2, height/2);
  fill(255, 100, 150);
  ellipse(width/2, height/2, 100, 100);
  
  pop();
}
Line-by-line explanation (10 lines)

🔧 Subcomponents:

conditional Zoom Transformation Stack translate(width / 2, height / 2); scale(zoomLevel); translate(-width / 2, -height / 2);

Three nested transformations that center the zoom effect at the canvas center

calculation Example Content Drawing fill(100, 150, 255); rect(width/4, height/4, width/2, height/2); fill(255, 100, 150); ellipse(width/2, height/2, 100, 100);

Draws a blue rectangle and pink circle that zoom in/out with the zoomLevel

background(220);
Clears the entire canvas with light gray (RGB value 220) each frame, erasing the previous frame's drawing
push();
Saves the current coordinate system and drawing settings so transformations only affect content inside this block
translate(width / 2, height / 2);
Moves the origin (0,0 point) to the center of the canvas—this is the first step in centering the zoom
scale(zoomLevel);
Multiplies all subsequent x and y coordinates by zoomLevel—if zoomLevel is 2, everything is drawn twice as large
translate(-width / 2, -height / 2);
Moves the origin back to the top-left, but now the zoom effect is centered because we already shifted to the middle
fill(100, 150, 255);
Sets the fill color to a light blue (100 red, 150 green, 255 blue)
rect(width/4, height/4, width/2, height/2);
Draws a rectangle at quarter-width and quarter-height, with half the canvas width and height—creates a centered rectangle
fill(255, 100, 150);
Changes the fill color to a light pink
ellipse(width/2, height/2, 100, 100);
Draws a circle at the canvas center with diameter 100—always stays at the exact center no matter the zoom level
pop();
Restores the coordinate system and drawing settings to what they were before push(), so future code is unaffected

createZoomButtons()

createZoomButtons() is a helper function called once at startup to build the UI. It uses p5.js button methods like position(), size(), style(), and mousePressed() to create interactive controls. The arrow function syntax (() => ...) is a modern JavaScript way to write callback functions that runs when events occur. The max() function is a common safety guard—it picks the larger of two numbers, preventing zoomLevel from becoming too small.

🔬 The zoom-out button has a max(0.1, ...) guard to prevent zooming too far out. What happens if you remove the max() and let zoomLevel go negative? Try it: what does a negative zoomLevel do to your shapes?

  let btnZoomOut = createButton('−');
  btnZoomOut.position(20, 80);
  btnZoomOut.size(50, 50);
  btnZoomOut.style('font-size', '24px');
  btnZoomOut.mousePressed(() => zoomLevel = max(0.1, zoomLevel - zoomIncrement));
function createZoomButtons() {
  let btnZoomIn = createButton('+');
  btnZoomIn.position(20, 20);
  btnZoomIn.size(50, 50);
  btnZoomIn.style('font-size', '24px');
  btnZoomIn.mousePressed(() => zoomLevel += zoomIncrement);
  
  let btnZoomOut = createButton('−');
  btnZoomOut.position(20, 80);
  btnZoomOut.size(50, 50);
  btnZoomOut.style('font-size', '24px');
  btnZoomOut.mousePressed(() => zoomLevel = max(0.1, zoomLevel - zoomIncrement));
}
Line-by-line explanation (10 lines)

🔧 Subcomponents:

function-call Zoom In Button Setup let btnZoomIn = createButton('+'); btnZoomIn.position(20, 20); btnZoomIn.size(50, 50); btnZoomIn.style('font-size', '24px'); btnZoomIn.mousePressed(() => zoomLevel += zoomIncrement);

Creates a '+' button at top-left that increases zoom when clicked

function-call Zoom Out Button Setup let btnZoomOut = createButton('−'); btnZoomOut.position(20, 80); btnZoomOut.size(50, 50); btnZoomOut.style('font-size', '24px'); btnZoomOut.mousePressed(() => zoomLevel = max(0.1, zoomLevel - zoomIncrement));

Creates a '−' button below the first that decreases zoom when clicked, with a minimum limit of 0.1

let btnZoomIn = createButton('+');
Creates a button with the label '+' and stores it in a variable so we can configure it
btnZoomIn.position(20, 20);
Positions the button 20 pixels from the left and 20 pixels from the top of the page
btnZoomIn.size(50, 50);
Makes the button 50 pixels wide and 50 pixels tall—a square touch target
btnZoomIn.style('font-size', '24px');
Sets the font size of the '+' label to 24 pixels so it is easily visible and tappable
btnZoomIn.mousePressed(() => zoomLevel += zoomIncrement);
Attaches a function that runs whenever the button is clicked: it adds zoomIncrement to zoomLevel, zooming in
let btnZoomOut = createButton('−');
Creates a second button with the minus symbol '−' and stores it in a separate variable
btnZoomOut.position(20, 80);
Positions the zoom-out button 20 pixels from the left and 80 pixels from the top—directly below the zoom-in button
btnZoomOut.size(50, 50);
Makes this button the same size as the zoom-in button
btnZoomOut.style('font-size', '24px');
Sets the font size to 24 pixels for consistency
btnZoomOut.mousePressed(() => zoomLevel = max(0.1, zoomLevel - zoomIncrement));
Attaches a function that subtracts zoomIncrement from zoomLevel, but uses max(0.1, ...) to prevent zoomLevel from dropping below 0.1—this stops the sketch from becoming invisible or flipped

windowResized()

windowResized() is a special p5.js function that runs automatically whenever the browser window is resized. It is essential for responsive sketches. Without it, resizing the window would leave a gap or cut off content. This function has no custom logic—it simply tells p5.js to stretch the canvas to fill the new window.

function windowResized() {
  resizeCanvas(windowWidth, windowHeight);
}
Line-by-line explanation (1 lines)
resizeCanvas(windowWidth, windowHeight);
When the browser window is resized, this updates the canvas dimensions to match the new window size, keeping the sketch responsive

📦 Key Variables

zoomLevel number

Stores the current zoom scale: 1 is normal size, 2 is double, 0.5 is half—passed to scale() every frame

let zoomLevel = 1;
zoomIncrement number

How much to add or subtract from zoomLevel when a button is clicked—higher values zoom more aggressively

let zoomIncrement = 0.1;
canvas object

Stores a reference to the p5.js canvas object so we can resize it dynamically when the window size changes

let canvas = createCanvas(...);

🔧 Potential Improvements (5)

Here are some ways this code could be enhanced:

BUG draw() transformation order

The transformation stack is correct but unintuitive; many learners struggle to understand why three translate/scale calls are needed instead of one

💡 Add a detailed inline comment explaining each step: '// Step 1: Move origin to center', '// Step 2: Zoom around that center', '// Step 3: Undo the center shift so coordinates work normally'

PERFORMANCE draw()

The rectangle and ellipse are redrawn every frame even though they never change position or size—for a static zoom interface, this is fine, but for complex content it wastes CPU

💡 Consider drawing content to a graphics buffer (createGraphics()) once, then scaling the buffer in draw() instead of redrawing shapes every frame

STYLE createZoomButtons()

Button creation code is repetitive—zoom-in and zoom-out buttons use nearly identical setup calls

💡 Extract button creation into a helper function: createButton_helper(label, x, y, callback) to reduce duplication and make it easier to add more buttons

FEATURE draw()

No visual feedback showing the current zoom level—users must infer it from shape size

💡 Add text() display at the top of the canvas showing zoomLevel.toFixed(2), e.g., 'Zoom: 1.50x', so users see exactly where they are

FEATURE createZoomButtons()

No keyboard shortcuts for zoom—only mouse/touch buttons work

💡 Add a keyPressed() function to let users press '+'/'-' or scroll wheel to zoom, making the interface more accessible and intuitive

🔄 Code Flow

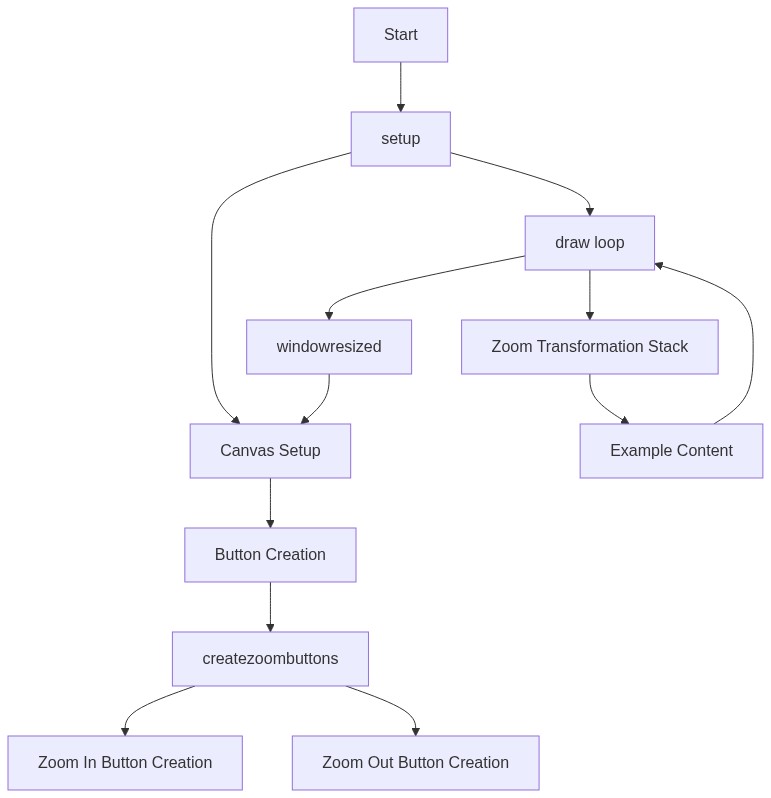
Code flow showing setup, draw, createzoombuttons, windowresized

💡 Click on function names in the diagram to jump to their code

graph TD start[Start] --> setup[setup] setup --> canvas-creation[Canvas Setup] setup --> button-creation[Zoom Button Initialization] setup --> draw[draw loop] click setup href "#fn-setup" click canvas-creation href "#sub-canvas-creation" click button-creation href "#sub-button-creation" draw --> zoom-transform[Zoom Transformation Stack] draw --> example-content[Example Content Drawing] click draw href "#fn-draw" click zoom-transform href "#sub-zoom-transform" click example-content href "#sub-example-content" zoom-transform --> translate1[Translate to Center] zoom-transform --> scale[Scale Zoom] zoom-transform --> translate2[Translate Back] click translate1 href "#sub-translate1" click scale href "#sub-scale" click translate2 href "#sub-translate2" example-content --> draw-rectangle[Draw Rectangle] example-content --> draw-circle[Draw Circle] click draw-rectangle href "#sub-draw-rectangle" click draw-circle href "#sub-draw-circle" button-creation --> zoom-in-button[Zoom In Button Setup] button-creation --> zoom-out-button[Zoom Out Button Setup] click zoom-in-button href "#sub-zoom-in-button" click zoom-out-button href "#sub-zoom-out-button" zoom-in-button --> increase-zoom[Increase Zoom Level] zoom-out-button --> decrease-zoom[Decrease Zoom Level] click increase-zoom href "#sub-increase-zoom" click decrease-zoom href "#sub-decrease-zoom" windowresized[windowResized] --> setup click windowresized href "#fn-windowresized"

❓ Frequently Asked Questions

What visual elements does this p5.js sketch display?

This sketch creates a zoomable interface featuring a blue rectangle and a pink ellipse, both positioned at the center of the canvas.

How can users interact with this creative coding sketch?

Users can interact with the sketch by clicking the '+' and '−' buttons to zoom in and out of the visual elements.

What key creative coding concepts are illustrated in this sketch?

The sketch demonstrates the use of scaling and translation to create zoom effects, along with responsive canvas resizing.

Preview

Sketch 2026-03-16 15:35 - p5.js creative coding sketch preview
Sketch Preview
Code flow diagram showing the structure of Sketch 2026-03-16 15:35 - Code flow showing setup, draw, createzoombuttons, windowresized
Code Flow Diagram