Sketch 2026-03-17 00:49

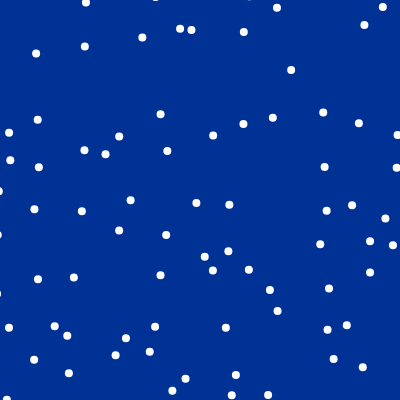
This sketch creates an animated flowing river effect where white dots move continuously downward across a dark blue canvas. The dots are arranged in a sparse grid pattern with random offsets, and they loop seamlessly by resetting to the top when they exit the bottom of the screen.

🧪 Try This!

Experiment with the code by making these changes:

  1. Make the river flow upward — Changing flowSpeed to a negative value reverses the direction of the flowing dots
  2. Create a much denser river — Reducing the spacing variable makes the grid finer, creating many more dots flowing together
  3. Make dots bright cyan — Changing the fill color from white to cyan creates a completely different visual mood
  4. Fill 100% of grid positions — Changing the random spawn condition from 0.8 to 1.0 creates a perfectly uniform grid of dots with no gaps
Prefer the full editor? Open it there →

📖 About This Sketch

This sketch animates a river of white dots flowing downward on a dark blue background, creating a mesmerizing looping effect. The dots are positioned in a sparse grid with randomized offsets to break up the rigid pattern, and they continuously flow from top to bottom while seamlessly wrapping around. It demonstrates three essential p5.js techniques: array-based particle systems, responsive canvas sizing with windowResized(), and how to create infinite scrolling animations by recycling objects.

The code is organized into three main functions: setup() initializes the canvas and calls initializeDots() to populate the dots array, draw() updates each dot's position and redraws them every frame, and windowResized() handles responsive resizing. By studying this sketch, you will learn how to manage collections of objects efficiently, create natural-looking motion through randomization, and build animations that adapt to any screen size.

⚙️ How It Works

  1. When the sketch loads, setup() creates a full-screen canvas and calls initializeDots() to populate the dots array with white dot objects positioned in a sparse grid pattern across the entire canvas height
  2. Every frame, draw() clears the background with a dark blue color and sets the fill to white for drawing
  3. The code loops through every dot in the dots array, increasing its y position by flowSpeed to move it downward each frame
  4. When a dot flows past the bottom of the screen, it wraps to the top with a small random y offset, and its x position is slightly randomized to create a more organic flowing effect
  5. Finally, ellipse() draws each dot at its current position, and the loop repeats 60 times per second to create smooth continuous motion
  6. When the window is resized, windowResized() updates the canvas dimensions and rebuilds the dots array so the animation still fills the entire screen

🎓 Concepts You'll Learn

Particle systemsArray loopsAnimation loopsModulo operatorResponsive canvas sizingRandomizationObject properties

📝 Code Breakdown

setup()

setup() runs once when the sketch starts. Using windowWidth and windowHeight here makes your canvas responsive—it automatically resizes when the browser window is resized (as long as windowResized() is also defined).

function setup() {
  createCanvas(windowWidth, windowHeight);
  // ヒント: windowWidth/windowHeightを使うと、キャンバスがレスポンシブになります
  
  initializeDots(); // ドットを初期化する関数を呼び出します
}
Line-by-line explanation (2 lines)

🔧 Subcomponents:

calculation Responsive canvas creation createCanvas(windowWidth, windowHeight);

Creates a canvas that fills the entire browser window, adapting to any screen size

function-call Initialize dots array initializeDots();

Populates the dots array with initial white dot objects in a grid pattern

createCanvas(windowWidth, windowHeight);
Creates a canvas with width and height equal to the browser window dimensions, making the animation fill the entire screen
initializeDots();
Calls the initializeDots() function to create all the dot objects and populate the dots array
draw()

draw() is the animation engine. It runs 60 times per second, updating every dot's position and redrawing them. The key pattern here is: clear background → update objects → redraw objects. This same pattern powers nearly every p5.js animation.

🔬 This code moves dots down and wraps them to the top. What happens if you change dot.y += flowSpeed to dot.y += flowSpeed * 2? How does the speed change visually?

    // ドットを垂直方向に動かします (縦の流れ)
    dot.y += flowSpeed;

    // ドットが画面の下端を越えたら、上端にリセットします
    // x座標にも少しランダムなオフセットを加えて、より自然な流れに見せます
    if (dot.y > height + spacing) {
      dot.y = -spacing + random(-randomOffsetRange, randomOffsetRange);

🔬 When a dot wraps to the top, this code also randomizes its x position. What happens if you comment out the dot.x line by adding // at the start? Will the dots still flow naturally?

      dot.y = -spacing + random(-randomOffsetRange, randomOffsetRange);
      dot.x = (dot.x + random(-randomOffsetRange, randomOffsetRange)) % (width + spacing);
      // JavaScriptの%演算子は負の数を返すことがあるため、x座標が負になった場合は調整します
      if (dot.x < -spacing) dot.x += width + spacing;
function draw() {
  background(0, 50, 150); // 濃い青色の背景 (ネイビーに近い色)

  noStroke(); // ドットの枠線なし
  fill(255);  // ドットの色を白に設定

  // 各ドットを更新して描画します
  for (let i = 0; i < dots.length; i++) {
    let dot = dots[i];

    // ドットを垂直方向に動かします (縦の流れ)
    dot.y += flowSpeed;

    // ドットが画面の下端を越えたら、上端にリセットします
    // x座標にも少しランダムなオフセットを加えて、より自然な流れに見せます
    if (dot.y > height + spacing) {
      dot.y = -spacing + random(-randomOffsetRange, randomOffsetRange);
      dot.x = (dot.x + random(-randomOffsetRange, randomOffsetRange)) % (width + spacing);
      // JavaScriptの%演算子は負の数を返すことがあるため、x座標が負になった場合は調整します
      if (dot.x < -spacing) dot.x += width + spacing;
    }

    // ドットを描画します
    ellipse(dot.x, dot.y, dot.size);
  }
}
Line-by-line explanation (11 lines)

🔧 Subcomponents:

calculation Dark blue background background(0, 50, 150);

Clears the canvas each frame with a dark navy blue color, making the white dots stand out

for-loop Update and draw each dot for (let i = 0; i < dots.length; i++) {

Iterates through every dot in the dots array to update its position and draw it

calculation Move dot downward dot.y += flowSpeed;

Increases each dot's y position by flowSpeed, making it move down the screen each frame

conditional Detect and wrap bottom exit if (dot.y > height + spacing) {

Checks if a dot has flowed past the bottom of the screen and needs to wrap to the top

calculation Reset dot to top with randomness dot.y = -spacing + random(-randomOffsetRange, randomOffsetRange);

Places the dot just above the top of the canvas with a random vertical offset for natural-looking flow

calculation Randomize and wrap horizontal position dot.x = (dot.x + random(-randomOffsetRange, randomOffsetRange)) % (width + spacing);

Adds randomness to the x position and uses modulo to wrap it horizontally, preventing gaps in the pattern

conditional Fix negative x coordinates if (dot.x < -spacing) dot.x += width + spacing;

Corrects negative x values that can result from JavaScript's modulo operator, ensuring dots stay on screen

background(0, 50, 150);
Clears the entire canvas with a dark blue color (RGB: 0 red, 50 green, 150 blue), erasing the previous frame's dots
noStroke();
Tells p5.js not to draw an outline around the dots, making them solid circles
fill(255);
Sets the fill color to white (255 = maximum brightness in all RGB channels) for all shapes drawn after this line
for (let i = 0; i < dots.length; i++) {
Starts a loop that repeats once for each dot in the dots array, accessing each one by index i
let dot = dots[i];
Creates a shorter variable name 'dot' that refers to the current dot object being processed, making the code easier to read
dot.y += flowSpeed;
Increases the dot's y position by flowSpeed pixels, moving it downward; this happens every frame, creating continuous downward motion
if (dot.y > height + spacing) {
Checks if the dot has moved past the bottom of the canvas (comparing y to canvas height); if true, the dot needs to wrap to the top
dot.y = -spacing + random(-randomOffsetRange, randomOffsetRange);
Resets the dot to just above the top of the canvas with a random offset, so it appears to endlessly flow from above
dot.x = (dot.x + random(-randomOffsetRange, randomOffsetRange)) % (width + spacing);
Randomizes the x position slightly and uses the modulo operator (%) to keep it within horizontal bounds, creating a natural side-to-side variation
if (dot.x < -spacing) dot.x += width + spacing;
Fixes a quirk of JavaScript's modulo operator: if x becomes negative, this adds it back to the canvas width so the dot stays visible
ellipse(dot.x, dot.y, dot.size);
Draws a white circle at the dot's current (x, y) position with diameter equal to dot.size

initializeDots()

initializeDots() is called by setup() and windowResized() to populate the dots array. It uses two nested for-loops to create a grid pattern, and random() to add variation and sparseness. Understanding nested loops is key to creating grid-based particle systems.

🔬 This nested loop creates a grid of dots. If you change y += spacing to y += spacing / 2, you'll create twice as many rows. What happens visually to the density of the flow?

  // グリッド状にドットを配置し、それぞれにランダムなオフセットを加えます
  for (let y = 0; y < height + spacing; y += spacing) {
    for (let x = 0; x < width + spacing; x += spacing) {
      // ランダムな条件を満たす場合にのみドットを追加して、まばらな配置にします
      if (random() < 0.8) { // 80%の確率でドットが出現
function initializeDots() {
  dots = []; // 既存のドットをクリアします

  // グリッド状にドットを配置し、それぞれにランダムなオフセットを加えます
  for (let y = 0; y < height + spacing; y += spacing) {
    for (let x = 0; x < width + spacing; x += spacing) {
      // ランダムな条件を満たす場合にのみドットを追加して、まばらな配置にします
      if (random() < 0.8) { // 80%の確率でドットが出現
        dots.push({
          x: x + random(-randomOffsetRange, randomOffsetRange),
          y: y + random(-randomOffsetRange, randomOffsetRange),
          size: dotSize // ドットのサイズは均一になります
        });
      }
    }
  }
}
Line-by-line explanation (8 lines)

🔧 Subcomponents:

calculation Clear existing dots dots = [];

Empties the dots array, removing all previous dot objects before creating new ones

for-loop Vertical grid rows for (let y = 0; y < height + spacing; y += spacing) {

Creates grid rows from top to bottom of the canvas, spaced by the spacing variable

for-loop Horizontal grid columns for (let x = 0; x < width + spacing; x += spacing) {

Creates grid columns from left to right across the canvas, spacing them by the spacing variable

conditional Random dot creation condition if (random() < 0.8) {

Only creates a dot 80% of the time, leaving 20% of grid positions empty for a sparse appearance

calculation Create dot object with randomization dots.push({ x: x + random(-randomOffsetRange, randomOffsetRange), y: y + random(-randomOffsetRange, randomOffsetRange), size: dotSize });

Creates a new dot object with x and y offset randomly from the grid position, and adds it to the dots array

dots = [];
Empties the dots array by assigning it to a new empty array, clearing any previous dots
for (let y = 0; y < height + spacing; y += spacing) {
Starts a loop that counts from 0 to the canvas height (plus spacing) in steps of spacing, creating horizontal rows in the grid
for (let x = 0; x < width + spacing; x += spacing) {
Starts a nested loop that counts from 0 to the canvas width (plus spacing) in steps of spacing, creating columns within each row
if (random() < 0.8) {
Generates a random number between 0 and 1; if it's less than 0.8, a dot is created; this creates an 80% spawn chance
x: x + random(-randomOffsetRange, randomOffsetRange),
Sets the dot's x position to the grid x coordinate plus a random offset between -randomOffsetRange and +randomOffsetRange, breaking up the rigid grid
y: y + random(-randomOffsetRange, randomOffsetRange),
Sets the dot's y position to the grid y coordinate plus a random offset, adding natural variation to the initial positions
size: dotSize
Assigns the dot object's size property to the global dotSize variable, keeping all dots the same size
dots.push({...});
Adds the newly created dot object to the end of the dots array, storing it for later use in the draw loop

windowResized()

windowResized() is a special p5.js function that automatically runs whenever the browser window is resized. By calling resizeCanvas() and initializeDots() here, the sketch adapts gracefully to any screen size, maintaining its visual quality at any resolution.

function windowResized() {
  resizeCanvas(windowWidth, windowHeight);
  // キャンバスのサイズが変更されたら、ドットの配置も再計算します
  initializeDots();
}
Line-by-line explanation (2 lines)

🔧 Subcomponents:

calculation Resize canvas to new window size resizeCanvas(windowWidth, windowHeight);

Updates the canvas dimensions to match the current browser window width and height

function-call Reinitialize dots for new canvas initializeDots();

Regenerates the dots array to fill the newly resized canvas with an appropriately spaced grid

resizeCanvas(windowWidth, windowHeight);
p5.js function that updates the canvas size to the current browser window dimensions, ensuring the animation fills the screen
initializeDots();
Calls initializeDots() again to regenerate the grid of dots for the new canvas size, preventing stretching or gaps

📦 Key Variables

dots array

Stores all the dot objects that make up the flowing river. Each dot has x, y, and size properties

let dots = [];
flowSpeed number

How many pixels each dot moves downward per frame. Controls the speed of the river's flow

let flowSpeed = 0.5;
dotSize number

The diameter of each white dot in pixels. All dots are the same size

let dotSize = 8;
spacing number

The grid spacing in pixels—controls how far apart dots are positioned initially. Larger spacing creates fewer dots

let spacing = 40;
randomOffsetRange number

Maximum pixels a dot can shift randomly from its grid position. Larger values create a more chaotic, less grid-like appearance

let randomOffsetRange = 15;

🔧 Potential Improvements (4)

Here are some ways this code could be enhanced:

PERFORMANCE initializeDots()

The function recreates the entire dots array every time the window resizes, which can be expensive for very large grids on bigger screens

💡 For performance optimization, consider creating dots once and only updating their positions in the wrap-around logic, rather than regenerating them. Alternatively, use object pooling to reuse dot objects instead of creating new ones.

BUG draw() - horizontal wrapping

The modulo operator and negative-number fix for the x coordinate can cause dots to jump unexpectedly at screen edges in rare cases

💡 Simplify the x-wrapping logic by using: if (dot.x > width + spacing) { dot.x = -spacing; } else if (dot.x < -spacing) { dot.x = width + spacing; } for more predictable behavior

STYLE draw() - dot rendering

All dots are drawn at the same z-depth with uniform color, making the river feel flat

💡 Add depth variation by mapping dot.y to opacity: let alpha = map(dot.y, 0, height, 100, 255); fill(255, alpha); This creates a fade-in effect at the top and fade-out at the bottom for more visual depth

FEATURE global variables

There is no user interaction—the animation runs the same way regardless of mouse position or keyboard input

💡 Add mouse interaction by mapping mouseX and mouseY to flowSpeed or dotSize dynamically: flowSpeed = map(mouseY, 0, height, 0.1, 2); This would let users control the river with their mouse

🔄 Code Flow

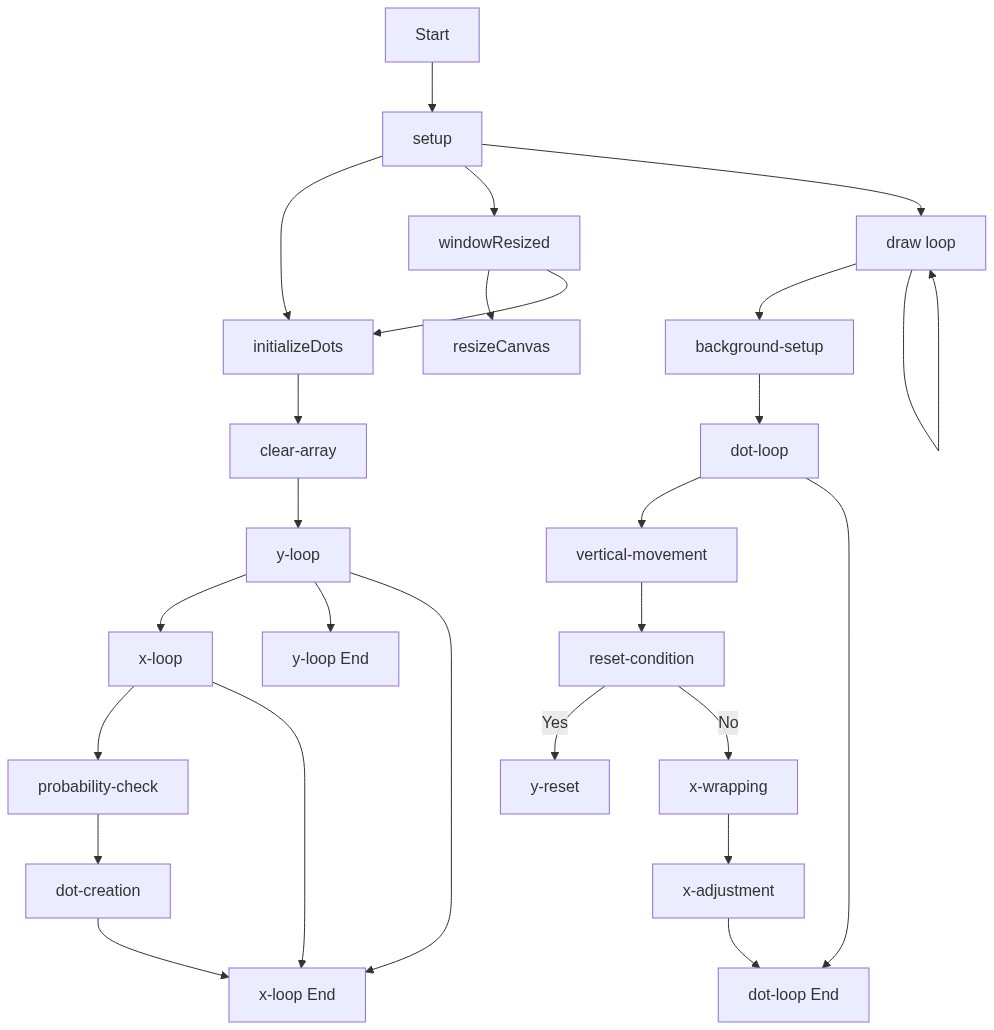
Code flow showing setup, draw, initializedots, windowresized

💡 Click on function names in the diagram to jump to their code

graph TD start[Start] --> setup[setup] setup --> draw[draw loop] draw --> backgroundfill[background-fill] draw --> dotloop[dot-loop] dotloop --> verticalmovement[vertical-movement] verticalmovement --> wrapdetection[wrap-detection] wrapdetection -->|If wrapped| wrapreset[wrap-reset] wrapdetection -->|If not wrapped| horizontalwrap[horizontal-wrap] horizontalwrap --> negativefix[negative-fix] draw --> dotsclear[dots-clear] dotsclear --> initializedots[dots-initialization] initializedots --> yloop[y-loop] yloop --> xloop[x-loop] xloop --> randomspawn[random-spawn] randomspawn --> dotcreation[dot-creation] dotcreation --> dotloop click setup href "#fn-setup" click draw href "#fn-draw" click backgroundfill href "#sub-background-fill" click dotloop href "#sub-dot-loop" click verticalmovement href "#sub-vertical-movement" click wrapdetection href "#sub-wrap-detection" click wrapreset href "#sub-wrap-reset" click horizontalwrap href "#sub-horizontal-wrap" click negativefix href "#sub-negative-fix" click dotsclear href "#sub-dots-clear" click initializedots href "#fn-initializedots" click yloop href "#sub-y-loop" click xloop href "#sub-x-loop" click randomspawn href "#sub-random-spawn" click dotcreation href "#sub-dot-creation"

❓ Frequently Asked Questions

What visual effects can I expect from the p5.js sketch titled 'Sketch 2026-03-17 00:49'?

The sketch creates a dynamic visual of floating dots that move vertically down the screen, resembling a flowing river, with a navy blue background enhancing the effect.

Is there any way for users to interact with this p5.js sketch?

While the sketch does not include direct user interaction, it automatically adjusts to the window size, recalculating the dot positions to maintain the visual effect.

What creative coding concepts are demonstrated in this p5.js sketch?

This sketch showcases concepts such as randomness in positioning, continuous animation through the draw loop, and responsive design with window resizing.

Preview

Sketch 2026-03-17 00:49 - p5.js creative coding sketch preview
Sketch Preview
Code flow diagram showing the structure of Sketch 2026-03-17 00:49 - Code flow showing setup, draw, initializedots, windowresized
Code Flow Diagram