
Sketch 2026-04-17 15:29

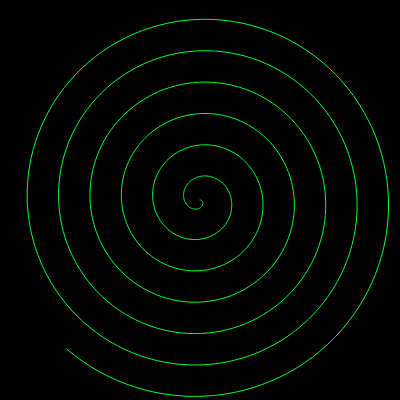
This sketch creates an interactive audio-reactive spiral visualization that pulses to microphone input, with colors shifting through the rainbow as the spiral expands. Pressing 'h' toggles between the music wave effect and a playful 'hacked screen' aesthetic with green code and digital glitch effects.

🧪 Try This!

Experiment with the code by making these changes:

  1. Make the spiral much denser — Smaller angleIncrement values pack more vertices into each rotation, creating a much smoother, more detailed spiral with no gaps.
  2. Boost the audio reactivity — Increasing the max wave offset (30 to 80) makes even quiet sounds cause huge visible ripples in the spiral.
  3. Change the spiral expansion speed — Higher radiusIncrement values make the spiral expand faster and cover more screen space before hitting the edge.
  4. Add more waves to the ripple — The 10 in sin(angle * 10) controls how many complete ripples circle the spiral—increase it to 20 for twice as many waves.
  5. Swap 'h' key to 'space' bar — Pressing space instead of 'h' will toggle between modes—easier to tap while the sketch is running.
  6. Use only green tones instead of rainbow — Locking hue to a fixed green value removes the rainbow effect—try 100 for pure green or 60 for yellow-green.
Prefer the full editor? Open it there →

📖 About This Sketch

This sketch captures microphone audio and transforms it into a mesmerizing spiral that grows outward from the center of your canvas while shifting through rainbow colors. The visualization is driven by p5.sound's FFT (Fast Fourier Transform) analyzer, which breaks down audio frequencies in real time, and the mid-frequency energy controls how much the spiral waves and pulses. It demonstrates one of creative coding's most satisfying techniques: syncing animation to live sound input.

The code is organized into a setup() function that initializes the microphone and FFT analyzer, a draw() function with two mutually exclusive visual modes (a mathematical spiral wave and a hacked-screen effect), and a keyPressed() function that lets you toggle between them by pressing 'h'. By studying it you will learn how to use p5.sound's FFT to read frequency data, map audio energy to visual parameters, and build interactive visualizations that respond to the real world.

⚙️ How It Works

  1. When the sketch loads, setup() creates a full-window canvas and initializes p5.sound's microphone input (mic) and FFT analyzer (fft), then calls userStartAudio() to request microphone permission.
  2. Every frame, draw() clears the canvas with a black background, then checks whether the hacked effect is active or not.
  3. If the hacked effect is OFF, the sketch analyzes the frequency spectrum using fft.analyze() and reads the mid-frequency energy band with fft.getEnergy('mid').
  4. That energy value is mapped to a waveOffset (0 to 30 pixels) that modulates the spiral's radius, creating the music-reactive pulsing effect.
  5. A continuous spiral is drawn using beginShape() and vertex(), with each point's color based on its angle (hue) and distance from center (brightness), and its radius perturbed by sin(angle * 10) * waveOffset to create the wave ripples.
  6. If the hacked effect is ON, random green lines, monospace 'code' text, and pixel noise are drawn instead, simulating a playful hacked terminal screen.
  7. Pressing 'h' toggles between the two modes by flipping the isHackedEffectActive boolean.

🎓 Concepts You'll Learn

Audio input and microphoneFFT frequency analysisReal-time sound visualizationParametric spiralsColor mapping with HSBInteractive mode togglingShape vertices and continuous drawingPixel manipulation

📝 Code Breakdown

setup()

setup() runs once when the sketch starts. Here it initializes the canvas, switches to HSB color mode for easier rainbow painting, and sets up the entire p5.sound pipeline: microphone → FFT analyzer. Understanding this initialization order is crucial for audio sketches.

function setup() {
  createCanvas(windowWidth, windowHeight);
  colorMode(HSB, 360, 100, 100); // Set color mode to HSB for rainbow

  mic = new p5.AudioIn(); // Create an audio input object
  mic.start(); // Start listening to the microphone

  fft = new p5.FFT(); // Create an FFT object to analyze frequencies
  fft.setInput(mic); // Connect FFT to the microphone

  userStartAudio(); // Prompt the user for microphone access. This is essential!
}
Line-by-line explanation (7 lines)
createCanvas(windowWidth, windowHeight);
Creates a canvas that fills the entire browser window by using windowWidth and windowHeight variables.
colorMode(HSB, 360, 100, 100);
Switches from RGB to HSB color mode, where 360 is the hue range (0-360 degrees on the color wheel), and 100 is the saturation and brightness range—this makes rainbow colors much easier to create.
mic = new p5.AudioIn();
Creates a new p5.AudioIn object that will capture sound from your microphone and stores it in the 'mic' variable.
mic.start();
Tells the microphone object to start listening and recording audio input.
fft = new p5.FFT();
Creates a new Fast Fourier Transform analyzer that will break down audio into frequency bands.
fft.setInput(mic);
Connects the FFT analyzer to the microphone input so it analyzes your voice or sounds in real time.
userStartAudio();
Prompts the browser to request microphone permission from the user—this is required before p5.sound can access audio.
draw()

draw() is where the real magic happens, running 60 times per second. It contains two distinct visual modes: the hacked screen (pure visual noise and text) and the music wave (audio-driven parametric spiral). The music wave uses polar-to-Cartesian conversion (angle and radius to x and y), frequency analysis (FFT to read microphone energy), and value mapping (map() to connect audio to visuals). Understanding how these three techniques layer creates the foundation for all audio-reactive visualizations.

🔬 These three lines create the rainbow color effect by mapping angle to hue and radius to brightness. What happens if you change brightness from 80, 100 to 50, 80? Or try map(angle, 0, TWO_PI, 0, 180) % 360 to only use half the color wheel?

let hue = map(angle, 0, TWO_PI, 0, 360) % 360; 
      let brightness = map(radius, 0, max(width, height) / 2, 80, 100);
      stroke(hue, 100, brightness); // Set the stroke color

🔬 This line creates the wave ripples by adding sin(angle * 10) * waveOffset to the base radius. The 10 controls the number of ripples. What happens if you change 10 to 5? To 20? To 0.5?

let currentRadius = radius + sin(angle * 10) * waveOffset;
function draw() {
  background(0); // Black background for contrast

  if (isHackedEffectActive) {
    // === HACKED SCREEN EFFECT START ===
    // This is purely a visual effect and does NOT actually hack your computer.
    // It's a game-like simulation.

    // Draw random green lines
    stroke(100, 100, 100); // Bright green
    for (let i = 0; i < 50; i++) {
      line(random(width), random(height), random(width), random(height));
    }

    // Draw some simulated "code" text
    textSize(24);
    fill(100, 100, 100); // Bright green text
    textFont('monospace'); // Use a monospace font for code aesthetic
    textAlign(LEFT, TOP);
    text("ACCESS DENIED\nRE-ATTEMPTING PROTOCOL 7.4.2\nENCRYPTED DATA STREAM INITIATED\nTARGET IP: 192.168.1.1\nSTATUS: ONLINE\nSCANNING FOR VULNERABILITIES...", 20, 20);

    // Add some random "noise" pixels
    loadPixels();
    for (let i = 0; i < pixels.length; i += 4) {
      if (random() < 0.1) { // 10% chance to alter a pixel
        pixels[i] = random(50, 150);   // Red (random green hue for noise)
        pixels[i + 1] = random(50, 150); // Green
        pixels[i + 2] = random(50, 150); // Blue
      }
    }
    updatePixels();

    // === HACKED SCREEN EFFECT END ===
  } else {
    // === RAINBOW MUSIC WAVE START ===
    // Only draw the music wave spiral if the hacked effect is not active

    noFill();      // No fill for the spiral segments

    let centerX = width / 2;
    let centerY = height / 2;

    let radius = 0;
    let angle = 0;
    let angleIncrement = 0.05; // Density of the spiral
    let radiusIncrement = 0.25; // How quickly the spiral expands

    // Analyze the frequency spectrum
    fft.analyze();
    
    // Using the "mid" band energy as a general indicator of volume
    let midEnergy = fft.getEnergy("mid"); 

    // Map the mid-band energy to a wave offset
    let waveOffset = map(midEnergy, 0, 255, 0, 30); // Max wave offset of 30 pixels

    beginShape(); // Start drawing a continuous shape
    for (let i = 0; i < 4000; i++) { 
      let hue = map(angle, 0, TWO_PI, 0, 360) % 360; 
      let brightness = map(radius, 0, max(width, height) / 2, 80, 100);
      stroke(hue, 100, brightness); // Set the stroke color

      // Modulate the radius by the waveOffset to create the "music wave" effect
      let currentRadius = radius + sin(angle * 10) * waveOffset; 
      
      let x = centerX + currentRadius * cos(angle);
      let y = centerY + currentRadius * sin(angle);

      vertex(x, y); // Add a vertex to our continuous shape

      angle += angleIncrement;
      radius += radiusIncrement;

      if (radius > max(width, height) / 2) {
        break;
      }
    }
    endShape(); // Finish drawing the continuous shape
    // === RAINBOW MUSIC WAVE END ===
  }
}
Line-by-line explanation (26 lines)

🔧 Subcomponents:

for-loop Hacked Effect Random Lines for (let i = 0; i < 50; i++) { line(random(width), random(height), random(width), random(height)); }

Draws 50 random lines across the screen in bright green to simulate a chaotic hacked interface.

for-loop Hacked Effect Pixel Noise for (let i = 0; i < pixels.length; i += 4) { if (random() < 0.1) { // 10% chance to alter a pixel pixels[i] = random(50, 150); // Red (random green hue for noise) pixels[i + 1] = random(50, 150); // Green pixels[i + 2] = random(50, 150); // Blue } }

Randomly corrupts 10% of the canvas pixels each frame to create a glitch/digital noise effect.

for-loop Spiral Vertex Loop for (let i = 0; i < 4000; i++) { let hue = map(angle, 0, TWO_PI, 0, 360) % 360; let brightness = map(radius, 0, max(width, height) / 2, 80, 100); stroke(hue, 100, brightness); // Set the stroke color // Modulate the radius by the waveOffset to create the "music wave" effect let currentRadius = radius + sin(angle * 10) * waveOffset; let x = centerX + currentRadius * cos(angle); let y = centerY + currentRadius * sin(angle); vertex(x, y); // Add a vertex to our continuous shape angle += angleIncrement; radius += radiusIncrement; if (radius > max(width, height) / 2) { break; } }

Iterates up to 4000 times, calculating the angle and radius of each point on the spiral, coloring it based on position, and adding it as a vertex to create a continuous visual spiral.

background(0); // Black background for contrast
Fills the entire canvas with black (0 in HSB) at the start of every frame, clearing any previous drawing.
if (isHackedEffectActive) {
Checks whether the hacked effect is currently active—if true, the rest of the if-block runs; otherwise the else block runs.
stroke(100, 100, 100); // Bright green
Sets the line color to bright green in HSB mode (hue 100 is green, saturation 100 is fully saturated, brightness 100 is fully bright).
line(random(width), random(height), random(width), random(height));
Draws a line from a random point on the canvas to another random point, creating chaotic visual noise.
text("ACCESS DENIED\nRE-ATTEMPTING PROTOCOL 7.4.2\nENCRYPTED DATA STREAM INITIATED\nTARGET IP: 192.168.1.1\nSTATUS: ONLINE\nSCANNING FOR VULNERABILITIES...", 20, 20);
Draws fake 'hacked' terminal text in the top-left corner (position 20, 20) using the monospace font, complete with newlines for readability.
if (random() < 0.1) { // 10% chance to alter a pixel
Randomly selects pixels: if a random number between 0 and 1 is less than 0.1, there's a 10% chance to corrupt that pixel.
pixels[i] = random(50, 150); // Red (random green hue for noise)
Sets the red channel of the pixel to a random value between 50 and 150, creating random color noise.
updatePixels();
Applies all the pixel-level changes made in the pixels array back to the canvas, making them visible.
noFill(); // No fill for the spiral segments
Tells p5.js not to fill any shapes drawn after this line—only their outlines (strokes) will be visible.
let centerX = width / 2;
Calculates the horizontal center of the canvas by dividing width by 2.
let centerY = height / 2;
Calculates the vertical center of the canvas by dividing height by 2—the spiral will grow from this point.
fft.analyze();
Tells the FFT analyzer to break down the current audio from the microphone into frequency bands so we can read individual bands.
let midEnergy = fft.getEnergy("mid");
Reads the energy level of the mid-frequency band (roughly human voice and melodic instruments) and stores it in midEnergy (a value from 0 to 255).
let waveOffset = map(midEnergy, 0, 255, 0, 30); // Max wave offset of 30 pixels
Converts midEnergy (0-255 range) to waveOffset (0-30 range) using the map() function—louder mid-frequencies push the spiral outward more.
beginShape(); // Start drawing a continuous shape
Tells p5.js to start collecting vertices for a continuous connected shape (the spiral).
let hue = map(angle, 0, TWO_PI, 0, 360) % 360;
Maps the current angle (0 to 2π radians) to a hue value (0-360), cycling through the entire rainbow, then wraps it with % 360 to keep it in range.
let brightness = map(radius, 0, max(width, height) / 2, 80, 100);
Maps the radius (distance from center) to brightness (80-100), making the spiral brighter as it expands outward.
stroke(hue, 100, brightness); // Set the stroke color
Sets the stroke color in HSB mode using the calculated hue and brightness—saturation is locked at 100 for vivid colors.
let currentRadius = radius + sin(angle * 10) * waveOffset;
Modulates the spiral radius by adding a sine wave scaled by waveOffset, creating the rippling effect that pulses with audio energy—sin(angle * 10) adds 10 complete waves as the spiral expands.
let x = centerX + currentRadius * cos(angle);
Converts polar coordinates (angle, currentRadius) to Cartesian x using cosine, placing it relative to the canvas center.
let y = centerY + currentRadius * sin(angle);
Converts polar coordinates (angle, currentRadius) to Cartesian y using sine, placing it relative to the canvas center.
vertex(x, y); // Add a vertex to our continuous shape
Adds a point at (x, y) to the shape being drawn—the next iteration will add another point, and p5.js will connect them.
angle += angleIncrement;
Rotates the angle slightly for the next iteration, moving the spiral outward while rotating.
radius += radiusIncrement;
Increases the radius for the next iteration, moving the spiral further from the center.
if (radius > max(width, height) / 2) {
Checks if the spiral has expanded beyond half the larger canvas dimension—if so, the loop breaks to avoid drawing far off-screen.
endShape(); // Finish drawing the continuous shape
Tells p5.js to stop collecting vertices and actually draw the complete spiral on the canvas.

keyPressed()

keyPressed() fires once when any key is pressed. Here it listens specifically for 'h' and toggles the isHackedEffectActive boolean using the ! operator. This is the foundation of interactive mode-switching in p5.js sketches—by toggling a single boolean, you control which entire visual system runs in draw().

🔬 What if you remove the inner 'if (!isHackedEffectActive)' block entirely? Then when you toggle the hacked effect off, the pixel noise will linger and blend with the spiral in the next frame. Try it!

if (key === 'h' || key === 'H') { // Check if the pressed key is 'h'
    isHackedEffectActive = !isHackedEffectActive; // Toggle the hacked effect state
    // If the hacked effect is turned off, clear the background to remove any residual noise
    if (!isHackedEffectActive) {
      background(0);
    }
  }
function keyPressed() {
  if (key === 'h' || key === 'H') { // Check if the pressed key is 'h'
    isHackedEffectActive = !isHackedEffectActive; // Toggle the hacked effect state
    // If the hacked effect is turned off, clear the background to remove any residual noise
    if (!isHackedEffectActive) {
      background(0);
    }
  }
}
Line-by-line explanation (4 lines)

🔧 Subcomponents:

conditional Toggle Hacked Effect isHackedEffectActive = !isHackedEffectActive;

Flips the boolean value: if it was true, it becomes false; if it was false, it becomes true.

conditional Clear Screen After Toggle Off if (!isHackedEffectActive) { background(0); }

If the hacked effect is turned off, immediately clears any remaining pixel noise from the canvas.

if (key === 'h' || key === 'H') { // Check if the pressed key is 'h'
Checks if the pressed key was lowercase 'h' or uppercase 'H'—only these keys trigger the toggle logic.
isHackedEffectActive = !isHackedEffectActive; // Toggle the hacked effect state
The ! operator flips the boolean: if isHackedEffectActive was true, it becomes false; if it was false, it becomes true—this switches between the two visual modes.
if (!isHackedEffectActive) {
Checks if the hacked effect is now OFF (the ! inverts the boolean).
background(0);
If the hacked effect just turned off, immediately clear the canvas with black to remove any lingering pixel noise from the previous hacked frames.

windowResized()

windowResized() is a p5.js lifecycle function that fires whenever the browser window is resized. Most sketches only need to resize the canvas, but because the hacked effect is drawn fresh each frame with random noise, we need to explicitly call draw() to update it immediately. The music wave, by contrast, will naturally redraw itself on the next frame cycle.

function windowResized() {
  resizeCanvas(windowWidth, windowHeight);
  // If the window is resized while the hacked effect is active, redraw the effect
  // Otherwise, the music wave will automatically redraw in draw()
  if (isHackedEffectActive) {
    draw(); // Call draw to redraw the hacked effect immediately
  }
}
Line-by-line explanation (3 lines)
resizeCanvas(windowWidth, windowHeight);
Resizes the canvas to match the new window dimensions whenever the user resizes their browser.
if (isHackedEffectActive) {
Checks if the hacked effect is currently active.
draw(); // Call draw to redraw the hacked effect immediately
If the hacked effect is active, immediately calls draw() to redraw it at the new canvas size—without this, the hacked effect would not update until the next frame.

📦 Key Variables

mic p5.AudioIn

Stores the microphone input object—p5.sound uses this to capture audio from your device's microphone.

let mic = new p5.AudioIn();
fft p5.FFT

Stores the Fast Fourier Transform analyzer object—p5.sound uses this to break audio into frequency bands so the sketch can read which frequencies are loudest.

let fft = new p5.FFT();
isHackedEffectActive boolean

A true/false flag that controls whether the hacked screen effect or music wave spiral is currently displayed—toggled by pressing 'h'.

let isHackedEffectActive = false;
centerX number

The horizontal center coordinate of the canvas (width / 2)—the spiral grows outward from this x position.

let centerX = width / 2;
centerY number

The vertical center coordinate of the canvas (height / 2)—the spiral grows outward from this y position.

let centerY = height / 2;
radius number

Tracks the current distance from the center in the spiral loop—increases each iteration to make the spiral expand outward.

let radius = 0;
angle number

Tracks the current rotation angle (in radians) as the spiral is drawn—increases each iteration to rotate the spiral points.

let angle = 0;
angleIncrement number

Controls how much the angle increases per vertex—smaller values create denser, smoother spirals; larger values create sparser, choppier ones.

let angleIncrement = 0.05;
radiusIncrement number

Controls how much the radius increases per vertex—determines how quickly the spiral expands outward from the center.

let radiusIncrement = 0.25;
midEnergy number

Stores the current energy level of the mid-frequency band from the microphone (0-255 range)—used to make the spiral pulse with audio.

let midEnergy = fft.getEnergy("mid");
waveOffset number

The mapped audio energy (0-30 range) that controls how far the sine wave pushes the spiral outward—louder audio = larger outward push.

let waveOffset = map(midEnergy, 0, 255, 0, 30);
hue number

The color hue (0-360 in HSB mode) calculated from the current angle—determines the rainbow colors of the spiral.

let hue = map(angle, 0, TWO_PI, 0, 360) % 360;
brightness number

The color brightness (0-100 in HSB mode) calculated from the current radius—the spiral gets brighter as it expands.

let brightness = map(radius, 0, max(width, height) / 2, 80, 100);
currentRadius number

The modified radius including the sine wave modulation—this is the actual radius used to position each vertex, creating the rippling wave effect.

let currentRadius = radius + sin(angle * 10) * waveOffset;
x number

The x coordinate of the current spiral vertex, converted from polar coordinates (angle, currentRadius) using cosine.

let x = centerX + currentRadius * cos(angle);
y number

The y coordinate of the current spiral vertex, converted from polar coordinates (angle, currentRadius) using sine.

let y = centerY + currentRadius * sin(angle);

🔧 Potential Improvements (5)

Here are some ways this code could be enhanced:

PERFORMANCE draw() - hacked effect pixel loop

The pixel noise loop runs every frame and checks every pixel (pixels.length can be 1+ million), with 10% randomly altered—this is computationally expensive and may cause frame drops on low-end devices.

💡 Instead of looping through all pixels, draw random-colored small rectangles or circles at random positions. This is much faster: 'for (let i = 0; i < 500; i++) rect(random(width), random(height), 10, 10);' with noStroke() and random fill colors.

BUG draw() - spiral drawing loop

The loop runs up to 4000 iterations regardless of canvas size or angle/radius increments—on a very small canvas or with large increments, this wastes iterations and CPU time; on a very large canvas or with tiny increments, 4000 may not be enough to fill the screen.

💡 Replace the fixed loop count with a condition that checks 'while (radius < max(width, height) / 2)' instead of 'for (let i = 0; i < 4000; i++)' with the break statement. This adapts to any canvas size automatically.

STYLE setup() - microphone initialization

The code calls userStartAudio() without any error handling or user feedback—if the browser denies microphone permission or the device has no microphone, the sketch will silently fail and display only the black background.

💡 Add a try-catch block or check if the microphone is actually listening using mic.enabled before assuming it's ready. Display a fallback message or visualization if audio input is unavailable.

FEATURE draw() - hacked effect

The hacked effect text and lines are static and don't sync to audio—only the spiral is audio-reactive, so the hacked effect feels disconnected from the sound.

💡 Modify the hacked effect to also respond to audio energy: animate the text position, change line colors based on frequency, or scale the random lines by fft.getEnergy() values. This would make both modes equally audio-reactive.

STYLE keyPressed() - toggle logic

The code only toggles on lowercase 'h' or uppercase 'H', but doesn't inform the user what keys are available—a new user won't know to press 'h' to switch modes.

💡 Display a help text or key indicator on the canvas (e.g., 'Press h to toggle hacked effect') at startup, or log it to the console with console.log('Press h to toggle hacked effect').

🔄 Code Flow

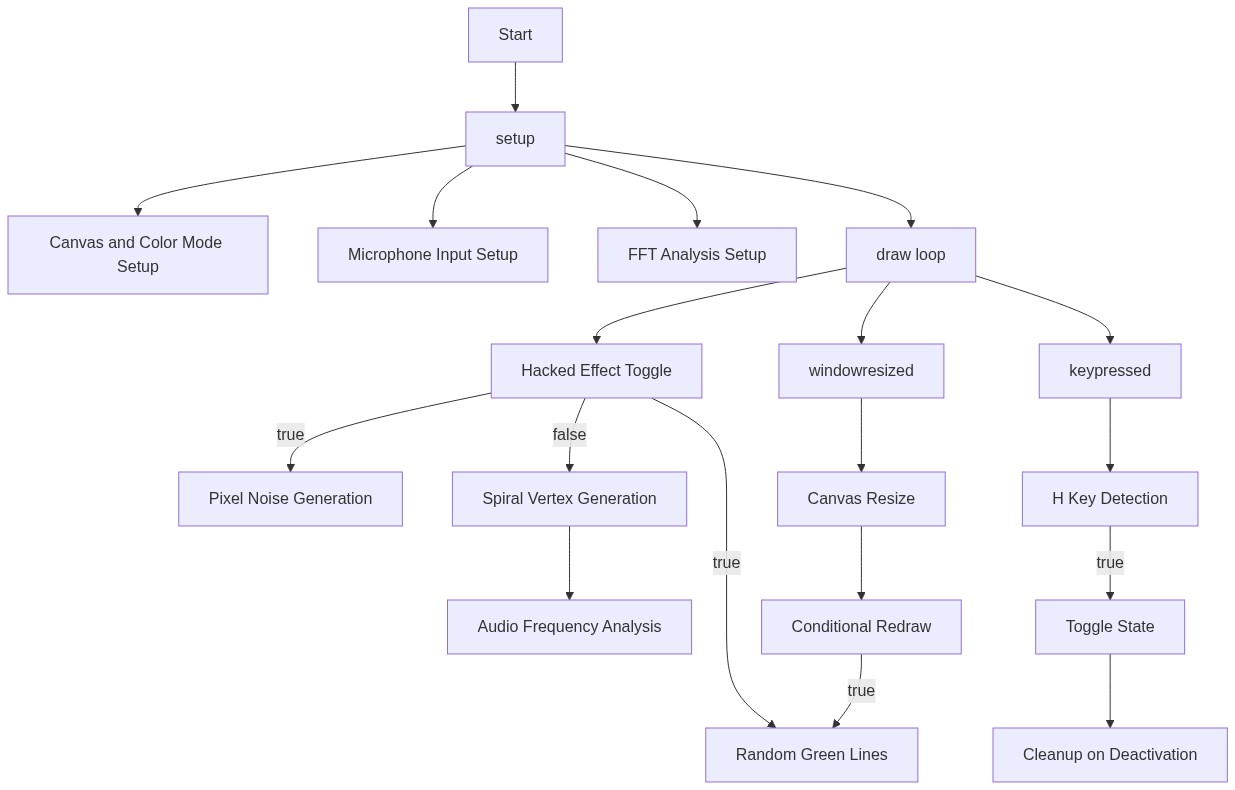
Code flow showing setup, draw, keypressed, windowresized

💡 Click on function names in the diagram to jump to their code

graph TD start[Start] --> setup[setup] setup --> draw[draw loop] draw -->|60 times per second| toggle-conditional[Toggle Hacked Effect] draw -->|if isHackedEffectActive| hacked-effect-random-lines[Hacked Effect Random Lines] draw -->|if isHackedEffectActive| hacked-effect-pixel-noise[Hacked Effect Pixel Noise] draw -->|if not isHackedEffectActive| spiral-vertex-loop[Spiral Vertex Loop] toggle-conditional -->|if 'h' pressed| keypressed[keypressed] keypressed -->|toggle isHackedEffectActive| toggle-conditional toggle-conditional -->|if toggled off| clear-screen-conditional[Clear Screen After Toggle Off] clear-screen-conditional -->|clear pixel noise| draw click setup href "#fn-setup" click draw href "#fn-draw" click keypressed href "#fn-keypressed" click toggle-conditional href "#sub-toggle-conditional" click clear-screen-conditional href "#sub-clear-screen-conditional" click hacked-effect-random-lines href "#sub-hacked-effect-random-lines" click hacked-effect-pixel-noise href "#sub-hacked-effect-pixel-noise" click spiral-vertex-loop href "#sub-spiral-vertex-loop"

❓ Frequently Asked Questions

What visual effects does the p5.js sketch create?

The sketch generates a dynamic visual experience with a black background, random bright green lines, and simulated 'code' text, creating a hacked screen effect.

How can users interact with the sketch?

Users interact with the sketch by providing microphone access, which activates sound input to influence the visual effects.

What creative coding techniques are showcased in this sketch?

The sketch demonstrates audio analysis with the p5.FFT library and incorporates pixel manipulation to create a glitchy, visual 'hacked' effect.

Preview

Sketch 2026-04-17 15:29 - p5.js creative coding sketch preview
Sketch Preview
Code flow diagram showing the structure of Sketch 2026-04-17 15:29 - Code flow showing setup, draw, keypressed, windowresized
Code Flow Diagram