
Sketch 2026-04-26 11:4167984590374985937458748930293845549382728942739723847923874937

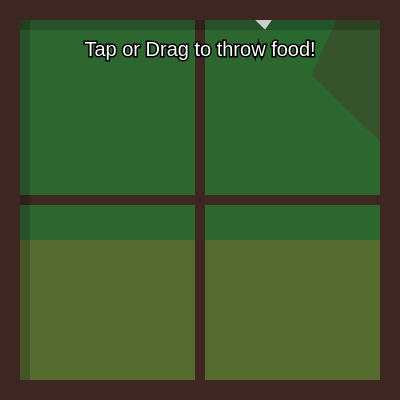
This interactive sketch creates a playful physics simulation where clicking or dragging launches food emojis (burgers, fries, hot dogs, pizza) into a sunny mountain landscape. The food items fly toward a vanishing point on the horizon, shrink as they recede into the distance, and spin in the air while gravity pulls them down, creating a convincing fake 3D perspective effect.

🧪 Try This!

Experiment with the code by making these changes:

  1. Make gravity stronger — Food will arc down faster and hit the ground sooner, creating a more dramatic parabolic arc.
  2. Slow down the perspective pull — Food will take longer to reach the vanishing point, staying visible on screen longer before shrinking away.
  3. Change the sky to sunset orange — The background instantly shifts to a warm orange, creating a dramatic sunset atmosphere.
  4. Increase the food spawn rate when dragging — Dragging creates a denser stream of food items, making it easier to fill the screen quickly.
  5. Make food items start larger — Food starts zoomed in much bigger, making it more visible initially before shrinking away into the distance.
Prefer the full editor? Open it there →

📖 About This Sketch

This sketch creates an interactive playground where you fling fast food items across a windowed scene overlooking mountains, clouds, and a sunny sky. The visual magic comes from combining several p5.js techniques: gravity physics that curves the food's trajectory, fake 3D perspective that pulls objects toward a vanishing point, and scale shrinking that makes distant items look far away. Every food item spins independently, creating a dynamic, playful sense of motion.

The code is organized into physics simulation (throwFood and updateAndDrawFood), landscape generation and rendering (drawLandscape and related helpers), and input handling (mousePressed, mouseDragged, touchStarted, touchMoved). By studying it you will learn how to fake depth-of-field and perspective in 2D graphics, apply realistic physics to flying objects, and handle both mouse and touch input for mobile compatibility.

⚙️ How It Works

  1. When the sketch loads, setup() creates a full-window canvas and calls generateLandscape() once to build random mountains and clouds—these are stored in arrays so they don't regenerate every frame, keeping performance high.
  2. Each frame, draw() calls drawLandscape() to paint the sky, sun, animated clouds, mountains, and ground; then updateAndDrawFood() handles all the active food items.
  3. When you click or drag the mouse (or touch on mobile), throwFood() creates a new food object at the bottom center of the screen with a velocity calculated from the angle toward your cursor and a random speed, then pushes it into the foodItems array.
  4. Every frame in updateAndDrawFood(), each food item moves by its velocity, has gravity added to its vertical speed (pulling it downward), then gets pulled toward the horizon vanishing point by a small amount each frame to create fake 3D perspective.
  5. Each food item's scale shrinks by 7% every frame (multiplying by 0.93), making it look farther away as it flies toward the horizon. When it becomes too tiny or falls off the bottom of the screen, it gets removed from the array.
  6. The food is drawn as a rotated, scaled emoji at its current position; rotation speed is independent for each item, creating natural tumbling motion.

🎓 Concepts You'll Learn

Physics simulation (velocity and gravity)Fake 3D perspective and vanishing pointsInteractive mouse and touch inputArray management and particle systemsEmoji rendering with scale and rotationResponsive canvas and window management

📝 Code Breakdown

setup()

setup() runs exactly once when the sketch starts. By generating the landscape here instead of in draw(), you ensure mountains and clouds don't change randomly each frame, keeping the scene stable and the code efficient.

function setup() {
  createCanvas(windowWidth, windowHeight);
  textAlign(CENTER, CENTER);
  
  // Generate static landscape objects once to keep performance high
  generateLandscape();
}
Line-by-line explanation (3 lines)
createCanvas(windowWidth, windowHeight);
Creates a canvas that fills the entire browser window, making the scene full-screen immersive
textAlign(CENTER, CENTER);
Centers all text drawing both horizontally and vertically—text coordinates now point to the center of the text, not the top-left
generateLandscape();
Calls a helper function once to create the mountains and clouds arrays—this runs only at startup, not every frame, saving performance
draw()

draw() is p5.js's main animation loop, running 60 times per second by default. This sketch keeps it simple by delegating specific tasks to helper functions—a clean pattern that makes the code readable and maintainable.

function draw() {
  drawLandscape();
  updateAndDrawFood();
  drawWindowFrame();
}
Line-by-line explanation (3 lines)
drawLandscape();
Paints the background (sky, sun, clouds, mountains, ground) fresh every frame
updateAndDrawFood();
Updates the position of every food item using physics, applies perspective, and renders each emoji
drawWindowFrame();
Draws the wooden window frame border and instruction text over everything else

throwFood(targetX, targetY)

throwFood() creates a single food object and adds it to the foodItems array. The object stores position (x, y), velocity (vx, vy), visual properties (scale, emoji, rot, rotSpeed), and animation speed. The trigonometry (angle, cos, sin) is the heart of converting 'I want to throw toward where the user clicked' into actual velocity vectors the physics engine can use each frame.

🔬 These two lines set where the throw originates. What happens if you change startY to height / 2 so food launches from the middle of the screen instead of the bottom?

  let startX = width / 2 + random(-40, 40);
  let startY = height;
function throwFood(targetX, targetY) {
  // Prevent lag by capping the maximum objects on screen
  if (foodItems.length > MAX_ITEMS) return; 

  // Start throwing from slightly random positions at the bottom center
  let startX = width / 2 + random(-40, 40);
  let startY = height;
  
  // Calculate angle towards the mouse/finger
  let angle = atan2(targetY - startY, targetX - startX);
  
  // Power of the throw
  let speed = random(18, 28);

  foodItems.push({
    emoji: random(FOOD_EMOJIS),
    x: startX,
    y: startY,
    vx: cos(angle) * speed,
    vy: sin(angle) * speed,
    scale: 2.5, // Start large (close to camera)
    rot: random(360),
    rotSpeed: random(-20, 20)
  });
}
Line-by-line explanation (9 lines)

🔧 Subcomponents:

conditional Performance cap check if (foodItems.length > MAX_ITEMS) return;

Stops creating new food if too many exist on screen, preventing lag and crashes

calculation Trajectory angle calculation let angle = atan2(targetY - startY, targetX - startX);

Uses atan2 to compute the angle from the throw origin to where the user clicked/touched

calculation Velocity vector components vx: cos(angle) * speed, vy: sin(angle) * speed,

Converts angle and speed into horizontal and vertical velocity components using trigonometry

if (foodItems.length > MAX_ITEMS) return;
Early exit: if the array already has more items than MAX_ITEMS, stop immediately and don't create a new food object
let startX = width / 2 + random(-40, 40);
Food starts at the horizontal center of the screen plus a small random jitter (±40 pixels) to make throws feel natural and varied
let startY = height;
Food always starts at the bottom of the screen (height), as if it's being thrown from below the window
let angle = atan2(targetY - startY, targetX - startX);
atan2 calculates the angle in radians from the starting position to the target (your mouse/finger). This angle drives the direction of the throw
let speed = random(18, 28);
Randomizes the throw speed between 18 and 28 pixels per frame, so each throw feels unique
vx: cos(angle) * speed,
Uses cosine to convert the angle into a horizontal velocity component; multiply by speed to scale it
vy: sin(angle) * speed,
Uses sine to convert the angle into a vertical velocity component; multiply by speed to scale it
scale: 2.5, // Start large (close to camera)
Food emoji starts at 2.5× normal size to simulate it being 'close to the camera' before shrinking into the distance
rotSpeed: random(-20, 20)
Each food gets a random spin speed between -20 and 20 degrees per frame, creating independent tumbling

updateAndDrawFood()

updateAndDrawFood() is the heartbeat of the animation. Every frame it moves, applies gravity, pulls toward the horizon (fake 3D), shrinks, rotates, and removes old items. The backwards loop is a common pattern in programming: when you remove items from an array while iterating, always go backwards so indices don't shift and cause skips. The vanishing-point perspective (pulling toward horizonX and horizonY) is a simple but effective way to fake depth in 2D graphics—objects get pulled toward a center point as they 'recede,' just like train tracks converging in a photograph.

🔬 These lines pull each food item toward the horizon, creating the fake 3D effect. What happens if you change 0.015 to 0.03 (double the strength)? What about 0 (turn it off)? Try each and watch how the perspective changes.

    item.x += (horizonX - item.x) * 0.015;
    item.y += (horizonY - item.y) * 0.015;

🔬 This removes food when it gets too tiny or falls off screen. What happens if you change 0.05 to 0.2 (remove items when much larger) or the condition to never trigger (comment it out)? Predict: will you get more food on screen? What happens to performance?

    if (item.scale < 0.05 || item.y > height + 100) {
      foodItems.splice(i, 1);
      continue;
    }
function updateAndDrawFood() {
  // Loop backwards to safely remove items while iterating
  for (let i = foodItems.length - 1; i >= 0; i--) {
    let item = foodItems[i];

    // Apply physics
    item.x += item.vx;
    item.y += item.vy;
    item.vy += 0.8; // Gravity pulling it down

    // Fake 3D Perspective (pull towards the horizon vanishing point)
    let horizonX = width / 2;
    let horizonY = height * 0.6;
    item.x += (horizonX - item.x) * 0.015;
    item.y += (horizonY - item.y) * 0.015;

    // Shrink as it flies away into the distance
    item.scale *= 0.93; 
    item.rot += item.rotSpeed;

    // Remove item if it's too small (far away) or falls off screen entirely
    if (item.scale < 0.05 || item.y > height + 100) {
      foodItems.splice(i, 1);
      continue;
    }

    // Draw the food
    push();
    translate(item.x, item.y);
    rotate(radians(item.rot));
    scale(item.scale);
    textSize(80);
    text(item.emoji, 0, 0);
    pop();
  }
}
Line-by-line explanation (20 lines)

🔧 Subcomponents:

for-loop Reverse iteration loop for (let i = foodItems.length - 1; i >= 0; i--)

Loops backwards through the array so removing items during iteration doesn't skip any or crash

calculation Position and velocity update item.x += item.vx; item.y += item.vy; item.vy += 0.8;

Updates position by velocity each frame and adds constant downward acceleration (gravity)

calculation Fake 3D perspective toward horizon item.x += (horizonX - item.x) * 0.015; item.y += (horizonY - item.y) * 0.015;

Pulls each item toward a vanishing point on the horizon, creating depth illusion

calculation Scale shrinking for distance item.scale *= 0.93;

Multiplies scale by 0.93 each frame, making food appear smaller as it recedes

conditional Remove far or off-screen items if (item.scale < 0.05 || item.y > height + 100) { foodItems.splice(i, 1); continue; }

Deletes food items that are too tiny or have fallen far below the screen to free memory

calculation Transformed emoji drawing push(); translate(item.x, item.y); rotate(radians(item.rot)); scale(item.scale); textSize(80); text(item.emoji, 0, 0); pop();

Draws the emoji at its position, rotated and scaled, using push/pop to isolate transformations

for (let i = foodItems.length - 1; i >= 0; i--)
Loop backwards through the array (from last index down to 0). Backwards iteration is crucial: if you looped forward and removed an item, the next item would be skipped
item.x += item.vx;
Move the food horizontally by adding its horizontal velocity component to its x position
item.y += item.vy;
Move the food vertically by adding its vertical velocity component to its y position
item.vy += 0.8; // Gravity pulling it down
Add 0.8 to the vertical velocity every frame—this creates constant downward acceleration, making the food arc downward like real gravity
let horizonX = width / 2;
Define the horizontal center of the screen as the vanishing point—this is where parallel lines converge in perspective drawing
let horizonY = height * 0.6;
Define the horizon line at 60% down the screen—food gets pulled toward this point to fake depth
item.x += (horizonX - item.x) * 0.015;
Calculate the distance from the food's x to the horizon's x, multiply by 0.015, and add it to current x. This pulls the food 1.5% of the way toward the center each frame
item.y += (horizonY - item.y) * 0.015;
Same idea vertically: pull the food 1.5% of the way toward the horizon line each frame, creating the illusion of receding into the distance
item.scale *= 0.93;
Multiply the scale by 0.93 (keep 93% of its current size), shrinking it by 7% every frame. Over time this creates the visual effect of the food flying far away and becoming tiny
item.rot += item.rotSpeed;
Add the food's rotation speed to its current rotation angle, making it spin every frame
if (item.scale < 0.05 || item.y > height + 100)
Check if the food has become too small (scale below 5% of original) or fallen too far below the screen (more than 100 pixels past the bottom)
foodItems.splice(i, 1);
Remove this item from the array by splicing it out at index i—this frees memory so the sketch doesn't slow down over time
continue;
Skip the rest of the loop iteration and move to the next item—important to not try drawing a deleted item
push();
Save the current transformation state (position, rotation, scale) so changes don't affect other drawings
translate(item.x, item.y);
Move the drawing origin to the food's current (x, y) position—all subsequent drawing happens relative to this point
rotate(radians(item.rot));
Rotate the coordinate system by the food's rotation angle (converted from degrees to radians). The emoji will now be drawn rotated
scale(item.scale);
Scale the coordinate system by the food's scale factor—the emoji will be drawn this many times larger or smaller
textSize(80);
Set the emoji size to 80 pixels before drawing (this base size gets scaled by the scale() call above)
text(item.emoji, 0, 0);
Draw the emoji at coordinates (0, 0)—because of translate/rotate/scale, this draws it at the right place, rotated, and at the right size
pop();
Restore the transformation state to what it was before push()—subsequent drawings won't be affected by this emoji's transforms

generateLandscape()

generateLandscape() runs once at startup and creates two arrays of objects: mountains and clouds. Each object stores the data needed to draw it (position, size, color, speed). Storing objects in arrays like this is efficient—later, drawLandscape() loops through them and draws each one. By generating the landscape once instead of every frame, the sketch runs much faster.

function generateLandscape() {
  // Generate mountains
  for (let i = 0; i < 7; i++) {
    mountains.push({
      x: random(width),
      w: random(300, 800),
      h: random(150, 400),
      color: color(random(40, 60), random(80, 110), random(40, 60)) // Shades of green/brown
    });
  }
  
  // Generate clouds
  for (let i = 0; i < 12; i++) {
    clouds.push({
      x: random(width),
      y: random(height * 0.4),
      w: random(80, 200),
      speed: random(0.3, 1.2)
    });
  }
}
Line-by-line explanation (9 lines)

🔧 Subcomponents:

for-loop Mountain generation loop for (let i = 0; i < 7; i++) {

Creates 7 random mountains with varied positions, sizes, and colors

for-loop Cloud generation loop for (let i = 0; i < 12; i++) {

Creates 12 random clouds at various heights and speeds

for (let i = 0; i < 7; i++) {
Loop 7 times to create 7 different mountains
x: random(width),
Assign each mountain a random x position anywhere across the canvas width
w: random(300, 800),
Give each mountain a random width between 300 and 800 pixels
h: random(150, 400),
Give each mountain a random height between 150 and 400 pixels
color: color(random(40, 60), random(80, 110), random(40, 60)) // Shades of green/brown
Create a color object with RGB values that produce greenish-brown hues; each component is randomized within a range to vary the color
for (let i = 0; i < 12; i++) {
Loop 12 times to create 12 different clouds
y: random(height * 0.4),
Place clouds randomly in the upper 40% of the screen (below y = height * 0.4 is the horizon/ground, so clouds stay in the sky)
w: random(80, 200),
Give each cloud a random width between 80 and 200 pixels
speed: random(0.3, 1.2)
Assign each cloud a random speed between 0.3 and 1.2 pixels per frame, making clouds drift across the sky at different rates

drawLandscape()

drawLandscape() paints the static scene: sky, sun, animated clouds, mountains, and ground. It runs every frame but the mountains never change—only the clouds move. The wrapping logic (if c.x > width + 100) is a common technique to make objects loop infinitely without recreating them. Notice how the horizon line (horizonY) is reused across multiple shapes—this consistency keeps the composition coherent and is the same vanishing point that food items are pulled toward.

function drawLandscape() {
  // Sky
  background('#87CEEB'); 
  
  // Sun
  noStroke();
  fill('#FFD700');
  circle(width * 0.8, height * 0.2, min(width, height) * 0.15);

  // Animate and draw clouds
  fill(255, 220); // Slightly transparent white
  for (let c of clouds) {
    ellipse(c.x, c.y, c.w, c.w * 0.5);
    c.x += c.speed;
    // Wrap clouds around screen
    if (c.x > width + 100) c.x = -100;
  }

  // Draw Mountains
  let horizonY = height * 0.6;
  for (let m of mountains) {
    fill(m.color);
    triangle(m.x - m.w/2, horizonY, m.x, horizonY - m.h, m.x + m.w/2, horizonY);
  }

  // Ground
  fill('#556B2F'); // Dark Olive Green
  rect(0, horizonY, width, height - horizonY);
}
Line-by-line explanation (15 lines)

🔧 Subcomponents:

calculation Sky background background('#87CEEB');

Paints the entire canvas sky blue, clearing the previous frame

calculation Sun circle circle(width * 0.8, height * 0.2, min(width, height) * 0.15);

Draws a golden circle in the upper right to represent the sun

for-loop Cloud rendering and animation for (let c of clouds) { ellipse(c.x, c.y, c.w, c.w * 0.5); c.x += c.speed; if (c.x > width + 100) c.x = -100; }

Draws each cloud as an ellipse, moves it each frame, and wraps it back from the left if it drifts off the right edge

for-loop Mountain rendering for (let m of mountains) { fill(m.color); triangle(m.x - m.w/2, horizonY, m.x, horizonY - m.h, m.x + m.w/2, horizonY); }

Draws each mountain as a triangle using its stored color, position, and dimensions

background('#87CEEB');
Fill the entire canvas with sky blue (hex color #87CEEB). This clears the canvas and creates the background for everything else
noStroke();
Turn off the outline (stroke) for the next shapes—the sun and clouds will have no border
fill('#FFD700');
Set the fill color to gold (#FFD700) for the sun
circle(width * 0.8, height * 0.2, min(width, height) * 0.15);
Draw a circle at 80% across (right side) and 20% down (upper area), with diameter 15% of the smaller canvas dimension—this makes the sun responsive to window size
fill(255, 220);
Set fill to white (255, 255, 255) with alpha 220, making clouds slightly transparent so they look ethereal and blendable
for (let c of clouds) {
Loop through each cloud object using the shorthand for...of syntax (instead of a traditional for loop)
ellipse(c.x, c.y, c.w, c.w * 0.5);
Draw each cloud as an ellipse at position (c.x, c.y) with width c.w and height c.w * 0.5, creating an oblong cloud shape
c.x += c.speed;
Move the cloud rightward by adding its speed to its x position each frame—clouds drift slowly across the sky
if (c.x > width + 100) c.x = -100;
When a cloud drifts 100 pixels past the right edge of the screen, wrap it back to 100 pixels off the left edge—creates infinite scrolling
let horizonY = height * 0.6;
Define the horizon line at 60% down the canvas—this is where the ground begins and the vanishing point sits
for (let m of mountains) {
Loop through each mountain object
fill(m.color);
Set the fill color to this mountain's stored color (which was randomly generated)
triangle(m.x - m.w/2, horizonY, m.x, horizonY - m.h, m.x + m.w/2, horizonY);
Draw a triangle with three points: bottom-left (m.x - m.w/2, horizonY), peak (m.x, horizonY - m.h), and bottom-right (m.x + m.w/2, horizonY). This creates a mountain shape
fill('#556B2F');
Set fill to dark olive green (#556B2F) for the ground
rect(0, horizonY, width, height - horizonY);
Draw a rectangle from the horizon line down to the bottom of the canvas, covering the entire width—this is the ground

drawWindowFrame()

drawWindowFrame() creates the visual conceit of looking out a window at the landscape. It draws a wooden frame border, divides it into four panes with crossbars, adds subtle shadow lines for depth, and displays instructions. This function runs every frame but nothing actually changes—the frame is static. It's drawn last (after the landscape and food) so it appears on top. The 'window' framing is pure visual storytelling: it gives context to the flinging mechanic and makes the sketch feel like a playful scene rather than abstract shapes.

function drawWindowFrame() {
  let frameColor = '#3e2723'; // Dark brown wood color
  let thickness = min(width, height) * 0.05; // Responsive thickness

  fill(frameColor);
  noStroke();
  
  // Outer frame
  rect(0, 0, width, thickness); // Top
  rect(0, height - thickness, width, thickness); // Bottom
  rect(0, 0, thickness, height); // Left
  rect(width - thickness, 0, thickness, height); // Right
  
  // Window panes (crossbars)
  rect(width / 2 - thickness / 4, 0, thickness / 2, height); // Vertical split
  rect(0, height / 2 - thickness / 4, width, thickness / 2); // Horizontal split

  // Inner shadow to give the window depth
  fill(0, 50);
  rect(thickness, thickness, width - thickness*2, 10);
  rect(thickness, thickness, 10, height - thickness*2);

  // Instruction Text
  fill(255);
  stroke(0);
  strokeWeight(3);
  textSize(min(32, width * 0.05));
  text("Tap or Drag to throw food!", width / 2, thickness + 30);
}
Line-by-line explanation (18 lines)

🔧 Subcomponents:

calculation Outer window border rect(0, 0, width, thickness); rect(0, height - thickness, width, thickness); rect(0, 0, thickness, height); rect(width - thickness, 0, thickness, height);

Draws four rectangles to form a wooden frame around all four edges

calculation Window pane crossbars rect(width / 2 - thickness / 4, 0, thickness / 2, height); rect(0, height / 2 - thickness / 4, width, thickness / 2);

Draws vertical and horizontal bars through the center to divide the window into four panes

calculation Inner shadow for depth fill(0, 50); rect(thickness, thickness, width - thickness*2, 10); rect(thickness, thickness, 10, height - thickness*2);

Adds subtle dark lines along the top and left to give the frame a 3D, beveled appearance

let frameColor = '#3e2723'; // Dark brown wood color
Define a dark brown color as a hex string—this will be used for the wooden window frame
let thickness = min(width, height) * 0.05; // Responsive thickness
Calculate the frame thickness as 5% of the smaller canvas dimension—this keeps the frame proportional on any screen size
fill(frameColor);
Set the fill color to the dark brown
noStroke();
Turn off strokes so rectangles have clean edges
rect(0, 0, width, thickness); // Top
Draw a rectangle at the top of the canvas (from 0,0) that spans the full width and has the calculated thickness
rect(0, height - thickness, width, thickness); // Bottom
Draw a rectangle at the bottom of the canvas, positioned thickness pixels up from the bottom edge
rect(0, 0, thickness, height); // Left
Draw a rectangle along the left edge from top to bottom
rect(width - thickness, 0, thickness, height); // Right
Draw a rectangle along the right edge (starting at width - thickness) from top to bottom
rect(width / 2 - thickness / 4, 0, thickness / 2, height); // Vertical split
Draw a thin vertical bar through the center of the canvas (at width / 2) with thickness / 2, dividing left and right panes
rect(0, height / 2 - thickness / 4, width, thickness / 2); // Horizontal split
Draw a thin horizontal bar through the center of the canvas (at height / 2) with thickness / 2, dividing top and bottom panes
fill(0, 50);
Set fill to near-black with low alpha (50 out of 255), creating a subtle transparent shadow
rect(thickness, thickness, width - thickness*2, 10);
Draw a thin shadow rectangle below the top frame edge (10 pixels tall) to suggest the frame has thickness and depth
rect(thickness, thickness, 10, height - thickness*2);
Draw a thin shadow rectangle to the right of the left frame edge (10 pixels wide) for the same depth effect
fill(255);
Set fill to white for the instruction text
stroke(0);
Set the text stroke (outline) to black to make it stand out against the sky
strokeWeight(3);
Make the text outline 3 pixels thick for strong contrast
textSize(min(32, width * 0.05));
Set text size to 32 pixels or 5% of the canvas width, whichever is smaller—responsive text sizing
text("Tap or Drag to throw food!", width / 2, thickness + 30);
Draw the instruction text centered horizontally and positioned 30 pixels below the top frame edge

mousePressed()

mousePressed() is a p5.js callback that runs whenever the mouse button is pressed. Here it calls throwFood() once, creating a single food item at the click location. Returning false prevents the browser's default click behavior.

function mousePressed() {
  throwFood(mouseX, mouseY);
  return false;
}
Line-by-line explanation (2 lines)
throwFood(mouseX, mouseY);
Call throwFood() with the current mouse position—this creates a food item aimed at where the user clicked
return false;
Return false to prevent the browser's default behavior (like selecting text) when the canvas is clicked

mouseDragged()

mouseDragged() runs every frame while the mouse button is held down. Without throttling, this would spawn 60 food items per second—way too many and would crash on slower devices. By using the modulo operator (frameCount % 4), we spawn only every 4th frame, creating a visually pleasing stream of food items. This is a common pattern for handling continuous input.

🔬 The % 4 controls how often food spawns during drag. What happens if you change it to % 2 (more frequent) or % 8 (less frequent)? Try each and notice the density of the food stream.

  if (frameCount % 4 === 0) {
    throwFood(mouseX, mouseY);
  }
function mouseDragged() {
  // Throttle spawns during drag to create a clean stream of food
  if (frameCount % 4 === 0) {
    throwFood(mouseX, mouseY);
  }
  return false; // Prevent selection highlighting
}
Line-by-line explanation (3 lines)

🔧 Subcomponents:

conditional Spawn throttling if (frameCount % 4 === 0) {

Creates food only every 4th frame during drag, producing a clean stream instead of overwhelming spam

if (frameCount % 4 === 0) {
Check if the current frame number is divisible by 4 (remainder is 0). This is true roughly every 4 frames, about 15 times per second at 60 FPS
throwFood(mouseX, mouseY);
Create a new food item only when the condition is true, spacing out the spawns to avoid overwhelming the sketch
return false; // Prevent selection highlighting
Return false to prevent the browser from highlighting/selecting content during the drag

touchStarted()

touchStarted() is a p5.js callback for mobile devices, running once when a finger first touches the screen. It mirrors mousePressed() but uses the touches array instead of mouse coordinates, making the sketch playable on phones and tablets.

function touchStarted() {
  if (touches.length > 0) {
    throwFood(touches[0].x, touches[0].y);
  }
  return false; // Prevent mobile default scrolling/zooming
}
Line-by-line explanation (3 lines)
if (touches.length > 0) {
Check if at least one finger is currently touching the screen—touches is a p5.js array of active touch points
throwFood(touches[0].x, touches[0].y);
Get the position of the first touch (touches[0]) and call throwFood() with its x and y coordinates
return false; // Prevent mobile default scrolling/zooming
Return false to prevent the browser's default touch behavior (scrolling, pinch-zoom) from interfering with the game

touchMoved()

touchMoved() mirrors mouseDragged() for mobile, running every frame while a finger moves on the screen. It uses the same throttling pattern (frameCount % 4) to create a clean stream of food items during touch dragging.

function touchMoved() {
  if (touches.length > 0 && frameCount % 4 === 0) {
    throwFood(touches[0].x, touches[0].y);
  }
  return false;
}
Line-by-line explanation (3 lines)
if (touches.length > 0 && frameCount % 4 === 0) {
Check that a finger is still touching AND that we're on every 4th frame—this throttles mobile touch input the same way mouseDragged() does
throwFood(touches[0].x, touches[0].y);
Create a food item at the current touch position
return false;
Return false to prevent default mobile behaviors

windowResized()

windowResized() is a p5.js callback that fires whenever the browser window is resized. This sketch uses it to resize the canvas and regenerate the landscape so everything scales properly and stays responsive. This is critical for fullscreen sketches and mobile devices.

function windowResized() {
  resizeCanvas(windowWidth, windowHeight);
  // Re-generate the landscape for the new screen dimensions
  mountains = [];
  clouds = [];
  generateLandscape();
}
Line-by-line explanation (4 lines)
resizeCanvas(windowWidth, windowHeight);
Tell p5.js to resize the canvas to match the new window dimensions
mountains = [];
Clear the old mountains array
clouds = [];
Clear the old clouds array
generateLandscape();
Regenerate mountains and clouds for the new canvas size—this ensures the landscape is proportional and fills the entire new window

📦 Key Variables

foodItems array

Stores all active food objects currently flying through the scene. Each object tracks position, velocity, rotation, scale, and emoji.

let foodItems = [];
clouds array

Stores all cloud objects. Each cloud has position (x, y), width (w), and speed. Regenerated when the window resizes.

let clouds = [];
mountains array

Stores all mountain objects. Each mountain has position (x), width (w), height (h), and color. Regenerated when the window resizes.

let mountains = [];
FOOD_EMOJIS array

A constant array of food emoji strings to randomly choose from when creating new food items. Mostly burgers to match the theme.

const FOOD_EMOJIS = ['🍔', '🍔', '🍔', '🍟', '🌭', '🥤', '🍕'];
MAX_ITEMS number

A constant that caps the maximum number of food items allowed on screen at once—prevents performance degradation on slow devices.

const MAX_ITEMS = 150;

🔧 Potential Improvements (5)

Here are some ways this code could be enhanced:

PERFORMANCE updateAndDrawFood() - emoji rendering

textSize(80) is set every frame for every food item, even though all emojis use the same size

💡 Move textSize(80) outside the loop or set it once in setup() if possible. This reduces redundant function calls.

BUG throwFood() - angle calculation

If the user clicks at exactly (startX, startY), atan2(0, 0) returns 0, which is not ideal. Also, clicking below the start point creates upside-down throws.

💡 Consider adding a check to handle edge cases: if (targetX === startX && targetY === startY) { angle = -PI/2; } to throw straight up, or document the expected behavior.

STYLE generateLandscape()

Magic numbers: 7 mountains and 12 clouds are hardcoded without explanation. If you want to adjust landscape density, these are buried in the code.

💡 Extract these to constants at the top: const NUM_MOUNTAINS = 7; const NUM_CLOUDS = 12; This makes the code more maintainable.

FEATURE throwFood()

All throws have the same randomized speed range. There's no visual feedback or indicator of throw strength.

💡 Consider adding a visual 'power meter' or cursor indicator, or vary the food emoji based on speed (heavier items throw slower, etc.).

BUG drawWindowFrame()

The instruction text 'Tap or Drag to throw food!' is hardcoded for English only and doesn't adapt if localization is added later.

💡 Consider storing UI text in a constant or object for easier localization and maintenance.

🔄 Code Flow

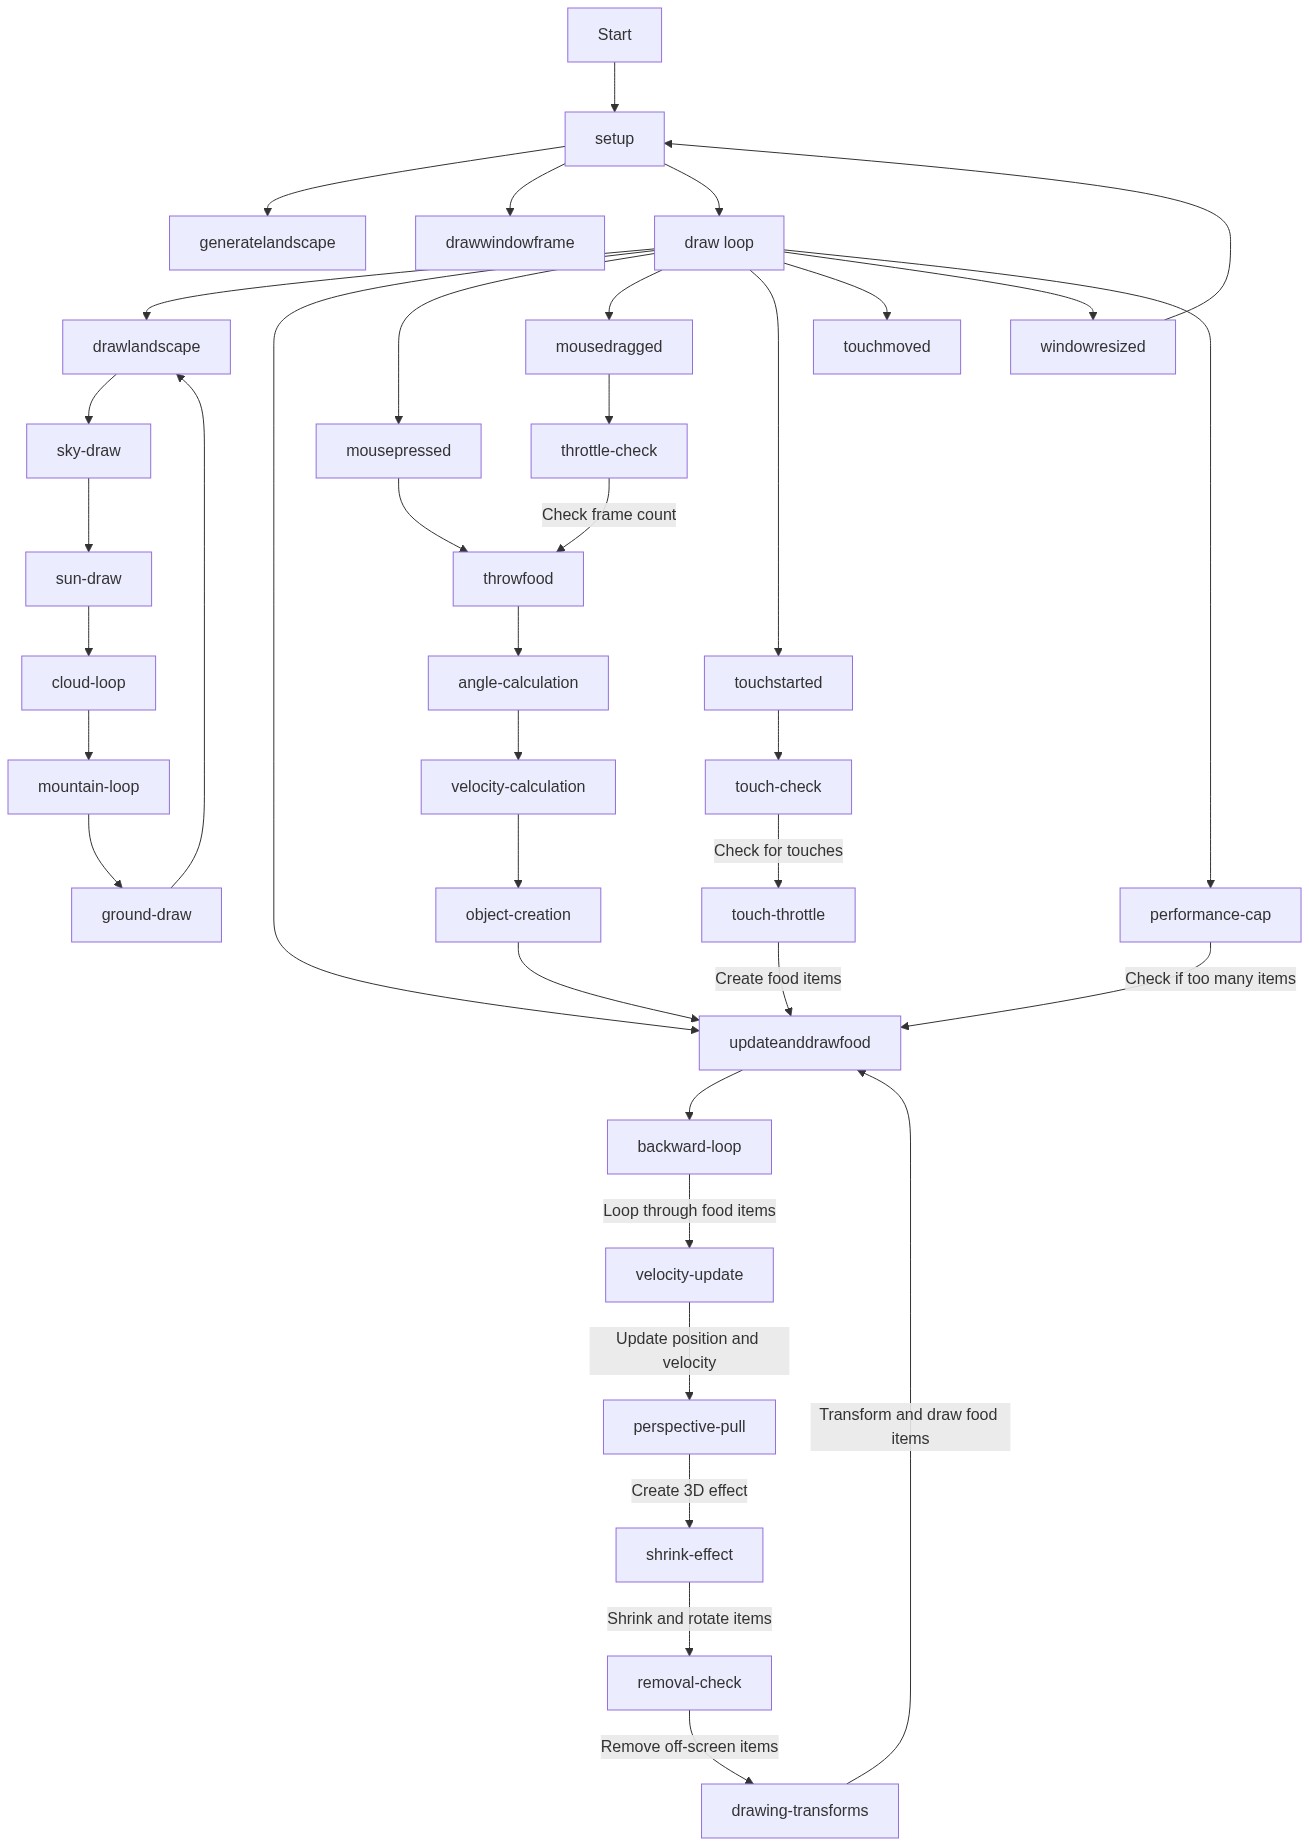
Code flow showing setup, draw, throwfood, updateanddrawfood, generatelandscape, drawlandscape, drawwindowframe, mousepressed, mousedragged, touchstarted, touchmoved, windowresized

💡 Click on function names in the diagram to jump to their code

graph TD start[Start] --> setup[setup] setup --> generatelandscape[generateLandscape] setup --> draw[draw loop] draw --> drawlandscape[drawLandscape] draw --> updateanddrawfood[updateAndDrawFood] updateanddrawfood --> perf-cap[Performance Cap Check] perf-cap -->|If not exceeded| reverse-loop[Reverse Iteration Loop] reverse-loop --> physics-update[Position and Velocity Update] physics-update --> perspective-pull[Fake 3D Perspective] perspective-pull --> scale-shrink[Scale Shrinking for Distance] scale-shrink --> cleanup-condition[Remove Far or Off-Screen Items] cleanup-condition --> emoji-render[Transformed Emoji Drawing] draw --> drawwindowframe[drawWindowFrame] drawwindowframe --> outer-frame[Outer Window Border] outer-frame --> window-panes[Window Pane Crossbars] window-panes --> shadow-effect[Inner Shadow for Depth] click setup href "#fn-setup" click generatelandscape href "#fn-generatelandscape" click draw href "#fn-draw" click drawlandscape href "#fn-drawlandscape" click updateanddrawfood href "#fn-updateanddrawfood" click perf-cap href "#sub-perf-cap" click reverse-loop href "#sub-reverse-loop" click physics-update href "#sub-physics-update" click perspective-pull href "#sub-perspective-pull" click scale-shrink href "#sub-scale-shrink" click cleanup-condition href "#sub-cleanup-condition" click emoji-render href "#sub-emoji-render" click drawwindowframe href "#fn-drawwindowframe" click outer-frame href "#sub-outer-frame" click window-panes href "#sub-window-panes" click shadow-effect href "#sub-shadow-effect"

❓ Frequently Asked Questions

What visual experience does the Sketch 2026-04-26 create?

The sketch visually showcases a sunny mountain landscape where users can fling animated fast food items, like burgers and fries, that shrink and spin as they soar toward the horizon.

How can users interact with the fast food sketch?

Users can interact by tapping or clicking anywhere on the canvas to launch a stream of bouncing, floating snacks into the sky.

What creative coding techniques are demonstrated in this p5.js sketch?

The sketch demonstrates techniques such as physics-based motion, perspective simulation, and dynamic object management to create an engaging visual experience.

Preview

Sketch 2026-04-26 11:4167984590374985937458748930293845549382728942739723847923874937 - p5.js creative coding sketch preview
Sketch Preview
Code flow diagram showing the structure of Sketch 2026-04-26 11:4167984590374985937458748930293845549382728942739723847923874937 - Code flow showing setup, draw, throwfood, updateanddrawfood, generatelandscape, drawlandscape, drawwindowframe, mousepressed, mousedragged, touchstarted, touchmoved, windowresized
Code Flow Diagram