
Sketch 2026-06-08 16:23

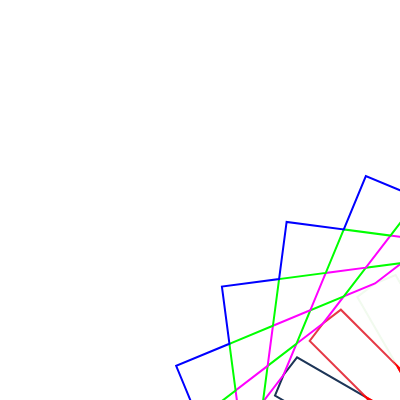
This sketch generates an Islamic-inspired geometric rosette pattern with 24 petals arranged in radial symmetry around a central star. Each petal is a curved polygon filled with colors from a palette, and the center features nested stars with alternating colors creating an intricate mandala-like effect.

🧪 Try This!

Experiment with the code by making these changes:

  1. Change the petal count to 12
  2. Make petals twice as big — Increases the base petal size multiplier from 1.0 to 2.0, making all petals and nested stars dramatically larger and more prominent.
  3. Make star outlines thicker
  4. Use a single petal color — Instead of cycling through the palette, all petals use red; simplifies the color scheme and focuses attention on the geometric structure.
Prefer the full editor? Open it there →

📖 About This Sketch

This sketch creates a stunning Islamic rosette—a 24-pointed geometric flower with symmetrical petals radiating from a colorful center star. What makes it visually striking is the use of two custom classes, Rosette and Star, that pre-calculate all the geometry using trigonometry, then arrange everything in perfect rotational symmetry. The code demonstrates advanced p5.js techniques: object-oriented design with ES6 classes, trigonometric calculations for precise angles and distances, the translate-rotate pattern for radial layouts, and the palette array for color cycling.

The sketch is organized into three major pieces: a setup() function that pre-instantiates all Rosette and Star objects once, a draw() function that rotates and displays each rosette around the center, and two classes—Rosette and Star—that encapsulate all the geometric math. By studying it, you will learn how to build complex geometric shapes from pure mathematics, how to use classes to organize and reuse visual components, and how pre-calculating geometry in the constructor (rather than on every frame) keeps code efficient and clean.

⚙️ How It Works

  1. When the sketch loads, setup() creates a 1000x1000 canvas, sets angleMode to DEGREES, and pre-instantiates 24 Rosette objects and one central Rosette object. Each Rosette constructor calculates dozens of trigonometric values once—angles, side lengths, and vertex positions—so the expensive math happens only at startup, not every frame.
  2. In the constructor of each Rosette, a petalPoints array is populated with six points that define the outline of a single petal, and seven Star objects are created with carefully calculated inner and outer radii to nestle perfectly within the petal geometry.
  3. The draw() function clears the canvas with a white background and translates the coordinate system to the center.
  4. A loop rotates the canvas by (360 / 24) degrees twenty-four times, and at each rotation calls rosettes[i].display(col) to draw one colored petal outline.
  5. Finally, centerRosette.displayStars() draws seven nested stars at the origin, each with a different stroke color—magenta, green, blue, and red—creating the intricate colorful center.
  6. The noLoop() call at the end of setup() means the sketch draws only once; no animation or frame-by-frame updates occur, making this a static final image built from pure geometry.

🎓 Concepts You'll Learn

Radial symmetry and rotation transformsTrigonometric geometry (sin, cos, tan calculations)Object-oriented design with ES6 classesPre-calculation for performance (constructor initialization)Palette-based color cyclingbeginShape/endShape polygon drawingNested object instantiation

📝 Code Breakdown

setup()

setup() runs once at startup and is the perfect place to create all your objects once, do expensive calculations, and initialize canvas properties. By putting geometry calculations in the Rosette constructor (called from setup), this sketch avoids recalculating trigonometry every frame, which would be wasteful since the image never changes.

function setup() {
  createCanvas(1000, 1000);
  angleMode(DEGREES);
  noFill();
  rectMode(CENTER);

  // Pre-calculate rosette parameters
  let sqSideLength = (width / 4) * 1.0;
  let nPoints = 24;
  let angle = 360 / nPoints;

  // Create all rosette objects once in setup
  for (let i = 0; i < nPoints; i++) {
    rosettes.push(new Rosette(sqSideLength, nPoints));
  }
  centerRosette = new Rosette(sqSideLength, nPoints); // Central rosette for stars
  noLoop(); // Draw once
}
Line-by-line explanation (10 lines)

🔧 Subcomponents:

for-loop Rosette Instantiation Loop for (let i = 0; i < nPoints; i++) { rosettes.push(new Rosette(sqSideLength, nPoints)); }

Creates 24 Rosette objects, each containing all geometry and stars, and adds them to the rosettes array for later display

createCanvas(1000, 1000);
Creates a 1000×1000 pixel square canvas, which is large enough to display the detailed geometry without crowding
angleMode(DEGREES);
Tells p5.js that all angles in this sketch are in degrees (0–360) rather than radians, making the math more intuitive
noFill();
Disables fill color for all shapes, so only the stroke outlines of petals and stars will be visible
let sqSideLength = (width / 4) * 1.0;
Calculates the base unit size for petal geometry as one quarter of the canvas width—250 pixels—which scales all geometric calculations
let nPoints = 24;
Sets the number of petals and the number of points on the central star; 24 is a traditional Islamic pattern value
let angle = 360 / nPoints;
Calculates the rotation angle between adjacent petals; 360 / 24 = 15 degrees per petal
for (let i = 0; i < nPoints; i++) {
Loops 24 times, once for each petal, creating and storing a new Rosette object in the array
rosettes.push(new Rosette(sqSideLength, nPoints));
Instantiates a Rosette object with the petal size and point count, then adds it to the rosettes array; the Rosette constructor does all the heavy trigonometric math at this moment
centerRosette = new Rosette(sqSideLength, nPoints);
Creates one additional Rosette object whose stars will be drawn at the center; uses the same geometry as the outer rosettes
noLoop();
Stops the p5.js animation loop after draw() runs once; this is a static image, not an animation, so we don't need draw() to repeat
draw()

Even though noLoop() is called in setup(), draw() still runs once to render the static image. The translate-push-rotate-pop pattern is a fundamental technique in p5.js for creating radial and grid-based layouts; push() and pop() protect each iteration from affecting the next.

function draw() {
  background(255);
  translate(width / 2, height / 2);

  let nPoints = 24;
  let angle = 360 / nPoints;

  stroke(255, 0, 0); // Red stroke for petals
  strokeWeight(2);

  // 🌸 Draw rosettes
  for (let i = 0; i < nPoints; i++) {
    push();
    rotate(angle * i);
    let col = palette[i % palette.length]; // cycle through palette
    rosettes[i].display(col);
    pop();
  }

  // 🌟 Draw central star
  centerRosette.displayStars();
}
Line-by-line explanation (12 lines)

🔧 Subcomponents:

for-loop Rosette Display Loop for (let i = 0; i < nPoints; i++) { push(); rotate(angle * i); let col = palette[i % palette.length]; rosettes[i].display(col); pop(); }

Rotates the canvas 24 times and draws each petal outline in a different color from the palette, creating the radial flower effect

calculation Palette Color Cycling let col = palette[i % palette.length];

Cycles through the five colors in the palette array, wrapping back to the start when the petal count exceeds palette length (i % palette.length ensures an index 0–4)

background(255);
Fills the entire canvas with white (RGB 255, 255, 255), creating a clean background for the geometry
translate(width / 2, height / 2);
Moves the origin (0, 0) from the top-left corner to the center of the canvas, so all rotations and draws are centered—essential for radial symmetry
let nPoints = 24;
Defines the number of petals; matches the setup() value to keep everything consistent
let angle = 360 / nPoints;
Calculates 15 degrees (360 / 24), the rotation increment between petals
stroke(255, 0, 0);
Sets the stroke color to red; this default is overridden later when each rosette.display(col) is called with its own color
strokeWeight(2);
Sets all stroke lines to 2 pixels thick, making the petals and stars clearly visible
push();
Saves the current transformation (rotation, translation) state before rotating, so each petal starts fresh
rotate(angle * i);
Rotates the canvas by i × 15 degrees; on iteration 0 it's 0°, on iteration 1 it's 15°, etc., positioning each petal around the circle
let col = palette[i % palette.length];
Selects the i-th color from the palette array, cycling back to the start using modulo (%) when i exceeds the palette length
rosettes[i].display(col);
Calls the display method of the i-th Rosette object, passing the selected color; this draws the petal outline in that color
pop();
Restores the transformation state so the next iteration starts with a fresh rotation, preventing cumulative transforms
centerRosette.displayStars();
Calls the displayStars() method of the central rosette, drawing all seven nested stars at the origin (center of the canvas)

class Rosette

The Rosette class is the mathematical heart of this sketch. Its constructor does heavy lifting: it calculates dozens of angles and lengths once using trigonometry, then assembles them into petalPoints and seven Star objects. This is brilliant performance design—by pre-computing everything in the constructor instead of in display(), the class is fast and reusable. If you want to understand Islamic geometric patterns, this class is a masterclass in how pure math creates complex beauty.

🔬 These six points are the vertices of the petal shape. What happens if you multiply all the x values by 0.5 (e.g., change this.xLength to this.xLength * 0.5 in the first point)? Predict whether the petals will be narrower or the same width.

    this.petalPoints = [
      { x: this.xLength * this.cosHalfAngle * this.ratio, y: -this.xLength * this.sinHalfAngle * this.ratio },
      { x: this.xLength * this.cosHalfAngle + this.wLength, y: -this.xLength * this.sinHalfAngle * this.ratio },
      { x: this.sqSideLength * this.ratio, y: 0 },
      { x: this.xLength * this.cosHalfAngle + this.wLength * this.ratio, y: this.xLength * this.sinHalfAngle * this.ratio },
      { x: this.xLength * this.cosHalfAngle * this.ratio, y: this.xLength * this.sinHalfAngle * this.ratio },
      { x: this.dLength * this.ratio, y: 0 },
    ];
class Rosette {
  constructor(sqSideLength, nPoints, ratio = 1) {
    this.sqSideLength = sqSideLength;
    this.nPoints = nPoints;
    this.ratio = ratio;
    this.angle = 360 / nPoints;
    this.halfAngle = this.angle / 2;
    this.intAngle = ((this.nPoints - 2) * 180) / this.nPoints;
    this.halfIntAngle = this.intAngle / 2;
    this.twoAngle = 2 * this.angle;
    this.fourHalfAngle = 4 * this.halfAngle;
    this.threeHalfAngle = 3 * this.halfAngle;
    this.halfAnglePlus90 = 90 + this.halfAngle;
    this.triangleOneComplement = 180 - 2 * this.halfAngle;
    this.triangleTwoComplement = 180 - 3 * this.halfAngle;
    this.angleExtTriComplement = 180 - (this.halfIntAngle + this.halfAngle);

    this.sinHalfAngle = sin(this.halfAngle);
    this.cosHalfAngle = cos(this.halfAngle);
    this.tanHalfAngle = tan(this.halfAngle);
    this.sinAngle = sin(this.angle);
    this.sinAngleComplement = sin(180 - this.angle);
    this.sinAnglePlusHalfAngleComplement = sin(180 - (this.angle + this.halfAngle));
    this.sinTwoAngle = sin(this.twoAngle);
    this.sinHalfIntrAngle = sin(this.halfIntAngle);
    this.sinAngleExtTriComplement = sin(this.angleExtTriComplement);

    this.rLength = (this.sqSideLength * this.sinAngleExtTriComplement) / this.sinTwoAngle;
    this.xLength = (this.sinAngle / this.sinAnglePlusHalfAngleComplement) * this.sqSideLength;
    this.dLength = (this.sinHalfAngle / this.sinAngleComplement) * this.xLength;
    this.tLength = (this.sinAngle / this.sinAnglePlusHalfAngleComplement) * this.dLength;
    this.yLength = this.sinHalfAngle * this.tanHalfAngle * this.xLength;
    this.zLength = this.sqSideLength - this.xLength * this.cosHalfAngle;
    this.wLength = this.zLength - this.yLength;

    this.petalPoints = [
      { x: this.xLength * this.cosHalfAngle * this.ratio, y: -this.xLength * this.sinHalfAngle * this.ratio },
      { x: this.xLength * this.cosHalfAngle + this.wLength, y: -this.xLength * this.sinHalfAngle * this.ratio },
      { x: this.sqSideLength * this.ratio, y: 0 },
      { x: this.xLength * this.cosHalfAngle + this.wLength * this.ratio, y: this.xLength * this.sinHalfAngle * this.ratio },
      { x: this.xLength * this.cosHalfAngle * this.ratio, y: this.xLength * this.sinHalfAngle * this.ratio },
      { x: this.dLength * this.ratio, y: 0 },
    ];

    // Pre-instantiate all Star objects in the constructor
    this.stars = [
      new Star(
        0,
        0,
        (this.sqSideLength * sin(90 + this.halfAngle)) / sin(90 - 2 * this.halfAngle),
        this.sqSideLength,
        this.nPoints
      ),
      new Star(
        0,
        0,
        (this.sqSideLength * sin(90 + this.halfAngle)) / sin(90 - 2 * this.halfAngle),
        (this.sqSideLength * sin(90 + this.halfAngle)) / sin(90 - 3 * this.halfAngle),
        this.nPoints
      ),
      new Star(
        0,
        0,
        (this.sqSideLength * sin(90 + this.halfAngle)) / sin(90 - 4 * this.halfAngle),
        (this.sqSideLength * sin(90 + this.halfAngle)) / sin(90 - 3 * this.halfAngle),
        this.nPoints
      ),
      new Star(
        0,
        0,
        (this.sqSideLength * sin(90 + this.halfAngle)) / sin(90 - 4 * this.halfAngle),
        (this.sqSideLength * sin(90 + this.halfAngle)) / sin(90 - 5 * this.halfAngle),
        this.nPoints
      ),
      new Star(
        0,
        0,
        (this.sqSideLength * sin(90 + this.halfAngle)) / sin(90 - 6 * this.halfAngle),
        (this.sqSideLength * sin(90 + this.halfAngle)) / sin(90 - 5 * this.halfAngle),
        this.nPoints
      ),
      new Star(0, 0, this.tLength, this.dLength, this.nPoints),
      new Star(0, 0, this.xLength, this.dLength, this.nPoints),
    ];
  }

  display(col) {
    stroke(col); // Use the passed color for the petal outline
    strokeWeight(2);
    noFill();
    beginShape();
    for (let pt of this.petalPoints) {
      vertex(pt.x, pt.y);
    }
    endShape(CLOSE);
  }

  displayStars(x = 0, y = 0) {
    // Iterate through the pre-instantiated Star objects and display them
    stroke(255, 0, 255); // Magenta for outer stars
    this.stars[0].display();
    stroke(0, 255, 0); // Green for middle outer stars
    this.stars[1].display();
    stroke(255, 0, 255); // Magenta for inner outer stars
    this.stars[2].display();
    stroke(0, 255, 0); // Green for fourth outer stars
    this.stars[3].display();
    stroke(0, 0, 255); // Blue for fifth outer stars
    this.stars[4].display();
    stroke(139, 0, 0); // Dark red for first inner star
    this.stars[5].display();
    stroke(255, 0, 0); // Red for second inner star
    this.stars[6].display();
  }
}
Line-by-line explanation (9 lines)

🔧 Subcomponents:

calculation Angle Setup this.angle = 360 / nPoints; this.halfAngle = this.angle / 2;

Establishes the fundamental angle and half-angle used throughout all geometry calculations

calculation Trigonometric Pre-calculation this.sinHalfAngle = sin(this.halfAngle); this.cosHalfAngle = cos(this.halfAngle); this.tanHalfAngle = tan(this.halfAngle);

Calculates sine, cosine, and tangent values for angles once at startup instead of repeatedly during rendering, improving performance

calculation Derived Length Calculations this.rLength = (this.sqSideLength * this.sinAngleExtTriComplement) / this.sinTwoAngle; this.xLength = (this.sinAngle / this.sinAnglePlusHalfAngleComplement) * this.sqSideLength;

Uses trigonometric identities to derive all the key distances (xLength, yLength, zLength, wLength) that define petal shape from the base sqSideLength

calculation Petal Vertex Definition this.petalPoints = [ { x: this.xLength * this.cosHalfAngle * this.ratio, y: -this.xLength * this.sinHalfAngle * this.ratio }, { x: this.xLength * this.cosHalfAngle + this.wLength, y: -this.xLength * this.sinHalfAngle * this.ratio }, { x: this.sqSideLength * this.ratio, y: 0 }, { x: this.xLength * this.cosHalfAngle + this.wLength * this.ratio, y: this.xLength * this.sinHalfAngle * this.ratio }, { x: this.xLength * this.cosHalfAngle * this.ratio, y: this.xLength * this.sinHalfAngle * this.ratio }, { x: this.dLength * this.ratio, y: 0 }, ];

Assembles the six vertex coordinates that define the outline of a single petal, using all the previously calculated lengths

for-loop Star Object Array Creation this.stars = [ new Star(...), ... ];

Pre-creates seven Star objects with carefully calculated inner and outer radii that nest perfectly within the petal, each assigned to the stars array

constructor(sqSideLength, nPoints, ratio = 1) {
Defines the Rosette constructor, taking the base petal size (sqSideLength), number of points (nPoints), and an optional scaling ratio (defaults to 1)
this.sqSideLength = sqSideLength;
Stores the base petal size as an instance property so it can be used throughout all calculations
this.angle = 360 / nPoints;
Calculates the angle between adjacent petals (e.g., 15° for 24 points); this is the foundation for all rotational geometry
this.halfAngle = this.angle / 2;
Pre-calculates half of the angle, which appears frequently in trigonometric formulas for petal shape
this.sinHalfAngle = sin(this.halfAngle);
Computes the sine of the half-angle once at startup; this value is used many times to calculate vertex positions, so pre-computing saves CPU
this.xLength = (this.sinAngle / this.sinAnglePlusHalfAngleComplement) * this.sqSideLength;
Uses a trigonometric formula to derive one of the key distances that shapes the petal; this is pure mathematical geometry from Islamic pattern theory
this.petalPoints = [
Begins the array of six vertex objects, each with x and y coordinates that define the petal outline
{ x: this.xLength * this.cosHalfAngle * this.ratio, y: -this.xLength * this.sinHalfAngle * this.ratio },
Defines the first vertex of the petal by combining pre-calculated lengths and trigonometric values; the negative y-value places it above the origin
new Star(0, 0, this.tLength, this.dLength, this.nPoints),
Creates a Star object centered at (0, 0) with specific inner and outer radii derived from the petal geometry; this star will be displayed at the center

class Star

The Star class is a concise example of polar coordinates—converting an angle and radius into x, y positions using cos() and sin(). By alternating between rOuter and rInner as the angle advances, you create the iconic star shape. The display() method does all the work; getSideLength() is a utility method that calculates the distance between adjacent vertices, useful for advanced geometric analysis.

🔬 This loop creates a star by alternating between outer and inner points. What happens if you swap rOuter and rInner (e.g., change this.rOuter to this.rInner and vice versa)? Will the star look inverted?

    for (let a = 0; a < 360; a += angle) {
      let sx = this.x + cos(a) * this.rOuter;
      let sy = this.y + sin(a) * this.rOuter;
      vertex(sx, sy);
      sx = this.x + cos(a + halfAngle) * this.rInner;
      sy = this.y + sin(a + halfAngle) * this.rInner;
      vertex(sx, sy);
    }
class Star {
  constructor(x, y, rInner, rOuter, npoints) {
    this.x = x;
    this.y = y;
    this.rInner = rInner;
    this.rOuter = rOuter;
    this.npoints = npoints;
  }

  // ⭐ NEW: compute the side length of the star
  getSideLength() {
    let angle = 360 / this.npoints;
    let halfAngle = angle / 2;

    // First outer vertex
    let x1 = this.x + cos(0) * this.rOuter;
    let y1 = this.y + sin(0) * this.rOuter;

    // Next inner vertex
    let x2 = this.x + cos(halfAngle) * this.rInner;
    let y2 = this.y + sin(halfAngle) * this.rInner;

    return dist(x1, y1, x2, y2);
  }

  display() {
    let angle = 360 / this.npoints;
    let halfAngle = angle / 2;
    beginShape();
    for (let a = 0; a < 360; a += angle) {
      let sx = this.x + cos(a) * this.rOuter;
      let sy = this.y + sin(a) * this.rOuter;
      vertex(sx, sy);
      sx = this.x + cos(a + halfAngle) * this.rInner;
      sy = this.y + sin(a + halfAngle) * this.rInner;
      vertex(sx, sy);
    }
    endShape(CLOSE);
  }
}
Line-by-line explanation (13 lines)

🔧 Subcomponents:

for-loop Star Vertex Loop for (let a = 0; a < 360; a += angle) { let sx = this.x + cos(a) * this.rOuter; let sy = this.y + sin(a) * this.rOuter; vertex(sx, sy); sx = this.x + cos(a + halfAngle) * this.rInner; sy = this.y + sin(a + halfAngle) * this.rInner; vertex(sx, sy); }

Loops through angles from 0° to 360°, alternating between outer and inner radius vertices to create the pointed star shape

constructor(x, y, rInner, rOuter, npoints) {
Defines the Star constructor with center coordinates (x, y), inner radius (rInner), outer radius (rOuter), and the number of points (npoints)
this.x = x;
Stores the star's x-coordinate as an instance property
this.y = y;
Stores the star's y-coordinate as an instance property
this.rInner = rInner;
Stores the inner radius (the distance from center to the points between the star's points) as an instance property
this.rOuter = rOuter;
Stores the outer radius (the distance from center to the tips of the star) as an instance property
this.npoints = npoints;
Stores the number of points the star will have (e.g., 24 for a 24-pointed star) as an instance property
let angle = 360 / this.npoints;
Calculates the angle between adjacent outer points; for a 24-pointed star, this is 15 degrees
let halfAngle = angle / 2;
Pre-calculates half of the angle; the inner points are placed at this offset, creating the star's pointed appearance
let x1 = this.x + cos(0) * this.rOuter;
Calculates the x-coordinate of the first outer point using trigonometry; cos(0) * rOuter gives the horizontal distance from the center
let sx = this.x + cos(a) * this.rOuter;
For the current angle a, calculates the x-coordinate of an outer vertex using polar to Cartesian conversion
vertex(sx, sy);
Adds the calculated point (sx, sy) to the current shape being drawn by beginShape()
sx = this.x + cos(a + halfAngle) * this.rInner;
Calculates the x-coordinate of an inner vertex at angle (a + halfAngle) with the inner radius, creating the 'valley' between points
endShape(CLOSE);
Closes the shape by connecting the last vertex back to the first, completing the star outline

📦 Key Variables

palette array

An array of five hex color strings that are cycled through to color the 24 petals; creates visual rhythm and harmony

let palette = ["#e63946", "#f1faee", "#a8dadc", "#457b9d", "#1d3557"];
rosettes array

Stores 24 Rosette objects, one for each petal; each contains all the geometry and seven nested stars

let rosettes = [];
centerRosette object

A single Rosette object whose displayStars() method draws the seven colorful stars at the center of the pattern

let centerRosette;
sqSideLength number

The base unit of petal size, calculated as one quarter of the canvas width; scales all geometric calculations proportionally

let sqSideLength = (width / 4) * 1.0;
nPoints number

The number of petals in the rosette and the number of points on each star; traditional Islamic patterns use 24

let nPoints = 24;
angle number

The rotation angle between adjacent petals, calculated as 360 divided by nPoints (e.g., 15° for 24 petals)

let angle = 360 / nPoints;

🔧 Potential Improvements (4)

Here are some ways this code could be enhanced:

STYLE Rosette constructor

Pre-calculated trig values (sinHalfAngle, cosHalfAngle, etc.) are calculated but some like sinHalfIntrAngle are never used, making the code harder to follow

💡 Remove unused pre-calculated values to reduce clutter and make the constructor more maintainable. Keep only the trig values actually used in deriving lengths.

PERFORMANCE draw() function

The variables nPoints and angle are recalculated in draw() even though they were already calculated in setup() and never change

💡 Move the nPoints and angle calculations to global scope (outside functions) or store them as properties so they are only computed once.

FEATURE Star and Rosette classes

The color scheme for nested stars is hardcoded in displayStars() with magenta, green, blue, and red; there is no easy way to change the color scheme

💡 Pass a color array to displayStars() or store it in the Rosette constructor as a property, allowing different color schemes to be applied without editing the code.

STYLE Star.getSideLength() method

The getSideLength() method is defined but never called in the sketch, adding unused code that confuses readers

💡 Either remove getSideLength() and leave it as a future utility, or use it for something visible (e.g., logging star edge length or scaling based on it).

🔄 Code Flow

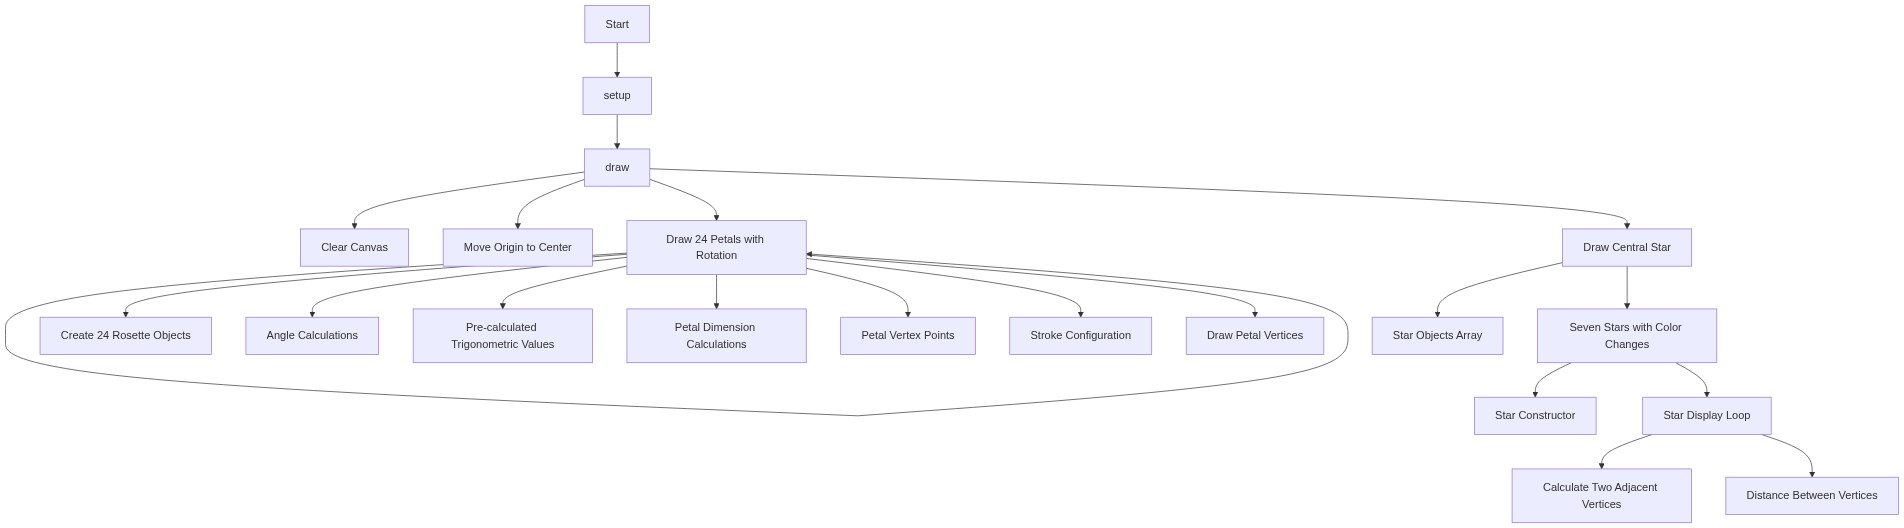
Code flow showing setup, draw, rosette, star

💡 Click on function names in the diagram to jump to their code

graph TD start[Start] --> setup[setup] setup --> draw[draw loop] draw --> rosette-rotation-loop[petal-rotation-loop] rosette-rotation-loop --> color-cycling[Palette Color Cycling] rosette-rotation-loop --> rosette[Rosette] click setup href "#fn-setup" click draw href "#fn-draw" click rosette-rotation-loop href "#sub-petal-rotation-loop" click color-cycling href "#sub-color-cycling" click rosette href "#fn-rosette" setup --> rosette-creation-loop[rosette-creation-loop] rosette-creation-loop --> angle-calculations[Angle Setup] angle-calculations --> trigonometric-precalc[Trigonometric Pre-calculation] trigonometric-precalc --> derived-lengths[Derived Length Calculations] derived-lengths --> petal-points-array[Petal Vertex Definition] petal-points-array --> star-instantiation[Star Object Array Creation] star-instantiation --> rosette-creation-loop rosette --> petal-rotation-loop[petal-rotation-loop] petal-rotation-loop --> display-loop[Star Vertex Loop] display-loop --> petal-rotation-loop click rosette-creation-loop href "#sub-rosette-creation-loop" click angle-calculations href "#sub-angle-calculations" click trigonometric-precalc href "#sub-trigonometric-precalc" click derived-lengths href "#sub-derived-lengths" click petal-points-array href "#sub-petal-points-array" click star-instantiation href "#sub-star-instantiation" click display-loop href "#sub-display-loop"

❓ Frequently Asked Questions

What visual elements does the Islamic rosette sketch create?

The sketch generates a vibrant pattern of rosettes arranged in a circular design, featuring a central star and petals in a colorful palette.

Is there any interactivity in the rosette sketch for users?

This sketch is not interactive; it draws the rosettes and central star once and does not respond to user input.

What creative coding techniques are showcased in this p5.js sketch?

The sketch demonstrates techniques such as object-oriented programming with the Rosette class and the use of trigonometry for geometric rotations and placements.

Preview

Sketch 2026-06-08 16:23 - p5.js creative coding sketch preview
Sketch Preview
Code flow diagram showing the structure of Sketch 2026-06-08 16:23 - Code flow showing setup, draw, rosette, star
Code Flow Diagram