Sketch 2026-06-08 16:23 (Remix)

This sketch creates an interactive geometric rosette pattern with multiple petals arranged radially around nested stars at the center. Users adjust a slider from 3 to 60 points to dynamically regenerate the entire flower-like design, with petals and concentric stars recalculating their geometry in real time.

🧪 Try This!

Experiment with the code by making these changes:

  1. Change the petal colors — The palette array holds five hex colors that cycle through each petal. Swap one or more colors to see the entire pattern repaint instantly.
  2. Make petals thicker — The stroke weight in the draw() loop controls how thick the petal outlines are. Increase it to make bold, dramatic lines.
  3. Start with more petals — Change the default slider value from 24 to a different number—the pattern will load with that many petals instead.
  4. Remove the nested stars — The central stars are drawn by displayStars(). Comment out that line to see the rosette without the colorful nested stars.
  5. Colorize all petals the same — Inside the draw loop, instead of cycling through palette colors, set all petals to one color by removing the color-cycling logic.
Prefer the full editor? Open it there →

📖 About This Sketch

This sketch generates a beautiful geometric rosette pattern—imagine a multi-petaled flower where every petal is a precise mathematical shape and concentric stars nestle at the center. The beauty comes from trigonometry: the sketch uses sine, cosine, and tangent functions to calculate exact vertex positions for petals and stars based on how many points the user requests. This is a masterclass in using classes (Rosette and Star) to encapsulate geometry, and in leveraging p5.js transforms like translate() and rotate() to create radial symmetry with minimal code.

The sketch is organized around three main ideas: a setup() that builds a slider, a handleSliderChange() function that regenerates all geometric objects when the slider moves, and a draw() loop that renders them with colorful strokes. By studying it you will learn how to build complex shapes from mathematical coordinates, how to design reusable classes that compute their own geometry, and how noLoop() with redraw() lets you optimize sketches that only need to update on user input rather than every frame.

⚙️ How It Works

  1. When the sketch loads, setup() creates a 1000×1000 canvas, sets angleMode to DEGREES for easier math, and builds an interactive slider (range 3–60 points, starting at 24). It calls handleSliderChange() to generate the initial rosette pattern, then noLoop() stops the draw loop so redraw() only happens when the slider moves.
  2. When the user moves the slider, handleSliderChange() reads the new nPoints value, empties the rosettes array, and instantiates brand-new Rosette objects—one for each petal. Each Rosette constructor runs dozens of trigonometric calculations to derive the exact coordinates of petal vertices and to pre-create seven nested Star objects at different radii.
  3. draw() translates the origin to the canvas center, then loops through each Rosette, rotating by (360 / nPoints) degrees each iteration to arrange petals radially. It calls rosette.display() to draw each colored petal outline, and centerRosette.displayStars() to render the nested stars in the middle with different stroke colors.
  4. The Rosette class stores pre-computed geometry—sine, cosine, and tangent of key angles—so that expensive calculations happen once in the constructor, not repeatedly during drawing. The Star class uses the stored nPoints value to calculate how many points each star should have, ensuring the stars match the petal count.

🎓 Concepts You'll Learn

Trigonometry (sin, cos, tan)Class design and object-oriented programmingRadial symmetry with rotate() and translate()Interactive sliders and event handlingPre-computed vs. real-time calculationsVertex-based shape drawing with beginShape/endShape

📝 Code Breakdown

setup()

setup() runs once when the sketch loads. It's where you initialize your canvas, configure p5.js modes, and prepare interactive elements. The key insight here is that by calling handleSliderChange() at the end of setup(), you generate the initial geometry before the first draw, and then noLoop() ensures draw() is lightweight because geometry only regenerates when the slider moves.

function setup() {
  createCanvas(1000, 1000);
  angleMode(DEGREES);
  noFill();
  rectMode(CENTER);

  // Pre-calculate square side length
  sqSideLength = (width / 4) * 1.0;

  // Create the slider for nPoints
  // Range: 3 to 60 points, initial value 24, step of 1
  nPointsSlider = createSlider(3, 60, 24, 1);
  nPointsSlider.id('nPointsSlider'); // Add an ID for CSS targeting
  nPointsSlider.position(10, 40); // Position it on the canvas

  // Create a label for the slider
  nPointsLabel = createP('Number of Points (nPoints): 24');
  nPointsLabel.id('nPointsLabel'); // Add an ID for CSS targeting
  nPointsLabel.position(10, 10); // Position it above the slider

  // Add an event listener to the slider
  // When the slider value changes, call handleSliderChange()
  nPointsSlider.input(handleSliderChange);

  // Initial call to draw the rosettes with the default slider value
  handleSliderChange();

  noLoop(); // Draw once, then only redraw on slider input
}
Line-by-line explanation (9 lines)

🔧 Subcomponents:

configuration Angle mode setup angleMode(DEGREES);

Tells all trigonometric functions (sin, cos, tan) to use degrees instead of radians, making angle math more intuitive

interaction-setup Interactive slider creation nPointsSlider = createSlider(3, 60, 24, 1);

Creates a slider element that lets users choose between 3 and 60 petals, starting at 24

event-binding Slider input event nPointsSlider.input(handleSliderChange);

Links slider movement to the handleSliderChange() function so the pattern updates whenever the user moves the slider

performance-optimization Disable continuous loop noLoop(); // Draw once, then only redraw on slider input

Stops the draw() function from running 60 times per second; instead it only runs when redraw() is called, saving CPU for a static pattern

createCanvas(1000, 1000);
Creates a 1000×1000 pixel canvas where all the rosette geometry will be drawn
angleMode(DEGREES);
Switches angle units from radians to degrees (0–360), making trigonometric calculations easier to reason about
noFill();
Tells p5.js not to fill any shapes with color—only draw their outlines (strokes)
rectMode(CENTER);
Makes rectangles draw from their center point instead of their top-left corner (not used here, but set for completeness)
sqSideLength = (width / 4) * 1.0;
Pre-calculates the base size for petal geometry as one-quarter of the canvas width
nPointsSlider = createSlider(3, 60, 24, 1);
Creates an interactive slider: minimum 3 points, maximum 60, default 24, step size 1
nPointsSlider.input(handleSliderChange);
Wires the slider to call handleSliderChange() every time the user moves it
handleSliderChange();
Immediately generates the initial rosette pattern before the user touches the slider
noLoop();
Stops the draw() loop from repeating; it will only run when you explicitly call redraw()

handleSliderChange()

This function is the bridge between user interaction (slider movement) and visual regeneration. The key pattern here is: read input → clear old data → create new data → redraw. By regenerating all Rosette objects on every slider change, you ensure the geometry is always correct for the current nPoints value. The Rosette constructor does all the expensive math, so this function just orchestrates the creation and calls redraw() to render.

🔬 This loop creates one Rosette per petal. What happens if you change the loop to create two Rosettes per petal? (Change i += 1 to i += 0.5, or duplicate the push line.) Will you see more petals or layers?

  rosettes = []; // Clear the existing rosettes array

  // Re-create all rosette objects with the new nPoints value
  for (let i = 0; i < nPoints; i++) {
    rosettes.push(new Rosette(sqSideLength, nPoints));
  }
function handleSliderChange() {
  let nPoints = nPointsSlider.value(); // Get the current value from the slider
  nPointsLabel.html('Number of Points (nPoints): ' + nPoints); // Update the label

  rosettes = []; // Clear the existing rosettes array

  // Re-create all rosette objects with the new nPoints value
  for (let i = 0; i < nPoints; i++) {
    rosettes.push(new Rosette(sqSideLength, nPoints));
  }
  // Re-create the central rosette for stars
  centerRosette = new Rosette(sqSideLength, nPoints);

  redraw(); // Call draw() to render the updated rosettes
}
Line-by-line explanation (7 lines)

🔧 Subcomponents:

input-reading Read slider value let nPoints = nPointsSlider.value();

Retrieves the current position of the slider as a number

ui-update Update display label nPointsLabel.html('Number of Points (nPoints): ' + nPoints);

Shows the user what number they've selected by updating the text above the slider

data-management Clear old rosettes rosettes = [];

Empties the array so that old Rosette objects can be garbage collected and new ones created fresh

for-loop Create petals for (let i = 0; i < nPoints; i++) { rosettes.push(new Rosette(sqSideLength, nPoints)); }

Instantiates one Rosette object for each petal; each constructor pre-computes all the trigonometry needed for that petal

object-creation Create central star centerRosette = new Rosette(sqSideLength, nPoints);

Creates one additional Rosette whose stars will be drawn at the center of the pattern

rendering-trigger Trigger draw redraw();

Calls draw() once to render the newly created rosettes

let nPoints = nPointsSlider.value();
Reads the slider and stores its current number (3 to 60) in the variable nPoints
nPointsLabel.html('Number of Points (nPoints): ' + nPoints);
Updates the label text to show the user which number they've selected
rosettes = [];
Clears the array, removing all old Rosette objects so they can be replaced with new ones
for (let i = 0; i < nPoints; i++) {
Loops from 0 to nPoints-1; each iteration creates one petal
rosettes.push(new Rosette(sqSideLength, nPoints));
Creates a new Rosette object (which pre-calculates all its geometry in the constructor) and adds it to the array
centerRosette = new Rosette(sqSideLength, nPoints);
Creates one Rosette that will be used only for drawing the nested stars at the center
redraw();
Calls draw() once to render all the newly created rosettes on the canvas

draw()

draw() is called only once per slider change (thanks to noLoop() and redraw()). It's responsible for rendering: clearing the canvas, translating to the center, looping through rosettes while rotating each one radially, and drawing the central stars. The key insight is the push/pop sandwich around rotate()—this pattern isolates each petal's rotation so they don't stack. Without push/pop, the second petal would be rotated by angle, but the third would be rotated by angle + angle, compounding the effect.

🔬 This loop rotates each petal by a multiple of angle. What happens if you change rotate(angle * i) to rotate(angle * i * 2)? Will petals be packed twice as densely, or will every other petal disappear?

  // 🌸 Draw rosettes
  for (let i = 0; i < nPoints; i++) {
    push();
    rotate(angle * i); // Now 'angle' is defined
    let col = palette[i % palette.length]; // cycle through palette
    rosettes[i].display(col);
    pop();
  }
function draw() {
  background(255);
  translate(width / 2, height / 2);

  let nPoints = rosettes.length; // Use the current number of rosettes
  let angle = 360 / nPoints; // FIX: Declare and calculate angle here, before it's used

  stroke(255, 0, 0); // Red stroke for petals
  strokeWeight(2);

  // 🌸 Draw rosettes
  for (let i = 0; i < nPoints; i++) {
    push();
    rotate(angle * i); // Now 'angle' is defined
    let col = palette[i % palette.length]; // cycle through palette
    rosettes[i].display(col);
    pop();
  }

  // 🌟 Draw central star
  centerRosette.displayStars();

  // Performance Note: The "Long task detected" warning is likely due to
  // re-creating all Rosette and Star objects in handleSliderChange()
  // and then drawing them in draw(). For very high nPoints, this can be slow.
  // For this fix, we're addressing the ReferenceError, but keeping the current
  // object creation strategy.
}
Line-by-line explanation (12 lines)

🔧 Subcomponents:

rendering-prep Clear canvas background(255);

Fills the entire canvas with white, erasing the previous frame

transform Move origin to center translate(width / 2, height / 2);

Shifts the coordinate system so (0,0) is at the center of the canvas, making radial rotation much simpler

calculation Calculate rotation angle let angle = 360 / nPoints;

Divides the full 360 degrees by the number of petals to find how much to rotate between each one

for-loop Draw each petal for (let i = 0; i < nPoints; i++) { push(); rotate(angle * i); let col = palette[i % palette.length]; rosettes[i].display(col); pop(); }

Loops through each Rosette, rotates it radially, colors it from the palette, draws it, then restores the rotation with pop()

rendering-call Render nested stars centerRosette.displayStars();

Calls the displayStars() method to draw all seven nested stars at the center with different colors

background(255);
Clears the canvas by filling it with white (RGB 255, 255, 255), erasing any previous drawing
translate(width / 2, height / 2);
Moves the coordinate system origin from the top-left corner to the center of the canvas, so rotations happen around the center
let nPoints = rosettes.length;
Gets the number of petals by checking how many Rosette objects are in the array
let angle = 360 / nPoints;
Calculates the rotation angle between petals (e.g., if nPoints is 24, angle is 15 degrees)
stroke(255, 0, 0);
Sets the default stroke color to red for petal outlines
strokeWeight(2);
Sets the line thickness to 2 pixels
push();
Saves the current transformation state (rotation) so that rotations don't stack
rotate(angle * i);
Rotates the coordinate system by (angle * i) degrees—petal 0 by 0°, petal 1 by angle°, petal 2 by 2×angle°, etc.
let col = palette[i % palette.length];
Picks a color from the palette array; the modulo operator (%) cycles back to the beginning if i exceeds the palette length
rosettes[i].display(col);
Draws the i-th petal with the chosen color
pop();
Restores the rotation state to what it was before push(), so the next petal starts fresh
centerRosette.displayStars();
Draws all seven nested stars at the center with magenta, green, blue, and red strokes

Rosette (class)

The Rosette class is a masterpiece of pre-computation. Rather than computing sines, cosines, and geometry lengths every time the petal needs to be drawn, all the expensive math happens once in the constructor. This is called 'caching'—store expensive results so they can be reused cheaply. The petalPoints array is the key deliverable: six (x, y) coordinates that, when connected, form a beautiful petal shape. The stars array holds seven nested Star objects that will be drawn at the center. By pre-instantiating them here, display() and displayStars() can just call their methods without creating objects on the fly.

🔬 This array defines six vertices that are connected to form the petal outline. What happens if you delete one vertex (remove one line)? Will the petal shape change from a six-sided polygon to a five-sided one?

    this.petalPoints = [
      { x: this.xLength * this.cosHalfAngle * this.ratio, y: -this.xLength * this.sinHalfAngle * this.ratio },
      { x: this.xLength * this.cosHalfAngle + this.wLength, y: -this.xLength * this.sinHalfAngle * this.ratio },
      { x: this.sqSideLength * this.ratio, y: 0 },
      { x: this.xLength * this.cosHalfAngle + this.wLength * this.ratio, y: this.xLength * this.sinHalfAngle * this.ratio },
      { x: this.xLength * this.cosHalfAngle * this.ratio, y: this.xLength * this.sinHalfAngle * this.ratio },
      { x: this.dLength * this.ratio, y: 0 },
    ];
class Rosette {
  constructor(sqSideLength, nPoints, ratio = 1) {
    this.sqSideLength = sqSideLength;
    this.nPoints = nPoints;
    this.ratio = ratio;
    this.angle = 360 / nPoints;
    this.halfAngle = this.angle / 2;
    this.intAngle = ((this.nPoints - 2) * 180) / this.nPoints;
    this.halfIntAngle = this.intAngle / 2;
    this.twoAngle = 2 * this.angle;
    this.fourHalfAngle = 4 * this.halfAngle;
    this.threeHalfAngle = 3 * this.halfAngle;
    this.halfAnglePlus90 = 90 + this.halfAngle;
    this.triangleOneComplement = 180 - 2 * this.halfAngle;
    this.triangleTwoComplement = 180 - 3 * this.halfAngle;
    this.angleExtTriComplement = 180 - (this.halfIntAngle + this.halfAngle);

    this.sinHalfAngle = sin(this.halfAngle);
    this.cosHalfAngle = cos(this.halfAngle);
    this.tanHalfAngle = tan(this.halfAngle);
    this.sinAngle = sin(this.angle);
    this.sinAngleComplement = sin(180 - this.angle);
    this.sinAnglePlusHalfAngleComplement = sin(180 - (this.angle + this.halfAngle));
    this.sinTwoAngle = sin(this.twoAngle);
    this.sinHalfIntrAngle = sin(this.halfIntAngle);
    this.sinAngleExtTriComplement = sin(this.angleExtTriComplement);

    this.rLength = (this.sqSideLength * this.sinAngleExtTriComplement) / this.sinTwoAngle;
    this.xLength = (this.sinAngle / this.sinAnglePlusHalfAngleComplement) * this.sqSideLength;
    this.dLength = (this.sinHalfAngle / this.sinAngleComplement) * this.xLength;
    this.tLength = (this.sinAngle / this.sinAnglePlusHalfAngleComplement) * this.dLength;
    this.yLength = this.sinHalfAngle * this.tanHalfAngle * this.xLength;
    this.zLength = this.sqSideLength - this.xLength * this.cosHalfAngle;
    this.wLength = this.zLength - this.yLength;

    this.petalPoints = [
      { x: this.xLength * this.cosHalfAngle * this.ratio, y: -this.xLength * this.sinHalfAngle * this.ratio },
      { x: this.xLength * this.cosHalfAngle + this.wLength, y: -this.xLength * this.sinHalfAngle * this.ratio },
      { x: this.sqSideLength * this.ratio, y: 0 },
      { x: this.xLength * this.cosHalfAngle + this.wLength * this.ratio, y: this.xLength * this.sinHalfAngle * this.ratio },
      { x: this.xLength * this.cosHalfAngle * this.ratio, y: this.xLength * this.sinHalfAngle * this.ratio },
      { x: this.dLength * this.ratio, y: 0 },
    ];

    // Pre-instantiate all Star objects in the constructor
    this.stars = [
      new Star(
        0,
        0,
        (this.sqSideLength * sin(90 + this.halfAngle)) / sin(90 - 2 * this.halfAngle),
        this.sqSideLength,
        this.nPoints // Pass nPoints to Star constructor
      ),
      new Star(
        0,
        0,
        (this.sqSideLength * sin(90 + this.halfAngle)) / sin(90 - 2 * this.halfAngle),
        (this.sqSideLength * sin(90 + this.halfAngle)) / sin(90 - 3 * this.halfAngle),
        this.nPoints // Pass nPoints to Star constructor
      ),
      new Star(
        0,
        0,
        (this.sqSideLength * sin(90 + this.halfAngle)) / sin(90 - 4 * this.halfAngle),
        (this.sqSideLength * sin(90 + this.halfAngle)) / sin(90 - 3 * this.halfAngle),
        this.nPoints // Pass nPoints to Star constructor
      ),
      new Star(
        0,
        0,
        (this.sqSideLength * sin(90 + this.halfAngle)) / sin(90 - 4 * this.halfAngle),
        (this.sqSideLength * sin(90 + this.halfAngle)) / sin(90 - 5 * this.halfAngle),
        this.nPoints // Pass nPoints to Star constructor
      ),
      new Star(
        0,
        0,
        (this.sqSideLength * sin(90 + this.halfAngle)) / sin(90 - 6 * this.halfAngle),
        (this.sqSideLength * sin(90 + this.halfAngle)) / sin(90 - 5 * this.halfAngle),
        this.nPoints // Pass nPoints to Star constructor
      ),
      new Star(0, 0, this.tLength, this.dLength, this.nPoints), // Pass nPoints
      new Star(0, 0, this.xLength, this.dLength, this.nPoints), // Pass nPoints
    ];
  }

  display(col) {
    stroke(col); // Use the passed color for the petal outline
    strokeWeight(2);
    noFill();
    beginShape();
    for (let pt of this.petalPoints) {
      vertex(pt.x, pt.y);
    }
    endShape(CLOSE);
  }

  displayStars() {
    // Iterate through the pre-instantiated Star objects and display them
    stroke(255, 0, 255); // Magenta for outer stars
    this.stars[0].display();
    stroke(0, 255, 0); // Green for middle outer stars
    this.stars[1].display();
    stroke(255, 0, 255); // Magenta for inner outer stars
    this.stars[2].display();
    stroke(0, 255, 0); // Green for fourth outer stars
    this.stars[3].display();
    stroke(0, 0, 255); // Blue for fifth outer stars
    this.stars[4].display();
    stroke(139, 0, 0); // Dark red for first inner star
    this.stars[5].display();
    stroke(255, 0, 0); // Red for second inner star
    this.stars[6].display();
  }
}
Line-by-line explanation (6 lines)

🔧 Subcomponents:

calculation Angle pre-computations this.angle = 360 / nPoints; this.halfAngle = this.angle / 2;

Pre-calculates key angles (full angle, half angle, etc.) so they don't need to be computed every time display() is called

optimization Sine/cosine/tangent cache this.sinHalfAngle = sin(this.halfAngle); this.cosHalfAngle = cos(this.halfAngle);

Pre-computes all needed sine, cosine, and tangent values in the constructor so that expensive trigonometric calls happen only once

calculation Petal geometry lengths this.rLength = (this.sqSideLength * this.sinAngleExtTriComplement) / this.sinTwoAngle;

Uses pre-computed angles and sines to derive the lengths needed to position petal vertices

data-structure Petal vertex array this.petalPoints = [ ... ];

Stores the six (x, y) coordinates that define the petal shape—these are calculated once in the constructor and reused every time display() draws

object-array Pre-instantiated stars this.stars = [ new Star(...), ... ];

Creates and stores all seven Star objects at construction time so they don't need to be recreated each time displayStars() is called

constructor(sqSideLength, nPoints, ratio = 1) {
Defines the constructor with three parameters: sqSideLength (the base size), nPoints (number of petals), and ratio (an optional scaling factor)
this.angle = 360 / nPoints;
Calculates the angle between adjacent petals (e.g., 360 / 24 = 15 degrees)
this.sinHalfAngle = sin(this.halfAngle);
Pre-computes the sine of half the petal angle—this is used multiple times in geometry calculations, so computing it once saves CPU
this.rLength = (this.sqSideLength * this.sinAngleExtTriComplement) / this.sinTwoAngle;
Uses the pre-computed sines to derive a key length for the petal's outer radius—complex trigonometry condensed into one formula
this.petalPoints = [ { x: ..., y: ... }, ... ];
Creates an array of six objects, each with an x and y coordinate that defines a vertex of the petal outline
this.stars = [ new Star(...), ... ];
Creates seven Star objects with different inner and outer radii, all stored in the stars array so they can be drawn later

display(col) — Rosette method

This method is simple but powerful: it takes a color argument and draws the petal outline using the six pre-computed vertices. The for-of loop (for (let pt of ...)) is a clean way to iterate through an array of objects. beginShape/vertex/endShape is the standard p5.js pattern for drawing custom polygons—you list each vertex, and endShape(CLOSE) connects them all into a closed shape.

  display(col) {
    stroke(col); // Use the passed color for the petal outline
    strokeWeight(2);
    noFill();
    beginShape();
    for (let pt of this.petalPoints) {
      vertex(pt.x, pt.y);
    }
    endShape(CLOSE);
  }
Line-by-line explanation (7 lines)

🔧 Subcomponents:

styling Set stroke color stroke(col);

Applies the passed color argument to the petal outline

for-loop Connect petal vertices for (let pt of this.petalPoints) { vertex(pt.x, pt.y); }

Iterates through the six petal vertices and connects them with lines to form the petal outline

stroke(col);
Sets the stroke color to the passed argument (e.g., '#e63946' or any RGB array)
strokeWeight(2);
Sets the line thickness to 2 pixels
noFill();
Tells p5.js not to fill the petal shape with a solid color—only draw the outline
beginShape();
Starts defining a shape by listing its vertices
for (let pt of this.petalPoints) {
Loops through each (x, y) object in the petalPoints array
vertex(pt.x, pt.y);
Adds a vertex to the shape at the (x, y) position
endShape(CLOSE);
Finishes the shape and closes it by drawing a line from the last vertex back to the first

displayStars() — Rosette method

This method draws all seven nested stars by iterating through the stars array and calling display() on each one. The pattern is simple: set a stroke color, draw a star, repeat. The seven stars create the intricate nested effect at the center. Since the Star objects were created in the constructor, this method just needs to set colors and call display()—no expensive geometry calculations happen here.

🔬 Each stroke/display pair draws one star in a color. What happens if you comment out one of the display lines (add // before it)? Will that star layer disappear?

    stroke(255, 0, 255); // Magenta for outer stars
    this.stars[0].display();
    stroke(0, 255, 0); // Green for middle outer stars
    this.stars[1].display();
    stroke(255, 0, 255); // Magenta for inner outer stars
    this.stars[2].display();
  displayStars() {
    // Iterate through the pre-instantiated Star objects and display them
    stroke(255, 0, 255); // Magenta for outer stars
    this.stars[0].display();
    stroke(0, 255, 0); // Green for middle outer stars
    this.stars[1].display();
    stroke(255, 0, 255); // Magenta for inner outer stars
    this.stars[2].display();
    stroke(0, 255, 0); // Green for fourth outer stars
    this.stars[3].display();
    stroke(0, 0, 255); // Blue for fifth outer stars
    this.stars[4].display();
    stroke(139, 0, 0); // Dark red for first inner star
    this.stars[5].display();
    stroke(255, 0, 0); // Red for second inner star
    this.stars[6].display();
  }
Line-by-line explanation (9 lines)

🔧 Subcomponents:

sequential-calls Draw seven stars with colors stroke(255, 0, 255); this.stars[0].display();

Sets a stroke color and draws each of the seven pre-instantiated Star objects in sequence with different colors

stroke(255, 0, 255);
Sets the stroke to magenta for the first star
this.stars[0].display();
Calls the display() method on the first Star object to draw it
stroke(0, 255, 0);
Changes the stroke to green for the second star
this.stars[1].display();
Draws the second star with the green stroke
stroke(255, 0, 255); // Magenta for inner outer stars this.stars[2].display();
Draws the third star in magenta
stroke(0, 255, 0); // Green for fourth outer stars this.stars[3].display();
Draws the fourth star in green
stroke(0, 0, 255); // Blue for fifth outer stars this.stars[4].display();
Draws the fifth star in blue
stroke(139, 0, 0); // Dark red for first inner star this.stars[5].display();
Draws the sixth star in dark red
stroke(255, 0, 0); // Red for second inner star this.stars[6].display();
Draws the seventh star in bright red

Star (class)

The Star class uses polar coordinates (angles and radii) to place vertices around a center point. Each iteration of the loop creates two vertices: one on the outer radius and one on the inner radius, offset by halfAngle. This alternation creates the classic star shape—pointy outer vertices and valleys where the inner vertices sit. Because npoints is passed in and stored, every star automatically adapts to match the rosette's petal count. The getSideLength() helper (currently unused) calculates the distance between an outer and inner vertex, which could be useful for advanced layout calculations.

🔬 This loop creates alternating outer and inner vertices around a circle. What happens if you change a + halfAngle to a + angle (so inner vertices align with outer vertices instead of being offset)? Will the star collapse into a circle?

    for (let a = 0; a < 360; a += angle) {
      let sx = this.x + cos(a) * this.rOuter;
      let sy = this.y + sin(a) * this.rOuter;
      vertex(sx, sy);
      sx = this.x + cos(a + halfAngle) * this.rInner;
      sy = this.y + sin(a + halfAngle) * this.rInner;
      vertex(sx, sy);
    }
class Star {
  constructor(x, y, rInner, rOuter, npoints) {
    this.x = x;
    this.y = y;
    this.rInner = rInner;
    this.rOuter = rOuter;
    this.npoints = npoints; // Store npoints in the Star object
  }

  // ⭐ NEW: compute the side length of the star
  getSideLength() {
    let angle = 360 / this.npoints; // Use this.npoints
    let halfAngle = angle / 2;

    // First outer vertex
    let x1 = this.x + cos(0) * this.rOuter;
    let y1 = this.y + sin(0) * this.rOuter;

    // Next inner vertex
    let x2 = this.x + cos(halfAngle) * this.rInner;
    let y2 = this.y + sin(halfAngle) * this.rInner;

    return dist(x1, y1, x2, y2);
  }

  display() {
    let angle = 360 / this.npoints; // Use this.npoints
    let halfAngle = angle / 2;
    beginShape();
    for (let a = 0; a < 360; a += angle) {
      let sx = this.x + cos(a) * this.rOuter;
      let sy = this.y + sin(a) * this.rOuter;
      vertex(sx, sy);
      sx = this.x + cos(a + halfAngle) * this.rInner;
      sy = this.y + sin(a + halfAngle) * this.rInner;
      vertex(sx, sy);
    }
    endShape(CLOSE);
  }
}
Line-by-line explanation (12 lines)

🔧 Subcomponents:

initialization Star constructor constructor(x, y, rInner, rOuter, npoints) { this.x = x; this.y = y; this.rInner = rInner; this.rOuter = rOuter; this.npoints = npoints; }

Stores the star's position (x, y), inner radius, outer radius, and point count so they can be used by display() and getSideLength()

for-loop Generate star vertices for (let a = 0; a < 360; a += angle) { let sx = this.x + cos(a) * this.rOuter; let sy = this.y + sin(a) * this.rOuter; vertex(sx, sy); sx = this.x + cos(a + halfAngle) * this.rInner; sy = this.y + sin(a + halfAngle) * this.rInner; vertex(sx, sy); }

Loops around 360 degrees, creating pairs of vertices: one on the outer radius, one on the inner radius, alternating to form a star shape

constructor(x, y, rInner, rOuter, npoints) {
Defines the Star constructor with five parameters: center position (x, y), inner radius, outer radius, and number of points
this.npoints = npoints;
Stores the number of points so the star can dynamically adapt to match the rosette's petal count
let angle = 360 / this.npoints;
Calculates the angle between adjacent points (e.g., 360 / 24 = 15 degrees)
let halfAngle = angle / 2;
Calculates half the angle—inner vertices are placed at this offset
for (let a = 0; a < 360; a += angle) {
Loops from 0 to 360 degrees, stepping by the angle between points
let sx = this.x + cos(a) * this.rOuter;
Calculates the x-coordinate of an outer vertex using cosine and the outer radius
let sy = this.y + sin(a) * this.rOuter;
Calculates the y-coordinate of an outer vertex using sine and the outer radius
vertex(sx, sy);
Adds the outer vertex to the shape
sx = this.x + cos(a + halfAngle) * this.rInner;
Calculates the x-coordinate of an inner vertex, rotated by halfAngle and at the inner radius
sy = this.y + sin(a + halfAngle) * this.rInner;
Calculates the y-coordinate of the inner vertex
vertex(sx, sy);
Adds the inner vertex to the shape, creating a sharp point between the outer and inner vertices
endShape(CLOSE);
Finishes the star by connecting the last vertex back to the first

📦 Key Variables

palette array

Stores five hex color strings that cycle through when coloring each petal—ensures the pattern uses a consistent, aesthetically pleasing color scheme

let palette = ["#e63946", "#f1faee", "#a8dadc", "#457b9d", "#1d3557"];
rosettes array

Holds all the Rosette objects (one per petal)—when the slider changes, this array is cleared and repopulated with new Rosette objects

let rosettes = [];
centerRosette object

Stores a single Rosette object whose stars are drawn at the center of the pattern—regenerated whenever the slider changes

let centerRosette;
sqSideLength number

Pre-calculated base length for petal geometry, set to one-quarter of the canvas width—passed to every Rosette constructor

let sqSideLength;
nPointsSlider p5.Slider object

The interactive slider element that lets users adjust the petal count from 3 to 60

let nPointsSlider;
nPointsLabel p5.Renderer object (HTML paragraph)

A DOM element that displays the current slider value as text above the slider

let nPointsLabel;

🔧 Potential Improvements (5)

Here are some ways this code could be enhanced:

BUG Star constructor and display()

getSideLength() method is defined but never called or used anywhere in the sketch, making it dead code

💡 Either remove the getSideLength() method entirely, or use it to display the star's characteristic edge length somewhere for debugging/learning

PERFORMANCE handleSliderChange()

Regenerating all Rosette and Star objects on every slider change creates many trigonometric calculations; for nPoints > 50, this can cause noticeable lag

💡 Cache Rosette objects for common nPoints values (e.g., every 5th value) so slider changes within that range just reuse geometry instead of recalculating. Alternatively, store pre-computed geometry for all 3–60 point counts at setup time

STYLE draw() and displayStars()

Stroke colors are hard-coded in multiple places (draw() uses red, displayStars() uses magenta, green, blue, etc.), making it hard to change the overall color scheme

💡 Define color constants at the top of the sketch (const PETAL_COLOR = color(255, 0, 0), const STAR_COLORS = [...]) and use them throughout to make the sketch more maintainable

FEATURE Rosette class

The ratio parameter in the Rosette constructor is defined but never actually used meaningfully to scale the geometry

💡 Implement ratio as a proper scaling factor that affects petalPoints, allowing each Rosette to be individually scaled—this would enable cool visual effects like a growing flower pattern

STYLE Rosette constructor

The constructor contains dozens of intermediate calculations (sinAngle, sinAngleComplement, etc.) that clutter the code and make it hard to understand the geometric logic

💡 Add comments explaining what each calculated value represents (e.g., 'Interior angle of the n-gon formed by petal tips') and group related calculations together so the geometry intent is clear

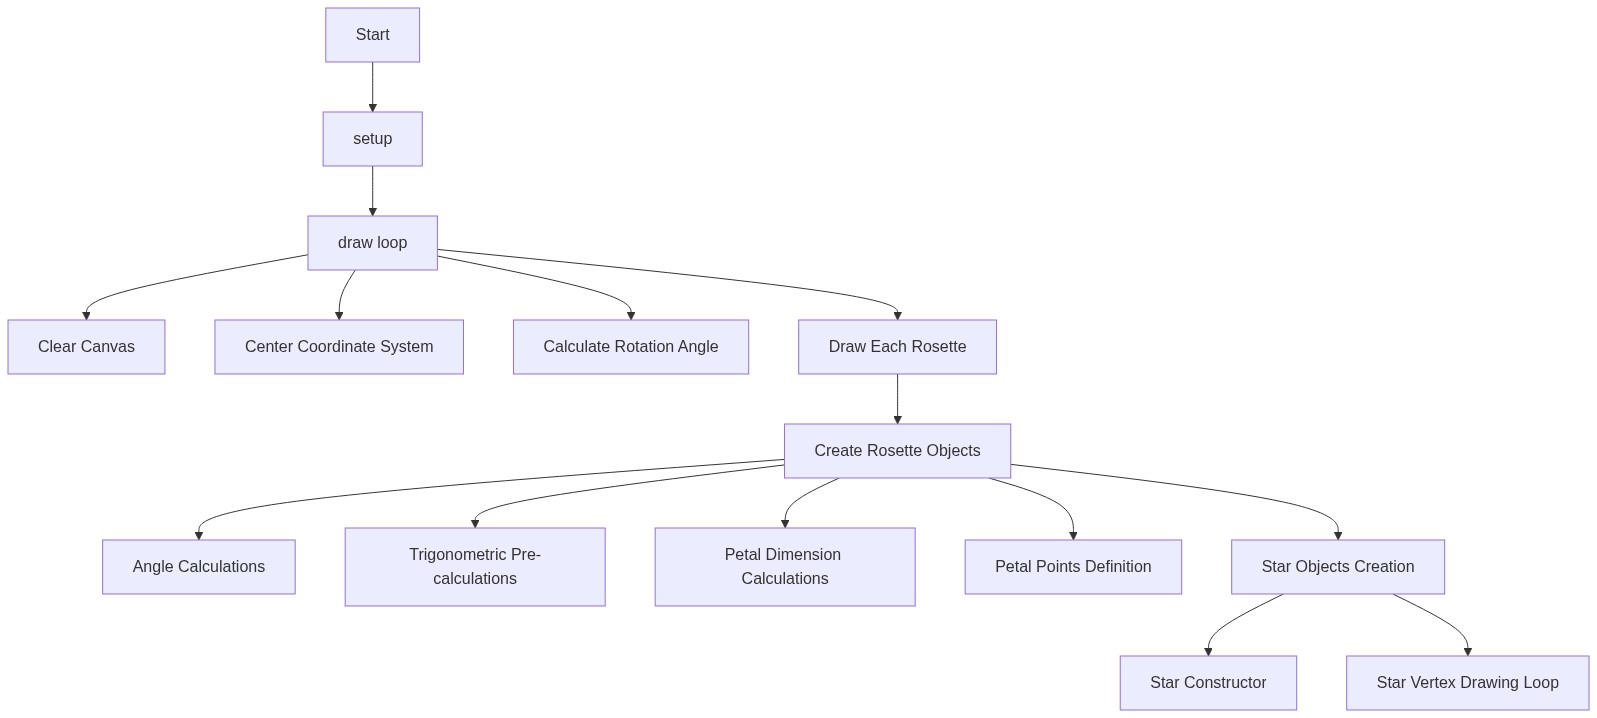
🔄 Code Flow

Code flow showing setup, handlesliderchange, draw, rosette, display, displaystars, star

💡 Click on function names in the diagram to jump to their code

graph TD start[Start] --> setup[setup] setup --> handlesliderchange[handlesliderchange] setup --> no-loop[no-loop] setup --> slider-creation[slider-creation] setup --> event-listener[event-listener] setup --> angle-mode[angle-mode] handlesliderchange --> slider-read[slider-read] handlesliderchange --> array-reset[array-reset] handlesliderchange --> rosette-loop[rosette-loop] handlesliderchange --> center-rosette[center-rosette] handlesliderchange --> redraw-call[redraw-call] draw[draw] --> background-clear[background-clear] draw --> translate-origin[translate-origin] draw --> angle-calc[angle-calc] draw --> petal-loop[petal-loop] draw --> stars-draw[stars-draw] petal-loop --> angle-calcs[angle-calcs] petal-loop --> trig-cache[trig-cache] petal-loop --> geometry-calcs[geometry-calcs] petal-loop --> petal-vertices[petal-vertices] petal-loop --> color-set[color-set] petal-loop --> vertex-loop[vertex-loop] stars-draw --> star-array[star-array] stars-draw --> star-loop[star-loop] star-loop --> constructor[constructor] star-loop --> star-angle-loop[star-angle-loop] click setup href "#fn-setup" click handlesliderchange href "#fn-handlesliderchange" click draw href "#fn-draw" click no-loop href "#sub-no-loop" click slider-creation href "#sub-slider-creation" click event-listener href "#sub-event-listener" click angle-mode href "#sub-angle-mode" click slider-read href "#sub-slider-read" click array-reset href "#sub-array-reset" click rosette-loop href "#sub-rosette-loop" click center-rosette href "#sub-center-rosette" click redraw-call href "#sub-redraw-call" click background-clear href "#sub-background-clear" click translate-origin href "#sub-translate-origin" click angle-calc href "#sub-angle-calc" click petal-loop href "#sub-petal-loop" click stars-draw href "#sub-stars-draw" click angle-calcs href "#sub-angle-calcs" click trig-cache href "#sub-trig-cache" click geometry-calcs href "#sub-geometry-calcs" click petal-vertices href "#sub-petal-vertices" click color-set href "#sub-color-set" click vertex-loop href "#sub-vertex-loop" click star-array href "#sub-star-array" click star-loop href "#sub-star-loop" click constructor href "#sub-constructor" click star-angle-loop href "#sub-star-angle-loop"

❓ Frequently Asked Questions

What visual elements does the p5.js Sketch 2026-06-08 16:23 (Remix) create?

This sketch generates a visually striking composition of rosettes, which are star-like shapes, using a vibrant color palette and customizable point counts.

How can users interact with the Sketch 2026-06-08 16:23 (Remix)?

Users can interact with the sketch by using a slider to adjust the number of points on the rosettes, dynamically changing the visual output.

What creative coding techniques are demonstrated in this p5.js sketch?

The sketch showcases object-oriented programming through the creation of rosette objects, as well as real-time interactivity by responding to user input via a slider.

Preview

Sketch 2026-06-08 16:23 (Remix) - p5.js creative coding sketch preview
Sketch Preview
Code flow diagram showing the structure of Sketch 2026-06-08 16:23 (Remix) - Code flow showing setup, handlesliderchange, draw, rosette, display, displaystars, star
Code Flow Diagram