
Sketch 2026-06-08 16:23 (Remix) (Remix)

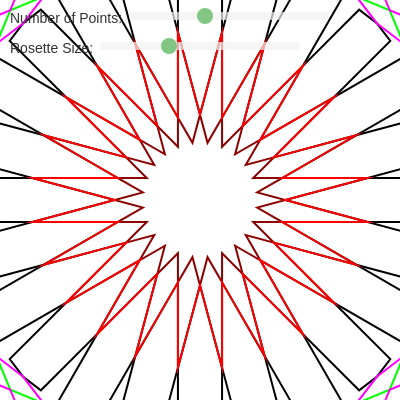
This sketch generates Islamic geometric rosettes—intricate star-petal patterns with radiating symmetry. Each rosette is constructed from mathematically derived petal shapes and nested stars, arranged around a central point with full rotational symmetry controlled by an adjustable number of points.

🧪 Try This!

Experiment with the code by making these changes:

  1. Make the canvas dark — A dark background creates dramatic contrast with the petal outlines, making the geometry pop off the screen
  2. Colorize the petals — Instead of black petals, use a rainbow gradient by reading the palette array
  3. Hide the central stars — Comment out the displayStars() call to see the rosette pattern without the nested star rings in the middle
  4. Add thick black outline — Increase the strokeWeight to make all lines thicker and bolder, emphasizing the geometry
  5. Flip the star radii — Swap rInner and rOuter when creating Star objects in the Rosette constructor to invert the star shape
Prefer the full editor? Open it there →

📖 About This Sketch

This sketch draws Islamic geometric rosettes, the classic ornamental star-and-petal patterns found in Islamic art and architecture. It uses trigonometry to calculate precise petal shapes, object-oriented design with Rosette and Star classes to organize the geometry, and p5.js transforms like rotate() and translate() to create radial symmetry. The result is a mesmerizing mandala-like pattern that shifts and evolves as you drag the sliders.

The code is organized around two main classes: Rosette manages the petal shapes and contains multiple Star objects, while Star draws the nested rings of alternating outer and inner points. The setup() function creates interactive sliders, updateSketch() regenerates the geometry when sliders change, and draw() orchestrates the layout by rotating and positioning each rosette. By studying it, you will learn how to combine mathematical geometry with p5.js classes, how to pre-compute expensive calculations in constructors, and how object-oriented design keeps complex visuals manageable.

⚙️ How It Works

  1. When the sketch loads, setup() creates a 1000×1000 canvas, sets angleMode to DEGREES, and creates two interactive sliders: one for the number of points (3–60) and one for rosette size (roughly 125–500 pixels). These sliders trigger updateSketch() whenever changed.
  2. updateSketch() creates fresh arrays of Rosette objects—one for each point in the pattern—and a central Rosette that will display stars. Each Rosette is instantiated with the current slider values, triggering its constructor to perform all the heavy trigonometric math once.
  3. Inside the Rosette constructor, dozens of sine, cosine, and tangent calculations compute the precise coordinates of petal vertices and the radii of nested stars. These calculations depend on angle relationships between the points (like 360 divided by nPoints). The constructor pre-builds an array of Star objects at various radii so display() is fast.
  4. In draw(), the canvas is translated to the center and the background is cleared. A loop rotates the canvas by angle increments and calls display() on each rosette in sequence, painting petals fanned around the center.
  5. The central Rosette then calls displayStars(), which iterates through its pre-instantiated Star objects, each stroked in a different color (magenta, green, blue, red) to reveal the nested geometry.

🎓 Concepts You'll Learn

Trigonometry and angle calculationsObject-oriented classes and constructorsRotational symmetry with rotate() and transformsInteractive sliders and real-time redrawPre-computed geometry for performanceNested data structures (Rosette contains Stars)

📝 Code Breakdown

setup()

setup() runs once when the sketch starts and is your chance to initialize the canvas, set global properties like angleMode, and prepare interactive controls. The noLoop() call is a performance win—combined with slider.input(updateSketch), it means draw() only runs when you actually change something.

function setup() {
  createCanvas(1000, 1000);
  angleMode(DEGREES);
  noFill();
  rectMode(CENTER);

  // Sliders
  nPointsLabel = createElement('label', 'Number of Points: ');
  nPointsLabel.position(10, 10);
  nPointsSlider = createSlider(3, 60, 24, 1); // Min 3, max 60, default 24, step 1
  nPointsSlider.position(nPointsLabel.width + 15, 10);
  nPointsSlider.style('width', '200px');
  nPointsSlider.input(updateSketch); // Call updateSketch when this slider changes

  sqSideLengthLabel = createElement('label', 'Rosette Size: ');
  sqSideLengthLabel.position(10, 40);
  sqSideLengthSlider = createSlider(width / 8, width / 2, width / 4, 1); // Min ~125, max ~500, default ~250, step 1
  sqSideLengthSlider.position(sqSideLengthLabel.width + 15, 40);
  sqSideLengthSlider.style('width', '200px');
  sqSideLengthSlider.input(updateSketch); // Call updateSketch when this slider changes

  // Initial calculation and drawing
  updateSketch();
  noLoop(); // Draw once, then only redraw on slider input
}
Line-by-line explanation (10 lines)

🔧 Subcomponents:

configuration Angle Mode Setup angleMode(DEGREES);

Tells p5.js to measure all angles in degrees (0–360) instead of radians, making math more intuitive

UI-control Points Slider Creation nPointsSlider = createSlider(3, 60, 24, 1);

Creates a slider ranging 3–60 points, starting at 24, that triggers updateSketch() when dragged

UI-control Size Slider Creation sqSideLengthSlider = createSlider(width / 8, width / 2, width / 4, 1);

Creates a slider for rosette size from ~125 to ~500 pixels, starting at ~250, that triggers updateSketch() when dragged

optimization Disable Continuous Loop noLoop(); // Draw once, then only redraw on slider input

Stops draw() from running every frame, saving CPU—it only runs when updateSketch() calls redraw()

createCanvas(1000, 1000);
Creates a 1000×1000 pixel square canvas, providing a symmetrical space for the rosette pattern
angleMode(DEGREES);
Sets all angle measurements (sin, cos, rotate, etc.) to use degrees 0–360 instead of radians 0–2π, making trigonometry more readable
noFill();
Disables fill for all shapes drawn after this, so only the stroked outlines of petals and stars will be visible
rectMode(CENTER);
Sets rectangle positioning mode to CENTER (not strictly used here, but prepared for potential rect() calls)
nPointsLabel = createElement('label', 'Number of Points: ');
Creates a text label above the first slider to describe what it controls
nPointsSlider = createSlider(3, 60, 24, 1);
Creates a slider with minimum 3, maximum 60, default value 24, and step size 1 for controlling petal count
nPointsSlider.input(updateSketch);
Binds the slider's input event to call updateSketch(), so the pattern redraws whenever the user drags this slider
sqSideLengthSlider = createSlider(width / 8, width / 2, width / 4, 1);
Creates a slider for rosette size: minimum 125 pixels (width/8), maximum 500 pixels (width/2), default 250 pixels (width/4)
updateSketch();
Calls updateSketch() once at startup to create the initial rosette objects and draw the pattern
noLoop();
Stops the draw loop from running continuously—draw() now only executes when updateSketch() explicitly calls redraw(), improving performance
updateSketch()

updateSketch() is the bridge between user input (sliders) and rendering. Every time a slider changes, this function is called. It rebuilds the rosette geometry from scratch with the new parameters and calls redraw() to make the change visible. This is where interactive sketches truly come alive—respond to user input by regenerating and displaying new content.

🔬 This loop creates one Rosette per point. What happens if you change the loop to push two Rosettes each iteration (e.g., push twice inside the loop)? How many petals appear now?

  for (let i = 0; i < currentNPoints; i++) {
    rosettes.push(new Rosette(currentSqSideLength, currentNPoints));
  }
function updateSketch() {
  let currentNPoints = nPointsSlider.value();
  let currentSqSideLength = sqSideLengthSlider.value();

  // Clear existing rosettes
  rosettes = [];

  // Create all rosette objects with current slider values
  for (let i = 0; i < currentNPoints; i++) {
    rosettes.push(new Rosette(currentSqSideLength, currentNPoints));
  }
  centerRosette = new Rosette(currentSqSideLength, currentNPoints); // Central rosette for stars
  redraw(); // Draw the canvas with updated parameters
}
Line-by-line explanation (7 lines)

🔧 Subcomponents:

data-collection Read Slider Values let currentNPoints = nPointsSlider.value();

Reads the current position of the nPoints slider and stores it in a local variable

cleanup Clear Old Rosettes rosettes = [];

Empties the rosettes array so new ones will replace the old geometry

for-loop Create Rosettes Loop for (let i = 0; i < currentNPoints; i++) { rosettes.push(new Rosette(currentSqSideLength, currentNPoints)); }

Loops nPoints times, creating a fresh Rosette object for each point and adding it to the array

instantiation Create Central Rosette centerRosette = new Rosette(currentSqSideLength, currentNPoints);

Creates a separate Rosette at the center to display the nested star rings

let currentNPoints = nPointsSlider.value();
Reads the current slider value and stores it—this is the number of petals to draw
let currentSqSideLength = sqSideLengthSlider.value();
Reads the size slider value and stores it—this controls how large each petal grows
rosettes = [];
Empties the rosettes array, discarding all old Rosette objects so new ones can replace them
for (let i = 0; i < currentNPoints; i++) {
Starts a loop that will run nPoints times, once for each petal in the pattern
rosettes.push(new Rosette(currentSqSideLength, currentNPoints));
Creates a new Rosette with the current size and point count, then adds it to the rosettes array
centerRosette = new Rosette(currentSqSideLength, currentNPoints);
Creates one additional Rosette object to serve as the central star display
redraw();
Manually triggers the draw() function once, so the new rosettes are immediately visible on screen

draw()

draw() is typically called every frame, but here noLoop() disables that, so draw() only runs when updateSketch() calls redraw(). This function orchestrates the visual composition: it clears the background, translates to center, and uses a loop with push/pop and rotate() to create radial symmetry. Understanding push/pop is crucial—they protect transformations from accumulating across loop iterations.

🔬 Right now every petal cycles through the palette. What if you always used the same color, like palette[0], regardless of i? Try it and see if the pattern feels less dynamic.

    let col = palette[i % palette.length]; // cycle through palette
    rosettes[i].display(col);
function draw() {
  // draw() is now only called when updateSketch() triggers redraw()
  // No need to check slider values here anymore!

  background(255);
  translate(width / 2, height / 2);

  let currentNPoints = nPointsSlider.value();
  let angle = 360 / currentNPoints;

  stroke(255, 0, 0); // Red stroke for petals
  strokeWeight(2);

  // 🌸 Draw rosettes
  for (let i = 0; i < currentNPoints; i++) {
    push();
    rotate(angle * i);
    let col = palette[i % palette.length]; // cycle through palette
    rosettes[i].display(col);
    pop();
  }

  // 🌟 Draw central star
  centerRosette.displayStars();
}
Line-by-line explanation (12 lines)

🔧 Subcomponents:

rendering Clear Canvas background(255);

Fills the entire canvas with white, erasing the previous frame

transform Move Origin to Center translate(width / 2, height / 2);

Shifts the coordinate system so (0,0) is at the center of the canvas, making rotational symmetry easier

for-loop Draw Rotated Rosettes for (let i = 0; i < currentNPoints; i++) { push(); rotate(angle * i); let col = palette[i % palette.length]; rosettes[i].display(col); pop(); }

Loops through each rosette, rotating the canvas by incremental angles and drawing each petal in its rotated position

scoping Isolate Transformations push(); rotate(angle * i); ... pop();

push() saves the current transform state, rotate() applies a rotation, pop() restores the state so rotations don't accumulate

rendering Draw Central Stars centerRosette.displayStars();

Calls displayStars() on the central rosette to draw all nested star rings at the very center

background(255);
Fills the entire canvas with white (255), clearing any previous drawing so there are no trails
translate(width / 2, height / 2);
Moves the drawing origin (0,0) to the center of the canvas, so rotations happen around the middle rather than the top-left corner
let currentNPoints = nPointsSlider.value();
Reads the current slider value to know how many petals to draw
let angle = 360 / currentNPoints;
Calculates the angular spacing between petals—e.g., 24 points means 15° between each petal (360/24)
stroke(255, 0, 0); // Red stroke for petals
Sets the stroke color to red for all petals drawn in this loop
for (let i = 0; i < currentNPoints; i++) {
Loops nPoints times, once for each petal position
push();
Saves the current transformation matrix so the rotate() that follows only affects this single petal
rotate(angle * i);
Rotates the canvas by angle*i degrees—first petal at 0°, second at 15°, third at 30°, etc., creating radial symmetry
let col = palette[i % palette.length];
Picks a color from the palette array, cycling back to the start if i exceeds the palette length (i % palette.length ensures wraparound)
rosettes[i].display(col);
Calls the display() method on the i-th Rosette object, drawing its petal shape in the rotated position
pop();
Restores the transformation matrix to what it was before the rotate(), so the next iteration starts fresh
centerRosette.displayStars();
Calls displayStars() on the central Rosette to draw all the nested stars (which are not rotated) at the very middle of the pattern

safeDivide()

This function prevents crashes caused by dividing by zero, which would otherwise produce Infinity or NaN. The Rosette constructor uses it extensively when computing star radii and petal geometry—some angle configurations can produce near-zero denominators, so safeDivide() gracefully falls back to a default value instead of breaking.

function safeDivide(numerator, denominator, defaultValue = 0) {
  // Use a small epsilon for floating point comparison to check if denominator is effectively zero
  return abs(denominator) < 0.0001 ? defaultValue : numerator / denominator;
}
Line-by-line explanation (2 lines)

🔧 Subcomponents:

conditional Near-Zero Check return abs(denominator) < 0.0001 ? defaultValue : numerator / denominator;

Uses a ternary operator to return defaultValue if the denominator is very close to zero, avoiding division by zero errors

function safeDivide(numerator, denominator, defaultValue = 0) {
Defines a helper function that takes three parameters: the numerator, denominator, and a fallback value (default 0)
return abs(denominator) < 0.0001 ? defaultValue : numerator / denominator;
If the absolute value of the denominator is smaller than 0.0001 (essentially zero in floating-point math), return defaultValue; otherwise, safely divide numerator by denominator

class Rosette

The Rosette class is the heart of this sketch. Its constructor performs all the expensive trigonometric calculations once upfront, storing results as instance variables. This is a key optimization: by pre-computing in the constructor, display() becomes very fast—it just iterates a pre-built array and draws. The class also encapsulates complexity: users don't need to understand the math, just call display() or displayStars() to render.

🔬 These 6 points define the petal's shape. What if you multiply the y-coordinates by 2? The petal will stretch vertically—try it and see how the rosette deforms.

    this.petalPoints = [
      { x: this.xLength * this.cosHalfAngle * this.ratio, y: -this.xLength * this.sinHalfAngle * this.ratio },
      { x: this.xLength * this.cosHalfAngle + this.wLength, y: -this.xLength * this.sinHalfAngle * this.ratio },
      { x: this.sqSideLength * this.ratio, y: 0 },
class Rosette {
  constructor(sqSideLength, nPoints, ratio = 1) {
    this.sqSideLength = sqSideLength;
    this.nPoints = nPoints;
    this.ratio = ratio;
    this.angle = 360 / nPoints;
    this.halfAngle = this.angle / 2;
    this.intAngle = ((this.nPoints - 2) * 180) / this.nPoints;
    this.halfIntAngle = this.intAngle / 2;
    this.twoAngle = 2 * this.angle;
    this.fourHalfAngle = 4 * this.halfAngle;
    this.threeHalfAngle = 3 * this.halfAngle;
    this.halfAnglePlus90 = 90 + this.halfAngle;
    this.triangleOneComplement = 180 - 2 * this.halfAngle;
    this.triangleTwoComplement = 180 - 3 * this.halfAngle;
    this.angleExtTriComplement = 180 - (this.halfIntAngle + this.halfAngle);

    this.sinHalfAngle = sin(this.halfAngle);
    this.cosHalfAngle = cos(this.halfAngle);
    this.tanHalfAngle = tan(this.halfAngle);
    this.sinAngle = sin(this.angle);
    this.sinAngleComplement = sin(180 - this.angle);
    this.sinAnglePlusHalfAngleComplement = sin(180 - (this.angle + this.halfAngle));
    this.sinTwoAngle = sin(this.twoAngle);
    this.sinHalfIntrAngle = sin(this.halfIntAngle);
    this.sinAngleExtTriComplement = sin(this.angleExtTriComplement);

    // Use safeDivide for all calculations that could potentially divide by zero
    this.rLength = safeDivide(this.sqSideLength * this.sinAngleExtTriComplement, this.sinTwoAngle);
    this.xLength = safeDivide(this.sinAngle * this.sqSideLength, this.sinAnglePlusHalfAngleComplement);
    this.dLength = safeDivide(this.sinHalfAngle * this.xLength, this.sinAngleComplement);
    this.tLength = safeDivide(this.sinAngle * this.dLength, this.sinAnglePlusHalfAngleComplement);
    this.yLength = this.sinHalfAngle * this.tanHalfAngle * this.xLength;
    this.zLength = this.sqSideLength - this.xLength * this.cosHalfAngle;
    this.wLength = this.zLength - this.yLength;

    this.petalPoints = [
      { x: this.xLength * this.cosHalfAngle * this.ratio, y: -this.xLength * this.sinHalfAngle * this.ratio },
      { x: this.xLength * this.cosHalfAngle + this.wLength, y: -this.xLength * this.sinHalfAngle * this.ratio },
      { x: this.sqSideLength * this.ratio, y: 0 },
      { x: this.xLength * this.cosHalfAngle + this.wLength * this.ratio, y: this.xLength * this.sinHalfAngle * this.ratio },
      { x: this.xLength * this.cosHalfAngle * this.ratio, y: this.xLength * this.sinHalfAngle * this.ratio },
      { x: this.dLength * this.ratio, y: 0 },
    ];

    // Pre-instantiate all Star objects in the constructor
    // Apply safeDivide to star radius calculations as well
    this.stars = [
      new Star(
        0,
        0,
        safeDivide(this.sqSideLength * sin(90 + this.halfAngle), sin(90 - 2 * this.halfAngle)),
        this.sqSideLength,
        this.nPoints
      ),
      new Star(
        0,
        0,
        safeDivide(this.sqSideLength * sin(90 + this.halfAngle), sin(90 - 2 * this.halfAngle)),
        safeDivide(this.sqSideLength * sin(90 + this.halfAngle), sin(90 - 3 * this.halfAngle)),
        this.nPoints
      ),
      new Star(
        0,
        0,
        safeDivide(this.sqSideLength * sin(90 + this.halfAngle), sin(90 - 4 * this.halfAngle)),
        safeDivide(this.sqSideLength * sin(90 + this.halfAngle), sin(90 - 3 * this.halfAngle)),
        this.nPoints
      ),
      new Star(
        0,
        0,
        safeDivide(this.sqSideLength * sin(90 + this.halfAngle), sin(90 - 4 * this.halfAngle)),
        safeDivide(this.sqSideLength * sin(90 + this.halfAngle), sin(90 - 5 * this.halfAngle)),
        this.nPoints
      ),
      new Star(
        0,
        0,
        safeDivide(this.sqSideLength * sin(90 + this.halfAngle), sin(90 - 6 * this.halfAngle)),
        safeDivide(this.sqSideLength * sin(90 + this.halfAngle), sin(90 - 5 * this.halfAngle)),
        this.nPoints
      ),
      new Star(0, 0, this.tLength, this.dLength, this.nPoints),
      new Star(0, 0, this.xLength, this.dLength, this.nPoints),
    ];
  }

  display(col) {
    stroke('black'); // Use the passed color for the petal outline
    strokeWeight(2);
    noFill();
    beginShape();
    for (let pt of this.petalPoints) {
      vertex(pt.x, pt.y);
    }
    endShape(CLOSE);
  }

  displayStars(x = 0, y = 0) {
    // Iterate through the pre-instantiated Star objects and display them
    stroke(255, 0, 255); // Magenta for outer stars
    this.stars[0].display();
    stroke(0, 255, 0); // Green for middle outer stars
    this.stars[1].display();
    stroke(255, 0, 255); // Magenta for inner outer stars
    this.stars[2].display();
    stroke(0, 255, 0); // Green for fourth outer stars
    this.stars[3].display();
    stroke(0, 0, 255); // Blue for fifth outer stars
    this.stars[4].display();
    stroke(139, 0, 0); // Dark red for first inner star
    this.stars[5].display();
    stroke(255, 0, 0); // Red for second inner star
    this.stars[6].display();
  }
}
Line-by-line explanation (12 lines)

🔧 Subcomponents:

initialization Angle Calculations this.angle = 360 / nPoints;

Pre-computes all angle-derived values needed for trigonometry, storing them as instance variables to avoid recalculation

optimization Trigonometric Values this.sinHalfAngle = sin(this.halfAngle);

Pre-computes sine, cosine, and tangent values once in the constructor so display() doesn't recalculate them on every draw

calculation Petal Dimensions this.rLength = safeDivide(this.sqSideLength * this.sinAngleExtTriComplement, this.sinTwoAngle);

Uses geometry formulas to compute derived lengths like rLength, xLength, dLength that define petal proportions

data-structure Petal Points Array this.petalPoints = [...]

Pre-builds an array of 6 vertex objects that define the petal's outline shape

instantiation Pre-Instantiate Stars this.stars = [new Star(...), ...]

Creates all 7 Star objects upfront in the constructor so displayStars() can simply loop and draw them without creating new objects each frame

rendering Display Petal display(col) { ... beginShape(); for (let pt of this.petalPoints) vertex(pt.x, pt.y); endShape(CLOSE); }

Iterates through pre-computed petal points and draws their outline using beginShape/vertex/endShape

rendering Display Stars displayStars(x = 0, y = 0) { ... this.stars[0].display(); ... this.stars[6].display(); }

Sets stroke colors and calls display() on each pre-instantiated Star in sequence, revealing nested layers

constructor(sqSideLength, nPoints, ratio = 1) {
The constructor receives the petal base size (sqSideLength), number of points, and an optional ratio to scale the petal (defaults to 1)
this.angle = 360 / nPoints;
Calculates the central angle between each point (e.g., 360/24 = 15 degrees for a 24-point rosette)
this.sinHalfAngle = sin(this.halfAngle);
Pre-computes sine of half the central angle and stores it—this avoids recalculating sin() repeatedly during display
this.rLength = safeDivide(this.sqSideLength * this.sinAngleExtTriComplement, this.sinTwoAngle);
Uses a complex geometric formula to derive a key length dimension, using safeDivide to prevent division-by-zero errors
this.petalPoints = [...]
Creates an array of 6 point objects (each with x, y coordinates) that define the vertices of the petal polygon
this.stars = [new Star(...), ...]
Pre-instantiates 7 Star objects with different radii, storing them so displayStars() can render them efficiently later
beginShape();
Starts a new polygon shape in p5.js
for (let pt of this.petalPoints) {
Loops through each pre-computed petal vertex
vertex(pt.x, pt.y);
Adds a vertex at each petal point's coordinates
endShape(CLOSE);
Closes the polygon by drawing a line from the last vertex back to the first
stroke(255, 0, 255); // Magenta for outer stars
Sets the stroke color to magenta before drawing the first star
this.stars[0].display();
Calls the display() method on the first pre-instantiated Star, drawing it with the current stroke color

class Star

The Star class uses polar coordinates to place vertices in a circle and then draws lines between them to create the star shape. By alternating between a large radius (rOuter) and a smaller one (rInner), the result is a classic star with points and valleys. This same technique—polar coordinates + alternating radii—is a fundamental building block for any radial pattern in creative coding.

🔬 This loop creates the star by alternating outer and inner points. What if you skip every other inner point by commenting out the second vertex() call? You'll get a jagged half-star effect—try it and see what pattern emerges.

    for (let a = 0; a < 360; a += angle) {
      let sx = this.x + cos(a) * this.rOuter;
      let sy = this.y + sin(a) * this.rOuter;
      vertex(sx, sy);
      sx = this.x + cos(a + halfAngle) * this.rInner;
      sy = this.y + sin(a + halfAngle) * this.rInner;
      vertex(sx, sy);
    }
class Star {
  constructor(x, y, rInner, rOuter, npoints) {
    this.x = x;
    this.y = y;
    this.rInner = rInner;
    this.rOuter = rOuter;
    this.npoints = npoints;
  }

  // ⭐ NEW: compute the side length of the star
  getSideLength() {
    let angle = 360 / this.npoints;
    let halfAngle = angle / 2;

    // First outer vertex
    let x1 = this.x + cos(0) * this.rOuter;
    let y1 = this.y + sin(0) * this.rOuter;

    // Next inner vertex
    let x2 = this.x + cos(halfAngle) * this.rInner;
    let y2 = this.y + sin(halfAngle) * this.rInner;

    return dist(x1, y1, x2, y2);
  }

  display() {
    let angle = 360 / this.npoints;
    let halfAngle = angle / 2;
    beginShape();
    for (let a = 0; a < 360; a += angle) {
      let sx = this.x + cos(a) * this.rOuter;
      let sy = this.y + sin(a) * this.rOuter;
      vertex(sx, sy);
      sx = this.x + cos(a + halfAngle) * this.rInner;
      sy = this.y + sin(a + halfAngle) * this.rInner;
      vertex(sx, sy);
    }
    endShape(CLOSE);
  }
}
Line-by-line explanation (14 lines)

🔧 Subcomponents:

initialization Star Constructor constructor(x, y, rInner, rOuter, npoints) { ... }

Stores the star's center position, inner and outer radii, and number of points

calculation Get Side Length Method getSideLength() { ... return dist(x1, y1, x2, y2); }

Computes the distance between one outer point and the next inner point, useful for geometry calculations

for-loop Star Drawing Loop for (let a = 0; a < 360; a += angle) { ... vertex(...); vertex(...); }

Loops around 360 degrees, alternating between outer and inner radii to create the star's zigzag edge

constructor(x, y, rInner, rOuter, npoints) {
Creates a Star with a center position (x, y), an inner radius (rInner) for the inner points and outer radius (rOuter) for the tips
this.x = x;
Stores the star's x-coordinate (typically 0 for centered stars)
this.rInner = rInner;
Stores the distance from center to the inner vertices (the valleys between star points)
this.rOuter = rOuter;
Stores the distance from center to the outer vertices (the tips of the star)
let angle = 360 / this.npoints;
Calculates the angular spacing between each star point (e.g., 360/24 = 15 degrees)
let halfAngle = angle / 2;
Calculates the angle to the inner valleys, which sit halfway between outer points
let x1 = this.x + cos(0) * this.rOuter;
Calculates the x-coordinate of the first outer point (at angle 0 degrees)
let x2 = this.x + cos(halfAngle) * this.rInner;
Calculates the x-coordinate of the first inner point (at angle halfAngle)
return dist(x1, y1, x2, y2);
Returns the Euclidean distance between the first outer point and the first inner point
for (let a = 0; a < 360; a += angle) {
Loops around the full circle in increments of angle, visiting each star point in sequence
let sx = this.x + cos(a) * this.rOuter;
Calculates the x-coordinate of an outer point at angle a using polar coordinates
vertex(sx, sy);
Adds a vertex at this outer point position
sx = this.x + cos(a + halfAngle) * this.rInner;
Calculates the x-coordinate of the next inner point (halfway between this and the next outer point)
vertex(sx, sy);
Adds a vertex at this inner point, creating the valley effect of a star

📦 Key Variables

palette array

Stores an array of color strings used to cycle through colors for the petals, creating visual variety

let palette = ["#e63946", "#f1faee", "#a8dadc", "#457b9d", "#1d3557"];
rosettes array

Stores all Rosette objects—one for each petal in the pattern. Updated by updateSketch() whenever sliders change

let rosettes = [];
centerRosette object

A single Rosette object used to display the nested stars at the center of the pattern

let centerRosette;
nPointsSlider object

A p5.js slider control that lets the user adjust the number of petals (3–60)

let nPointsSlider;
sqSideLengthSlider object

A p5.js slider control that lets the user adjust the rosette size (roughly 125–500 pixels)

let sqSideLengthSlider;

🔧 Potential Improvements (5)

Here are some ways this code could be enhanced:

BUG updateSketch()

When nPoints is very small (like 3), some trigonometric calculations in the Rosette constructor can produce unexpected values or even negative radii, causing stars to invert

💡 Add validation in the Rosette constructor to clamp star radii to positive values: this.rInner = max(0, this.rInner); this.rOuter = max(this.rOuter, this.rInner); This ensures stars never collapse or invert unexpectedly

PERFORMANCE Rosette.displayStars()

The displayStars() method calls stroke() and display() sequentially 7 times, which is inefficient if called every frame. However, since noLoop() prevents continuous redraws, this is currently not a bottleneck

💡 For a more efficient design, consider batching stroke changes or using a color array to loop through colors instead of hardcoding 7 separate stroke() calls. This would scale better if the number of stars increased

STYLE display(col) parameter

The Rosette.display(col) method accepts a color parameter but ignores it, always drawing in black. The parameter suggests intention but is unused, which is confusing

💡 Either use the color parameter (stroke(col) inside display()) to actually colorize petals, or remove the parameter entirely to clarify the method's behavior

FEATURE User interface

The sketch lacks visual feedback showing what the sliders control—beginners might not understand which slider is which until they drag them

💡 Add a small text display showing the current values: add text("Points: " + nPointsSlider.value(), 10, 80) and similar for size, so users see live updates

BUG Rosette constructor, petal calculation

The petalPoints array uses hardcoded ratios and dimensions. For very small nPoints values (3–5), the geometry can produce overlapping or self-intersecting petals, distorting the shape

💡 Validate petal geometry by checking that consecutive points don't create zero-width or negative-area regions; adjust the petal formula or add guards to prevent degenerate cases

🔄 Code Flow

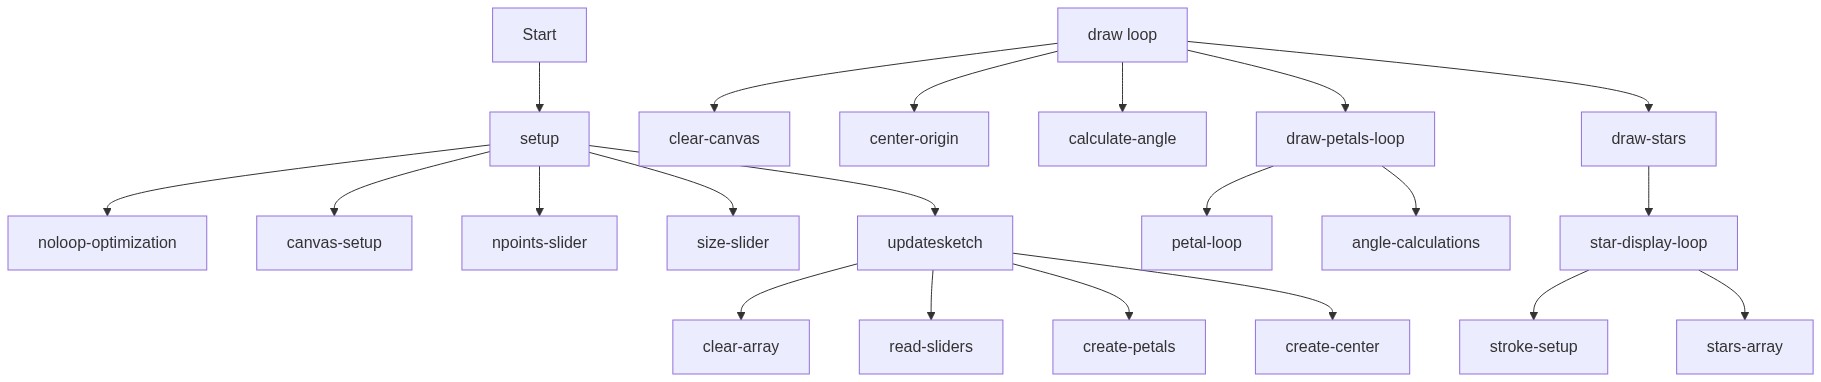
Code flow showing setup, updatesketch, draw, safedivide, rosette, star

💡 Click on function names in the diagram to jump to their code

graph TD start[Start] --> setup[setup] setup --> draw[draw loop] draw --> background-clear[Clear Canvas] draw --> translate-center[Move Origin to Center] draw --> rosette-loop[Draw Rotated Rosettes] rosette-loop --> push-pop[Isolate Transformations] push-pop --> star-display[Draw Central Stars] star-display --> draw click setup href "#fn-setup" click draw href "#fn-draw" click background-clear href "#sub-clear-canvas" click translate-center href "#sub-move-origin-to-center" click rosette-loop href "#sub-draw-rotated-rosettes" click push-pop href "#sub-isolate-transformations" click star-display href "#sub-draw-central-stars" setup --> angle-mode[Angle Mode Setup] setup --> npoints-slider[Points Slider Creation] setup --> size-slider[Size Slider Creation] setup --> noloop[Disable Continuous Loop] click angle-mode href "#sub-angle-mode" click npoints-slider href "#sub-points-slider" click size-slider href "#sub-size-slider" click noloop href "#sub-disable-continuous-loop" updatesketch[updateSketch] --> read-sliders[Read Slider Values] read-sliders --> clear-old[Clear Old Rosettes] clear-old --> create-loop[Create Rosettes Loop] create-loop --> center-rosette[Create Central Rosette] click updatesketch href "#fn-updatesketch" click read-sliders href "#sub-read-slider-values" click clear-old href "#sub-clear-old-rosettes" click create-loop href "#sub-create-rosettes-loop" click center-rosette href "#sub-create-central-rosette" rosette-loop --> angle-setup[Angle Calculations] angle-setup --> trig-precompute[Trigonometric Values] trig-precompute --> dimension-calcs[Petal Dimensions] dimension-calcs --> petal-vertices[Petal Points Array] click rosette-loop href "#sub-draw-rotated-rosettes" click angle-setup href "#sub-angle-calculations" click trig-precompute href "#sub-trigonometric-values" click dimension-calcs href "#sub-petal-dimensions" click petal-vertices href "#sub-petal-points-array" star-display --> star-array[Pre-Instantiate Stars] star-array --> displaystars-method[Display Stars] displaystars-method --> display-loop[Star Drawing Loop] display-loop --> display-method[Display Petal] click star-display href "#sub-draw-stars" click star-array href "#sub-pre-instantiate-stars" click displaystars-method href "#sub-display-stars" click display-loop href "#sub-star-drawing-loop" click display-method href "#sub-display-petal" safedivide[safedivide] --> epsilon-check[Near-Zero Check] epsilon-check --> safedivide click safedivide href "#fn-safedivide" click epsilon-check href "#sub-near-zero-check"

❓ Frequently Asked Questions

What visual elements does the p5.js sketch create?

The sketch generates a vibrant Islamic geometric rosette pattern, closely resembling polygrams, using a colorful palette.

How can users customize the sketch experience?

Users can interact with the sketch by adjusting sliders that control the number of points in the rosette and its size, allowing for dynamic visual changes.

What creative coding concept is showcased in this p5.js sketch?

This sketch demonstrates the use of parametric drawing techniques to create intricate geometric patterns based on user-defined parameters.

Preview

Sketch 2026-06-08 16:23 (Remix) (Remix) - p5.js creative coding sketch preview
Sketch Preview
Code flow diagram showing the structure of Sketch 2026-06-08 16:23 (Remix) (Remix) - Code flow showing setup, updatesketch, draw, safedivide, rosette, star
Code Flow Diagram