
Sketch 2026-06-08 16:23 (Remix)

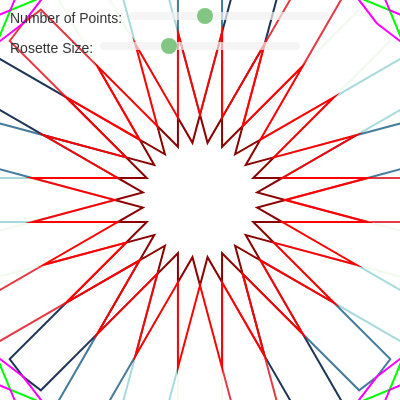
This sketch generates an interactive Islamic rosette motif with symmetrical petals radiating from a center point. Users control the number of petals and the overall size with sliders, and the design updates dynamically to show intricate geometric patterns with nested stars at the center.

🧪 Try This!

Experiment with the code by making these changes:

  1. Change the background color — A different background will make the stroked petals pop—try dark colors to make red and green stand out.
  2. Make petals thicker and bolder — Increasing strokeWeight makes all lines more dramatic—try 6 or 8 for a heavier look.
  3. Hide all the central stars — Commenting out this line reveals the petal structure without the nested stars filling the center.
  4. Paint the petals one color instead of cycling — Currently the palette cycles; forcing a single color removes the rainbow effect.
Prefer the full editor? Open it there →

📖 About This Sketch

This sketch creates a beautiful Islamic geometric rosette pattern that responds instantly to slider input. The design combines rotational symmetry with complex mathematical geometry: each petal is constructed from precisely calculated trigonometric points, and nested stars fill the center with their own n-pointed symmetry. It demonstrates how a few sliders can generate infinite variations of an intricate design.

The code is built around two custom classes—Rosette and Star—that pre-calculate all geometry in their constructors using heavy trigonometry. The sketch uses p5.js transforms (translate, rotate, push/pop) to repeat the petal pattern around the center, and an updateSketch() function tied to slider input that regenerates the entire design instantly. By studying this code you will learn object-oriented design, how to structure complex geometric calculations, when to use noLoop() for efficiency, and how to create responsive interactive visualizations.

⚙️ How It Works

  1. When the sketch loads, setup() creates a 1000×1000 canvas, sets angleMode to DEGREES, and builds two interactive sliders: one controls the number of petals (3–60), and one controls the rosette size (125–500 pixels). Both sliders call updateSketch() whenever their values change.
  2. updateSketch() reads the current slider values and constructs arrays of Rosette and Star objects with those parameters. It then calls redraw() to trigger draw() exactly once.
  3. draw() clears the canvas, translates to the center, and uses a for-loop with rotate() to stamp each petal around the center point. Each petal is drawn by calling the display() method on a Rosette object, which strokes a polygon defined by six pre-calculated points.
  4. After all petals are drawn, displayStars() draws seven nested stars at the very center, each with different inner and outer radii and a different color. The stars are created during Rosette construction and stored in an array.
  5. The Rosette constructor performs all heavy lifting: it pre-calculates dozens of trigonometric values (sines, cosines, tangents) and geometric lengths (rLength, xLength, dLength, etc.) that define petal shape. It uses safeDivide() to prevent division-by-zero errors.
  6. The Star class alternates between outer and inner vertices to create a classic n-pointed star polygon. Each Star is instantiated with inner and outer radii, and displays itself by looping through all angles and drawing alternating outer/inner vertices.

🎓 Concepts You'll Learn

Object-oriented design with classesTrigonometric calculations for geometryRotational symmetry and transformsPre-calculation and caching for performanceInteractive controls with slider inputnoLoop() and redraw() for efficiency

📝 Code Breakdown

setup()

setup() runs once when the sketch starts. It's where you initialize your canvas, set p5.js modes, create interactive elements, and call initial calculations. The noLoop() at the end is a key optimization: instead of redrawing 60 times per second regardless of whether anything changed, the sketch only redraws when a slider moves.

function setup() {
  createCanvas(1000, 1000);
  angleMode(DEGREES);
  noFill();
  rectMode(CENTER);

  // Sliders
  nPointsLabel = createElement('label', 'Number of Points: ');
  nPointsLabel.position(10, 10);
  nPointsSlider = createSlider(3, 60, 24, 1); // Min 3, max 60, default 24, step 1
  nPointsSlider.position(nPointsLabel.width + 15, 10);
  nPointsSlider.style('width', '200px');
  nPointsSlider.input(updateSketch); // Call updateSketch when this slider changes

  sqSideLengthLabel = createElement('label', 'Rosette Size: ');
  sqSideLengthLabel.position(10, 40);
  sqSideLengthSlider = createSlider(width / 8, width / 2, width / 4, 1); // Min ~125, max ~500, default ~250, step 1
  sqSideLengthSlider.position(sqSideLengthLabel.width + 15, 40);
  sqSideLengthSlider.style('width', '200px');
  sqSideLengthSlider.input(updateSketch); // Call updateSketch when this slider changes

  // Initial calculation and drawing
  updateSketch();
  noLoop(); // Draw once, then only redraw on slider input
}
Line-by-line explanation (8 lines)

🔧 Subcomponents:

initialization Canvas and Mode Setup createCanvas(1000, 1000); angleMode(DEGREES); noFill(); rectMode(CENTER);

Creates the drawing surface, sets angles to degrees instead of radians for readability, disables automatic fill, and centers rectangle origins

initialization Slider Creation and Binding nPointsSlider = createSlider(3, 60, 24, 1); nPointsSlider.position(nPointsLabel.width + 15, 10); nPointsSlider.input(updateSketch);

Creates interactive slider elements and connects them to updateSketch() so any change triggers a redraw

optimization Disable Continuous Loop noLoop(); // Draw once, then only redraw on slider input

Stops the draw loop from running every frame—now it only runs when a slider changes, saving CPU

createCanvas(1000, 1000);
Creates a 1000×1000 pixel canvas—a square is ideal for symmetrical rosette designs
angleMode(DEGREES);
Switches angle measurement from radians (0–2π) to degrees (0–360), making geometry easier to visualize
noFill();
All shapes drawn after this will have no interior fill—only stroked outlines
rectMode(CENTER);
Sets the origin point of rectangles to their center instead of top-left (not used here but standard practice)
nPointsSlider = createSlider(3, 60, 24, 1);
Creates a slider ranging from 3 to 60 petals, starting at 24, with step size 1
nPointsSlider.input(updateSketch);
Connects the slider so every value change immediately calls updateSketch()
updateSketch();
Calls updateSketch() once at startup to generate and draw the initial rosette pattern
noLoop();
Disables the default 60-fps draw loop—now draw() only runs when redraw() is explicitly called by a slider
updateSketch()

updateSketch() is the bridge between user interaction and drawing. It's called by the slider's input event listener whenever the user adjusts either control. Notice it doesn't draw directly—instead it prepares data and calls redraw(), which triggers the draw() function exactly once. This pattern is more efficient than continuously checking slider values inside draw().

function updateSketch() {
  let currentNPoints = nPointsSlider.value();
  let currentSqSideLength = sqSideLengthSlider.value();

  // Clear existing rosettes
  rosettes = [];

  // Create all rosette objects with current slider values
  for (let i = 0; i < currentNPoints; i++) {
    rosettes.push(new Rosette(currentSqSideLength, currentNPoints));
  }
  centerRosette = new Rosette(currentSqSideLength, currentNPoints); // Central rosette for stars
  redraw(); // Draw the canvas with updated parameters
}
Line-by-line explanation (7 lines)

🔧 Subcomponents:

initialization Read Current Slider Values let currentNPoints = nPointsSlider.value(); let currentSqSideLength = sqSideLengthSlider.value();

Captures the current state of both sliders so the rosette can be rebuilt with new parameters

for-loop Create Rosette Array for (let i = 0; i < currentNPoints; i++) { rosettes.push(new Rosette(currentSqSideLength, currentNPoints)); }

Creates one Rosette object for each petal, all sharing the same size and point count. Each will be rotated in draw().

let currentNPoints = nPointsSlider.value();
Reads the slider's current value to find out how many petals to draw
let currentSqSideLength = sqSideLengthSlider.value();
Reads the size slider to get the base measurement for petal geometry
rosettes = [];
Clears the old rosette array so old patterns won't overlap with the new ones
for (let i = 0; i < currentNPoints; i++) {
Loops once for each petal count—if the slider is at 24, this loop runs 24 times
rosettes.push(new Rosette(currentSqSideLength, currentNPoints));
Creates a new Rosette object and stores it in the array. Each Rosette does all geometry calculations in its constructor.
centerRosette = new Rosette(currentSqSideLength, currentNPoints);
Creates one additional Rosette object just for its pre-calculated Star objects to draw in the center
redraw();
Triggers draw() exactly once to redraw the canvas with the new rosettes

draw()

draw() is called exactly once per user interaction (because of noLoop() in setup). The translate() moves the origin to the center, and push/pop allow us to rotate the canvas repeatedly without affecting future rotations. This is the pattern for radial symmetry: rotate, draw, restore, repeat.

🔬 This loop is the heart of the radial symmetry—it rotates and draws the same petal shape multiple times. What happens if you change rotate(angle * i) to rotate(angle * i * 2)? The petals should appear to spin twice as far apart, creating overlapping patterns.

  for (let i = 0; i < currentNPoints; i++) {
    push();
    rotate(angle * i);
    let col = palette[i % palette.length]; // cycle through palette
    rosettes[i].display(col);
    pop();
  }
function draw() {
  // draw() is now only called when updateSketch() triggers redraw()
  // No need to check slider values here anymore!

  background(255);
  translate(width / 2, height / 2);

  let currentNPoints = nPointsSlider.value();
  let angle = 360 / currentNPoints;

  stroke(255, 0, 0); // Red stroke for petals
  strokeWeight(2);

  // 🌸 Draw rosettes
  for (let i = 0; i < currentNPoints; i++) {
    push();
    rotate(angle * i);
    let col = palette[i % palette.length]; // cycle through palette
    rosettes[i].display(col);
    pop();
  }

  // 🌟 Draw central star
  centerRosette.displayStars();
}
Line-by-line explanation (12 lines)

🔧 Subcomponents:

initialization Canvas Centering background(255); translate(width / 2, height / 2);

Clears the canvas white and moves the origin to the center, making rotation symmetrical

for-loop Rotate and Draw Each Petal for (let i = 0; i < currentNPoints; i++) { push(); rotate(angle * i); let col = palette[i % palette.length]; // cycle through palette rosettes[i].display(col); pop(); }

Loops through all petals, rotating the canvas a little further each time and drawing each petal at a different angle using push/pop to save and restore the rotation state

function-call Central Star Pattern centerRosette.displayStars();

Draws seven nested stars at the center using pre-calculated radii stored in the centerRosette object

background(255);
Fills the entire canvas with white, erasing any previous frame
translate(width / 2, height / 2);
Moves the origin (0,0) to the center of the canvas, making all subsequent rotations spin around the middle
let currentNPoints = nPointsSlider.value();
Reads the slider again to know how many petals to draw
let angle = 360 / currentNPoints;
Calculates the degrees to rotate between each petal so they're evenly spaced (e.g., 24 petals = 15° apart)
stroke(255, 0, 0); // Red stroke for petals
Sets the stroke color to red for outlining petals
for (let i = 0; i < currentNPoints; i++) {
Loops once for each petal
push();
Saves the current rotation state so the next petal starts fresh
rotate(angle * i);
Rotates the canvas by a multiple of the angle—first petal at 0°, second at angle°, third at 2×angle°, etc.
let col = palette[i % palette.length]; // cycle through palette
Picks a color from the palette array, cycling back to the start when you run out of colors
rosettes[i].display(col);
Calls the display method on the i-th Rosette, drawing that petal with the chosen color
pop();
Restores the rotation state to what it was before rotate() so the next petal isn't affected
centerRosette.displayStars();
Draws seven nested stars at the very center, filling the hole with intricate geometry

safeDivide()

safeDivide() prevents a common bug in geometric calculations: when angles or dimensions create certain special cases, the denominator in a formula can become zero or nearly zero, causing NaN or infinity values that break the sketch. The epsilon threshold 0.0001 is small enough to catch problematic cases without being so small that floating-point rounding errors cause false positives. This function is called throughout the Rosette constructor wherever division occurs.

function safeDivide(numerator, denominator, defaultValue = 0) {
  // Use a small epsilon for floating point comparison to check if denominator is effectively zero
  return abs(denominator) < 0.0001 ? defaultValue : numerator / denominator;
}
Line-by-line explanation (2 lines)

🔧 Subcomponents:

conditional Epsilon Comparison return abs(denominator) < 0.0001 ? defaultValue : numerator / denominator;

Checks if the denominator is close enough to zero (within a tiny epsilon value) to prevent division errors

function safeDivide(numerator, denominator, defaultValue = 0) {
Defines a helper function that takes three parameters: the number being divided, the divisor, and a fallback value if division is unsafe
return abs(denominator) < 0.0001 ? defaultValue : numerator / denominator;
Uses a ternary operator: if the absolute value of the denominator is tiny (less than 0.0001), return the defaultValue; otherwise, safely perform the division

Rosette constructor

The constructor is where all the heavy mathematical lifting happens. Because geometry calculations are complex and involve many trigonometric relationships, it's smart to calculate everything once during construction and cache it in instance variables. This approach makes the display() and displayStars() methods very fast—they just loop through pre-calculated values rather than repeating expensive trig calculations. This is a key optimization pattern in computational geometry.

constructor(sqSideLength, nPoints, ratio = 1) {
    this.sqSideLength = sqSideLength;
    this.nPoints = nPoints;
    this.ratio = ratio;
    this.angle = 360 / nPoints;
    this.halfAngle = this.angle / 2;
    this.intAngle = ((this.nPoints - 2) * 180) / this.nPoints;
    this.halfIntAngle = this.intAngle / 2;
    this.twoAngle = 2 * this.angle;
    this.fourHalfAngle = 4 * this.halfAngle;
    this.threeHalfAngle = 3 * this.halfAngle;
    this.halfAnglePlus90 = 90 + this.halfAngle;
    this.triangleOneComplement = 180 - 2 * this.halfAngle;
    this.triangleTwoComplement = 180 - 3 * this.halfAngle;
    this.angleExtTriComplement = 180 - (this.halfIntAngle + this.halfAngle);

    this.sinHalfAngle = sin(this.halfAngle);
    this.cosHalfAngle = cos(this.halfAngle);
    this.tanHalfAngle = tan(this.halfAngle);
    this.sinAngle = sin(this.angle);
    this.sinAngleComplement = sin(180 - this.angle);
    this.sinAnglePlusHalfAngleComplement = sin(180 - (this.angle + this.halfAngle));
    this.sinTwoAngle = sin(this.twoAngle);
    this.sinHalfIntrAngle = sin(this.halfIntAngle);
    this.sinAngleExtTriComplement = sin(this.angleExtTriComplement);

    // Use safeDivide for all calculations that could potentially divide by zero
    this.rLength = safeDivide(this.sqSideLength * this.sinAngleExtTriComplement, this.sinTwoAngle);
    this.xLength = safeDivide(this.sinAngle * this.sqSideLength, this.sinAnglePlusHalfAngleComplement);
    this.dLength = safeDivide(this.sinHalfAngle * this.xLength, this.sinAngleComplement);
    this.tLength = safeDivide(this.sinAngle * this.dLength, this.sinAnglePlusHalfAngleComplement);
    this.yLength = this.sinHalfAngle * this.tanHalfAngle * this.xLength;
    this.zLength = this.sqSideLength - this.xLength * this.cosHalfAngle;
    this.wLength = this.zLength - this.yLength;

    this.petalPoints = [
      { x: this.xLength * this.cosHalfAngle * this.ratio, y: -this.xLength * this.sinHalfAngle * this.ratio },
      { x: this.xLength * this.cosHalfAngle + this.wLength, y: -this.xLength * this.sinHalfAngle * this.ratio },
      { x: this.sqSideLength * this.ratio, y: 0 },
      { x: this.xLength * this.cosHalfAngle + this.wLength * this.ratio, y: this.xLength * this.sinHalfAngle * this.ratio },
      { x: this.xLength * this.cosHalfAngle * this.ratio, y: this.xLength * this.sinHalfAngle * this.ratio },
      { x: this.dLength * this.ratio, y: 0 },
    ];

    // Pre-instantiate all Star objects in the constructor
    // Apply safeDivide to star radius calculations as well
    this.stars = [
      new Star(
        0,
        0,
        safeDivide(this.sqSideLength * sin(90 + this.halfAngle), sin(90 - 2 * this.halfAngle)),
        this.sqSideLength,
        this.nPoints
      ),
      new Star(
        0,
        0,
        safeDivide(this.sqSideLength * sin(90 + this.halfAngle), sin(90 - 2 * this.halfAngle)),
        safeDivide(this.sqSideLength * sin(90 + this.halfAngle), sin(90 - 3 * this.halfAngle)),
        this.nPoints
      ),
      new Star(
        0,
        0,
        safeDivide(this.sqSideLength * sin(90 + this.halfAngle), sin(90 - 4 * this.halfAngle)),
        safeDivide(this.sqSideLength * sin(90 + this.halfAngle), sin(90 - 3 * this.halfAngle)),
        this.nPoints
      ),
      new Star(
        0,
        0,
        safeDivide(this.sqSideLength * sin(90 + this.halfAngle), sin(90 - 4 * this.halfAngle)),
        safeDivide(this.sqSideLength * sin(90 + this.halfAngle), sin(90 - 5 * this.halfAngle)),
        this.nPoints
      ),
      new Star(
        0,
        0,
        safeDivide(this.sqSideLength * sin(90 + this.halfAngle), sin(90 - 6 * this.halfAngle)),
        safeDivide(this.sqSideLength * sin(90 + this.halfAngle), sin(90 - 5 * this.halfAngle)),
        this.nPoints
      ),
      new Star(0, 0, this.tLength, this.dLength, this.nPoints),
      new Star(0, 0, this.xLength, this.dLength, this.nPoints),
    ];
  }
Line-by-line explanation (13 lines)

🔧 Subcomponents:

initialization Angle Pre-calculation this.angle = 360 / nPoints; this.halfAngle = this.angle / 2; this.intAngle = ((this.nPoints - 2) * 180) / this.nPoints;

Calculates key angles once that will be used repeatedly in trig functions—storing them prevents recalculating thousands of times

initialization Trigonometric Value Cache this.sinHalfAngle = sin(this.halfAngle); this.cosHalfAngle = cos(this.halfAngle); this.tanHalfAngle = tan(this.halfAngle);

Pre-calculates all sine, cosine, and tangent values once during construction so they don't need to be recalculated in display()

calculation Derived Geometric Lengths this.rLength = safeDivide(this.sqSideLength * this.sinAngleExtTriComplement, this.sinTwoAngle); this.xLength = safeDivide(this.sinAngle * this.sqSideLength, this.sinAnglePlusHalfAngleComplement);

Uses trigonometric relationships to derive five key distances (rLength, xLength, dLength, tLength, wLength) that define the petal outline

data-structure Petal Vertex Array this.petalPoints = [ { x: this.xLength * this.cosHalfAngle * this.ratio, y: -this.xLength * this.sinHalfAngle * this.ratio }, { x: this.xLength * this.cosHalfAngle + this.wLength, y: -this.xLength * this.sinHalfAngle * this.ratio }, { x: this.sqSideLength * this.ratio, y: 0 },

Pre-computes all six vertices of the petal polygon and stores them as objects with x and y properties

initialization Star Array Creation this.stars = [ new Star(0, 0, safeDivide(this.sqSideLength * sin(90 + this.halfAngle), sin(90 - 2 * this.halfAngle)), this.sqSideLength, this.nPoints),

Creates seven Star objects with different inner and outer radii, all pre-calculated and stored for instant display

constructor(sqSideLength, nPoints, ratio = 1) {
Defines the constructor that runs when a new Rosette is created. Parameters are size, point count, and an optional ratio for scaling
this.angle = 360 / nPoints;
Calculates the central angle between adjacent petals (e.g., 24 petals = 15° per petal)
this.halfAngle = this.angle / 2;
Calculates half the petal angle, used frequently in the geometry calculations
this.intAngle = ((this.nPoints - 2) * 180) / this.nPoints;
Calculates the interior angle of a regular n-gon polygon, used for certain geometry relationships
this.sinHalfAngle = sin(this.halfAngle);
Pre-calculates the sine of the half angle once so it can be used repeatedly without recalculation
this.cosHalfAngle = cos(this.halfAngle);
Pre-calculates the cosine of the half angle for efficiency
this.tanHalfAngle = tan(this.halfAngle);
Pre-calculates the tangent of the half angle
this.rLength = safeDivide(this.sqSideLength * this.sinAngleExtTriComplement, this.sinTwoAngle);
Uses trigonometry to calculate a key petal radius; safeDivide prevents errors if the denominator is near zero
this.xLength = safeDivide(this.sinAngle * this.sqSideLength, this.sinAnglePlusHalfAngleComplement);
Calculates another geometric dimension derived from the angle and size
this.yLength = this.sinHalfAngle * this.tanHalfAngle * this.xLength;
Calculates a dimension used to define one of the petal outline points
this.zLength = this.sqSideLength - this.xLength * this.cosHalfAngle;
Calculates the remaining distance along the petal's outer edge
this.petalPoints = [ { x: ..., y: ... }, ... ];
Creates an array of six point objects, each with x and y coordinates that define the petal's polygon outline
this.stars = [ new Star(...), new Star(...), ... ];
Pre-instantiates seven Star objects with varying radii, all ready to display instantly without further calculation

Rosette.display()

display() is where the actual drawing happens, but it's very simple because all geometry is pre-calculated in the constructor. The method just loops through the stored vertex array and draws them. By separating calculation (constructor) from drawing (display), the code becomes clearer and faster—you can instantiate many Rosette objects but only draw the ones you need.

🔬 This loop traces the six petal vertices in order and connects them with lines. What happens if you change endShape(CLOSE) to endShape()? (No CLOSE argument.)

    beginShape();
    for (let pt of this.petalPoints) {
      vertex(pt.x, pt.y);
    }
    endShape(CLOSE);
display(col) {
    stroke(col); // Use the passed color for the petal outline
    strokeWeight(2);
    noFill();
    beginShape();
    for (let pt of this.petalPoints) {
      vertex(pt.x, pt.y);
    }
    endShape(CLOSE);
  }
Line-by-line explanation (8 lines)

🔧 Subcomponents:

for-loop Vertex Loop for (let pt of this.petalPoints) { vertex(pt.x, pt.y); }

Iterates through all six pre-calculated petal vertices and draws them as connected line segments

display(col) {
Defines the display method that takes one parameter: the color to stroke the petal outline with
stroke(col);
Sets the stroke color to the passed color (a hex value from the palette)
strokeWeight(2);
Sets the line thickness to 2 pixels
noFill();
Ensures the petal shape has no interior fill, only a stroked outline
beginShape();
Tells p5.js to start recording vertices for a new polygon
for (let pt of this.petalPoints) {
Loops through each pre-calculated petal point object using a for-of loop
vertex(pt.x, pt.y);
Adds one vertex to the polygon at the point's x and y coordinates
endShape(CLOSE);
Closes the polygon by connecting the last vertex back to the first, then draws the completed outline

Rosette.displayStars()

displayStars() repeats a simple pattern seven times: set a stroke color, then call display() on a pre-instantiated Star. Because all Star objects are created during the Rosette constructor, this method just needs to choose colors and call display()—very efficient and easy to read.

displayStars(x = 0, y = 0) {
    // Iterate through the pre-instantiated Star objects and display them
    stroke(255, 0, 255); // Magenta for outer stars
    this.stars[0].display();
    stroke(0, 255, 0); // Green for middle outer stars
    this.stars[1].display();
    stroke(255, 0, 255); // Magenta for inner outer stars
    this.stars[2].display();
    stroke(0, 255, 0); // Green for fourth outer stars
    this.stars[3].display();
    stroke(0, 0, 255); // Blue for fifth outer stars
    this.stars[4].display();
    stroke(139, 0, 0); // Dark red for first inner star
    this.stars[5].display();
    stroke(255, 0, 0); // Red for second inner star
    this.stars[6].display();
  }
Line-by-line explanation (5 lines)
displayStars(x = 0, y = 0) {
Defines the displayStars method (x and y parameters are unused but available for future extensions)
stroke(255, 0, 255);
Sets stroke color to magenta (red + blue) for the first star
this.stars[0].display();
Draws the first pre-calculated Star object using its stored inner and outer radii
stroke(0, 255, 0);
Changes stroke color to green for the next star
this.stars[1].display();
Draws the second Star

Star constructor

The Star constructor is minimal—it just stores the five parameters as instance variables. The actual drawing happens in display(). This separation of concerns makes the code easy to understand and modify.

constructor(x, y, rInner, rOuter, npoints) {
    this.x = x;
    this.y = y;
    this.rInner = rInner;
    this.rOuter = rOuter;
    this.npoints = npoints;
  }
Line-by-line explanation (6 lines)
constructor(x, y, rInner, rOuter, npoints) {
Defines the Star constructor with center position (x, y), inner radius, outer radius, and point count
this.x = x;
Stores the center x coordinate
this.y = y;
Stores the center y coordinate
this.rInner = rInner;
Stores the inner radius (distance to valley points)
this.rOuter = rOuter;
Stores the outer radius (distance to tip points)
this.npoints = npoints;
Stores how many points the star has

Star.display()

Star.display() demonstrates the core technique of creating star shapes: calculate vertices on a circle at regular angles, but alternate between an outer radius (for points) and an inner radius (for valleys). Using cos and sin to place points around a circle is the foundation of circular geometry in p5.js.

🔬 This loop creates a classic star by alternating between outer and inner vertices. What happens if you change a + halfAngle to just a? Now both vertices use the same angle—what shape appears?

    for (let a = 0; a < 360; a += angle) {
      let sx = this.x + cos(a) * this.rOuter;
      let sy = this.y + sin(a) * this.rOuter;
      vertex(sx, sy);
      sx = this.x + cos(a + halfAngle) * this.rInner;
      sy = this.y + sin(a + halfAngle) * this.rInner;
      vertex(sx, sy);
    }
display() {
    let angle = 360 / this.npoints;
    let halfAngle = angle / 2;
    beginShape();
    for (let a = 0; a < 360; a += angle) {
      let sx = this.x + cos(a) * this.rOuter;
      let sy = this.y + sin(a) * this.rOuter;
      vertex(sx, sy);
      sx = this.x + cos(a + halfAngle) * this.rInner;
      sy = this.y + sin(a + halfAngle) * this.rInner;
      vertex(sx, sy);
    }
    endShape(CLOSE);
  }
Line-by-line explanation (11 lines)

🔧 Subcomponents:

for-loop Star Vertex Loop for (let a = 0; a < 360; a += angle) { let sx = this.x + cos(a) * this.rOuter; let sy = this.y + sin(a) * this.rOuter; vertex(sx, sy); sx = this.x + cos(a + halfAngle) * this.rInner; sy = this.y + sin(a + halfAngle) * this.rInner; vertex(sx, sy); }

Loops around a full 360° circle, alternating between outer and inner vertices to create star points

let angle = 360 / this.npoints;
Calculates the degrees between each point of the star
let halfAngle = angle / 2;
Calculates half the point angle so inner vertices can be offset exactly between outer vertices
beginShape();
Starts recording a new polygon
for (let a = 0; a < 360; a += angle) {
Loops from 0° to 360° in steps of the point angle, once for each star point
let sx = this.x + cos(a) * this.rOuter;
Calculates the x coordinate of an outer (tip) vertex using cos and the outer radius
let sy = this.y + sin(a) * this.rOuter;
Calculates the y coordinate of the outer vertex using sin
vertex(sx, sy);
Adds the outer vertex to the polygon
sx = this.x + cos(a + halfAngle) * this.rInner;
Calculates the x coordinate of an inner (valley) vertex, offset by half the point angle
sy = this.y + sin(a + halfAngle) * this.rInner;
Calculates the y coordinate of the inner vertex
vertex(sx, sy);
Adds the inner vertex to the polygon
endShape(CLOSE);
Closes the polygon by connecting the last vertex back to the first

📦 Key Variables

palette array

Stores five hex color codes that cycle through as the petals are drawn, creating a varied color scheme

let palette = ["#e63946", "#f1faee", "#a8dadc", "#457b9d", "#1d3557"];
rosettes array

Stores all the Rosette objects, one for each petal. Created fresh whenever the slider changes.

let rosettes = [];
centerRosette object

A single Rosette object whose pre-calculated Star array is used to draw the nested stars at the center

let centerRosette;
nPointsSlider object

HTML slider element that controls the number of petals (3–60)

let nPointsSlider;
sqSideLengthSlider object

HTML slider element that controls the rosette size (125–500 pixels)

let sqSideLengthSlider;

🔧 Potential Improvements (4)

Here are some ways this code could be enhanced:

PERFORMANCE Rosette constructor

Many trigonometric calculations are pre-computed but some derived values like sinAngleExtTriComplement combine multiple trig calls without caching intermediate results

💡 Cache all intermediate trig expressions at the top of the constructor to avoid any repeated sin/cos/tan calls. For example, pre-calculate sin(90 + this.halfAngle) and sin(90 - 2 * this.halfAngle) once and reuse them in all Star instantiations.

BUG safeDivide function

The epsilon threshold 0.0001 may be too small for certain canvas sizes or petal counts. Edge cases with very large sqSideLength values could produce denominator values just above epsilon that still cause numerical instability.

💡 Make epsilon relative to the magnitude of the denominator: return abs(denominator) < max(abs(numerator), 1) * 0.0001 ? defaultValue : numerator / denominator. This adapts to different scales automatically.

STYLE Rosette constructor

Variable names like rLength, xLength, dLength, tLength, yLength, zLength, wLength are cryptic and don't convey geometric meaning

💡 Rename to more descriptive names: rLength → outerPetalRadius, xLength → petalBaseWidth, dLength → innerPetalRadius, etc. Add comments explaining what each derived length represents geometrically.

FEATURE Star class

Star.getSideLength() method is defined but never called in the sketch

💡 Either use this method for validation or documentation, or remove it. If kept, add a comment explaining why it exists for future reference.

🔄 Code Flow

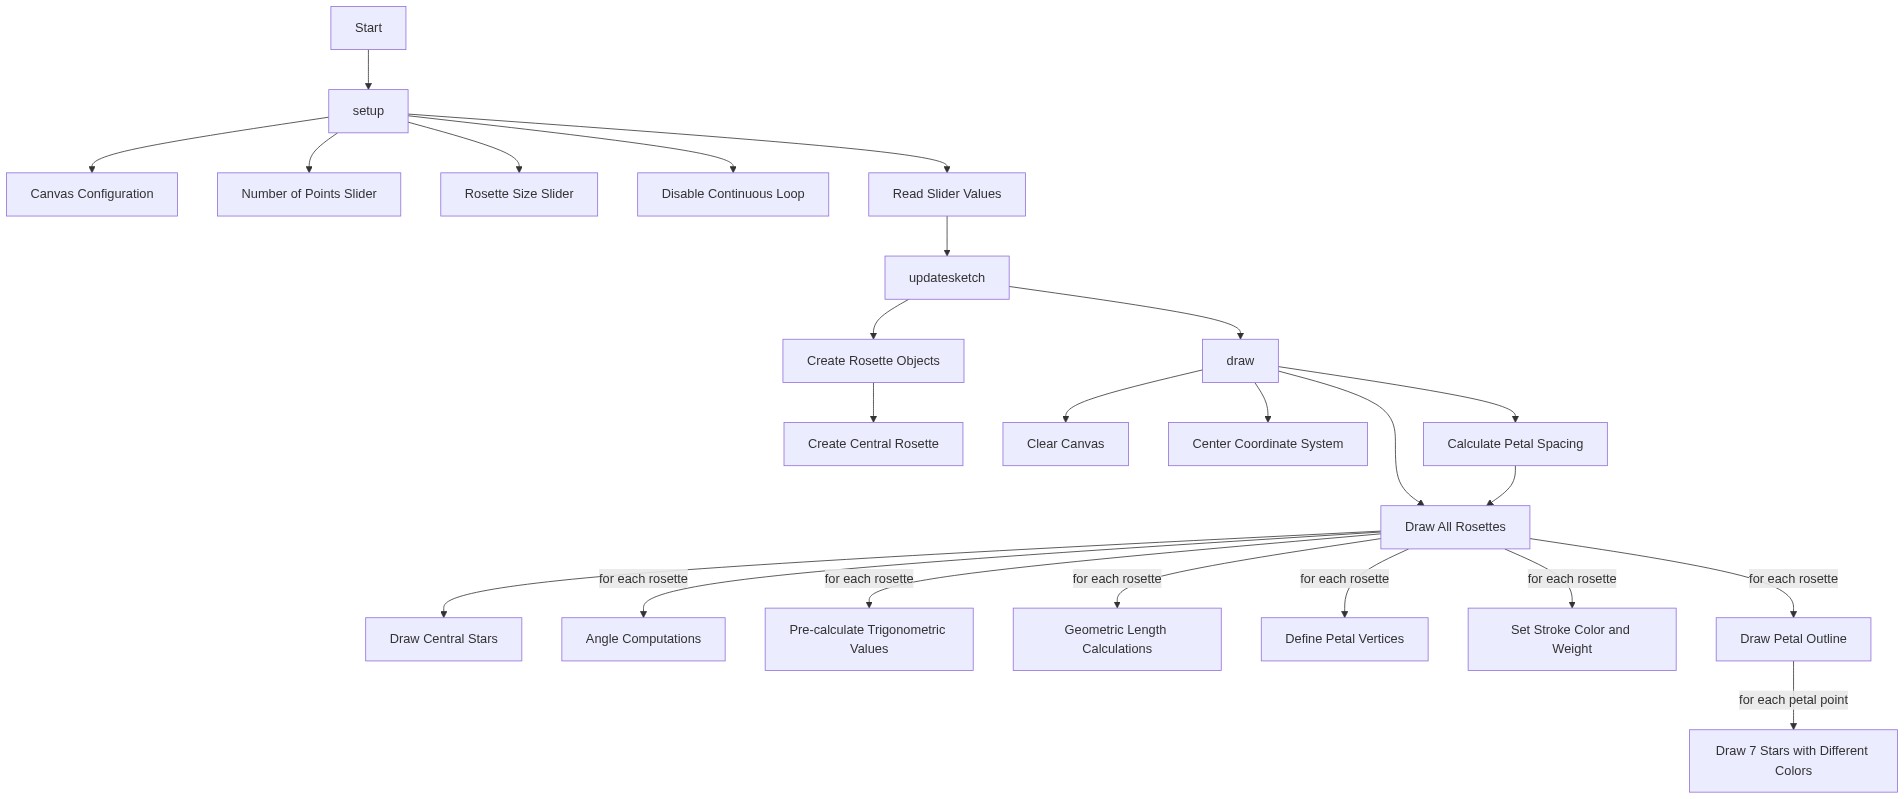
Code flow showing setup, updatesketch, draw, safedivide, rosette_constructor, rosette_display, rosette_displaystars, star_constructor, star_display

💡 Click on function names in the diagram to jump to their code

graph TD start[Start] --> setup[setup] setup --> updatesketch[updateSketch] updatesketch --> draw[draw loop] draw --> transform-setup[Canvas Centering] draw --> petal-loop[Rotate and Draw Each Petal] draw --> star-draw[Central Star Pattern] petal-loop --> rosette-loop[Create Rosette Array] petal-loop --> shape-loop[Vertex Loop] shape-loop --> petal-points-array[Petal Vertex Array] rosette-loop --> angle-calculations[Angle Pre-calculation] rosette-loop --> trig-cache[Trigonometric Value Cache] rosette-loop --> geometric-lengths[Derived Geometric Lengths] star-draw --> star-instantiation[Star Array Creation] star-instantiation --> star-loop[Star Vertex Loop] star-loop --> star_display[Star.display()] click setup href "#fn-setup" click updatesketch href "#fn-updatesketch" click draw href "#fn-draw" click transform-setup href "#sub-transform-setup" click petal-loop href "#sub-petal-loop" click star-draw href "#sub-star-draw" click rosette-loop href "#sub-rosette-loop" click angle-calculations href "#sub-angle-calculations" click trig-cache href "#sub-trig-cache" click geometric-lengths href "#sub-geometric-lengths" click petal-points-array href "#sub-petal-points-array" click star-instantiation href "#sub-star-instantiation" click shape-loop href "#sub-shape-loop" click star-loop href "#sub-star-loop"

❓ Frequently Asked Questions

What visual elements does the p5.js sketch create?

The sketch generates an intricate Islamic rosette motif that features a customizable number of petals and size, creating a visually striking geometric pattern.

How can users customize the sketch's design?

Users can interact with the sketch by adjusting sliders to change the number of points (petals) and the size of the rosettes, allowing for dynamic visual variations.

What creative coding concepts are illustrated in this p5.js sketch?

This sketch demonstrates the use of parametric drawing and object-oriented programming by creating multiple rosette objects based on user-defined parameters.

Preview

Sketch 2026-06-08 16:23 (Remix) - p5.js creative coding sketch preview
Sketch Preview
Code flow diagram showing the structure of Sketch 2026-06-08 16:23 (Remix) - Code flow showing setup, updatesketch, draw, safedivide, rosette_constructor, rosette_display, rosette_displaystars, star_constructor, star_display
Code Flow Diagram