
SKIPPED

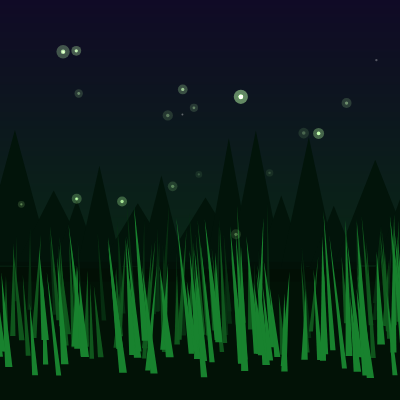
This sketch creates a peaceful twilight meadow scene with layered grass, twinkling stars, tree silhouettes, and glowing fireflies that drift organically through the air. The scene uses Perlin noise for natural motion, gradient skies, and additive blending to make the fireflies glow convincingly.

🧪 Try This!

Experiment with the code by making these changes:

  1. Create a night of pure blue fireflies — Change the firefly glow colors from warm yellow to cool ice blue for an alien atmosphere
  2. Make the grass sway dramatically — Increase the grass sway amplitude so each blade bends much further in the wind
  3. Bring the horizon line down (more sky) — Push the landscape lower so the twilight sky takes up more of the scene
  4. Fill the scene with more fireflies — Increase the initial firefly count and population cap so the sky is alive with light
  5. Make stars twinkle more slowly — Lower the maximum twinkling speed so stars pulse gently rather than rapidly
  6. Create a warmer twilight palette — Shift the sky colors from cool purples to warm oranges and reds for sunset vibes
Prefer the full editor? Open it there →

📖 About This Sketch

This sketch paints a serene nighttime meadow that feels alive with motion. Fireflies drift through a layered landscape of swaying grass, distant trees, and a gradient twilight sky dotted with twinkling stars. Every visual element—from the grass blades to the fireflies—uses Perlin noise to create organic, natural-looking movement rather than mechanical animation. The fireflies glow convincingly thanks to blendMode(ADD), which combines their light additively instead of overwriting what's behind them.

The code is organized into three main visual layers: a background system (gradient sky, stars, trees), an animated grass system with three depth layers, and a firefly system built on a Firefly class. By studying this sketch, you will learn how to organize complex scenes with multiple animated elements, use noise() for organic motion, leverage lerpColor() for smooth gradients, and apply blendMode() for special lighting effects. You will also see how depth (the z variable) can drive size, brightness, and speed to create a sense of distance.

⚙️ How It Works

  1. When the sketch loads, setup() initializes the canvas, defines a color palette, and calls initScene() to create stars scattered across the upper sky, tree silhouettes along the horizon, and three layers of grass blades at different depths with random positions and sizes.
  2. Every frame, draw() captures the current time in milliseconds and uses it to drive all animation. It sets blendMode(BLEND) and draws the background gradient, stars, and trees. Then it switches to blendMode(ADD) and draws the fireflies so their light glows naturally.
  3. The background gradient is drawn line by line from top (deep purple-blue) to horizon (dark green), and then the ground below is filled with solid dark green.
  4. Stars twinkle by using a sine wave timed with each star's individual twinkleSpeed and phase offset, so they pulse in and out at different rates.
  5. Grass blades sway using a combination of sine and Perlin noise: the angle of each blade's bend is calculated from sin(time × swaySpeed) multiplied by noise() to add organic variation, making the motion feel natural and unpredictable.
  6. Fireflies move smoothly by using Perlin noise in two axes (noiseSeedX and noiseSeedY) to generate drifting paths. Each firefly's brightness pulses independently, and when they move fast enough, they leave a glowing trail behind. Clicking the mouse spawns a burst of new fireflies around the cursor.

🎓 Concepts You'll Learn

Perlin noise for organic animationBlend modes and additive lightDepth layering and parallaxSine waves and trigonometric animationColor gradients with lerpColorClass-based particle systemsCanvas layering and draw order

📝 Code Breakdown

setup()

setup() runs once when the sketch starts. It is the ideal place to define your canvas size, set global colors, and initialize your scene by creating data structures like arrays of objects.

function setup() {
  createCanvas(windowWidth, windowHeight);
  colorMode(RGB);

  // Define colors once
  topSkyColor = color(16, 10, 38);       // deep purple-blue
  horizonSkyColor = color(8, 40, 20);    // dark green near horizon
  groundColor = color(2, 18, 6);         // very dark green ground

  farGrassColor = color(8, 50, 18, 220);
  midGrassColor = color(16, 90, 30, 240);
  nearGrassColor = color(24, 130, 46, 255);

  treeColor = color(2, 20, 10);

  fireflyInnerColor = color(210, 255, 170); // bright core
  fireflyOuterColor = color(190, 255, 150); // soft outer glow

  initScene();
}
Line-by-line explanation (7 lines)
createCanvas(windowWidth, windowHeight);
Creates a canvas that fills the entire browser window, making the scene immersive and responsive
colorMode(RGB);
Sets the color mode to RGB so all color() calls use Red, Green, Blue values (0–255)
topSkyColor = color(16, 10, 38);
Defines a deep purple-blue color for the top of the gradient and stores it in a variable so it can be reused without recalculating
horizonSkyColor = color(8, 40, 20);
Defines a dark green color for the horizon where the sky meets the landscape
farGrassColor = color(8, 50, 18, 220);
Defines a muted green with 220 alpha (slightly transparent) for distant grass blades that appear farther away
fireflyInnerColor = color(210, 255, 170);
Bright yellowish-green for the firefly's core, which glows inside the softer outer glow
initScene();
Calls the initScene() function to populate the scene with stars, trees, grass, and fireflies after colors are defined
draw()

draw() runs 60 times per second by default, creating animation. The order of drawing matters: background first, then static elements, then dynamic elements. Notice how blendMode(ADD) is switched just for the fireflies, then switched back—this is a common technique to apply special effects to specific layers.

🔬 This section draws the static background layers before the fireflies. What happens if you comment out the drawBackgroundGradient() line? Why do you think the visual effect changes?

  const time = millis() * 0.001; // smooth time in seconds

  blendMode(BLEND);
  drawBackgroundGradient();
  drawStars(time);
  drawTrees();
  drawGrass(time);
function draw() {
  const time = millis() * 0.001; // smooth time in seconds

  blendMode(BLEND);
  drawBackgroundGradient();
  drawStars(time);
  drawTrees();
  drawGrass(time);

  // Glowing fireflies
  blendMode(ADD);
  drawFireflies(time);
  blendMode(BLEND); // restore default for any overlays/UI
}
Line-by-line explanation (9 lines)

🔧 Subcomponents:

calculation Time in seconds const time = millis() * 0.001;

Converts milliseconds to seconds for smooth, continuous animation that doesn't depend on frame rate

conditional Additive blending for fireflies blendMode(ADD);

Switches to additive blending so firefly light glows naturally instead of replacing the background

const time = millis() * 0.001;
Converts the current time in milliseconds to seconds, creating a smooth animation value that increases continuously
blendMode(BLEND);
Sets the blend mode to BLEND (the default) so shapes drawn after this overwrite what is behind them, not add to it
drawBackgroundGradient();
Draws the sky gradient and ground, clearing the previous frame
drawStars(time);
Draws twinkling stars at their fixed positions, using time to control their opacity pulse
drawTrees();
Draws the stationary tree silhouettes along the horizon
drawGrass(time);
Draws the animated grass blades, using time and Perlin noise to make them sway
blendMode(ADD);
Switches to additive blend mode so the fireflies' light combines with what is behind them instead of covering it up
drawFireflies(time);
Updates and draws all fireflies, whose brightness and motion are driven by time
blendMode(BLEND);
Restores BLEND mode after drawing fireflies so any future overlays draw normally

drawBackgroundGradient()

This function creates a smooth color gradient by interpolating (lerping) between two colors for each pixel row. lerpColor() is a p5.js function that blends two colors: it returns the first color when t=0, the second when t=1, and a smooth blend in between. Drawing many thin overlapping rectangles is one of the most common ways to create smooth gradients in creative coding.

🔬 This loop draws one thin rectangle per pixel row. What happens if you change the step from 1 to 10 by writing `for (let y = 0; y < horizonY; y += 10)`? How does the visual change, and why?

  for (let y = 0; y < horizonY; y++) {
    const t = y / horizonY;
    const c = lerpColor(topSkyColor, horizonSkyColor, t);
    fill(c);
    rect(0, y, width, 1);
  }
function drawBackgroundGradient() {
  noStroke();

  // Vertical gradient from topSkyColor to horizonSkyColor
  for (let y = 0; y < horizonY; y++) {
    const t = y / horizonY;
    const c = lerpColor(topSkyColor, horizonSkyColor, t);
    fill(c);
    rect(0, y, width, 1);
  }

  // Dark ground
  fill(groundColor);
  rect(0, horizonY, width, height - horizonY);
}
Line-by-line explanation (8 lines)

🔧 Subcomponents:

for-loop Sky gradient pixel loop for (let y = 0; y < horizonY; y++) {

Iterates through each row of pixels in the sky to draw a smooth color transition from top to horizon

calculation Color lerping const t = y / horizonY; const c = lerpColor(topSkyColor, horizonSkyColor, t);

Calculates a blend between the top and horizon colors based on the pixel's vertical position

noStroke();
Disables outline drawing so rectangles are filled without borders
for (let y = 0; y < horizonY; y++) {
Loops through every pixel row from the top of the canvas to the horizon line
const t = y / horizonY;
Calculates a value between 0 (top) and 1 (horizon) representing this row's position as a fraction of sky height
const c = lerpColor(topSkyColor, horizonSkyColor, t);
Uses lerpColor() to blend between the top sky color and horizon color—at t=0 it returns topSkyColor, at t=1 it returns horizonSkyColor, and at t=0.5 it blends halfway between them
fill(c);
Sets the fill color to this interpolated blend color for the upcoming rectangle
rect(0, y, width, 1);
Draws a thin horizontal line (1 pixel tall, full canvas width) at this y position in the blended color, building up the gradient smoothly
fill(groundColor);
Sets the fill color to the dark ground color for the bottom section
rect(0, horizonY, width, height - horizonY);
Draws a rectangle from the horizon line to the bottom of the canvas, filling the entire ground area with one color

createStars()

createStars() demonstrates how to populate a dynamic array with objects that each store multiple related properties. By giving each star its own twinkleSpeed and phase, we create the illusion that they twinkle independently and naturally. The random() function is used to generate variation, making each star unique.

function createStars() {
  stars = [];
  // Scales with canvas size, but remains subtle
  const starCount = floor((width * height) / 50000);

  for (let i = 0; i < starCount; i++) {
    const x = random(width);
    const y = random(0, horizonY * 0.8); // upper sky
    const size = random(1, 2.5);
    const baseAlpha = random(60, 140);
    const twinkleSpeed = random(0.3, 1.2);
    const phase = random(TWO_PI);
    stars.push({ x, y, size, baseAlpha, twinkleSpeed, phase });
  }
}
Line-by-line explanation (10 lines)

🔧 Subcomponents:

calculation Responsive star count const starCount = floor((width * height) / 50000);

Calculates how many stars to create based on canvas size—larger canvases get more stars automatically

for-loop Star generation loop for (let i = 0; i < starCount; i++) {

Creates each star with random position, size, and animation properties

stars = [];
Empties the stars array and prepares it to receive fresh star objects
const starCount = floor((width * height) / 50000);
Calculates the number of stars based on canvas area—dividing by 50000 keeps the star density consistent across screen sizes
for (let i = 0; i < starCount; i++) {
Loops starCount times to create each individual star
const x = random(width);
Assigns a random horizontal position anywhere across the canvas width
const y = random(0, horizonY * 0.8);
Assigns a random vertical position in the upper 80% of the sky (stars don't go too close to the horizon)
const size = random(1, 2.5);
Each star gets a random diameter between 1 and 2.5 pixels, making them subtly varied
const baseAlpha = random(60, 140);
Each star has its own base brightness (opacity) between 60 and 140, so some are naturally dimmer than others
const twinkleSpeed = random(0.3, 1.2);
Each star twinkles at a different speed—faster speeds make rapid pulsing, slower speeds make slow breathing
const phase = random(TWO_PI);
Each star gets a random starting offset in its twinkling cycle (TWO_PI = 6.28) so they don't all pulse in unison
stars.push({ x, y, size, baseAlpha, twinkleSpeed, phase });
Adds a new star object with all these properties to the stars array as an object literal

drawStars(time)

drawStars() shows how to use sine waves to create smooth, natural-looking pulsing animations. The key is that sin() oscillates between -1 and 1, so by wrapping it in `0.5 + 0.5 * sin(...)` we shift that to oscillate between 0 and 1—perfect for an opacity value. Each star's phase offset makes it twinkle independently, creating a realistic night sky rather than all stars pulsing in unison.

🔬 This loop makes each star twinkle by multiplying its baseAlpha by a sine wave. What happens if you remove the s.phase offset from the calculation (change `+ s.phase` to nothing), so all stars use the exact same twinkling pattern?

  for (const s of stars) {
    const twinkle = 0.5 + 0.5 * sin(time * s.twinkleSpeed + s.phase);
    const alpha = s.baseAlpha * twinkle;
    fill(255, 255, 255, alpha);
    circle(s.x, s.y, s.size);
  }
function drawStars(time) {
  noStroke();
  for (const s of stars) {
    const twinkle = 0.5 + 0.5 * sin(time * s.twinkleSpeed + s.phase);
    const alpha = s.baseAlpha * twinkle;
    fill(255, 255, 255, alpha);
    circle(s.x, s.y, s.size);
  }
}
Line-by-line explanation (6 lines)

🔧 Subcomponents:

calculation Twinkling pulse math const twinkle = 0.5 + 0.5 * sin(time * s.twinkleSpeed + s.phase);

Uses a sine wave to create a smooth oscillation between 0 and 1 that makes the star's brightness pulse

noStroke();
Disables outlines for clean, smooth star circles
for (const s of stars) {
Loops through each star object in the stars array (using const s as shorthand for the current star)
const twinkle = 0.5 + 0.5 * sin(time * s.twinkleSpeed + s.phase);
Creates a twinkle value between 0 and 1 by using sin()—the addition of s.phase ensures each star twinkles at a different time, and multiplying by s.twinkleSpeed controls how fast it pulses
const alpha = s.baseAlpha * twinkle;
Multiplies the star's base brightness by the twinkle value, so when twinkle is high the star is bright, when low it dims
fill(255, 255, 255, alpha);
Sets the fill to white (255, 255, 255) with the calculated alpha (opacity), making the star bright or dim
circle(s.x, s.y, s.size);
Draws the star as a white circle at its stored position with its stored size

createTrees()

createTrees() uses a while loop instead of a for loop, which is common when you don't know the exact count in advance—here, we keep adding trees until we've spanned the entire screen width. The overlap strategy (advancing by w * 0.5) ensures the forest looks continuous. This pattern is useful for creating infinite or procedurally generated landscapes.

🔬 This loop spaces trees by advancing x by `w * 0.5` (half the tree width), creating overlap. What happens if you change `x += w * 0.5` to `x += w` (full width)? How does the forest line change visually?

  let x = -60;
  while (x < width + 60) {
    const w = random(40, 90);
    const h = random(60, 140);
    const offsetY = random(-10, 15);
    trees.push({ x: x + w * 0.5, w, h, offsetY });
    x += w * 0.5;
function createTrees() {
  trees = [];
  let x = -60;
  while (x < width + 60) {
    const w = random(40, 90);
    const h = random(60, 140);
    const offsetY = random(-10, 15);
    trees.push({ x: x + w * 0.5, w, h, offsetY });
    x += w * 0.5; // overlap a bit for a continuous forest line
  }
}
Line-by-line explanation (8 lines)

🔧 Subcomponents:

while-loop Tree generation loop while (x < width + 60) {

Continues creating trees across the entire canvas width, with slight overlap to create a continuous forest line

trees = [];
Empties the trees array to prepare it for fresh tree objects
let x = -60;
Initializes the starting x position slightly off-screen to the left (negative), so the forest line appears complete at screen edges
while (x < width + 60) {
Continues looping until x moves past the right edge of the canvas (width + 60), ensuring trees cover the entire horizontal span
const w = random(40, 90);
Each tree gets a random width between 40 and 90 pixels, creating variety in the forest silhouette
const h = random(60, 140);
Each tree gets a random height between 60 and 140 pixels—taller trees appear farther back or more mature
const offsetY = random(-10, 15);
A small random vertical offset allows trees to sit slightly higher or lower than the horizon, adding natural irregularity
trees.push({ x: x + w * 0.5, w, h, offsetY });
Stores a tree object with its center x position (x + w * 0.5), width, height, and vertical offset
x += w * 0.5;
Advances x by half the tree's width, so trees overlap slightly and create a continuous forest line without gaps

drawTrees()

drawTrees() demonstrates how to calculate geometric vertices based on stored data. The triangle is drawn with three points: two at the base (left and right) and one at the top (center). This is a silhouette pattern—just the outline of shapes, no internal detail. The thin grounding shadow at the end is a subtle technique that anchors objects visually to the landscape.

function drawTrees() {
  noStroke();
  fill(treeColor);

  for (const t of trees) {
    const baseY = horizonY + t.offsetY * 0.2;
    const leftX = t.x - t.w * 0.5;
    const rightX = t.x + t.w * 0.5;
    const topY = baseY - t.h;
    triangle(leftX, baseY, t.x, topY, rightX, baseY);
  }

  // Slight dark band at the horizon to "ground" the trees
  fill(0, 0, 0, 40);
  rect(0, horizonY - 5, width, 20);
}
Line-by-line explanation (10 lines)

🔧 Subcomponents:

calculation Triangle vertex math const baseY = horizonY + t.offsetY * 0.2; const leftX = t.x - t.w * 0.5; const rightX = t.x + t.w * 0.5; const topY = baseY - t.h;

Calculates the three vertices (left, right, top) of the tree triangle from its stored position, width, and height

noStroke();
Disables outlines for smooth, solid tree silhouettes
fill(treeColor);
Sets the fill color to the dark tree color defined in setup()
for (const t of trees) {
Loops through each tree object in the trees array
const baseY = horizonY + t.offsetY * 0.2;
Calculates the base y position of the tree (where it sits on the horizon), scaled down by the offset so it doesn't move too much
const leftX = t.x - t.w * 0.5;
Calculates the x position of the left corner of the tree base (center x minus half the width)
const rightX = t.x + t.w * 0.5;
Calculates the x position of the right corner of the tree base (center x plus half the width)
const topY = baseY - t.h;
Calculates the y position of the tree's peak (base y minus the height)
triangle(leftX, baseY, t.x, topY, rightX, baseY);
Draws a triangle with vertices at left-base, center-top, and right-base, creating the classic tree silhouette shape
fill(0, 0, 0, 40);
Sets fill to semi-transparent black (alpha 40) for the grounding shadow
rect(0, horizonY - 5, width, 20);
Draws a thin dark rectangle across the horizon line to create a shadow that anchors the trees visually

createGrass()

createGrass() shows how to organize complex data using layered configurations. Each layer is a template object that defines how many blades to create and what properties they should have. The nested loops apply each template to generate individual blades with randomized details within that template's ranges. This pattern is powerful for creating depth: distant objects are smaller, more transparent, and have slower motion, while nearby objects are larger, more opaque, and more active.

function createGrass() {
  grassBlades = [];

  const layers = [
    {
      count: floor(width / 10),
      color: farGrassColor,
      heightRange: [50, 100],
      widthRange: [1.5, 2.5],
      swayAmplitude: 0.18,
      swaySpeedRange: [0.6, 1.0],
      baseYOffsetRange: [60, 100] // distance from bottom
    },
    {
      count: floor(width / 8),
      color: midGrassColor,
      heightRange: [60, 120],
      widthRange: [2, 3],
      swayAmplitude: 0.22,
      swaySpeedRange: [0.5, 0.9],
      baseYOffsetRange: [40, 80]
    },
    {
      count: floor(width / 6),
      color: nearGrassColor,
      heightRange: [70, 140],
      widthRange: [2.5, 4],
      swayAmplitude: 0.26,
      swaySpeedRange: [0.4, 0.8],
      baseYOffsetRange: [20, 60]
    }
  ];

  for (const layer of layers) {
    for (let i = 0; i < layer.count; i++) {
      const baseX = random(-20, width + 20);
      const baseY = height - random(layer.baseYOffsetRange[0], layer.baseYOffsetRange[1]);
      const h = random(layer.heightRange[0], layer.heightRange[1]);
      const w = random(layer.widthRange[0], layer.widthRange[1]);
      const swaySpeed = random(layer.swaySpeedRange[0], layer.swaySpeedRange[1]);
      const noiseOffset = random(1000);

      grassBlades.push({
        baseX,
        baseY,
        h,
        w,
        swayAmplitude: layer.swayAmplitude,
        swaySpeed,
        noiseOffset,
        color: layer.color
      });
    }
  }
}
Line-by-line explanation (14 lines)

🔧 Subcomponents:

calculation Three-layer grass configuration const layers = [

Defines three depth layers of grass with different counts, colors, sizes, and sway characteristics to create a sense of distance

for-loop Nested layer and blade loops for (const layer of layers) { for (let i = 0; i < layer.count; i++) {

For each layer, creates the specified number of grass blades with randomized properties from that layer's template

grassBlades = [];
Empties the grassBlades array to prepare it for fresh blade objects
const layers = [
Begins defining an array of layer objects, each with properties that control grass appearance and animation at that depth
count: floor(width / 10),
The far (background) layer has fewer blades (width / 10) because distant grass is sparse; closer layers have more (width / 6) for density
color: farGrassColor,
Far layer uses a muted, slightly transparent green; nearer layers use brighter, more opaque greens for visual depth
heightRange: [50, 100],
Grass blades in this layer are 50–100 pixels tall; closer layers are taller (70–140) for perspective
swayAmplitude: 0.18,
This layer's grass sways by 0.18 radians; closer layers sway more (0.22, 0.26) for more dramatic motion in the foreground
swaySpeedRange: [0.6, 1.0],
Blades in this layer sway at speeds between 0.6 and 1.0; distant grass sways slower, nearby grass sways faster
baseYOffsetRange: [60, 100]
Blades are positioned 60–100 pixels from the bottom of the canvas; closer layers are lower (20–60 pixels away)
for (const layer of layers) {
Iterates through each of the three layer definitions
for (let i = 0; i < layer.count; i++) {
For each layer, creates layer.count individual grass blade objects with randomized properties
const baseX = random(-20, width + 20);
Each blade gets a random horizontal position, slightly extending off-screen so the field feels continuous
const baseY = height - random(layer.baseYOffsetRange[0], layer.baseYOffsetRange[1]);
Each blade gets a y position near the bottom of the canvas, with a random offset from the specified range (closer layers sit higher on screen)
const noiseOffset = random(1000);
Each blade gets a unique noise seed so its Perlin noise motion is independent and organic
grassBlades.push({
Stores the blade object with all its properties in the grassBlades array

drawGrass(time)

drawGrass() demonstrates a powerful technique: combining sine waves with Perlin noise. Sine alone creates perfectly periodic, mathematical motion that looks artificial. Perlin noise adds organic irregularity—it's smooth, not random, so the motion feels alive. By adding them together (sine() + noisePhase), you get natural-looking animation that still moves in time to a beat. This is how real wind-blown vegetation moves.

🔬 These lines combine sine and Perlin noise for the sway. What happens if you remove the noise part entirely by changing `+ noisePhase * TWO_PI` to just an empty string, so the line reads `const angle = sin(time * blade.swaySpeed) * blade.swayAmplitude;`? Will the grass still move naturally?

    const noisePhase = noise(blade.noiseOffset, time * 0.2); // 0..1
    const angle = sin(time * blade.swaySpeed + noisePhase * TWO_PI) * blade.swayAmplitude;
function drawGrass(time) {
  noStroke();
  for (const blade of grassBlades) {
    fill(blade.color);

    // Sway angle combines sin() and a Perlin noise phase
    const noisePhase = noise(blade.noiseOffset, time * 0.2); // 0..1
    const angle = sin(time * blade.swaySpeed + noisePhase * TWO_PI) * blade.swayAmplitude;

    const tipX = blade.baseX + sin(angle) * blade.h * 0.45;
    const tipY = blade.baseY - blade.h;
    const leftX = blade.baseX - blade.w;
    const rightX = blade.baseX + blade.w;

    triangle(leftX, blade.baseY, rightX, blade.baseY, tipX, tipY);
  }
}
Line-by-line explanation (10 lines)

🔧 Subcomponents:

calculation Perlin noise-driven animation const noisePhase = noise(blade.noiseOffset, time * 0.2);

Uses Perlin noise to add organic, unpredictable variation to the sway pattern so grass doesn't move in perfect mathematical rhythm

calculation Sway angle math const angle = sin(time * blade.swaySpeed + noisePhase * TWO_PI) * blade.swayAmplitude;

Combines sine wave timing with Perlin noise to create smooth, natural-looking sway motion

calculation Blade tip bend calculation const tipX = blade.baseX + sin(angle) * blade.h * 0.45;

Moves the top of the grass blade horizontally based on the sway angle, creating the illusion of bending

noStroke();
Disables outlines for smooth, filled grass blades
for (const blade of grassBlades) {
Loops through each grass blade object
fill(blade.color);
Sets the fill color to this blade's layer color (far, mid, or near green)
const noisePhase = noise(blade.noiseOffset, time * 0.2);
Generates a Perlin noise value (0–1) using the blade's unique seed and the current time—this creates organic variation in the motion
const angle = sin(time * blade.swaySpeed + noisePhase * TWO_PI) * blade.swayAmplitude;
Combines two influences: a sine wave that oscillates at the blade's speed, plus the Perlin noise phase shifted to radians (TWO_PI ≈ 6.28)—the result is a sway angle in radians
const tipX = blade.baseX + sin(angle) * blade.h * 0.45;
Moves the tip of the grass blade horizontally using sin(angle)—when angle is 0 the tip is directly above the base, when angle is larger the tip bends sideways
const tipY = blade.baseY - blade.h;
Calculates the tip's y position as the base position minus the blade height (moving upward)
const leftX = blade.baseX - blade.w;
Calculates the x position of the left corner of the blade base
const rightX = blade.baseX + blade.w;
Calculates the x position of the right corner of the blade base
triangle(leftX, blade.baseY, rightX, blade.baseY, tipX, tipY);
Draws the grass blade as a triangle with two base corners and the swaying tip, creating a believable grass shape

Firefly (class)

The Firefly class is a great example of object-oriented coding in p5.js. Each firefly encapsulates its own position, speed, brightness, and animation parameters. The key insight is depth: by mapping a single 'z' value to multiple properties (size, speed, brightness), you create a convincing sense of 3D space with overlapping layers. The update() and draw() methods are called every frame from drawFireflies()—this separation of logic and rendering is a clean pattern for managing complex animated objects.

🔬 This code makes fireflies pulse between 30% and 100% brightness (controlled by the 0.3 and 0.7). What if you change those to 0.5 and 0.5 so the pulse range becomes much narrower? Will the glow effect still look natural?

    const pulse = 0.5 + 0.5 * sin(time * this.pulseSpeed + this.phase);
    this.brightness = this.baseBrightness * (0.3 + 0.7 * pulse);
class Firefly {
  constructor(x, y, depth) {
    // Some can be seeded at custom positions (e.g. on mouse click)
    this.x = x !== undefined ? x : random(width);
    this.y = y !== undefined ? y : random(40, horizonY - 40);
    this.prevX = this.x;
    this.prevY = this.y;

    // Depth controls size/brightness/speed (0.3 = far, 1 = close)
    this.z = depth !== undefined ? depth : random(0.3, 1);
    this.size = map(this.z, 0.3, 1, 2, 5);
    this.baseBrightness = map(this.z, 0.3, 1, 80, 255);

    this.noiseSeedX = random(1000);
    this.noiseSeedY = random(1000);

    this.phase = random(TWO_PI);
    this.pulseSpeed = random(0.6, 1.4);

    this.speed = 0;
  }

  update(time) {
    this.prevX = this.x;
    this.prevY = this.y;

    // Smooth drift driven by Perlin noise in both axes
    const speedBase = map(this.z, 0.3, 1, 0.2, 0.7);
    const moveX = map(noise(this.noiseSeedX, time * 0.25), 0, 1, -1, 1) * speedBase * 2.2;
    const moveY = map(noise(this.noiseSeedY, time * 0.25), 0, 1, -1, 1) * speedBase * 2.2;

    this.x += moveX;
    this.y += moveY;

    // Wrap horizontally and softly constrain vertically to the air above the grass
    if (this.x < -20) this.x = width + 20;
    if (this.x > width + 20) this.x = -20;

    const minY = 40;
    const maxY = horizonY - 20;
    if (this.y < minY) this.y = minY + (minY - this.y) * 0.5;
    if (this.y > maxY) this.y = maxY - (this.y - maxY) * 0.5;

    // Sinusoidal glow pulse with individual timing
    const pulse = 0.5 + 0.5 * sin(time * this.pulseSpeed + this.phase);
    this.brightness = this.baseBrightness * (0.3 + 0.7 * pulse);

    // Track speed for occasional trails
    this.speed = dist(this.x, this.y, this.prevX, this.prevY);
  }

  draw() {
    const alpha = this.brightness;

    noStroke();

    // Inner bright core
    fill(
      red(fireflyInnerColor),
      green(fireflyInnerColor),
      blue(fireflyInnerColor),
      alpha
    );
    circle(this.x, this.y, this.size);

    // Soft outer glow
    fill(
      red(fireflyOuterColor),
      green(fireflyOuterColor),
      blue(fireflyOuterColor),
      alpha * 0.5
    );
    circle(this.x, this.y, this.size * 3);

    // Occasional glowing trail when moving faster
    if (this.speed > 0.5) {
      stroke(
        red(fireflyOuterColor),
        green(fireflyOuterColor),
        blue(fireflyOuterColor),
        alpha * 0.6
      );
      strokeWeight(this.size * 0.4);
      line(this.prevX, this.prevY, this.x, this.y);
      noStroke();
    }
  }
}
Line-by-line explanation (26 lines)

🔧 Subcomponents:

calculation Depth-based size and brightness this.z = depth !== undefined ? depth : random(0.3, 1); this.size = map(this.z, 0.3, 1, 2, 5); this.baseBrightness = map(this.z, 0.3, 1, 80, 255);

Maps a firefly's depth value to its visual size and brightness so distant fireflies appear dimmer and smaller

calculation Perlin noise-driven movement const speedBase = map(this.z, 0.3, 1, 0.2, 0.7); const moveX = map(noise(this.noiseSeedX, time * 0.25), 0, 1, -1, 1) * speedBase * 2.2; const moveY = map(noise(this.noiseSeedY, time * 0.25), 0, 1, -1, 1) * speedBase * 2.2;

Uses separate Perlin noise values for x and y movement so fireflies drift smoothly and independently in both directions

conditional Horizontal wrapping and vertical constraints if (this.x < -20) this.x = width + 20; if (this.x > width + 20) this.x = -20;

Wraps fireflies horizontally so they reappear on the opposite side when leaving the screen

calculation Independent brightness pulsing const pulse = 0.5 + 0.5 * sin(time * this.pulseSpeed + this.phase); this.brightness = this.baseBrightness * (0.3 + 0.7 * pulse);

Each firefly pulses its brightness independently using its own pulseSpeed and phase offset

class Firefly {
Defines a Firefly class so each firefly is an object with its own data and methods
constructor(x, y, depth) {
The constructor runs when a new Firefly is created, initializing all properties from the arguments (or defaults)
this.x = x !== undefined ? x : random(width);
If x is provided, use it; otherwise pick a random x position—this allows custom spawning (like on mouse click)
this.z = depth !== undefined ? depth : random(0.3, 1);
The depth value (0.3 = far, 1 = close) controls all other properties; if not provided, pick a random depth
this.size = map(this.z, 0.3, 1, 2, 5);
Uses map() to convert depth (0.3–1) to size (2–5 pixels)—closer fireflies are bigger
this.baseBrightness = map(this.z, 0.3, 1, 80, 255);
Uses map() to convert depth (0.3–1) to brightness (80–255)—closer fireflies are brighter
this.noiseSeedX = random(1000);
Each firefly gets a unique Perlin noise seed for x movement so they drift independently
this.noiseSeedY = random(1000);
Each firefly gets a separate unique seed for y movement so x and y drift are uncorrelated
this.phase = random(TWO_PI);
Each firefly gets a random phase offset for its glow pulse so they don't all brighten and dim in sync
update(time) {
The update method is called each frame to move the firefly and update its brightness
this.prevX = this.x;
Saves the current position before moving so we can draw a trail line later
const speedBase = map(this.z, 0.3, 1, 0.2, 0.7);
Maps depth to a base speed—distant fireflies move slower (0.2 pixels/frame), close ones move faster (0.7)
const moveX = map(noise(this.noiseSeedX, time * 0.25), 0, 1, -1, 1) * speedBase * 2.2;
Generates a smooth drift in x using Perlin noise, scales it to move in both directions, and scales by speedBase
this.x += moveX;
Updates the firefly's x position by the calculated amount
if (this.x < -20) this.x = width + 20;
When the firefly leaves the left side of the screen, wrap it to the right side for seamless movement
const minY = 40;
Defines the topmost boundary for fireflies so they stay visible in the sky area
if (this.y < minY) this.y = minY + (minY - this.y) * 0.5;
If the firefly goes above the minimum y, bounce it back down softly (not a hard bounce, but a gentle push)
const pulse = 0.5 + 0.5 * sin(time * this.pulseSpeed + this.phase);
Calculates a pulse value between 0 and 1 using sine—the pulseSpeed and phase make each firefly pulse at different rates
this.brightness = this.baseBrightness * (0.3 + 0.7 * pulse);
Multiplies the firefly's base brightness by the pulse to make it oscillate—at pulse=0 it's 30% bright, at pulse=1 it's 100% bright
this.speed = dist(this.x, this.y, this.prevX, this.prevY);
Calculates how far the firefly moved this frame using the dist() function, used later to decide whether to draw a trail
draw() {
The draw method renders this firefly to the canvas
fill( red(fireflyInnerColor), green(fireflyInnerColor), blue(fireflyInnerColor), alpha );
Extracts the red, green, and blue components from the predefined fireflyInnerColor and applies the calculated alpha (brightness)
circle(this.x, this.y, this.size);
Draws the bright inner core of the firefly at its position with its size
circle(this.x, this.y, this.size * 3);
Draws a larger, softer outer glow around the core (3× the size) at half the brightness for a realistic halo effect
if (this.speed > 0.5) {
Only draws a trail if the firefly is moving fast enough (more than 0.5 pixels per frame)
line(this.prevX, this.prevY, this.x, this.y);
Draws a line from the firefly's previous position to its current position, creating a glowing trail

createFireflies()

createFireflies() is a simple initialization function that populates the scene with fireflies. The responsive count calculation (width / 20) is a good practice for making sketches scale gracefully—instead of hardcoding a number like 30, you let the screen size determine the density.

function createFireflies() {
  fireflies = [];
  const count = floor(width / 20); // scales with width
  for (let i = 0; i < count; i++) {
    const depth = random(0.3, 1);
    const x = random(width);
    const y = random(60, horizonY - 40);
    fireflies.push(new Firefly(x, y, depth));
  }
}
Line-by-line explanation (7 lines)

🔧 Subcomponents:

calculation Responsive firefly count const count = floor(width / 20);

Scales the number of fireflies to the canvas width so larger screens get more fireflies automatically

fireflies = [];
Empties the fireflies array to prepare for fresh firefly objects
const count = floor(width / 20);
Calculates how many fireflies to create by dividing canvas width by 20—wider screens get more fireflies
for (let i = 0; i < count; i++) {
Loops count times to create each firefly
const depth = random(0.3, 1);
Assigns a random depth value to create a mix of close and distant fireflies
const x = random(width);
Places the firefly at a random horizontal position across the canvas
const y = random(60, horizonY - 40);
Places the firefly at a random vertical position in the sky area (between 60 pixels from top and 40 pixels above horizon)
fireflies.push(new Firefly(x, y, depth));
Creates a new Firefly object with the calculated position and depth, adding it to the fireflies array

drawFireflies(time)

drawFireflies() is a simple loop that calls the update and draw methods on every firefly. This is the standard pattern for animating objects: (1) update their state, (2) render them. By separating update from draw, your code stays organized and easy to modify.

function drawFireflies(time) {
  for (const f of fireflies) {
    f.update(time);
    f.draw();
  }
}
Line-by-line explanation (3 lines)
for (const f of fireflies) {
Loops through each firefly object in the fireflies array
f.update(time);
Calls each firefly's update method to move it and calculate its brightness based on the current time
f.draw();
Calls each firefly's draw method to render it on the canvas

mousePressed()

mousePressed() is a p5.js event handler that runs once per click. It demonstrates interactive particle spawning: using trigonometry (cos/sin) to distribute new objects radially. The population cap at the end is a memory management technique—without it, rapid clicking could eventually slow the sketch down. This pattern is useful for any interactive burst effect: fireworks, particle explosions, magic spells, etc.

🔬 These lines use sin/cos to spread fireflies in a circular burst. What happens if you change `const radius = random(0, 60)` to `const radius = 30` (a fixed radius) instead of a random range? Will the burst pattern look different?

    const angle = random(TWO_PI);
    const radius = random(0, 60);
    const x = mouseX + cos(angle) * radius;
    const y = mouseY + sin(angle) * radius;
function mousePressed() {
  const extra = floor(random(8, 16));
  for (let i = 0; i < extra; i++) {
    const angle = random(TWO_PI);
    const radius = random(0, 60);
    const x = mouseX + cos(angle) * radius;
    const y = mouseY + sin(angle) * radius;
    const depth = random(0.5, 1); // closer/brighter burst
    fireflies.push(new Firefly(x, y, depth));
  }

  // Cap population so it doesn't grow forever
  if (fireflies.length > 200) {
    fireflies.splice(0, fireflies.length - 200);
  }
}
Line-by-line explanation (11 lines)

🔧 Subcomponents:

for-loop Burst particle generation for (let i = 0; i < extra; i++) {

Creates 8–16 new fireflies at random angles and distances from the mouse, simulating a burst effect

conditional Population limit check if (fireflies.length > 200) {

Removes the oldest fireflies when population exceeds 200 to prevent memory buildup

function mousePressed() {
This special p5.js function runs automatically when the mouse is clicked
const extra = floor(random(8, 16));
Decides how many new fireflies to create—a random number between 8 and 16, giving variety to each burst
for (let i = 0; i < extra; i++) {
Loops extra times to create each new firefly
const angle = random(TWO_PI);
Picks a random angle in radians (0 to TWO_PI ≈ 6.28) for radial burst distribution
const radius = random(0, 60);
Picks a random distance from 0 to 60 pixels from the mouse to spread the burst outward
const x = mouseX + cos(angle) * radius;
Uses trigonometry (cos and sin) to convert the angle and radius into x coordinates relative to the mouse
const y = mouseY + sin(angle) * radius;
Uses trigonometry to convert the angle and radius into y coordinates relative to the mouse
const depth = random(0.5, 1);
The new burst fireflies are all relatively close (0.5–1), making them brighter and more visible
fireflies.push(new Firefly(x, y, depth));
Creates a new Firefly at the calculated position and adds it to the fireflies array
if (fireflies.length > 200) {
Checks if the firefly population has exceeded 200
fireflies.splice(0, fireflies.length - 200);
Removes the oldest fireflies (at the beginning of the array) to keep the population capped at 200, preventing memory overflow from infinite clicking

windowResized()

windowResized() ensures your sketch responds gracefully to window resizing. Without it, the canvas would stay at its original size when the window grows. By calling initScene(), we regenerate all the procedural elements so they scale appropriately—more stars and grass on a larger screen, fewer on a smaller one. This is a best practice for full-screen sketches.

function windowResized() {
  resizeCanvas(windowWidth, windowHeight);
  initScene();
}
Line-by-line explanation (3 lines)
function windowResized() {
This special p5.js function runs automatically whenever the browser window is resized
resizeCanvas(windowWidth, windowHeight);
Resizes the p5.js canvas to match the new window dimensions, ensuring the sketch always fills the screen
initScene();
Reinitializes the entire scene (stars, trees, grass, fireflies) so they are regenerated with appropriate counts and positions for the new canvas size

initScene()

initScene() is a central initialization function called from both setup() and windowResized(). It calculates the horizon position and then calls all the creation functions. This pattern—centralizing initialization—makes it easy to reinitialize when needed (like on window resize) without duplicating code.

function initScene() {
  // Horizon at two-thirds height
  horizonY = height * 2 / 3;

  createStars();
  createTrees();
  createGrass();
  createFireflies();
}
Line-by-line explanation (5 lines)
horizonY = height * 2 / 3;
Calculates the y position of the horizon line at two-thirds down the canvas, leaving one-third as sky
createStars();
Populates the stars array with randomly positioned twinkling stars
createTrees();
Populates the trees array with overlapping tree silhouettes along the horizon
createGrass();
Populates the grassBlades array with three layers of swaying grass
createFireflies();
Populates the fireflies array with drifting, glowing fireflies

📦 Key Variables

fireflies array

Stores all active Firefly objects in the scene; updated each frame and when clicked

let fireflies = [];
grassBlades array

Stores all grass blade objects with their position, animation, and color properties

let grassBlades = [];
stars array

Stores all star objects with position, size, brightness, and twinkling speed

let stars = [];
trees array

Stores all tree silhouette objects with position, width, and height

let trees = [];
horizonY number

The y-coordinate of the horizon line, dividing sky from ground and constraining firefly motion

let horizonY;
topSkyColor p5.Color

The deep purple-blue color at the top of the sky gradient

let topSkyColor = color(16, 10, 38);
horizonSkyColor p5.Color

The dark green color at the horizon line where sky meets landscape

let horizonSkyColor = color(8, 40, 20);
groundColor p5.Color

The very dark green color of the ground below the horizon

let groundColor = color(2, 18, 6);
farGrassColor p5.Color

Muted, semi-transparent green for distant grass blades in the background layer

let farGrassColor = color(8, 50, 18, 220);
midGrassColor p5.Color

Medium green for grass in the middle depth layer

let midGrassColor = color(16, 90, 30, 240);
nearGrassColor p5.Color

Bright, fully opaque green for grass in the foreground layer, closest to viewer

let nearGrassColor = color(24, 130, 46, 255);
treeColor p5.Color

Dark color used for tree silhouettes

let treeColor = color(2, 20, 10);
fireflyInnerColor p5.Color

The bright yellowish-green core of the firefly glow

let fireflyInnerColor = color(210, 255, 170);
fireflyOuterColor p5.Color

The soft yellowish-green outer glow of the firefly

let fireflyOuterColor = color(190, 255, 150);

🔧 Potential Improvements (5)

Here are some ways this code could be enhanced:

PERFORMANCE drawBackgroundGradient()

Drawing one thin rectangle per pixel row is inefficient—at 1080p that's 1080+ rectangles every frame

💡 Use a canvas gradient or draw larger rectangles with a step (e.g., every 10 pixels), then interpolate: for (let y = 0; y < horizonY; y += 10) instead of y += 1. This reduces draw calls by 90%.

BUG mousePressed()

The population cap removes the oldest fireflies (splice from index 0), but users expect to remove fireflies in order of when they were created. After repeated clicking, old fireflies from the initial scene may still linger unexpectedly.

💡 Consider using a queue or marking fireflies with a creation time, then remove by age instead of array order. Or document the behavior so it's intentional.

STYLE Firefly class

The `red()`, `green()`, `blue()` extraction pattern is repeated in both the inner and outer circle draws

💡 Cache these values at the start of draw(): const r = red(fireflyInnerColor); const g = green(...); const b = blue(...); Then reuse them, reducing function calls.

FEATURE Firefly movement

Fireflies use 2D Perlin noise for drift, but distant fireflies (z=0.3) still move at perceptible speeds, potentially breaking the depth illusion

💡 Further reduce faraway firefly speeds by applying an extra depth factor: const moveX = ... * speedBase * (this.z * 2); This scales the movement multiplier by depth, making distant fireflies drift much more subtly.

FEATURE Interaction

The sketch only responds to clicks to spawn fireflies; there is no hover feedback or other interactivity

💡 Add mouseMoved() to detect when the user hovers near existing fireflies, and make them glow brighter or move away slightly. Or detect key presses (e.g., spacebar) to trigger scene changes like a rainstorm or seasonal shift.

🔄 Code Flow

Code flow showing setup, draw, drawbackgroundgradient, createstars, drawstars, createtrees, drawtrees, creategrass, drawgrass, firefly, createfireflies, drawfireflies, mousepressed, windowresized, initscene

💡 Click on function names in the diagram to jump to their code

graph TD start[Start] --> setup[setup] setup --> initscene[initscene] initscene --> draw[draw loop] draw --> timecalculation[time-calculation] draw --> blendmodeswitch[blend-mode-switch] draw --> drawbackgroundgradient[drawbackgroundgradient] drawbackgroundgradient --> skygradientloop[sky-gradient-loop] skygradientloop --> colorinterpolation[color-interpolation] draw --> createstars[createstars] createstars --> starcountcalculation[star-count-calculation] starcountcalculation --> starcreationloop[star-creation-loop] starcreationloop --> drawstars[drawstars] drawstars --> twinklecalculation[twinkle-calculation] draw --> createtrees[createtrees] createtrees --> treeplacementloop[tree-placement-loop] treeplacementloop --> trianglecalculation[triangle-calculation] draw --> creategrass[creategrass] creategrass --> layersdefinition[layers-definition] layersdefinition --> nestedloop[nested-loop] nestedloop --> drawgrass[drawgrass] drawgrass --> perlinnoisephase[perlin-noise-phase] drawgrass --> anglecalculation[angle-calculation] anglecalculation --> tipposition[tip-position] draw --> createfireflies[createfireflies] createfireflies --> responsivecount[responsive-count] draw --> drawfireflies[drawfireflies] drawfireflies --> updateperlin drift[update-perlin-drift] drawfireflies --> boundarywrapping[boundary-wrapping] drawfireflies --> glowpulse[glow-pulse] draw --> mousepressed[mousepressed] mousepressed --> burstgeneration[burst-generation] burstgeneration --> populationcap[population-cap] draw --> windowresized[windowresized] windowresized --> initscene click setup href "#fn-setup" click initscene href "#fn-initscene" click draw href "#fn-draw" click drawbackgroundgradient href "#fn-drawbackgroundgradient" click createstars href "#fn-createstars" click drawstars href "#fn-drawstars" click createtrees href "#fn-createtrees" click creategrass href "#fn-creategrass" click createfireflies href "#fn-createfireflies" click drawfireflies href "#fn-drawfireflies" click mousepressed href "#fn-mousepressed" click windowresized href "#fn-windowresized" click timecalculation href "#sub-time-calculation" click blendmodeswitch href "#sub-blend-mode-switch" click skygradientloop href "#sub-sky-gradient-loop" click colorinterpolation href "#sub-color-interpolation" click starcountcalculation href "#sub-star-count-calculation" click starcreationloop href "#sub-star-creation-loop" click twinklecalculation href "#sub-twinkle-calculation" click treeplacementloop href "#sub-tree-placement-loop" click trianglecalculation href "#sub-triangle-calculation" click layersdefinition href "#sub-layers-definition" click nestedloop href "#sub-nested-loop" click perlinnoisephase href "#sub-perlin-noise-phase" click anglecalculation href "#sub-angle-calculation" click tipposition href "#sub-tip-position" click responsivecount href "#sub-responsive-count" click updateperlin drift href "#sub-update-perlin-drift" click boundarywrapping href "#sub-boundary-wrapping" click glowpulse href "#sub-glow-pulse" click burstgeneration href "#sub-burst-generation" click populationcap href "#sub-population-cap"

❓ Frequently Asked Questions

What visual elements are depicted in the SKIPPED p5.js sketch?

The sketch creates a serene twilight meadow scene featuring swaying grass, glowing fireflies, twinkling stars, and silhouetted trees against a gradient sky.

Is there any user interaction in the SKIPPED sketch?

The sketch does not include interactive elements; it is primarily a visual representation meant for observation.

What creative coding techniques are showcased in this p5.js sketch?

This sketch demonstrates the use of Perlin noise for organic motion and blendMode(ADD) for creating glowing effects of fireflies.

Preview

SKIPPED - p5.js creative coding sketch preview
Sketch Preview
Code flow diagram showing the structure of SKIPPED - Code flow showing setup, draw, drawbackgroundgradient, createstars, drawstars, createtrees, drawtrees, creategrass, drawgrass, firefly, createfireflies, drawfireflies, mousepressed, windowresized, initscene
Code Flow Diagram