
stimulation final boss

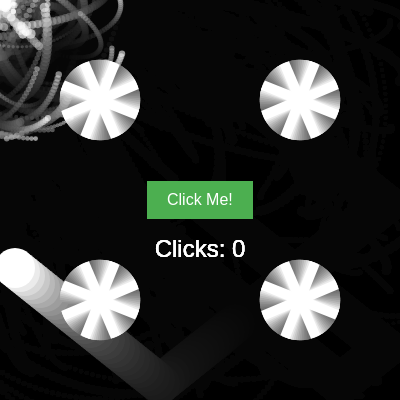
This sketch creates a dynamic, multi-layered interactive canvas where a swirling cloud of particles follows your mouse while being repelled by a bouncing white ball. Four spinning pinwheels anchor the corners, you can draw permanent white lines by clicking and dragging, and a clickable button in the center tracks interactions.

🧪 Try This!

Experiment with the code by making these changes:

  1. Make particles live much longer — Increase the initial lifespan so particles fade out slowly instead of quickly, creating longer, ghostlier trails.
  2. Spawn more particles each frame — Higher spawn rates make the trail around your mouse much thicker and more opaque, filling the screen faster.
  3. Make the ball move slower — Lower speed values create a slower, more sedate bounce that's easier to watch.
  4. Make pinwheels spin faster — Increase the pinwheel rotation speed so the corner decorations whirl around more frenetically.
  5. Draw longer-lasting trails — Lower the background's alpha so previous frames fade more slowly, extending the visual trail effect.
  6. Make the ball much bigger — Increase the ball's radius so it takes up more space and has a stronger visual presence.
Prefer the full editor? Open it there →

📖 About This Sketch

This sketch combines five visual layers into one cohesive interactive experience. Particles spawn continuously at your mouse position and are attracted toward it using vector forces, while a bright white ball bounces independently off canvas edges and repels nearby particles. Four spinning pinwheels rotate steadily in the corners, a clickable button sits in the center, and any line you drag stays permanently on the canvas thanks to a separate graphics layer. Together, these elements teach vectors, force simulation, collision detection, and persistent drawing—skills that power countless creative coding projects.

The code is organized into a setup() function that initializes all elements and positions the button, a draw() function that orchestrates particle physics and rendering, a Particle class that encapsulates individual particle behavior, helper functions like drawPinwheel() and buttonClicked(), and a windowResized() function that keeps everything aligned when the browser resizes. By reading it you will learn how to apply multiple forces to objects, layer graphics for visual depth, use separate drawing contexts to preserve artwork, and manage arrays of dynamic objects that spawn and die.

⚙️ How It Works

  1. When the sketch loads, setup() creates a full-window canvas, populates it with 200 initial particles scattered randomly, places a bouncing ball at the center, positions four pinwheels in the corners, creates a button in the middle, and initializes a separate p5.Graphics object called drawingLayer to store permanent drawings.
  2. Every frame, draw() first renders the permanent drawing layer onto the main canvas so any lines you've drawn stay visible. Then it applies a semi-transparent black background that creates fading trails for particles and the ball while preserving the permanent lines.
  3. For each particle, the code calculates two vector forces: one that pulls it toward the current mouse position (attraction) and one that pushes it away from the bouncing ball if it gets too close (repulsion). These forces are applied, the particle's position is updated, and it's drawn as a small ellipse with decreasing opacity until it dies.
  4. The bouncing ball moves at constant velocity each frame and flips its horizontal or vertical speed when it hits a canvas edge, creating a classic physics bounce.
  5. Four identical pinwheels rotate continuously by rotating the entire coordinate system before drawing eight radiating rectangles. The rotation angle is tied to frameCount so the spin continues smoothly.
  6. When you click and drag the mouse, the drawingLayer.line() function draws white strokes from the previous mouse position to the current one, permanently storing them on the drawing layer rather than the main canvas.

🎓 Concepts You'll Learn

Particle systemsVector forces and attractionCollision detection and repulsionGraphics layers and persistent drawingAnimation loops and frame-based physicsObject-oriented programming with classesArray management and iterationCoordinate system transformations

📝 Code Breakdown

setup()

setup() runs once when the sketch starts. It initializes all variables, creates the canvas, spawns initial particles, positions the button, and prepares the drawing layer. This is where you set up the 'scene' before animation begins.

function setup() {
  // Create a canvas that fills the entire browser window
  createCanvas(windowWidth, windowHeight);
  
  // Add some initial particles randomly across the canvas
  // This ensures there are particles present even before the mouse moves
  for (let i = 0; i < maxParticles / 4; i++) { // Add more initial particles
    particles.push(new Particle(random(width), random(height)));
  }

  // Set the initial position of the bouncing ball to the center of the canvas
  ballX = width / 2;
  ballY = height / 2;

  // Set initial positions for all four pinwheels
  pinwheel1X = 100; // Top-left
  pinwheel1Y = 100;

  pinwheel2X = width - 100; // Top-right
  pinwheel2Y = 100;

  pinwheel3X = 100; // Bottom-left
  pinwheel3Y = height - 100;

  pinwheel4X = width - 100; // Bottom-right
  pinwheel4Y = height - 100;

  // Create the button dynamically using p5.js DOM functions
  myButton = createButton('Click Me!');
  // Style the button first so we can get its dimensions correctly
  myButton.style('background-color', '#4CAF50'); // Green background (keeping it green for visibility)
  myButton.style('color', 'white'); // White text
  myButton.style('font-size', '16px');
  myButton.style('border', 'none');
  myButton.style('padding', '10px 20px');
  myButton.style('cursor', 'pointer');
  myButton.style('z-index', '1000'); // Ensure button is on top of canvas

  // Position the button in the middle of the canvas
  // We use .elt.offsetWidth and .elt.offsetHeight to get the actual HTML element's dimensions
  myButton.position(width / 2 - myButton.elt.offsetWidth / 2, height / 2 - myButton.elt.offsetHeight / 2);
  myButton.mousePressed(buttonClicked); // Attach the function to be called on click

  // Initialize the drawing layer
  drawingLayer = createGraphics(width, height);
  drawingLayer.stroke(255); // White stroke color for the drawing layer
  drawingLayer.strokeWeight(4); // Set the thickness of the lines on the drawing layer
}
Line-by-line explanation (13 lines)

🔧 Subcomponents:

for-loop Populate initial particles for (let i = 0; i < maxParticles / 4; i++) {

Spawns 200 particles at random positions so the canvas is active before the user moves the mouse

calculation Position pinwheels in four corners pinwheel1X = 100;

Places pinwheels 100 pixels from each corner, anchoring the visual composition

calculation Center button on canvas myButton.position(width / 2 - myButton.elt.offsetWidth / 2, height / 2 - myButton.elt.offsetHeight / 2);

Calculates the exact pixel position so the button appears centered by subtracting half its width and height from the center

createCanvas(windowWidth, windowHeight);
Creates a canvas that stretches to fill the entire browser window, making the sketch responsive and immersive
for (let i = 0; i < maxParticles / 4; i++) {
Loops 200 times (maxParticles / 4) to create initial particles so there is activity on screen immediately
particles.push(new Particle(random(width), random(height)));
Creates a new Particle object at a random position and adds it to the particles array
ballX = width / 2;
Places the bouncing ball horizontally at the center of the canvas
ballY = height / 2;
Places the bouncing ball vertically at the center of the canvas
pinwheel1X = 100;
Sets the x-coordinate of the first pinwheel to 100 pixels from the left edge
pinwheel2X = width - 100;
Sets the second pinwheel 100 pixels from the right edge, placing it in the top-right corner
myButton = createButton('Click Me!');
Creates an interactive HTML button element with the text 'Click Me!' and stores a reference to it
myButton.style('background-color', '#4CAF50');
Applies CSS styling to the button—in this case, a green background color
myButton.mousePressed(buttonClicked);
Attaches the buttonClicked function to trigger whenever the button is clicked
drawingLayer = createGraphics(width, height);
Creates a separate graphics context the same size as the canvas to store permanent drawings independently
drawingLayer.stroke(255);
Sets the stroke color to white (255) for all lines drawn on the drawing layer
drawingLayer.strokeWeight(4);
Sets the thickness of lines drawn on the drawing layer to 4 pixels
draw()

draw() runs 60 times per second and orchestrates every visual element. It layers the permanent drawing on top, spawns new particles, applies forces to create movement, bounces the ball, lets you draw, renders all pinwheels, and displays the click counter. Understanding how draw() coordinates all these systems is key to building complex interactive sketches.

🔬 This block calculates a vector from each particle to the mouse and applies it as a force. What happens if you change attractionForce.setMag(0.2) to setMag(0.05) or setMag(0.5)? How does the 'stickiness' of the particle cloud change?

    // Calculate a force that attracts the particle towards the mouse
    let mousePos = createVector(mouseX, mouseY);
    let attractionForce = p5.Vector.sub(mousePos, p.pos); // Vector from particle to mouse
    attractionForce.setMag(0.2); // Stronger attraction force
    p.applyForce(attractionForce); // Apply the attraction force

🔬 This is the bounce logic—when the ball hits a side, it flips the x velocity. What happens if you change -xSpeed to -xSpeed * 0.8 so the ball loses energy on each bounce?

  // Check for bouncing off the left or right edges
  if (ballX - ballRadius < 0 || ballX + ballRadius > width) {
    xSpeed = -xSpeed; // Reverse the X speed
  }
function draw() {
  // 1. Draw the permanent drawing layer onto the main canvas
  image(drawingLayer, 0, 0);

  // 2. Draw a semi-transparent black background over the drawing layer and any dynamic elements from the previous frame.
  // This creates a fading trail effect for the particles, ball, and pinwheels,
  // but the lines on drawingLayer will persist because drawingLayer is redrawn each frame.
  background(0, 20); 

  // --- Particle System Logic ---
  // Add new particles at the current mouse position
  for (let i = 0; i < newParticlesPerFrame; i++) {
    if (particles.length < maxParticles) { // Only add if we haven't reached the max limit
      particles.push(new Particle(mouseX, mouseY));
    }
  }

  // Iterate through the particles array from end to beginning
  // This is important when removing elements from an array during iteration.
  for (let i = particles.length - 1; i >= 0; i--) {
    let p = particles[i];

    // Calculate a force that attracts the particle towards the mouse
    let mousePos = createVector(mouseX, mouseY);
    let attractionForce = p5.Vector.sub(mousePos, p.pos); // Vector from particle to mouse
    attractionForce.setMag(0.2); // Stronger attraction force
    p.applyForce(attractionForce); // Apply the attraction force

    // Calculate a force that repels the particle from the bouncing ball
    let ballPos = createVector(ballX, ballY);
    let distanceToBall = p5.Vector.dist(p.pos, ballPos);

    // If the particle is within a certain range of the ball, apply a repulsion force
    if (distanceToBall < 100) { // Repel if within 100 pixels
      let repulsionForce = p5.Vector.sub(p.pos, ballPos); // Vector from ball to particle
      repulsionForce.normalize(); // Set magnitude to 1
      // Scale repulsion strength based on distance (stronger when closer)
      repulsionForce.mult(map(distanceToBall, 0, 100, 1.5, 0)); 
      p.applyForce(repulsionForce); // Apply the repulsion force
    }

    p.update(); // Update the particle's position and lifespan
    p.show();   // Display the particle

    // If the particle has "died" (lifespan is less than 0), remove it from the array
    if (p.isDead()) {
      particles.splice(i, 1);
    }
  }

  // --- Bouncing Ball Logic ---
  // Update the ball's position based on its speed
  ballX += xSpeed;
  ballY += ySpeed;
  
  // Check for bouncing off the left or right edges
  if (ballX - ballRadius < 0 || ballX + ballRadius > width) {
    xSpeed = -xSpeed; // Reverse the X speed
  }
  
  // Check for bouncing off the top or bottom edges
  if (ballY - ballRadius < 0 || ballY + ballRadius > height) {
    ySpeed = -ySpeed; // Reverse the Y speed
  }
  
  // Set the ball's color to white (as requested)
  fill(255); 
  noStroke(); // No outline for the ball
  
  // Draw the ball as an ellipse
  ellipse(ballX, ballY, ballRadius * 2, ballRadius * 2);

  // --- Drawing Logic ---
  // If the mouse is pressed, draw a line onto the permanent drawing layer
  if (mouseIsPressed) {
    // drawingLayer.stroke(255); // Already set in setup(), but can be overridden here if needed
    // drawingLayer.strokeWeight(4); // Already set in setup()
    drawingLayer.line(pmouseX, pmouseY, mouseX, mouseY); // Draw the line on the drawing layer
  }

  // --- Pinwheels Logic ---
  // Draw all four pinwheels
  drawPinwheel(pinwheel1X, pinwheel1Y, pinwheelSize);
  drawPinwheel(pinwheel2X, pinwheel2Y, pinwheelSize);
  drawPinwheel(pinwheel3X, pinwheel3Y, pinwheelSize);
  drawPinwheel(pinwheel4X, pinwheel4Y, pinwheelSize);

  // --- Button Click Counter Logic ---
  fill(255); // White text color
  noStroke();
  textSize(24); // Larger text size for visibility
  textAlign(CENTER, CENTER); // Center the text
  text('Clicks: ' + clickCount, width / 2, height / 2 + 50); // Display the counter below the button
}
Line-by-line explanation (27 lines)

🔧 Subcomponents:

for-loop Spawn particles at mouse position for (let i = 0; i < newParticlesPerFrame; i++) {

Adds new particles at the current mouse coordinates each frame, up to the maximum limit

for-loop Update and render all particles for (let i = particles.length - 1; i >= 0; i--) {

Loops through every particle in reverse order, applies forces, updates position, renders it, and removes dead particles

calculation Calculate attraction to mouse let attractionForce = p5.Vector.sub(mousePos, p.pos);

Creates a vector pointing from the particle toward the mouse, which pulls particles into the swirling cloud

conditional Calculate repulsion from ball if (distanceToBall < 100) {

Checks if particles are close enough to the ball and applies a repulsive force if so, creating a visible 'push' effect

conditional Horizontal edge bounce if (ballX - ballRadius < 0 || ballX + ballRadius > width) {

Detects when the ball hits left or right edges and reverses its horizontal direction

conditional Vertical edge bounce if (ballY - ballRadius < 0 || ballY + ballRadius > height) {

Detects when the ball hits top or bottom edges and reverses its vertical direction

conditional Handle permanent drawing if (mouseIsPressed) {

Detects mouse drags and draws white lines onto the persistent drawing layer

image(drawingLayer, 0, 0);
Renders the permanent drawing layer (all the lines you've drawn) onto the main canvas at the top-left corner
background(0, 20);
Draws a semi-transparent black background (alpha = 20) that darkens the previous frame, creating fading trails while preserving the permanent lines
for (let i = 0; i < newParticlesPerFrame; i++) {
Loops 4 times per frame to spawn new particles at the mouse position
if (particles.length < maxParticles) {
Only adds a new particle if the total count is below 800, preventing memory overload
particles.push(new Particle(mouseX, mouseY));
Creates a fresh Particle object at the current mouse coordinates and adds it to the array
for (let i = particles.length - 1; i >= 0; i--) {
Loops through the particles array backwards, which is essential when removing items during iteration to avoid skipping particles
let mousePos = createVector(mouseX, mouseY);
Converts the mouse's current x and y coordinates into a vector so we can perform vector math on it
let attractionForce = p5.Vector.sub(mousePos, p.pos);
Subtracts the particle's position from the mouse position to create a vector pointing from the particle toward the mouse
attractionForce.setMag(0.2);
Sets the magnitude (length) of the attraction vector to 0.2, controlling how strongly particles are pulled toward the mouse
p.applyForce(attractionForce);
Applies this vector as a force to the particle's acceleration, which will gradually speed it toward the mouse
let distanceToBall = p5.Vector.dist(p.pos, ballPos);
Calculates the straight-line distance in pixels from the particle to the ball's center
if (distanceToBall < 100) {
Checks whether the particle is within 100 pixels of the ball—if so, it applies a repulsion force
let repulsionForce = p5.Vector.sub(p.pos, ballPos);
Subtracts the ball's position from the particle's position to create a vector pointing from the ball toward the particle
repulsionForce.normalize();
Shortens the vector to a length of 1 pixel so we can control its exact strength independently of distance
repulsionForce.mult(map(distanceToBall, 0, 100, 1.5, 0));
Multiplies the repulsion by a value that starts at 1.5 when the particle is very close (distance = 0) and decreases to 0 as the particle moves away (distance = 100), making the push stronger for nearby particles
ballX += xSpeed;
Moves the ball horizontally by adding its current speed (5 or -5) to its x position
ballY += ySpeed;
Moves the ball vertically by adding its current speed (4 or -4) to its y position
if (ballX - ballRadius < 0 || ballX + ballRadius > width) {
Checks if the ball's left edge (ballX - 20) is past the left side OR the right edge (ballX + 20) is past the right side of the canvas
xSpeed = -xSpeed;
Flips the horizontal speed sign from positive to negative or vice versa, making the ball bounce back horizontally
if (ballY - ballRadius < 0 || ballY + ballRadius > height) {
Checks if the ball's top edge (ballY - 20) is above the top OR the bottom edge (ballY + 20) is below the canvas
ySpeed = -ySpeed;
Flips the vertical speed sign, making the ball bounce back vertically
fill(255);
Sets the fill color to white (255) for the next shape drawn
ellipse(ballX, ballY, ballRadius * 2, ballRadius * 2);
Draws a white circle (ellipse with equal width and height) at the ball's position with diameter 40 (ballRadius * 2)
if (mouseIsPressed) {
Checks whether the mouse button is currently held down
drawingLayer.line(pmouseX, pmouseY, mouseX, mouseY);
Draws a white line on the permanent drawing layer from the previous mouse position (pmouseX, pmouseY) to the current position, creating a smooth stroke when dragging
drawPinwheel(pinwheel1X, pinwheel1Y, pinwheelSize);
Calls the drawPinwheel function to render the first pinwheel at its fixed position
text('Clicks: ' + clickCount, width / 2, height / 2 + 50);
Displays the current click counter as text centered horizontally and positioned 50 pixels below the middle of the canvas

drawPinwheel()

drawPinwheel() demonstrates coordinate system transformations: push/pop to isolate changes, translate to reposition the origin, rotate to spin, and rectMode to control drawing behavior. This function is called four times per frame with different x, y coordinates to place pinwheels in all four corners.

🔬 This loop draws one arm, then rotates the entire coordinate system, then draws the next arm in the rotated position. What happens if you change TWO_PI / numArms to TWO_PI / (numArms * 2) so the arms overlap more densely, or to TWO_PI / (numArms / 2) so they are more spread out?

  for (let i = 0; i < numArms; i++) {
    rectMode(CENTER); // Draw rectangles from their center
    rect(armLength / 2, 0, armLength, armWidth); // Draw one arm
    rotate(TWO_PI / numArms); // Rotate for the next arm
  }
function drawPinwheel(x, y, size) {
  push(); // Isolate transformations so they don't affect other elements
  translate(x, y); // Move the origin to the pinwheel's center
  rotate(frameCount * pinwheelSpeed); // Rotate based on frameCount for continuous spin

  fill(255); // Pinwheel color is white (as requested for new additions)
  noStroke();
  
  // Draw radiating rectangles to form a pinwheel
  let armLength = size / 2;
  let armWidth = 10;
  let numArms = 8;
  
  for (let i = 0; i < numArms; i++) {
    rectMode(CENTER); // Draw rectangles from their center
    rect(armLength / 2, 0, armLength, armWidth); // Draw one arm
    rotate(TWO_PI / numArms); // Rotate for the next arm
  }
  
  pop(); // Restore previous transformations
}
Line-by-line explanation (13 lines)

🔧 Subcomponents:

for-loop Draw eight rotating arms for (let i = 0; i < numArms; i++) {

Draws 8 rectangles in a circle, rotating the coordinate system after each one to create a pinwheel pattern

push();
Saves the current coordinate system state so transformations inside this function don't affect other drawings
translate(x, y);
Moves the origin (0, 0) to the pinwheel's center position, so all shapes are drawn relative to that point
rotate(frameCount * pinwheelSpeed);
Rotates the entire coordinate system by an angle that increases every frame (frameCount increases by 1 each frame), creating continuous spin
fill(255);
Sets the fill color to white for all rectangles that follow
noStroke();
Turns off outlines so the rectangles have clean edges
let armLength = size / 2;
Calculates the length of each pinwheel arm as half the pinwheel size (40 pixels if size = 80)
let armWidth = 10;
Sets the width of each rectangular arm to 10 pixels
let numArms = 8;
Defines how many arms the pinwheel has—8 arms create an evenly spaced pattern
for (let i = 0; i < numArms; i++) {
Loops 8 times to draw each arm of the pinwheel
rectMode(CENTER);
Changes rectangle drawing mode so that rect() draws from the center point outward, rather than from the top-left
rect(armLength / 2, 0, armLength, armWidth);
Draws a rectangle at (armLength/2, 0)—offset to the right—with dimensions armLength × armWidth, creating one arm extending outward
rotate(TWO_PI / numArms);
Rotates the coordinate system by 45 degrees (TWO_PI / 8 radians = 360° / 8) so the next arm is positioned correctly
pop();
Restores the coordinate system to its previous state, undoing all transformations so they don't affect the rest of the sketch

buttonClicked()

buttonClicked() is a callback function attached to the button with myButton.mousePressed(buttonClicked) in setup(). Every time the button is clicked, p5.js automatically calls this function. It's a simple way to respond to user interaction.

function buttonClicked() {
  console.log('Button clicked!');
  clickCount++; // Increment the click counter
}
Line-by-line explanation (2 lines)
console.log('Button clicked!');
Prints a message to the browser console (F12 > Console tab) for debugging—helps verify the button is working
clickCount++;
Increments the clickCount variable by 1, so the click counter displayed on screen goes up each time the button is pressed

Particle class

The Particle class encapsulates the data and behavior of a single particle. In setup() and draw(), you create instances and call methods like applyForce(), update(), and show(). This object-oriented approach makes it easy to manage hundreds of particles—each one independently tracks its own position, velocity, forces, and lifespan.

🔬 This is the physics heartbeat: forces become acceleration, acceleration becomes velocity, velocity becomes position, then acceleration resets. What happens if you change this.vel.limit(6) to this.vel.limit(3) so particles slow down, or to this.vel.limit(15) so they zoom faster?

  update() {
    this.vel.add(this.acc); // Apply acceleration to velocity
    this.vel.limit(6);     // Slightly higher limit the particle's maximum speed
    this.pos.add(this.vel); // Apply velocity to position
    this.acc.mult(0);      // Reset acceleration for the next frame
    this.lifespan -= random(0.5, 1.5); // Slower lifespan decrease for longer trails
  }
class Particle {
  constructor(x, y) {
    this.pos = createVector(x, y); // Position vector
    this.vel = createVector(random(-1.5, 1.5), random(-1.5, 1.5)); // Slightly faster initial random velocity
    this.acc = createVector(0, 0); // Acceleration vector (used for applying forces)
    this.size = random(3, 10); // More varied random size
    this.color = color(255, 150); // Particles are now white with transparency
    this.lifespan = 255; // Initial lifespan (will decrease over time)
  }

  // Method to apply a force to the particle
  applyForce(force) {
    this.acc.add(force);
  }

  // Method to update the particle's state (position, velocity, lifespan)
  update() {
    this.vel.add(this.acc); // Apply acceleration to velocity
    this.vel.limit(6);     // Slightly higher limit the particle's maximum speed
    this.pos.add(this.vel); // Apply velocity to position
    this.acc.mult(0);      // Reset acceleration for the next frame
    this.lifespan -= random(0.5, 1.5); // Slower lifespan decrease for longer trails
  }

  // Method to display the particle on the canvas
  show() {
    noStroke(); // No outline for the particles
    fill(this.color, this.lifespan); // Fill with the particle's color and current lifespan (alpha)
    ellipse(this.pos.x, this.pos.y, this.size); // Draw the particle as an ellipse
  }

  // Method to check if the particle has "died" (lifespan < 0)
  isDead() {
    return this.lifespan < 0;
  }
}
Line-by-line explanation (21 lines)

🔧 Subcomponents:

constructor Initialize particle constructor(x, y) {

Creates a new particle object with position, velocity, size, color, and lifespan properties

calculation Update physics each frame this.vel.add(this.acc);

Applies acceleration to velocity, which is the core of physics-based movement

class Particle {
Declares a new class called Particle that groups related data and functions together
constructor(x, y) {
The constructor runs once when a new Particle is created (e.g., new Particle(100, 50)) and initializes all properties
this.pos = createVector(x, y);
Stores the particle's starting position as a p5.Vector with the x and y coordinates passed in
this.vel = createVector(random(-1.5, 1.5), random(-1.5, 1.5));
Creates a random starting velocity between -1.5 and 1.5 in both x and y directions, so particles don't all move in the same way
this.acc = createVector(0, 0);
Initializes acceleration to zero—this will be updated when forces are applied
this.size = random(3, 10);
Assigns a random diameter between 3 and 10 pixels so particles have visual variety
this.color = color(255, 150);
Sets the particle color to white (255) with alpha transparency of 150, making it semi-transparent
this.lifespan = 255;
Initializes lifespan to 255—this will decrease each frame until it reaches 0, at which point the particle dies
applyForce(force) {
Defines a method that adds a force vector to the particle's acceleration, enabling external forces (attraction, repulsion) to move it
this.acc.add(force);
Adds the incoming force vector to the acceleration vector, accumulating all forces for this frame
update() {
Defines the method that updates the particle's position and state each frame according to physics
this.vel.add(this.acc);
Applies acceleration to velocity (Newton's second law: a = F/m)—faster acceleration makes the particle move quicker
this.vel.limit(6);
Caps the particle's maximum speed at 6 pixels per frame, preventing it from moving too fast
this.pos.add(this.vel);
Adds the updated velocity to position, moving the particle across the canvas
this.acc.mult(0);
Resets acceleration to zero each frame so forces don't accumulate indefinitely—this is crucial for proper physics
this.lifespan -= random(0.5, 1.5);
Decreases the particle's lifespan by a random amount between 0.5 and 1.5 per frame, causing it to fade over time
show() {
Defines the method that renders the particle to the screen
fill(this.color, this.lifespan);
Fills the particle with white, using the remaining lifespan as the alpha (transparency) value—it gets more transparent as it dies
ellipse(this.pos.x, this.pos.y, this.size);
Draws the particle as a circle at its current position with its assigned size
isDead() {
Defines a method that checks whether the particle has finished its life
return this.lifespan < 0;
Returns true if lifespan has dropped below 0, signaling that this particle should be removed from the array

windowResized()

windowResized() is a built-in p5.js function that p5.js calls automatically whenever the browser window is resized. It's essential for making responsive sketches that adapt to any screen size. In this sketch, it recalculates positions for the ball, pinwheels, and button, and it recreates the drawing layer to match the new dimensions.

function windowResized() {
  resizeCanvas(windowWidth, windowHeight);
  // Optional: Reset ball position on resize if desired
  ballX = width / 2;
  ballY = height / 2;

  // Recalculate and reposition the pinwheels
  pinwheel1X = 100; // Top-left
  pinwheel1Y = 100;

  pinwheel2X = width - 100; // Top-right
  pinwheel2Y = 100;

  pinwheel3X = 100; // Bottom-left
  pinwheel3Y = height - 100;

  pinwheel4X = width - 100; // Bottom-right
  pinwheel4Y = height - 100;

  // Reposition the button in the middle on resize
  myButton.position(width / 2 - myButton.elt.offsetWidth / 2, height / 2 - myButton.elt.offsetHeight / 2);

  // Recreate the drawing layer with the new canvas size
  drawingLayer = createGraphics(width, height);
  drawingLayer.stroke(255); // Re-set drawing styles
  drawingLayer.strokeWeight(4);
}
Line-by-line explanation (9 lines)
resizeCanvas(windowWidth, windowHeight);
Resizes the canvas to match the new browser window dimensions whenever the user resizes their window
ballX = width / 2;
Resets the ball's x position to the center of the newly sized canvas
ballY = height / 2;
Resets the ball's y position to the center of the newly sized canvas
pinwheel1X = 100;
Keeps the first pinwheel 100 pixels from the left edge after resize
pinwheel2X = width - 100;
Repositions the second pinwheel 100 pixels from the right edge of the resized canvas
myButton.position(width / 2 - myButton.elt.offsetWidth / 2, height / 2 - myButton.elt.offsetHeight / 2);
Recalculates the button's position so it stays centered even after the window is resized
drawingLayer = createGraphics(width, height);
Creates a new graphics layer matching the new canvas size—note this clears previous drawings, which is a limitation of this implementation
drawingLayer.stroke(255);
Re-applies white stroke color to the new drawing layer
drawingLayer.strokeWeight(4);
Re-applies the stroke thickness of 4 pixels to the new drawing layer

📦 Key Variables

particles array

Stores all active Particle objects. Particles are added each frame at the mouse position and removed when their lifespan reaches zero.

let particles = [];
maxParticles number

The maximum number of particles allowed on screen at once. Prevents memory overload by capping how many particles can exist simultaneously.

let maxParticles = 800;
newParticlesPerFrame number

How many new particles to spawn at the mouse position each frame. Higher values create a thicker, more responsive particle cloud.

let newParticlesPerFrame = 4;
ballX number

The x-coordinate (horizontal position) of the bouncing ball center.

let ballX = 200;
ballY number

The y-coordinate (vertical position) of the bouncing ball center.

let ballY = 200;
ballRadius number

The radius of the bouncing ball in pixels. Used both for collision detection and drawing.

let ballRadius = 20;
xSpeed number

The ball's horizontal velocity—how many pixels it moves left or right each frame. Changes sign when bouncing off walls.

let xSpeed = 5;
ySpeed number

The ball's vertical velocity—how many pixels it moves up or down each frame. Changes sign when bouncing off walls.

let ySpeed = 4;
pinwheel1X number

X-coordinate of the first (top-left) pinwheel center.

let pinwheel1X = 100;
pinwheel1Y number

Y-coordinate of the first (top-left) pinwheel center.

let pinwheel1Y = 100;
pinwheel2X number

X-coordinate of the second (top-right) pinwheel center.

let pinwheel2X = width - 100;
pinwheel2Y number

Y-coordinate of the second (top-right) pinwheel center.

let pinwheel2Y = 100;
pinwheel3X number

X-coordinate of the third (bottom-left) pinwheel center.

let pinwheel3X = 100;
pinwheel3Y number

Y-coordinate of the third (bottom-left) pinwheel center.

let pinwheel3Y = height - 100;
pinwheel4X number

X-coordinate of the fourth (bottom-right) pinwheel center.

let pinwheel4X = width - 100;
pinwheel4Y number

Y-coordinate of the fourth (bottom-right) pinwheel center.

let pinwheel4Y = height - 100;
pinwheelSize number

The size of each pinwheel. Used to calculate arm length (size / 2) for drawing.

let pinwheelSize = 80;
pinwheelSpeed number

Rotation speed for the pinwheels. Multiplied by frameCount to control how fast they spin.

let pinwheelSpeed = 0.05;
myButton object

Reference to the interactive button created with createButton(). Stores the HTML element so we can position and style it.

let myButton = createButton('Click Me!');
clickCount number

Tracks how many times the button has been clicked. Incremented each time buttonClicked() is called.

let clickCount = 0;
drawingLayer p5.Graphics

A separate graphics context for storing permanent drawings. Lines drawn here persist across frames and are rendered on top of animated elements.

let drawingLayer = createGraphics(width, height);

🔧 Potential Improvements (6)

Here are some ways this code could be enhanced:

BUG windowResized()

Recreating the drawingLayer erases all permanent drawings when the window resizes. Users lose their artwork.

💡 Store the drawing layer's contents before resizing, or implement a backup system that preserves the pixel data and reapplies it to the new graphics context.

PERFORMANCE draw() particle iteration

Looping through particles backward and using splice() is O(n) for each deletion. With 800 particles, this can slow the sketch.

💡 Use a circular buffer or mark-and-sweep pattern: mark dead particles and filter the array once per frame instead of splicing during iteration.

STYLE draw()

Multiple similar calls to drawPinwheel() are repetitive. Four identical lines with different coordinates.

💡 Create an array of pinwheel positions and loop through them: let pinwheels = [[100, 100], [width-100, 100], ...]; then for (let p of pinwheels) drawPinwheel(p[0], p[1], pinwheelSize);

FEATURE drawingLayer

Users cannot clear their drawings. The only way is to refresh the page.

💡 Add a 'Clear' button that calls drawingLayer.clear() or drawingLayer.background(255, 0) depending on whether you want transparency or white.

BUG Ball collision detection

The ball can get stuck or jitter at edges if it moves faster than ballRadius per frame, as it may overshoot and flip multiple times.

💡 Use clamping instead of just flipping: ballX = constrain(ballX, ballRadius, width - ballRadius); Then check only if the ball crossed the boundary, not its entire bounding box.

STYLE Particle class constructor

Initial velocity is randomized but not relative to the mouse or any force, making the behavior less predictable.

💡 Initialize velocity toward the mouse or in the direction away from it for more cohesive behavior: this.vel = p5.Vector.random2D().mult(0.5);

🔄 Code Flow

Code flow showing setup, draw, drawpinwheel, buttonclicked, particle, windowresized

💡 Click on function names in the diagram to jump to their code

graph TD start[Start] --> setup[setup] setup --> draw[draw loop] draw --> initialparticlesloop[initial-particles-loop] draw --> spawnparticlesloop[spawn-particles-loop] draw --> particleiterationloop[particle-iteration-loop] draw --> drawinginput[drawing-input] draw --> drawpinwheel[drawPinwheel] draw --> ballbouncex[ball-bounce-x] draw --> ballbouncey[ball-bounce-y] initialparticlesloop -->|Spawn 200 particles| particleconstructor[particle-constructor] spawnparticlesloop -->|Add particles at mouse position| particleconstructor particleiterationloop -->|Update and render particles| particleupdate[particle-update-method] particleiterationloop -->|Check for dead particles| particleiterationloop particleupdate -->|Apply forces| attractionforce[attraction-force] particleupdate -->|Check for repulsion| repulsionforce[repulsion-force] ballbouncex -->|Reverse direction| ballbouncex ballbouncey -->|Reverse direction| ballbouncey drawpinwheel --> pinwheelpositionassignment[pinwheel-position-assignment] drawpinwheel --> pinwheelarmloop[pinwheel-arm-loop] pinwheelpositionassignment -->|Position pinwheels| pinwheelpositionassignment buttoncentering[button-centering] -->|Center button on canvas| buttoncentering click setup href "#fn-setup" click draw href "#fn-draw" click initialparticlesloop href "#sub-initial-particles-loop" click spawnparticlesloop href "#sub-spawn-particles-loop" click particleiterationloop href "#sub-particle-iteration-loop" click drawinginput href "#sub-drawing-input" click drawpinwheel href "#fn-drawpinwheel" click ballbouncex href "#sub-ball-bounce-x" click ballbouncey href "#sub-ball-bounce-y" click attractionforce href "#sub-attraction-force" click repulsionforce href "#sub-repulsion-force" click pinwheelpositionassignment href "#sub-pinwheel-position-assignment" click pinwheelarmloop href "#sub-pinwheel-arm-loop" click particleconstructor href "#sub-particle-constructor" click particleupdate href "#sub-particle-update-method"

❓ Frequently Asked Questions

What visual experience does the 'stimulation final boss' sketch offer?

The sketch creates a dynamic visual experience with swirling particles that follow the mouse, a bouncing ball, and spinning pinwheels anchored at the corners of the screen.

How can users interact with the 'stimulation final boss' creative coding sketch?

Users can interact by clicking and dragging to draw glowing white lines on the canvas, and by tapping a central button to trigger additional interactions.

What creative coding techniques are demonstrated in this p5.js sketch?

This sketch showcases particle systems, mouse tracking, independent object movement, and permanent drawing on the canvas.

Preview

stimulation final boss - p5.js creative coding sketch preview
Sketch Preview
Code flow diagram showing the structure of stimulation final boss - Code flow showing setup, draw, drawpinwheel, buttonclicked, particle, windowresized
Code Flow Diagram