The best snake game (Remix)

This sketch builds a complete Snake game with a canvas-drawn menu system, an unlockable outfit/skin system tied to your score, a lives mechanic that gives you a second chance before Game Over, and a hidden DOM-based admin panel for live debugging. A finite state machine switches between the Menu, Outfits, Gameplay, and Game Over screens, all rendered on a single p5.js canvas.

🧪 Try This!

Experiment with the code by making these changes:

  1. Speed up the snake from the start — Increasing the initial frame rate makes the snake dart around the grid much faster the moment a new game begins.
  2. Award more points per food — Bumping up the score per food eaten makes the score climb faster and unlocks outfits much sooner.
  3. Recolor the food — The food's fill color is set right before it's drawn as a square - change the RGB values for an instantly different look.
Prefer the full editor? Open it there →

📖 About This Sketch

This sketch turns the classic Snake game into a small game engine: a menu screen, a paginated outfit-selection screen, the gameplay itself, and a game-over screen are all drawn on the same canvas and swapped using a state machine. Along the way it demonstrates grid-based movement with an array-backed tail, collision detection against walls and the snake's own body, score-driven unlocks saved to localStorage, and a mixed canvas + DOM interface where a real HTML sidebar (the admin panel) lets you tweak speed, score, and lives while the game runs.

The code is organized around one gameState variable that draw() reads every frame to decide which drawX() function to call, mirrored by matching handleXClicks() and keyPressed() logic for input. Two ES6 classes, Snake and Food, hold all the gameplay data and behavior, while a cluster of admin-panel functions build and wire up p5.js DOM elements outside the canvas. Studying this sketch teaches you how to structure a multi-screen game, how to fake button clicks with simple rectangle hit-testing, and how canvas-based games can still talk to real HTML UI.

⚙️ How It Works

  1. When the sketch loads, setup() creates the canvas, builds the hidden admin panel, loads any previously unlocked outfits from localStorage, creates the Snake and Food objects, and sets the frame rate to 10 (the snake's initial speed) while starting gameState at MENU.
  2. Every frame, draw() clears the background and then calls exactly one of drawMenu(), drawOutfitsMenu(), drawGameplay(), or drawGameOver() depending on the current gameState, so only one screen is ever visible at a time.
  3. Clicking the canvas triggers mousePressed(), which forwards the click to handleMenuClicks(), handleOutfitsMenuClicks(), or handleGameOverClicks() based on the state; each of these checks the mouse position against hand-coded rectangle coordinates to detect 'button' presses and changes gameState or currentOutfitIndex accordingly.
  4. During GAMEPLAY, keyPressed() changes the snake's direction, snake.update() shifts its position and grows its tail, snake.checkDeath() tests for wall or self collisions (decrementing lives on a hit), and snake.eat() checks whether the head reached the food, increasing score and triggering checkOutfitUnlocks().
  5. checkOutfitUnlocks() compares the score against each outfit's unlockScore and flips outfits to unlocked, saving the unlocked list to localStorage so skins stay unlocked between visits.
  6. The gear icon toggles the hidden DOM admin panel via toggleAdminPanel(), which resizes the canvas to make room for the panel and lets you drag a speed slider or type in new score/lives/position values that directly overwrite the game's global variables.

🎓 Concepts You'll Learn

Finite state machine for screen managementGrid-based movement with an array tailCollision detection (walls and self)Score-driven unlock system with localStorage persistenceCanvas-drawn UI with manual rectangle hit-testingMixed canvas + DOM interface (admin panel)ES6 classes for game objects (Snake, Food)

📝 Code Breakdown

loadUnlockedOutfits()

This function runs once in setup() to restore progress between browser sessions. localStorage only stores strings, which is why the array of names is serialized with JSON.stringify() when saving and parsed back with JSON.parse() when loading.

function loadUnlockedOutfits() {
  let unlockedData = localStorage.getItem('snakeGameOutfits');
  if (unlockedData) {
    let unlockedNames = JSON.parse(unlockedData);
    for (let outfit of outfits) {
      if (unlockedNames.includes(outfit.name)) {
        outfit.unlocked = true;
      }
    }
  }
}
Line-by-line explanation (5 lines)

🔧 Subcomponents:

for-loop Mark Saved Outfits Unlocked for (let outfit of outfits) {

Goes through every outfit and flips unlocked to true if its name was saved in localStorage

let unlockedData = localStorage.getItem('snakeGameOutfits');
Reads a saved string from the browser's localStorage, or null if nothing was saved before
if (unlockedData) {
Only continue if there is actually saved data (first-time players will have null here)
let unlockedNames = JSON.parse(unlockedData);
Converts the saved JSON string back into a real JavaScript array of outfit names
if (unlockedNames.includes(outfit.name)) {
Checks whether this outfit's name is in the saved list of unlocked names
outfit.unlocked = true;
Marks the outfit object as unlocked so the outfits menu shows it as available
saveUnlockedOutfits()

filter() and map() are chained here to transform the full outfits array into just the small piece of data worth saving. This is called every time a new outfit is unlocked, inside checkOutfitUnlocks().

function saveUnlockedOutfits() {
  let unlockedNames = outfits.filter(o => o.unlocked).map(o => o.name);
  localStorage.setItem('snakeGameOutfits', JSON.stringify(unlockedNames));
}
Line-by-line explanation (2 lines)
let unlockedNames = outfits.filter(o => o.unlocked).map(o => o.name);
Builds a plain array of names, keeping only outfits whose unlocked flag is true, then extracting just their name field
localStorage.setItem('snakeGameOutfits', JSON.stringify(unlockedNames));
Turns that array into a JSON string and saves it in the browser so it persists after the page is closed

setup()

setup() runs once when the sketch starts and is the place to create the canvas, initialize objects, and load any saved data before the draw loop begins.

function setup() {
  // Create the canvas initially with full width, as the panel starts minimized
  // The canvas height is 85% of window height and it's centered vertically.
  gameCanvas = createCanvas(windowWidth, windowHeight * 0.85);
  gameCanvas.position(0, (windowHeight - gameCanvas.height) / 2);

  // Create the admin panel container and its controls
  createAdminPanel();

  // Load unlocked outfits
  loadUnlockedOutfits();
  // Ensure the currentOutfitIndex is for an unlocked outfit, or default
  if (!outfits[currentOutfitIndex].unlocked) {
    currentOutfitIndex = outfits.findIndex(o => o.unlocked) || 0;
  }

  // Initialize the snake and food (will be reset when game starts)
  snake = new Snake();
  food = new Food();
  food.pickLocation();

  // Set the frame rate to control the snake's speed
  // A higher frame rate means a faster snake
  frameRate(10); // Snake moves 10 times per second
  
  // Hide admin panel toggle icon initially in menu states
  adminPanelToggle.hide();

  // Removed: userStartAudio() call
}
Line-by-line explanation (10 lines)

🔧 Subcomponents:

conditional Fallback Outfit Selection if (!outfits[currentOutfitIndex].unlocked) {

Makes sure the starting outfit is actually unlocked, falling back to another unlocked one if not

gameCanvas = createCanvas(windowWidth, windowHeight * 0.85);
Creates the drawing surface sized to the browser window, using only 85% of the height to leave room at top/bottom
gameCanvas.position(0, (windowHeight - gameCanvas.height) / 2);
Moves the canvas element on the page so it is vertically centered in the window
createAdminPanel();
Builds the hidden HTML sidebar with sliders, inputs, and buttons for debugging
loadUnlockedOutfits();
Restores any outfits the player unlocked in a previous session
currentOutfitIndex = outfits.findIndex(o => o.unlocked) || 0;
If the previously selected outfit isn't unlocked, pick the index of the first unlocked outfit instead
snake = new Snake();
Creates a fresh Snake object using the class defined later in the file
food = new Food();
Creates the Food object that will track where the next piece of food is
food.pickLocation();
Immediately gives the food a random starting grid position
frameRate(10); // Snake moves 10 times per second
Sets how many times per second draw() runs - since the snake moves one grid step per draw() call, this controls its speed
adminPanelToggle.hide();
Hides the gear icon button so it's not visible while sitting in the menu

draw()

This is the heart of the state machine pattern: instead of many booleans like inMenu/inGame/isGameOver, one gameState string decides everything, making it easy to add new screens later.

function draw() {
  // Clear the canvas
  background(220);

  // Render different screens based on the current game state
  switch (gameState) {
    case GAME_STATES.MENU:
      drawMenu();
      break;
    case GAME_STATES.OUTFITS_MENU:
      drawOutfitsMenu();
      break;
    case GAME_STATES.GAMEPLAY:
      drawGameplay();
      break;
    case GAME_STATES.GAMEOVER:
      drawGameOver();
      break;
  }
}
Line-by-line explanation (4 lines)

🔧 Subcomponents:

switch-case Screen Router switch (gameState) {

Calls exactly one draw function depending on which screen the player is currently on

background(220);
Clears the entire canvas to light grey every frame, erasing whatever was drawn last frame
switch (gameState) {
Checks the single gameState variable to decide which screen-drawing function to run this frame
case GAME_STATES.MENU:
If the game is on the main menu, run drawMenu() and stop checking other cases (break)
case GAME_STATES.GAMEPLAY:
If the game is actively being played, run drawGameplay() which handles the snake, food, and score

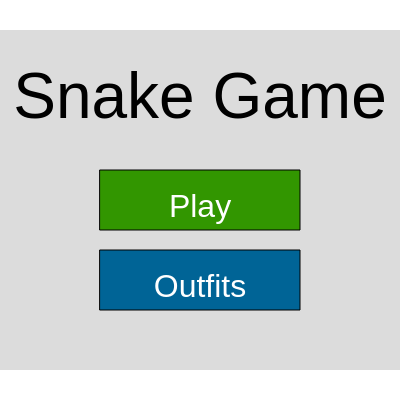
drawMenu()

This function only draws pixels - it never listens for clicks itself. The matching handleMenuClicks() function recalculates the exact same button coordinates to test whether the mouse landed inside them, so the two functions must always agree on positions and sizes.

function drawMenu() {
  // Show game canvas and admin toggle
  gameCanvas.show();
  adminPanelToggle.hide(); // Hide toggle in menu

  textAlign(CENTER, CENTER);
  fill(0);
  textSize(64);
  text("Snake Game", width / 2, height / 2 - 100);

  // Play Button
  let playButtonX = width / 2;
  let playButtonY = height / 2;
  let buttonWidth = 200;
  let buttonHeight = 60;
  rectMode(CENTER); // Center rectangles for easier positioning
  fill(50, 150, 0); // Green
  rect(playButtonX, playButtonY, buttonWidth, buttonHeight); // Removed rounded corner argument
  fill(255);
  textSize(32);
  text("Play", playButtonX, playButtonY + 8);

  // Outfits Button
  let outfitsButtonY = playButtonY + buttonHeight + 20;
  fill(0, 100, 150); // Blue
  rect(playButtonX, outfitsButtonY, buttonWidth, buttonHeight); // Removed rounded corner argument
  fill(255);
  textSize(32);
  text("Outfits", playButtonX, outfitsButtonY + 8);
  rectMode(CORNER); // Reset rectMode

  // Instructions
  fill(0);
  textSize(18);
  text("Click to interact", width / 2, height / 2 + 180);
}
Line-by-line explanation (6 lines)
textAlign(CENTER, CENTER);
Makes text() draw centered both horizontally and vertically around the given x,y point
text("Snake Game", width / 2, height / 2 - 100);
Draws the title above the buttons, positioned relative to the canvas center so it works at any window size
rectMode(CENTER);
Changes how rect() interprets its x,y arguments - as the center of the rectangle instead of the corner - which makes centering buttons much easier
rect(playButtonX, playButtonY, buttonWidth, buttonHeight);
Draws the green Play button rectangle at the calculated center position
let outfitsButtonY = playButtonY + buttonHeight + 20;
Positions the Outfits button just below the Play button with a 20 pixel gap
rectMode(CORNER);
Resets rectMode back to the default so other drawing functions aren't affected by this setting

drawOutfitsMenu()

This function recalculates layout values (startY, itemHeight, button positions) every single frame from scratch rather than storing them, which keeps the code simple but means handleOutfitsMenuClicks() must repeat the exact same math to correctly detect clicks.

🔬 This shows green 'UNLOCKED' text and blue 'CURRENT' text. What happens if you swap the two fill() colors so unlocked outfits show blue and the current one shows green?

    if (isUnlocked) {
      fill(0, 150, 0); // Green
      text("UNLOCKED", width / 2 - 60, itemY + itemHeight / 2 + 10);
      if (isCurrent) {
        fill(0, 0, 150); // Blue for current
        text("CURRENT", width / 2 + 30, itemY + itemHeight / 2 + 10);
      }
function drawOutfitsMenu() {
  // Show game canvas and admin toggle
  gameCanvas.show();
  adminPanelToggle.hide(); // Hide toggle in outfits menu

  textAlign(CENTER, CENTER);
  fill(0);
  textSize(48);
  text("Choose Your Snake!", width / 2, height / 2 - 200);

  let outfitsPerPage = 4;
  let startY = height / 2 - 100;
  let itemHeight = 100;
  let itemSpacing = 20;
  let totalOutfits = outfits.length;
  let maxPage = floor((totalOutfits - 1) / outfitsPerPage);

  // Ensure current page is valid
  outfitsMenuPage = constrain(outfitsMenuPage, 0, maxPage);

  let startIndex = outfitsMenuPage * outfitsPerPage;
  let endIndex = min(startIndex + outfitsPerPage, totalOutfits);

  // Draw outfits for the current page
  for (let i = startIndex; i < endIndex; i++) {
    let outfit = outfits[i];
    let isCurrent = (i === currentOutfitIndex);
    let isUnlocked = outfit.unlocked;

    // Calculate position relative to the current page
    let pageIndex = i - startIndex;
    let itemY = startY + pageIndex * (itemHeight + itemSpacing);

    // Draw background for the outfit item
    fill(240);
    rect(width / 2 - 150, itemY, 300, itemHeight); // Removed rounded corner argument

    // Draw snake preview
    noStroke();
    fill(outfit.bodyColor);
    ellipse(width / 2 - 110, itemY + itemHeight / 2, scl * 2);
    fill(outfit.headColor);
    ellipse(width / 2 - 110 + scl, itemY + itemHeight / 2, scl * 1.5);

    // Display outfit name
    fill(0);
    textAlign(LEFT, CENTER);
    textSize(24);
    text(outfit.name, width / 2 - 60, itemY + itemHeight / 2 - 20);

    // Display status/unlock requirement
    textAlign(LEFT, TOP);
    textSize(16);
    if (isUnlocked) {
      fill(0, 150, 0); // Green
      text("UNLOCKED", width / 2 - 60, itemY + itemHeight / 2 + 10);
      if (isCurrent) {
        fill(0, 0, 150); // Blue for current
        text("CURRENT", width / 2 + 30, itemY + itemHeight / 2 + 10);
      }
    } else {
      fill(150, 0, 0); // Red
      text("Locked (Score " + outfit.unlockScore + ")", width / 2 - 60, itemY + itemHeight / 2 + 10);
    }

    // Draw Select Button
    if (isUnlocked && !isCurrent) {
      let selectButtonX = width / 2 + 80;
      let selectButtonY = itemY + itemHeight / 2;
      let selectButtonWidth = 80;
      let selectButtonHeight = 40;
      rectMode(CENTER); // Center rectangles for easier positioning
      fill(0, 100, 150); // Blue
      rect(selectButtonX, selectButtonY, selectButtonWidth, selectButtonHeight); // Removed rounded corner argument
      fill(255);
      textSize(20);
      textAlign(CENTER, CENTER);
      text("Select", selectButtonX, selectButtonY + 5);
      rectMode(CORNER); // Reset rectMode
    }
  }

  // Back Button - Fixed position at the bottom
  let backButtonX = width / 2;
  let backButtonY = height - 50; // 50 pixels from the bottom
  let buttonWidth = 150;
  let buttonHeight = 50;
  rectMode(CENTER); // Center rectangles for easier positioning
  fill(120); // Darker grey for better visibility
  rect(backButtonX, backButtonY, buttonWidth, buttonHeight); // Removed rounded corner argument
  fill(0);
  textSize(24);
  textAlign(CENTER, CENTER);
  text("Go back to Lobby", backButtonX, backButtonY + 6);
  rectMode(CORNER); // Reset rectMode

  // Pagination Arrows
  if (totalOutfits > outfitsPerPage) {
    let arrowSize = 30;
    let arrowOffset = 200;

    // Previous Page Arrow
    if (outfitsMenuPage > 0) {
      rectMode(CENTER);
      fill(100);
      rect(width / 2 - arrowOffset, backButtonY, arrowSize, arrowSize); // Removed rounded corner argument
      fill(255);
      text("<", width / 2 - arrowOffset, backButtonY + 5);
      rectMode(CORNER);
    }

    // Next Page Arrow
    if (outfitsMenuPage < maxPage) {
      rectMode(CENTER);
      fill(100);
      rect(width / 2 + arrowOffset, backButtonY, arrowSize, arrowSize); // Removed rounded corner argument
      fill(255);
      text(">", width / 2 + arrowOffset, backButtonY + 5);
      rectMode(CORNER);
    }
  }
}
Line-by-line explanation (6 lines)

🔧 Subcomponents:

for-loop Draw Outfits On Current Page for (let i = startIndex; i < endIndex; i++) {

Draws a preview card, name, lock status, and Select button for each outfit visible on the current page

conditional Unlocked vs Locked Display if (isUnlocked) {

Shows 'UNLOCKED'/'CURRENT' in green/blue for available outfits, or a red 'Locked' message with the required score otherwise

conditional Pagination Arrows if (totalOutfits > outfitsPerPage) {

Only draws next/previous page arrows when there are more outfits than fit on one page

let outfitsPerPage = 4;
Sets how many outfit cards are shown at once before pagination kicks in
let maxPage = floor((totalOutfits - 1) / outfitsPerPage);
Calculates the index of the last page based on how many outfits exist
outfitsMenuPage = constrain(outfitsMenuPage, 0, maxPage);
Clamps the page number so it can never go below 0 or past the last real page
let itemY = startY + pageIndex * (itemHeight + itemSpacing);
Stacks each outfit card vertically, spacing them by their height plus a gap
fill(outfit.bodyColor);
Uses the outfit object's stored RGB array directly as the fill color for the body preview
if (isUnlocked && !isCurrent) {
Only draws a clickable Select button if the outfit is unlocked but not already the one in use

drawGameplay()

This function is the core game loop logic, run once per frame only while gameState is GAMEPLAY. Notice how it mixes canvas drawing (text, snake.show()) with game logic (collision checks, score updates) in one place - a common pattern in small p5.js games.

🔬 The game only truly ends when lives < 0. What happens if you change that to lives < 2, ending the game one attempt earlier?

  if (snake.checkDeath()) {
    // If lives drop below 0, it's a true game over
    if (lives < 0) {
      gameOver = true;
      gameState = GAME_STATES.GAMEOVER;
    } else {
function drawGameplay() {
  // Show game canvas and admin toggle
  gameCanvas.show();
  adminPanelToggle.show();

  // Display the current score on canvas
  textSize(24);
  fill(0);
  textAlign(LEFT, TOP);
  text("Score: " + score, 10, 30);

  // Display lives
  textAlign(RIGHT, TOP);
  text("Lives: " + max(0, lives), width - 10, 30); // max(0, lives) ensures it doesn't show negative lives

  // Update speed display on admin panel less frequently
  if (adminPanelExpanded) {
    frameCountForSpeedDisplay++;
    if (frameCountForSpeedDisplay % speedDisplayUpdateInterval === 0) {
      select('#speed-display').html(frameRate().toFixed(0) + ' fps');
      frameCountForSpeedDisplay = 0;
    }
  }

  // Check if the snake has died
  if (snake.checkDeath()) {
    // If lives drop below 0, it's a true game over
    if (lives < 0) {
      gameOver = true;
      gameState = GAME_STATES.GAMEOVER;
    } else {
      // Otherwise, reset snake and food for the next "try"
      snake = new Snake();
      food.pickLocation();
      frameRate(10); // Reset speed
      if (adminPanelExpanded) {
        select('#speed-slider').value(10);
      }
    }
    return; // NEW: Return immediately after a death and reset to prevent flickering
  }

  // Update and show the snake
  snake.update();
  snake.show();

  // Check if the snake eats the food
  if (snake.eat(food.pos)) {
    score += 10;
    food.pickLocation();
    checkOutfitUnlocks();
    // New: Play collect sound (only if collectSound exists and is loaded)
    // if (collectSound && collectSound.isLoaded()) {
    //   collectSound.play();
    // }
  }

  // Show the food
  food.show();

  // Add a small instruction text for controls on canvas
  textSize(16);
  fill(0, 100, 0);
  textAlign(LEFT, BOTTOM);
  text("Controls: Arrow Keys (Up, Down, Left, Right)", 10, height - 10);
}
Line-by-line explanation (10 lines)

🔧 Subcomponents:

conditional Throttled Speed Readout if (frameCountForSpeedDisplay % speedDisplayUpdateInterval === 0) {

Only updates the admin panel's fps text every 30 frames instead of every frame, saving unnecessary DOM writes

conditional Death and Life Loss Handling if (snake.checkDeath()) {

Ends the game if lives are exhausted, otherwise resets the snake and food for another attempt

conditional Food Eaten Handling if (snake.eat(food.pos)) {

Increases score, respawns food, and checks for new outfit unlocks whenever the snake reaches the food

text("Score: " + score, 10, 30);
Draws the current score in the top-left corner of the canvas
text("Lives: " + max(0, lives), width - 10, 30);
Draws remaining lives in the top-right corner, using max() to avoid ever showing a negative number
if (snake.checkDeath()) {
Calls the Snake's own collision check; returns true if it hit a wall or itself this frame
if (lives < 0) {
checkDeath() already decremented lives, so this checks whether all extra chances have run out
snake = new Snake();
Replaces the snake with a brand new one (empty tail, starting position) so the player can try again
return; // NEW: Return immediately after a death and reset to prevent flickering
Skips the rest of this frame's drawing so a dead/reset snake isn't shown mid-transition
snake.update();
Moves the snake forward one grid cell and updates its tail array
if (snake.eat(food.pos)) {
Checks if the snake's head is exactly on the food's grid position
score += 10;
Awards 10 points for each food eaten
checkOutfitUnlocks();
Re-checks whether the new score total has unlocked any additional snake outfits

drawGameOver()

Like the other menu-drawing functions, this only renders pixels - handleGameOverClicks() independently checks the mouse against the same button coordinates to detect the click.

function drawGameOver() {
  // Show game canvas and admin toggle
  gameCanvas.show();
  adminPanelToggle.hide(); // Hide toggle in Game Over menu

  textAlign(CENTER, CENTER);
  fill(255, 0, 0);
  textSize(64);
  text("Return back to menu", width / 2, height / 2 - 40);
  fill(0);
  textSize(24);
  // Removed "Press any key" as button is primary interaction

  // Return to Menu Button
  let returnButtonX = width / 2;
  let returnButtonY = height / 2 + 60;
  let buttonWidth = 200;
  let buttonHeight = 60;
  rectMode(CENTER);
  fill(120); // Darker grey for better visibility
  rect(returnButtonX, returnButtonY, buttonWidth, buttonHeight); // Removed rounded corner argument
  fill(0);
  textSize(24);
  text("Return to Menu", returnButtonX, returnButtonY + 6);
  rectMode(CORNER);
}
Line-by-line explanation (3 lines)
fill(255, 0, 0);
Sets the large heading text to red to signal the game has ended
text("Return back to menu", width / 2, height / 2 - 40);
Draws the Game Over headline centered above the button
rect(returnButtonX, returnButtonY, buttonWidth, buttonHeight);
Draws the grey 'Return to Menu' button using rectMode(CENTER) for easy centering

keyPressed()

p5.js automatically calls keyPressed() whenever any key is pressed, and keyCode tells you exactly which one. The UP_ARROW, DOWN_ARROW, etc. are built-in p5.js constants for the arrow keys.

🔬 The `if (snake.yspeed !== 1)` guard stops the snake reversing directly into itself. What happens if you remove these guards so any arrow key works instantly, even when it means reversing?

  switch (keyCode) {
    case UP_ARROW:
      if (snake.yspeed !== 1) snake.setDir(0, -1);
      break;
    case DOWN_ARROW:
      if (snake.yspeed !== -1) snake.setDir(0, 1);
      break;
function keyPressed() {
  if (gameState === GAME_STATES.GAMEOVER) {
    // Pressing any key in Game Over state also returns to menu
    gameState = GAME_STATES.MENU;
    return;
  }
  if (gameState !== GAME_STATES.GAMEPLAY) {
    return; // Only process game controls in GAMEPLAY state
  }

  // Change snake's direction based on arrow keys
  switch (keyCode) {
    case UP_ARROW:
      if (snake.yspeed !== 1) snake.setDir(0, -1);
      break;
    case DOWN_ARROW:
      if (snake.yspeed !== -1) snake.setDir(0, 1);
      break;
    case RIGHT_ARROW:
      if (snake.xspeed !== -1) snake.setDir(1, 0);
      break;
    case LEFT_ARROW:
      if (snake.xspeed !== 1) snake.setDir(-1, 0);
      break;
  }
}
Line-by-line explanation (4 lines)

🔧 Subcomponents:

switch-case Direction Switch switch (keyCode) {

Maps each arrow key to a direction change, but only if it isn't the exact opposite of the current direction

if (gameState === GAME_STATES.GAMEOVER) {
Lets any keypress on the Game Over screen return the player to the main menu
if (gameState !== GAME_STATES.GAMEPLAY) {
Ignores arrow key presses entirely unless the player is actively in a game
if (snake.yspeed !== 1) snake.setDir(0, -1);
Only lets the snake turn upward if it isn't currently moving downward, preventing an instant reverse into its own neck
snake.setDir(1, 0);
Sets the snake's horizontal speed to move right by writing directly into its xspeed/yspeed properties

mousePressed()

p5.js calls mousePressed() automatically on every mouse click. Notice there's no case for GAMEPLAY - clicking during gameplay intentionally does nothing since the snake is controlled by the keyboard.

function mousePressed() {
  if (gameState === GAME_STATES.MENU) {
    handleMenuClicks();
  } else if (gameState === GAME_STATES.OUTFITS_MENU) {
    handleOutfitsMenuClicks();
  } else if (gameState === GAME_STATES.GAMEOVER) {
    handleGameOverClicks();
  }
}
Line-by-line explanation (2 lines)

🔧 Subcomponents:

conditional Click Router if (gameState === GAME_STATES.MENU) {

Forwards the click to whichever handler function matches the currently active screen

if (gameState === GAME_STATES.MENU) {
Checks whether the player is on the main menu before running its click handler
handleMenuClicks();
Delegates the actual button hit-testing to a dedicated function, keeping mousePressed() short and readable

handleMenuClicks()

This is a manual re-implementation of button click detection using nothing but mouseX, mouseY, and rectangle math - the same bounding-box coordinates used when the buttons were drawn in drawMenu() must match exactly here.

function handleMenuClicks() {
  let playButtonX = width / 2;
  let playButtonY = height / 2;
  let buttonWidth = 200;
  let buttonHeight = 60;

  // Check Play button
  if (mouseX > playButtonX - buttonWidth / 2 && mouseX < playButtonX + buttonWidth / 2 &&
    mouseY > playButtonY - buttonHeight / 2 && mouseY < playButtonY + buttonHeight / 2) {
    gameState = GAME_STATES.GAMEPLAY; // Start the game
    restartGame(); // Reset game state
    return;
  }

  // Check Outfits button
  let outfitsButtonY = playButtonY + buttonHeight + 20;
  if (mouseX > playButtonX - buttonWidth / 2 && mouseX < playButtonX + buttonWidth / 2 &&
    mouseY > outfitsButtonY - buttonHeight / 2 && mouseY < outfitsButtonY + buttonHeight / 2) {
    gameState = GAME_STATES.OUTFITS_MENU; // Go to outfits menu
    return;
  }
}
Line-by-line explanation (4 lines)

🔧 Subcomponents:

conditional Play Button Hit Test if (mouseX > playButtonX - buttonWidth / 2 && mouseX < playButtonX + buttonWidth / 2 &&

Tests whether the mouse click landed inside the Play button's rectangle bounds

if (mouseX > playButtonX - buttonWidth / 2 && mouseX < playButtonX + buttonWidth / 2 &&
Checks that the click's x position is within the button's left and right edges
mouseY > playButtonY - buttonHeight / 2 && mouseY < playButtonY + buttonHeight / 2) {
Checks that the click's y position is within the button's top and bottom edges - together with the x check this confirms the click was inside the rectangle
gameState = GAME_STATES.GAMEPLAY; // Start the game
Switches the state machine so draw() starts calling drawGameplay() next frame
restartGame(); // Reset game state
Resets score, lives, snake, and food so every new game starts fresh

handleOutfitsMenuClicks()

Because drawOutfitsMenu() doesn't store its layout in shared variables, this function must duplicate the exact same position formulas to correctly test for clicks - a good example of why extracting shared layout logic into one function can reduce bugs.

function handleOutfitsMenuClicks() {
  let outfitsPerPage = 4;
  let startY = height / 2 - 100;
  let itemHeight = 100;
  let itemSpacing = 20;
  let totalOutfits = outfits.length;
  let maxPage = floor((totalOutfits - 1) / outfitsPerPage);

  // Ensure current page is valid
  outfitsMenuPage = constrain(outfitsMenuPage, 0, maxPage);

  let startIndex = outfitsMenuPage * outfitsPerPage;
  let endIndex = min(startIndex + outfitsPerPage, totalOutfits);

  // Check outfit select buttons
  for (let i = startIndex; i < endIndex; i++) {
    let outfit = outfits[i];
    let isCurrent = (i === currentOutfitIndex);
    let isUnlocked = outfit.unlocked;

    let pageIndex = i - startIndex;
    let itemY = startY + pageIndex * (itemHeight + itemSpacing);

    if (isUnlocked && !isCurrent) {
      let selectButtonX = width / 2 + 80;
      let selectButtonY = itemY + itemHeight / 2;
      let selectButtonWidth = 80;
      let selectButtonHeight = 40;

      if (mouseX > selectButtonX - selectButtonWidth / 2 && mouseX < selectButtonX + selectButtonWidth / 2 &&
        mouseY > selectButtonY - selectButtonHeight / 2 && mouseY < selectButtonY + selectButtonHeight / 2) {
        currentOutfitIndex = i; // Select this outfit
        return;
      }
    }
  }

  // Check "Go back to Lobby" Button - Fixed position at the bottom
  let backButtonX = width / 2;
  let backButtonY = height - 50; // 50 pixels from the bottom
  let buttonWidth = 150;
  let buttonHeight = 50;

  if (mouseX > backButtonX - buttonWidth / 2 && mouseX < backButtonX + buttonWidth / 2 &&
    mouseY > backButtonY - buttonHeight / 2 && mouseY < backButtonY + buttonHeight / 2) {
    gameState = GAME_STATES.MENU; // Go back to main menu
    return;
  }

  // Check Pagination Arrows
  let arrowSize = 30;
  let arrowOffset = 200;

  // Previous Page Arrow
  if (outfitsMenuPage > 0) {
    if (mouseX > width / 2 - arrowOffset - arrowSize / 2 && mouseX < width / 2 - arrowOffset + arrowSize / 2 &&
      mouseY > backButtonY - arrowSize / 2 && mouseY < backButtonY + arrowSize / 2) {
      outfitsMenuPage--;
      return;
    }
  }

  // Next Page Arrow
  if (outfitsMenuPage < maxPage) {
    if (mouseX > width / 2 + arrowOffset - arrowSize / 2 && mouseX < width / 2 + arrowOffset + arrowSize / 2 &&
      mouseY > backButtonY - arrowSize / 2 && mouseY < backButtonY + arrowSize / 2) {
      outfitsMenuPage++;
      return;
    }
  }
}
Line-by-line explanation (5 lines)

🔧 Subcomponents:

for-loop Select Button Hit Test Loop for (let i = startIndex; i < endIndex; i++) {

Checks each visible outfit's Select button for a click and switches the active outfit if one is clicked

conditional Previous Page Arrow Click if (outfitsMenuPage > 0) {

Only checks for a previous-page click when a previous page actually exists

let maxPage = floor((totalOutfits - 1) / outfitsPerPage);
Recomputes the same pagination math used in drawOutfitsMenu() so click zones line up with what's drawn
if (isUnlocked && !isCurrent) {
Only tests for a Select button click if that button was actually drawn (unlocked outfits that aren't already selected)
currentOutfitIndex = i; // Select this outfit
Updates the global variable that determines which colors the Snake class uses when drawing itself
outfitsMenuPage--;
Moves to the previous page of outfits when the left arrow is clicked
outfitsMenuPage++;
Moves to the next page of outfits when the right arrow is clicked

handleGameOverClicks()

The simplest of the click handlers - only one button exists on this screen, so there's just a single bounding-box test.

function handleGameOverClicks() {
  let returnButtonX = width / 2;
  let returnButtonY = height / 2 + 60;
  let buttonWidth = 200;
  let buttonHeight = 60;

  // Check "Return to Menu" button
  if (mouseX > returnButtonX - buttonWidth / 2 && mouseX < returnButtonX + buttonWidth / 2 &&
    mouseY > returnButtonY - buttonHeight / 2 && mouseY < returnButtonY + buttonHeight / 2) {
    gameState = GAME_STATES.MENU; // Go back to main menu
    return;
  }
}
Line-by-line explanation (2 lines)
if (mouseX > returnButtonX - buttonWidth / 2 && mouseX < returnButtonX + buttonWidth / 2 &&
Tests if the click's x position falls within the Return to Menu button's width
gameState = GAME_STATES.MENU; // Go back to main menu
Switches back to the main menu state, which will be picked up by draw() next frame

restartGame()

This function centralizes all the state that needs resetting whenever a new game begins, whether triggered by the Play button or the admin panel's Restart button - keeping that logic in one place avoids bugs from forgetting to reset a variable somewhere.

function restartGame() {
  gameOver = false;
  score = 0;
  lives = 1; // Reset lives on restart
  snake = new Snake();
  food.pickLocation();
  frameRate(10); // Reset speed on restart
  if (adminPanelExpanded) {
    select('#speed-slider').value(10);
    select('#score-input').value(0);
    select('#lives-input').value(1); // Update lives input field
  }
  frameCountForSpeedDisplay = 0;
}
Line-by-line explanation (6 lines)
gameOver = false;
Clears the game over flag so gameplay logic runs normally again
score = 0;
Resets the score counter back to zero for the new game
lives = 1; // Reset lives on restart
Gives the player their full set of extra lives again
snake = new Snake();
Creates a brand new Snake object, discarding the old one's tail and position entirely
food.pickLocation();
Moves the food to a new random grid position for the fresh game
if (adminPanelExpanded) {
Only touches the admin panel's HTML input fields if that panel is actually open, avoiding errors on hidden elements

checkOutfitUnlocks()

This function runs every time the score changes (after eating food), so unlocks happen instantly during gameplay rather than only being checked when opening the outfits menu.

🔬 This loop unlocks an outfit once score >= outfit.unlockScore. What happens if you change the comparison to score >= outfit.unlockScore * 2, making every outfit twice as hard to earn?

  for (let outfit of outfits) {
    if (!outfit.unlocked && score >= outfit.unlockScore) {
      outfit.unlocked = true;
      newUnlock = true;
      console.log("Unlocked new outfit: " + outfit.name);
    }
  }
function checkOutfitUnlocks() {
  let newUnlock = false;
  for (let outfit of outfits) {
    if (!outfit.unlocked && score >= outfit.unlockScore) {
      outfit.unlocked = true;
      newUnlock = true;
      console.log("Unlocked new outfit: " + outfit.name);
    }
  }
  if (newUnlock) {
    saveUnlockedOutfits();
    // If outfits menu is open, update it to show new unlocks
    if (gameState === GAME_STATES.OUTFITS_MENU) {
      // No need to call updateOutfitsList() explicitly here,
      // as drawOutfitsMenu() will call it next frame anyway.
    }
  }
}
Line-by-line explanation (4 lines)

🔧 Subcomponents:

for-loop Scan All Outfits For New Unlocks for (let outfit of outfits) {

Checks every outfit's unlockScore against the current score and flips it to unlocked if the player has earned enough points

let newUnlock = false;
Tracks whether anything actually changed this call, so localStorage is only written when necessary
if (!outfit.unlocked && score >= outfit.unlockScore) {
Only unlocks outfits that aren't already unlocked and whose score requirement has been met
outfit.unlocked = true;
Flips the outfit's unlocked flag so it becomes selectable in the outfits menu
if (newUnlock) {
Only calls saveUnlockedOutfits() if at least one new outfit was unlocked this call, avoiding unnecessary localStorage writes

toggleAdminPanel()

This is called both by the gear icon toggle button and the panel's own Close button, both wired up in createAdminPanel() with .mousePressed(toggleAdminPanel).

function toggleAdminPanel() {
  adminPanelExpanded = !adminPanelExpanded;

  if (adminPanelExpanded) {
    adminPanelContainer.addClass('admin-panel-expanded');
    adminPanelToggle.hide();
    gameCanvas.size(windowWidth - adminPanelWidth, windowHeight * 0.85);
    gameCanvas.position(0, (windowHeight - gameCanvas.height) / 2);
  } else {
    adminPanelContainer.removeClass('admin-panel-expanded');
    adminPanelToggle.show();
    gameCanvas.size(windowWidth, windowHeight * 0.85);
    gameCanvas.position(0, (windowHeight - gameCanvas.height) / 2);
  }
}
Line-by-line explanation (4 lines)

🔧 Subcomponents:

conditional Expand vs Collapse Panel if (adminPanelExpanded) {

Shrinks the canvas and shows the panel when expanding, or restores full width when collapsing

adminPanelExpanded = !adminPanelExpanded;
Flips the boolean each time this function runs, toggling the panel open/closed
adminPanelContainer.addClass('admin-panel-expanded');
Adds a CSS class that presumably slides the panel into view (defined in style.css)
gameCanvas.size(windowWidth - adminPanelWidth, windowHeight * 0.85);
Shrinks the canvas width to make room for the panel so the game area isn't hidden behind it
gameCanvas.position(0, (windowHeight - gameCanvas.height) / 2);
Re-centers the (now different-sized) canvas vertically after resizing it

windowResized()

p5.js automatically calls windowResized() whenever the browser window changes size, making it the right place to keep a responsive canvas in sync with the viewport.

function windowResized() {
  let canvasHeight = windowHeight * 0.85; // Game area canvas height

  // Resize the main p5 canvas based on admin panel state
  if (adminPanelExpanded) {
    resizeCanvas(windowWidth - adminPanelWidth, canvasHeight);
    gameCanvas.position(0, (windowHeight - canvasHeight) / 2);
  } else {
    resizeCanvas(windowWidth, canvasHeight);
    gameCanvas.position(0, (windowHeight - canvasHeight) / 2);
  }

  // Adjust DOM menu UI positions/sizes
  // positionMenuUI(); // Not needed as canvas-based menus are drawn relative to canvas
  updateOutfitsList(); // Ensure outfit previews are redrawn if canvas resized

  // The admin panel container's size and position are handled by CSS and its fixed nature
}
Line-by-line explanation (3 lines)

🔧 Subcomponents:

conditional Resize With or Without Panel if (adminPanelExpanded) {

Keeps the canvas correctly sized around the admin panel whenever the browser window changes size

let canvasHeight = windowHeight * 0.85;
Recalculates the game area's height as 85% of the new window height, matching setup()
resizeCanvas(windowWidth - adminPanelWidth, canvasHeight);
Resizes the actual p5 canvas element, leaving room on the right for the admin panel if it's open
updateOutfitsList(); // Ensure outfit previews are redrawn if canvas resized
Calls a leftover function from an earlier DOM-based outfits menu; it does nothing now since the menu is canvas-based

createAdminPanel()

This function shows how p5.js DOM functions (createButton, createSlider, createInput, select) let you build a real HTML control panel alongside your canvas, and how arrow-function callbacks can directly read/write your sketch's global variables for live debugging.

function createAdminPanel() {
  adminPanelContainer = select('#admin-panel-container');
  adminPanelContent = createElement('div');
  adminPanelContent.id('admin-panel');
  adminPanelContainer.child(adminPanelContent);

  adminPanelToggle = select('#admin-panel-toggle');
  adminPanelToggle.mousePressed(toggleAdminPanel);

  let closeButton = createButton('Close Panel');
  closeButton.id('admin-panel-close');
  closeButton.mousePressed(toggleAdminPanel);
  adminPanelContent.child(closeButton);

  adminPanelContent.html('<h2>Admin Panel</h2>', true);

  adminPanelContent.child(createP('Snake Speed: <span id="speed-display">10 fps</span>'));
  let speedSlider = createSlider(1, 60, 10, 1);
  speedSlider.id('speed-slider');
  speedSlider.style('width', '90%');
  speedSlider.input(() => frameRate(speedSlider.value()));
  adminPanelContent.child(speedSlider);

  adminPanelContent.child(createP('Set Score:'));
  let scoreInput = createInput(score, 'number');
  scoreInput.id('score-input');
  scoreInput.style('width', '80px');
  adminPanelContent.child(scoreInput);
  let scoreButton = createButton('Set Score');
  scoreButton.mousePressed(() => score = int(scoreInput.value()));
  adminPanelContent.child(scoreButton);
  
  adminPanelContent.child(createP('Set Lives:'));
  let livesInput = createInput(lives, 'number');
  livesInput.id('lives-input');
  livesInput.style('width', '80px');
  adminPanelContent.child(livesInput);
  let livesButton = createButton('Set Lives');
  livesButton.mousePressed(() => lives = int(livesInput.value()));
  adminPanelContent.child(livesButton);

  adminPanelContent.child(createElement('hr'));

  let addLengthButton = createButton('Add 5 Segments');
  addLengthButton.mousePressed(() => snake.total += 5);
  adminPanelContent.child(addLengthButton);

  let gameOverButton = createButton('Force Game Over');
  gameOverButton.mousePressed(() => {
    gameOver = true;
    gameState = GAME_STATES.GAMEOVER; // Ensure transition to Game Over state
  });
  adminPanelContent.child(gameOverButton);

  let restartButton = createButton('Restart Game');
  restartButton.mousePressed(restartGame);
  adminPanelContent.child(restartButton);

  adminPanelContent.child(createElement('hr'));

  let spawnFoodButton = createButton('Spawn Food');
  spawnFoodButton.mousePressed(() => food.pickLocation());
  adminPanelContent.child(spawnFoodButton);

  adminPanelContent.child(createElement('hr'));

  adminPanelContent.child(createP('Teleport Snake (X, Y):'));
  let teleportXInput = createInput('0', 'number');
  teleportXInput.id('teleport-x');
  teleportXInput.style('width', '60px');
  adminPanelContent.child(teleportXInput);
  adminPanelContent.child(createElement('span', ', '));
  let teleportYInput = createInput('0', 'number');
  teleportYInput.id('teleport-y');
  teleportYInput.style('width', '60px');
  adminPanelContent.child(teleportYInput);
  adminPanelContent.child(createElement('br'));
  let teleportButton = createButton('Teleport');
  teleportButton.mousePressed(() => {
    snake.x = int(teleportXInput.value()) * scl;
    snake.y = int(teleportYInput.value()) * scl;
  });
  adminPanelContent.child(teleportButton);
}
Line-by-line explanation (7 lines)
adminPanelContainer = select('#admin-panel-container');
Grabs the empty <div> already sitting in index.html and stores a reference to build content inside it
adminPanelToggle.mousePressed(toggleAdminPanel);
Wires the gear icon button (defined in HTML) to call toggleAdminPanel() whenever it's clicked
let speedSlider = createSlider(1, 60, 10, 1);
Creates an HTML range slider from 1 to 60 with a starting value of 10 and step size of 1
speedSlider.input(() => frameRate(speedSlider.value()));
Every time the slider moves, immediately updates the game's frame rate (and therefore the snake's speed) to match
scoreButton.mousePressed(() => score = int(scoreInput.value()));
Reads whatever text is in the score input box, converts it to an integer, and overwrites the global score variable
addLengthButton.mousePressed(() => snake.total += 5);
Directly increases the snake's total length property, causing its tail to visually grow over the next several frames
teleportButton.mousePressed(() => {
Reads the two teleport input boxes and directly sets the snake's x/y pixel position, multiplied by scl to convert from grid cells to pixels

createMenuUI()

This is dead code left behind after the menus were converted from HTML divs/buttons to canvas-drawn screens (drawMenu, drawOutfitsMenu, drawGameOver). It is never called anywhere in the sketch.

function createMenuUI() {
  // --- Main Menu ---
  // (all DOM-based menu creation code below is commented out)
  // ...
}
Line-by-line explanation (1 lines)
function createMenuUI() {
This function exists but its entire body is commented out - it's leftover from an earlier version of the game that used DOM elements (divs and buttons) for menus instead of drawing them on the canvas

positionMenuUI()

This function is only referenced in a comment inside windowResized() ('// positionMenuUI(); // Not needed...') confirming it's intentionally unused now.

function positionMenuUI() {
  // let menuWidth = 300;
  // let menuHeight = 500;
  // ... (all body commented out)
}
Line-by-line explanation (1 lines)
function positionMenuUI() {
Another leftover function whose entire body is commented out; it used to position the DOM-based menu divs and is no longer needed

updateOutfitsList()

This function is called once from windowResized() but has no effect since drawOutfitsMenu() now handles everything on canvas. It's a candidate for deletion or reactivation depending on future plans.

function updateOutfitsList() {
  // outfitsListDiv.html(''); // Clear existing list
  // ... (all body commented out - originally built DOM outfit cards)
}
Line-by-line explanation (2 lines)
function updateOutfitsList() {
This function's body is entirely commented out; it used to build HTML outfit preview cards before the outfits menu was redrawn to use the canvas instead
updateOutfitsList(); // Ensure outfit previews are redrawn if canvas resized
Still called from windowResized(), but since the body is empty it currently does nothing

Snake (class)

The Snake class encapsulates all the movement, growth, drawing, and collision logic for the player-controlled snake. Storing the tail as an array of vectors and using unshift/pop is a classic, simple way to implement a 'following' body without a real physics simulation.

🔬 This is what makes the snake die when it hits a wall. What happens if you replace it with code that wraps the snake around to the opposite edge instead, like this.x = (this.x + width) % width; this.y = (this.y + height) % height; return false;?

  checkDeath() {
    if (this.x < 0 || this.x >= width || this.y < 0 || this.y >= height) {
      lives--;
      return true;
    }
class Snake {
  constructor() {
    this.x = 0;
    this.y = 0;
    this.xspeed = 1;
    this.yspeed = 0;
    this.tail = [];
    this.total = 0;
  }

  setDir(x, y) {
    this.xspeed = x;
    this.yspeed = y;
  }

  eat(pos) {
    if (this.x === pos.x && this.y === pos.y) {
      this.total++;
      return true;
    }
    return false;
  }

  update() {
    this.tail.unshift(createVector(this.x, this.y));
    if (this.tail.length > this.total) {
      this.tail.pop();
    }
    this.x += this.xspeed * scl;
    this.y += this.yspeed * scl;
  }

  show() {
    noStroke();
    let bodyColor = outfits[currentOutfitIndex].bodyColor;
    let headColor = outfits[currentOutfitIndex].headColor;

    fill(bodyColor);
    // Draw the tail segments as individual ellipses
    for (let i = 0; i < this.tail.length; i++) {
      ellipse(this.tail[i].x + scl / 2, this.tail[i].y + scl / 2, scl);
    }

    fill(headColor);
    ellipse(this.x + scl / 2, this.y + scl / 2, scl * 1.2);
  }

  checkDeath() {
    if (this.x < 0 || this.x >= width || this.y < 0 || this.y >= height) {
      lives--;
      return true;
    }
    for (let i = 0; i < this.tail.length; i++) {
      let pos = this.tail[i];
      if (this.x === pos.x && this.y === pos.y) {
        lives--;
        return true;
      }
    }
    return false;
  }
}
Line-by-line explanation (12 lines)

🔧 Subcomponents:

for-loop Draw Each Tail Segment for (let i = 0; i < this.tail.length; i++) {

Draws one ellipse per stored tail position, building the visible body of the snake

conditional Wall Collision Check if (this.x < 0 || this.x >= width || this.y < 0 || this.y >= height) {

Detects when the snake's head has moved outside the canvas boundaries

for-loop Self Collision Check for (let i = 0; i < this.tail.length; i++) {

Compares the head's position against every tail segment to detect the snake running into itself

this.tail = [];
An empty array that will hold a p5.Vector for every past head position, forming the visible body
this.total = 0;
Tracks how many segments the tail should have; starts at 0 so a fresh snake has no visible body yet
setDir(x, y) {
A simple method that overwrites xspeed/yspeed - called from keyPressed() whenever an arrow key changes direction
eat(pos) {
Compares the snake's head position to the food's position; if they match exactly, grows the snake and reports success
this.tail.unshift(createVector(this.x, this.y));
Adds the current head position to the FRONT of the tail array before moving, so the body follows where the head has been
if (this.tail.length > this.total) {
Keeps the tail array from growing forever - once it's longer than the total allowed segments, the oldest position is removed
this.x += this.xspeed * scl;
Moves the head by one full grid cell (scl pixels) in the x direction, based on current speed
let bodyColor = outfits[currentOutfitIndex].bodyColor;
Looks up which colors to use based on the player's currently selected outfit
ellipse(this.tail[i].x + scl / 2, this.tail[i].y + scl / 2, scl);
Draws a circle centered inside each grid cell the tail occupies (adding scl/2 centers it, since positions are stored as the cell's top-left corner)
if (this.x < 0 || this.x >= width || this.y < 0 || this.y >= height) {
Checks if the head has moved past any of the four canvas edges
lives--;
Deducts one life immediately whenever any death condition is triggered
if (this.x === pos.x && this.y === pos.y) {
Compares the head's exact pixel position against each stored tail segment to detect self-collision

Food (class)

The Food class is intentionally tiny - it only tracks a position and knows how to relocate and draw itself. Notice it never checks whether the new random location overlaps the snake's body, which is a common Snake-game bug worth fixing.

🔬 This picks a random column and row across the WHOLE canvas. What happens if you divide cols by 2, restricting food to only spawn in the left half of the screen?

  pickLocation() {
    let cols = floor(width / scl);
    let rows = floor(height / scl);
    this.pos = createVector(floor(random(cols)) * scl, floor(random(rows)) * scl);
  }
class Food {
  constructor() {
    this.pos = createVector();
  }

  pickLocation() {
    let cols = floor(width / scl);
    let rows = floor(height / scl);
    this.pos = createVector(floor(random(cols)) * scl, floor(random(rows)) * scl);
  }

  show() {
    fill(255, 0, 100);
    rect(this.pos.x, this.pos.y, scl, scl);
  }
}
Line-by-line explanation (5 lines)
this.pos = createVector();
Starts the food at position (0,0) until pickLocation() gives it a real spot
let cols = floor(width / scl);
Figures out how many grid columns fit across the canvas width, based on the cell size scl
this.pos = createVector(floor(random(cols)) * scl, floor(random(rows)) * scl);
Picks a random column and row, then multiplies each by scl to convert that grid coordinate into an actual pixel position
fill(255, 0, 100);
Sets the food's color to a pink/magenta shade
rect(this.pos.x, this.pos.y, scl, scl);
Draws the food as a square exactly one grid cell in size

📦 Key Variables

snake object

Holds the current Snake instance controlling position, tail, and movement of the player

let snake;
food object

Holds the current Food instance tracking where the next piece of food is located

let food;
scl number

The pixel size of one grid cell; determines segment size and how far the snake moves per step

let scl = 20;
score number

Tracks how many points the player has earned this game, driving outfit unlocks

let score = 0;
gameOver boolean

Flags whether the player has run out of lives and the game has truly ended

let gameOver = false;
lives number

Counts remaining extra chances before a true Game Over; decremented on every death

let lives = 1;
adminPanelToggle object

Reference to the gear icon DOM button that opens/closes the admin panel

let adminPanelToggle;
adminPanelContainer object

Reference to the outer DOM container holding all admin panel content

let adminPanelContainer;
adminPanelContent object

Reference to the inner DOM div where sliders, inputs, and buttons are actually placed

let adminPanelContent;
adminPanelWidth number

Fixed pixel width reserved for the admin panel when it's expanded

const adminPanelWidth = 250;
gameCanvas object

Reference to the p5.Canvas element, used to resize and reposition it when the admin panel toggles

let gameCanvas;
adminPanelExpanded boolean

Tracks whether the admin panel is currently open, controlling canvas resizing and UI visibility

let adminPanelExpanded = false;
frameCountForSpeedDisplay number

A frame counter used to throttle how often the admin panel's fps readout updates

let frameCountForSpeedDisplay = 0;
speedDisplayUpdateInterval number

How many frames to wait between updates to the fps display, reducing unnecessary DOM writes

const speedDisplayUpdateInterval = 30;
GAME_STATES object

A constant lookup of valid screen names used to avoid typos when comparing/setting gameState

const GAME_STATES = { MENU: 'MENU', ... };
gameState string

The single source of truth for which screen is currently active; read every frame by draw()

let gameState = GAME_STATES.MENU;
outfits array

A list of outfit objects, each with a name, colors, unlock status, and score requirement

let outfits = [ { name: 'Default Green', ... } ];
currentOutfitIndex number

The index into the outfits array of the skin currently applied to the snake

let currentOutfitIndex = 0;
outfitsMenuPage number

Which page of the paginated outfits menu is currently displayed

let outfitsMenuPage = 0;

🔧 Potential Improvements (4)

Here are some ways this code could be enhanced:

BUG setup() - currentOutfitIndex fallback

`currentOutfitIndex = outfits.findIndex(o => o.unlocked) || 0;` breaks if no outfit is unlocked: findIndex() returns -1, and since -1 is truthy in JavaScript, the `|| 0` fallback never triggers, leaving currentOutfitIndex set to -1.

💡 Use an explicit check instead, e.g. `let idx = outfits.findIndex(o => o.unlocked); currentOutfitIndex = idx === -1 ? 0 : idx;` to correctly fall back to index 0.

BUG Food.pickLocation()

The new random location for food is never checked against the snake's current tail or head position, so food can occasionally spawn directly on top of the snake's body.

💡 After picking a location, loop through snake.tail (and the head position) and re-roll pickLocation() if there's a collision, similar to how checkDeath() already loops through the tail.

PERFORMANCE drawOutfitsMenu() and handleOutfitsMenuClicks()

Both functions independently recompute identical layout math (outfitsPerPage, startY, itemHeight, button coordinates) every single call, duplicating logic that must be kept perfectly in sync by hand.

💡 Extract a shared function like getOutfitLayout() that returns the computed positions once, and have both the drawing function and the click handler call it, reducing duplication and the risk of the two drifting out of sync.

STYLE createMenuUI(), positionMenuUI(), updateOutfitsList()

These three functions are almost entirely commented-out dead code left over from an earlier DOM-based menu system that has since been replaced by canvas-drawn menus, cluttering the file.

💡 Delete these unused functions (and their leftover calls, such as `updateOutfitsList();` in windowResized()) now that the outfits/menu screens are fully canvas-based.

🔄 Code Flow

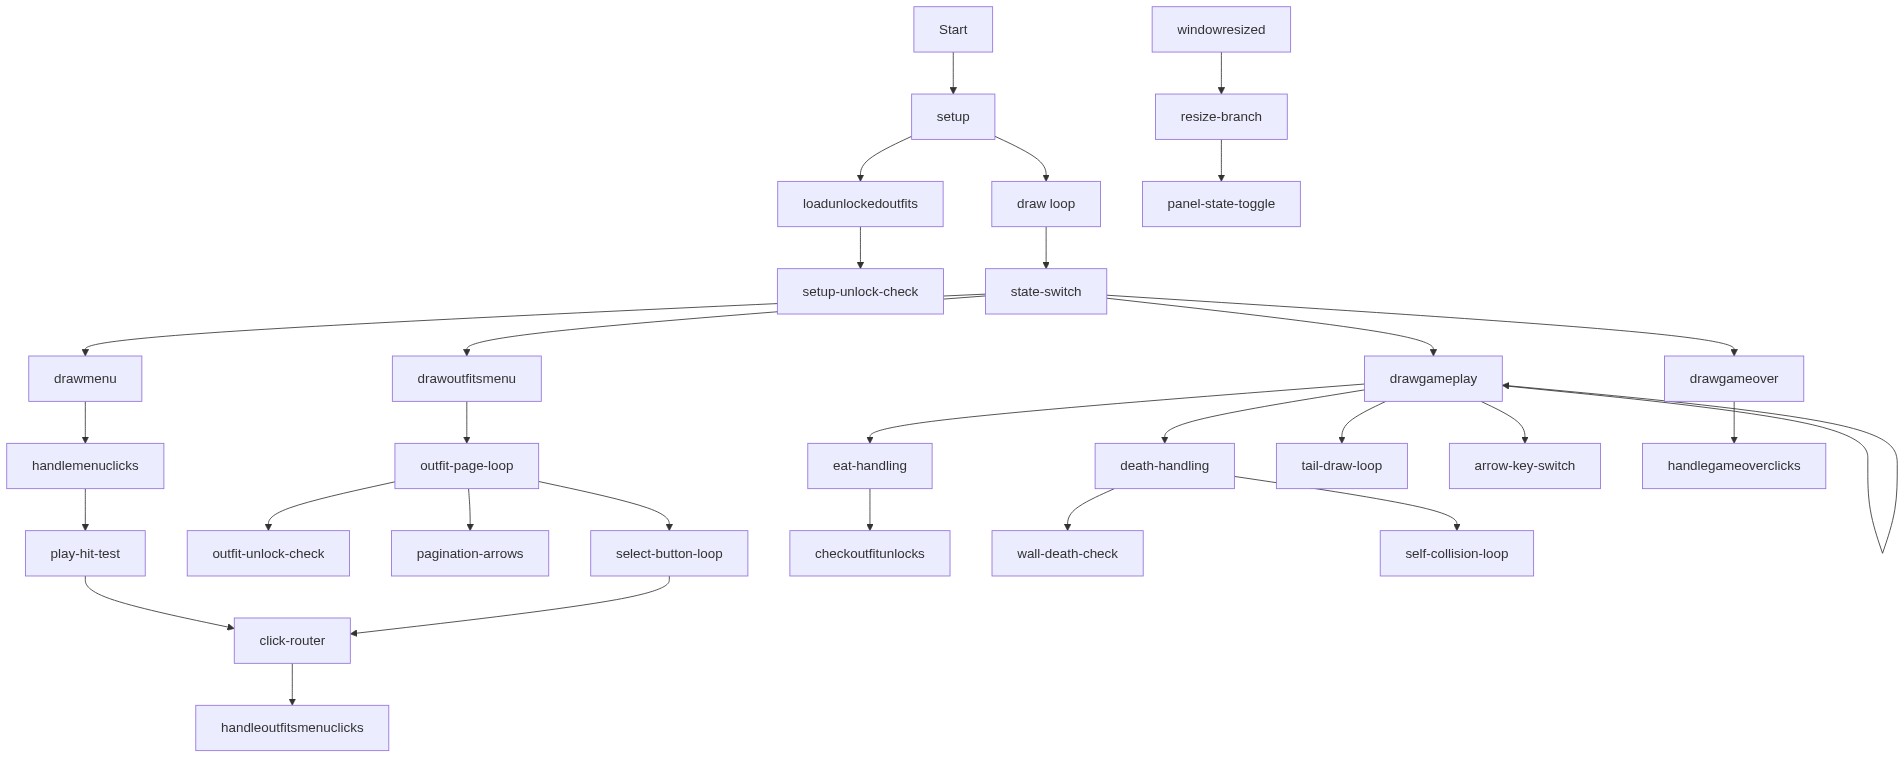
Code flow showing loadunlockedoutfits, saveunlockedoutfits, setup, draw, drawmenu, drawoutfitsmenu, drawgameplay, drawgameover, keypressed, mousepressed, handlemenuclicks, handleoutfitsmenuclicks, handlegameoverclicks, restartgame, checkoutfitunlocks, toggleadminpanel, windowresized, createadminpanel, createmenuui, positionmenuui, updateoutfitslist, snake, food

💡 Click on function names in the diagram to jump to their code

graph TD start[Start] --> setup[setup] setup --> loadunlockedoutfits[loadunlockedoutfits] loadunlockedoutfits --> setup-unlock-check[setup-unlock-check] setup --> draw[draw loop] draw --> state-switch[state-switch] state-switch --> drawmenu[drawmenu] state-switch --> drawoutfitsmenu[drawoutfitsmenu] state-switch --> drawgameplay[drawgameplay] state-switch --> drawgameover[drawgameover] drawmenu --> handlemenuclicks[handlemenuclicks] handlemenuclicks --> play-hit-test[play-hit-test] play-hit-test --> click-router[click-router] drawoutfitsmenu --> outfit-page-loop[outfit-page-loop] outfit-page-loop --> outfit-unlock-check[outfit-unlock-check] outfit-page-loop --> pagination-arrows[pagination-arrows] outfit-page-loop --> select-button-loop[select-button-loop] select-button-loop --> click-router click-router --> handleoutfitsmenuclicks[handleoutfitsmenuclicks] drawgameplay --> drawgameplay[drawgameplay] drawgameplay --> eat-handling[eat-handling] eat-handling --> checkoutfitunlocks[checkoutfitunlocks] drawgameplay --> death-handling[death-handling] death-handling --> wall-death-check[wall-death-check] death-handling --> self-collision-loop[self-collision-loop] drawgameplay --> tail-draw-loop[tail-draw-loop] drawgameplay --> arrow-key-switch[arrow-key-switch] drawgameover --> handlegameoverclicks[handlegameoverclicks] windowresized --> resize-branch[resize-branch] resize-branch --> panel-state-toggle[panel-state-toggle] click setup href "#fn-setup" click loadunlockedoutfits href "#fn-loadunlockedoutfits" click draw href "#fn-draw" click state-switch href "#sub-state-switch" click drawmenu href "#fn-drawmenu" click handlemenuclicks href "#fn-handlemenuclicks" click play-hit-test href "#sub-play-hit-test" click click-router href "#sub-click-router" click drawoutfitsmenu href "#fn-drawoutfitsmenu" click outfit-page-loop href "#sub-outfit-page-loop" click outfit-unlock-check href "#sub-outfit-unlock-check" click pagination-arrows href "#sub-pagination-arrows" click select-button-loop href "#sub-select-button-loop" click handleoutfitsmenuclicks href "#fn-handleoutfitsmenuclicks" click drawgameplay href "#fn-drawgameplay" click eat-handling href "#sub-eat-handling" click checkoutfitunlocks href "#fn-checkoutfitunlocks" click death-handling href "#sub-death-handling" click wall-death-check href "#sub-wall-death-check" click self-collision-loop href "#sub-self-collision-loop" click tail-draw-loop href "#sub-tail-draw-loop" click arrow-key-switch href "#sub-arrow-key-switch" click drawgameover href "#fn-drawgameover" click handlegameoverclicks href "#fn-handlegameoverclicks" click windowresized href "#fn-windowresized" click resize-branch href "#sub-resize-branch" click panel-state-toggle href "#sub-panel-state-toggle"

❓ Frequently Asked Questions

What visual elements does the best snake game sketch create?

The sketch visually represents a classic snake game where players control a snake that grows in length as it consumes food, displayed on a grid with vibrant colors for the snake and food.

How can users interact with the best snake game remix?

Users can interact with the game using keyboard controls to navigate the snake, and they can also access an admin panel to toggle settings and select different outfits for the snake.

What creative coding techniques are demonstrated in this snake game sketch?

This sketch showcases object-oriented programming through the use of a snake object, as well as game state management to handle various phases of gameplay.

Preview

The best snake game (Remix) - p5.js creative coding sketch preview
Sketch Preview
Code flow diagram showing the structure of The best snake game (Remix) - Code flow showing loadunlockedoutfits, saveunlockedoutfits, setup, draw, drawmenu, drawoutfitsmenu, drawgameplay, drawgameover, keypressed, mousepressed, handlemenuclicks, handleoutfitsmenuclicks, handlegameoverclicks, restartgame, checkoutfitunlocks, toggleadminpanel, windowresized, createadminpanel, createmenuui, positionmenuui, updateoutfitslist, snake, food
Code Flow Diagram