The best snake game (Remix)

This is a full-featured snake game with a grid-based gameplay system, multiple customizable snake outfits unlocked by reaching score thresholds, and a developer admin panel for testing and tweaking. Players navigate their snake around the canvas eating food to grow and score points while avoiding walls and self-collision.

🧪 Try This!

Experiment with the code by making these changes:

  1. Make the snake faster — The frameRate controls how many times per second the snake moves. Increase it to make gameplay harder
  2. Change the grid cell size — The scl variable controls how big each grid square is. Larger values make bigger cells and fewer positions
  3. Award more points per food — Change how many points the player earns each time the snake eats food
  4. Change the food color — The fill() call in the Food class's show() method controls the food's color using RGB values
  5. Add a new outfit — Add a new outfit to the outfits array with custom body and head colors and an unlock score threshold
Prefer the full editor? Open it there →

📖 About This Sketch

This sketch creates a polished, playable snake game where you guide a growing serpent around a grid to eat food and rack up points. The game is visually engaging thanks to the outfit system, which lets players unlock custom color schemes by reaching score milestones. Under the hood, it uses game state management to switch between menu, gameplay, outfit selection, and game over screens—a pattern you'll use in almost every game you build.

The code is organized around three core ideas: a game state machine (MENU, OUTFITS_MENU, GAMEPLAY, GAMEOVER), two classes (Snake and Food) that handle the game logic, and a DOM-based admin panel for real-time tweaking. By studying this sketch, you'll learn how to structure a multi-screen game, design reusable classes for game objects, persist player progress to browser storage, and build developer tools that make debugging and playtesting faster.

⚙️ How It Works

  1. When the sketch loads, setup() creates a canvas and initializes the Snake and Food objects. The game starts in the MENU state, showing Play and Outfits buttons drawn on the canvas.
  2. When you click Play, the gameState switches to GAMEPLAY, and drawGameplay() begins running every frame at 10 fps by default. The snake moves continuously in the direction set by arrow key presses.
  3. Every frame, snake.update() shifts the snake forward by one grid cell and stores old positions in a tail array. snake.show() draws the body (using the current outfit's colors) and head. Food.show() draws a pink square.
  4. When the snake's head position matches the food position, snake.eat() returns true, score increases by 10, and food.pickLocation() spawns food at a random grid cell.
  5. If the snake hits a wall or itself, checkDeath() decrements lives. When lives drop below 0, the game transitions to GAMEOVER state and shows a return button.
  6. The Outfits menu displays all available outfits in a paginated list. Outfits unlock automatically when your score reaches their unlockScore threshold, and unlocked outfits are saved to localStorage so they persist between sessions. The admin panel (toggle with the ⚙️ button during gameplay) lets you adjust speed, lives, score, and spawn food for testing.

🎓 Concepts You'll Learn

Game state machinesObject-oriented class designCanvas-based UI drawingGrid-based movementCollision detectionLocalStorage persistenceDOM and canvas integrationDynamic menu pagination

📝 Code Breakdown

setup()

setup() runs once when the sketch starts. It is the perfect place to initialize your canvas, create objects, load saved data, and set starting values. Notice how we store the canvas in a global variable (gameCanvas) so we can resize it later when the admin panel opens and closes.

function setup() {
  gameCanvas = createCanvas(windowWidth, windowHeight * 0.85);
  gameCanvas.position(0, (windowHeight - gameCanvas.height) / 2);

  createAdminPanel();

  loadUnlockedOutfits();
  if (!outfits[currentOutfitIndex].unlocked) {
    currentOutfitIndex = outfits.findIndex(o => o.unlocked) || 0;
  }

  snake = new Snake();
  food = new Food();
  food.pickLocation();

  frameRate(10);
  
  adminPanelToggle.hide();
}
Line-by-line explanation (9 lines)

🔧 Subcomponents:

calculation Canvas initialization gameCanvas = createCanvas(windowWidth, windowHeight * 0.85);

Creates the main drawing canvas at 85% of window height and stores its reference for later resizing

conditional Outfit validation if (!outfits[currentOutfitIndex].unlocked) { currentOutfitIndex = outfits.findIndex(o => o.unlocked) || 0; }

Ensures the player starts with an unlocked outfit; if the current choice is locked, switches to the first unlocked one

gameCanvas = createCanvas(windowWidth, windowHeight * 0.85);
Creates the game canvas at full width and 85% of window height, then stores it in gameCanvas so we can resize it later
gameCanvas.position(0, (windowHeight - gameCanvas.height) / 2);
Vertically centers the canvas on the page by positioning it at the midpoint between top and bottom
createAdminPanel();
Builds the developer control panel with buttons and sliders for testing (speed, score, lives, etc.)
loadUnlockedOutfits();
Reads localStorage to restore which outfits the player has already unlocked in previous sessions
if (!outfits[currentOutfitIndex].unlocked) { currentOutfitIndex = outfits.findIndex(o => o.unlocked) || 0; }
Safety check: if the player's selected outfit was somehow locked, switches to the first unlocked outfit (or outfit 0 as fallback)
snake = new Snake();
Creates a new Snake object at position (0, 0) with zero length, ready for the player to control
food = new Food();
Creates a Food object; pickLocation() will place it at a random grid cell
frameRate(10);
Sets the draw loop to run 10 times per second, which is also the speed the snake moves
adminPanelToggle.hide();
Hides the gear icon at the start because the admin panel is not needed on the menu screen
draw()

draw() is the main loop—it runs 60 times per second by default in p5.js. This game uses a switch statement to dispatch to different drawing functions based on the current game state. This is a common pattern called a 'state machine,' and it's how you structure multi-screen games and interactive apps.

🔬 This switch statement is the heart of the game's menu system. What would happen if you removed the 'break;' statements? Try it and watch the chaos—then put them back to understand why 'break' is crucial.

  switch (gameState) {
    case GAME_STATES.MENU:
      drawMenu();
      break;
    case GAME_STATES.OUTFITS_MENU:
      drawOutfitsMenu();
      break;
    case GAME_STATES.GAMEPLAY:
      drawGameplay();
      break;
    case GAME_STATES.GAMEOVER:
      drawGameOver();
      break;
  }
function draw() {
  background(220);

  switch (gameState) {
    case GAME_STATES.MENU:
      drawMenu();
      break;
    case GAME_STATES.OUTFITS_MENU:
      drawOutfitsMenu();
      break;
    case GAME_STATES.GAMEPLAY:
      drawGameplay();
      break;
    case GAME_STATES.GAMEOVER:
      drawGameOver();
      break;
  }
}
Line-by-line explanation (2 lines)

🔧 Subcomponents:

switch-case Game state dispatcher switch (gameState) { case GAME_STATES.MENU: drawMenu(); break; case GAME_STATES.OUTFITS_MENU: drawOutfitsMenu(); break; case GAME_STATES.GAMEPLAY: drawGameplay(); break; case GAME_STATES.GAMEOVER: drawGameOver(); break; }

Routes to the correct drawing function based on which screen the player is currently viewing

background(220);
Clears the canvas with a light gray color each frame, erasing everything drawn in the previous frame
switch (gameState) {
Starts a switch statement that checks the current game state and calls the matching draw function

drawMenu()

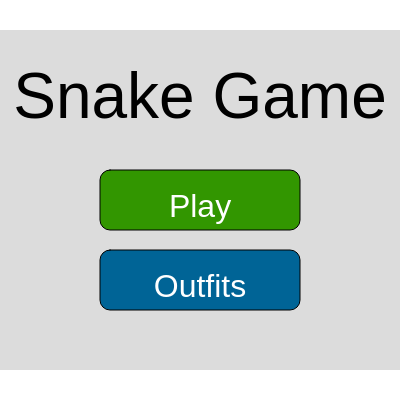
This function draws the main menu screen. It uses rectMode(CENTER) to center rectangles and text() to overlay labels, a common pattern for drawing clickable buttons. The coordinates are calculated relative to canvas center (width/2, height/2) so the menu adapts if you resize the window.

function drawMenu() {
  gameCanvas.show();
  adminPanelToggle.hide();

  textAlign(CENTER, CENTER);
  fill(0);
  textSize(64);
  text("Snake Game", width / 2, height / 2 - 100);

  let playButtonX = width / 2;
  let playButtonY = height / 2;
  let buttonWidth = 200;
  let buttonHeight = 60;
  rectMode(CENTER);
  fill(50, 150, 0);
  rect(playButtonX, playButtonY, buttonWidth, buttonHeight, 10);
  fill(255);
  textSize(32);
  text("Play", playButtonX, playButtonY + 8);

  let outfitsButtonY = playButtonY + buttonHeight + 20;
  fill(0, 100, 150);
  rect(playButtonX, outfitsButtonY, buttonWidth, buttonHeight, 10);
  fill(255);
  textSize(32);
  text("Outfits", playButtonX, outfitsButtonY + 8);
  rectMode(CORNER);

  fill(0);
  textSize(18);
  text("Click to interact", width / 2, height / 2 + 180);
}
Line-by-line explanation (6 lines)

🔧 Subcomponents:

calculation Play button rendering rect(playButtonX, playButtonY, buttonWidth, buttonHeight, 10); fill(255); textSize(32); text("Play", playButtonX, playButtonY + 8);

Draws a centered green rectangle and overlays white 'Play' text to create a clickable button

calculation Outfits button rendering rect(playButtonX, outfitsButtonY, buttonWidth, buttonHeight, 10); fill(255); textSize(32); text("Outfits", playButtonX, outfitsButtonY + 8);

Draws a centered blue rectangle and overlays white 'Outfits' text below the Play button

textAlign(CENTER, CENTER);
Centers text both horizontally and vertically around the x, y coordinates you give to text()
textSize(64);
Sets the font size to 64 pixels for the game title
text("Snake Game", width / 2, height / 2 - 100);
Draws the title at the horizontal center and 100 pixels above the vertical center
rectMode(CENTER);
Changes rect() to interpret x, y as the center of the rectangle instead of the top-left corner, making button positioning easier
fill(50, 150, 0);
Sets the fill color to green using RGB values (50 red, 150 green, 0 blue)
rect(playButtonX, playButtonY, buttonWidth, buttonHeight, 10);
Draws a green rectangle at the center of the canvas, 10 pixels for rounded corners

drawOutfitsMenu()

This function renders a paginated outfit selection menu. It calculates which outfits fit on the current page, draws a preview (using ellipse to show body and head colors), and shows unlock status. Notice how pagination is implemented: you track the current page number (outfitsMenuPage) and use math (startIndex, endIndex) to slice the array. This pattern appears in almost every app that displays a long list.

function drawOutfitsMenu() {
  gameCanvas.show();
  adminPanelToggle.hide();

  textAlign(CENTER, CENTER);
  fill(0);
  textSize(48);
  text("Choose Your Snake!", width / 2, height / 2 - 200);

  let outfitsPerPage = 4;
  let startY = height / 2 - 100;
  let itemHeight = 100;
  let itemSpacing = 20;
  let totalOutfits = outfits.length;
  let maxPage = floor((totalOutfits - 1) / outfitsPerPage);

  outfitsMenuPage = constrain(outfitsMenuPage, 0, maxPage);

  let startIndex = outfitsMenuPage * outfitsPerPage;
  let endIndex = min(startIndex + outfitsPerPage, totalOutfits);

  for (let i = startIndex; i < endIndex; i++) {
    let outfit = outfits[i];
    let isCurrent = (i === currentOutfitIndex);
    let isUnlocked = outfit.unlocked;

    let pageIndex = i - startIndex;
    let itemY = startY + pageIndex * (itemHeight + itemSpacing);

    fill(240);
    rect(width / 2 - 150, itemY, 300, itemHeight, 10);

    noStroke();
    fill(outfit.bodyColor);
    ellipse(width / 2 - 110, itemY + itemHeight / 2, scl * 2);
    fill(outfit.headColor);
    ellipse(width / 2 - 110 + scl, itemY + itemHeight / 2, scl * 1.5);

    fill(0);
    textAlign(LEFT, CENTER);
    textSize(24);
    text(outfit.name, width / 2 - 60, itemY + itemHeight / 2 - 20);

    textAlign(LEFT, TOP);
    textSize(16);
    if (isUnlocked) {
      fill(0, 150, 0);
      text("UNLOCKED", width / 2 - 60, itemY + itemHeight / 2 + 10);
      if (isCurrent) {
        fill(0, 0, 150);
        text("CURRENT", width / 2 + 30, itemY + itemHeight / 2 + 10);
      }
    } else {
      fill(150, 0, 0);
      text("Locked (Score " + outfit.unlockScore + ")", width / 2 - 60, itemY + itemHeight / 2 + 10);
    }

    if (isUnlocked && !isCurrent) {
      let selectButtonX = width / 2 + 80;
      let selectButtonY = itemY + itemHeight / 2;
      let selectButtonWidth = 80;
      let selectButtonHeight = 40;
      rectMode(CENTER);
      fill(0, 100, 150);
      rect(selectButtonX, selectButtonY, selectButtonWidth, selectButtonHeight, 5);
      fill(255);
      textSize(20);
      textAlign(CENTER, CENTER);
      text("Select", selectButtonX, selectButtonY + 5);
      rectMode(CORNER);
    }
  }

  let backButtonX = width / 2;
  let backButtonY = height - 50;
  let buttonWidth = 150;
  let buttonHeight = 50;
  rectMode(CENTER);
  fill(120);
  rect(backButtonX, backButtonY, buttonWidth, buttonHeight, 10);
  fill(0);
  textSize(24);
  textAlign(CENTER, CENTER);
  text("Go back to Lobby", backButtonX, backButtonY + 6);
  rectMode(CORNER);

  if (totalOutfits > outfitsPerPage) {
    let arrowSize = 30;
    let arrowOffset = 200;

    if (outfitsMenuPage > 0) {
      rectMode(CENTER);
      fill(100);
      rect(width / 2 - arrowOffset, backButtonY, arrowSize, arrowSize, 5);
      fill(255);
      text("<", width / 2 - arrowOffset, backButtonY + 5);
      rectMode(CORNER);
    }

    if (outfitsMenuPage < maxPage) {
      rectMode(CENTER);
      fill(100);
      rect(width / 2 + arrowOffset, backButtonY, arrowSize, arrowSize, 5);
      fill(255);
      text(">", width / 2 + arrowOffset, backButtonY + 5);
      rectMode(CORNER);
    }
  }
}
Line-by-line explanation (6 lines)

🔧 Subcomponents:

calculation Pagination calculation let outfitsPerPage = 4; let maxPage = floor((totalOutfits - 1) / outfitsPerPage); outfitsMenuPage = constrain(outfitsMenuPage, 0, maxPage); let startIndex = outfitsMenuPage * outfitsPerPage; let endIndex = min(startIndex + outfitsPerPage, totalOutfits);

Calculates which outfit indices to display on the current page and prevents the page number from going out of bounds

for-loop Outfit item rendering loop for (let i = startIndex; i < endIndex; i++) { ... }

Loops through the 4 outfits on the current page and draws each one with preview, name, unlock status, and select button

conditional Pagination arrows if (outfitsMenuPage > 0) { ... } if (outfitsMenuPage < maxPage) { ... }

Draws left and right arrows to navigate between pages, hiding them when you reach the first or last page

let outfitsPerPage = 4;
Sets how many outfit items display on each page—4 fits nicely on most screens
let maxPage = floor((totalOutfits - 1) / outfitsPerPage);
Calculates the highest valid page number; with 8 outfits and 4 per page, maxPage is 1
outfitsMenuPage = constrain(outfitsMenuPage, 0, maxPage);
Clamps the current page to valid range [0, maxPage] to prevent navigating past the last page
for (let i = startIndex; i < endIndex; i++) {
Loops through only the outfits that belong on the current page
fill(outfit.bodyColor);
Sets the fill to the outfit's body color (an RGB array like [0, 0, 200] for blue)
ellipse(width / 2 - 110, itemY + itemHeight / 2, scl * 2);
Draws a circle as the body preview, scaled by grid size and positioned in the left part of the item

drawGameplay()

drawGameplay() is the core game loop. Each frame it checks for death, updates and displays the snake, and tests whether the snake ate food. The key pattern: update logic first, then draw. Notice how it returns early if the snake died to prevent drawing overlapping snakes. Also notice how it syncs the admin panel's UI with game state (speed slider, score input).

function drawGameplay() {
  gameCanvas.show();
  adminPanelToggle.show();

  textSize(24);
  fill(0);
  textAlign(LEFT, TOP);
  text("Score: " + score, 10, 30);

  textAlign(RIGHT, TOP);
  text("Lives: " + max(0, lives), width - 10, 30);

  if (adminPanelExpanded) {
    frameCountForSpeedDisplay++;
    if (frameCountForSpeedDisplay % speedDisplayUpdateInterval === 0) {
      select('#speed-display').html(frameRate().toFixed(0) + ' fps');
      frameCountForSpeedDisplay = 0;
    }
  }

  if (snake.checkDeath()) {
    if (lives < 0) {
      gameOver = true;
      gameState = GAME_STATES.GAMEOVER;
    } else {
      snake = new Snake();
      food.pickLocation();
      frameRate(10);
      if (adminPanelExpanded) {
        select('#speed-slider').value(10);
      }
    }
    return;
  }

  snake.update();
  snake.show();

  if (snake.eat(food.pos)) {
    score += 10;
    food.pickLocation();
    checkOutfitUnlocks();
  }

  food.show();

  textSize(16);
  fill(0, 100, 0);
  textAlign(LEFT, BOTTOM);
  text("Controls: Arrow Keys (Up, Down, Left, Right)", 10, height - 10);
}
Line-by-line explanation (9 lines)

🔧 Subcomponents:

conditional Death check and response if (snake.checkDeath()) { if (lives < 0) { gameOver = true; gameState = GAME_STATES.GAMEOVER; } else { snake = new Snake(); food.pickLocation(); frameRate(10); if (adminPanelExpanded) { select('#speed-slider').value(10); } } return; }

Checks if the snake died; if lives remain, respawns the snake; if lives are exhausted, ends the game

conditional Food collision and growth if (snake.eat(food.pos)) { score += 10; food.pickLocation(); checkOutfitUnlocks(); }

Tests whether the snake's head is on the food; if so, grows the snake, increments score, and moves food to a new location

text("Score: " + score, 10, 30);
Displays the current score in the top-left corner at pixel (10, 30)
text("Lives: " + max(0, lives), width - 10, 30);
Displays lives in the top-right corner; max(0, lives) prevents showing negative lives
if (snake.checkDeath()) {
Tests whether the snake hit a wall or itself; returns true if it did
if (lives < 0) {
If lives are exhausted (less than 0), triggers game over; otherwise, respawns the snake
snake.update();
Moves the snake forward one grid cell in its current direction and updates the tail array
snake.show();
Draws the snake's body (tail segments) and head on the canvas using the current outfit's colors
if (snake.eat(food.pos)) {
Checks if the snake's head position matches the food's position
score += 10;
Increases score by 10 points when food is eaten
checkOutfitUnlocks();
Tests whether the new score has unlocked any new outfit colors; if so, saves them to localStorage

drawGameOver()

drawGameOver() is a simple final screen. It draws a message and a button to return to the menu. Notice that adminPanelToggle.hide() ensures the admin gear doesn't show during game over, keeping the UI clean. This is a good example of a minimal state screen in a state machine.

function drawGameOver() {
  gameCanvas.show();
  adminPanelToggle.hide();

  textAlign(CENTER, CENTER);
  fill(255, 0, 0);
  textSize(64);
  text("Return back to menu", width / 2, height / 2 - 40);
  fill(0);
  textSize(24);

  let returnButtonX = width / 2;
  let returnButtonY = height / 2 + 60;
  let buttonWidth = 200;
  let buttonHeight = 60;
  rectMode(CENTER);
  fill(120);
  rect(returnButtonX, returnButtonY, buttonWidth, buttonHeight, 10);
  fill(0);
  textSize(24);
  text("Return to Menu", returnButtonX, returnButtonY + 6);
  rectMode(CORNER);
}
Line-by-line explanation (4 lines)
fill(255, 0, 0);
Sets fill color to red (255 red, 0 green, 0 blue) for the game over message
text("Return back to menu", width / 2, height / 2 - 40);
Displays the game over message in large red text at the center of the canvas
rectMode(CENTER);
Switches to CENTER mode so rect() interprets coordinates as the center of the button
rect(returnButtonX, returnButtonY, buttonWidth, buttonHeight, 10);
Draws a gray button with rounded corners (radius 10)

keyPressed()

keyPressed() is p5.js's built-in function called whenever a key is pressed. This version uses a switch statement to map arrow keys to direction changes, with safety checks to prevent the snake from reversing into itself (a classic bug). The pattern of checking current speed before allowing a new direction is essential for any grid-based movement game.

🔬 Each direction check uses a condition like 'yspeed !== 1' to prevent reversing. What are these checking? Think about it: if yspeed is 1, the snake is moving DOWN. So the UP arrow should be ignored to prevent a 180-degree flip. Try removing one of these conditions (like the 'if' before UP_ARROW) and see what happens—the snake will crash into itself instantly.

    case UP_ARROW:
      if (snake.yspeed !== 1) snake.setDir(0, -1);
      break;
    case DOWN_ARROW:
      if (snake.yspeed !== -1) snake.setDir(0, 1);
      break;
    case RIGHT_ARROW:
      if (snake.xspeed !== -1) snake.setDir(1, 0);
      break;
    case LEFT_ARROW:
      if (snake.xspeed !== 1) snake.setDir(-1, 0);
      break;
function keyPressed() {
  if (gameState === GAME_STATES.GAMEOVER) {
    gameState = GAME_STATES.MENU;
    return;
  }
  if (gameState !== GAME_STATES.GAMEPLAY) {
    return;
  }

  switch (keyCode) {
    case UP_ARROW:
      if (snake.yspeed !== 1) snake.setDir(0, -1);
      break;
    case DOWN_ARROW:
      if (snake.yspeed !== -1) snake.setDir(0, 1);
      break;
    case RIGHT_ARROW:
      if (snake.xspeed !== -1) snake.setDir(1, 0);
      break;
    case LEFT_ARROW:
      if (snake.xspeed !== 1) snake.setDir(-1, 0);
      break;
  }
}
Line-by-line explanation (5 lines)

🔧 Subcomponents:

conditional Game over escape hatch if (gameState === GAME_STATES.GAMEOVER) { gameState = GAME_STATES.MENU; return; }

Pressing any key on the game over screen returns to the menu

switch-case Arrow key direction mapping switch (keyCode) { case UP_ARROW: if (snake.yspeed !== 1) snake.setDir(0, -1); break; case DOWN_ARROW: if (snake.yspeed !== -1) snake.setDir(0, 1); break; case RIGHT_ARROW: if (snake.xspeed !== -1) snake.setDir(1, 0); break; case LEFT_ARROW: if (snake.xspeed !== 1) snake.setDir(-1, 0); break; }

Converts arrow key presses into direction changes, preventing the snake from reversing into itself

if (gameState === GAME_STATES.GAMEOVER) {
Checks if the game is over; if so, pressing any key returns to the menu
if (gameState !== GAME_STATES.GAMEPLAY) {
Early return: only process arrow key controls during actual gameplay, not in menus
switch (keyCode) {
Starts a switch that branches based on which arrow key was pressed
case UP_ARROW:
Matches the up arrow key code
if (snake.yspeed !== 1) snake.setDir(0, -1);
Prevents reversing: only moves up if the snake isn't already moving down (yspeed !== 1)

mousePressed()

mousePressed() is p5.js's built-in function called whenever the mouse is clicked. This version acts as a dispatcher, routing clicks to the correct handler based on the current game state. This is a clean way to organize menu interactions across multiple screens.

function mousePressed() {
  if (gameState === GAME_STATES.MENU) {
    handleMenuClicks();
  } else if (gameState === GAME_STATES.OUTFITS_MENU) {
    handleOutfitsMenuClicks();
  } else if (gameState === GAME_STATES.GAMEOVER) {
    handleGameOverClicks();
  }
}
Line-by-line explanation (2 lines)

🔧 Subcomponents:

conditional Menu click dispatcher if (gameState === GAME_STATES.MENU) { handleMenuClicks(); } else if (gameState === GAME_STATES.OUTFITS_MENU) { handleOutfitsMenuClicks(); } else if (gameState === GAME_STATES.GAMEOVER) { handleGameOverClicks(); }

Routes clicks to the appropriate handler function based on which menu or screen is currently displayed

if (gameState === GAME_STATES.MENU) {
Checks if the player is on the main menu
handleMenuClicks();
Calls the function that processes clicks on Play and Outfits buttons

handleMenuClicks()

This function detects clicks on menu buttons by testing whether the mouse position falls within each button's rectangular boundary. The math is the core skill: a button centered at (x, y) with width w and height h spans from (x - w/2, y - h/2) to (x + w/2, y + h/2). This AABB (axis-aligned bounding box) test is used in almost every interactive sketch.

🔬 This multi-part condition tests whether the click is inside the button box. It compares mouseX and mouseY against the button's boundaries. What happens if you change the subtraction to addition? Try changing 'playButtonX - buttonWidth / 2' to 'playButtonX + buttonWidth / 2' and the hitbox will become impossible to click—this teaches you how boundary math works.

  if (mouseX > playButtonX - buttonWidth / 2 && mouseX < playButtonX + buttonWidth / 2 &&
    mouseY > playButtonY - buttonHeight / 2 && mouseY < playButtonY + buttonHeight / 2) {
function handleMenuClicks() {
  let playButtonX = width / 2;
  let playButtonY = height / 2;
  let buttonWidth = 200;
  let buttonHeight = 60;

  if (mouseX > playButtonX - buttonWidth / 2 && mouseX < playButtonX + buttonWidth / 2 &&
    mouseY > playButtonY - buttonHeight / 2 && mouseY < playButtonY + buttonHeight / 2) {
    gameState = GAME_STATES.GAMEPLAY;
    restartGame();
    return;
  }

  let outfitsButtonY = playButtonY + buttonHeight + 20;
  if (mouseX > playButtonX - buttonWidth / 2 && mouseX < playButtonX + buttonWidth / 2 &&
    mouseY > outfitsButtonY - buttonHeight / 2 && mouseY < outfitsButtonY + buttonHeight / 2) {
    gameState = GAME_STATES.OUTFITS_MENU;
    return;
  }
}
Line-by-line explanation (5 lines)

🔧 Subcomponents:

conditional Play button collision detection if (mouseX > playButtonX - buttonWidth / 2 && mouseX < playButtonX + buttonWidth / 2 && mouseY > playButtonY - buttonHeight / 2 && mouseY < playButtonY + buttonHeight / 2) {

Tests whether the mouse click is inside the Play button's rectangular boundary

conditional Outfits button collision detection if (mouseX > playButtonX - buttonWidth / 2 && mouseX < playButtonX + buttonWidth / 2 && mouseY > outfitsButtonY - buttonHeight / 2 && mouseY < outfitsButtonY + buttonHeight / 2) {

Tests whether the mouse click is inside the Outfits button's rectangular boundary

let playButtonX = width / 2;
Recalculates the button positions (must match drawMenu() exactly or buttons won't align with visual display)
if (mouseX > playButtonX - buttonWidth / 2 && mouseX < playButtonX + buttonWidth / 2 &&
Tests if the mouse x is within the button's left and right edges
mouseY > playButtonY - buttonHeight / 2 && mouseY < playButtonY + buttonHeight / 2) {
Tests if the mouse y is within the button's top and bottom edges; if both x and y are in bounds, click is detected
gameState = GAME_STATES.GAMEPLAY;
Transitions to gameplay mode when Play is clicked
restartGame();
Resets score, lives, and snake position to start values

handleOutfitsMenuClicks()

This function mirrors the structure of drawOutfitsMenu(), recalculating button positions and testing clicks. The key pattern: drawing and click detection must use identical math or buttons won't align. Notice how it uses early returns (return;) to exit after each button press, preventing multiple simultaneous interactions.

function handleOutfitsMenuClicks() {
  let outfitsPerPage = 4;
  let startY = height / 2 - 100;
  let itemHeight = 100;
  let itemSpacing = 20;
  let totalOutfits = outfits.length;
  let maxPage = floor((totalOutfits - 1) / outfitsPerPage);

  outfitsMenuPage = constrain(outfitsMenuPage, 0, maxPage);

  let startIndex = outfitsMenuPage * outfitsPerPage;
  let endIndex = min(startIndex + outfitsPerPage, totalOutfits);

  for (let i = startIndex; i < endIndex; i++) {
    let outfit = outfits[i];
    let isCurrent = (i === currentOutfitIndex);
    let isUnlocked = outfit.unlocked;

    let pageIndex = i - startIndex;
    let itemY = startY + pageIndex * (itemHeight + itemSpacing);

    if (isUnlocked && !isCurrent) {
      let selectButtonX = width / 2 + 80;
      let selectButtonY = itemY + itemHeight / 2;
      let selectButtonWidth = 80;
      let selectButtonHeight = 40;

      if (mouseX > selectButtonX - selectButtonWidth / 2 && mouseX < selectButtonX + selectButtonWidth / 2 &&
        mouseY > selectButtonY - selectButtonHeight / 2 && mouseY < selectButtonY + selectButtonHeight / 2) {
        currentOutfitIndex = i;
        return;
      }
    }
  }

  let backButtonX = width / 2;
  let backButtonY = height - 50;
  let buttonWidth = 150;
  let buttonHeight = 50;

  if (mouseX > backButtonX - buttonWidth / 2 && mouseX < backButtonX + buttonWidth / 2 &&
    mouseY > backButtonY - buttonHeight / 2 && mouseY < backButtonY + buttonHeight / 2) {
    gameState = GAME_STATES.MENU;
    return;
  }

  let arrowSize = 30;
  let arrowOffset = 200;

  if (outfitsMenuPage > 0) {
    if (mouseX > width / 2 - arrowOffset - arrowSize / 2 && mouseX < width / 2 - arrowOffset + arrowSize / 2 &&
      mouseY > backButtonY - arrowSize / 2 && mouseY < backButtonY + arrowSize / 2) {
      outfitsMenuPage--;
      return;
    }
  }

  if (outfitsMenuPage < maxPage) {
    if (mouseX > width / 2 + arrowOffset - arrowSize / 2 && mouseX < width / 2 + arrowOffset + arrowSize / 2 &&
      mouseY > backButtonY - arrowSize / 2 && mouseY < backButtonY + arrowSize / 2) {
      outfitsMenuPage++;
      return;
    }
  }
}
Line-by-line explanation (5 lines)

🔧 Subcomponents:

for-loop Outfit select button detection for (let i = startIndex; i < endIndex; i++) { // ... hit detection for Select buttons ... }

Loops through outfit items on the current page and tests if the Select button was clicked

conditional Back button detection if (mouseX > backButtonX - buttonWidth / 2 && mouseX < backButtonX + buttonWidth / 2 && mouseY > backButtonY - buttonHeight / 2 && mouseY < backButtonY + buttonHeight / 2) {

Tests if the 'Go back to Lobby' button was clicked

conditional Pagination arrow detection if (outfitsMenuPage > 0) { if (mouseX > width / 2 - arrowOffset - arrowSize / 2 && mouseX < width / 2 - arrowOffset + arrowSize / 2 && mouseY > backButtonY - arrowSize / 2 && mouseY < backButtonY + arrowSize / 2) { outfitsMenuPage--; return; } } if (outfitsMenuPage < maxPage) { if (mouseX > width / 2 + arrowOffset - arrowSize / 2 && mouseX < width / 2 + arrowOffset + arrowSize / 2 && mouseY > backButtonY - arrowSize / 2 && mouseY < backButtonY + arrowSize / 2) { outfitsMenuPage++; return; } }

Tests if left or right pagination arrows were clicked, incrementing/decrementing the page number

for (let i = startIndex; i < endIndex; i++) {
Loops only through the 4 outfits on the current page
if (isUnlocked && !isCurrent) {
Only shows a Select button if the outfit is unlocked AND not already selected
currentOutfitIndex = i;
Changes the player's selected outfit to the one they clicked
if (outfitsMenuPage > 0) {
Only draws and checks the left arrow if there are earlier pages to go to
outfitsMenuPage--;
Moves to the previous page

handleGameOverClicks()

This is the simplest click handler—it just checks one button. It demonstrates the same AABB boundary test used in all the other menu handlers. Consistent use of this pattern across all menus makes the code predictable and maintainable.

function handleGameOverClicks() {
  let returnButtonX = width / 2;
  let returnButtonY = height / 2 + 60;
  let buttonWidth = 200;
  let buttonHeight = 60;

  if (mouseX > returnButtonX - buttonWidth / 2 && mouseX < returnButtonX + buttonWidth / 2 &&
    mouseY > returnButtonY - buttonHeight / 2 && mouseY < returnButtonY + buttonHeight / 2) {
    gameState = GAME_STATES.MENU;
    return;
  }
}
Line-by-line explanation (3 lines)
if (mouseX > returnButtonX - buttonWidth / 2 && mouseX < returnButtonX + buttonWidth / 2 &&
Tests if the mouse click's x coordinate is within the button's left and right boundaries
mouseY > returnButtonY - buttonHeight / 2 && mouseY < returnButtonY + buttonHeight / 2) {
Tests if the mouse click's y coordinate is within the button's top and bottom boundaries
gameState = GAME_STATES.MENU;
Transitions back to the main menu when the button is clicked

restartGame()

restartGame() is the nuclear reset button. It resets all game variables to their starting values and creates new Snake and Food objects. Notice how it also syncs the admin panel's UI to match the new state—this is important to prevent confusion when dev tools are open.

function restartGame() {
  gameOver = false;
  score = 0;
  lives = 1;
  snake = new Snake();
  food.pickLocation();
  frameRate(10);
  if (adminPanelExpanded) {
    select('#speed-slider').value(10);
    select('#score-input').value(0);
    select('#lives-input').value(1);
  }
  frameCountForSpeedDisplay = 0;
}
Line-by-line explanation (8 lines)
gameOver = false;
Resets the gameOver flag so the game is no longer in an ended state
score = 0;
Resets the score to zero
lives = 1;
Resets lives to 1 (meaning 2 total chances before true game over)
snake = new Snake();
Creates a brand new Snake object with zero length at the origin
food.pickLocation();
Places food at a random new grid location
frameRate(10);
Resets the game speed to 10 fps
if (adminPanelExpanded) {
If the admin panel is open, update its UI elements to reflect the new game state
frameCountForSpeedDisplay = 0;
Resets the frame counter used to throttle speed display updates

checkOutfitUnlocks()

checkOutfitUnlocks() runs every time the snake eats food. It compares the current score to each outfit's unlockScore threshold and marks new outfits as unlocked. This is a common pattern in games: checking progress milestones and triggering unlock systems. Notice it only saves to localStorage if something changed—a performance optimization to avoid unnecessary disk writes.

🔬 This loop checks score >= unlockScore. What if you changed >= to ==? Then only exact score matches would unlock outfits, making them much harder to get. Try it and see how the game feels—this teaches you how small math changes affect game balance.

  let newUnlock = false;
  for (let outfit of outfits) {
    if (!outfit.unlocked && score >= outfit.unlockScore) {
      outfit.unlocked = true;
      newUnlock = true;
      console.log("Unlocked new outfit: " + outfit.name);
    }
  }
function checkOutfitUnlocks() {
  let newUnlock = false;
  for (let outfit of outfits) {
    if (!outfit.unlocked && score >= outfit.unlockScore) {
      outfit.unlocked = true;
      newUnlock = true;
      console.log("Unlocked new outfit: " + outfit.name);
    }
  }
  if (newUnlock) {
    saveUnlockedOutfits();
  }
}
Line-by-line explanation (7 lines)

🔧 Subcomponents:

for-loop Outfit unlock check loop for (let outfit of outfits) { if (!outfit.unlocked && score >= outfit.unlockScore) { outfit.unlocked = true; newUnlock = true; console.log("Unlocked new outfit: " + outfit.name); } }

Iterates through all outfits and unlocks any that match the current score threshold

let newUnlock = false;
Flag to track whether any new outfit was unlocked this frame
for (let outfit of outfits) {
Uses a for...of loop to iterate through each outfit object in the outfits array
if (!outfit.unlocked && score >= outfit.unlockScore) {
Checks if an outfit is locked AND the current score meets or exceeds its unlock threshold
outfit.unlocked = true;
Marks the outfit as unlocked
console.log("Unlocked new outfit: " + outfit.name);
Prints a message to the browser console for debugging
if (newUnlock) {
Only saves to localStorage if at least one new outfit was unlocked, avoiding unnecessary writes
saveUnlockedOutfits();
Persists the new unlock state to the browser's localStorage

toggleAdminPanel()

toggleAdminPanel() shows a key skill: managing responsive layout by resizing the canvas and showing/hiding DOM elements together. When the panel opens, the canvas shrinks to make room. When it closes, the canvas expands again. Notice how it repositions the canvas vertically to keep it centered. This is how professional tools manage real estate in their UIs.

function toggleAdminPanel() {
  adminPanelExpanded = !adminPanelExpanded;

  if (adminPanelExpanded) {
    adminPanelContainer.addClass('admin-panel-expanded');
    adminPanelToggle.hide();
    gameCanvas.size(windowWidth - adminPanelWidth, windowHeight * 0.85);
    gameCanvas.position(0, (windowHeight - gameCanvas.height) / 2);
  } else {
    adminPanelContainer.removeClass('admin-panel-expanded');
    adminPanelToggle.show();
    gameCanvas.size(windowWidth, windowHeight * 0.85);
    gameCanvas.position(0, (windowHeight - gameCanvas.height) / 2);
  }
}
Line-by-line explanation (6 lines)

🔧 Subcomponents:

conditional Panel expansion/collapse if (adminPanelExpanded) { adminPanelContainer.addClass('admin-panel-expanded'); adminPanelToggle.hide(); gameCanvas.size(windowWidth - adminPanelWidth, windowHeight * 0.85); gameCanvas.position(0, (windowHeight - gameCanvas.height) / 2); } else { adminPanelContainer.removeClass('admin-panel-expanded'); adminPanelToggle.show(); gameCanvas.size(windowWidth, windowHeight * 0.85); gameCanvas.position(0, (windowHeight - gameCanvas.height) / 2); }

Expands the admin panel and shrinks the canvas, or collapses the panel and expands the canvas

adminPanelExpanded = !adminPanelExpanded;
Flips the boolean: if the panel is expanded, make it collapsed; if collapsed, make it expanded
adminPanelContainer.addClass('admin-panel-expanded');
Applies CSS class 'admin-panel-expanded' which displays the panel (defined in style.css)
adminPanelToggle.hide();
Hides the gear icon button since the panel is now visible and has its own close button
gameCanvas.size(windowWidth - adminPanelWidth, windowHeight * 0.85);
Shrinks the canvas width to make room for the 250-pixel-wide panel
adminPanelContainer.removeClass('admin-panel-expanded');
Removes the CSS class, hiding the panel
adminPanelToggle.show();
Shows the gear icon again so the user can re-open the panel

windowResized()

windowResized() is p5.js's built-in function called whenever the browser window is resized. This version maintains responsive layout by resizing the canvas and re-centering it. Notice it checks adminPanelExpanded to account for the panel's width. This is a best practice: always respond to window resize events if you want your sketch to feel native.

function windowResized() {
  let canvasHeight = windowHeight * 0.85;

  if (adminPanelExpanded) {
    resizeCanvas(windowWidth - adminPanelWidth, canvasHeight);
    gameCanvas.position(0, (windowHeight - canvasHeight) / 2);
  } else {
    resizeCanvas(windowWidth, canvasHeight);
    gameCanvas.position(0, (windowHeight - canvasHeight) / 2);
  }

  updateOutfitsList();
}
Line-by-line explanation (5 lines)

🔧 Subcomponents:

conditional Responsive canvas resizing if (adminPanelExpanded) { resizeCanvas(windowWidth - adminPanelWidth, canvasHeight); gameCanvas.position(0, (windowHeight - canvasHeight) / 2); } else { resizeCanvas(windowWidth, canvasHeight); gameCanvas.position(0, (windowHeight - canvasHeight) / 2); }

Resizes the canvas when the browser window changes, accounting for the admin panel's width if it's open

let canvasHeight = windowHeight * 0.85;
Calculates the game area height as 85% of the window (leaving room for margin/UI)
if (adminPanelExpanded) {
Checks whether the admin panel is currently open
resizeCanvas(windowWidth - adminPanelWidth, canvasHeight);
If panel is open, shrink canvas width to make room for the 250-pixel panel
resizeCanvas(windowWidth, canvasHeight);
If panel is closed, resize canvas to full window width
gameCanvas.position(0, (windowHeight - canvasHeight) / 2);
Vertically center the canvas each time

loadUnlockedOutfits()

loadUnlockedOutfits() runs in setup() to restore player progress from the browser's localStorage. This is how game progress persists across sessions. The key skill: JSON.parse() converts a string back into a JavaScript object/array. Paired with JSON.stringify() (in saveUnlockedOutfits), this is how you save and load complex data structures.

function loadUnlockedOutfits() {
  let unlockedData = localStorage.getItem('snakeGameOutfits');
  if (unlockedData) {
    let unlockedNames = JSON.parse(unlockedData);
    for (let outfit of outfits) {
      if (unlockedNames.includes(outfit.name)) {
        outfit.unlocked = true;
      }
    }
  }
}
Line-by-line explanation (6 lines)

🔧 Subcomponents:

conditional LocalStorage data retrieval if (unlockedData) { let unlockedNames = JSON.parse(unlockedData); for (let outfit of outfits) { if (unlockedNames.includes(outfit.name)) { outfit.unlocked = true; } } }

Reads unlocked outfit names from localStorage and marks matching outfits as unlocked

let unlockedData = localStorage.getItem('snakeGameOutfits');
Retrieves the saved unlock data from the browser's localStorage; returns null if no data was saved yet
if (unlockedData) {
Only processes if data exists (first game won't have any saved data)
let unlockedNames = JSON.parse(unlockedData);
Converts the JSON string back into a JavaScript array of outfit names
for (let outfit of outfits) {
Iterates through all outfits
if (unlockedNames.includes(outfit.name)) {
Checks if this outfit's name is in the saved list
outfit.unlocked = true;
Marks the outfit as unlocked in memory

saveUnlockedOutfits()

saveUnlockedOutfits() is called whenever a new outfit is unlocked. It uses filter() to get only unlocked outfits and map() to extract just their names. Then JSON.stringify() serializes the array into a string for storage. This is a compact, functional programming approach—chaining array methods makes the code concise and readable.

function saveUnlockedOutfits() {
  let unlockedNames = outfits.filter(o => o.unlocked).map(o => o.name);
  localStorage.setItem('snakeGameOutfits', JSON.stringify(unlockedNames));
}
Line-by-line explanation (2 lines)
let unlockedNames = outfits.filter(o => o.unlocked).map(o => o.name);
Chains two array methods: filter() gets only unlocked outfits, then map() extracts their names into a new array
localStorage.setItem('snakeGameOutfits', JSON.stringify(unlockedNames));
Converts the array to a JSON string and saves it to localStorage under the key 'snakeGameOutfits'

createAdminPanel()

createAdminPanel() builds the entire developer control panel using p5.js DOM functions (createSlider, createInput, createButton, etc.). It demonstrates how to create HTML elements, wire them to event listeners, and style them. This is the full toolkit for embedding interactive controls in a p5.js sketch. Notice how each control has an id so it can be found later (e.g., #speed-display), and how arrow functions (() => {}) are used for event callbacks.

function createAdminPanel() {
  adminPanelContainer = select('#admin-panel-container');
  adminPanelContent = createElement('div');
  adminPanelContent.id('admin-panel');
  adminPanelContainer.child(adminPanelContent);

  adminPanelToggle = select('#admin-panel-toggle');
  adminPanelToggle.mousePressed(toggleAdminPanel);

  let closeButton = createButton('Close Panel');
  closeButton.id('admin-panel-close');
  closeButton.mousePressed(toggleAdminPanel);
  adminPanelContent.child(closeButton);

  adminPanelContent.html('<h2>Admin Panel</h2>', true);

  adminPanelContent.child(createP('Snake Speed: <span id="speed-display">10 fps</span>'));
  let speedSlider = createSlider(1, 60, 10, 1);
  speedSlider.id('speed-slider');
  speedSlider.style('width', '90%');
  speedSlider.input(() => frameRate(speedSlider.value()));
  adminPanelContent.child(speedSlider);

  adminPanelContent.child(createP('Set Score:'));
  let scoreInput = createInput(score, 'number');
  scoreInput.id('score-input');
  scoreInput.style('width', '80px');
  adminPanelContent.child(scoreInput);
  let scoreButton = createButton('Set Score');
  scoreButton.mousePressed(() => score = int(scoreInput.value()));
  adminPanelContent.child(scoreButton);
  
  adminPanelContent.child(createP('Set Lives:'));
  let livesInput = createInput(lives, 'number');
  livesInput.id('lives-input');
  livesInput.style('width', '80px');
  adminPanelContent.child(livesInput);
  let livesButton = createButton('Set Lives');
  livesButton.mousePressed(() => lives = int(livesInput.value()));
  adminPanelContent.child(livesButton);

  adminPanelContent.child(createElement('hr'));

  let addLengthButton = createButton('Add 5 Segments');
  addLengthButton.mousePressed(() => snake.total += 5);
  adminPanelContent.child(addLengthButton);

  let gameOverButton = createButton('Force Game Over');
  gameOverButton.mousePressed(() => {
    gameOver = true;
    gameState = GAME_STATES.GAMEOVER;
  });
  adminPanelContent.child(gameOverButton);

  let restartButton = createButton('Restart Game');
  restartButton.mousePressed(restartGame);
  adminPanelContent.child(restartButton);

  adminPanelContent.child(createElement('hr'));

  let spawnFoodButton = createButton('Spawn Food');
  spawnFoodButton.mousePressed(() => food.pickLocation());
  adminPanelContent.child(spawnFoodButton);

  adminPanelContent.child(createElement('hr'));

  adminPanelContent.child(createP('Teleport Snake (X, Y):'));
  let teleportXInput = createInput('0', 'number');
  teleportXInput.id('teleport-x');
  teleportXInput.style('width', '60px');
  adminPanelContent.child(teleportXInput);
  adminPanelContent.child(createElement('span', ', '));
  let teleportYInput = createInput('0', 'number');
  teleportYInput.id('teleport-y');
  teleportYInput.style('width', '60px');
  adminPanelContent.child(teleportYInput);
  adminPanelContent.child(createElement('br'));
  let teleportButton = createButton('Teleport');
  teleportButton.mousePressed(() => {
    snake.x = int(teleportXInput.value()) * scl;
    snake.y = int(teleportYInput.value()) * scl;
  });
  adminPanelContent.child(teleportButton);
}
Line-by-line explanation (8 lines)

🔧 Subcomponents:

calculation Speed slider creation let speedSlider = createSlider(1, 60, 10, 1); speedSlider.id('speed-slider'); speedSlider.style('width', '90%'); speedSlider.input(() => frameRate(speedSlider.value()));

Creates a slider from 1 to 60 fps and wires it to change the game's frame rate in real-time

adminPanelContainer = select('#admin-panel-container');
Finds the HTML div with id 'admin-panel-container' and stores it
adminPanelContent = createElement('div');
Creates a new div element for the panel's content
adminPanelContent.id('admin-panel');
Assigns the id 'admin-panel' so CSS styling applies to it
adminPanelToggle = select('#admin-panel-toggle');
Finds the gear icon button in the HTML
adminPanelToggle.mousePressed(toggleAdminPanel);
Wires the gear icon to call toggleAdminPanel() when clicked
let speedSlider = createSlider(1, 60, 10, 1);
Creates a slider: min=1 fps, max=60 fps, default=10 fps, step=1
speedSlider.input(() => frameRate(speedSlider.value()));
Wires the slider so changing it immediately calls frameRate() with the new value
let scoreButton = createButton('Set Score');
Creates a button that sets the game score to the value in the scoreInput field

Snake class

The Snake class encapsulates all the snake's state (position, velocity, tail) and behavior (movement, collision, drawing). The key insight: the tail is stored in reverse order with unshift/pop, so the oldest segment is at the end and gets removed first. This is how the snake appears to 'slide' across the screen—new head positions are added, old tail segments are deleted.

🔬 This method is the heartbeat of the game. First it records the current head position, then removes the oldest tail segment if needed, then moves the head. What happens if you reverse the order and move the head BEFORE recording the position? Try cutting and pasting the movement lines before the unshift—the snake will lag behind the movement.

  update() {
    this.tail.unshift(createVector(this.x, this.y));
    if (this.tail.length > this.total) {
      this.tail.pop();
    }
    this.x += this.xspeed * scl;
    this.y += this.yspeed * scl;
  }
class Snake {
  constructor() {
    this.x = 0;
    this.y = 0;
    this.xspeed = 1;
    this.yspeed = 0;
    this.tail = [];
    this.total = 0;
  }

  setDir(x, y) {
    this.xspeed = x;
    this.yspeed = y;
  }

  eat(pos) {
    if (this.x === pos.x && this.y === pos.y) {
      this.total++;
      return true;
    }
    return false;
  }

  update() {
    this.tail.unshift(createVector(this.x, this.y));
    if (this.tail.length > this.total) {
      this.tail.pop();
    }
    this.x += this.xspeed * scl;
    this.y += this.yspeed * scl;
  }

  show() {
    noStroke();
    let bodyColor = outfits[currentOutfitIndex].bodyColor;
    let headColor = outfits[currentOutfitIndex].headColor;

    fill(bodyColor);
    for (let i = 0; i < this.tail.length; i++) {
      ellipse(this.tail[i].x + scl / 2, this.tail[i].y + scl / 2, scl);
    }

    fill(headColor);
    ellipse(this.x + scl / 2, this.y + scl / 2, scl * 1.2);
  }

  checkDeath() {
    if (this.x < 0 || this.x >= width || this.y < 0 || this.y >= height) {
      lives--;
      return true;
    }
    for (let i = 0; i < this.tail.length; i++) {
      let pos = this.tail[i];
      if (this.x === pos.x && this.y === pos.y) {
        lives--;
        return true;
      }
    }
    return false;
  }
}
Line-by-line explanation (13 lines)

🔧 Subcomponents:

calculation Snake initialization constructor() { this.x = 0; this.y = 0; this.xspeed = 1; this.yspeed = 0; this.tail = []; this.total = 0; }

Initializes a new snake at the origin (0,0) with zero length, moving right by default

calculation Tail tracking in update() this.tail.unshift(createVector(this.x, this.y)); if (this.tail.length > this.total) { this.tail.pop(); }

Records the snake's current position at the head of the tail array, then removes the oldest tail segment if the snake isn't growing

conditional Death detection in checkDeath() if (this.x < 0 || this.x >= width || this.y < 0 || this.y >= height) { lives--; return true; } for (let i = 0; i < this.tail.length; i++) { let pos = this.tail[i]; if (this.x === pos.x && this.y === pos.y) { lives--; return true; } }

Tests whether the snake hit a boundary or collided with its own tail

this.x = 0;
Starting x position (grid column 0)
this.xspeed = 1;
Horizontal velocity: 1 means moving right, -1 means moving left, 0 means stationary
this.tail = [];
Empty array that will store all the body segments as p5.Vector objects
this.total = 0;
How many segments the tail should contain; grows by 1 each time the snake eats
setDir(x, y) {
Method to change the snake's direction: call setDir(1, 0) to move right, setDir(0, -1) to move up, etc.
eat(pos) {
Checks if the head's position matches the food's position; increments total if true
this.tail.unshift(createVector(this.x, this.y));
Adds the current head position to the front of the tail array (unshift = add to beginning)
if (this.tail.length > this.total) {
If the tail is longer than it should be (e.g., 5 segments but total is 3), remove the oldest segment
this.tail.pop();
Removes the last element of the tail array
this.x += this.xspeed * scl;
Moves the head one grid cell in the x direction: multiply speed by scl (grid size)
fill(bodyColor);
Sets the fill color to the current outfit's body color before drawing tail segments
ellipse(this.tail[i].x + scl / 2, this.tail[i].y + scl / 2, scl);
Draws the tail segment centered in its grid cell (adding scl/2 to center it)
ellipse(this.x + scl / 2, this.y + scl / 2, scl * 1.2);
Draws the head slightly larger (1.2x) to distinguish it from body segments

Food class

The Food class is simpler than Snake, but it teaches an important skill: converting between grid coordinates and pixel coordinates. random(cols) picks a random grid column (0 to cols-1), then multiplying by scl converts that back to pixels for drawing. This grid-to-pixel conversion is used in almost every tile-based game.

🔬 This method calculates the number of grid cells and picks a random one. The key: it multiplies by scl at the end to convert from grid coordinates back to pixels. What if you didn't multiply by scl? Try removing the '* scl' at the end—food will spawn scattered randomly instead of snapping to the grid.

  pickLocation() {
    let cols = floor(width / scl);
    let rows = floor(height / scl);
    this.pos = createVector(floor(random(cols)) * scl, floor(random(rows)) * scl);
  }
class Food {
  constructor() {
    this.pos = createVector();
  }

  pickLocation() {
    let cols = floor(width / scl);
    let rows = floor(height / scl);
    this.pos = createVector(floor(random(cols)) * scl, floor(random(rows)) * scl);
  }

  show() {
    fill(255, 0, 100);
    rect(this.pos.x, this.pos.y, scl, scl);
  }
}
Line-by-line explanation (6 lines)

🔧 Subcomponents:

calculation Random grid placement let cols = floor(width / scl); let rows = floor(height / scl); this.pos = createVector(floor(random(cols)) * scl, floor(random(rows)) * scl);

Calculates how many grid cells fit on the canvas, then picks a random cell and converts it back to pixel coordinates

this.pos = createVector();
Initializes the food's position as a p5.Vector object (will be set by pickLocation())
let cols = floor(width / scl);
Calculates how many grid columns fit on the canvas: e.g., if width is 400 and scl is 20, cols = 20
let rows = floor(height / scl);
Calculates how many grid rows fit on the canvas
floor(random(cols)) * scl
Picks a random integer from 0 to cols-1, then multiplies by scl to convert back to pixel coordinates
fill(255, 0, 100);
Sets fill to a bright pink color (RGB: 255 red, 0 green, 100 blue)
rect(this.pos.x, this.pos.y, scl, scl);
Draws a square at the food's grid position, sized to one grid cell

📦 Key Variables

snake Snake object

Stores the player's snake, with properties for position (x, y), velocity (xspeed, yspeed), and tail array

let snake = new Snake();
food Food object

Stores the current food's position as a p5.Vector; gets repositioned each time the snake eats

let food = new Food();
scl number

The size of each grid cell in pixels (grid scale). All positions are multiples of scl to snap to the grid

let scl = 20;
score number

Tracks the player's current score, incremented by 10 each time food is eaten. Drives outfit unlocks

let score = 0;
gameState string

The current screen being displayed: MENU, OUTFITS_MENU, GAMEPLAY, or GAMEOVER. Used by draw() to dispatch to the correct drawing function

let gameState = GAME_STATES.MENU;
lives number

Number of extra respawns before true game over. Decrements by 1 each time the snake dies

let lives = 1;
outfits array of objects

Array of outfit configurations, each with name, bodyColor, headColor, unlocked status, and unlockScore threshold

let outfits = [{ name: "Default Green", bodyColor: [0, 0, 0], headColor: [50, 150, 0], unlocked: true, unlockScore: 0 }, ...]
currentOutfitIndex number

Index into the outfits array; selects which outfit colors the snake currently uses

let currentOutfitIndex = 0;
adminPanelExpanded boolean

Tracks whether the developer admin panel is currently open or closed

let adminPanelExpanded = false;
outfitsMenuPage number

Current page number in the paginated outfit selection menu; incremented/decremented by pagination arrows

let outfitsMenuPage = 0;

🔧 Potential Improvements (6)

Here are some ways this code could be enhanced:

BUG Snake.checkDeath()

The collision boundary check uses >= for width and height, but the snake can go slightly out of bounds before hitting; also doesn't account for snake head radius (scl * 1.2)

💡 Use exact boundary checks: 'if (this.x < 0 || this.x + scl > width || this.y < 0 || this.y + scl > height)' to be more precise

PERFORMANCE drawOutfitsMenu() and handleOutfitsMenuClicks()

Button position calculations are duplicated in two places; if a designer changes button sizes, they must update both functions or clicks won't match visuals

💡 Extract button position calculations into a helper function like 'getOutfitButtonBounds(index)' to keep them in sync

STYLE Multiple click handlers (handleMenuClicks, handleOutfitsMenuClicks, handleGameOverClicks)

Each handler recalculates button positions using hardcoded numbers. The code is repetitive and fragile

💡 Create a reusable collision detection function like 'isClickInBounds(mx, my, cx, cy, w, h)' to reduce duplication

FEATURE Game over screen

When the game ends, there's no display of the final score to celebrate the player's achievement

💡 Add 'text("Final Score: " + score, width / 2, height / 2 + 100);' to show the score on the game over screen

FEATURE Gameplay

The snake can instantly reverse into itself if the player holds down opposite arrow keys in quick succession

💡 Implement a command queue to buffer the next direction, preventing accidental reversal within a single frame

STYLE Food spawning

Food can spawn on top of the snake, making it impossible to eat immediately without moving

💡 Before calling food.pickLocation(), check that the new position doesn't overlap the snake's body and loop until a safe spot is found

🔄 Code Flow

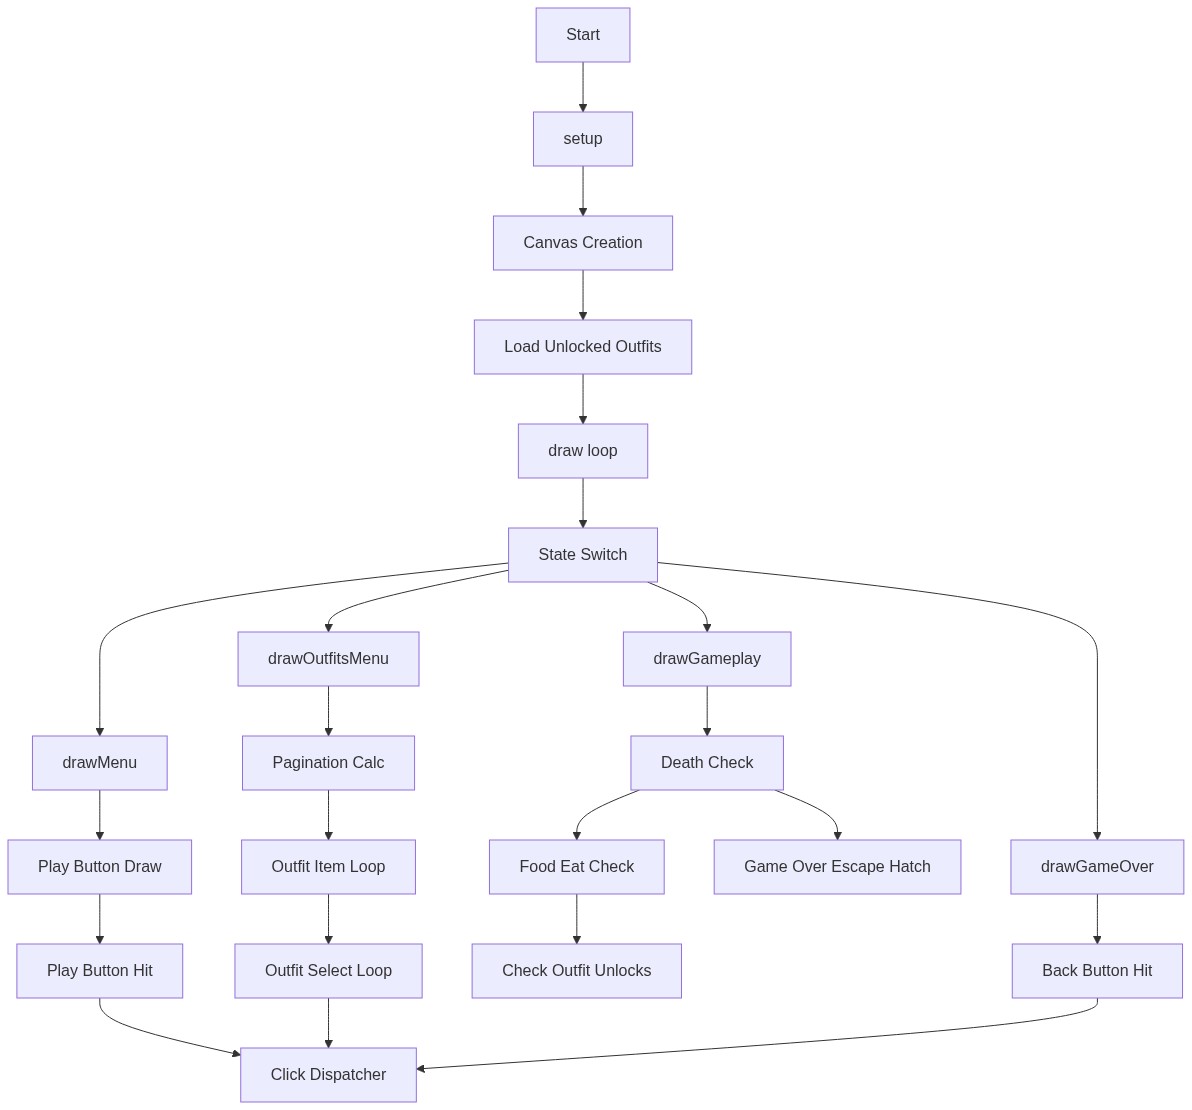
Code flow showing setup, draw, drawmenu, drawoutfitsmenu, drawgameplay, drawgameover, keypressed, mousepressed, handlemenclicks, handleoutfitsmenclicks, handlegameoerclicks, restartgame, checkoutfitunlocks, toggleadminpanel, windowresized, loadunlockedoutfits, saveunlockedoutfits, createadminpanel, snake, food

💡 Click on function names in the diagram to jump to their code

graph TD start[Start] --> setup[setup] setup --> canvas-creation[Canvas Creation] canvas-creation --> load-unlocked-outfits[Load Unlocked Outfits] load-unlocked-outfits --> draw[draw loop] draw --> state-switch[State Switch] state-switch --> drawmenu[drawMenu] state-switch --> drawoutfitsmenu[drawOutfitsMenu] state-switch --> drawgameplay[drawGameplay] state-switch --> drawgameover[drawGameOver] drawmenu --> play-button-draw[Play Button Draw] play-button-draw --> play-button-hit[Play Button Hit] play-button-hit --> click-dispatcher[Click Dispatcher] drawoutfitsmenu --> pagination-calc[Pagination Calc] pagination-calc --> outfit-item-loop[Outfit Item Loop] outfit-item-loop --> outfit-select-loop[Outfit Select Loop] outfit-select-loop --> click-dispatcher drawgameplay --> death-check[Death Check] death-check --> food-eat-check[Food Eat Check] food-eat-check --> checkoutfitunlocks[Check Outfit Unlocks] death-check --> gameover-escape[Game Over Escape Hatch] drawgameover --> back-button-hit[Back Button Hit] back-button-hit --> click-dispatcher click setup href "#fn-setup" click draw href "#fn-draw" click canvas-creation href "#sub-canvas-creation" click load-unlocked-outfits href "#sub-load-outfits" click state-switch href "#sub-state-switch" click drawmenu href "#fn-drawmenu" click play-button-draw href "#sub-play-button-draw" click play-button-hit href "#sub-play-button-hit" click click-dispatcher href "#sub-click-dispatcher" click drawoutfitsmenu href "#fn-drawoutfitsmenu" click pagination-calc href "#sub-pagination-calc" click outfit-item-loop href "#sub-outfit-item-loop" click outfit-select-loop href "#sub-outfit-select-loop" click drawgameplay href "#fn-drawgameplay" click death-check href "#sub-death-check" click food-eat-check href "#sub-food-eat-check" click checkoutfitunlocks href "#fn-checkoutfitunlocks" click gameover-escape href "#sub-gameover-escape" click drawgameover href "#fn-drawgameover" click back-button-hit href "#sub-back-button-hit"

❓ Frequently Asked Questions

What visual experience does the best snake game (Remix) offer?

The sketch features a colorful, grid-based world where players control a snake that grows in length as it consumes food, complemented by vibrant outfits that can be unlocked.

How can players interact with the snake game to enhance their experience?

Users can navigate through menus to select different outfits, switch styles, and engage in gameplay while aiming to increase their score and avoid a game over.

What creative coding concepts are showcased in the best snake game (Remix)?

This sketch demonstrates concepts of game state management, outfit customization, and real-time user interaction within a simple yet engaging grid-based environment.

Preview

The best snake game (Remix) - p5.js creative coding sketch preview
Sketch Preview
Code flow diagram showing the structure of The best snake game (Remix) - Code flow showing setup, draw, drawmenu, drawoutfitsmenu, drawgameplay, drawgameover, keypressed, mousepressed, handlemenclicks, handleoutfitsmenclicks, handlegameoerclicks, restartgame, checkoutfitunlocks, toggleadminpanel, windowresized, loadunlockedoutfits, saveunlockedoutfits, createadminpanel, snake, food
Code Flow Diagram