this is my first project

This is a clicker game inspired by CS:GO where players click a central target to earn money, buy upgrades that increase click power or passive income, and unlock a mod menu with cheats. The game features a dynamic gradient background, visual click effects, and a responsive UI with an upgrade panel and dat.gui mod controls.

🧪 Try This!

Experiment with the code by making these changes:

  1. Triple the starting click power — Each click earns 3 money instead of 1, making the early game progress much faster
  2. Make upgrades cost less money — Changing the cost values in the upgrades array makes all upgrades much more affordable to test quickly
  3. Make the target twice as big — The target circle will be much larger, making it easier to click
  4. Change the background gradient colors — The animated gradient background will shift from purple-to-blue instead of grey-to-dark-blue for a different mood
  5. Start with passive income — The player begins earning 5 money per second automatically, even at the game start
Prefer the full editor? Open it there →

📖 About This Sketch

This sketch creates an engaging clicker game where you repeatedly click a central crosshair target to earn money, then spend that money on upgrades that boost your clicking power or generate passive income over time. The visuals include a dynamic animated gradient background, hover effects on the target, fading yellow shot particles, and a crosshair that follows your mouse. The game demonstrates core p5.js techniques: the animation loop, mouse interaction, state management with objects and arrays, custom drawing functions, and integration of external UI libraries like dat.gui for a mod menu.

The code is organized into setup logic that initializes the canvas and UI elements, a continuous draw loop that handles animation and passive income, and helper functions for purchasing upgrades, drawing the target, and triggering click effects. By studying it, you will learn how to build a complete game system with economies, upgrade trees, and cheat menus—patterns that appear in everything from Idle Clicker games to game modding frameworks.

⚙️ How It Works

  1. When the sketch loads, setup() creates a full-screen canvas, positions a semi-transparent upgrade panel on the left side, creates four upgrade buttons dynamically from an array, and initializes a dat.gui mod menu in the top-right corner with options to auto-click, add money, unlock upgrades, or reset the game.
  2. Every frame, draw() renders a smooth animated gradient background using noise-based texture, updates the player's money by adding passive income every frame based on elapsed time, and checks if the mouse is hovering over the central target to enable a visual highlight effect.
  3. When you click inside the target circle, mousePressed() triggers doClick(), which adds clickPower to money, plays a sound, and creates a fading yellow particle effect at the click location.
  4. The upgrade panel on the left displays all four available upgrades as buttons. When you click a button, buyUpgrade() checks if you have enough money, deducts the cost, applies the upgrade's effect (increasing clickPower or passiveIncome), and marks it as bought so the button turns green and disables.
  5. The dat.gui mod menu allows cheating: the Auto Clicker toggle makes the game click automatically every 10 frames, the Add Money button instantly gives 10,000, Unlock All Upgrades applies all remaining upgrades for free, and Reset Game returns all stats to their starting values.
  6. Visual feedback appears everywhere: the HUD displays current money and stats at the top, the target glows yellow when hovered, shot effects fade away to show activity, and upgrade buttons change color based on affordability (blue when you can buy, green when bought, gray when too expensive).

🎓 Concepts You'll Learn

Game loop and animationMouse interaction and collision detectionState management with arrays and objectsUpgrade systems and economy mechanicsPassive income calculation with delta timeExternal UI library integration (dat.gui)Dynamic visual feedback and particle effects

📝 Code Breakdown

preload()

preload() runs before setup() and is the right place to load images, sounds, and other files. Without preload(), your sketch might try to use files before they finish downloading.

function preload() {
  photo_1772817628708 = loadImage('photo-1772817628708.png');
  clickSound = loadSound('https://p5js.org/examples/assets/ping.mp3');
  // Placeholder sound, replace with an actual click/gun sound if you have one
}
Line-by-line explanation (2 lines)
photo_1772817628708 = loadImage('photo-1772817628708.png');
Loads an image file before setup runs (though the image is not currently used in the sketch)
clickSound = loadSound('https://p5js.org/examples/assets/ping.mp3');
Loads a sound file from a URL so it can be played when you click—essential to load in preload() before the game starts

setup()

setup() runs once at the start and is where you initialize your game state, create UI elements, and prepare variables. The button loop demonstrates dynamic UI creation—a powerful pattern for games with many items.

function setup() {
  createCanvas(windowWidth, windowHeight);
  lastPassiveTime = millis(); // Initialize passive income timer

  targetX = width / 2;
  targetY = height / 2;
  targetSize = min(width, height) * 0.4; // Target is 40% of the smaller dimension

  // Use CSS font for 2D canvas
  textFont('Orbitron');

  // Create a panel for upgrade buttons
  upgradePanel = createDiv();
  upgradePanel.class('upgrade-panel'); // Add a class for CSS styling
  upgradePanel.position(0, 0); // Positioned by CSS
  upgradePanel.style('width', '250px'); // Fixed width for the panel
  upgradePanel.style('height', '100%');
  upgradePanel.style('overflow-y', 'auto'); // Allow scrolling if many upgrades

  // Create upgrade buttons and append to the upgrade panel
  for (let i = 0; i < upgrades.length; i++) {
    let upgrade = upgrades[i];
    let btn = createButton(`${upgrade.name} ($${upgrade.cost})`);
    btn.style('font-size', '16px');
    btn.style('background-color', '#008CBA'); // Default blue
    btn.style('color', 'white');
    btn.style('border', 'none');
    btn.style('border-radius', '5px');
    btn.style('cursor', 'pointer');
    btn.mousePressed(() => buyUpgrade(upgrade));
    upgradeButtons.push(btn);
    upgradePanel.child(btn); // Add button to the upgrade panel
  }

  // Initialize dat.gui for the "Mod Menu"
  gui = new dat.GUI();
  gui.add(mods, 'autoClick').name('Auto Clicker');
  gui.add(mods, 'addMoney').name('Add 10,000 Money');
  gui.add(mods, 'unlockAllUpgrades').name('Unlock All Upgrades');
  gui.add(mods, 'resetGame').name('Reset Game');

  // Start audio on user gesture
  userStartAudio();
}
Line-by-line explanation (13 lines)

🔧 Subcomponents:

calculation Canvas and target initialization createCanvas(windowWidth, windowHeight);

Creates a full-screen canvas and positions the clickable target in the center

for-loop Upgrade button generation loop for (let i = 0; i < upgrades.length; i++)

Dynamically creates a button for each upgrade in the upgrades array

calculation dat.GUI mod menu initialization gui = new dat.GUI();

Creates the mod menu UI that allows players to activate cheats

createCanvas(windowWidth, windowHeight);
Creates a canvas that fills the entire window—the stage where all game graphics appear
lastPassiveTime = millis();
Records the current time in milliseconds so the game knows when to calculate passive income each frame
targetX = width / 2;
Places the clickable target at the horizontal center of the canvas
targetY = height / 2;
Places the clickable target at the vertical center of the canvas
targetSize = min(width, height) * 0.4;
Makes the target 40% of the smaller dimension (width or height) so it scales responsively on different screen sizes
textFont('Orbitron');
Sets the font for all text to 'Orbitron' (loaded in the CSS)—a futuristic style matching the game's theme
upgradePanel = createDiv();
Creates an empty HTML div container that will hold all the upgrade buttons
upgradePanel.class('upgrade-panel');
Applies CSS styling from the style.css file to position and style the panel
for (let i = 0; i < upgrades.length; i++) {
Loops through each upgrade object in the upgrades array to create a button for it
btn.mousePressed(() => buyUpgrade(upgrade));
Connects the button click event to the buyUpgrade function, passing the upgrade data
upgradePanel.child(btn);
Adds the button to the upgrade panel so it appears on screen
gui = new dat.GUI();
Creates the dat.gui interface that will display the mod menu controls
userStartAudio();
Allows the browser to play sounds in response to user interaction (required for web audio)

setGradient(c1, c2)

setGradient() is called every frame to paint the background. It demonstrates three powerful techniques: loops to build complex visuals, Perlin noise for organic randomness, and color blending with lerpColor(). The noise animation happens because frameCount increments every frame.

function setGradient(c1, c2) {
  for (let y = 0; y < height; y++) {
    let inter = map(y, 0, height, 0, 1);

    // Add a subtle noise-based offset to the interpolation factor
    // This creates a slightly wavy, textured gradient that animates over time
    let noiseVal = noise(y * 0.005, frameCount * 0.003); // Adjust multipliers for desired scale and animation speed
    let noiseOffset = map(noiseVal, 0, 1, -0.03, 0.03); // Small offset, e.g., -3% to +3%

    // Apply offset, clamping to 0-1 range to prevent color errors
    inter = constrain(inter + noiseOffset, 0, 1);

    let c = lerpColor(c1, c2, inter);
    stroke(c);
    line(0, y, width, y);
  }
}
Line-by-line explanation (8 lines)

🔧 Subcomponents:

for-loop Horizontal line drawing loop for (let y = 0; y < height; y++)

Draws one horizontal line per pixel vertically, each a slightly different color to create a smooth gradient

calculation Perlin noise texture generation let noiseVal = noise(y * 0.005, frameCount * 0.003);

Generates natural-looking random variation that changes smoothly over time and space

for (let y = 0; y < height; y++) {
Loops from the top of the canvas (y=0) to the bottom, processing one pixel row at a time
let inter = map(y, 0, height, 0, 1);
Converts the pixel row number into a value between 0 and 1 that represents the gradient's position from top to bottom
let noiseVal = noise(y * 0.005, frameCount * 0.003);
Uses Perlin noise to generate a value between 0 and 1 based on vertical position and current frame—noise creates natural-looking variation
let noiseOffset = map(noiseVal, 0, 1, -0.03, 0.03);
Converts the noise value into a small offset (between -3% and +3%) to subtly distort the gradient for a textured effect
inter = constrain(inter + noiseOffset, 0, 1);
Adds the noise offset to the gradient position and clamps it between 0 and 1 to prevent colors from breaking
let c = lerpColor(c1, c2, inter);
Blends between the two input colors (c1 and c2) based on the position value—0 is pure c1, 1 is pure c2, 0.5 is halfway between
stroke(c);
Sets the drawing color to the blended color so the next line() call uses it
line(0, y, width, y);
Draws a horizontal line across the full width at row y, creating one slice of the gradient

draw()

draw() is the heart of the sketch—it runs 60 times per second and handles all animation, interaction, and state updates. Key patterns here: passive income uses delta time (time elapsed) to stay frame-rate independent, hover detection uses distance geometry, and the button loop demonstrates reactive UI that updates based on game state.

🔬 This code continuously adds passive income every frame using delta time. What happens if you multiply passiveIncome by 2 in this calculation? You'll earn money twice as fast without changing the upgrade values.

  // Update passive income
  let currentTime = millis();
  let deltaTime = (currentTime - lastPassiveTime) / 1000; // Convert to seconds
  money += passiveIncome * deltaTime;
  lastPassiveTime = currentTime;

🔬 Notice buttons change color based on affordability: blue when you can afford, gray when you can't. What if you add a fourth state—changing the text size when affordable? Try adding btn.style('font-size', '18px'); after btn.style('background-color', '#1E90FF');

    } else if (money >= upgrade.cost) {
      btn.html(`${upgrade.name} ($${upgrade.cost})`);
      btn.style('background-color', '#1E90FF'); // Dodger blue when affordable
      btn.removeAttribute('disabled'); // Enable button
    } else {
      btn.html(`${upgrade.name} ($${upgrade.cost})`);
      btn.style('background-color', '#888888'); // Gray when unaffordable
      btn.style('color', '#DDDDDD'); // Lighter gray text for unaffordable
      btn.attribute('disabled', ''); // Disable button
    }
function draw() {
  // Dynamic gradient background with noise texture
  setGradient(color(20, 30, 40), color(40, 50, 60)); // Dark grey to dark blue

  // Update passive income
  let currentTime = millis();
  let deltaTime = (currentTime - lastPassiveTime) / 1000; // Convert to seconds
  money += passiveIncome * deltaTime;
  lastPassiveTime = currentTime;

  // Check if mouse is over the target for hover effect
  let d = dist(mouseX, mouseY, targetX, targetY);
  isTargetHovered = (d < targetSize / 2);

  // Auto-clicker logic
  if (mods.autoClick) {
    if (frameCount % 10 === 0) { // Auto-click every 10 frames
      money += clickPower;
      // clickSound.play(); // Optional: play sound for auto-click
      // Add auto-click effect at target center
      shotEffects.push({
        x: targetX + random(-targetSize * 0.1, targetSize * 0.1),
        y: targetY + random(-targetSize * 0.1, targetSize * 0.1),
        alpha: 255,
        size: random(8, 15)
      });
    }
  }

  // Display money and stats (top HUD)
  textSize(24);
  fill(0, 255, 0); // Bright green for money
  textAlign(LEFT, CENTER);
  text(`Money: $${floor(money)}`, 270, 30); // Offset from upgrade panel

  textSize(16);
  fill(173, 216, 230); // Light blue for stats
  textAlign(RIGHT, CENTER);
  text(`Click Power: ${clickPower}`, width - 270, 30); // Offset from dat.gui
  text(`Passive Income: ${passiveIncome}/sec`, width - 270, 55);

  // Draw central target with hover effect
  drawTarget(isTargetHovered);

  // Draw shot effects
  for (let i = shotEffects.length - 1; i >= 0; i--) {
    let effect = shotEffects[i];
    noStroke();
    fill(255, 255, 0, effect.alpha); // Yellow-white fading effect
    ellipse(effect.x, effect.y, effect.size);
    effect.alpha -= 20; // Fade out faster for better visibility
    if (effect.alpha <= 0) {
      shotEffects.splice(i, 1); // Remove faded effects
    }
  }

  // Draw crosshair
  noFill();
  stroke(255, 200); // More opaque white for better visibility
  strokeWeight(3); // Slightly thicker for better visibility
  let crosshairSize = 30;
  line(mouseX - crosshairSize / 2, mouseY, mouseX + crosshairSize / 2, mouseY);
  line(mouseX, mouseY - crosshairSize / 2, mouseX, mouseY + crosshairSize / 2);

  // Update upgrade button states
  for (let i = 0; i < upgrades.length; i++) {
    let upgrade = upgrades[i];
    let btn = upgradeButtons[i];
    if (upgrade.bought) {
      btn.html(`${upgrade.name} (BOUGHT)`);
      btn.style('background-color', '#4CAF50'); // Green when bought
      btn.attribute('disabled', ''); // Disable button
    } else if (money >= upgrade.cost) {
      btn.html(`${upgrade.name} ($${upgrade.cost})`);
      btn.style('background-color', '#1E90FF'); // Dodger blue when affordable
      btn.removeAttribute('disabled'); // Enable button
    } else {
      btn.html(`${upgrade.name} ($${upgrade.cost})`);
      btn.style('background-color', '#888888'); // Gray when unaffordable
      btn.style('color', '#DDDDDD'); // Lighter gray text for unaffordable
      btn.attribute('disabled', ''); // Disable button
    }
  }
}

Line-by-line explanation (21 lines)

🔧 Subcomponents:

calculation Passive income calculation money += passiveIncome * deltaTime;

Continuously adds money based on time elapsed since the last frame

conditional Target hover detection isTargetHovered = (d < targetSize / 2);

Checks if the mouse is within the clickable target radius to enable visual feedback

conditional Auto-clicker mod logic if (mods.autoClick) {

Automatically adds clicks every 10 frames when the auto-click mod is enabled

for-loop Shot effects rendering loop for (let i = shotEffects.length - 1; i >= 0; i--)

Draws and animates all active particle effects, removing them when faded

for-loop Upgrade button state update loop for (let i = 0; i < upgrades.length; i++)

Updates each button's appearance based on whether it's bought or if you have enough money

setGradient(color(20, 30, 40), color(40, 50, 60));
Calls the gradient function to paint an animated background every frame
let currentTime = millis();
Gets the current time in milliseconds—used to calculate how much time has passed since the last frame
let deltaTime = (currentTime - lastPassiveTime) / 1000;
Calculates the time elapsed since the last frame in seconds by finding the difference and dividing by 1000
money += passiveIncome * deltaTime;
Adds money based on your passive income rate and how much time has passed—if you earn 5/sec and 0.1 sec passes, you get 0.5 money
lastPassiveTime = currentTime;
Records this frame's time so the next frame can calculate the time difference
let d = dist(mouseX, mouseY, targetX, targetY);
Calculates the distance from your mouse to the center of the target
isTargetHovered = (d < targetSize / 2);
Sets isTargetHovered to true if your mouse is inside the target circle, false otherwise
if (mods.autoClick) {
Checks if the auto-click mod is turned on
if (frameCount % 10 === 0) {
Triggers every 10 frames (at 60 FPS this is roughly 6 times per second) using modulo arithmetic
shotEffects.push({
Adds a new particle effect object to the shotEffects array
textSize(24);
Sets the font size for the money text to 24 pixels
fill(0, 255, 0);
Sets the color to bright green (RGB: red=0, green=255, blue=0)
text(`Money: $${floor(money)}`, 270, 30);
Draws the money display at position (270, 30), rounding money to the nearest whole number with floor()
for (let i = shotEffects.length - 1; i >= 0; i--) {
Loops backward through the shotEffects array—important so removing items mid-loop doesn't skip any
effect.alpha -= 20;
Decreases the particle's opacity by 20 each frame, making it fade out
if (effect.alpha <= 0) {
Checks if the particle has become completely transparent
shotEffects.splice(i, 1);
Removes the faded particle from the array so it stops being drawn
if (upgrade.bought) {
Checks if this upgrade has already been purchased
btn.style('background-color', '#4CAF50');
Changes the button color to green to show it's been bought
} else if (money >= upgrade.cost) {
Checks if you have enough money to afford this upgrade but haven't bought it yet
btn.style('background-color', '#1E90FF');
Changes the button color to bright blue to show it's now affordable

drawTarget(hovered)

drawTarget() is a custom drawing function that encapsulates the visual logic for the clickable target. Notice how it takes a parameter (hovered) to change its appearance—this is a clean way to create interactive visuals that respond to player input.

🔬 Four concentric circles form the target rings. What happens if you add a fifth circle with ellipse(targetX, targetY, targetSize * 0.125)? Or change 0.75 to 0.6 to bring the rings closer together?

  // Outer circle
  ellipse(targetX, targetY, targetSize);

  // Inner circles
  ellipse(targetX, targetY, targetSize * 0.75);
  ellipse(targetX, targetY, targetSize * 0.5);
  ellipse(targetX, targetY, targetSize * 0.25);
function drawTarget(hovered) {
  noFill();
  if (hovered) {
    stroke(255, 255, 0, 150); // Yellowish glow when hovered
    strokeWeight(4); // Thicker outline when hovered
  } else {
    stroke(255, 100); // Semi-transparent white
    strokeWeight(3);
  }


  // Outer circle
  ellipse(targetX, targetY, targetSize);

  // Inner circles
  ellipse(targetX, targetY, targetSize * 0.75);
  ellipse(targetX, targetY, targetSize * 0.5);
  ellipse(targetX, targetY, targetSize * 0.25);

  // Center dot
  fill(255, hovered ? 150 : 100); // Brighter center dot when hovered
  noStroke();
  ellipse(targetX, targetY, targetSize * 0.1);

  // Cross lines
  line(targetX - targetSize / 2, targetY, targetX + targetSize / 2, targetY);
  line(targetX, targetY - targetSize / 2, targetX, targetY + targetSize / 2);
}
Line-by-line explanation (11 lines)

🔧 Subcomponents:

conditional Hover-based stroke styling if (hovered) {

Changes the stroke color and weight based on whether the mouse is hovering

function drawTarget(hovered) {
Defines a function that draws the clickable target, taking a boolean parameter to know if it's being hovered
noFill();
Tells p5.js not to fill circles and lines with color—only draw their outlines (strokes)
if (hovered) {
Checks if the mouse is currently over the target
stroke(255, 255, 0, 150);
Sets the stroke color to yellow (255, 255, 0) with transparency 150 when hovered
strokeWeight(4);
Makes the outline 4 pixels thick when hovered—noticeably thicker than normal
ellipse(targetX, targetY, targetSize);
Draws the outermost circle of the target centered at (targetX, targetY) with diameter targetSize
ellipse(targetX, targetY, targetSize * 0.75);
Draws a slightly smaller circle inside the first one—three concentric circles create a visual target pattern
fill(255, hovered ? 150 : 100);
Uses a ternary operator to set the center dot's opacity to 150 if hovered, 100 otherwise—creates a brighter hover effect
ellipse(targetX, targetY, targetSize * 0.1);
Draws a small filled dot at the very center of the target
line(targetX - targetSize / 2, targetY, targetX + targetSize / 2, targetY);
Draws a horizontal line through the target center from left to right
line(targetX, targetY - targetSize / 2, targetX, targetY + targetSize / 2);
Draws a vertical line through the target center from top to bottom, completing a crosshair

doClick()

doClick() is called whenever you click inside the target. It demonstrates the immediate feedback loop: money increases, sound plays, and a visual effect appears. This multi-sensory feedback is what makes clicker games feel satisfying.

🔬 This creates a particle at the mouse position with random size. What happens if you change alpha from 255 to 100? The particle starts semi-transparent. Or try size: random(50, 100) for huge particles.

  shotEffects.push({
    x: mouseX,
    y: mouseY,
    alpha: 255,
    size: random(10, 20) // Random size for variety
  });
function doClick() {
  money += clickPower;
  clickSound.play();

  // Add a new shot effect at the mouse position on the canvas
  shotEffects.push({
    x: mouseX,
    y: mouseY,
    alpha: 255,
    size: random(10, 20) // Random size for variety
  });
}
Line-by-line explanation (6 lines)

🔧 Subcomponents:

calculation Add click power to money money += clickPower;

Increases the player's money by the current click power value

calculation Create and add particle effect shotEffects.push({

Creates a new particle effect object and adds it to the array so it gets drawn next frame

money += clickPower;
Adds the current click power value to the player's money—the core game mechanic
clickSound.play();
Plays the click sound that was loaded in preload(), giving auditory feedback
shotEffects.push({
Creates a new object with particle properties and adds it to the shotEffects array
x: mouseX,
Stores the particle's x position at the current mouse location
alpha: 255,
Sets the particle's initial opacity to fully opaque (255 = no transparency)
size: random(10, 20)
Assigns a random diameter between 10 and 20 pixels so each particle looks slightly different

mousePressed()

mousePressed() is a p5.js built-in function that runs whenever the mouse is clicked. Here it uses collision detection with dist() to check if the click landed inside the target. This pattern—checking distance to determine interaction—is fundamental to interactive p5.js sketches.

🔬 This function only triggers doClick() if your click is inside the target circle. What happens if you remove the if-statement entirely so doClick() runs on ANY click? You could click anywhere on the canvas to earn money!

function mousePressed() {
  // Check if mouse is within the central target
  let d = dist(mouseX, mouseY, targetX, targetY);
  if (d < targetSize / 2) {
    doClick();
  }
}
function mousePressed() {
  // Check if mouse is within the central target
  let d = dist(mouseX, mouseY, targetX, targetY);
  if (d < targetSize / 2) {
    doClick();
  }
}
Line-by-line explanation (3 lines)

🔧 Subcomponents:

conditional Target collision detection if (d < targetSize / 2) {

Checks if the click point is inside the circular target radius

let d = dist(mouseX, mouseY, targetX, targetY);
Calculates the distance from the click position to the center of the target
if (d < targetSize / 2) {
Checks if the distance is less than the target's radius (diameter divided by 2)—click is inside the circle
doClick();
Calls doClick() to process the click and add money, sound, and particles

buyUpgrade(upgrade)

buyUpgrade() implements the core economy mechanic: validate the purchase, deduct money, apply the effect, and mark as complete. The 'apply' property pattern on the upgrade object is clever—each upgrade stores its own behavior as a function, so this one function works for all upgrades.

🔬 This function prevents buying the same upgrade twice (because of !upgrade.bought). What if you removed that check so upgrades could be bought multiple times? Then '!upgrade.bought' becomes just a true condition and stacking upgrades becomes possible.

function buyUpgrade(upgrade) {
  if (money >= upgrade.cost && !upgrade.bought) {
    money -= upgrade.cost;
    upgrade.apply();
    upgrade.bought = true;
  }
}
function buyUpgrade(upgrade) {
  if (money >= upgrade.cost && !upgrade.bought) {
    money -= upgrade.cost;
    upgrade.apply();
    upgrade.bought = true;
  }
}
Line-by-line explanation (4 lines)

🔧 Subcomponents:

conditional Purchase validation check if (money >= upgrade.cost && !upgrade.bought) {

Ensures player has enough money and hasn't already bought this upgrade

if (money >= upgrade.cost && !upgrade.bought) {
Checks two conditions: money must be >= the cost AND the upgrade must not already be bought (! means NOT)
money -= upgrade.cost;
Deducts the upgrade cost from the player's money
upgrade.apply();
Calls the upgrade's apply function, which typically modifies clickPower or passiveIncome
upgrade.bought = true;
Marks this upgrade as purchased so it won't be bought again

unlockAllgradesCheat()

This cheat function applies all unbought upgrades instantly without deducting money. It's triggered by the dat.gui mod menu button and demonstrates a clean loop pattern for applying effects to multiple items—useful for debugging, testing, or intentional cheating.

function unlockAllgradesCheat() {
  for (let upgrade of upgrades) {
    if (!upgrade.bought) {
      upgrade.apply();
      upgrade.bought = true;
    }
  }
}
Line-by-line explanation (4 lines)

🔧 Subcomponents:

for-loop All upgrades unlock loop for (let upgrade of upgrades) {

Iterates through every upgrade and applies those not yet purchased

for (let upgrade of upgrades) {
Uses a for-of loop to iterate through each upgrade in the upgrades array
if (!upgrade.bought) {
Checks if this upgrade hasn't been bought yet (! means NOT)
upgrade.apply();
Applies the upgrade's effect even though no money was spent
upgrade.bought = true;
Marks the upgrade as bought so it appears in the BOUGHT state

resetGame()

resetGame() reverts all game state to its initial values. It's a utility function useful for testing, restarting, or as a menu option. Notice it resets both the variables and the upgrade objects—a complete clean slate.

function resetGame() {
  money = 0;
  clickPower = 1;
  passiveIncome = 0;
  lastPassiveTime = millis();
  for (let upgrade of upgrades) {
    upgrade.bought = false;
  }
}
Line-by-line explanation (6 lines)

🔧 Subcomponents:

for-loop Upgrade reset loop for (let upgrade of upgrades) {

Marks all upgrades as unbought to return them to their initial state

money = 0;
Sets money back to zero
clickPower = 1;
Resets click power to its starting value of 1
passiveIncome = 0;
Resets passive income to 0 (no income per second)
lastPassiveTime = millis();
Resets the passive income timer so delta time calculations restart fresh
for (let upgrade of upgrades) {
Loops through each upgrade to reset their bought status
upgrade.bought = false;
Marks each upgrade as unbought, returning buttons to their initial state

windowResized()

windowResized() is a p5.js built-in function called whenever the browser window is resized. Here it ensures the canvas and target reposition themselves to stay centered and proportional on any screen size. The upgrade panel position is handled by CSS instead, a clean separation of concerns.

function windowResized() {
  resizeCanvas(windowWidth, windowHeight);
  // Re-position target
  targetX = width / 2;
  targetY = height / 2;
  targetSize = min(width, height) * 0.4;
  // Upgrade panel position is handled by CSS
}
Line-by-line explanation (4 lines)
resizeCanvas(windowWidth, windowHeight);
Expands or contracts the p5.js canvas to fill the new window size
targetX = width / 2;
Recalculates the target's horizontal center based on the new canvas width
targetY = height / 2;
Recalculates the target's vertical center based on the new canvas height
targetSize = min(width, height) * 0.4;
Recalculates the target size as 40% of the smaller dimension so it scales proportionally

📦 Key Variables

money number

Stores the player's current money balance—the primary resource in the game

let money = 0;
clickPower number

How much money each click earns—increased by buying upgrades

let clickPower = 1;
passiveIncome number

Money earned per second without clicking—increased by certain upgrades

let passiveIncome = 0;
lastPassiveTime number

Stores the time of the last frame to calculate how much time has passed for passive income

let lastPassiveTime = 0;
upgrades array

Array of upgrade objects, each with id, name, cost, bought status, and an apply function

let upgrades = [ { id: 0, name: 'Basic Scope', cost: 100, bought: false, apply: () => clickPower += 2 }, ... ]
upgradeButtons array

Stores references to all p5.js button elements so their appearance can be updated each frame

let upgradeButtons = [];
upgradePanel object

Reference to the HTML div that contains all upgrade buttons on the left side of the screen

let upgradePanel;
gui object

Reference to the dat.gui GUI object that displays the mod menu in the top-right corner

let gui;
mods object

Object containing mod settings like autoClick boolean and cheat functions

let mods = { autoClick: false, addMoney: function() { ... }, ... };
shotEffects array

Array of particle effect objects that fade away—populated when clicking or auto-clicking

let shotEffects = [];
targetX number

Horizontal position of the clickable target (centered on canvas)

let targetX, targetY, targetSize;
targetY number

Vertical position of the clickable target (centered on canvas)

let targetX, targetY, targetSize;
targetSize number

Diameter of the clickable target circle in pixels

let targetX, targetY, targetSize;
isTargetHovered boolean

Tracks whether the mouse is currently over the target to enable hover visual effects

let isTargetHovered = false;
clickSound object

p5.sound audio object loaded in preload() and played whenever a valid click happens

let clickSound;
gameFont object

Reserved variable for custom font loading (currently unused but declared)

let gameFont;

🔧 Potential Improvements (6)

Here are some ways this code could be enhanced:

BUG upgrades array

The function unlockAllgradesCheat() is called by dat.gui but is misspelled in the upgrades array callback—it's 'unlockAllgradesCheat' in mods but the actual function is spelled the same, so it works by luck

💡 Standardize spelling to either 'unlockAllUpgrades' everywhere or keep current spelling but verify it's consistent. The function name itself has a typo: 'gra**d**es' should be 'gra**d**es'—consider renaming to 'unlockAllUpgrades' for clarity.

PERFORMANCE setGradient()

Drawing one horizontal line per pixel (hundreds or thousands per frame) is expensive on large screens. This loop runs every frame at 60 FPS.

💡 Pre-render the gradient to a p5.Renderer once in setup() and redraw it only when the window resizes, or use createGraphics() with a lower vertical resolution and scale it up.

FEATURE draw() button update section

Upgrade buttons update their styles every frame, but their HTML text is regenerated even when nothing changes

💡 Track the previous button state and only update when it actually changes—reduces DOM manipulation and improves performance slightly.

STYLE upgrades array

Arrow function syntax () => clickPower += 2 inside object literals can be hard to read and debug

💡 Define named functions for each upgrade's effect, or use a factory function pattern, to improve readability and make the code easier to extend with new upgrade types.

FEATURE draw() auto-click logic

Auto-click uses frameCount % 10, but this is frame-rate dependent—playing at 30 FPS vs 60 FPS gives different auto-click speeds

💡 Use time-based logic similar to passive income: track lastAutoClickTime and trigger when enough milliseconds have passed, making it frame-rate independent.

BUG draw() shot effects loop

Looping backward through the array is correct, but the alpha fades out in 12-13 frames (255 / 20 ≈ 12.75). On fast monitors, particles vanish almost instantly.

💡 Reduce the alpha decrement from 20 to 5-8, or make it proportional to frame rate using deltaTime: effect.alpha -= 20 * deltaTime / (1/60).

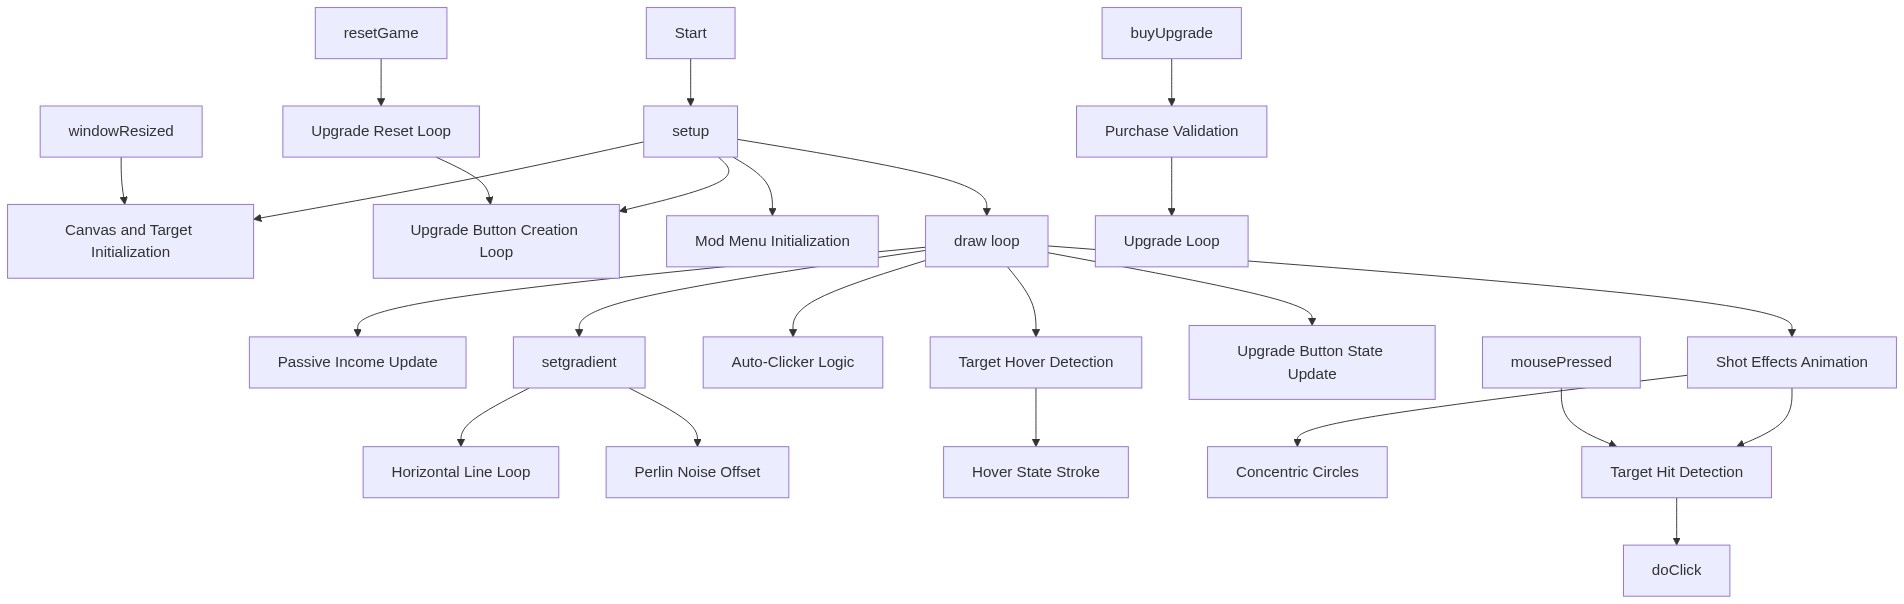
🔄 Code Flow

Code flow showing preload, setup, setgradient, draw, drawtarget, doclick, mousepressed, buyupgrade, unlockallgradescheat, resetgame, windowresized

💡 Click on function names in the diagram to jump to their code

graph TD start[Start] --> setup[setup] setup --> canvas-setup[Canvas Setup] canvas-setup --> button-loop[Button Loop] button-loop --> gui-init[GUI Init] setup --> draw[draw loop] draw --> setgradient[setGradient] setgradient --> gradient-loop[Gradient Loop] gradient-loop --> noise-calculation[Noise Calculation] draw --> passive-income-calc[Passive Income Calc] passive-income-calc --> draw draw --> hover-detection[Hover Detection] hover-detection --> hover-stroke-logic[Hover Stroke Logic] hover-detection --> drawtarget[drawTarget] drawtarget --> distance-collision[Distance Collision] distance-collision --> doclick[doClick] doclick --> money-add[Money Add] money-add --> effect-push[Effect Push] draw --> auto-click-logic[Auto-Click Logic] draw --> shot-effects-loop[Shot Effects Loop] shot-effects-loop --> draw draw --> button-state-loop[Button State Loop] button-state-loop --> draw click setup href "#fn-setup" click canvas-setup href "#sub-canvas-setup" click button-loop href "#sub-button-loop" click gui-init href "#sub-gui-init" click draw href "#fn-draw" click setgradient href "#fn-setgradient" click gradient-loop href "#sub-gradient-loop" click noise-calculation href "#sub-noise-calculation" click passive-income-calc href "#sub-passive-income-calc" click hover-detection href "#sub-hover-detection" click hover-stroke-logic href "#sub-hover-stroke-logic" click drawtarget href "#fn-drawtarget" click distance-collision href "#sub-distance-collision" click doclick href "#fn-doclick" click money-add href "#sub-money-add" click effect-push href "#sub-effect-push" click auto-click-logic href "#sub-auto-click-logic" click shot-effects-loop href "#sub-shot-effects-loop" click button-state-loop href "#sub-button-state-loop"

❓ Frequently Asked Questions

What visual elements can users expect to see in this p5.js clicker game?

Users will see a central target that users can click on, along with various upgrade options displayed in a panel, and a background image that enhances the game's aesthetic.

How do users interact with the clicker game and mod menu?

Users can click on the target to earn money, purchase upgrades from the upgrade panel, and access a mod menu to enable features like auto-clicking or adding in-game currency.

What creative coding concepts are demonstrated in this sketch?

This sketch showcases concepts such as event-driven programming through user interactions, dynamic UI elements for upgrades, and the implementation of a mod menu for enhanced gameplay.

Preview

this is my first project - p5.js creative coding sketch preview
Sketch Preview
Code flow diagram showing the structure of this is my first project - Code flow showing preload, setup, setgradient, draw, drawtarget, doclick, mousepressed, buyupgrade, unlockallgradescheat, resetgame, windowresized
Code Flow Diagram