time janitor

Time Janitor is an interactive puzzle game where players drag historical event cards into the correct sequence to repair a corrupted timeline. Players must decide whether to fix or keep chaotic "glitch" events, and their choices reshape the story's ending across three possible outcomes.

🧪 Try This!

Experiment with the code by making these changes:

  1. Change the card colors — Glitch cards currently use purple; change them to a different color to make them stand out visually.
  2. Add a third outcome — Currently there are three outcomes (perfect, sloppy, chaos); add a fourth threshold condition to unlock a special 'flawless' outcome for perfect sequences with no glitches.
  3. Make the starfield denser — Increase the number of stars in the background for a more immersive cosmic effect.
  4. Speed up or slow down the twinkle — Change the twinkle rate by adjusting the 0.02 multiplier; higher values make stars pulse faster.
  5. Shuffle on every retry — Currently cards stay in the same shuffled order if you retry; uncomment the shuffle to randomize on every level start.
Prefer the full editor? Open it there →

📖 About This Sketch

Time Janitor is a narrative puzzle game built in p5.js that challenges players to restore a corrupted timeline by dragging event cards into the correct sequence. The twist: "glitch" events can be either fixed or deliberately left broken, and keeping them alive mutates the story's ending. It's visually grounded in a animated starfield, with draggable UI cards, toggle switches, and dynamic text that responds to player choices. The sketch teaches game state management, interactive drag-and-drop mechanics, and how to build multi-screen UI (menu, gameplay, results) in a single p5.js sketch.

The code is organized around a global game state that transitions between 'menu', 'level', and 'result' screens. A levels array stores all game content (prompts, events, correct sequence, possible outcomes). When the player drags cards, the currentOrder array is reordered; when they toggle glitch fixes, the event objects themselves record the choice. The evaluateTimeline() function calculates which ending to show based on accuracy and glitch decisions. By studying this sketch, you'll learn how to structure a multi-screen game, manage dragging with mouse events, and drive narrative outcomes from player decisions.

⚙️ How It Works

  1. Setup initializes the canvas and precomputes a static starfield of 80 animated stars stored in an array; each star twinkles based on frameCount.
  2. The draw loop runs at 60 fps, drawing the starfield background and then dispatching to one of three screens (menu, level, or result) based on gameState.
  3. When 'Start Cleaning Time' is clicked, startLevel() initializes the current level by shuffling the event cards using a Fisher–Yates shuffle into currentOrder.
  4. On the level screen, players click and drag cards vertically; handleLevelMousePressed() detects which card was grabbed, and handleLevelMouseReleased() drops it into a new slot by splicing the currentOrder array.
  5. For glitch events, players click a toggle switch that sets the event's keepGlitch property; the toggle appears only on cards where isGlitch is true.
  6. When 'Seal Timeline' is clicked, evaluateTimeline() compares currentOrder against each event's correctIndex to count errors, collects kept glitches, and assigns one of three outcomes (perfect, sloppy, chaos) based on error count and glitch count.
  7. The result screen displays the outcome text and lists the consequences of any glitches left unfixed, then offers buttons to replay or return to the menu.

🎓 Concepts You'll Learn

Game state machineInteractive drag and dropArray manipulation (splice)Mouse event handlingDynamic UI renderingGame logic and evaluationStarfield animation

📝 Code Breakdown

setup()

setup() runs once when the sketch starts. It's the perfect place to create your canvas and initialize any data that won't change during gameplay—like the starfield geometry.

function setup() {
  createCanvas(windowWidth, windowHeight);
  textFont('sans-serif'); // Use default system font (no preload needed)

  // Precompute a simple starfield (static geometry, done once)
  for (let i = 0; i < NUM_STARS; i++) {
    stars.push({
      x: random(width),
      y: random(height),
      r: random(1, 3),
      twinkleOffset: random(TWO_PI)
    });
  }
}
Line-by-line explanation (7 lines)

🔧 Subcomponents:

for-loop Starfield Initialization for (let i = 0; i < NUM_STARS; i++)

Creates NUM_STARS star objects with random positions, sizes, and twinkle phases

createCanvas(windowWidth, windowHeight);
Creates a canvas that fills the entire browser window; resizes dynamically if the window changes
textFont('sans-serif');
Sets the font for all text to use the system default sans-serif font (no external font loading needed)
for (let i = 0; i < NUM_STARS; i++) {
Loops NUM_STARS times (80 by default) to create each star object once
stars.push({
Adds a new star object to the stars array with four properties
x: random(width),
Random x position anywhere across the canvas width
r: random(1, 3),
Random radius between 1 and 3 pixels; controls the star's base size
twinkleOffset: random(TWO_PI)
Random phase offset (0 to 2π) so each star twinkles independently rather than all at once
draw()

draw() runs 60 times per second. This function's only job is to route between screens—think of it as a 'main menu' for your code. The actual work happens in drawMenu(), drawLevel(), and drawResult().

🔬 This is the game's "traffic controller"—what happens if you add a fourth state, like 'gameState === "pause"', and call drawPauseScreen()? Could you build a pause menu?

  if (gameState === 'menu') {
    drawMenu();
  } else if (gameState === 'level') {
    drawLevel();
  } else if (gameState === 'result') {
    drawResult();
  }
function draw() {
  drawStarfieldBackground();

  if (gameState === 'menu') {
    drawMenu();
  } else if (gameState === 'level') {
    drawLevel();
  } else if (gameState === 'result') {
    drawResult();
  }
}
Line-by-line explanation (7 lines)

🔧 Subcomponents:

conditional Game State Dispatcher if (gameState === 'menu') { ... } else if (gameState === 'level') { ... } else if (gameState === 'result') { ... }

Routes to the correct screen-drawing function based on the current game state

drawStarfieldBackground();
Draws the animated starfield on every frame—the starfield is always visible behind all UI
if (gameState === 'menu') {
Checks if the game is in the menu state
drawMenu();
If in menu state, render the title screen with the 'Start Cleaning Time' button
} else if (gameState === 'level') {
Otherwise, check if the game is in the level state
drawLevel();
If in level state, render the draggable cards and 'Seal Timeline' button
} else if (gameState === 'result') {
Otherwise, check if the game is in the result state
drawResult();
If in result state, render the outcome report and replay/back buttons

drawStarfieldBackground()

This function demonstrates how to create organic animation using trigonometry (sine waves). Every star twinkles at a different phase because of twinkleOffset, making the effect feel less mechanical and more alive.

🔬 Right now the twinkle affects both brightness AND size (s.r * twinkle). What if you remove the twinkle multiplier from the circle's radius so stars only pulse in brightness, not size?

    const twinkle = 0.6 + 0.4 * sin(frameCount * 0.02 + s.twinkleOffset);
    fill(180 * twinkle, 210 * twinkle, 255, 200);
    circle(s.x, s.y, s.r * twinkle);
function drawStarfieldBackground() {
  background(5, 5, 20);
  noStroke();
  for (let s of stars) {
    const twinkle = 0.6 + 0.4 * sin(frameCount * 0.02 + s.twinkleOffset);
    fill(180 * twinkle, 210 * twinkle, 255, 200);
    circle(s.x, s.y, s.r * twinkle);
  }
}
Line-by-line explanation (6 lines)

🔧 Subcomponents:

for-loop Star Rendering Loop for (let s of stars) {

Iterates through every star and draws it with a sine-wave twinkle effect

calculation Twinkle Brightness const twinkle = 0.6 + 0.4 * sin(frameCount * 0.02 + s.twinkleOffset);

Calculates a brightness multiplier (0.2 to 1.0) that oscillates smoothly using a sine wave

background(5, 5, 20);
Fills the entire canvas with a very dark navy blue, clearing the previous frame
noStroke();
Disables outlines on all shapes, so stars are pure filled circles with no border
for (let s of stars) {
Loops through each star object in the stars array
const twinkle = 0.6 + 0.4 * sin(frameCount * 0.02 + s.twinkleOffset);
Uses a sine wave to create a smooth brightness pulse: as time passes (frameCount), the value oscillates between 0.2 and 1.0, starting at a different phase for each star (s.twinkleOffset)
fill(180 * twinkle, 210 * twinkle, 255, 200);
Multiplies the R and G channels by the twinkle value, making the star pulse in brightness while staying blue; alpha is always 200 (semi-transparent)
circle(s.x, s.y, s.r * twinkle);
Draws the star at its position (s.x, s.y) with a diameter that also twinkles (s.r * twinkle)

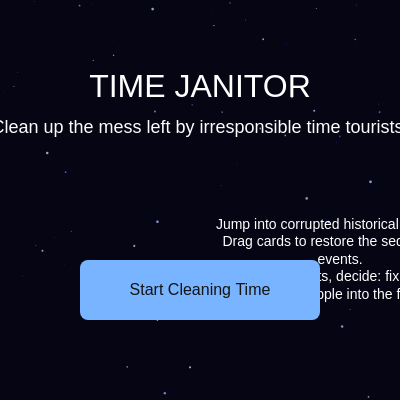
drawMenu()

drawMenu() demonstrates responsive text sizing (textSize with min()) and text wrapping (passing width and height to text()). All positioning uses percentage-based coordinates (height * 0.22) so the layout adapts to any window size.

function drawMenu() {
  const title = 'TIME JANITOR';

  fill(255);
  textAlign(CENTER, CENTER);
  textSize(min(64, width * 0.08));
  text(title, width / 2, height * 0.22);

  textSize(18);
  text(
    'Clean up the mess left by irresponsible time tourists.',
    width / 2,
    height * 0.32
  );

  textSize(14);
  const infoY = height * 0.4;
  const infoW = min(width * 0.7, 600);
  text(
    'Jump into corrupted historical moments.\n' +
      'Drag cards to restore the sequence of events.\n' +
      'For GLITCH events, decide: fix them, or let the chaos ripple into the future.',
    width / 2,
    infoY,
    infoW,
    200
  );

  const btnW = 240;
  const btnH = 60;
  const btnX = width / 2 - btnW / 2;
  const btnY = height * 0.65;
  drawButton(btnX, btnY, btnW, btnH, 'Start Cleaning Time', true);
}
Line-by-line explanation (9 lines)
const title = 'TIME JANITOR';
Stores the game title as a constant string
fill(255);
Sets all subsequent text and shapes to white
textAlign(CENTER, CENTER);
Aligns text horizontally and vertically to the center, so coordinates specify the text's center point
textSize(min(64, width * 0.08));
Scales the title font responsively: use 8% of window width, but cap it at 64 pixels so it doesn't overflow on tiny screens
text(title, width / 2, height * 0.22);
Draws the title centered horizontally and 22% down from the top
textSize(18);
Shrinks the font to 18 pixels for the subtitle
const infoW = min(width * 0.7, 600);
Calculates the width for wrapped text: 70% of window width, but never wider than 600 pixels
text(..., width / 2, infoY, infoW, 200);
Draws multi-line text centered, wrapping to fit within infoW width and 200 pixels of height
drawButton(btnX, btnY, btnW, btnH, 'Start Cleaning Time', true);
Calls drawButton() to render the start button with label, size, and position calculated above

drawLevel()

drawLevel() shows how to layer UI: a HUD panel at the top provides context, cards in the middle are interactive, and a button at the bottom advances the game. All positioning uses percentages (height * 0.18) to stay responsive.

function drawLevel() {
  const level = levels[currentLevelIndex];

  // Top HUD panel
  noStroke();
  fill(5, 5, 25, 230);
  rect(0, 0, width, height * 0.18);

  fill(255);
  textAlign(LEFT, TOP);

  textSize(32);
  text(level.title, 32, 18);

  textSize(16);
  text(level.era, 32, 58);

  textSize(13);
  const promptY = 88;
  const promptW = width - 64;
  text(level.prompt, 32, promptY, promptW, height * 0.18 - 32);

  textSize(11);
  const instrY = height * 0.18 - 30;
  text(
    'Drag cards vertically to reorder events. For GLITCH cards, tap the toggle to either FIX IT or LEAVE IT.',
    32,
    instrY,
    promptW,
    40
  );

  // Timeline cards
  drawTimelineCards(level);

  // Seal button
  const sealBounds = getSealButtonBounds();
  drawButton(
    sealBounds.x,
    sealBounds.y,
    sealBounds.w,
    sealBounds.h,
    'Seal Timeline',
    true
  );
}
Line-by-line explanation (10 lines)
const level = levels[currentLevelIndex];
Retrieves the current level object from the levels array using currentLevelIndex
fill(5, 5, 25, 230);
Sets the HUD panel background to a dark navy with slight transparency (alpha 230)
rect(0, 0, width, height * 0.18);
Draws the HUD panel rectangle at the top of the screen, spanning full width and 18% of height
fill(255);
Switches fill color to white for all text
textAlign(LEFT, TOP);
Aligns text to the upper-left corner so coordinates specify the start of text
text(level.title, 32, 18);
Displays the level's title (e.g., 'Jurassic Jam') in large font, 32 pixels from the left
text(level.era, 32, 58);
Displays the time period (e.g., 'Late Cretaceous, 66,000,000 BCE') below the title
text(level.prompt, 32, promptY, promptW, height * 0.18 - 32);
Wraps and displays the level's instruction prompt, constrained to promptW width
drawTimelineCards(level);
Calls the function that renders all draggable event cards
drawButton(..., 'Seal Timeline', true);
Renders the 'Seal Timeline' button that players click to finish and see results

drawTimelineCards()

This function separates rendering into two passes: first, all static cards; second, the dragged card on top. This 'layering' technique ensures the dragged card is always visible and never hidden by other cards. The 'continue' statement is a key trick for skipping the card that's being dragged.

🔬 The 'continue' statement skips the dragged card so it doesn't draw twice. What happens if you remove the 'continue' line? You'll see the original card AND the dragged ghost—is that cool or confusing?

  // Draw all non-dragging cards
  for (let slotIndex = 0; slotIndex < n; slotIndex++) {
    const eventIndex = currentOrder[slotIndex];
    if (dragging && slotIndex === draggingSlotIndex) continue;
function drawTimelineCards(level) {
  const n = level.events.length;
  const layout = getCardLayout(n);

  // Draw all non-dragging cards
  for (let slotIndex = 0; slotIndex < n; slotIndex++) {
    const eventIndex = currentOrder[slotIndex];
    if (dragging && slotIndex === draggingSlotIndex) continue;

    const cardX = layout.x;
    const cardY = layout.y0 + slotIndex * (layout.cardH + layout.gap);
    drawCard(
      level.events[eventIndex],
      cardX,
      cardY,
      layout.cardW,
      layout.cardH,
      slotIndex,
      false
    );
  }

  // Draw the dragged card on top
  if (dragging && draggingEventIndex !== -1) {
    const e = level.events[draggingEventIndex];
    let y = mouseY - dragOffsetY;
    y = constrain(y, layout.areaTop, layout.areaBottom - layout.cardH);
    drawCard(
      e,
      layout.x,
      y,
      layout.cardW,
      layout.cardH,
      draggingSlotIndex,
      true
    );
  }
}
Line-by-line explanation (11 lines)

🔧 Subcomponents:

for-loop Static Cards Loop for (let slotIndex = 0; slotIndex < n; slotIndex++) {

Renders all cards that are not currently being dragged

conditional Skip Dragged Card if (dragging && slotIndex === draggingSlotIndex) continue;

Skips rendering a card if it's the one being dragged, so it doesn't appear twice

conditional Render Dragged Card on Top if (dragging && draggingEventIndex !== -1) {

Renders the dragged card at the current mouse position after all static cards, so it appears on top

const n = level.events.length;
Counts how many events are in the current level (used for loop bounds)
const layout = getCardLayout(n);
Calls getCardLayout() to compute card size, spacing, and starting y position based on number of cards
for (let slotIndex = 0; slotIndex < n; slotIndex++) {
Loops through each slot in the timeline
const eventIndex = currentOrder[slotIndex];
Retrieves which event is currently in this slot by looking up currentOrder
if (dragging && slotIndex === draggingSlotIndex) continue;
Skips drawing a card if it's currently being dragged—prevents a duplicate card at its original position
const cardY = layout.y0 + slotIndex * (layout.cardH + layout.gap);
Calculates the card's y position: start position plus slot number times (card height plus gap)
drawCard(..., slotIndex, false);
Renders this card at its calculated position with isDragging=false (not selected)
if (dragging && draggingEventIndex !== -1) {
Checks if the player is currently dragging a card
let y = mouseY - dragOffsetY;
Calculates the dragged card's y position: current mouse y minus the offset where the player grabbed it
y = constrain(y, layout.areaTop, layout.areaBottom - layout.cardH);
Clamps the card's y so it stays within the valid area and doesn't escape the top or bottom
drawCard(..., draggingSlotIndex, true);
Renders the dragged card at the mouse position with isDragging=true (highlights it)

drawCard()

drawCard() is a workhorse function that renders each event card with all its visual elements: background, order badge, text, and (for glitch events) a toggle switch. Notice how it uses push()/pop() to isolate drawing state—a best practice that prevents side effects.

🔬 The knob moves left and right based on isKept. What if you made the knob bigger or smaller by changing 'toggle.h - 4' to a different value? Try 'toggle.h - 1' for a large knob or 'toggle.h - 10' for a tiny one.

    const knobX = isKept
      ? toggle.x + toggle.w - toggle.h / 2
      : toggle.x + toggle.h / 2;
    fill(255);
    circle(knobX, toggle.y + toggle.h / 2, toggle.h - 4);
function drawCard(e, x, y, w, h, slotIndex, isDragging) {
  push();

  // Card background color
  const baseColor = e.isGlitch
    ? color(70, 30, 110, 230)
    : color(20, 50, 100, 230);
  const hoverColor = e.isGlitch
    ? color(100, 60, 150, 240)
    : color(40, 80, 130, 240);
  const bg = isDragging ? hoverColor : baseColor;

  noStroke();
  fill(bg);
  rect(x, y, w, h, 12);

  // Order badge on the left
  const badgeR = min(28, h * 0.4);
  const badgeX = x + 24;
  const badgeY = y + h / 2;

  fill(255, 230);
  circle(badgeX, badgeY, badgeR * 2);

  fill(20);
  textAlign(CENTER, CENTER);
  textSize(16);
  text(slotIndex + 1, badgeX, badgeY + 1);

  // Event text
  const textX = badgeX + badgeR + 16;
  const textY = y + 16;
  const textW = w - (textX - x) - 130;

  fill(255);
  textAlign(LEFT, TOP);
  textSize(14);
  text(e.text, textX, textY, textW, h - 32);

  // Glitch / fixed info and toggle
  const statusX = x + w - 120;
  const statusY = y + 14;

  textSize(10);
  if (e.isGlitch) {
    fill(255, 200, 120);
    text('GLITCH', statusX, statusY);

    // Toggle switch
    const toggle = getToggleBounds(x, y, w, h);
    const isKept = !!e.keepGlitch;

    const labelFix = 'FIX IT';
    const labelKeep = 'LEAVE IT';

    noStroke();
    fill(isKept ? color(190, 80, 130) : color(80, 200, 160));
    rect(toggle.x, toggle.y, toggle.w, toggle.h, 10);

    fill(0, 180);
    textAlign(CENTER, CENTER);
    textSize(9);
    text(
      isKept ? labelKeep : labelFix,
      toggle.x + toggle.w / 2,
      toggle.y + toggle.h / 2 + 0.5
    );

    // Knob
    const knobX = isKept
      ? toggle.x + toggle.w - toggle.h / 2
      : toggle.x + toggle.h / 2;
    fill(255);
    circle(knobX, toggle.y + toggle.h / 2, toggle.h - 4);
  } else {
    fill(150, 200, 255);
    text('FIXED POINT', statusX, statusY);
  }

  pop();
}
Line-by-line explanation (15 lines)

🔧 Subcomponents:

conditional Background Color Selection const baseColor = e.isGlitch ? color(70, 30, 110, 230) : color(20, 50, 100, 230);

Chooses purple for glitch events, blue for normal events; darker when not dragging, brighter when dragging

conditional Glitch Toggle Rendering if (e.isGlitch) { ... }

Only renders the toggle switch for glitch events; normal events show a fixed-point label instead

push();
Saves the current drawing state (fill, stroke, transforms) so changes inside this function don't affect other parts
const baseColor = e.isGlitch ? color(70, 30, 110, 230) : color(20, 50, 100, 230);
If the event is a glitch, use purple; otherwise, use blue. Both colors have alpha 230 for slight transparency
const bg = isDragging ? hoverColor : baseColor;
If the card is being dragged, brighten the color; otherwise, use the base color
fill(bg); rect(x, y, w, h, 12);
Draws the card's background rectangle with 12-pixel rounded corners
const badgeR = min(28, h * 0.4);
Calculates the badge radius: 40% of card height, but cap it at 28 pixels so it scales responsively
circle(badgeX, badgeY, badgeR * 2);
Draws a white circle (diameter = badgeR * 2) that holds the order number
text(slotIndex + 1, badgeX, badgeY + 1);
Displays the card's order number (1-indexed: slotIndex + 1) centered on the badge
const textW = w - (textX - x) - 130;
Calculates text width: card width minus space used by badge minus 130 pixels for the right-side toggle area
text(e.text, textX, textY, textW, h - 32);
Displays the event description, wrapping it to fit within textW and with height of h - 32 pixels
if (e.isGlitch) { ... } else { ... }
Different rendering for glitch vs. normal events: glitch gets a toggle switch, normal events get a label
const isKept = !!e.keepGlitch;
Converts the keepGlitch property to a boolean (true if kept, false if fixed)
fill(isKept ? color(190, 80, 130) : color(80, 200, 160));
Toggle background: pinkish if kept, teal if fixed
const knobX = isKept ? toggle.x + toggle.w - toggle.h / 2 : toggle.x + toggle.h / 2;
Positions the toggle knob to the right if kept, to the left if fixed
circle(knobX, toggle.y + toggle.h / 2, toggle.h - 4);
Draws the white knob circle that visually indicates the toggle state
pop();
Restores the drawing state saved at the beginning, so this function doesn't affect subsequent draws

drawResult()

drawResult() showcases conditional rendering: different text appears based on whether glitches were kept. It also demonstrates a loop over an array (keptGlitches) to list consequences—a pattern used in many games for displaying multiple results.

function drawResult() {
  const level = levels[currentLevelIndex];

  const panelX = width * 0.1;
  const panelY = height * 0.08;
  const panelW = width * 0.8;
  const panelH = height * 0.7;

  noStroke();
  fill(5, 5, 25, 235);
  rect(panelX, panelY, panelW, panelH, 16);

  fill(255);
  textAlign(LEFT, TOP);

  textSize(26);
  text('Timeline Report: ' + level.title, panelX + 24, panelY + 20);

  textSize(14);
  text(level.era, panelX + 24, panelY + 56);

  textSize(14);
  const summaryY = panelY + 84;
  text('Stability: ' + resultData.stabilityLabel, panelX + 24, summaryY);

  const baseY = summaryY + 26;
  const textW = panelW - 48;
  text(resultData.baseText, panelX + 24, baseY, textW, 140);

  let glitchesY = baseY + 120;
  textSize(13);

  if (resultData.keptGlitches && resultData.keptGlitches.length > 0) {
    text(
      'Because you left some glitches loose, the future mutates:',
      panelX + 24,
      glitchesY,
      textW,
      40
    );
    glitchesY += 24;

    for (let i = 0; i < resultData.keptGlitches.length; i++) {
      const line = '• ' + resultData.keptGlitches[i];
      text(line, panelX + 40, glitchesY, textW - 16, 60);
      glitchesY += 32;
    }
  } else {
    text(
      'You cleaned every major glitch. This future will probably never know you saved it.',
      panelX + 24,
      glitchesY,
      textW,
      60
    );
  }

  // Buttons
  const btnY = height * 0.82;
  const btnW = 180;
  const btnH = 44;
  const centerX = width / 2;

  drawButton(
    centerX - btnW - 20,
    btnY,
    btnW,
    btnH,
    'Replay Moment',
    true
  );
  drawButton(centerX + 20, btnY, btnW, btnH, 'Back to Hub', true);
}
Line-by-line explanation (12 lines)

🔧 Subcomponents:

conditional Kept Glitches Display if (resultData.keptGlitches && resultData.keptGlitches.length > 0) {

Shows different text depending on whether the player kept any glitches or cleaned them all

for-loop Glitch Consequences Loop for (let i = 0; i < resultData.keptGlitches.length; i++) {

Iterates through each kept glitch and displays its consequence as a bullet point

const level = levels[currentLevelIndex];
Retrieves the current level object
const panelX = width * 0.1;
Panel starts 10% from the left edge of the screen
const panelH = height * 0.7;
Panel is 70% of screen height, leaving space for buttons below
noStroke(); fill(5, 5, 25, 235); rect(panelX, panelY, panelW, panelH, 16);
Draws a dark background panel with 16-pixel rounded corners
text('Timeline Report: ' + level.title, panelX + 24, panelY + 20);
Displays the report header with the level's title
text('Stability: ' + resultData.stabilityLabel, panelX + 24, summaryY);
Shows the stability label (Stable, Fragile, or Chaotic) calculated by evaluateTimeline()
text(resultData.baseText, panelX + 24, baseY, textW, 140);
Displays the outcome text (perfect, sloppy, or chaos message)
if (resultData.keptGlitches && resultData.keptGlitches.length > 0) {
Checks if any glitches were kept; if yes, display consequences; if no, show a congratulations message
for (let i = 0; i < resultData.keptGlitches.length; i++) {
Loops through each kept glitch and displays its consequence as a bullet-pointed line
const line = '• ' + resultData.keptGlitches[i];
Prepends a bullet point to each glitch consequence text
drawButton(..., 'Replay Moment', true);
Renders the 'Replay Moment' button to retry the level
drawButton(centerX + 20, btnY, btnW, btnH, 'Back to Hub', true);
Renders the 'Back to Hub' button to return to the menu

evaluateTimeline()

This function is the game's 'judge'—it grades the player's work and determines the story's ending. It demonstrates a two-pass evaluation: first, count errors; second, collect consequences. The nested if-else structure shows how to map multiple variables (errorCount, keptGlitches.length) onto discrete outcomes.

🔬 These three conditions determine the outcome. What if you changed the second condition from 'errorCount <= 1' to 'errorCount === 0'? Now 'sloppy' would only trigger if the order is perfect but glitches were kept—does that make narrative sense?

  if (errorCount === 0 && keptGlitches.length === 0) {
    outcomeKey = 'perfect';
    stabilityLabel = 'Stable';
    baseText = level.outcomes.perfect;
  } else if (errorCount <= 1 && keptGlitches.length <= 1) {
    outcomeKey = 'sloppy';
    stabilityLabel = 'Fragile';
    baseText = level.outcomes.sloppy;
  } else {
    outcomeKey = 'chaotic';
    stabilityLabel = 'Chaotic';
    baseText = level.outcomes.chaos;
  }
function evaluateTimeline() {
  const level = levels[currentLevelIndex];
  const n = level.events.length;

  let errorCount = 0;

  for (let slotIndex = 0; slotIndex < n; slotIndex++) {
    const eventIndex = currentOrder[slotIndex];
    const e = level.events[eventIndex];
    if (e.correctIndex !== slotIndex) {
      errorCount++;
    }
  }

  const keptGlitches = [];
  for (let e of level.events) {
    if (e.isGlitch && e.keepGlitch) {
      keptGlitches.push(
        e.consequenceIfKept || ('Glitch preserved: ' + e.text)
      );
    }
  }

  let stabilityLabel;
  let baseText;
  let outcomeKey;

  if (errorCount === 0 && keptGlitches.length === 0) {
    outcomeKey = 'perfect';
    stabilityLabel = 'Stable';
    baseText = level.outcomes.perfect;
  } else if (errorCount <= 1 && keptGlitches.length <= 1) {
    outcomeKey = 'sloppy';
    stabilityLabel = 'Fragile';
    baseText = level.outcomes.sloppy;
  } else {
    outcomeKey = 'chaotic';
    stabilityLabel = 'Chaotic';
    baseText = level.outcomes.chaos;
  }

  resultData = {
    outcomeKey,
    stabilityLabel,
    baseText,
    keptGlitches,
    errorCount
  };
}
Line-by-line explanation (14 lines)

🔧 Subcomponents:

for-loop Error Counting Loop for (let slotIndex = 0; slotIndex < n; slotIndex++) {

Counts how many events are in the wrong position by comparing currentOrder to correctIndex

for-loop Glitch Collection Loop for (let e of level.events) {

Iterates through all events to find and collect those marked as kept glitches

conditional Outcome Determination if (errorCount === 0 && keptGlitches.length === 0) { ... } else if (errorCount <= 1 && keptGlitches.length <= 1) { ... } else { ... }

Assigns the outcome (perfect, sloppy, or chaotic) based on error and glitch counts

const level = levels[currentLevelIndex];
Retrieves the current level to access its events and outcomes
const n = level.events.length;
Stores the number of events for use in loops
let errorCount = 0;
Initializes a counter for misplaced events
for (let slotIndex = 0; slotIndex < n; slotIndex++) {
Loops through each slot position in the timeline
const eventIndex = currentOrder[slotIndex];
Gets which event is in this slot
const e = level.events[eventIndex];
Retrieves the event object
if (e.correctIndex !== slotIndex) { errorCount++; }
If the event's correct position doesn't match its current slot, increment the error counter
for (let e of level.events) {
Iterates through every event in the level (regardless of current order)
if (e.isGlitch && e.keepGlitch) {
Checks if this event is a glitch AND the player chose to keep it
keptGlitches.push(e.consequenceIfKept || ('Glitch preserved: ' + e.text));
Adds the glitch's consequence to the keptGlitches array (uses a fallback message if no explicit consequence)
if (errorCount === 0 && keptGlitches.length === 0) {
If timeline is perfect and no glitches were kept, assign the 'perfect' outcome
} else if (errorCount <= 1 && keptGlitches.length <= 1) {
If timeline has 1 or fewer errors and 1 or fewer kept glitches, assign the 'sloppy' outcome
} else {
Otherwise, assign the 'chaotic' outcome for messy timelines
resultData = { outcomeKey, stabilityLabel, baseText, keptGlitches, errorCount };
Stores all evaluation results in the global resultData object for drawResult() to use

handleLevelMousePressed()

This function demonstrates hit-testing (checking if a click lands inside a rectangle) and input priority. By checking seal button first, then toggles, then drag, the code ensures that button clicks and toggle flips take priority over card dragging. The 'return' statements prevent falling through to lower-priority handlers.

🔬 This function checks three things in order: seal button, toggles, then drag. The order matters! What happens if you move the toggle loop AFTER the drag loop? Toggles would no longer work—why? (Hint: 'break' vs 'return')

  // 1. Seal Timeline button
  const sealBounds = getSealButtonBounds();
  if (pointInRect(mouseX, mouseY, sealBounds)) {
    evaluateTimeline();
    gameState = 'result';
    return;
  }

  // 2. Glitch toggles
  for (let slotIndex = 0; slotIndex < n; slotIndex++) {
    const eventIndex = currentOrder[slotIndex];
    const e = level.events[eventIndex];
    if (!e.isGlitch) continue;

    const cardX = layout.x;
    const cardY = layout.y0 + slotIndex * (layout.cardH + layout.gap);
    const toggle = getToggleBounds(cardX, cardY, layout.cardW, layout.cardH);

    if (pointInRect(mouseX, mouseY, toggle)) {
      e.keepGlitch = !e.keepGlitch;
      return; // do not start dragging if we hit a toggle
    }
  }
function handleLevelMousePressed() {
  const level = levels[currentLevelIndex];
  const n = level.events.length;
  const layout = getCardLayout(n);

  // 1. Seal Timeline button
  const sealBounds = getSealButtonBounds();
  if (pointInRect(mouseX, mouseY, sealBounds)) {
    evaluateTimeline();
    gameState = 'result';
    return;
  }

  // 2. Glitch toggles
  for (let slotIndex = 0; slotIndex < n; slotIndex++) {
    const eventIndex = currentOrder[slotIndex];
    const e = level.events[eventIndex];
    if (!e.isGlitch) continue;

    const cardX = layout.x;
    const cardY = layout.y0 + slotIndex * (layout.cardH + layout.gap);
    const toggle = getToggleBounds(cardX, cardY, layout.cardW, layout.cardH);

    if (pointInRect(mouseX, mouseY, toggle)) {
      e.keepGlitch = !e.keepGlitch;
      return; // do not start dragging if we hit a toggle
    }
  }

  // 3. Start dragging a card if clicked on it
  for (let slotIndex = 0; slotIndex < n; slotIndex++) {
    const cardX = layout.x;
    const cardY = layout.y0 + slotIndex * (layout.cardH + layout.gap);
    const cardRect = {
      x: cardX,
      y: cardY,
      w: layout.cardW,
      h: layout.cardH
    };

    if (pointInRect(mouseX, mouseY, cardRect)) {
      dragging = true;
      draggingSlotIndex = slotIndex;
      draggingEventIndex = currentOrder[slotIndex];
      dragOffsetY = mouseY - cardY;
      break;
    }
  }
}
Line-by-line explanation (18 lines)

🔧 Subcomponents:

conditional Seal Button Collision if (pointInRect(mouseX, mouseY, sealBounds)) {

Detects if the 'Seal Timeline' button was clicked

for-loop Toggle Detection Loop for (let slotIndex = 0; slotIndex < n; slotIndex++) {

Checks each glitch card's toggle to see if one was clicked

for-loop Drag Start Detection Loop for (let slotIndex = 0; slotIndex < n; slotIndex++) {

Checks if a card was clicked to begin dragging

const layout = getCardLayout(n);
Gets card positions and sizing to check collision bounds
const sealBounds = getSealButtonBounds();
Retrieves the rectangular bounds of the 'Seal Timeline' button
if (pointInRect(mouseX, mouseY, sealBounds)) {
Checks if the mouse click was inside the seal button
evaluateTimeline();
Calls the function to grade the timeline and build the result data
gameState = 'result';
Transitions to the result screen
return;
Exits the function early so other handlers don't run
for (let slotIndex = 0; slotIndex < n; slotIndex++) {
Loops through each card slot to check if a toggle was clicked
if (!e.isGlitch) continue;
Skips non-glitch events since they have no toggle
const toggle = getToggleBounds(cardX, cardY, layout.cardW, layout.cardH);
Calculates the toggle switch's bounding rectangle for this card
if (pointInRect(mouseX, mouseY, toggle)) {
Checks if the click was inside a toggle
e.keepGlitch = !e.keepGlitch;
Toggles the keepGlitch property: flips it from true to false or false to true
return;
Exits early so the drag handler doesn't run (prevents accidentally starting a drag when clicking a toggle)
if (pointInRect(mouseX, mouseY, cardRect)) {
Checks if the click was inside a card
dragging = true;
Sets the dragging flag to true
draggingSlotIndex = slotIndex;
Records which slot the card came from
draggingEventIndex = currentOrder[slotIndex];
Records which event is being dragged
dragOffsetY = mouseY - cardY;
Calculates how far down the card the user clicked (used to keep the cursor on the same spot while dragging)
break;
Exits the loop so only one card starts dragging per click

handleLevelMouseReleased()

This function demonstrates the core of drag-and-drop: converting a continuous mouse position into a discrete slot and reordering the array. The Math.floor(...+ 0.5) trick implements 'round-to-nearest' and is a common pattern in grid-based interfaces.

🔬 These two splice() calls move a card: first one removes it, second one inserts it. What if you only called the first splice() and forgot the second? The card would disappear from the order array—can you imagine how to write a different reordering without splice()?

    // Reorder currentOrder array
    currentOrder.splice(draggingSlotIndex, 1);
    currentOrder.splice(droppedSlot, 0, draggingEventIndex);
function handleLevelMouseReleased() {
  if (!dragging) return;

  const level = levels[currentLevelIndex];
  const n = level.events.length;
  const layout = getCardLayout(n);

  const relativeY = mouseY - layout.y0;
  const slotSize = layout.cardH + layout.gap;
  let droppedSlot = Math.floor(relativeY / slotSize + 0.5);
  droppedSlot = constrain(droppedSlot, 0, n - 1);

  if (droppedSlot !== draggingSlotIndex) {
    // Reorder currentOrder array
    currentOrder.splice(draggingSlotIndex, 1);
    currentOrder.splice(droppedSlot, 0, draggingEventIndex);
  }

  dragging = false;
  draggingSlotIndex = -1;
  draggingEventIndex = -1;
}
Line-by-line explanation (11 lines)

🔧 Subcomponents:

calculation Drop Slot Calculation let droppedSlot = Math.floor(relativeY / slotSize + 0.5);

Converts mouse y-position to the nearest slot index using rounding

conditional Reorder Check if (droppedSlot !== draggingSlotIndex) {

Only reorders the array if the card was dropped into a different slot

if (!dragging) return;
If the player isn't dragging, exit early—nothing to do on release
const relativeY = mouseY - layout.y0;
Converts the mouse's absolute y-position to a position relative to the first card
const slotSize = layout.cardH + layout.gap;
Calculates the total height of one card slot (card height plus gap)
let droppedSlot = Math.floor(relativeY / slotSize + 0.5);
Divides relative y by slotSize to get a slot number, then rounds to the nearest integer (+ 0.5 before floor rounds to nearest rather than down)
droppedSlot = constrain(droppedSlot, 0, n - 1);
Clamps the dropped slot to be within valid bounds (0 to n-1)
if (droppedSlot !== draggingSlotIndex) {
Only reorder if the card was dropped into a different slot (prevents array changes for no-op drops)
currentOrder.splice(draggingSlotIndex, 1);
Removes the card from its original slot
currentOrder.splice(droppedSlot, 0, draggingEventIndex);
Inserts the card at the new slot position
dragging = false;
Clears the dragging flag
draggingSlotIndex = -1;
Resets dragging slot index to -1 (invalid value)
draggingEventIndex = -1;
Resets dragging event index to -1 (invalid value)

startLevel()

startLevel() demonstrates the Fisher–Yates shuffle, a classic algorithm for randomly reordering arrays. It runs in O(n) time and produces a uniform distribution—unlike naive 'swap with random element' approaches that can bias results. It also shows good practice: resetting state (keepGlitch, dragging flags) before starting a fresh game session.

🔬 This is the famous Fisher–Yates shuffle. The loop works backward (i--, from n-1 down to 1) and picks a random element from the remaining unsorted portion. What if you changed 'i > 0' to 'i > -1'? It would do one extra iteration with i=0—does that break anything? (Hint: what does random(1) return?)

  for (let i = n - 1; i > 0; i--) {
    const j = Math.floor(random(i + 1));
    const tmp = currentOrder[i];
    currentOrder[i] = currentOrder[j];
    currentOrder[j] = tmp;
  }
function startLevel(index) {
  currentLevelIndex = index;
  const level = levels[currentLevelIndex];
  const n = level.events.length;

  currentOrder = [];
  for (let i = 0; i < n; i++) {
    currentOrder.push(i);
    // Reset glitch choices each run
    level.events[i].keepGlitch = false;
  }

  // Shuffle order using Fisher–Yates; this uses p5.random()
  for (let i = n - 1; i > 0; i--) {
    const j = Math.floor(random(i + 1));
    const tmp = currentOrder[i];
    currentOrder[i] = currentOrder[j];
    currentOrder[j] = tmp;
  }

  dragging = false;
  draggingSlotIndex = -1;
  draggingEventIndex = -1;
}
Line-by-line explanation (11 lines)

🔧 Subcomponents:

for-loop Order Initialization for (let i = 0; i < n; i++) {

Creates currentOrder as [0, 1, 2, ...] and resets glitch choices to false

for-loop Fisher–Yates Shuffle for (let i = n - 1; i > 0; i--) {

Randomizes the order array using the Fisher–Yates algorithm

currentLevelIndex = index;
Sets the global currentLevelIndex to load the correct level
const level = levels[currentLevelIndex];
Retrieves the level object
const n = level.events.length;
Counts the number of events in the level
currentOrder = [];
Initializes currentOrder as an empty array
for (let i = 0; i < n; i++) {
Loops n times to set up initial order
currentOrder.push(i);
Adds event index i to the end of currentOrder, starting with [0, 1, 2, ...]
level.events[i].keepGlitch = false;
Resets each event's keepGlitch property to false so previous choices don't carry over
for (let i = n - 1; i > 0; i--) {
Fisher–Yates loop: starts at the end and works backward
const j = Math.floor(random(i + 1));
Picks a random index from 0 to i (inclusive), moving the random boundary down each iteration
const tmp = currentOrder[i]; currentOrder[i] = currentOrder[j]; currentOrder[j] = tmp;
Swaps the elements at positions i and j
dragging = false;
Ensures no drag is in progress when the level starts

drawButton()

drawButton() demonstrates a reusable UI component pattern: a function that accepts parameters (position, size, label, enabled state) and renders an interactive element. The hover detection creates visual feedback without needing to track button state separately—it calculates 'over' fresh every frame based on the current mouse position.

function drawButton(x, y, w, h, label, enabled) {
  push();
  const over =
    enabled &&
    mouseX >= x &&
    mouseX <= x + w &&
    mouseY >= y &&
    mouseY <= y + h;

  const base = enabled ? color(120, 180, 255) : color(90);
  const hover = enabled ? color(160, 210, 255) : base;

  noStroke();
  fill(over ? hover : base);
  rect(x, y, w, h, 8);

  fill(20);
  textAlign(CENTER, CENTER);
  textSize(16);
  text(label, x + w / 2, y + h / 2 + 1);
  pop();
}
Line-by-line explanation (10 lines)

🔧 Subcomponents:

conditional Hover Detection const over = enabled && mouseX >= x && mouseX <= x + w && mouseY >= y && mouseY <= y + h;

Checks if the mouse is inside the button bounds and the button is enabled

push();
Saves the drawing state so button styling doesn't affect other draws
const over = enabled && mouseX >= x && mouseX <= x + w && mouseY >= y && mouseY <= y + h;
Calculates whether the mouse is over the button: true only if enabled AND inside the x and y bounds
const base = enabled ? color(120, 180, 255) : color(90);
If enabled, use light blue; otherwise, use gray (disabled appearance)
const hover = enabled ? color(160, 210, 255) : base;
If enabled, use brighter blue for hover; otherwise, same as base (no hover effect when disabled)
fill(over ? hover : base);
Use hover color if the mouse is over, otherwise use base color
rect(x, y, w, h, 8);
Draws the button rectangle with 8-pixel rounded corners
fill(20);
Changes fill to dark gray for the text
textAlign(CENTER, CENTER);
Centers the text both horizontally and vertically
text(label, x + w / 2, y + h / 2 + 1);
Draws the button label (centered) at the button's center position (+ 1 for slight visual adjustment)
pop();
Restores the drawing state

getCardLayout()

getCardLayout() encapsulates responsive layout math. By centralizing these calculations, the code stays DRY (Don't Repeat Yourself) and makes it easy to adjust spacing or sizing rules globally. The constrain() call prevents cards from becoming unreadable or taking up all screen space.

function getCardLayout(numCards) {
  const areaTop = height * 0.2;
  const areaBottom = height * 0.82;
  const availableH = areaBottom - areaTop;

  let gap = 16;
  let cardH = (availableH - gap * (numCards - 1)) / numCards;
  cardH = constrain(cardH, 80, 140);

  const totalCardsH = cardH * numCards + gap * (numCards - 1);
  const y0 = areaTop + (availableH - totalCardsH) / 2;

  const cardW = min(width * 0.8, 720);
  const x = (width - cardW) / 2;

  return { areaTop, areaBottom, availableH, gap, cardH, cardW, x, y0 };
}
Line-by-line explanation (11 lines)

🔧 Subcomponents:

calculation Card Height Calculation let cardH = (availableH - gap * (numCards - 1)) / numCards;

Distributes available space evenly across cards, accounting for gaps between them

calculation Vertical Centering const y0 = areaTop + (availableH - totalCardsH) / 2;

Calculates the starting y position to center all cards vertically in the available area

const areaTop = height * 0.2;
Cards start 20% down the screen (below the HUD)
const areaBottom = height * 0.82;
Cards end 82% down the screen (above the button)
const availableH = areaBottom - areaTop;
Calculates the total vertical space available for cards
let gap = 16;
Sets the spacing between cards to 16 pixels
let cardH = (availableH - gap * (numCards - 1)) / numCards;
Divides available space evenly: subtract total gap space first, then divide by number of cards
cardH = constrain(cardH, 80, 140);
Clamps card height between 80 and 140 pixels (prevents cards from being too tiny or too large)
const totalCardsH = cardH * numCards + gap * (numCards - 1);
Recalculates the total height of all cards plus gaps (after constraining cardH)
const y0 = areaTop + (availableH - totalCardsH) / 2;
Centers the card stack vertically within the available area
const cardW = min(width * 0.8, 720);
Card width is 80% of screen width, but never wider than 720 pixels
const x = (width - cardW) / 2;
Centers cards horizontally
return { areaTop, areaBottom, availableH, gap, cardH, cardW, x, y0 };
Returns an object with all calculated values for other functions to use

pointInRect()

pointInRect() is a tiny utility function that performs axis-aligned bounding-box collision detection. It's used throughout the code for button clicks, toggle hits, and card selection. Many games and interactive apps use this same pattern.

function pointInRect(px, py, r) {
  return px >= r.x && px <= r.x + r.w && py >= r.y && py <= r.y + r.h;
}
Line-by-line explanation (1 lines)
return px >= r.x && px <= r.x + r.w && py >= r.y && py <= r.y + r.h;
Checks if point (px, py) is inside rectangle r: x must be between r.x and r.x+r.w, AND y must be between r.y and r.y+r.h

📦 Key Variables

gameState string

Tracks which screen the game is showing: 'menu', 'level', or 'result'

let gameState = 'menu';
currentLevelIndex number

Stores the index of the currently active level in the levels array

let currentLevelIndex = 0;
currentOrder array

Array of event indices in their current on-screen order; reordered when cards are dragged

let currentOrder = [2, 0, 3, 1];
dragging boolean

Flag indicating whether the player is currently dragging a card

let dragging = false;
draggingSlotIndex number

Records which slot the dragged card came from (used to reorder the array)

let draggingSlotIndex = -1;
draggingEventIndex number

Stores which event object is being dragged (needed to render it at the mouse position)

let draggingEventIndex = -1;
dragOffsetY number

Vertical distance from the top of the card to where the user clicked; keeps the cursor on the same spot while dragging

let dragOffsetY = 0;
resultData object

Stores the evaluation results (outcome, stability, consequences) displayed on the result screen

let resultData = { outcomeKey: 'perfect', stabilityLabel: 'Stable', baseText: '...', keptGlitches: [], errorCount: 0 };
stars array

Array of star objects for the background, each with x, y, r (radius), and twinkleOffset properties

let stars = [{ x: 100, y: 50, r: 2, twinkleOffset: 1.5 }, ...];
NUM_STARS number

Constant controlling how many stars are created in the starfield background

const NUM_STARS = 80;
levels array

Array of level objects, each containing id, title, era, prompt, events array, and outcomes

const levels = [{ id: 'dino', title: 'Jurassic Jam', era: '...', events: [...], outcomes: {...} }];

🔧 Potential Improvements (6)

Here are some ways this code could be enhanced:

BUG startLevel()

If no levels array has a level at the given index, accessing levels[currentLevelIndex] will fail silently, causing undefined behavior.

💡 Add a bounds check: if (index < 0 || index >= levels.length) { console.warn('Invalid level index'); return; }

PERFORMANCE drawStarfieldBackground()

The starfield is recalculated every frame even though stars don't move—only their twinkle changes.

💡 Consider pre-rendering the starfield to an off-screen canvas (createGraphics) and updating only the twinkle effect, reducing per-frame calculations.

STYLE drawCard()

Magic numbers (24, 16, 30, 120, 130) hardcode positions and sizes; changing card layout requires editing multiple lines scattered throughout the function.

💡 Extract these values to named constants at the top of the function: const BADGE_PADDING = 24, TEXT_MARGIN = 16, etc.

FEATURE resultData and drawResult()

The current levels array has only one level; players see the same Jurassic Jam repeatedly.

💡 Add more level objects to the levels array with different eras, events, and outcomes (e.g., Ancient Rome, the Renaissance, future timelines) to expand replayability.

BUG handleLevelMouseReleased()

If the player drags a card far above or below the card area, rounding in droppedSlot may place it in an unexpected slot, frustrating the player.

💡 Add visual feedback during dragging (e.g., highlight the target slot) so players see where the card will land before releasing.

STYLE levels array

The events array and outcomes object structure are tightly coupled; adding fields (e.g., image, audio cue) requires changes throughout the rendering code.

💡 Consider using a data schema library or adding default property checks to make the data structure more extensible.

🔄 Code Flow

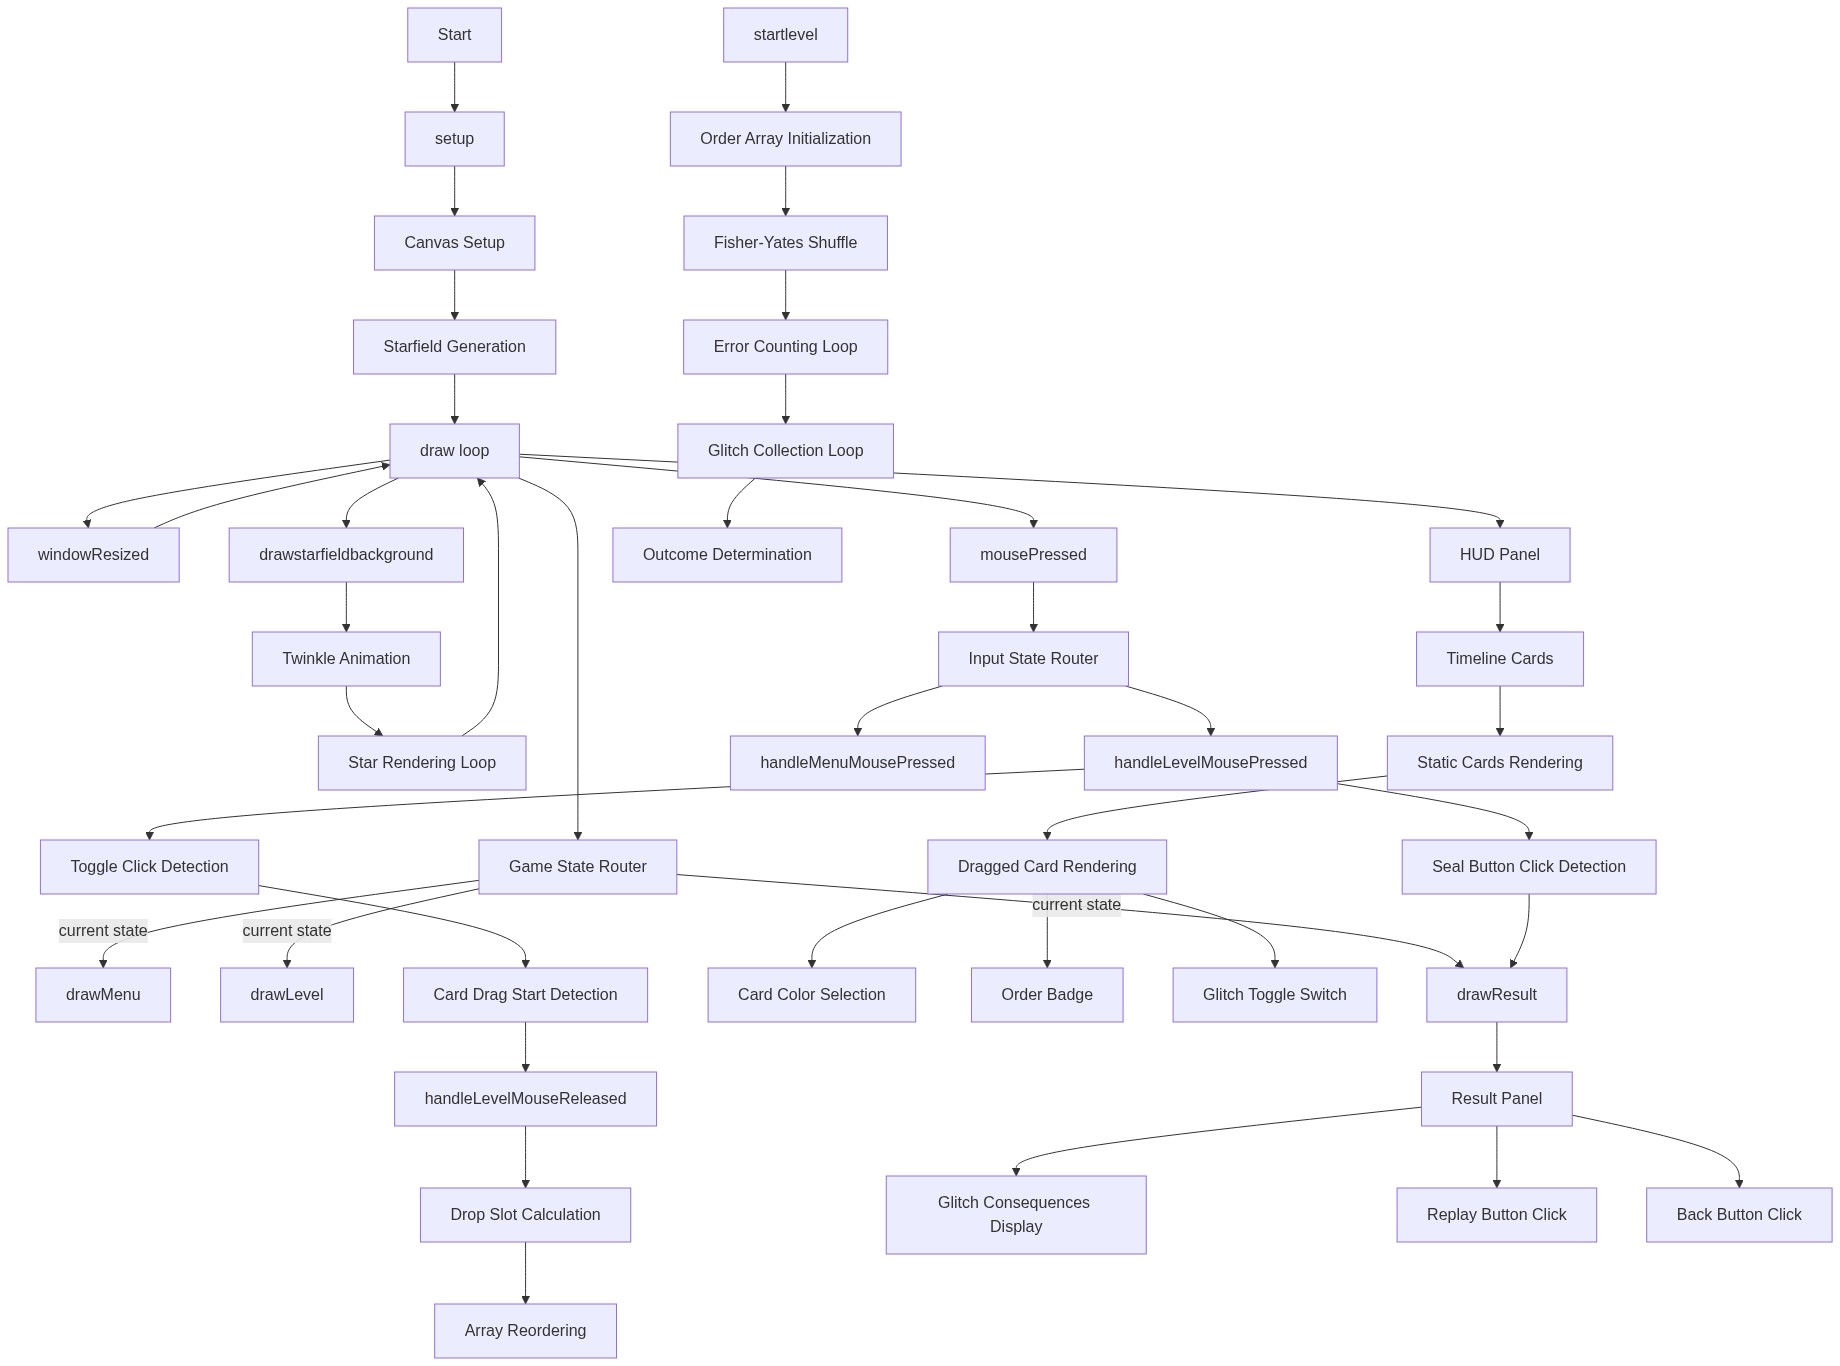
Code flow showing setup, draw, drawstarfieldbackground, drawmenu, drawlevel, drawtimelinecards, drawcard, drawresult, evaluatetimeline, handlelevelmousepressed, handlelevelmousereleased, startlevel, drawbutton, getCardLayout, pointinrect

💡 Click on function names in the diagram to jump to their code

graph TD start[Start] --> setup[setup] setup --> draw[draw loop] draw --> state-dispatch[Game State Dispatcher] state-dispatch -->|current state is menu| drawmenu[drawMenu] state-dispatch -->|current state is level| drawlevel[drawLevel] state-dispatch -->|current state is result| drawresult[drawResult] drawmenu --> height-calculation[Card Height Calculation] height-calculation --> drawmenu click setup href "#fn-setup" click draw href "#fn-draw" click drawmenu href "#fn-drawmenu" click height-calculation href "#sub-height-calculation" drawlevel --> drawstarfieldbackground[drawStarfieldBackground] drawlevel --> static-cards-loop[Static Cards Loop] static-cards-loop --> drag-skip-conditional[Skip Dragged Card] drag-skip-conditional --> dragged-card-render[Render Dragged Card on Top] drawlevel --> drawbutton[drawButton] drawbutton --> hover-detection[Hover Detection] hover-detection --> drawlevel click drawlevel href "#fn-drawlevel" click drawstarfieldbackground href "#fn-drawstarfieldbackground" click static-cards-loop href "#sub-static-cards-loop" click drag-skip-conditional href "#sub-drag-skip-conditional" click dragged-card-render href "#sub-dragged-card-render" click drawbutton href "#fn-drawbutton" click hover-detection href "#sub-hover-detection" drawresult --> glitch-list-conditional[Kept Glitches Display] glitch-list-conditional --> glitch-loop[Glitch Consequences Loop] glitch-loop --> drawresult click drawresult href "#fn-drawresult" click glitch-list-conditional href "#sub-glitch-list-conditional" click glitch-loop href "#sub-glitch-loop" evaluatetimeline --> error-count-loop[Error Counting Loop] error-count-loop --> glitch-collection-loop[Glitch Collection Loop] glitch-collection-loop --> outcome-determination[Outcome Determination] outcome-determination --> evaluatetimeline click evaluatetimeline href "#fn-evaluatetimeline" click error-count-loop href "#sub-error-count-loop" click glitch-collection-loop href "#sub-glitch-collection-loop" click outcome-determination href "#sub-outcome-determination" handlelevelmousepressed --> seal-button-check[Seal Button Collision] seal-button-check --> toggle-detection-loop[Toggle Detection Loop] toggle-detection-loop --> drag-start-loop[Drag Start Detection Loop] drag-start-loop --> handlelevelmousepressed click handlelevelmousepressed href "#fn-handlelevelmousepressed" click seal-button-check href "#sub-seal-button-check" click toggle-detection-loop href "#sub-toggle-detection-loop" click drag-start-loop href "#sub-drag-start-loop" handlelevelmousereleased --> slot-calculation[Drop Slot Calculation] slot-calculation --> reorder-conditional[Reorder Check] reorder-conditional --> handlelevelmousereleased click handlelevelmousereleased href "#fn-handlelevelmousereleased" click slot-calculation href "#sub-slot-calculation" click reorder-conditional href "#sub-reorder-conditional" startlevel --> initialization-loop[Order Initialization] initialization-loop --> fisher-yates-shuffle[Fisher–Yates Shuffle] fisher-yates-shuffle --> startlevel click startlevel href "#fn-startlevel" click initialization-loop href "#sub-initialization-loop" click fisher-yates-shuffle href "#sub-fisher-yates-shuffle" drawstarfieldbackground --> starfield-loop[Starfield Initialization] starfield-loop --> star-loop[Star Rendering Loop] star-loop --> twinkle-calculation[Twinkle Brightness] twinkle-calculation --> star-loop click drawstarfieldbackground href "#fn-drawstarfieldbackground" click starfield-loop href "#sub-starfield-loop" click star-loop href "#sub-star-loop" click twinkle-calculation href "#sub-twinkle-calculation" pointinrect --> pointinrect click pointinrect href "#fn-pointinrect"

❓ Frequently Asked Questions

What visual experience does the 'Time Janitor' sketch provide?

The 'Time Janitor' sketch creates a captivating starry environment where users float through a time portal filled with quirky dinosaur-era events.

How do users interact with the 'Time Janitor' game?

Users can drag and drop events into the correct chronological order while deciding whether to fix or keep glitch moments that impact the timeline.

What creative coding concepts are explored in the 'Time Janitor' sketch?

The sketch demonstrates concepts of interactive storytelling, timeline manipulation, and the impact of choices on narrative outcomes through a playful, gamified interface.

Preview

time janitor - p5.js creative coding sketch preview
Sketch Preview
Code flow diagram showing the structure of time janitor - Code flow showing setup, draw, drawstarfieldbackground, drawmenu, drawlevel, drawtimelinecards, drawcard, drawresult, evaluatetimeline, handlelevelmousepressed, handlelevelmousereleased, startlevel, drawbutton, getCardLayout, pointinrect
Code Flow Diagram