
Try this

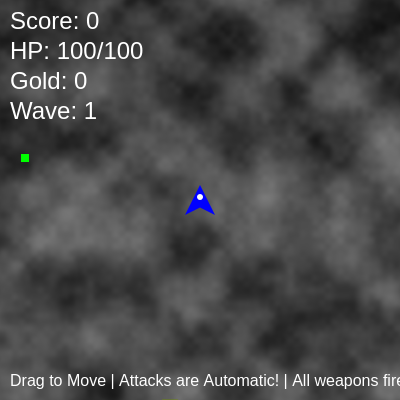
This is a roguelike action game where you control a character that automatically attacks enemies with multiple weapons simultaneously. Defeat enemies to earn gold, buy upgrades in the shop, and survive increasingly difficult waves.

🧪 Try This!

Experiment with the code by making these changes:

  1. Make enemies spawn faster — Reduce the spawn interval so waves feel more intense and challenging earlier
  2. Increase max concurrent enemies — Allow more enemies on-screen at once to create larger, chaotic battles
  3. Make the player larger — Increase the player's size to make them a bigger target or more visible
  4. Increase base damage on all weapons — Make projectiles deal more damage by default, enabling earlier wave progression
  5. Change background to pure noise animation — Adjust noise scale to create more visible animated patterns
  6. Make player start with shotgun — Begin the game with a multi-shot weapon instead of the pistol
Prefer the full editor? Open it there →

📖 About This Sketch

This sketch creates a complete roguelike combat game playable on touch devices or desktop. You drag to move your character while it automatically fires all weapons at the nearest enemy. The game is visually interesting because it combines animated texture rendering with particle systems (projectiles), real-time collision detection, and a dynamic shop system where you upgrade weapons and stats between waves. It demonstrates several advanced p5.js techniques: procedural texture generation using p5.Graphics, game state machines, object-oriented design with custom classes, localStorage persistence, and touch input handling.

The code is organized into four main sections: game state management (setup, draw, gameState switch), game logic (spawning, movement, collision detection), visual rendering (textures and display functions), and utility classes (Enemy, Projectile, Item, Weapon, ShopItem). By studying it, you'll learn how professional game frameworks handle architecture—separating concerns into update and display phases, managing multiple game objects in arrays, and chaining state transitions. The codebase is well-commented and teaches both beginner concepts (loops, conditionals) and intermediate ideas (classes, array manipulation, game design patterns).

⚙️ How It Works

  1. When the sketch loads, setup() creates a p5.Graphics-based texture for the player (blue triangle), enemies (red pentagons), items (yellow stars), and four weapon types. It initializes the player at the canvas center with a pistol, then loads any saved progress from localStorage or starts a new game.
  2. The draw loop runs every frame and uses a gameState switch to control which logic runs: WAVE_START shows a countdown, PLAYING updates all game objects and renders them, SHOP displays upgrade buttons, WAVE_END celebrates victory, and GAME_OVER lets you restart.
  3. During PLAYING state, updateGame() handles five key responsibilities: spawning enemies from random canvas edges at intervals that accelerate with score, moving enemies toward the player using atan2 angle calculations, updating all projectiles and checking if they're off-screen, regenerating player HP over time, and checking collisions.
  4. Collision detection happens in checkCollisions(): if an enemy touches the player, you take damage and the enemy dies; if a projectile hits an enemy, it deals damage and the enemy drops gold and possibly an item.
  5. The shoot() function fires all weapons at once toward the nearest enemy, or randomly if no enemies exist. Each weapon has its own shootInterval timer that increments each frame—when it reaches the threshold, projectiles spawn and the timer resets.
  6. When all enemies for a wave are defeated and all items are collected, you enter SHOP state. Buying upgrades modifies your weapons' stats or adds new weapons. Pressing START WAVE calls startNextWave(), which increments the wave counter, heals you, resets enemy arrays, and returns to WAVE_START for the countdown.

🎓 Concepts You'll Learn

Game state machinesObject-oriented design with classesCollision detection using distancep5.Graphics texture renderingTouch input handlinglocalStorage persistenceArray manipulation and iterationProcedural animation with noiseTrigonometry for aiming and movement

📝 Code Breakdown

setup()

setup() runs once when the sketch starts. It's where you create textures (reusable images) and initialize variables. Using p5.Graphics to pre-render shapes is much faster than redrawing them every frame—you draw once, then reuse the result thousands of times. This is how real games optimize performance.

🔬 The first parameter of fill() is red, second is green, third is blue—each from 0 to 255. What happens if you change (0, 0, 255) to (255, 0, 255)? To (100, 100, 100)?

  let maxPlayerSize = 60; // Max size player could grow to (if upgrades affected size)
  playerTexture = createGraphics(maxPlayerSize, maxPlayerSize);
  playerTexture.fill(0, 0, 255); // Blue
function setup() {
  createCanvas(windowWidth, windowHeight);

  // Create simulated textures (p5.Graphics objects)
  // These are created once and then scaled when drawn.
  let maxPlayerSize = 60; // Max size player could grow to (if upgrades affected size)
  playerTexture = createGraphics(maxPlayerSize, maxPlayerSize);
  playerTexture.fill(0, 0, 255); // Blue
  playerTexture.noStroke();
  playerTexture.beginShape();
  playerTexture.vertex(maxPlayerSize / 2, 0);
  playerTexture.vertex(maxPlayerSize, maxPlayerSize);
  playerTexture.vertex(maxPlayerSize / 2, maxPlayerSize * 0.75);
  playerTexture.vertex(0, maxPlayerSize);
  playerTexture.endShape(CLOSE);
  playerTexture.fill(255); // White "eye" or indicator
  playerTexture.ellipse(maxPlayerSize / 2, maxPlayerSize * 0.4, maxPlayerSize * 0.2);

  let maxEnemySize = 70; // Max size enemy could grow to
  enemyTexture = createGraphics(maxEnemySize, maxEnemySize);
  enemyTexture.fill(255, 0, 0); // Red
  enemyTexture.noStroke();
  enemyTexture.beginShape();
  enemyTexture.vertex(maxEnemySize / 2, 0);
  enemyTexture.vertex(maxEnemySize, maxEnemySize / 3);
  enemyTexture.vertex(maxEnemySize * 0.75, maxEnemySize);
  enemyTexture.vertex(maxEnemySize / 4, maxEnemySize);
  enemyTexture.vertex(0, maxEnemySize / 3);
  enemyTexture.endShape(CLOSE);
  enemyTexture.fill(255); // White "eye" or indicator
  enemyTexture.ellipse(maxEnemySize / 2, maxEnemySize * 0.3, maxEnemySize * 0.2);

  let maxItemSize = 30;
  itemTexture = createGraphics(maxItemSize, maxItemSize);
  itemTexture.fill(255, 255, 0); // Yellow
  itemTexture.noStroke();
  itemTexture.beginShape();
  for (let i = 0; i < 5; i++) {
    let angle = TWO_PI / 5 * i - HALF_PI;
    let x = maxItemSize / 2 + cos(angle) * maxItemSize * 0.4;
    let y = maxItemSize / 2 + sin(angle) * maxItemSize * 0.4;
    itemTexture.vertex(x, y);
    angle += TWO_PI / 10;
    x = maxItemSize / 2 + cos(angle) * maxItemSize * 0.15; // Inner point
    y = maxItemSize / 2 + sin(angle) * maxItemSize * 0.15;
    itemTexture.vertex(x, y);
  }
  itemTexture.endShape(CLOSE);

  // --- Weapon Textures (new) ---
  pistolTexture = createGraphics(30, 20);
  pistolTexture.fill(100); // Gray
  pistolTexture.noStroke();
  pistolTexture.rect(0, 5, 25, 10);
  pistolTexture.rect(5, 15, 10, 5); // Handle
  pistolProjectileTexture = createGraphics(15, 5); // Green rectangle (NOW GLOBAL)
  pistolProjectileTexture.fill(0, 255, 0);
  pistolProjectileTexture.noStroke();
  pistolProjectileTexture.rect(0, 0, 15, 5);

  shotgunTexture = createGraphics(40, 25);
  shotgunTexture.fill(150, 75, 0); // Brown
  shotgunTexture.noStroke();
  shotgunTexture.rect(0, 5, 35, 15);
  shotgunTexture.rect(30, 8, 10, 9); // Barrel tip
  shotgunProjectileTexture = createGraphics(10, 10); // Red circle (pellet) (NOW GLOBAL)
  shotgunProjectileTexture.fill(255, 0, 0);
  shotgunProjectileTexture.noStroke();
  shotgunProjectileTexture.ellipse(5, 5, 10, 10);

  machineGunTexture = createGraphics(35, 20);
  machineGunTexture.fill(50); // Dark Gray
  machineGunTexture.noStroke();
  machineGunTexture.rect(0, 5, 30, 10);
  machineGunTexture.rect(25, 8, 10, 4); // Barrel tip
  machineGunTexture.rect(5, 15, 15, 5); // Handle
  machineGunProjectileTexture = createGraphics(8, 3); // Small, fast, light blue rectangle
  machineGunProjectileTexture.fill(100, 100, 255);
  machineGunProjectileTexture.noStroke();
  machineGunProjectileTexture.rect(0, 0, 8, 3);

  rocketLauncherTexture = createGraphics(50, 25);
  rocketLauncherTexture.fill(75); // Dark Greenish Gray
  rocketLauncherTexture.noStroke();
  rocketLauncherTexture.rect(0, 8, 45, 9);
  rocketLauncherTexture.ellipse(45, 12, 10, 10); // Barrel opening
  rocketLauncherTexture.rect(10, 17, 20, 5); // Handle
  rocketLauncherProjectileTexture = createGraphics(20, 10); // Large, slow, orange rocket
  rocketLauncherProjectileTexture.fill(255, 150, 0);
  rocketLauncherProjectileTexture.noStroke();
  rocketLauncherProjectileTexture.rect(0, 0, 15, 10);
  rocketLauncherProjectileTexture.triangle(15, 0, 15, 10, 20, 5); // Rocket tip

  // Create the background texture
  backgroundTexture = createGraphics(width, height);
  generateBackgroundTexture(); // Initial generation

  // Initialize player character (or load from localStorage)
  loadProgress();

  // Start the first wave
  // If loading progress, start next wave directly, otherwise start wave 1
  if (waveNumber === 0) {
    startNextWave();
  } else {
    // If progress was loaded, ensure game state is set for the next wave
    gameState = "WAVE_START";
    waveStartTime = millis(); // Reset wave start time for countdown
    setTimeout(() => gameState = "PLAYING", 3000); // 3-second countdown
  }
}
Line-by-line explanation (8 lines)

🔧 Subcomponents:

calculation Player Texture Drawing playerTexture = createGraphics(maxPlayerSize, maxPlayerSize);

Creates a 60x60 pixel canvas object to pre-render the blue triangle player shape once, reused throughout the game

calculation Weapon Texture Setup pistolTexture = createGraphics(30, 20);

Pre-renders all four weapon types (pistol, shotgun, machine gun, rocket launcher) as p5.Graphics objects for fast drawing

calculation Progress Loading loadProgress();

Loads saved game data from localStorage if it exists, otherwise initializes a fresh player

createCanvas(windowWidth, windowHeight);
Creates a full-screen canvas that adapts to the window size
playerTexture = createGraphics(maxPlayerSize, maxPlayerSize);
Creates a 60x60 pixel off-screen canvas (p5.Graphics) where the player shape will be drawn once
playerTexture.fill(0, 0, 255); // Blue
Sets the fill color to blue for the player shape
playerTexture.beginShape(); ... playerTexture.endShape(CLOSE);
Draws a four-pointed triangle shape (like a spaceship) using vertices
playerTexture.ellipse(maxPlayerSize / 2, maxPlayerSize * 0.4, maxPlayerSize * 0.2);
Adds a white circle at the top of the player to represent an eye or indicator
backgroundTexture = createGraphics(width, height);
Creates a full-size off-screen canvas where the animated noise background will be rendered
loadProgress();
Attempts to load saved game data from the browser's localStorage, or initializes a new player if none exists
if (waveNumber === 0) { startNextWave(); }
If no game was loaded (fresh start), begin wave 1; otherwise resume from the saved wave
draw()

draw() is p5.js's main loop—it runs 60 times per second by default. It clears the canvas, updates game logic, and redraws everything. The switch statement here is a 'state machine,' a design pattern that routes different behaviors based on a current mode. This is how professional games separate concerns: wave start, playing, shop, and game over each have their own logic.

🔬 The first line controls animation speed and the second controls how often we regenerate. What happens if you change 0.005 to 0.02? What if you change the 60 to 30?

  noiseOffset += 0.005; // Adjust for slower/faster animation
  if (frameCount % 60 === 0) { // Regenerate texture every second (or less frequently for performance)
    generateBackgroundTexture();
  }
function draw() {
  background(0); // Explicitly set background to black each frame

  // Draw the cool background texture
  image(backgroundTexture, 0, 0);

  // Animate the noise background subtly
  noiseOffset += 0.005; // Adjust for slower/faster animation
  if (frameCount % 60 === 0) { // Regenerate texture every second (or less frequently for performance)
    generateBackgroundTexture();
  }

  switch (gameState) {
    case "WAVE_START":
      displayWaveStart();
      break;
    case "PLAYING":
      updateGame();
      displayGame();
      break;
    case "SHOP":
      displayShop();
      break;
    case "WAVE_END":
      displayWaveEnd();
      break;
    case "GAME_OVER":
      displayGameOver();
      break;
  }
}
Line-by-line explanation (5 lines)

🔧 Subcomponents:

calculation Screen Clear background(0);

Fills entire canvas with black each frame, erasing the previous frame's visuals

switch-case Game State Control switch (gameState) { ... }

Routes execution to different display and update functions based on current game state

calculation Animated Background noiseOffset += 0.005;

Slowly changes the noise seed to create a subtle animated background effect

background(0);
Fills the entire canvas with black (color value 0), clearing anything drawn last frame
image(backgroundTexture, 0, 0);
Draws the animated noise background texture at the top-left corner of the canvas
noiseOffset += 0.005;
Increments the noiseOffset variable slowly, which changes the appearance of the Perlin noise each frame, creating animation
if (frameCount % 60 === 0) { generateBackgroundTexture(); }
Every 60 frames (roughly once per second), regenerates the background texture using the updated noiseOffset to optimize performance
switch (gameState) { case "WAVE_START": ... case "PLAYING": ... }
Tests the current gameState string and calls the matching display/update function—this is the core game loop architecture

updateGame()

updateGame() is the core game loop orchestrator. It calls all the individual update functions in the right order so the game behaves correctly: player first, then objects, then collisions, then state checks. This organization pattern (separate update and display) is fundamental to game architecture.

function updateGame() {
  // Update player character and weapons
  updatePlayer();

  // Spawn new enemies
  spawnEnemies();

  // Update player's projectiles
  updateProjectiles();

  // Update enemies
  updateEnemies();

  // Update dropped items
  updateItems();

  // Check for collisions between game elements
  checkCollisions();

  // Check if player's HP has reached zero
  if (player.hp <= 0) {
    gameState = "GAME_OVER"; // Transition to game over state
  }

  // Check if wave has ended
  checkWaveEnd();
}
Line-by-line explanation (8 lines)

🔧 Subcomponents:

conditional Player Death Check if (player.hp <= 0) { gameState = "GAME_OVER"; }

Ends the game immediately if player health drops to or below zero

updatePlayer();
Regenerates player HP and increments all weapon shoot timers
spawnEnemies();
Creates new enemies at random edges if there's room and the wave isn't complete
updateProjectiles();
Moves all projectiles and removes those that left the screen
updateEnemies();
Moves all enemies toward the player and removes distant ones
updateItems();
Moves dropped items, checks if player picked them up, removes expired items
checkCollisions();
Tests for collisions between player–enemies, projectiles–enemies, and player–items
if (player.hp <= 0) { gameState = "GAME_OVER"; }
If health reaches zero or below, immediately transition to game over state
checkWaveEnd();
Tests whether all enemies are spawned and defeated to determine if wave is complete

spawnEnemies()

Spawning with a timer (not every frame) is a common pattern—it avoids overwhelming the player instantly. The difficulty scaling makes the game progressively harder as you earn score, which is motivating: better players get challenged more. The off-screen spawn point prevents enemies from suddenly appearing on top of you.

🔬 This code picks a random edge and spawns enemies off-screen. What happens if you change the -50 to 0 or 100? What if you change random(4) to 0 so enemies only spawn from one edge?

      let edge = floor(random(4)); // Randomly choose an edge: 0:top, 1:right, 2:bottom, 3:left

      if (edge === 0) { // Top edge
        x = random(width);
        y = -50; // Start off-screen
function spawnEnemies() {
  // Only spawn if not all enemies for the wave are spawned and there's room on screen
  if (enemiesSpawnedThisWave < enemiesThisWave && enemies.length < maxEnemiesOnScreen) {
    enemySpawnTimer++;
    if (enemySpawnTimer >= enemySpawnInterval) {
      enemySpawnTimer = 0;

      // Make spawning faster as score increases for difficulty scaling
      // Minimum interval is 30 frames (0.5 seconds)
      enemySpawnInterval = max(30, 60 - floor(score / 50));

      let x, y;
      let edge = floor(random(4)); // Randomly choose an edge: 0:top, 1:right, 2:bottom, 3:left

      if (edge === 0) { // Top edge
        x = random(width);
        y = -50; // Start off-screen
      } else if (edge === 1) { // Right edge
        x = width + 50;
        y = random(height);
      } else if (edge === 2) { // Bottom edge
        x = random(width);
        y = height + 50;
      } else { // Left edge
        x = -50;
        y = random(height);
      }

      enemies.push(new Enemy(x, y, waveNumber)); // Add a new enemy to the array
      enemiesSpawnedThisWave++;
    }
  }
}
Line-by-line explanation (8 lines)

🔧 Subcomponents:

conditional Spawn Permission Check if (enemiesSpawnedThisWave < enemiesThisWave && enemies.length < maxEnemiesOnScreen) {

Only permits spawning if the wave quota isn't met AND fewer than 10 enemies are on-screen

calculation Spawn Interval Timer enemySpawnTimer++; if (enemySpawnTimer >= enemySpawnInterval) {

Increments a counter each frame and spawns an enemy when the counter reaches the interval threshold

calculation Difficulty Scaling enemySpawnInterval = max(30, 60 - floor(score / 50));

Decreases the spawn interval (faster spawning) as the player's score increases, making the game harder over time

conditional Edge Selection let edge = floor(random(4)); if (edge === 0) { ... } else if (edge === 1) { ... }

Picks a random edge (0=top, 1=right, 2=bottom, 3=left) and spawns the enemy just off-screen at that edge

if (enemiesSpawnedThisWave < enemiesThisWave && enemies.length < maxEnemiesOnScreen) {
Only continue if we haven't spawned all enemies for this wave AND there's room on-screen (fewer than 10 enemies)
enemySpawnTimer++;
Increments the timer by 1 each frame, measuring progress toward the next spawn
if (enemySpawnTimer >= enemySpawnInterval) {
When the timer reaches the spawn interval (60 frames by default), it's time to spawn
enemySpawnTimer = 0;
Resets the timer to 0 after spawning so the countdown begins again
enemySpawnInterval = max(30, 60 - floor(score / 50));
Calculates a new spawn interval: for every 50 points of score, spawn 5 frames faster, down to a minimum of 30 frames
let edge = floor(random(4));
Picks a random number from 0 to 3.99, rounds it down to 0, 1, 2, or 3
if (edge === 0) { x = random(width); y = -50; }
If edge is 0 (top), place the enemy at a random horizontal position but above the canvas
enemies.push(new Enemy(x, y, waveNumber));
Creates a new Enemy object at position (x, y) with difficulty scaling based on the wave number, and adds it to the enemies array

updateEnemies()

Iterating backward when deleting items is a critical pattern. If you loop forward and remove item 2, items after it shift down, so you accidentally skip checking item 3. Looping backward avoids this: removing item 2 doesn't affect items you haven't checked yet. The distance-based cleanup prevents 'zombie' enemies from draining performance.

🔬 Try changing the loop to forward (for (let i = 0; i < enemies.length; i++)) without changing the removal logic. What happens? Why do you think the reverse loop is needed?

  for (let i = enemies.length - 1; i >= 0; i--) {
    let enemy = enemies[i];
    enemy.move(player.x, player.y);
function updateEnemies() {
  for (let i = enemies.length - 1; i >= 0; i--) {
    let enemy = enemies[i];
    enemy.move(player.x, player.y); // Move enemy towards the player

    // Remove enemies that are very far off-screen
    // This prevents performance issues with enemies that might pass the player
    if (dist(enemy.x, enemy.y, player.x, player.y) > max(width, height) * 1.5) {
      enemies.splice(i, 1);
    }
  }
}
Line-by-line explanation (4 lines)

🔧 Subcomponents:

for-loop Reverse Loop with Removal for (let i = enemies.length - 1; i >= 0; i--) { ... if (...) { enemies.splice(i, 1); } }

Iterates backward through the array so removing items doesn't skip any elements

conditional Distance-Based Cleanup if (dist(enemy.x, enemy.y, player.x, player.y) > max(width, height) * 1.5) {

Removes enemies that wander far from the player to prevent memory leaks

for (let i = enemies.length - 1; i >= 0; i--) {
Loops through the enemies array backward (from last to first)—this is crucial because removing items from a forward loop skips elements
enemy.move(player.x, player.y);
Calls the Enemy's move() method, which moves it toward the player's position using trigonometry
if (dist(enemy.x, enemy.y, player.x, player.y) > max(width, height) * 1.5) {
Tests if the enemy is more than 1.5× the canvas's larger dimension away from the player
enemies.splice(i, 1);
Removes the enemy at index i from the array, freeing memory

checkCollisions()

Collision detection using distance is simple and fast: measure how far apart two objects are, and if they're closer than the sum of their sizes, they collide. The nested loop for projectile-enemy collisions is O(n²)—if there are many projectiles and enemies, this gets slow. Professional games optimize this with spatial partitioning, but for small numbers it's fine. The item drop chance demonstrates probability: random(1) returns a value 0–0.999..., so 10% of the time (when random is 0–0.1) an item drops.

🔬 When you kill an enemy, you earn 10 points and the enemy's gold drop. What happens if you change 10 to 50? What if you multiply by the wave number: score += 10 * waveNumber?

        if (enemy.takeDamage(proj.damage)) {
          // Enemy is dead
          enemies.splice(j, 1);
          score += 10; // Increment score
          player.gold += enemy.goldDrop; // Add gold to player
function checkCollisions() {
  // Player-Enemy collision
  for (let i = enemies.length - 1; i >= 0; i--) {
    let enemy = enemies[i];
    let d = dist(player.x, player.y, enemy.x, enemy.y);
    if (d < player.size / 2 + enemy.size / 2) {
      // Player takes damage
      player.hp -= enemy.damage;
      player.hp = max(0, player.hp); // HP cannot go below 0

      // Remove the enemy after it hits the player (simple collision model)
      enemies.splice(i, 1);
    }
  }

  // Projectile-Enemy collision
  for (let i = projectiles.length - 1; i >= 0; i--) {
    let proj = projectiles[i];
    for (let j = enemies.length - 1; j >= 0; j--) {
      let enemy = enemies[j];
      let d = dist(proj.x, proj.y, enemy.x, enemy.y);
      if (d < proj.size / 2 + enemy.size / 2) {
        // Projectile hits enemy
        if (enemy.takeDamage(proj.damage)) {
          // Enemy is dead
          enemies.splice(j, 1);
          score += 10; // Increment score
          player.gold += enemy.goldDrop; // Add gold to player

          // Check for item drop
          if (random(1) < enemy.itemDropChance) {
            dropItems.push(new Item(enemy.x, enemy.y)); // Create a new dropped item
          }
        }
        projectiles.splice(i, 1); // Remove projectile
        break; // Exit inner loop as this projectile is gone
      }
    }
  }
}
Line-by-line explanation (9 lines)

🔧 Subcomponents:

for-loop Player-Enemy Collision Loop for (let i = enemies.length - 1; i >= 0; i--) { let d = dist(...); if (d < ...) { ... } }

Tests each enemy against the player's position using distance and removes enemies that collide

for-loop Projectile-Enemy Collision Nested Loop for (let i = projectiles.length - 1; i >= 0; i--) { for (let j = enemies.length - 1; j >= 0; j--) { ... } }

Checks each projectile against every enemy; when a hit occurs, damage the enemy, possibly drop items, and remove both objects

conditional Damage and Loot if (enemy.takeDamage(proj.damage)) { ... score += 10; player.gold += enemy.goldDrop; }

If enemy dies from the damage, award score and gold, then chance-spawn a loot item

let d = dist(player.x, player.y, enemy.x, enemy.y);
Calculates the straight-line distance between the player and this enemy in pixels
if (d < player.size / 2 + enemy.size / 2) {
If the distance is less than the sum of their radii, the two circles overlap—they collide
player.hp -= enemy.damage;
Subtracts the enemy's damage value from the player's health
player.hp = max(0, player.hp);
Ensures health never goes below 0 (prevents negative health)
enemies.splice(i, 1);
Removes the enemy from the array after it damages the player
for (let i = projectiles.length - 1; i >= 0; i--) { for (let j = enemies.length - 1; j >= 0; j--) {
Nested loops: outer loop checks each projectile, inner loop tests that projectile against every enemy
if (enemy.takeDamage(proj.damage)) { ... score += 10; player.gold += enemy.goldDrop; }
Calls enemy.takeDamage() (which subtracts health and returns true if dead); if dead, award points and gold
if (random(1) < enemy.itemDropChance) { dropItems.push(new Item(enemy.x, enemy.y)); }
Generates a random number 0–1; if it's less than 0.1 (10%), create a new dropped item at the enemy's position
projectiles.splice(i, 1); break;
Removes the projectile and breaks the inner loop (exits the enemy-checking loop) because this projectile is gone

shoot()

All weapons fire at once (no switching), targeting the nearest enemy automatically. The multi-shot logic creates a shotgun-like spread: if numProjectiles is 5, they fan out around the base angle. This is controlled by map(), which remaps a value from one range to another—a core p5.js utility for creating smooth transitions.

🔬 This loop fires multiple projectiles per shot spread in a cone. What happens if you remove the if-statement so angleOffset is always map(...) even for single-shot weapons? What if you change the -0.2, 0.2 to -0.02, 0.02?

      for (let i = 0; i < weapon.numProjectiles; i++) {
        let angleOffset = 0;
        if (weapon.numProjectiles > 1) {
          // Spread projectiles for multi-shot weapons
          angleOffset = map(i, 0, weapon.numProjectiles - 1, -0.2, 0.2); // Adjust spread angle
        }
function shoot() {
  if (player.weapons.length === 0) return; // No weapons, no shooting

  let targetEnemy = findNearestEnemy();

  // If there are no enemies, shoot randomly
  if (!targetEnemy) {
    let angle = random(TWO_PI);
    for (let weapon of player.weapons) {
      if (weapon.shootTimer >= weapon.shootInterval) {
        weapon.shootTimer = 0;
        projectiles.push(new Projectile(
          player.x, player.y,
          player.x + cos(angle) * 100, player.y + sin(angle) * 100, // Target a point in that direction
          weapon.projectileSpeed, weapon.projectileSize, weapon.projectileDamage,
          weapon.projectileTexture // Pass projectile texture
        ));
      }
    }
    return;
  }

  // If there are enemies, all weapons target the nearest one
  let baseAngle = atan2(targetEnemy.y - player.y, targetEnemy.x - player.x);

  for (let weapon of player.weapons) {
    if (weapon.shootTimer >= weapon.shootInterval) {
      weapon.shootTimer = 0;

      for (let i = 0; i < weapon.numProjectiles; i++) {
        let angleOffset = 0;
        if (weapon.numProjectiles > 1) {
          // Spread projectiles for multi-shot weapons
          angleOffset = map(i, 0, weapon.numProjectiles - 1, -0.2, 0.2); // Adjust spread angle
        }
        let currentAngle = baseAngle + angleOffset;

        projectiles.push(new Projectile(
          player.x, player.y,
          player.x + cos(currentAngle) * 100, player.y + sin(currentAngle) * 100, // Target a point in that direction
          weapon.projectileSpeed, weapon.projectileSize, weapon.projectileDamage,
          weapon.projectileTexture // Pass projectile texture
        ));
      }
    }
  }
}
Line-by-line explanation (8 lines)

🔧 Subcomponents:

conditional No-Enemy Random Shooting if (!targetEnemy) { let angle = random(TWO_PI); ... }

If no enemies exist, shoots all weapons in a random direction

conditional Enemy Targeting let baseAngle = atan2(targetEnemy.y - player.y, targetEnemy.x - player.x);

Calculates the angle from player to the nearest enemy, then fires all weapons in that direction

for-loop Multi-Shot Spread Logic for (let i = 0; i < weapon.numProjectiles; i++) { angleOffset = map(...); ... }

For shotguns that fire multiple pellets, spreads them in a cone around the base angle

if (player.weapons.length === 0) return;
Exit early if the player has no weapons—nothing to shoot
let targetEnemy = findNearestEnemy();
Calls findNearestEnemy() to determine which enemy to aim at; returns null if no enemies exist
if (!targetEnemy) { let angle = random(TWO_PI);
If there's no target, pick a random angle in a full 360-degree circle (TWO_PI radians = 2π = 360°)
if (weapon.shootTimer >= weapon.shootInterval) {
Only fire if this weapon's shootTimer has reached its shootInterval (e.g., 30 frames for a pistol)
weapon.shootTimer = 0;
Resets the timer to 0, so the next shot must wait shootInterval frames again
let baseAngle = atan2(targetEnemy.y - player.y, targetEnemy.x - player.x);
Uses atan2 to calculate the angle from player to target in radians
angleOffset = map(i, 0, weapon.numProjectiles - 1, -0.2, 0.2);
Maps the projectile index (0, 1, 2...) to an angle offset between -0.2 and +0.2 radians, spreading multi-shot attacks
projectiles.push(new Projectile(...));
Creates a new Projectile object with the calculated angle and parameters, adds it to the projectiles array

findNearestEnemy()

This is a classic 'minimum search' algorithm: iterate through a list, tracking the current champion, and update it whenever you find a better candidate. It's simple, O(n), and perfect for small lists like enemies. A more advanced version could use spatial data structures for thousands of objects.

function findNearestEnemy() {
  if (enemies.length === 0) return null;
  let nearestEnemy = enemies[0];
  let minD = dist(player.x, player.y, nearestEnemy.x, nearestEnemy.y);

  for (let i = 1; i < enemies.length; i++) {
    let d = dist(player.x, player.y, enemies[i].x, enemies[i].y);
    if (d < minD) {
      minD = d;
      nearestEnemy = enemies[i];
    }
  }
  return nearestEnemy;
}
Line-by-line explanation (6 lines)

🔧 Subcomponents:

for-loop Minimum Distance Search for (let i = 1; i < enemies.length; i++) { if (d < minD) { minD = d; nearestEnemy = enemies[i]; } }

Iterates through all enemies, tracking the one with the smallest distance to the player

if (enemies.length === 0) return null;
If no enemies exist, immediately return null (nothing to target)
let nearestEnemy = enemies[0]; let minD = dist(player.x, player.y, nearestEnemy.x, nearestEnemy.y);
Initializes by assuming the first enemy is nearest and calculating its distance
for (let i = 1; i < enemies.length; i++) {
Loops through remaining enemies (starting from index 1, since we already checked 0)
let d = dist(player.x, player.y, enemies[i].x, enemies[i].y);
Calculates this enemy's distance to the player
if (d < minD) { minD = d; nearestEnemy = enemies[i]; }
If this distance is smaller than the previous minimum, update the nearest enemy
return nearestEnemy;
After checking all enemies, return the one that was closest

generateBackgroundTexture()

Perlin noise is a procedural algorithm that generates natural-looking randomness—smooth, not chaotic. It's used for clouds, terrain, and organic textures. The scale (0.02) controls feature size, and the offset creates animation. Accessing pixels directly is advanced but very powerful for effects like this. The pixel array is RGBA format: 4 values per pixel in sequence.

🔬 This creates grayscale by setting R, G, B to the same value. What happens if you set them to different values, like pixels[index] = c, pixels[index + 1] = c * 0.5, pixels[index + 2] = c * 2? Or if you change the map range from (0, 150) to (100, 200)?

      let c = map(n, 0, 1, 0, 150); // Changed from 180, 250 to 0, 150
      backgroundTexture.pixels[index] = c;
      backgroundTexture.pixels[index + 1] = c;
      backgroundTexture.pixels[index + 2] = c;
function generateBackgroundTexture() {
  backgroundTexture.loadPixels();
  for (let x = 0; x < backgroundTexture.width; x++) {
    for (let y = 0; y < backgroundTexture.height; y++) {
      let index = (x + y * backgroundTexture.width) * 4;
      let n = noise(x * 0.02 + noiseOffset, y * 0.02 + noiseOffset); // Adjust 0.02 for scale
      // Map noise value to a grayscale range that includes darker values
      let c = map(n, 0, 1, 0, 150); // Changed from 180, 250 to 0, 150
      backgroundTexture.pixels[index] = c;
      backgroundTexture.pixels[index + 1] = c;
      backgroundTexture.pixels[index + 2] = c;
      backgroundTexture.pixels[index + 3] = 255; // Alpha
    }
  }
  backgroundTexture.updatePixels();
}
Line-by-line explanation (8 lines)

🔧 Subcomponents:

for-loop Nested Pixel Loop for (let x = 0; x < backgroundTexture.width; x++) { for (let y = 0; y < backgroundTexture.height; y++) { ... } }

Iterates through every pixel in the background texture, generating procedural noise

calculation Perlin Noise Sampling let n = noise(x * 0.02 + noiseOffset, y * 0.02 + noiseOffset);

Samples Perlin noise at scaled coordinates, with the offset value controlling animation

backgroundTexture.loadPixels();
Prepares the p5.Graphics texture for pixel-level access by loading the pixel array into memory
for (let x = 0; x < backgroundTexture.width; x++) { for (let y = 0; y < backgroundTexture.height; y++) {
Nested loops: outer for X coordinates, inner for Y—processes every pixel in the texture
let index = (x + y * backgroundTexture.width) * 4;
Calculates the starting index in the pixel array (×4 because each pixel is RGBA = 4 values)
let n = noise(x * 0.02 + noiseOffset, y * 0.02 + noiseOffset);
Generates Perlin noise at this pixel's position, scaled by 0.02 (affects how large the noise features are) and offset by noiseOffset (creates animation)
let c = map(n, 0, 1, 0, 150);
Maps the noise value (0–1) to a grayscale color (0–150), where 0 is black and 150 is dark gray
backgroundTexture.pixels[index] = c; ... pixels[index + 2] = c;
Sets the red, green, and blue channels to the same value (c), creating grayscale
backgroundTexture.pixels[index + 3] = 255;
Sets the alpha (transparency) channel to 255, making the pixel fully opaque
backgroundTexture.updatePixels();
Applies all the pixel changes to the texture so it's visible

setupShop()

Grid layout using modulo (%) and floor division is a neat trick: (i % 3) cycles 0, 1, 2, and floor(i/3) increments every 3 items. This creates a 3-column grid without hardcoding positions. The shop demonstrates JSON-like configuration: each item is defined declaratively with name, cost, and effect type.

🔬 These variables control the button size and position. What happens if you change buttonWidth to 150? What if you change gap to 40 to space buttons further apart?

  let buttonWidth = 200;
  let buttonHeight = 50;
  let gap = 20;
  let startX = width / 2 - (buttonWidth + gap) * 1.5;
function setupShop() {
  // Clear any existing shop buttons
  for (let btn of shopButtons) {
    btn.remove();
  }
  shopButtons = [];
  if (startWaveButton) startWaveButton.remove();

  shopItems = [
    new ShopItem("HP Regen +0.1/s", 50, { type: "HP_REGEN", value: 0.1 }),
    new ShopItem("Damage +5", 75, { type: "DAMAGE_BOOST", value: 5 }),
    new ShopItem("Fire Rate -5 frames", 60, { type: "FIRE_RATE_BOOST", value: -5 }), // Negative value makes interval smaller
    new ShopItem("Proj Speed +2", 40, { type: "PROJECTILE_SPEED", value: 2 }),
    new ShopItem("Max HP +20", 80, { type: "MAX_HP", value: 20 }),
    // New weapon types
    new ShopItem("Shotgun Weapon", 150, {
      type: "NEW_WEAPON",
      value: new Weapon("Shotgun", 60, 8, 12, 5, 3, shotgunTexture, shotgunProjectileTexture) // Pass texture
    }),
    new ShopItem("Machine Gun Weapon", 120, {
      type: "NEW_WEAPON",
      value: new Weapon("Machine Gun", 10, 12, 5, 3, 1, machineGunTexture, machineGunProjectileTexture) // Faster, smaller, lower damage
    }),
    new ShopItem("Rocket Launcher Weapon", 200, {
      type: "NEW_WEAPON",
      value: new Weapon("Rocket Launcher", 120, 5, 20, 50, 1, rocketLauncherTexture, rocketLauncherProjectileTexture) // Slower, larger, higher damage
    })
  ];

  let buttonWidth = 200;
  let buttonHeight = 50;
  let gap = 20;
  let startX = width / 2 - (buttonWidth + gap) * 1.5;
  let startY = height / 2 - (buttonHeight + gap) * 1;

  for (let i = 0; i < shopItems.length; i++) {
    let item = shopItems[i];
    let btnX = startX + (buttonWidth + gap) * (i % 3);
    let btnY = startY + (buttonHeight + gap) * floor(i / 3);

    let btn = createButton(`${item.name} (${item.cost} Gold)`);
    btn.position(btnX, btnY);
    btn.size(buttonWidth, buttonHeight);
    btn.style('font-size', '16px');
    btn.mousePressed(() => buyItem(item));
    shopButtons.push(btn);
  }

  startWaveButton = createButton("START WAVE");
  startWaveButton.position(width / 2 - 100, height - 100);
  startWaveButton.size(200, 75);
  startWaveButton.style('font-size', '24px');
  startWaveButton.style('background-color', '#4CAF50');
  startWaveButton.style('color', 'white');
  startWaveButton.mousePressed(startNextWave);
}
Line-by-line explanation (7 lines)

🔧 Subcomponents:

for-loop Shop Button Grid Layout for (let i = 0; i < shopItems.length; i++) { let btnX = startX + (buttonWidth + gap) * (i % 3); ... }

Creates buttons arranged in a 3-column grid, computing x/y positions from index

calculation Shop Items Definition shopItems = [ new ShopItem(...), ... ];

Defines all available upgrades (stat boosts and new weapons) that players can purchase

for (let btn of shopButtons) { btn.remove(); }
Loops through existing shop buttons and removes them from the DOM (cleanup before creating new ones)
shopItems = [ new ShopItem(...), ... ];
Populates the shopItems array with all 8 upgrade options: 5 stat upgrades and 3 new weapons
let btnX = startX + (buttonWidth + gap) * (i % 3);
Calculates X position: (i % 3) gives 0, 1, 2 repeating, so buttons are placed in 3 columns
let btnY = startY + (buttonHeight + gap) * floor(i / 3);
Calculates Y position: (i / 3) gives 0, 0, 0, 1, 1, 1, 2... so buttons are placed in rows
let btn = createButton(`${item.name} (${item.cost} Gold)`);
Creates a p5 button element with the shop item's name and cost displayed
btn.mousePressed(() => buyItem(item));
Attaches a click handler that calls buyItem() with this item when the button is pressed
startWaveButton = createButton("START WAVE");
Creates the large green button that advances to the next wave

loadProgress()

localStorage lets you save data in the user's browser that persists across page refreshes. It's perfect for game progress. JSON.parse() converts a string back to a JavaScript object. This function demonstrates a common pattern: try to load, and if that fails, initialize defaults. Textures (p5.Graphics objects) can't be saved to JSON, so you reconstruct them by looking them up after loading.

function loadProgress() {
  const savedData = localStorage.getItem('brotatoGameData');
  if (savedData) {
    const gameData = JSON.parse(savedData);

    score = gameData.score;
    waveNumber = gameData.waveNumber;
    player.gold = gameData.playerGold;
    player.hp = gameData.playerHp;
    player.maxHp = gameData.playerMaxHp;
    player.regenRate = gameData.playerRegenRate;

    // Reconstruct Weapon objects with their textures
    player.weapons = gameData.playerWeapons.map(wData => {
      return new Weapon(
        wData.name, wData.shootInterval, wData.projectileSpeed,
        wData.projectileSize, wData.projectileDamage, wData.numProjectiles,
        getWeaponTexture(wData.name), getProjectileTexture(wData.name)
      );
    });

    // Restore game state
    gameState = gameData.gameState;
    // Set wave start time for countdown if needed
    if (gameState === "WAVE_START") {
      waveStartTime = millis();
    }

    console.log('Game Progress Loaded!');
  } else {
    // Initialize player character if no saved data
    player = {
      x: width / 2,
      y: height / 2,
      size: 30,
      hp: 100,
      maxHp: 100,
      regenRate: 0.05,
      gold: 0,
      weapons: [new Weapon("Pistol", 30, 10, 8, 10, 1, pistolTexture, pistolProjectileTexture)],
      activeWeaponIndex: 0, // No longer used for firing, but kept as a property
      isMoving: false,
      moveStartX: 0,
      moveStartY: 0,
      playerStartX: 0,
      playerStartY: 0
    };
    console.log('No saved progress found. Starting new game.');
  }
}
Line-by-line explanation (6 lines)

🔧 Subcomponents:

conditional LocalStorage Retrieval const savedData = localStorage.getItem('brotatoGameData'); if (savedData) { ... }

Attempts to load saved game data from the browser; if it exists, parse and restore it

calculation Weapon Reconstruction player.weapons = gameData.playerWeapons.map(wData => { return new Weapon(...); });

Recreates Weapon objects with textures from the saved weapon data

conditional Fresh Start Initialization } else { player = { ... }; }

If no saved data exists, initializes a new player with a pistol and default stats

const savedData = localStorage.getItem('brotatoGameData');
Tries to retrieve saved game data from the browser's localStorage using the key 'brotatoGameData'; returns null if nothing is saved
if (savedData) { const gameData = JSON.parse(savedData);
If saved data exists, parse the JSON string back into a JavaScript object
score = gameData.score; ... player.regenRate = gameData.playerRegenRate;
Restores all simple variables (score, wave, health, regen rate) from the saved data
player.weapons = gameData.playerWeapons.map(wData => { return new Weapon(...); });
Uses map() to transform each saved weapon into a full Weapon object with textures (textures can't be stored in JSON, so they're re-linked here)
gameState = gameData.gameState;
Restores the game state so you resume from where you left off (in shop, playing, etc.)
} else { player = { x: width / 2, ... };
If no saved data exists, initialize a fresh player object with starting stats and a single pistol

saveProgress()

JSON.stringify() converts a JavaScript object into a text string that can be stored. The inverse is JSON.parse() (used in loadProgress). You can't save p5.Graphics objects to JSON, so you extract only the data and reconstruct textures later. This is a common pattern in game development: save configuration, reload resources.

function saveProgress() {
  const gameData = {
    score: score,
    waveNumber: waveNumber,
    playerGold: player.gold,
    playerHp: player.hp,
    playerMaxHp: player.maxHp,
    playerRegenRate: player.regenRate,
    // Store only essential weapon properties, not p5.Graphics objects
    playerWeapons: player.weapons.map(w => ({
      name: w.name,
      shootInterval: w.shootInterval,
      projectileSpeed: w.projectileSpeed,
      projectileSize: w.projectileSize,
      projectileDamage: w.projectileDamage,
      numProjectiles: w.numProjectiles
      // shootTimer is transient, textures are re-linked
    })),
    gameState: gameState // Save current game state
  };
  localStorage.setItem('brotatoGameData', JSON.stringify(gameData));
  console.log('Game Progress Saved!');
}
Line-by-line explanation (4 lines)

🔧 Subcomponents:

calculation Game Data Object const gameData = { score: score, ... playerWeapons: player.weapons.map(...) };

Assembles all game state into a single object, filtering out non-serializable data like textures

calculation Weapon Serialization playerWeapons: player.weapons.map(w => ({ name: w.name, ... })),

Extracts only the numeric/string properties of weapons, omitting textures which can't be stored in JSON

const gameData = { score: score, ... };
Creates a new object containing all game variables that should be saved
playerWeapons: player.weapons.map(w => ({ name: w.name, shootInterval: w.shootInterval, ... })),
Uses map() to create a simplified array of weapon objects containing only serializable properties (name, numbers, etc.)
localStorage.setItem('brotatoGameData', JSON.stringify(gameData));
Converts the gameData object to a JSON string and stores it in localStorage under the key 'brotatoGameData'
console.log('Game Progress Saved!');
Logs a message to the browser console for debugging, so you know the save succeeded

touchStarted()

touchStarted() is a p5.js event that fires when a finger touches the screen. The touches array contains all active touches. Storing the starting position lets you calculate drag distance in touchMoved(). Returning false prevents the browser from scrolling, which is important for full-screen games.

function touchStarted() {
  // If the game is over, tap to restart
  if (gameState === "GAME_OVER") {
    restartGame();
    return false; // Prevent further touch handling
  }

  // If a touch is already moving the player, ignore subsequent touches
  // This ensures only the first touch (or the primary touch) controls movement
  if (!player.isMoving && gameState === "PLAYING" && touches.length > 0) { // Added touches.length check
    player.isMoving = true;
    player.moveStartX = touches[0].x; // Store start touch position
    player.moveStartY = touches[0].y;
    player.playerStartX = player.x; // Store player's position at start of touch
    player.playerStartY = player.y;
  }
  return false; // Prevent default browser behavior (like scrolling/zooming)
}
Line-by-line explanation (6 lines)

🔧 Subcomponents:

conditional Game Over Tap Handler if (gameState === "GAME_OVER") { restartGame(); return false; }

Detects when player taps to restart after dying

conditional Movement Initiation if (!player.isMoving && gameState === "PLAYING" && touches.length > 0) { ... }

Starts drag-based movement when player first touches the screen during gameplay

if (gameState === "GAME_OVER") { restartGame(); return false; }
If the game is over, tapping anywhere calls restartGame() to reset everything and return false to prevent other handlers
if (!player.isMoving && gameState === "PLAYING" && touches.length > 0) {
Only start movement if: player isn't already moving, game is running, and at least one touch is active
player.isMoving = true;
Sets the isMoving flag to true, preventing other touches from interfering
player.moveStartX = touches[0].x; player.moveStartY = touches[0].y;
Records the X and Y position where the first touch began
player.playerStartX = player.x; player.playerStartY = player.y;
Records the player's X and Y position at the moment of touch, so we can track the drag offset
return false;
Prevents the browser's default touch behavior (like scrolling or zooming)

touchMoved()

touchMoved() fires every frame while a finger is touching. By calculating the difference between current and start position, you implement 'drag': the player follows your finger but constrain() keeps them in bounds. This is how touch-based games let you control characters smoothly.

function touchMoved() {
  if (gameState === "PLAYING" && player.isMoving && touches.length > 0) { // Added touches.length check
    // Calculate the difference between the current touch and where it started
    let diffX = touches[0].x - player.moveStartX;
    let diffY = touches[0].y - player.moveStartY;

    // Apply this difference to the player's starting position to move it
    // Constrain player within canvas bounds
    player.x = constrain(player.playerStartX + diffX, 0, width);
    player.y = constrain(player.playerStartY + diffY, 0, height);
  }
  return false; // Prevent default browser behavior (like scrolling)
}
Line-by-line explanation (6 lines)

🔧 Subcomponents:

calculation Drag Offset Calculation let diffX = touches[0].x - player.moveStartX; let diffY = touches[0].y - player.moveStartY;

Calculates how far the finger has moved since the drag started

calculation Boundary-Constrained Movement player.x = constrain(player.playerStartX + diffX, 0, width);

Moves the player by the drag offset, but clamps the result to keep them on-screen

if (gameState === "PLAYING" && player.isMoving && touches.length > 0) {
Only update position if we're in gameplay, the player started a drag, and a touch is still active
let diffX = touches[0].x - player.moveStartX;
Calculates how many pixels the finger has moved horizontally from where the drag started
let diffY = touches[0].y - player.moveStartY;
Calculates how many pixels the finger has moved vertically from where the drag started
player.x = constrain(player.playerStartX + diffX, 0, width);
Adds the horizontal drag offset to the player's starting position, then clamps the result to 0–width pixels
player.y = constrain(player.playerStartY + diffY, 0, height);
Same for vertical: drag offset + starting position, clamped to 0–height
return false;
Prevents the browser's default touch behavior (like scrolling)

📦 Key Variables

player object

Stores the player character's position, health, weapons, and movement state

let player = { x: 200, y: 300, hp: 100, weapons: [pistol], isMoving: false };
enemies array

Stores all currently active Enemy objects on-screen

let enemies = []; // Populated by spawnEnemies()
projectiles array

Stores all active Projectile objects (bullets, pellets, rockets) fired by weapons

let projectiles = []; // Populated by shoot()
dropItems array

Stores items dropped by defeated enemies (stat upgrades, gold pickups)

let dropItems = [];
gameState string

Controls which phase of the game is active (WAVE_START, PLAYING, SHOP, WAVE_END, GAME_OVER)

let gameState = "WAVE_START";
score number

Tracks cumulative score earned by defeating enemies

let score = 0;
waveNumber number

Tracks which wave (difficulty level) the player is on

let waveNumber = 0;
enemySpawnInterval number

Frames between each enemy spawn; decreases as score increases for scaling difficulty

let enemySpawnInterval = 60; // Spawn every 60 frames
maxEnemiesOnScreen number

Maximum number of enemies allowed to exist simultaneously

let maxEnemiesOnScreen = 10;
shopItems array

Stores ShopItem objects (stat upgrades and weapons) available for purchase each wave

let shopItems = [];
backgroundTexture p5.Graphics

Pre-rendered animated noise texture used as background each frame

let backgroundTexture = createGraphics(width, height);
noiseOffset number

Seed value for Perlin noise that changes each frame, animating the background

let noiseOffset = 0; // Incremented by 0.005 each frame
waveStartTime number

Timestamp (in milliseconds) when the wave start countdown begins, used to calculate countdown display

let waveStartTime = 0;

🔧 Potential Improvements (6)

Here are some ways this code could be enhanced:

PERFORMANCE checkCollisions() - Projectile-Enemy nested loop

Nested loops checking every projectile against every enemy is O(n²)—with many projectiles and enemies, performance degrades. No spatial partitioning.

💡 Implement spatial hashing or grid-based collision detection to only check nearby objects. For now, consider limiting max projectiles on-screen or caching the nearest enemy per projectile.

BUG spawnEnemies() - Spawn interval scaling

enemySpawnInterval decreases with score but can become very small, potentially spawning too many enemies simultaneously and overwhelming the player unfairly.

💡 The max(30, ...) prevents it from going below 30 frames, which is good, but test wave difficulty carefully. Consider capping at 40 or scaling differently after a certain score threshold.

FEATURE Weapon class and upgrade system

No visual feedback when weapons fire (muzzle flash, animation) or when projectiles hit enemies (impact effects, screen shake).

💡 Add visual polish: flash the weapon briefly when it fires, add a brief red screen tint on enemy hits, or emit particle effects. This makes the game feel more responsive.

STYLE displayGameInfo() and game state displays

Text is hardcoded at specific pixel positions; on very small screens or resizing, text can overlap buttons or move off-screen.

💡 Use responsive positioning (e.g., percentage-based or relative to safe areas). Consider a responsive UI framework or at least adjust text size based on window dimensions.

BUG touchStarted() and touchMoved()

On multi-touch devices, only the first touch controls movement—if a player accidentally touches with two fingers, the second touch is ignored. No feedback for this.

💡 Document this as a design choice, or add a tooltip. Alternatively, allow drag-to-aim separate from drag-to-move for more advanced controls.

FEATURE Enemy spawning and wave design

All enemies spawn at the same edges with the same difficulty. No wave patterns (e.g., 'bullet hell' waves, boss enemies, themed waves).

💡 Add wave-specific spawn patterns: alternate edge preferences, occasional stronger 'elite' enemies, or waves where enemies favor specific edges. This makes progression feel more varied.

🔄 Code Flow

Code flow showing setup, draw, updategame, spawnEnemies, updateenemies, checkcollisions, shoot, findnearestenemy, generabackgroundtexture, setupshop, loadprogress, saveProgress, touchstarted, touchmoved

💡 Click on function names in the diagram to jump to their code

graph TD start[Start] --> setup[setup] setup --> player-texture-creation[player-texture-creation] setup --> weapon-texture-loop[weapon-texture-loop] setup --> load-progress[load-progress] setup --> setupshop[setupshop] setup --> generabackgroundtexture[generabackgroundtexture] setup --> loadprogress[loadprogress] setup --> saveProgress[saveProgress] setup --> touchstarted[touchstarted] setup --> touchmoved[touchmoved] setup --> updategame[updategame] updategame --> draw[draw loop] draw --> background-clear[background-clear] draw --> state-switch[state-switch] draw --> background-animation[background-animation] draw --> death-check[death-check] draw --> spawnEnemies[spawnEnemies] draw --> updateenemies[updateenemies] draw --> checkcollisions[checkcollisions] draw --> shoot[shoot] click setup href "#fn-setup" click player-texture-creation href "#sub-player-texture-creation" click weapon-texture-loop href "#sub-weapon-texture-loop" click load-progress href "#sub-load-progress" click setupshop href "#fn-setupshop" click generabackgroundtexture href "#fn-generabackgroundtexture" click loadprogress href "#fn-loadprogress" click saveProgress href "#fn-saveProgress" click touchstarted href "#fn-touchstarted" click touchmoved href "#fn-touchmoved" click updategame href "#fn-updategame" click draw href "#fn-draw" click background-clear href "#sub-background-clear" click state-switch href "#sub-state-switch" click background-animation href "#sub-background-animation" click death-check href "#sub-death-check" click spawnEnemies href "#fn-spawnEnemies" click updateenemies href "#fn-updateenemies" click checkcollisions href "#fn-checkcollisions" click shoot href "#fn-shoot"

❓ Frequently Asked Questions

What visual elements can I expect to see in the Try This p5.js sketch?

The sketch features a dynamic environment where players control a character that fights various monsters, collects gold, and utilizes different weapon textures to enhance gameplay.

How can players interact with the Try This sketch during gameplay?

Players can control their character to shoot projectiles at enemies, gather gold dropped by defeated monsters, and access a shop to upgrade their stats and weapons.

What creative coding techniques are showcased in the Try This sketch?

The sketch demonstrates techniques such as simulated textures using p5.Graphics, game state management for different gameplay phases, and dynamic enemy spawning.

Preview

Try this - p5.js creative coding sketch preview
Sketch Preview
Code flow diagram showing the structure of Try this - Code flow showing setup, draw, updategame, spawnEnemies, updateenemies, checkcollisions, shoot, findnearestenemy, generabackgroundtexture, setupshop, loadprogress, saveProgress, touchstarted, touchmoved
Code Flow Diagram
