
u clicker 2

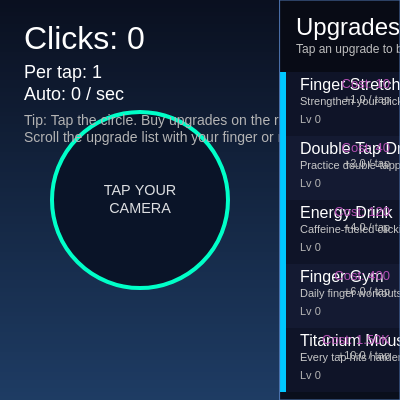
This sketch transforms your webcam into an interactive clicker game where tapping a circular video feed earns points that can be spent on 40 quirky upgrades—from flat click bonuses to wild auto-clickers and time-bending multipliers. As you upgrade, your click power snowballs exponentially.

🧪 Try This!

Experiment with the code by making these changes:

  1. Make the circle bigger — The clickable webcam circle will become larger, making it easier to tap on mobile
  2. Double the starting score — The player begins with 2 clicks instead of 1, letting them afford early upgrades immediately
  3. Speed up passive income — Auto-clickers generate income twice as fast without any upgrades
  4. Make click upgrades cheaper — Finger Stretch costs 5 instead of 10, making early upgrades more accessible
  5. Disable mouse wheel scroll — Desktop players can only drag to scroll the upgrade list, not use the mouse wheel
  6. Change glow color to purple — The click pulse animation will glow purple instead of cyan
Prefer the full editor? Open it there →

📖 About This Sketch

This sketch creates a full-featured incremental game built entirely in p5.js. Your webcam appears as a glowing, clickable circle; every tap earns points while invisible "auto-clickers" generate income passively. The heart of the code is a scrollable upgrade shop with 40 purchasable enhancements spanning four categories: flat click power, click multipliers, passive income, and passive speed multipliers. You'll see dynamic color gradients, click pulse animations, cost inflation scaling, and a layout that splits the canvas between game area and shop panel.

The sketch demonstrates several powerful p5.js patterns: capturing webcam video with createCapture, clipping graphics with the canvas API inside p5, detecting both mouse and touch input with separate handlers, managing scroll state and UI layout, and building a complex state machine where purchasing upgrades applies cumulative mathematical effects. By studying it, you'll learn how to build interactive games, handle user input across platforms, work with exponential game progression, and organize large data structures of upgradeable items.

⚙️ How It Works

  1. When setup() runs, it creates a canvas, captures video from your webcam (hiding the raw HTML element), and initializes 40 upgrade definitions with names, costs, multipliers, and effect amounts.
  2. Every frame, draw() calculates accumulated auto-clicks using the time delta since the last frame, adds that to your score, then renders the background gradient, the circular webcam target in the left half, stats text, and the scrollable upgrades panel on the right.
  3. When you tap or click the circular webcam region, handlePointerPressed() detects the collision (distance from circle center), adds your current click value to the score, and triggers the clickPulse animation that creates a bright glow.
  4. The upgrades panel displays all 40 items in rows; each has a level counter, a cost calculated with exponential scaling (baseCost × costMultiplier^level), and a color-coded stripe indicating type (blue for click add, green for click mult, gold for auto add, orange for auto mult).
  5. When you click an upgrade row, handleUpgradeClick() identifies which upgrade and attempts to purchase it via attemptPurchase(). If you have enough score, your account is charged, the upgrade's level increases, and its effect is applied—adding to clickAddBonus, multiplying clickMultBonus, or modifying auto-clicker stats.
  6. On mobile, touch events enable both vertical scroll (drag to move the upgrade list) and tap detection (if your finger barely moves, it counts as a click). Mouse wheel on desktop also scrolls the upgrades. All input is unified in the handlePointerPressed() dispatcher.

🎓 Concepts You'll Learn

Webcam capture and clippingGame state management and persistenceTouch and mouse input handlingExponential cost scalingCanvas layout and UI panelsAnimation and visual feedbackCumulative multiplier systems

📝 Code Breakdown

setup()

setup() runs once at the start of the sketch. It's where you initialize the canvas, load assets (like webcam video), and set up game state. Every variable you want to exist when the game starts should be prepared here.

function setup() {
  createCanvas(windowWidth, windowHeight);

  video = createCapture(VIDEO);
  video.size(320, 240);
  video.hide();

  textFont('sans-serif');
  textAlign(LEFT, TOP);

  initUpgrades();

  lastUpdateTime = millis();
}
Line-by-line explanation (8 lines)

🔧 Subcomponents:

function-call Canvas initialization createCanvas(windowWidth, windowHeight);

Creates a fullscreen canvas that matches the current window size

function-call Webcam capture video = createCapture(VIDEO);

Requests access to the user's webcam and stores the video stream

function-call Upgrade initialization initUpgrades();

Populates the upgrades array with 40 unique upgrade definitions

createCanvas(windowWidth, windowHeight);
Creates a fullscreen p5.js canvas that spans the entire browser window
video = createCapture(VIDEO);
Asks the browser for permission to access your webcam and stores the video stream in the `video` variable
video.size(320, 240);
Resizes the internal webcam resolution to 320×240 pixels (smaller = faster processing)
video.hide();
Hides the raw HTML video element so it doesn't appear twice on the page—we'll draw it manually with p5.js
textFont('sans-serif');
Sets the font family for all text drawn by p5.js
textAlign(LEFT, TOP);
Tells p5.js that text coordinates refer to the top-left corner of each text string
initUpgrades();
Calls a helper function to create and populate the upgrades array with 40 unique items
lastUpdateTime = millis();
Records the current time in milliseconds; used later to calculate time elapsed between frames for auto-click income
initUpgrades()

initUpgrades() separates upgrade data (the `defs` array) from upgrade state (the `upgrades` array with level counters). This separation is a best practice: it keeps your game logic clean and makes it easy to add, remove, or modify upgrades without touching the simulation code.

🔬 This loop transforms each simple definition into a full upgrade object with a `level` property. What would happen if you changed `level: 0` to `level: 1`? Would players start with upgrades already purchased, or would you need to also adjust their starting score?

  for (let i = 0; i < defs.length; i++) {
    const d = defs[i];
    upgrades.push({
      id: i,
      name: d.name,
      description: d.description,
      type: d.type,
      baseCost: d.baseCost,
      costMultiplier: d.costMultiplier,
      level: 0,
      effectAmount: d.effectAmount
    });
  }
function initUpgrades() {
  upgrades = [];

  const defs = [
    {
      name: 'Finger Stretch',
      description: 'Strengthen your clicking finger for a tiny boost.',
      type: 'clickAdd',
      baseCost: 10,
      costMultiplier: 1.18,
      effectAmount: 1
    },
    // ... 39 more upgrade definitions
  ];

  for (let i = 0; i < defs.length; i++) {
    const d = defs[i];
    upgrades.push({
      id: i,
      name: d.name,
      description: d.description,
      type: d.type,
      baseCost: d.baseCost,
      costMultiplier: d.costMultiplier,
      level: 0,
      effectAmount: d.effectAmount
    });
  }
}
Line-by-line explanation (4 lines)

🔧 Subcomponents:

data-structure Upgrade definitions const defs = [ { name: ..., type: ..., }, ... ];

Stores metadata for all 40 upgrades: names, costs, multipliers, and effect amounts

for-loop Upgrade population loop for (let i = 0; i < defs.length; i++)

Iterates through each definition and creates an upgradeable object with a level counter set to 0

upgrades = [];
Resets the upgrades array to empty, ensuring a fresh start
const defs = [ ... ];
Defines an array of 40 upgrade metadata objects, each containing name, description, type, base cost, cost multiplier, and effect amount
for (let i = 0; i < defs.length; i++) {
Loops through each of the 40 upgrade definitions
upgrades.push({ id: i, ... level: 0, ... });
Creates a new upgrade object with all the metadata from `d` plus an `id` and `level` counter starting at 0, then adds it to the upgrades array

draw()

draw() is the main loop running ~60 times per second. It updates game state (auto-clicks), calculates layout, and draws everything. The key insight here is using `dt` (time delta) to make physics frame-rate-independent: income ticks smoothly even if fps drops.

🔬 These two lines are the heart of passive income. The first multiplies two numbers together; the second multiplies that by time. What would happen if you changed the second line to `score += autoPerSecond;` (removing the × dt)? Why would the game break on slower computers?

  const autoPerSecond = autoBase * autoMult;
  score += autoPerSecond * dt;
function draw() {
  const now = millis();
  const dt = (now - lastUpdateTime) / 1000;
  lastUpdateTime = now;

  const autoPerSecond = autoBase * autoMult;
  score += autoPerSecond * dt;

  drawBackground();

  const panelX = width * 0.7;
  const panelW = width - panelX;

  camRadius = min(width * 0.20, height * 0.3);
  camX = panelX * 0.5;
  camY = height * 0.5;

  drawCameraTarget();
  drawStats(autoPerSecond);

  drawUpgradesPanel(panelX, 0, panelW, height);

  clickPulse = max(0, clickPulse - dt * 2);
}
Line-by-line explanation (15 lines)

🔧 Subcomponents:

calculation Time delta calculation const dt = (now - lastUpdateTime) / 1000;

Computes the elapsed time in seconds since the last frame for smooth frame-rate-independent animation

calculation Auto-click accumulation score += autoPerSecond * dt;

Adds passive income based on time elapsed and current auto-clicker power

calculation Panel layout const panelX = width * 0.7;

Positions the upgrade panel 70% across the screen, leaving 30% for the game area on the left

calculation Click pulse animation decay clickPulse = max(0, clickPulse - dt * 2);

Fades the click glow animation by decrementing it each frame; max() prevents it from going below 0

const now = millis();
Gets the current time in milliseconds since the sketch started
const dt = (now - lastUpdateTime) / 1000;
Calculates the time elapsed since the last frame, converted to seconds
lastUpdateTime = now;
Updates lastUpdateTime to the current frame's time for use in the next frame
const autoPerSecond = autoBase * autoMult;
Multiplies the flat auto-click rate by the cumulative auto-speed multiplier to get total passive income per second
score += autoPerSecond * dt;
Adds passive income to the score; multiplying by dt ensures income is smooth regardless of frame rate
drawBackground();
Clears and redraws the animated gradient background
const panelX = width * 0.7;
Positions the upgrade panel at 70% of the canvas width
const panelW = width - panelX;
Calculates the panel's width (30% of the canvas)
camRadius = min(width * 0.20, height * 0.3);
Sets the webcam circle radius to scale with window size, capped at 20% of width or 30% of height (whichever is smaller)
camX = panelX * 0.5;
Centers the webcam circle horizontally within the left game area (30% panel width × 0.5)
camY = height * 0.5;
Centers the webcam circle vertically in the middle of the screen
drawCameraTarget();
Renders the circular webcam feed with glow effects
drawStats(autoPerSecond);
Draws the score and stats text on the left side
drawUpgradesPanel(panelX, 0, panelW, height);
Draws the scrollable upgrades list on the right side of the screen
clickPulse = max(0, clickPulse - dt * 2);
Decreases the click pulse animation by dt × 2 each frame; max() ensures it never drops below 0

drawBackground()

This function demonstrates the power of `lerp()` to smoothly interpolate between two values. By dividing y by height, we get a 0–1 value that drives the blend. This same technique powers color transitions, animations, and smooth state changes throughout creative code.

🔬 These three lines blend RGB channels independently to create the gradient. What would happen if you swapped the start and end colors, e.g., `lerp(30, 10, t)` for red? Try making the gradient start bright at the top and dark at the bottom.

    const r = lerp(10, 30, t);
    const g = lerp(16, 60, t);
    const b = lerp(32, 100, t);
function drawBackground() {
  noStroke();
  for (let y = 0; y < height; y += 4) {
    const t = y / height;
    const r = lerp(10, 30, t);
    const g = lerp(16, 60, t);
    const b = lerp(32, 100, t);
    fill(r, g, b);
    rect(0, y, width, 4);
  }
}
Line-by-line explanation (8 lines)

🔧 Subcomponents:

for-loop Vertical gradient loop for (let y = 0; y < height; y += 4)

Draws horizontal stripes from top to bottom, with colors blending smoothly from dark blue at top to brighter blue at bottom

noStroke();
Disables outline strokes so rectangles are filled-only
for (let y = 0; y < height; y += 4) {
Loops through every 4 pixels vertically (from top to bottom of the screen)
const t = y / height;
Normalizes y to a value between 0 (top) and 1 (bottom), used as a blend factor
const r = lerp(10, 30, t);
Linearly interpolates the red channel from 10 (dark) at top to 30 (slightly lighter) at bottom
const g = lerp(16, 60, t);
Interpolates green from 16 to 60, creating more color shift in the middle spectrum
const b = lerp(32, 100, t);
Interpolates blue from 32 to 100, the most dramatic change, making the bottom brighter and more blue
fill(r, g, b);
Sets the fill color using the interpolated RGB values
rect(0, y, width, 4);
Draws a thin horizontal rectangle across the full width at height y, creating one stripe of the gradient

drawCameraTarget()

This function demonstrates several advanced p5.js techniques: clipping graphics with canvas 2D API, layering shapes with transparency, and using animation values (clickPulse) to drive visual feedback. The clipping technique is essential for circular or masked graphics in games and interactive art.

🔬 These two lines drive the click animation. The first makes the glow grow by 20% at max; the second makes it fade to alpha=80 at max. What happens if you change 0.2 to 0.5 or 80 to 200? How would the click feel different?

  const pulseScale = 1 + clickPulse * 0.2;
  const pulseAlpha = 80 * clickPulse;
function drawCameraTarget() {
  const pulseScale = 1 + clickPulse * 0.2;
  const pulseAlpha = 80 * clickPulse;

  noStroke();
  fill(0, 255, 180, pulseAlpha);
  ellipse(camX, camY, camRadius * 2.4 * pulseScale, camRadius * 2.4 * pulseScale);

  stroke(0, 255, 200);
  strokeWeight(4);
  fill(10, 20, 40);
  ellipse(camX, camY, camRadius * 2.2, camRadius * 2.2);

  if (video) {
    push();
    drawingContext.save();
    drawingContext.beginPath();
    drawingContext.arc(camX, camY, camRadius, 0, Math.PI * 2);
    drawingContext.clip();

    imageMode(CENTER);
    image(video, camX, camY, camRadius * 2, camRadius * 2);

    drawingContext.restore();
    pop();
  }

  noStroke();
  fill(255, 255, 255, 220);
  textAlign(CENTER, CENTER);
  textSize(camRadius * 0.18);
  text('TAP YOUR\nCAMERA', camX, camY);

  textAlign(LEFT, TOP);
}
Line-by-line explanation (18 lines)

🔧 Subcomponents:

calculation Pulse glow effect const pulseScale = 1 + clickPulse * 0.2;

Scales the outer glow ring based on clickPulse; grows larger when you click, shrinks back down

conditional Video clipping and drawing if (video) { drawingContext.beginPath(); ... }

Draws the webcam feed clipped to a circular mask using the canvas 2D API's arc and clip methods

calculation Centered text overlay text('TAP YOUR\nCAMERA', camX, camY);

Displays instruction text centered over the webcam circle

const pulseScale = 1 + clickPulse * 0.2;
Calculates a scale multiplier: when clickPulse = 0, scale = 1 (normal); when clickPulse = 1, scale = 1.2 (20% larger)
const pulseAlpha = 80 * clickPulse;
Calculates the opacity of the glow: when clickPulse = 1, alpha = 80 (visible); when clickPulse = 0, alpha = 0 (invisible)
noStroke();
Disables outlines for the glow ellipse
fill(0, 255, 180, pulseAlpha);
Sets the glow color to cyan with opacity controlled by pulseAlpha
ellipse(camX, camY, camRadius * 2.4 * pulseScale, camRadius * 2.4 * pulseScale);
Draws the glow as a large cyan ellipse; its size pulses when you click
stroke(0, 255, 200);
Sets the stroke color to bright cyan
strokeWeight(4);
Sets the outline thickness to 4 pixels
fill(10, 20, 40);
Sets the fill color to dark blue-black
ellipse(camX, camY, camRadius * 2.2, camRadius * 2.2);
Draws a dark blue ring around the circle
if (video) {
Checks if video successfully loaded before trying to draw it
drawingContext.save();
Saves the current canvas state (for restoration after clipping)
drawingContext.beginPath();
Starts a new canvas path for the clipping region
drawingContext.arc(camX, camY, camRadius, 0, Math.PI * 2);
Defines a circular arc from 0 to 2π radians (a full circle) as the clipping boundary
drawingContext.clip();
Applies the circular path as a clipping mask; anything drawn after this will only appear inside the circle
image(video, camX, camY, camRadius * 2, camRadius * 2);
Draws the webcam video centered at (camX, camY) with diameter camRadius × 2; the clip() call ensures only the circular part shows
drawingContext.restore();
Restores the saved canvas state, removing the clipping mask
textSize(camRadius * 0.18);
Scales text size proportionally to the circle radius
text('TAP YOUR\nCAMERA', camX, camY);
Draws two-line centered text on top of the webcam circle

drawStats(autoPerSecond)

drawStats() demonstrates the importance of visual hierarchy: larger font for main score, smaller font for secondary stats, and dimmed color for hints. This helps players understand what matters most at a glance.

function drawStats(autoPerSecond) {
  const margin = 24;

  fill(255);
  textAlign(LEFT, TOP);

  textSize(32);
  text(`Clicks: ${formatNumber(score)}`, margin, margin);

  const currentClickValue = getCurrentClickValue();

  textSize(18);
  text(
    `Per tap: ${formatNumber(currentClickValue)}\n` +
    `Auto: ${formatNumber(autoPerSecond)} / sec`,
    margin,
    margin + 40
  );

  fill(180);
  textSize(14);
  text(
    'Tip: Tap the circle. Buy upgrades on the right.\n' +
    'Scroll the upgrade list with your finger or mouse wheel.',
    margin,
    margin + 90
  );
}
Line-by-line explanation (11 lines)

🔧 Subcomponents:

calculation Score display text(`Clicks: ${formatNumber(score)}`, margin, margin);

Shows the player's total accumulated score in formatted notation (K, M, B, etc.)

calculation Click value calculation const currentClickValue = getCurrentClickValue();

Calculates and displays the total points earned per tap, including all upgrades

const margin = 24;
Defines a padding value in pixels from the edges where text will appear
fill(255);
Sets text color to white
textAlign(LEFT, TOP);
Aligns text to the left horizontally and top vertically
textSize(32);
Sets the large headline font size
text(`Clicks: ${formatNumber(score)}`, margin, margin);
Displays the player's total score (score) formatted with K/M/B notation
const currentClickValue = getCurrentClickValue();
Calls a helper function to compute total click power: (baseClick + clickAddBonus) × clickMultBonus
textSize(18);
Sets a medium font size for stat details
text( ... `Per tap: ...` ... );
Displays two stats: current click value and passive income per second
fill(180);
Reduces text brightness to create visual hierarchy; these are hints, not primary stats
textSize(14);
Sets a smaller font size for hint text
text( ... 'Tip: Tap the circle...' ... );
Displays instructions for the player

drawUpgradesPanel(x, y, w, h)

drawUpgradesPanel() showcases essential UI techniques: scrollable lists with culling (skipping off-screen rows for performance), hover interaction, color coding by type, and dynamic affordability feedback. The scroll constraint logic is especially important—without it, users could scroll infinitely and lose their place.

🔬 These lines assign a color to each upgrade type's 6-pixel stripe. What happens if you change the cyan (0, 200, 255) to pure blue (0, 0, 255) or bright lime (0, 255, 0)? Try giving each type a radically different color.

    let typeColor;
    if (upg.type === 'clickAdd') typeColor = color(0, 200, 255);
    else if (upg.type === 'clickMult') typeColor = color(0, 255, 150);
    else if (upg.type === 'autoAdd') typeColor = color(255, 210, 0);
    else typeColor = color(255, 120, 0);
function drawUpgradesPanel(x, y, w, h) {
  noStroke();
  fill(8, 10, 20, 230);
  rect(x, y, w, h);

  const innerMargin = 16;
  const titleY = y + innerMargin;

  fill(255);
  textAlign(LEFT, TOP);
  textSize(24);
  text('Upgrades', x + innerMargin, titleY);

  textSize(12);
  fill(190);
  text('Tap an upgrade to buy. Prices rise every level.', x + innerMargin, titleY + 28);

  const listTop = titleY + 56;
  const listHeight = h - (listTop - y) - innerMargin;

  const totalHeight = upgrades.length * UPGRADE_ROW_H;
  const maxScroll = max(0, totalHeight - listHeight);
  upgradeScroll = constrain(upgradeScroll, 0, maxScroll);

  for (let i = 0; i < upgrades.length; i++) {
    const rowY = listTop + i * UPGRADE_ROW_H - upgradeScroll;
    if (rowY + UPGRADE_ROW_H < listTop || rowY > listTop + listHeight) continue;

    const upg = upgrades[i];
    const cost = getUpgradeCost(upg);
    const affordable = score >= cost;

    if (i % 2 === 0) fill(15, 20, 40);
    else fill(20, 26, 50);
    rect(x, rowY, w, UPGRADE_ROW_H);

    if (mouseX > x && mouseX < x + w && mouseY > rowY && mouseY < rowY + UPGRADE_ROW_H) {
      fill(255, 255, 255, 16);
      rect(x, rowY, w, UPGRADE_ROW_H);
    }

    let typeColor;
    if (upg.type === 'clickAdd') typeColor = color(0, 200, 255);
    else if (upg.type === 'clickMult') typeColor = color(0, 255, 150);
    else if (upg.type === 'autoAdd') typeColor = color(255, 210, 0);
    else typeColor = color(255, 120, 0);
    noStroke();
    fill(typeColor);
    rect(x, rowY, 6, UPGRADE_ROW_H);

    const rowMargin = 10;
    const textX = x + rowMargin + 10;
    const textY = rowY + 6;

    fill(255);
    textSize(16);
    text(upg.name, textX, textY);

    textSize(11);
    fill(200);
    text(upg.description, textX, textY + 18);

    fill(180);
    textSize(11);
    const levelStr = `Lv ${upg.level}`;
    text(levelStr, textX, textY + 18 + 18);

    textAlign(RIGHT, TOP);
    textSize(13);
    if (affordable) {
      fill(0, 255, 180);
    } else {
      fill(180, 80, 180);
    }
    text(`Cost: ${formatNumber(cost)}`, x + w - rowMargin, textY);

    textSize(11);
    fill(190);
    text(effectLabel(upg), x + w - rowMargin, textY + 16);

    textAlign(LEFT, TOP);
  }

  noFill();
  stroke(80, 120, 180);
  strokeWeight(1);
  rect(x, y, w, h);
}
Line-by-line explanation (21 lines)

🔧 Subcomponents:

calculation Scroll boundary clamping upgradeScroll = constrain(upgradeScroll, 0, maxScroll);

Keeps the scroll position within valid bounds so you can't scroll off the top or bottom

for-loop Upgrade row rendering loop for (let i = 0; i < upgrades.length; i++)

Iterates through all upgrades and draws each as a styled row with background, type indicator, text, and cost

conditional Row visibility culling if (rowY + UPGRADE_ROW_H < listTop || rowY > listTop + listHeight) continue;

Skips drawing rows that are scrolled off-screen to improve performance

conditional Hover highlight if (mouseX > x && mouseX < x + w && mouseY > rowY && mouseY < rowY + UPGRADE_ROW_H)

Checks if the mouse is over a row and draws a subtle highlight to show interactivity

conditional Affordability coloring if (affordable) { fill(0, 255, 180); } else { fill(180, 80, 180); }

Colors the cost text cyan if affordable, purple if too expensive

fill(8, 10, 20, 230);
Sets the panel background to dark blue with slight transparency
const listTop = titleY + 56;
Calculates where the scrollable list area begins (below title and description)
const listHeight = h - (listTop - y) - innerMargin;
Computes how much vertical space is available for upgrade rows
const totalHeight = upgrades.length * UPGRADE_ROW_H;
Calculates the total height if all upgrade rows were visible
const maxScroll = max(0, totalHeight - listHeight);
Determines the maximum scroll distance: total height minus visible area
upgradeScroll = constrain(upgradeScroll, 0, maxScroll);
Clamps upgradeScroll between 0 and maxScroll so scrolling doesn't go out of bounds
const rowY = listTop + i * UPGRADE_ROW_H - upgradeScroll;
Calculates the Y position of each row, accounting for the current scroll offset
if (rowY + UPGRADE_ROW_H < listTop || rowY > listTop + listHeight) continue;
Skips rendering rows that are completely off-screen (above or below the visible area)
const cost = getUpgradeCost(upg);
Calculates the current purchase cost using exponential scaling
const affordable = score >= cost;
Checks if the player has enough score to buy this upgrade
if (i % 2 === 0) fill(15, 20, 40); else fill(20, 26, 50);
Alternates row background colors to create visual separation (zebra striping)
rect(x, rowY, w, UPGRADE_ROW_H);
Draws the row background rectangle
if (mouseX > x && mouseX < x + w && mouseY > rowY && mouseY < rowY + UPGRADE_ROW_H)
Checks if the mouse cursor is inside this row's bounding box
fill(255, 255, 255, 16);
Sets a subtle white highlight color with low alpha to show hover state
if (upg.type === 'clickAdd') typeColor = color(0, 200, 255);
Assigns cyan to flat click bonuses
rect(x, rowY, 6, UPGRADE_ROW_H);
Draws the 6-pixel color-coded type indicator stripe on the left edge of the row
text(upg.name, textX, textY);
Displays the upgrade name in large white text
text(upg.description, textX, textY + 18);
Displays the flavor text description below the name
text(levelStr, textX, textY + 18 + 18);
Shows the current purchase level
text(`Cost: ${formatNumber(cost)}`, x + w - rowMargin, textY);
Displays the purchase cost right-aligned, colored by affordability
text(effectLabel(upg), x + w - rowMargin, textY + 16);
Displays a short description of what the upgrade does (e.g., '+0.5 /tap')

getCurrentClickValue()

This tiny function demonstrates a key game design pattern: separating additive bonuses (flat +1, +2, +3) from multiplicative bonuses (×1.5, ×2, etc.). Multipliers always act on the sum, ensuring balanced scaling as the player acquires more upgrades.

function getCurrentClickValue() {
  return (baseClick + clickAddBonus) * clickMultBonus;
}
Line-by-line explanation (1 lines)
return (baseClick + clickAddBonus) * clickMultBonus;
Calculates total click power by first adding all flat bonuses to the base, then multiplying by the cumulative multiplier. This preserves game balance: multipliers amplify both base and bonus power.

getUpgradeCost(upg)

Exponential cost scaling is the core mechanic of incremental games. Each upgrade gets progressively more expensive, forcing players to diversify purchases and spend time grinding. This formula (base × multiplier^level) ensures costs grow predictably and stays readable for the player.

function getUpgradeCost(upg) {
  return Math.floor(upg.baseCost * Math.pow(upg.costMultiplier, upg.level));
}
Line-by-line explanation (1 lines)
return Math.floor(upg.baseCost * Math.pow(upg.costMultiplier, upg.level));
Calculates cost using exponential scaling: baseCost × (costMultiplier ^ level). As the level increases, the cost grows exponentially. Math.floor() rounds down to a whole number of points.

effectLabel(upg)

effectLabel() demonstrates readable UI design: each upgrade type gets a unique verb ('+' for add, 'x' for multiply) and context label so players instantly understand what they're buying. The toFixed() method ensures consistent decimal precision across all labels.

function effectLabel(upg) {
  if (upg.type === 'clickAdd') {
    return `+${upg.effectAmount.toFixed(1)} / tap`;
  } else if (upg.type === 'clickMult') {
    return `x${upg.effectAmount.toFixed(2)} tap power`;
  } else if (upg.type === 'autoAdd') {
    return `+${upg.effectAmount.toFixed(2)} auto /s`;
  } else if (upg.type === 'autoMult') {
    return `x${upg.effectAmount.toFixed(2)} auto speed`;
  }
  return '';
}
Line-by-line explanation (5 lines)

🔧 Subcomponents:

switch-case Effect label switch if (upg.type === 'clickAdd') { return ... } else if ...

Routes to the correct label format based on the upgrade type

if (upg.type === 'clickAdd') { return `+${upg.effectAmount.toFixed(1)} / tap`; }
For flat click bonuses, shows the bonus as '+X / tap' (e.g., '+1.0 / tap')
else if (upg.type === 'clickMult') { return `x${upg.effectAmount.toFixed(2)} tap power`; }
For click multipliers, shows 'xX tap power' (e.g., 'x1.15 tap power')
else if (upg.type === 'autoAdd') { return `+${upg.effectAmount.toFixed(2)} auto /s`; }
For flat auto-click bonuses, shows '+X auto /s' (e.g., '+0.50 auto /s')
else if (upg.type === 'autoMult') { return `x${upg.effectAmount.toFixed(2)} auto speed`; }
For auto-click multipliers, shows 'xX auto speed' (e.g., 'x1.10 auto speed')
return '';
Fallback: returns an empty string if the type doesn't match any known category

mousePressed()

mousePressed() is p5.js's built-in callback for mouse clicks. By delegating to handlePointerPressed(), we reuse the same logic for both mouse and touch, reducing code duplication and ensuring consistent behavior across platforms.

function mousePressed() {
  handlePointerPressed(mouseX, mouseY);
}
Line-by-line explanation (1 lines)
handlePointerPressed(mouseX, mouseY);
Delegates mouse clicks to a unified handler function that also processes touch input

touchStarted()

touchStarted() is called when a finger first touches the screen. By recording position and resetting movement counters, we prepare to distinguish between a tap (minimal movement) and a scroll (significant movement).

function touchStarted() {
  if (touches.length > 0) {
    touchStartPos = { x: touches[0].x, y: touches[0].y };
    lastTouchY = touches[0].y;
    touchMovedDist = 0;
  }
  return false;
}
Line-by-line explanation (5 lines)
if (touches.length > 0) {
Checks if at least one finger is touching the screen
touchStartPos = { x: touches[0].x, y: touches[0].y };
Records the initial touch position as an object with x and y properties
lastTouchY = touches[0].y;
Stores the initial Y position for detecting vertical drag
touchMovedDist = 0;
Resets the movement tracker; will be incremented in touchMoved()
return false;
Prevents the browser from performing default touch actions (like page scroll)

touchMoved()

touchMoved() tracks finger movement and updates the scroll position. The key insight is that we negate dy (scroll -= dy rather than scroll += dy), creating intuitive dragging behavior where moving your finger up scrolls the list down.

function touchMoved() {
  if (touches.length > 0) {
    const y = touches[0].y;
    const dy = y - lastTouchY;
    lastTouchY = y;
    touchMovedDist += abs(dy);

    const listVisibleHeight = height - (24 + 56 + 16);
    const totalHeight = upgrades.length * UPGRADE_ROW_H;
    const maxScroll = max(0, totalHeight - listVisibleHeight);

    upgradeScroll -= dy;
    upgradeScroll = constrain(upgradeScroll, 0, maxScroll);
  }
  return false;
}
Line-by-line explanation (6 lines)

🔧 Subcomponents:

calculation Drag-based scroll update upgradeScroll -= dy;

Updates the scroll position by the finger's vertical movement

const y = touches[0].y;
Gets the current Y position of the first touch
const dy = y - lastTouchY;
Calculates the pixel movement since the last frame
lastTouchY = y;
Updates lastTouchY for the next frame
touchMovedDist += abs(dy);
Adds the absolute movement to a cumulative total; used later to detect if this is a tap or a scroll
upgradeScroll -= dy;
Moves the scroll position in the opposite direction of the finger movement (drag up = scroll down)
upgradeScroll = constrain(upgradeScroll, 0, maxScroll);
Clamps the scroll position to valid bounds

touchEnded()

touchEnded() is called when a finger lifts off the screen. The TAP_MOVE_THRESHOLD logic distinguishes between intentional taps (used for clicking upgrades) and accidental movement during scrolls. This threshold is tunable to balance responsiveness with scroll reliability.

function touchEnded() {
  if (touchStartPos && touchMovedDist < TAP_MOVE_THRESHOLD) {
    handlePointerPressed(touchStartPos.x, touchStartPos.y);
  }
  touchStartPos = null;
  return false;
}
Line-by-line explanation (4 lines)

🔧 Subcomponents:

conditional Tap detection logic if (touchStartPos && touchMovedDist < TAP_MOVE_THRESHOLD)

Treats a lift as a tap if the finger moved less than the threshold; otherwise it was a scroll

if (touchStartPos && touchMovedDist < TAP_MOVE_THRESHOLD) {
Checks if a touch position was recorded AND the total movement is below the threshold (default 12 pixels)
handlePointerPressed(touchStartPos.x, touchStartPos.y);
Treats the touch as a click/tap at the original position
touchStartPos = null;
Clears the start position for the next touch
return false;
Prevents default browser behavior

mouseWheel(event)

mouseWheel() enables desktop users to scroll the upgrade list. The event.delta property tells you the wheel direction and magnitude. Returning false prevents the browser from scrolling the entire page, keeping interaction focused on the game.

function mouseWheel(event) {
  const listVisibleHeight = height - (24 + 56 + 16);
  const totalHeight = upgrades.length * UPGRADE_ROW_H;
  const maxScroll = max(0, totalHeight - listVisibleHeight);

  upgradeScroll += event.delta;
  upgradeScroll = constrain(upgradeScroll, 0, maxScroll);

  return false;
}
Line-by-line explanation (6 lines)
const listVisibleHeight = height - (24 + 56 + 16);
Calculates the visible height of the upgrade list (total height minus title and margins)
const totalHeight = upgrades.length * UPGRADE_ROW_H;
Calculates the total height if all upgrade rows were visible
const maxScroll = max(0, totalHeight - listVisibleHeight);
Determines the maximum scroll distance
upgradeScroll += event.delta;
Increases scroll position by the wheel delta (positive = scroll down, negative = scroll up)
upgradeScroll = constrain(upgradeScroll, 0, maxScroll);
Clamps the scroll position to valid bounds
return false;
Prevents the browser from scrolling the page itself

handlePointerPressed(px, py)

handlePointerPressed() is the unified input dispatcher. It first checks for a circle click (using distance-squared collision), then checks for panel clicks. This pattern—detect collision, route to handler—is the foundation of interactive p5.js games.

🔬 This is a classic circle collision check: it calculates distance squared and compares it to radius squared, avoiding expensive sqrt(). What would happen if you changed the <= to < ? To >=? How would that change which clicks register?

  const dx = px - camX;
  const dy = py - camY;
  if (dx * dx + dy * dy <= camRadius * camRadius) {
function handlePointerPressed(px, py) {
  const dx = px - camX;
  const dy = py - camY;
  if (dx * dx + dy * dy <= camRadius * camRadius) {
    const value = getCurrentClickValue();
    score += value;
    clickPulse = 1.0;
    return;
  }

  const panelX = width * 0.7;
  const panelW = width - panelX;
  if (px >= panelX && px <= panelX + panelW) {
    handleUpgradeClick(px, py, panelX, panelW);
  }
}
Line-by-line explanation (10 lines)

🔧 Subcomponents:

calculation Circle collision check if (dx * dx + dy * dy <= camRadius * camRadius)

Uses distance squared to detect if a click is inside the circular webcam target

conditional Panel click routing if (px >= panelX && px <= panelX + panelW)

Routes clicks within the upgrade panel to the upgrade handler

const dx = px - camX;
Calculates the horizontal distance from the click to the circle center
const dy = py - camY;
Calculates the vertical distance from the click to the circle center
if (dx * dx + dy * dy <= camRadius * camRadius) {
Checks if the click is inside the circle by comparing distance squared; avoids expensive sqrt()
const value = getCurrentClickValue();
Gets the current click value including all upgrades
score += value;
Awards the player that many points
clickPulse = 1.0;
Triggers the click animation glow
const panelX = width * 0.7;
Calculates the left edge of the upgrade panel (70% across the screen)
const panelW = width - panelX;
Calculates the panel width
if (px >= panelX && px <= panelX + panelW) {
Checks if the click was on the right 30% of the screen (the panel area)
handleUpgradeClick(px, py, panelX, panelW);
Delegates panel clicks to a specialized handler

handleUpgradeClick(px, py, panelX, panelW)

handleUpgradeClick() demonstrates hit testing on scrollable UI: it recalculates row positions using the scroll offset, just like drawUpgradesPanel does, ensuring clicks land on the correct items regardless of scroll state.

function handleUpgradeClick(px, py, panelX, panelW) {
  const innerMargin = 16;
  const titleY = innerMargin;
  const listTop = titleY + 56;

  for (let i = 0; i < upgrades.length; i++) {
    const rowY = listTop + i * UPGRADE_ROW_H - upgradeScroll;
    if (py >= rowY && py <= rowY + UPGRADE_ROW_H) {
      attemptPurchase(i);
      break;
    }
  }
}
Line-by-line explanation (8 lines)

🔧 Subcomponents:

const innerMargin = 16;
Padding constant matching drawUpgradesPanel
const titleY = innerMargin;
Y position of the panel title
const listTop = titleY + 56;
Y position where the upgrade list begins
for (let i = 0; i < upgrades.length; i++) {
Iterates through all upgrades to find which row was clicked
const rowY = listTop + i * UPGRADE_ROW_H - upgradeScroll;
Calculates the current Y position of the row, accounting for scroll
if (py >= rowY && py <= rowY + UPGRADE_ROW_H) {
Checks if the click Y position is within this row's vertical bounds
attemptPurchase(i);
Calls the purchase handler with the upgrade index
break;
Exits the loop after finding and clicking the first row (prevents multiple purchases from one click)

attemptPurchase(index)

attemptPurchase() is the core purchase logic: it validates affordability, deducts cost, increments level, and applies effects. The switch-case routing by type is a clean pattern for handling different upgrade categories with different game mechanics (addition vs. multiplication).

🔬 These two lines charge the player and increment the level. What would happen if you commented out the `score -= cost;` line? Players could buy infinitely without paying! Try it to see how broken the game becomes.

  score -= cost;
  upg.level++;
function attemptPurchase(index) {
  const upg = upgrades[index];
  const cost = getUpgradeCost(upg);
  if (score < cost) return;

  score -= cost;
  upg.level++;

  if (upg.type === 'clickAdd') {
    clickAddBonus += upg.effectAmount;
  } else if (upg.type === 'clickMult') {
    clickMultBonus *= upg.effectAmount;
  } else if (upg.type === 'autoAdd') {
    autoBase += upg.effectAmount;
  } else if (upg.type === 'autoMult') {
    autoMult *= upg.effectAmount;
  }
}
Line-by-line explanation (9 lines)

🔧 Subcomponents:

conditional Affordability check if (score < cost) return;

Cancels purchase if the player doesn't have enough score

switch-case Effect application switch if (upg.type === 'clickAdd') { ... } else if ...

Routes to the correct game stat update based on upgrade type

const upg = upgrades[index];
Retrieves the upgrade object at the given index
const cost = getUpgradeCost(upg);
Calculates the purchase cost using exponential scaling
if (score < cost) return;
Aborts if the player can't afford it
score -= cost;
Deducts the cost from the player's score
upg.level++;
Increments the upgrade level (used to calculate next purchase cost)
if (upg.type === 'clickAdd') { clickAddBonus += upg.effectAmount; }
Adds a flat click bonus to clickAddBonus, increasing all future click values
else if (upg.type === 'clickMult') { clickMultBonus *= upg.effectAmount; }
Multiplies the click multiplier, amplifying all future clicks exponentially
else if (upg.type === 'autoAdd') { autoBase += upg.effectAmount; }
Adds passive income per second
else if (upg.type === 'autoMult') { autoMult *= upg.effectAmount; }
Multiplies the passive income rate, creating cascading automation

formatNumber(v)

formatNumber() transforms large numbers into readable shorthand—essential for clicker games where scores reach millions, billions, and beyond. The while loop is elegant: it divides by 1000 repeatedly until the number is under 1000, automatically choosing the right unit.

🔬 This array controls what letter appears for each magnitude. What happens if you change 'K' to '💪' or 'M' to '⭐'? You could use emoji or custom symbols instead of letters!

  const units = ['K', 'M', 'B', 'T', 'Q'];
function formatNumber(v) {
  if (v < 1000) return v.toFixed(0);
  const units = ['K', 'M', 'B', 'T', 'Q'];
  let unitIndex = -1;
  let value = v;
  while (value >= 1000 && unitIndex < units.length - 1) {
    value /= 1000;
    unitIndex++;
  }
  return value.toFixed(2) + units[unitIndex];
}
Line-by-line explanation (8 lines)

🔧 Subcomponents:

while-loop Unit conversion loop while (value >= 1000 && unitIndex < units.length - 1)

Repeatedly divides by 1000 and increments the unit index to convert large numbers to readable shorthand

if (v < 1000) return v.toFixed(0);
Returns numbers below 1000 as whole numbers (no decimal places)
const units = ['K', 'M', 'B', 'T', 'Q'];
Array of unit symbols: Kilo, Mega, Billion, Trillion, Quadrillion
let unitIndex = -1;
Starts at -1 so the first increment makes it 0 (K)
let value = v;
Stores a copy of the input value to avoid modifying the original
while (value >= 1000 && unitIndex < units.length - 1) {
Loops while the value is >= 1000 AND we haven't exhausted all units
value /= 1000;
Divides value by 1000 (e.g., 1,500,000 → 1,500)
unitIndex++;
Advances to the next unit (e.g., K → M)
return value.toFixed(2) + units[unitIndex];
Returns the formatted value with 2 decimal places plus the unit letter (e.g., '1.50M')

windowResized()

windowResized() is called automatically by p5.js whenever the browser window changes size. By calling resizeCanvas(), the game adapts to the new dimensions—essential for mobile and responsive design. Without it, the canvas would become letterboxed or cut off.

function windowResized() {
  resizeCanvas(windowWidth, windowHeight);
}
Line-by-line explanation (1 lines)
resizeCanvas(windowWidth, windowHeight);
Resizes the p5.js canvas to match the new browser window size

📦 Key Variables

video p5.Capture

Stores the webcam video stream, allowing the sketch to display and interact with live video

let video;
score number

The player's total accumulated currency (clicks); spent on upgrades and shown as the main stat

let score = 0;
baseClick number

The base click value before any bonuses; typically 1 point per tap

let baseClick = 1;
clickAddBonus number

Sum of all flat click power bonuses from purchased upgrades

let clickAddBonus = 0;
clickMultBonus number

Product of all click multipliers; starts at 1 (no multiplier), grows as you buy multiplier upgrades

let clickMultBonus = 1;
autoBase number

Flat auto-clicks per second (passive income base rate)

let autoBase = 0;
autoMult number

Product of all auto-click speed multipliers; starts at 1, grows as you buy auto multiplier upgrades

let autoMult = 1;
lastUpdateTime number

Timestamp of the last frame in milliseconds; used to calculate dt for frame-rate-independent auto-clicks

let lastUpdateTime = 0;
camX number

X coordinate of the webcam circle center

let camX, camY, camRadius;
camY number

Y coordinate of the webcam circle center

let camX, camY, camRadius;
camRadius number

Radius of the webcam circle in pixels

let camX, camY, camRadius;
upgrades array

Array of upgrade objects; each has id, name, description, type, level, costs, and effect amount

let upgrades = [];
upgradeScroll number

Current scroll offset in pixels for the upgrades list panel

let upgradeScroll = 0;
UPGRADE_ROW_H number

Height of each upgrade row in pixels (constant)

const UPGRADE_ROW_H = 64;
clickPulse number

Animation value (0–1) that controls the click glow brightness and size; decays each frame

let clickPulse = 0;
touchStartPos object

Stores the initial x/y position of a touch; used to detect taps vs. scrolls

let touchStartPos = null;
touchMovedDist number

Total pixel distance the touch has moved; compared to TAP_MOVE_THRESHOLD to distinguish taps from scrolls

let touchMovedDist = 0;
lastTouchY number

Y position of the touch during the previous frame; used to calculate vertical drag distance

let lastTouchY = 0;
TAP_MOVE_THRESHOLD number

Maximum pixel movement allowed to still count a touch as a tap (constant); tunable for touch sensitivity

const TAP_MOVE_THRESHOLD = 12;

🔧 Potential Improvements (6)

Here are some ways this code could be enhanced:

PERFORMANCE drawBackground()

Redraws a full vertical gradient every frame by creating many small rectangles; expensive on older devices

💡 Use createGraphics() to render the gradient once, store it, and display the cached image each frame. Or use a canvas gradient and clip it to a rect.

BUG handleUpgradeClick()

Row Y calculation must match drawUpgradesPanel exactly; if either changes, clicks may miss their targets

💡 Extract the row Y calculation into a shared helper function so both drawing and clicking use identical logic

FEATURE attemptPurchase()

No visual feedback when a purchase succeeds (like a sound or animation burst); feels less satisfying

💡 Add a score pop-up animation or color flash when an upgrade is purchased; consider sound effects if using p5.sound

STYLE Global variables

Many loose variables (clickAddBonus, clickMultBonus, etc.) make state hard to track and modify

💡 Bundle game state into an object: `let game = { score, baseClick, clickAddBonus, clickMultBonus, autoBase, autoMult }` for cleaner organization

BUG drawUpgradesPanel()

If video fails to load, the webcam circle won't appear, but the game will still try to register clicks there

💡 Add a fallback shape or message when video fails to load (e.g., empty circle with 'Camera Denied' text)

PERFORMANCE draw()

Layout calculations (panelX, panelW, camRadius, etc.) are recomputed every frame even though they only change on window resize

💡 Move these calculations to windowResized() and store them in variables, computing them only when needed

🔄 Code Flow

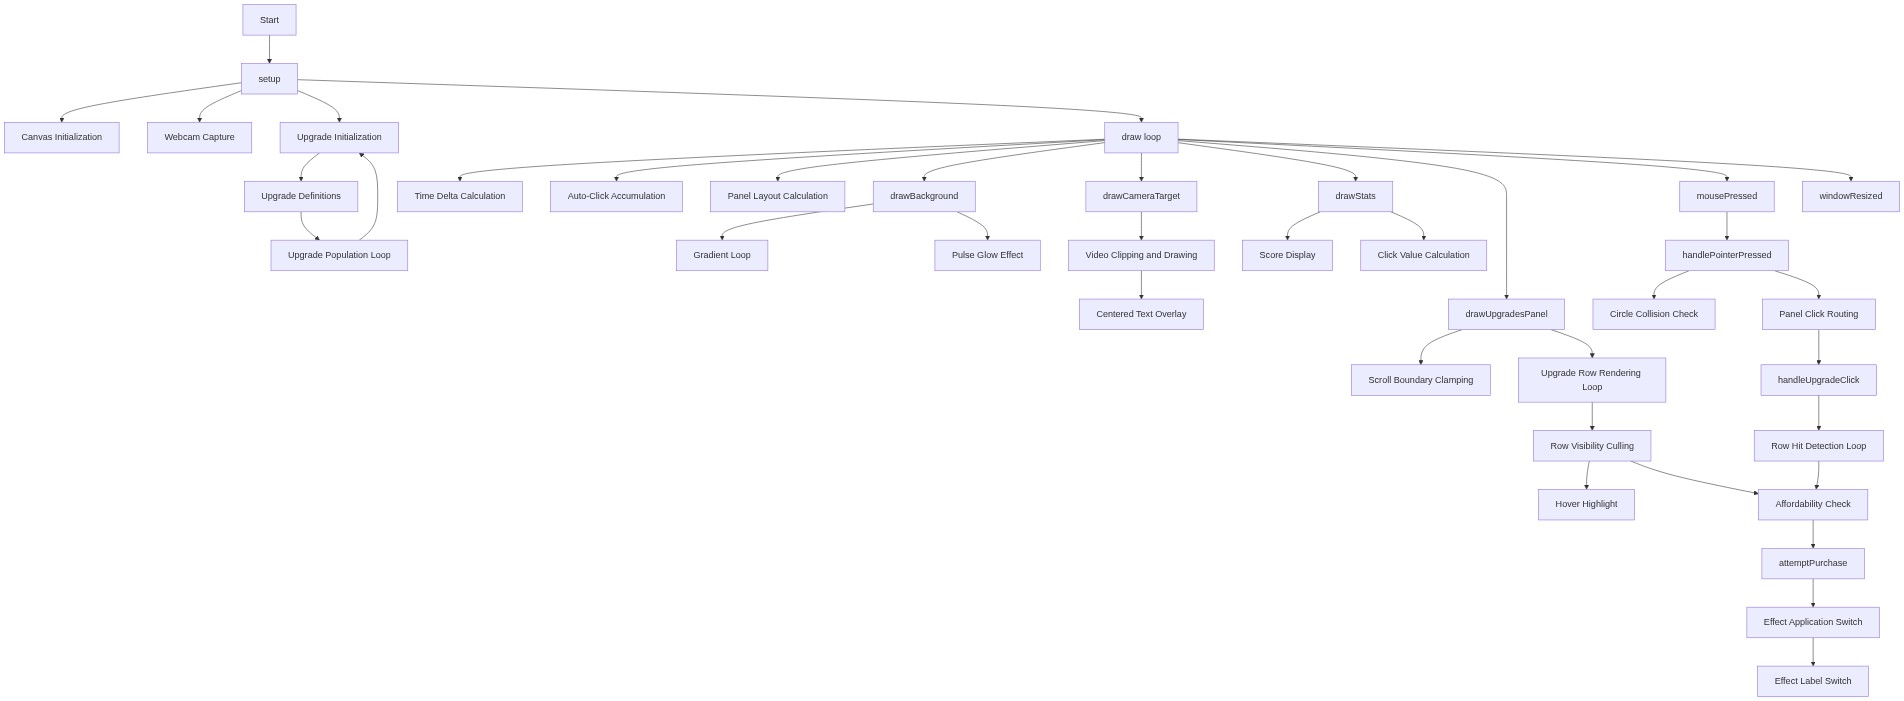
Code flow showing setup, initupgrades, draw, drawbackground, drawcameratarget, drawstats, drawupgradespanel, getCurrentClickValue, getupgradecost, effectlabel, mousepressed, touchstarted, touchmoved, touchended, mousewheel, handlePointerpressed, handleupgradeclick, attemptpurchase, formatnumber, windowresized

💡 Click on function names in the diagram to jump to their code

graph TD start[Start] --> setup[setup] setup --> canvas-setup[Canvas Initialization] setup --> webcam-capture[Webcam Capture] setup --> upgrade-init[Upgrade Initialization] upgrade-init --> defs-array[Upgrade Definitions] defs-array --> for-loop[Upgrade Population Loop] for-loop --> upgrade-init setup --> draw[draw loop] draw --> time-delta[Time Delta Calculation] draw --> auto-click[Auto-Click Accumulation] draw --> layout-calc[Panel Layout Calculation] draw --> drawbackground[drawBackground] drawbackground --> gradient-loop[Gradient Loop] drawbackground --> pulse-glow[Pulse Glow Effect] draw --> drawcameratarget[drawCameraTarget] drawcameratarget --> clip-video[Video Clipping and Drawing] clip-video --> text-overlay[Centered Text Overlay] draw --> drawstats[drawStats] drawstats --> score-display[Score Display] drawstats --> click-value-calc[Click Value Calculation] draw --> drawupgradespanel[drawUpgradesPanel] drawupgradespanel --> scroll-constraint[Scroll Boundary Clamping] drawupgradespanel --> row-rendering[Upgrade Row Rendering Loop] row-rendering --> visibility-check[Row Visibility Culling] visibility-check --> hover-highlight[Hover Highlight] visibility-check --> affordability-check[Affordability Check] draw --> mousepressed[mousePressed] mousepressed --> handlePointerpressed[handlePointerPressed] handlePointerpressed --> circle-collision[Circle Collision Check] handlePointerpressed --> panel-collision[Panel Click Routing] panel-collision --> handleupgradeclick[handleUpgradeClick] handleupgradeclick --> row-search[Row Hit Detection Loop] row-search --> affordability-check affordability-check --> attemptpurchase[attemptPurchase] attemptpurchase --> effect-application[Effect Application Switch] effect-application --> effect-switch[Effect Label Switch] draw --> windowresized[windowResized] click setup href "#fn-setup" click draw href "#fn-draw" click canvas-setup href "#sub-canvas-setup" click webcam-capture href "#sub-webcam-capture" click upgrade-init href "#sub-upgrade-init" click defs-array href "#sub-defs-array" click for-loop href "#sub-for-loop" click time-delta href "#sub-time-delta" click auto-click href "#sub-auto-click" click layout-calc href "#sub-layout-calc" click gradient-loop href "#sub-gradient-loop" click pulse-glow href "#sub-pulse-glow" click clip-video href "#sub-clip-video" click text-overlay href "#sub-text-overlay" click score-display href "#sub-score-display" click click-value-calc href "#sub-click-value-calc" click scroll-constraint href "#sub-scroll-constraint" click row-rendering href "#sub-row-rendering" click visibility-check href "#sub-visibility-check" click hover-highlight href "#sub-hover-highlight" click affordability-check href "#sub-affordability-check" click handlePointerpressed href "#sub-handlePointerpressed" click circle-collision href "#sub-circle-collision" click panel-collision href "#sub-panel-collision" click handleupgradeclick href "#sub-handleupgradeclick" click row-search href "#sub-row-search" click attemptpurchase href "#sub-attemptpurchase" click effect-application href "#sub-effect-application" click effect-switch href "#sub-effect-switch" click windowresized href "#sub-windowresized"

❓ Frequently Asked Questions

What visual experience does the u clicker 2 sketch provide?

The u clicker 2 sketch transforms your webcam feed into a glowing, clickable circle, creating an engaging visual interaction as users earn points with each click.

How can users interact with the u clicker 2 game?

Users can interact by clicking on the glowing circle generated from their webcam feed to earn points, which can be spent on quirky upgrades to enhance their clicking power.

What creative coding techniques are showcased in the u clicker 2 sketch?

This sketch demonstrates the use of webcam integration, dynamic scoring systems, and upgrade mechanics, showcasing how interactivity can enhance user engagement in creative coding.

Preview

u clicker 2 - p5.js creative coding sketch preview
Sketch Preview
Code flow diagram showing the structure of u clicker 2 - Code flow showing setup, initupgrades, draw, drawbackground, drawcameratarget, drawstats, drawupgradespanel, getCurrentClickValue, getupgradecost, effectlabel, mousepressed, touchstarted, touchmoved, touchended, mousewheel, handlePointerpressed, handleupgradeclick, attemptpurchase, formatnumber, windowresized
Code Flow Diagram