virutal boy for switch vr extension

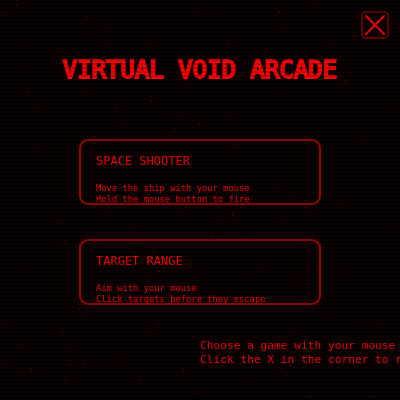
Virtual Void Arcade is a retro-styled arcade experience with two mouse-controlled games: Space Shooter, where you move a ship and hold to fire at descending enemies, and Target Range, where you click targets before they escape. Neon red graphics, scrolling stars, glowing particles, and scanlines create an immersive 80s arcade aesthetic.

🧪 Try This!

Experiment with the code by making these changes:

  1. Make enemies spawn faster — Reduce the initial spawn delay so enemies appear more frequently and the game is harder from the start.
  2. Increase bullet fire rate — Lower the shot delay so you can fire bullets much faster while holding the mouse button.
  3. Make stars scroll faster — Increase the star field motion multiplier to create a dizzying sense of speed through space.
  4. Add more stars to the background — Increase the star density to make the background feel more populated and immersive.
  5. Make scanlines more visible — Increase the opacity of the CRT scanlines to make the retro effect more pronounced.
  6. Give the player more starting lives — Increase the initial life count from 3 to make the game more forgiving.
Prefer the full editor? Open it there →

📖 About This Sketch

Virtual Void Arcade is a two-game arcade system with stunning retro visuals. You choose between Space Shooter (move your ship with the mouse and hold to fire at enemies) or Target Range (aim and click targets before they scroll away). The sketch uses p5.js animation loops, collision detection, particle effects, and state machines to create a complete interactive experience with score tracking, lives, and game-over screens. Scrolling stars, red neon colors, and CRT scanlines give it authentic 80s arcade charm.

The code is organized into setup and draw functions, a game state manager that switches between menu, playing, and game-over screens, and two separate game logic modules (Shooter and Targets) with their own update and draw routines. You will learn how to build a menu system, manage multiple game states, detect collisions between moving objects, create particle explosions, and handle responsive mouse input. The sketch also demonstrates six custom classes (Player, Bullet, Enemy, Target, Particle) that encapsulate game entities and their behavior.

⚙️ How It Works

  1. When the sketch loads, setup() initializes the canvas, loads a monospace font, and creates 120 stars scattered across the screen at varying depths.
  2. Every frame, draw() clears the background, updates and draws the scrolling stars, and dispatches to one of three screen states: main menu, active gameplay, or game-over overlay.
  3. On the main menu, two clickable cards invite you to choose Space Shooter or Target Range. Hovering over a card brightens its border.
  4. In Space Shooter mode, your ship follows your mouse x-position near the bottom of the screen. Holding the mouse button fires bullets upward at a controlled rate. Enemies spawn from the top, move downward with horizontal drift, and bounce off the left/right edges. Bullets collide with enemies (both are removed, score increases), and enemies collide with your ship (you lose a life). Difficulty increases with score—enemies spawn faster the higher you score.
  5. In Target Range mode, targets spawn from the top and drift downward with slight wobble. You aim a crosshair with your mouse and click targets before they escape off the bottom. Each hit spawns a particle explosion and increases your score. Targets that escape cause you to lose a life.
  6. Both games end when lives reach zero. An overlay announces the final score and prompts you to click to play again or use the red X button in the top-right corner to return to the menu. Throughout, a red HUD displays your score and remaining lives, and retro scanlines flicker across the entire screen.
  7. The red X button is always clickable—pressing it instantly returns you to the main menu, pausing the current game.

🎓 Concepts You'll Learn

Game state machinesCollision detectionParticle effects and explosionsMouse input and interactionAnimation loops and timingObject-oriented design with classesDifficulty scaling with scoreUI/menu systemsCanvas resize handlingRetro visual effects (scanlines, neon colors)

📝 Code Breakdown

setup()

setup() runs once when the sketch starts. It's where you initialize the canvas size, load fonts, and set up any global state that won't change during gameplay.

function setup() {
  createCanvas(windowWidth, windowHeight);
  pixelDensity(1);

  initStars();
  textFont("monospace");
}
Line-by-line explanation (4 lines)

🔧 Subcomponents:

initialization Canvas Setup createCanvas(windowWidth, windowHeight);

Creates a full-screen canvas that fills the entire browser window

initialization Star Field Initialization initStars();

Populates the stars array with 120 stars at random positions and depths for the scrolling background effect

createCanvas(windowWidth, windowHeight);
Creates a canvas that stretches to fill the entire browser window, allowing the arcade to be responsive to screen size
pixelDensity(1);
Tells p5.js to render at 1 pixel per display pixel, preventing blurriness on high-DPI screens while keeping performance steady
initStars();
Calls the function that fills the stars array with 120 star objects, each with random position, depth, and speed
textFont("monospace");
Sets all text to display in a monospace font, giving the arcade a retro computer feel

draw()

draw() is the heartbeat of a p5.js sketch, running 60 times per second. This function is a dispatcher that branches to different parts of your game based on state variables. Learning to structure your draw() function as a state machine (where different branches handle different modes) is a core skill in game development.

🔬 This nested if-else structure routes the game to different screens. What happens if you swap the order and check for 'gameover' first instead of 'start'? Does the menu still work?

  if (gameState === "start") {
    drawMainMenu();
  } else if (gameState === "playing") {
    if (currentGame === "shooter") {
      updateShooterGame();
function draw() {
  background(0);

  updateStars();
  drawCloseButton();

  if (gameState === "start") {
    drawMainMenu();
  } else if (gameState === "playing") {
    if (currentGame === "shooter") {
      updateShooterGame();
    } else if (currentGame === "targets") {
      updateTargetsGame();
    }
  } else if (gameState === "gameover") {
    if (currentGame === "shooter") {
      drawShooterGame();
      drawShooterGameOver();
    } else if (currentGame === "targets") {
      drawTargetsGame();
      drawTargetsGameOver();
    }
  }

  drawScanlines();
}
Line-by-line explanation (7 lines)

🔧 Subcomponents:

conditional Game State Router if (gameState === "start") {

Directs execution to the correct screen (menu, gameplay, or game-over) based on the current game state

conditional Game Mode Router if (currentGame === "shooter") {

Runs the logic for the Space Shooter or Target Range game depending on what the player chose

background(0);
Clears the canvas with black every frame, erasing everything drawn in the previous frame
updateStars();
Moves each star downward based on its depth and speed, creating the illusion of scrolling motion through space
drawCloseButton();
Draws the red X button in the top-right corner, always visible so the player can return to the menu anytime
if (gameState === "start") {
Checks if the game state is 'start'—if so, the main menu screen is drawn
if (currentGame === "shooter") {
If the player selected the Space Shooter, updateShooterGame() runs all logic for that game mode
} else if (gameState === "gameover") {
When the game ends, both the game visuals and the game-over overlay are drawn together
drawScanlines();
Draws horizontal red lines across the entire screen to simulate old CRT monitor scanlines, adding retro atmosphere

startGame()

startGame() is the initializer that transitions the arcade from menu to gameplay. It resets all global variables and game-specific arrays, then sets the game state to 'playing'. This function is a critical pattern in game development: create a 'New Game' function that wipes the slate clean and prepares the game environment for fresh play.

🔬 In Shooter mode, spawnDelay starts at 900 ms. What happens if you change it to 300 when the game starts—do enemies spawn much faster right away?

  if (currentGame === "shooter") {
    bullets = [];
    enemies = [];
    player = new Player();
    lastSpawnTime = millis();
    lastShotTime = 0;
    spawnDelay = 900;
function startGame(selectedGame) {
  currentGame = selectedGame;
  score = 0;
  lives = 3;
  particles = [];

  if (currentGame === "shooter") {
    bullets = [];
    enemies = [];
    player = new Player();
    lastSpawnTime = millis();
    lastShotTime = 0;
    spawnDelay = 900;
  } else if (currentGame === "targets") {
    targets = [];
    lastTargetSpawnTime = millis();
    targetSpawnDelay = 900;
  }

  gameState = "playing";
}
Line-by-line explanation (7 lines)

🔧 Subcomponents:

initialization Global State Reset score = 0; lives = 3; particles = [];

Clears score, lives, and any lingering particles from the previous game, giving the new game a clean slate

conditional Shooter Mode Setup if (currentGame === "shooter") {

Initializes arrays and objects specific to the Space Shooter game, including the player ship and enemy/bullet arrays

conditional Targets Mode Setup } else if (currentGame === "targets") {

Initializes the targets array and spawn timing variables for Target Range mode

currentGame = selectedGame;
Stores which game the player chose ('shooter' or 'targets') so draw() and the game loops know which mode to run
score = 0;
Resets the score to 0, giving the player a fresh start
lives = 3;
Sets lives to 3, the starting health for either game
particles = [];
Clears any leftover explosion particles from a previous game
player = new Player();
Creates a new Player object at the starting position and size
lastSpawnTime = millis();
Records the current time in milliseconds so the enemy spawner can measure delays accurately
gameState = "playing";
Sets the game state to 'playing', which tells draw() to run the active game logic instead of showing the menu

updateShooterGame()

updateShooterGame() is the main game loop for Space Shooter. It demonstrates four core game programming patterns: player input handling, enemy spawning with dynamic difficulty, collision detection between multiple object types, and cleanup of off-screen objects. The backward-loop iteration pattern (i-- starting from length-1) is essential when removing items from arrays during iteration, because removing an item shifts indices and breaks forward iteration.

🔬 This nested loop checks every bullet against every enemy. What happens if you remove the break statement—can one bullet destroy multiple enemies in the same frame?

  // Bullet–enemy collisions
  for (let ei = enemies.length - 1; ei >= 0; ei--) {
    const e = enemies[ei];
    for (let bi = bullets.length - 1; bi >= 0; bi--) {
      const b = bullets[bi];
      if (circlePointCollision(e.x, e.y, e.size * 0.5, b.x, b.y)) {
        spawnExplosion(e.x, e.y);
        enemies.splice(ei, 1);
        bullets.splice(bi, 1);
        score++;
        break;
function updateShooterGame() {
  // Move ship with mouse and handle shooting (mouse only)
  updateShooterPlayerWithMouse();
  handleShootingShooter();

  // Update bullets
  for (let i = bullets.length - 1; i >= 0; i--) {
    bullets[i].update();
    if (bullets[i].offscreen()) {
      bullets.splice(i, 1);
    }
  }

  // Spawn new enemies based on time + score difficulty
  const now = millis();
  if (now - lastSpawnTime > spawnDelay) {
    enemies.push(new Enemy());
    lastSpawnTime = now;

    const difficulty = constrain(score / 50, 0, 1);
    spawnDelay = 900 - difficulty * 500; // faster spawns with score
  }

  // Update enemies; check if they pass bottom
  for (let i = enemies.length - 1; i >= 0; i--) {
    const e = enemies[i];
    e.update();
    if (e.y - e.size / 2 > height) {
      spawnExplosion(e.x, height - 40);
      enemies.splice(i, 1);
      loseLife();
    }
  }

  // Bullet–enemy collisions
  for (let ei = enemies.length - 1; ei >= 0; ei--) {
    const e = enemies[ei];
    for (let bi = bullets.length - 1; bi >= 0; bi--) {
      const b = bullets[bi];
      if (circlePointCollision(e.x, e.y, e.size * 0.5, b.x, b.y)) {
        spawnExplosion(e.x, e.y);
        enemies.splice(ei, 1);
        bullets.splice(bi, 1);
        score++;
        break; // enemy destroyed, move to next enemy
      }
    }
  }

  // Enemy–player collisions
  if (player) {
    for (let ei = enemies.length - 1; ei >= 0; ei--) {
      const e = enemies[ei];
      if (e.hitsPlayer(player)) {
        spawnExplosion(e.x, e.y);
        spawnExplosion(player.x, player.y);
        enemies.splice(ei, 1);
        loseLife();
      }
    }
  }

  // Update particles
  for (let i = particles.length - 1; i >= 0; i--) {
    particles[i].update();
    if (particles[i].isDead()) {
      particles.splice(i, 1);
    }
  }

  drawShooterGame();
}
Line-by-line explanation (14 lines)

🔧 Subcomponents:

for-loop Bullet Update Loop for (let i = bullets.length - 1; i >= 0; i--) {

Iterates through all bullets, moves each one upward, and removes bullets that leave the screen

conditional Enemy Spawn Timer if (now - lastSpawnTime > spawnDelay) {

Checks if enough time has passed since the last enemy was spawned, and creates a new enemy if so

calculation Difficulty Scaling const difficulty = constrain(score / 50, 0, 1);

Converts the player's score into a 0–1 difficulty multiplier that speeds up enemy spawning as the game progresses

for-loop Enemy Update and Escape Check for (let i = enemies.length - 1; i >= 0; i--) {

Moves each enemy downward and removes it if it escapes off the bottom, causing a life loss

for-loop Bullet–Enemy Collision Detection for (let ei = enemies.length - 1; ei >= 0; ei--) {

Nested loop that checks every bullet against every enemy; if a hit is detected, both are removed and the score increases

for-loop Enemy–Player Collision Detection if (player) { for (let ei = enemies.length - 1; ei >= 0; ei--) {

Checks if any enemy has collided with the player ship; if so, both are destroyed and a life is lost

updateShooterPlayerWithMouse();
Moves the player ship so it follows the mouse's x position, keeping it near the bottom of the screen
handleShootingShooter();
Checks if the mouse button is held, and if enough time has passed, fires a new bullet from the ship's nose
for (let i = bullets.length - 1; i >= 0; i--) {
Loops backward through the bullets array so we can safely remove bullets during iteration
bullets[i].update();
Moves each bullet upward by calling its update() method
if (bullets[i].offscreen()) {
Checks if the bullet has moved above the canvas; if so, it's no longer useful and should be removed
bullets.splice(i, 1);
Removes the offscreen bullet from the array to save memory and reduce calculation overhead
const now = millis();
Records the current time in milliseconds for comparison against the last spawn time
if (now - lastSpawnTime > spawnDelay) {
Checks if spawnDelay milliseconds have passed since the last enemy spawn; if so, it's time to spawn a new enemy
const difficulty = constrain(score / 50, 0, 1);
Converts score to a 0–1 value: every 50 points increases difficulty toward 1.0, capping at 1.0 to avoid extreme speeds
spawnDelay = 900 - difficulty * 500;
Uses the difficulty value to shorten the spawn delay: at difficulty 0, enemies spawn every 900 ms; at difficulty 1, every 400 ms
if (e.y - e.size / 2 > height) {
Checks if the top of the enemy has passed the bottom of the screen; if so, the player lost the chance to shoot it
if (circlePointCollision(e.x, e.y, e.size * 0.5, b.x, b.y)) {
Calls circlePointCollision() to test if the bullet point is inside the enemy circle; a hit triggers destruction and scoring
break;
Stops checking this enemy against remaining bullets after a hit, since the enemy is already destroyed
if (e.hitsPlayer(player)) {
Calls the enemy's collision method to test if it overlaps with the player ship; a hit causes both to explode

updateTargetsGame()

updateTargetsGame() is the main loop for Target Range. It mirrors the structure of updateShooterGame() but is simpler because targets cannot collide with each other and there's no player ship to protect. The key difference is the difficulty divisor (20 vs. 50), which makes Target Range escalate faster, creating a different challenge curve. This demonstrates how the same structure (spawn, update, cleanup) can be tweaked to create two distinct gameplay experiences.

🔬 The difficulty calculation divides score by 20 instead of 50 (like in Shooter). Why does Target Range escalate faster? Try changing it to 50—do targets spawn much slower as you score?

  // Spawn new targets
  if (now - lastTargetSpawnTime > targetSpawnDelay) {
    targets.push(new Target());
    lastTargetSpawnTime = now;

    const difficulty = constrain(score / 20, 0, 1);
    targetSpawnDelay = 1000 - difficulty * 500;
function updateTargetsGame() {
  const now = millis();

  // Spawn new targets
  if (now - lastTargetSpawnTime > targetSpawnDelay) {
    targets.push(new Target());
    lastTargetSpawnTime = now;

    const difficulty = constrain(score / 20, 0, 1);
    targetSpawnDelay = 1000 - difficulty * 500; // more targets as score rises
  }

  // Update targets; if they escape off bottom, lose a life
  for (let i = targets.length - 1; i >= 0; i--) {
    const t = targets[i];
    t.update();
    if (t.isOffscreen()) {
      spawnExplosion(t.x, height - 40);
      targets.splice(i, 1);
      loseLife();
    }
  }

  // Update particles
  for (let i = particles.length - 1; i >= 0; i--) {
    particles[i].update();
    if (particles[i].isDead()) {
      particles.splice(i, 1);
    }
  }

  drawTargetsGame();
}
Line-by-line explanation (9 lines)

🔧 Subcomponents:

conditional Target Spawn Timer if (now - lastTargetSpawnTime > targetSpawnDelay) {

Checks elapsed time and spawns a new target if spawnDelay milliseconds have passed

calculation Target Difficulty Scaling const difficulty = constrain(score / 20, 0, 1);

Converts score into a 0–1 difficulty multiplier; score scales faster here (divide by 20) than in Shooter (divide by 50)

for-loop Target Update and Escape Check for (let i = targets.length - 1; i >= 0; i--) {

Moves each target downward and removes it if it escapes, triggering a life loss

for-loop Particle Cleanup for (let i = particles.length - 1; i >= 0; i--) {

Updates all active particles and removes those that have expired

const now = millis();
Captures the current time for comparison against the last target spawn time
if (now - lastTargetSpawnTime > targetSpawnDelay) {
If the elapsed time since the last spawn exceeds the delay, spawn a new target
targets.push(new Target());
Creates a new Target object and adds it to the targets array
const difficulty = constrain(score / 20, 0, 1);
Converts score to difficulty; every 20 points moves difficulty up (faster than Shooter's every 50 points)
targetSpawnDelay = 1000 - difficulty * 500;
At difficulty 0, targets spawn every 1000 ms; at difficulty 1, every 500 ms—a tighter, more intense pace
for (let i = targets.length - 1; i >= 0; i--) {
Iterates backward through targets so we can safely remove ones that escape
t.update();
Moves the target downward and applies its horizontal wobble animation
if (t.isOffscreen()) {
Checks if the target has scrolled off the bottom of the screen without being clicked
loseLife();
Decrements lives and potentially ends the game if lives reach zero

drawMainMenu()

drawMainMenu() demonstrates responsive UI design: all text sizes and positions are calculated as percentages of the canvas width and height, so the menu adapts to any screen size. The use of min() ensures text never becomes too large. This is essential for an arcade that must work on phones, tablets, and desktops.

function drawMainMenu() {
  textAlign(CENTER, CENTER);
  noStroke();
  fill(255, 0, 0);
  stroke(255, 0, 0);
  strokeWeight(2);

  textSize(min(width * 0.06, 56));
  text("VIRTUAL VOID ARCADE", width / 2, height * 0.18);

  const layout = getMenuLayout();

  drawMenuCard(
    layout.shooter,
    "SPACE SHOOTER",
    "Move the ship with your mouse\nHold the mouse button to fire"
  );

  drawMenuCard(
    layout.targets,
    "TARGET RANGE",
    "Aim with your mouse\nClick targets before they escape"
  );

  noStroke();
  textSize(min(width * 0.028, 22));
  fill(255, 0, 0);
  text(
    "Choose a game with your mouse\nClick the X in the corner to return here",
    width / 2,
    height * 0.85
  );
}
Line-by-line explanation (6 lines)

🔧 Subcomponents:

calculation Main Title text("VIRTUAL VOID ARCADE", width / 2, height * 0.18);

Renders the arcade's name in large red text at the top of the menu

function-call Menu Card Rendering drawMenuCard(

Calls drawMenuCard twice to render the two game selection buttons with descriptions

textAlign(CENTER, CENTER);
Sets text alignment so text is centered horizontally and vertically at the given x,y coordinates
fill(255, 0, 0);
Sets the text color to bright red (r=255, g=0, b=0), the signature neon color of the arcade
stroke(255, 0, 0);
Sets the outline color for shapes to red as well
textSize(min(width * 0.06, 56));
Sets the font size to 6% of the canvas width, but caps it at 56 pixels so it doesn't get unreasonably huge on wide screens
const layout = getMenuLayout();
Calls getMenuLayout() to calculate the positions and sizes of the two menu cards based on the current canvas size
drawMenuCard(
Renders the first menu card for Space Shooter with its title and instructions

drawMenuCard()

drawMenuCard() demonstrates responsive button design with hover feedback. The hover detection pattern (four comparisons for a rectangular bound) is fundamental in interactive UI. The ternary operator (condition ? valueIfTrue : valueIfFalse) is a concise way to choose between two values based on a condition.

🔬 This checks if the mouse is inside a rectangle. What happens if you change the first >= to > and the others to <—do the hover boundaries shift or tighten?

  const hovered =
    mouseX >= card.x &&
    mouseX <= card.x + card.w &&
    mouseY >= card.y &&
    mouseY <= card.y + card.h;
function drawMenuCard(card, title, desc) {
  const hovered =
    mouseX >= card.x &&
    mouseX <= card.x + card.w &&
    mouseY >= card.y &&
    mouseY <= card.y + card.h;

  stroke(255, 0, 0, hovered ? 255 : 170);
  noFill();
  rect(card.x, card.y, card.w, card.h, 8);

  const pad = 16;
  noStroke();
  fill(255, 0, 0);
  textAlign(LEFT, TOP);

  textSize(min(width * 0.03, 24));
  text(title, card.x + pad, card.y + pad);

  textSize(min(width * 0.022, 18));
  text(desc, card.x + pad, card.y + pad + 28);
}
Line-by-line explanation (9 lines)

🔧 Subcomponents:

conditional Hover Detection const hovered = mouseX >= card.x && mouseX <= card.x + card.w && mouseY >= card.y && mouseY <= card.y + card.h;

Tests if the mouse is inside the card's rectangular bounds; used to brighten the border when hovered

const hovered =
Starts a multi-line boolean expression that checks if the mouse is inside the card rectangle
mouseX >= card.x &&
Tests if the mouse x is at or to the right of the card's left edge
mouseX <= card.x + card.w &&
Tests if the mouse x is at or to the left of the card's right edge
mouseY >= card.y &&
Tests if the mouse y is at or below the card's top edge
mouseY <= card.y + card.h;
Tests if the mouse y is at or above the card's bottom edge; if all four conditions are true, hovered is true
stroke(255, 0, 0, hovered ? 255 : 170);
Uses a ternary operator to set the border opacity to 255 (full brightness) if hovered, otherwise 170 (dimmer)
rect(card.x, card.y, card.w, card.h, 8);
Draws the card's border rectangle with 8-pixel rounded corners; the border opacity changes based on hover state
text(title, card.x + pad, card.y + pad);
Draws the game title 16 pixels from the top-left corner of the card
text(desc, card.x + pad, card.y + pad + 28);
Draws the description text 28 pixels below the title, creating a two-line label inside the card

handleShootingShooter()

handleShootingShooter() demonstrates rate limiting, a core mechanic in games to prevent actions from happening too fast. By checking elapsed time and only allowing actions when a threshold is exceeded, you can create balanced, controllable gameplay. This pattern (storing lastActionTime and comparing to now()) is used everywhere in games.

function handleShootingShooter() {
  if (!player) return;
  if (!mouseIsPressed) return;
  const now = millis();
  if (now - lastShotTime > shotDelay) {
    const nose = player.getNosePosition();
    bullets.push(new Bullet(nose.x, nose.y));
    lastShotTime = now;
  }
}
Line-by-line explanation (7 lines)

🔧 Subcomponents:

conditional Shot Rate Limiting if (now - lastShotTime > shotDelay) {

Prevents the player from firing faster than shotDelay milliseconds, creating a controlled fire rate

if (!player) return;
Exits early if there's no player object, preventing errors if the player was destroyed
if (!mouseIsPressed) return;
Exits early if the mouse button is not held down, so shooting only happens while actively pressed
const now = millis();
Captures the current time in milliseconds to compare against the last shot time
if (now - lastShotTime > shotDelay) {
Checks if enough time has passed since the last shot; if not, nothing happens and the function returns implicitly
const nose = player.getNosePosition();
Gets the tip of the ship (its nose) by calling the player's method, ensuring bullets spawn from the front
bullets.push(new Bullet(nose.x, nose.y));
Creates a new Bullet at the nose position and adds it to the bullets array
lastShotTime = now;
Updates lastShotTime to the current time, resetting the countdown for the next allowed shot

handleTargetClick()

handleTargetClick() runs when the player clicks in Target Range mode. It demonstrates the classic pattern of collision detection followed by object destruction and score update. The early return prevents the same click from hitting multiple targets, keeping the mechanic simple and fair.

🔬 This function returns early after the first hit. What happens if you remove the return statement—can one click destroy multiple targets if they overlap?

  for (let i = targets.length - 1; i >= 0; i--) {
    const t = targets[i];
    if (circlePointCollision(t.x, t.y, t.r, mx, my)) {
      spawnExplosion(t.x, t.y);
      targets.splice(i, 1);
      score++;
      return;
function handleTargetClick(mx, my) {
  for (let i = targets.length - 1; i >= 0; i--) {
    const t = targets[i];
    if (circlePointCollision(t.x, t.y, t.r, mx, my)) {
      spawnExplosion(t.x, t.y);
      targets.splice(i, 1);
      score++;
      return;
    }
  }
}
Line-by-line explanation (7 lines)

🔧 Subcomponents:

conditional Click Collision Detection if (circlePointCollision(t.x, t.y, t.r, mx, my)) {

Tests if the click point is inside any target; if so, destroys it and increments the score

for (let i = targets.length - 1; i >= 0; i--) {
Loops backward through the targets array so we can safely remove a target during iteration
const t = targets[i];
Gets the current target object for easier reference
if (circlePointCollision(t.x, t.y, t.r, mx, my)) {
Calls circlePointCollision() to test if the click point (mx, my) is inside the target's circular boundary
spawnExplosion(t.x, t.y);
Creates a burst of particles at the target's position to give visual feedback for a successful hit
targets.splice(i, 1);
Removes the target from the array since it has been destroyed
score++;
Increments the score by 1 for the successful hit
return;
Exits the function early; since one click can only hit one target, we stop checking after the first hit

drawScanlines()

drawScanlines() adds the iconic CRT television effect—horizontal lines that simulate the refresh rate of old monitors. It's called every frame on top of all game graphics, creating a retro visual filter. The for loop stepping pattern (y += 4) is a key technique for creating evenly spaced repeating elements.

🔬 This loop draws horizontal lines 4 pixels apart. What happens if you change += 4 to += 1 or += 8—do scanlines become denser or sparser?

  for (let y = 0; y < height; y += 4) {
    line(0, y, width, y);
  }
function drawScanlines() {
  stroke(60, 0, 0, 120);
  strokeWeight(1);
  for (let y = 0; y < height; y += 4) {
    line(0, y, width, y);
  }
}
Line-by-line explanation (4 lines)

🔧 Subcomponents:

for-loop Scanline Loop for (let y = 0; y < height; y += 4) {

Draws horizontal lines every 4 pixels down the screen, simulating old CRT monitor refresh lines

stroke(60, 0, 0, 120);
Sets the line color to dark red (r=60, g=0, b=0) with partial transparency (alpha=120), so scanlines are visible but subtle
strokeWeight(1);
Sets line thickness to 1 pixel, keeping scanlines thin and crisp
for (let y = 0; y < height; y += 4) {
Loops from y=0 to the bottom of the canvas, incrementing by 4 each iteration; this spaces scanlines 4 pixels apart
line(0, y, width, y);
Draws a horizontal line from the left edge (0) to the right edge (width) at the current y position

updateStars()

updateStars() demonstrates parallax scrolling, a classic technique to create the illusion of depth. Stars with higher depth values move faster and appear brighter, while shallower stars move slowly and dimly. The wrap-around logic ensures infinite scrolling without creating a massive array of stars. This is computationally efficient and creates a compelling sense of movement through space.

🔬 This creates a parallax scrolling effect where deeper stars move faster. What happens if you change s.depth to a constant like 1 everywhere—do all stars move at the same speed?

    s.y += s.speed * s.depth * 1.5;
    if (s.y > height) {
      s.y = 0;
      s.x = random(width);
function updateStars() {
  strokeWeight(1);
  for (let s of stars) {
    s.y += s.speed * s.depth * 1.5;
    if (s.y > height) {
      s.y = 0;
      s.x = random(width);
    }
    const alpha = 80 + s.depth * 140;
    stroke(255, 0, 0, alpha);
    point(s.x, s.y);
  }
}
Line-by-line explanation (9 lines)

🔧 Subcomponents:

calculation Depth-Based Scrolling s.y += s.speed * s.depth * 1.5;

Moves each star downward; stars with higher depth move faster, creating a parallax effect

conditional Star Wrap-Around if (s.y > height) {

When a star scrolls off the bottom, it reappears at the top with a new random x position

calculation Depth-Based Opacity const alpha = 80 + s.depth * 140;

Stars with higher depth (closer to camera) are brighter; those with lower depth are dimmer

strokeWeight(1);
Sets line thickness to 1 pixel for all stars drawn this frame
for (let s of stars) {
Uses a for-of loop to iterate through each star object in the stars array
s.y += s.speed * s.depth * 1.5;
Moves the star downward; the amount depends on its speed property, its depth (0.3–1), and the multiplier 1.5. Deeper stars move faster, creating motion parallax.
if (s.y > height) {
Checks if the star has scrolled below the bottom of the canvas
s.y = 0;
Resets the star's y position to the top (y=0) so it scrolls up from the top again
s.x = random(width);
Assigns a new random x position so stars don't follow predictable vertical paths; each cycle varies their horizontal position
const alpha = 80 + s.depth * 140;
Calculates opacity: stars with depth 0.3 get alpha ~122 (dim), while depth 1 gets alpha ~220 (bright)
stroke(255, 0, 0, alpha);
Sets the stroke color to red with the calculated alpha; this affects the next point() call
point(s.x, s.y);
Draws a 1-pixel red dot at the star's current position

drawCloseButton()

drawCloseButton() demonstrates building a custom interactive UI element. The button's position is calculated relative to the window edges, making it stay in the corner on any screen size. The X icon is drawn with two diagonal lines, a clean and recognizable close button design. Hover feedback (color change and fill) gives players visual confirmation that the button is interactive.

function drawCloseButton() {
  const x1 = width - CLOSE_BTN_MARGIN - CLOSE_BTN_SIZE;
  const y1 = CLOSE_BTN_MARGIN;
  const x2 = x1 + CLOSE_BTN_SIZE;
  const y2 = y1 + CLOSE_BTN_SIZE;

  const hovered = isOverCloseButton(mouseX, mouseY);

  stroke(hovered ? color(255, 0, 0) : color(120, 0, 0, 200));
  strokeWeight(2);
  noFill();
  rect(x1, y1, CLOSE_BTN_SIZE, CLOSE_BTN_SIZE, 4);

  if (hovered) {
    fill(40, 0, 0, 180);
    rect(x1, y1, CLOSE_BTN_SIZE, CLOSE_BTN_SIZE, 4);
  }

  stroke(255, 0, 0);
  line(x1 + 4, y1 + 4, x2 - 4, y2 - 4);
  line(x1 + 4, y2 - 4, x2 - 4, y1 + 4);
}
Line-by-line explanation (10 lines)

🔧 Subcomponents:

conditional Hover Feedback if (hovered) {

Fills the button with dark red when hovered, giving visual feedback that it's interactive

drawing X Icon Drawing line(x1 + 4, y1 + 4, x2 - 4, y2 - 4);

Draws the two diagonal lines that form an X symbol inside the button

const x1 = width - CLOSE_BTN_MARGIN - CLOSE_BTN_SIZE;
Calculates the left edge of the button: start from the right edge of the canvas, subtract the margin, then subtract the button size
const y1 = CLOSE_BTN_MARGIN;
Positions the button's top edge at a fixed distance from the top of the canvas
const x2 = x1 + CLOSE_BTN_SIZE;
Calculates the right edge by adding the button size to the left edge
const y2 = y1 + CLOSE_BTN_SIZE;
Calculates the bottom edge by adding the button size to the top edge
const hovered = isOverCloseButton(mouseX, mouseY);
Calls isOverCloseButton() to test if the mouse is currently over the button
stroke(hovered ? color(255, 0, 0) : color(120, 0, 0, 200));
Uses a ternary operator to set the border to bright red if hovered, or dark red if not
rect(x1, y1, CLOSE_BTN_SIZE, CLOSE_BTN_SIZE, 4);
Draws the button's rectangular border with 4-pixel rounded corners
if (hovered) {
If the button is hovered, fill it with a dark red semi-transparent color
line(x1 + 4, y1 + 4, x2 - 4, y2 - 4);
Draws a diagonal line from the top-left corner (inset by 4 pixels) to the bottom-right, forming the first stroke of the X
line(x1 + 4, y2 - 4, x2 - 4, y1 + 4);
Draws a diagonal line from the bottom-left (inset by 4 pixels) to the top-right, completing the X symbol

circlePointCollision()

circlePointCollision() is a workhorse collision detection utility used by both games. It checks if a point (px, py) lies inside a circle centered at (cx, cy) with radius r. The key insight is using squared distances to avoid expensive sqrt() calculations: if dx² + dy² ≤ r², then distance ≤ r. This pattern is used throughout the arcade for all hit detection.

🔬 This uses squared distances (dx * dx) instead of sqrt(). What happens if you change it to use sqrt and compare sqrt(dx*dx + dy*dy) to r—does collision detection still work, but run slower?

function circlePointCollision(cx, cy, r, px, py) {
  const dx = cx - px;
  const dy = cy - py;
  return dx * dx + dy * dy <= r * r;
}
function circlePointCollision(cx, cy, r, px, py) {
  const dx = cx - px;
  const dy = cy - py;
  return dx * dx + dy * dy <= r * r;
}
Line-by-line explanation (3 lines)

🔧 Subcomponents:

calculation Distance Calculation const dx = cx - px; const dy = cy - py; return dx * dx + dy * dy <= r * r;

Uses the Pythagorean theorem to check if the point is within the circle's radius

const dx = cx - px;
Calculates the horizontal distance from the point to the circle's center
const dy = cy - py;
Calculates the vertical distance from the point to the circle's center
return dx * dx + dy * dy <= r * r;
Uses the distance formula (dx² + dy² ≤ r²) to check if the point is inside or on the circle; this avoids the costly sqrt() function by comparing squared distances

mousePressed()

mousePressed() is p5.js's event handler for mouse clicks. By checking the game state and routing clicks to different logic functions, this function acts as a command dispatcher. The close button check comes first to ensure it always works, regardless of game state—a common UI pattern called priority checking. Notice how the game-over state allows the player to replay, while the start state checks the menu selection.

function mousePressed() {
  // X in the corner: always go back to main menu
  if (isOverCloseButton(mouseX, mouseY)) {
    gameState = "start";
    currentGame = null;
    return;
  }

  if (gameState === "start") {
    const selection = getMenuSelection(mouseX, mouseY);
    if (selection) {
      startGame(selection);
    }
  } else if (gameState === "playing") {
    if (currentGame === "targets") {
      handleTargetClick(mouseX, mouseY);
    }
  } else if (gameState === "gameover") {
    if (currentGame) {
      startGame(currentGame);
    } else {
      gameState = "start";
    }
  }
}
Line-by-line explanation (11 lines)

🔧 Subcomponents:

conditional Close Button Priority if (isOverCloseButton(mouseX, mouseY)) {

Checks the close button first so it works from any screen, preventing accidental clicks on other UI elements

if (isOverCloseButton(mouseX, mouseY)) {
Checks if the player clicked the close button in the top-right; if so, immediately return to the menu
gameState = "start";
Changes the game state to 'start', which will draw the main menu on the next frame
currentGame = null;
Clears the currentGame variable so the arcade forgets which game was being played
if (gameState === "start") {
If we're on the main menu, check which game the player clicked
const selection = getMenuSelection(mouseX, mouseY);
Calls getMenuSelection() to determine if the click was on the Shooter or Targets card
startGame(selection);
If a valid selection was made, calls startGame() to initialize and begin gameplay
} else if (gameState === "playing") {
If a game is currently active, handle clicks appropriately for that mode
if (currentGame === "targets") {
In Target Range, a click should check if it hit any targets
handleTargetClick(mouseX, mouseY);
Calls handleTargetClick() to check for collisions and destroy targets
} else if (gameState === "gameover") {
If the game has ended, a click should restart the same game
startGame(currentGame);
Restarts the current game (Shooter or Targets) with a fresh score and lives

keyPressed()

keyPressed() is p5.js's event handler for keyboard input. Returning false from this function prevents the browser's default behavior for certain keys. This is essential for arcade games: without it, pressing arrow keys would scroll the page, disrupting gameplay. This function only prevents scroll behavior; it doesn't handle actual game input (the Space Shooter uses mouse input instead).

function keyPressed() {
  if (
    keyCode === UP_ARROW ||
    keyCode === DOWN_ARROW ||
    keyCode === LEFT_ARROW ||
    keyCode === RIGHT_ARROW ||
    key === " "
  ) {
    return false;
  }
}
Line-by-line explanation (6 lines)

🔧 Subcomponents:

conditional Arrow Key / Space Suppression if ( keyCode === UP_ARROW ||

Prevents browser default behavior for arrow keys and space, which would normally scroll the page

if ( keyCode === UP_ARROW ||
Checks if the pressed key is the UP arrow
keyCode === DOWN_ARROW ||
Checks if the pressed key is the DOWN arrow
keyCode === LEFT_ARROW ||
Checks if the pressed key is the LEFT arrow
keyCode === RIGHT_ARROW ||
Checks if the pressed key is the RIGHT arrow
key === " "
Checks if the pressed key is the spacebar (represented as a space character)
return false;
Returning false from keyPressed() tells the browser to prevent the default behavior (like scrolling) for these keys

windowResized()

windowResized() is p5.js's event handler that fires whenever the browser window is resized. This function ensures the arcade remains playable and visually correct at any screen size. By regenerating stars and repositioning the player, the arcade adapts responsively. This is critical for web games played on phones, tablets, and desktops with varying aspect ratios and dimensions.

function windowResized() {
  resizeCanvas(windowWidth, windowHeight);
  initStars();

  if (player) {
    player.w = min(width * 0.06, 80);
    player.h = player.w * 0.5;
    player.x = constrain(player.x, player.w / 2, width - player.w / 2);
    player.y = height * 0.8;
  }
}
Line-by-line explanation (7 lines)

🔧 Subcomponents:

function-call Canvas Resize resizeCanvas(windowWidth, windowHeight);

Resizes the p5.js canvas to match the new window dimensions

conditional Player Reposition if (player) {

Recalculates the player ship's size and position to keep it visible and usable on the resized canvas

resizeCanvas(windowWidth, windowHeight);
Tells p5.js to resize the canvas to match the browser window's new width and height
initStars();
Regenerates the star field with new random positions, distributing stars across the resized canvas
if (player) {
Checks if a player ship exists; if not (e.g., on the menu), skips repositioning
player.w = min(width * 0.06, 80);
Recalculates the player's width as 6% of the new canvas width, but caps it at 80 pixels for very wide screens
player.h = player.w * 0.5;
Keeps the player's height proportional to its width
player.x = constrain(player.x, player.w / 2, width - player.w / 2);
Constrains the player's x position to stay within valid bounds on the resized canvas, preventing it from being positioned off-screen
player.y = height * 0.8;
Repositions the player near the bottom of the new canvas (80% down)

Player

Player is a class that encapsulates the player's ship. The constructor sets up size and position, getNosePosition() returns where bullets spawn, and draw() renders the ship. Classes like this are essential in game development: they group related data (position, size) and behavior (drawing, getting the nose) into reusable objects. The use of translate() simplifies drawing by setting the origin at the ship's center.

🔬 This draws a triangle with three vertices. What happens if you add a fourth vertex like vertex(0, this.h / 2 + 10)—does the ship shape change from a triangle to a quadrilateral?

    beginShape();
    vertex(-this.w / 2, this.h / 2);
    vertex(0, -this.h / 2);
    vertex(this.w / 2, this.h / 2);
    endShape(CLOSE);
class Player {
  constructor() {
    this.w = min(width * 0.06, 80);
    this.h = this.w * 0.5;
    this.x = width / 2;
    this.y = height * 0.8;
  }

  getNosePosition() {
    return { x: this.x, y: this.y - this.h / 2 };
  }

  draw() {
    push();
    translate(this.x, this.y);
    noFill();
    stroke(255, 0, 0);
    strokeWeight(2);

    // Simple angular ship
    beginShape();
    vertex(-this.w / 2, this.h / 2);
    vertex(0, -this.h / 2);
    vertex(this.w / 2, this.h / 2);
    endShape(CLOSE);

    // Cockpit line
    line(-this.w / 3, this.h / 4, this.w / 3, this.h / 4);
    pop();
  }
}
Line-by-line explanation (13 lines)

🔧 Subcomponents:

initialization Constructor constructor() {

Initializes a new Player object with starting position, size, and ship parameters

method getNosePosition Method getNosePosition() {

Returns the tip of the ship (for spawning bullets)

drawing Ship Shape Drawing beginShape(); vertex(-this.w / 2, this.h / 2); vertex(0, -this.h / 2); vertex(this.w / 2, this.h / 2); endShape(CLOSE);

Draws a triangular ship pointing upward, creating a classic arcade spaceship silhouette

this.w = min(width * 0.06, 80);
Sets the ship width to 6% of the canvas, but never wider than 80 pixels, making it responsive to screen size
this.h = this.w * 0.5;
Sets height to half the width, creating a compact, tapered ship shape
this.x = width / 2;
Positions the ship horizontally at the center of the canvas
this.y = height * 0.8;
Positions the ship 80% down the canvas, near the bottom where the player can defend
getNosePosition() {
Defines a method that returns an object with the x and y coordinates of the ship's tip
return { x: this.x, y: this.y - this.h / 2 };
The nose is at the ship's x position but shifted up by half the height, pointing in the direction the ship faces
translate(this.x, this.y);
Moves the coordinate origin to the ship's center, so all drawing is relative to the ship
beginShape();
Starts defining a polygon shape for the ship's hull
vertex(-this.w / 2, this.h / 2);
Defines the bottom-left corner of the ship
vertex(0, -this.h / 2);
Defines the top point (nose) of the ship, creating the angular tip
vertex(this.w / 2, this.h / 2);
Defines the bottom-right corner of the ship
endShape(CLOSE);
Closes the shape by connecting the last vertex back to the first, completing the triangle
line(-this.w / 3, this.h / 4, this.w / 3, this.h / 4);
Draws a horizontal line across the ship's upper third as a cockpit detail, adding visual depth

Bullet

Bullet is a simple projectile class. Each bullet moves upward at a constant speed and is removed when it leaves the screen. The offscreen() method is a common pattern for cleaning up objects that are no longer needed, saving memory. The speed is calculated relative to canvas height, ensuring bullets behave consistently on different screen sizes.

class Bullet {
  constructor(x, y) {
    this.x = x;
    this.y = y;
    this.speed = max(8, height * 0.015);
  }

  update() {
    this.y -= this.speed;
  }

  offscreen() {
    return this.y < -10;
  }

  draw() {
    stroke(255, 0, 0);
    strokeWeight(3);
    line(this.x, this.y + 4, this.x, this.y - 8);
  }
}
Line-by-line explanation (9 lines)

🔧 Subcomponents:

calculation Responsive Speed this.speed = max(8, height * 0.015);

Sets bullet speed based on canvas height, ensuring bullets move at a consistent apparent speed across different screen sizes

constructor(x, y) {
Initializes a bullet at the given x, y position (spawned from the ship's nose)
this.speed = max(8, height * 0.015);
Sets speed to 1.5% of canvas height, but at least 8 pixels per frame, ensuring bullets move fast enough on any screen
update() {
Defines the update method, called every frame to move the bullet
this.y -= this.speed;
Moves the bullet upward (negative y) by its speed each frame, creating upward motion
offscreen() {
Defines a method that checks if the bullet has left the screen and should be removed
return this.y < -10;
Returns true if the bullet's y position is above the top of the canvas (with a 10-pixel buffer), indicating it's gone
stroke(255, 0, 0);
Sets the line color to bright red, matching the arcade's neon aesthetic
strokeWeight(3);
Makes the bullet line thick (3 pixels) so it's visible and easy to track during gameplay
line(this.x, this.y + 4, this.x, this.y - 8);
Draws a short vertical line centered at the bullet's position, creating a simple beam projectile shape

Enemy

Enemy is the main antagonist class in Space Shooter. Each enemy combines vertical scrolling (descending) with horizontal drifting and bouncing. The randomized size and speed make them less predictable. The hitsPlayer() method demonstrates circular collision detection using squared distances, the same technique as circlePointCollision(). Enemy is a good example of how classes encapsulate all data and behavior related to a game object.

🔬 Enemies drift horizontally (this.vx) and bounce at edges. What happens if you remove the vx bouncing logic—do enemies just scroll off the sides?

    this.y += this.speed;
    this.x += this.vx;
    if (this.x < this.size / 2 || this.x > width - this.size / 2) {
      this.vx *= -1;
class Enemy {
  constructor() {
    this.size = random(30, 60);
    this.x = random(this.size, width - this.size);
    this.y = -this.size;
    this.speed = random(1.5, 3);
    this.vx = random(-1.2, 1.2);
  }

  update() {
    this.y += this.speed;
    this.x += this.vx;
    if (this.x < this.size / 2 || this.x > width - this.size / 2) {
      this.vx *= -1;
    }
  }

  hitsPlayer(player) {
    const dx = this.x - player.x;
    const dy = this.y - player.y;
    const distSq = dx * dx + dy * dy;
    const rad = this.size / 2 + max(player.w, player.h) / 3;
    return distSq < rad * rad;
  }

  draw() {
    push();
    translate(this.x, this.y);
    noFill();
    stroke(255, 0, 0);
    strokeWeight(2);

    // Saucer / ring
    ellipse(0, 0, this.size, this.size * 0.6);
    line(-this.size * 0.4, 0, this.size * 0.4, 0);
    pop();
  }
}
Line-by-line explanation (16 lines)

🔧 Subcomponents:

initialization Randomized Spawning this.size = random(30, 60); this.x = random(this.size, width - this.size); this.speed = random(1.5, 3); this.vx = random(-1.2, 1.2);

Each enemy is spawned with random size, position, and speed, creating variety and preventing predictable patterns

conditional Edge Bouncing if (this.x < this.size / 2 || this.x > width - this.size / 2) {

When an enemy approaches the left or right edge, its horizontal velocity reverses, keeping it on screen

method Player Collision hitsPlayer(player) {

Checks if this enemy overlaps with the player ship using distance-based collision

this.size = random(30, 60);
Assigns a random diameter between 30 and 60 pixels, making enemies visually varied
this.x = random(this.size, width - this.size);
Spawns the enemy at a random x position, but constrained so it doesn't start partially off-screen
this.y = -this.size;
Spawns the enemy just above the canvas (negative y), so it descends into view
this.speed = random(1.5, 3);
Each enemy moves downward at a different speed, creating unpredictability
this.vx = random(-1.2, 1.2);
Each enemy has a random horizontal velocity component, making it drift side-to-side as it descends
this.y += this.speed;
Moves the enemy downward by its speed each frame
this.x += this.vx;
Moves the enemy horizontally by its drift velocity
if (this.x < this.size / 2 || this.x > width - this.size / 2) {
Checks if the enemy has hit the left or right edge; if so, reverses its horizontal direction
this.vx *= -1;
Flips the enemy's horizontal velocity, making it bounce back toward the center
const dx = this.x - player.x;
Calculates horizontal distance from enemy to player
const dy = this.y - player.y;
Calculates vertical distance from enemy to player
const distSq = dx * dx + dy * dy;
Calculates squared distance (avoiding expensive sqrt)
const rad = this.size / 2 + max(player.w, player.h) / 3;
Calculates the collision radius by adding enemy radius to a portion of the player's dimensions
return distSq < rad * rad;
Returns true if the squared distance is less than the squared radius, indicating a collision
ellipse(0, 0, this.size, this.size * 0.6);
Draws an ellipse (wider than it is tall) to represent the enemy saucer shape
line(-this.size * 0.4, 0, this.size * 0.4, 0);
Draws a horizontal line across the middle of the ellipse, adding detail to the saucer design

Target

Target is the flying target class for Target Range mode. Each target combines vertical scrolling with horizontal drift and a sine-wave wobble, making them challenging to hit. The phase offset ensures targets don't all wobble in sync. The crosshair design makes targets visually distinct from other arcade elements. This class demonstrates how combining multiple motion types (constant speed + drift + sine oscillation) creates complex, interesting behavior from simple math.

🔬 The sine wave creates smooth horizontal wobble. What happens if you remove the sin() calculation—do targets move in straight lines instead of weaving?

  update() {
    this.y += this.baseSpeed;
    // slight horizontal wobble
    this.x += this.vx + sin(millis() * 0.003 + this.phase) * 0.3;
    this.x = constrain(this.x, this.r, width - this.r);
class Target {
  constructor() {
    this.r = random(18, 30);
    this.x = random(this.r, width - this.r);
    this.y = -this.r - random(20, height * 0.3);
    this.baseSpeed = random(1.0, 2.2);
    this.vx = random(-0.5, 0.5);
    this.phase = random(TWO_PI);
  }

  update() {
    this.y += this.baseSpeed;
    // slight horizontal wobble
    this.x += this.vx + sin(millis() * 0.003 + this.phase) * 0.3;
    this.x = constrain(this.x, this.r, width - this.r);
  }

  isOffscreen() {
    return this.y - this.r > height;
  }

  draw() {
    push();
    translate(this.x, this.y);
    noFill();
    stroke(255, 0, 0);
    strokeWeight(2);
    ellipse(0, 0, this.r * 2, this.r * 2);
    line(-this.r * 0.6, 0, this.r * 0.6, 0);
    line(0, -this.r * 0.6, 0, this.r * 0.6);
    pop();
  }
}
Line-by-line explanation (13 lines)

🔧 Subcomponents:

calculation Animated Wobble this.x += this.vx + sin(millis() * 0.003 + this.phase) * 0.3;

Adds sine-wave horizontal wobble to make targets more visually interesting and harder to predict

method Offscreen Detection isOffscreen() {

Checks if the target has scrolled below the bottom of the screen without being clicked

this.r = random(18, 30);
Sets a random radius between 18 and 30 pixels, making targets visually varied in size
this.x = random(this.r, width - this.r);
Spawns the target at a random x position, constrained so it doesn't start off-screen horizontally
this.y = -this.r - random(20, height * 0.3);
Spawns the target above the screen at a random distance, so targets appear from varying heights
this.baseSpeed = random(1.0, 2.2);
Each target scrolls down at a different base speed, creating unpredictability
this.vx = random(-0.5, 0.5);
Sets a small drift velocity component, giving targets slight horizontal bias
this.phase = random(TWO_PI);
Assigns a random phase offset for the sine wobble, so targets don't all wobble in sync
this.y += this.baseSpeed;
Moves the target downward at its base speed
this.x += this.vx + sin(millis() * 0.003 + this.phase) * 0.3;
Moves the target horizontally; the sine wave (millis() * 0.003) creates a smooth oscillation, and phase makes each target wobble independently
this.x = constrain(this.x, this.r, width - this.r);
Clamps the target's x position so it never moves completely off-screen horizontally
return this.y - this.r > height;
Returns true if the bottom of the target has passed below the canvas, indicating it escaped
ellipse(0, 0, this.r * 2, this.r * 2);
Draws a circle centered at the origin, with diameter = 2 * radius
line(-this.r * 0.6, 0, this.r * 0.6, 0);
Draws a horizontal crosshair line across the target
line(0, -this.r * 0.6, 0, this.r * 0.6);
Draws a vertical crosshair line, completing the crosshair reticle design

Particle

Particle is the visual feedback class for explosions. Each particle is a tiny dot that bursts outward in a random direction, falls due to gravity, and fades to transparency. The combination of initial velocity, gravity, and alpha fadeout creates satisfying explosion effects. Particles are the quintessential example of simple physics simulation: velocity updates position, and an external force (gravity) changes velocity over time. Spawning many particles at once creates the illusion of a solid impact.

🔬 This uses cos and sin to spread particles in all directions. What happens if you remove the angle randomness and just set this.vx = speed and this.vy = 0—do all particles move horizontally?

    const angle = random(TWO_PI);
    const speed = random(1, 5);
    this.vx = cos(angle) * speed;
    this.vy = sin(angle) * speed;
class Particle {
  constructor(x, y) {
    this.x = x;
    this.y = y;
    const angle = random(TWO_PI);
    const speed = random(1, 5);
    this.vx = cos(angle) * speed;
    this.vy = sin(angle) * speed;
    this.maxLife = random(15, 35);
    this.life = this.maxLife;
  }

  update() {
    this.x += this.vx;
    this.y += this.vy;
    this.vy += 0.05; // slight gravity
    this.life -= 1;
  }

  isDead() {
    return this.life <= 0;
  }

  draw() {
    const alpha = (this.life / this.maxLife) * 255;
    stroke(255, 0, 0, alpha);
    strokeWeight(2);
    point(this.x, this.y);
  }
}
Line-by-line explanation (14 lines)

🔧 Subcomponents:

calculation Random Burst Direction const angle = random(TWO_PI); const speed = random(1, 5); this.vx = cos(angle) * speed; this.vy = sin(angle) * speed;

Each particle shoots off in a random direction at a random speed, creating a burst effect

calculation Gravity Simulation this.vy += 0.05; // slight gravity

Particles accelerate downward over time, creating a realistic arc trajectory

calculation Fade Out const alpha = (this.life / this.maxLife) * 255;

Particles become more transparent as they age, creating a smooth disappearance

constructor(x, y) {
Creates a particle at the given x, y position (typically the location of a destroyed object)
const angle = random(TWO_PI);
Picks a random angle in radians (0 to 2π), representing a direction from 0° to 360° around the center
const speed = random(1, 5);
Assigns a random speed between 1 and 5 pixels per frame
this.vx = cos(angle) * speed;
Calculates the horizontal velocity component using cosine; particles moving at 0° move right, 90° move up, etc.
this.vy = sin(angle) * speed;
Calculates the vertical velocity component using sine
this.maxLife = random(15, 35);
Sets a random lifetime between 15 and 35 frames, so particles live for varying durations
this.life = this.maxLife;
Initializes current life to max life; it decrements each frame until reaching zero
this.x += this.vx;
Moves the particle by its velocity each frame
this.y += this.vy;
Moves the particle vertically by its velocity
this.vy += 0.05;
Adds slight gravity: the vertical velocity accelerates downward each frame, causing particles to arc and fall
this.life -= 1;
Decrements the particle's remaining life each frame
const alpha = (this.life / this.maxLife) * 255;
Calculates the particle's opacity: at full life, alpha is 255 (opaque); at zero life, alpha is 0 (invisible)
stroke(255, 0, 0, alpha);
Sets the color to red with the calculated alpha, making the particle fade out smoothly
point(this.x, this.y);
Draws a 1-pixel red dot at the particle's current position

spawnExplosion()

spawnExplosion() is a factory function that creates a burst of particles at a given location. It's called whenever something is destroyed (enemy, target, or player). The count parameter makes it flexible: you could spawn different explosion sizes by calling spawnExplosion(x, y, 50) for a big explosion or spawnExplosion(x, y, 5) for a small pop. This function demonstrates the value of parameterized behavior in games—small tweaks to a number (like count) create very different visual results.

function spawnExplosion(x, y, count = 18) {
  for (let i = 0; i < count; i++) {
    particles.push(new Particle(x, y));
  }
}
Line-by-line explanation (3 lines)

🔧 Subcomponents:

for-loop Particle Creation Loop for (let i = 0; i < count; i++) {

Creates multiple particles at the same location, each with its own random velocity and lifetime

function spawnExplosion(x, y, count = 18) {
Defines a function that takes an x, y position and an optional count parameter (defaulting to 18 particles)
for (let i = 0; i < count; i++) {
Loops count times (default 18), creating that many particles
particles.push(new Particle(x, y));
Creates a new Particle at the given position and adds it to the global particles array

📦 Key Variables

stars array

Stores all star objects in the scrolling background; each star has x, y, depth, and speed properties

let stars = [];
particles array

Stores all active particles from explosions; particles are removed when their life reaches zero

let particles = [];
score number

Tracks the player's current score; incremented when enemies or targets are destroyed

let score = 0;
lives number

Tracks the player's remaining lives; decremented when enemies escape or targets are missed

let lives = 3;
gameState string

Stores the current game state: 'start' (menu), 'playing' (active game), or 'gameover'

let gameState = "start";
currentGame string or null

Stores which game is active: 'shooter', 'targets', or null if on the menu

let currentGame = null;
player object (Player class)

Reference to the Player ship in Shooter mode; null when not playing Shooter

let player;
bullets array

Stores all active bullets fired by the player in Shooter mode

let bullets = [];
enemies array

Stores all active enemies descending down the screen in Shooter mode

let enemies = [];
targets array

Stores all active targets descending down the screen in Target Range mode

let targets = [];
lastShotTime number (milliseconds)

Records the time of the last bullet fired, used to enforce a fire rate delay

let lastShotTime = 0;
shotDelay number (milliseconds)

The minimum time between consecutive shots; lower values allow faster firing

let shotDelay = 180;
lastSpawnTime number (milliseconds)

Records the time of the last enemy spawn, used to enforce spawn rate delays

let lastSpawnTime = 0;
spawnDelay number (milliseconds)

The minimum time between enemy spawns; decreases with difficulty

let spawnDelay = 900;
lastTargetSpawnTime number (milliseconds)

Records the time of the last target spawn in Target Range mode

let lastTargetSpawnTime = 0;
targetSpawnDelay number (milliseconds)

The minimum time between target spawns in Target Range; decreases with score

let targetSpawnDelay = 900;
CLOSE_BTN_SIZE number

The width and height of the close button in pixels

const CLOSE_BTN_SIZE = 26;
CLOSE_BTN_MARGIN number

The distance from the top-right corner of the canvas to the close button edges

const CLOSE_BTN_MARGIN = 12;

🔧 Potential Improvements (6)

Here are some ways this code could be enhanced:

BUG circlePointCollision()

Uses squared distance comparison (dx*dx + dy*dy <= r*r) which is correct but could be clearer with comments

💡 Add a comment explaining why squared distances are used: // Avoids expensive sqrt() by comparing squared values

PERFORMANCE updateShooterGame() and updateTargetsGame()

Nested for-loops check every bullet against every enemy (or click against every target), which becomes slow with many objects

💡 Use spatial partitioning (divide canvas into grid cells) to only check collisions between nearby objects. For now, limit max enemies/targets with a cap.

STYLE draw() function

Long nested if-else chain for game state routing is readable but could be more elegant with a switch statement or state object

💡 Replace nested if-else with: switch(gameState) { case 'start': ... case 'playing': ... case 'gameover': ... }

FEATURE menu and game-over screens

No high score tracking; scores are lost when returning to the menu

💡 Store high scores in localStorage and display them on the menu. Example: localStorage.setItem('shooterHighScore', score); localStorage.getItem('shooterHighScore')

BUG updateShooterGame() enemy escaping

Enemies that escape the bottom spawn particles but then immediately reset. Particle position (height - 40) doesn't match where the enemy actually was.

💡 Store the actual y position: spawnExplosion(e.x, e.y) instead of (e.x, height - 40) to show the particle burst where the enemy was last seen

FEATURE windowResized()

Star field is regenerated on resize, causing a sudden visual change; targets and enemies aren't repositioned if window shrinks

💡 Smoothly scale existing stars rather than regenerating, and add bounds checks for current game objects on resize to prevent them from being off-screen

🔄 Code Flow

Code flow showing setup, draw, startgame, updateshootergame, updatetargetsgame, drawmainmenu, drawmenucard, handleshootingshooter, handletargetclick, drawscanlines, updatestars, drawclosebtn, circlpointcollision, mousepressed, keypressed, windowresized, player, bullet, enemy, target, particle, spawnexplosion

💡 Click on function names in the diagram to jump to their code

graph TD start[Start] --> setup[setup] setup --> canvas-creation[Canvas Creation] setup --> star-init[Star Field Initialization] setup --> draw[draw loop] click setup href "#fn-setup" click canvas-creation href "#sub-canvas-creation" click star-init href "#sub-star-init" draw --> state-dispatcher[Game State Router] state-dispatcher -->|menu| drawmainmenu[drawMainMenu] state-dispatcher -->|playing| game-selection[Game Mode Router] game-selection -->|shooter| updateshootergame[updateShooterGame] game-selection -->|targets| updatetargetsgame[updateTargetsGame] state-dispatcher -->|game-over| drawmainmenu click draw href "#fn-draw" click drawmainmenu href "#fn-drawmainmenu" click game-selection href "#sub-game-selection" click updateshootergame href "#fn-updateshootergame" click updatetargetsgame href "#fn-updatetargetsgame" drawmainmenu --> title-text[Main Title] title-text --> card-draw[Menu Card Rendering] card-draw --> hover-check[Hover Detection] card-draw --> drawmenucard[drawMenuCard] click title-text href "#sub-title-text" click card-draw href "#sub-card-draw" click hover-check href "#sub-hover-check" updateshootergame --> reset-globals[Global State Reset] reset-globals --> shooter-init[Shooter Mode Setup] shooter-init --> bullet-loop[Bullet Update Loop] bullet-loop --> bullet-enemy-collision[Bullet–Enemy Collision Detection] bullet-loop --> enemy-update-loop[Enemy Update and Escape Check] enemy-update-loop --> enemy-spawn[Enemy Spawn Timer] enemy-update-loop --> enemy-player-collision[Enemy–Player Collision Detection] enemy-spawn --> difficulty-scaling[Difficulty Scaling] click reset-globals href "#sub-reset-globals" click shooter-init href "#sub-shooter-init" click bullet-loop href "#sub-bullet-loop" click bullet-enemy-collision href "#sub-bullet-enemy-collision" click enemy-update-loop href "#sub-enemy-update-loop" click enemy-spawn href "#sub-enemy-spawn" click difficulty-scaling href "#sub-difficulty-scaling" updatetargetsgame --> targets-init[Targets Mode Setup] targets-init --> target-update-loop[Target Update and Escape Check] target-update-loop --> target-spawn[Target Spawn Timer] target-update-loop --> target-difficulty[Target Difficulty Scaling] target-update-loop --> collision-check[Click Collision Detection] click targets-init href "#sub-targets-init" click target-update-loop href "#sub-target-update-loop" click target-spawn href "#sub-target-spawn" click target-difficulty href "#sub-target-difficulty" click collision-check href "#sub-collision-check" draw --> drawscanlines[drawScanlines] draw --> updatestars[updateStars] updatestars --> depth-scrolling[Depth-Based Scrolling] depth-scrolling --> wrap-around[Star Wrap-Around] depth-scrolling --> depth-based-alpha[Depth-Based Opacity] click drawscanlines href "#fn-drawscanlines" click updatestars href "#fn-updatestars" click depth-scrolling href "#sub-depth-scrolling" click wrap-around href "#sub-wrap-around" click depth-based-alpha href "#sub-depth-based-alpha" mousepressed --> close-btn-check[Close Button Priority] close-btn-check --> menu-dispatch[Menu Click Dispatch] menu-dispatch --> game-selection click mousepressed href "#fn-mousepressed" click close-btn-check href "#sub-close-btn-check" click menu-dispatch href "#sub-menu-dispatch" keypressed --> key-blocking[Arrow Key / Space Suppression] click keypressed href "#fn-keypressed" click key-blocking href "#sub-key-blocking" windowresized --> canvas-resize[Canvas Resize] canvas-resize --> player-reposition[Player Reposition] click windowresized href "#fn-windowresized" click canvas-resize href "#sub-canvas-resize" click player-reposition href "#sub-player-reposition" player --> player-constructor[Constructor] player-constructor --> getnose[getNosePosition Method] player-constructor --> ship-drawing[Ship Shape Drawing] click player href "#fn-player" click player-constructor href "#sub-player-constructor" click getnose href "#sub-getnose" click ship-drawing href "#sub-ship-drawing" bullet --> bullet-speed[Responsive Speed] click bullet href "#fn-bullet" click bullet-speed href "#sub-bullet-speed" enemy --> randomization[Randomized Spawning] enemy --> edge-bounce[Edge Bouncing] enemy --> collision-check[Player Collision] click enemy href "#fn-enemy" click randomization href "#sub-randomization" click edge-bounce href "#sub-edge-bounce" click collision-check href "#sub-collision-check" target --> wobble-animation[Animated Wobble] target --> offscreen-check[Offscreen Detection] click target href "#fn-target" click wobble-animation href "#sub-wobble-animation" click offscreen-check href "#sub-offscreen-check" particle --> random-direction[Random Burst Direction] particle --> gravity[Gravity Simulation] particle --> fade-out[Fade Out] particle --> particle-loop[Particle Creation Loop] click particle href "#fn-particle" click random-direction href "#sub-random-direction" click gravity href "#sub-gravity" click fade-out href "#sub-fade-out" click particle-loop href "#sub-particle-loop"

❓ Frequently Asked Questions

What visual experience does the 'Virtual Boy for Switch VR Extension' sketch offer?

The sketch creates a vibrant, neon-lit space arcade environment filled with scrolling stars, glowing pixels, and retro scanlines that enhance the immersive atmosphere.

How can users interact with the 'Virtual Boy for Switch VR Extension' sketch?

Users can control a spaceship using their mouse to either shoot enemies in a space shooter mode or aim and click on popping targets in a target range mode.

What creative coding techniques are demonstrated in this p5.js sketch?

The sketch showcases techniques such as mouse-based controls, dynamic object spawning, and visual effects like star fields and scanlines to create an engaging arcade experience.

Preview

virutal boy for switch vr extension - p5.js creative coding sketch preview
Sketch Preview
Code flow diagram showing the structure of virutal boy for switch vr extension - Code flow showing setup, draw, startgame, updateshootergame, updatetargetsgame, drawmainmenu, drawmenucard, handleshootingshooter, handletargetclick, drawscanlines, updatestars, drawclosebtn, circlpointcollision, mousepressed, keypressed, windowresized, player, bullet, enemy, target, particle, spawnexplosion
Code Flow Diagram