
Voxel-destructible (Remix)

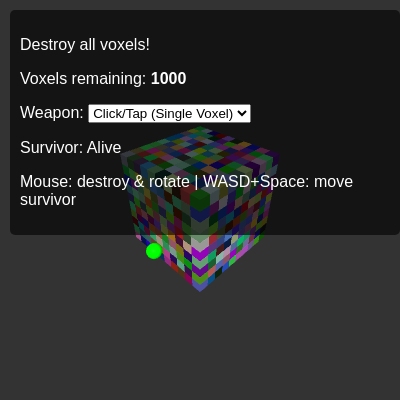
This sketch creates an interactive 3D voxel destruction game powered by three.js, cannon.js physics, and tone.js audio. Players blast apart a colorful cubic landscape using five different weapons while a tiny green survivor character tries to avoid the chaos.

🧪 Try This!

Experiment with the code by making these changes:

  1. Make a smaller voxel world — Change gridSize to 6 to create a 6×6×6 grid instead of 10×10×10—the game becomes much faster and easier to complete.
  2. Make bombs more destructive — Increase bombRadius to voxelSize * 6 so explosions destroy a much larger area—more chaos, easier weapon.
  3. Make the survivor faster — Change moveForce to 200 so the survivor responds more quickly to WASD input and can escape explosions easier.
  4. Speed up projectiles — Change projectileSpeed to 100 so cannonballs fly twice as fast and hit voxels from much farther away.
  5. Make mines explode instantly — Change explosionDelay to 100 so mines detonate almost immediately instead of waiting 2 seconds.
  6. Change background color — Change the scene background from dark gray to black for a more dramatic look, or try 0x1a1a2e for dark blue.
Prefer the full editor? Open it there →

📖 About This Sketch

This sketch builds a fully interactive 3D game where you click to destroy colorful voxel blocks using different weapons: single-click destruction, area-effect bombs, flying projectiles, laser beams, and time-delayed explosive mines. The game combines three major 3D libraries—three.js for 3D graphics, cannon.js for realistic physics simulation, and tone.js for procedural audio feedback. A tiny green survivor character moves around the landscape using WASD keys and Space, and you can accidentally kill them with your weapons, creating dramatic physics-driven destruction spectacles.

The code is organized into three initialization sections (audio, three.js scene, cannon.js physics world), a voxel generation system that creates the 10×10×10 grid of blocks, five distinct weapon implementations, collision handlers that trigger destruction and sound effects, and input management for mouse/touch targeting and keyboard movement. By studying this sketch you will learn how to synchronize three.js meshes with cannon.js physics bodies, implement raycasting for click-based selection, trigger audio synthesis on game events, and manage complex game state across multiple interacting systems.

⚙️ How It Works

  1. When the sketch loads, setup() initializes the three.js scene with camera and lighting, creates a cannon.js physics world with gravity, generates a 10×10×10 grid of randomly-colored voxel cubes each with both a visual mesh and a physics body, and spawns a small green survivor sphere that the player can move around.
  2. The draw() loop runs 60 times per second: it clears the background, updates physics with world.step(), and synchronizes every voxel mesh position/rotation to match its physics body so destruction looks realistic.
  3. When you click or tap the canvas without dragging (isDragging = false), a raycaster shoots a ray from the camera through the mouse cursor into the scene to detect which voxel was hit.
  4. Depending on the active weapon, the hit voxel is destroyed instantly (click mode) or triggers an area-effect explosion (bomb, mine, laser) that destroys nearby voxels in a radius, applies outward forces to make them fly away, and may kill or knockback the survivor.
  5. Each weapon fires a corresponding tone.js synthesizer sound, and destroyed voxels spawn an orange expanding sphere visual effect before being removed from both the scene and the physics world.
  6. The survivor character responds to WASD and Space key presses by applying forces to its physics body, allowing it to move and jump around the landscape while avoiding your weapons.

🎓 Concepts You'll Learn

3D graphics with three.jsPhysics simulation with cannon.jsRaycasting for intersection detectionProcedural audio synthesis with tone.jsPhysics body synchronizationCollision event handlingKeyboard and mouse input managementObject pooling and cleanup

📝 Code Breakdown

setup()

setup() runs once when the sketch starts. It initializes three major systems: three.js graphics, cannon.js physics, and tone.js audio. It also connects all event listeners so clicks, touches, and keyboard presses trigger the right handlers. The keys object is the heart of continuous input—by storing keydown/keyup state, we can check any key's status during draw() without waiting for events.

function setup() {
  p5Canvas = createCanvas(windowWidth, windowHeight);
  p5Canvas.style('display', 'none'); // hide p5 canvas

  voxelCountSpan = select('#voxel-count');
  survivorStatusSpan = select('#survivor-status');
  if (survivorStatusSpan) survivorStatusSpan.html('Alive');
  weaponSelector = select('#weapon-selector');
  weaponSelector.changed(onWeaponChange);

  // Custom keyboard listeners
  window.addEventListener('keydown', (e) => {
    keys[e.code] = true;
    // prevent page scroll on space / arrows / WASD
    if (['Space', 'ArrowUp', 'ArrowDown', 'ArrowLeft', 'ArrowRight',
         'KeyW', 'KeyA', 'KeyS', 'KeyD'].includes(e.code)) {
      e.preventDefault();
    }
  });
  window.addEventListener('keyup', (e) => {
    keys[e.code] = false;
  });

  initializeAudio();
  initializeThreeJS();
  initializeCannonJS();
  generateVoxelWorld();
  createSurvivorPlayer();

  // Mouse / touch events on the three.js canvas
  renderer.domElement.addEventListener('mousedown', onMouseDown, false);
  renderer.domElement.addEventListener('mouseup', onMouseUp, false);
  renderer.domElement.addEventListener('mousemove', onMouseMove, false);
  renderer.domElement.addEventListener('touchstart', onTouchStart, false);
  renderer.domElement.addEventListener('touchend', onTouchEnd, false);
  renderer.domElement.addEventListener('touchmove', onTouchMove, false);
}
Line-by-line explanation (8 lines)

🔧 Subcomponents:

event-listener Keyboard input tracking window.addEventListener('keydown', (e) => { keys[e.code] = true; ... });

Records which keys are currently pressed so applyPlayerInput() can check them every frame

event-listener Mouse and touch event binding renderer.domElement.addEventListener('mousedown', onMouseDown, false);

Connects click/tap events to weapon firing and interaction handlers

p5Canvas = createCanvas(windowWidth, windowHeight);
Creates the p5.js canvas at full window size, even though we hide it—p5 still runs in the background
p5Canvas.style('display', 'none'); // hide p5 canvas
Hides the p5 canvas because three.js renderer draws on top of it via renderer.domElement
voxelCountSpan = select('#voxel-count');
Grabs the HTML element that displays how many voxels remain in the game
weaponSelector.changed(onWeaponChange);
Tells the select dropdown to call onWeaponChange() whenever the player switches weapons
keys[e.code] = true;
When a key is pressed, stores its code (like 'KeyW') in the keys object to track active keys
e.preventDefault();
Stops the browser from scrolling when you press Space or arrow keys, so you can use them for movement
initializeAudio(); initializeThreeJS(); initializeCannonJS(); generateVoxelWorld(); createSurvivorPlayer();
Calls helper functions that set up the audio system, 3D scene, physics engine, voxel grid, and survivor character in sequence
renderer.domElement.addEventListener('mousedown', onMouseDown, false);
Binds the three.js canvas to listen for mouse and touch events so clicks trigger weapon firing
draw()

draw() is the core animation loop—it runs 60 times per second. The critical pattern here is: step physics, then sync meshes. By running world.step() every frame and immediately copying physics positions to three.js meshes, we create the illusion that the visual world IS the physics world. If you skip the sync loops, meshes would stay in their original positions while physics bodies moved invisibly underneath. The key insight is that three.js and cannon.js are completely separate—we have to manually keep them in sync.

🔬 This loop syncs every voxel mesh to its physics body every frame. What happens if you comment out the quaternion.copy line so rotation doesn't sync? Destroyed voxels will fall but won't spin—watch how much less dynamic it looks.

  // Sync voxels
  for (let voxel of voxels) {
    if (voxel.mesh && voxel.body) {
      voxel.mesh.position.copy(voxel.body.position);
      voxel.mesh.quaternion.copy(voxel.body.quaternion);
    }
  }

🔬 world.step() advances physics by 1/60 second each frame. What if you pass world.step(timeStep * 2) to run physics at double speed? All physics motion will play twice as fast—gravity pulls harder, collisions happen sooner.

  if (world) {
    world.step(timeStep);
  }
function draw() {
  background(20);
  controls.update();

  // Always allow movement & physics, regardless of audio state
  applyPlayerInput();
  if (world) {
    world.step(timeStep);
  }

  // Sync voxels
  for (let voxel of voxels) {
    if (voxel.mesh && voxel.body) {
      voxel.mesh.position.copy(voxel.body.position);
      voxel.mesh.quaternion.copy(voxel.body.quaternion);
    }
  }

  // Sync projectiles
  for (let projectile of activeProjectiles) {
    if (projectile.mesh && projectile.body) {
      projectile.mesh.position.copy(projectile.body.position);
      projectile.mesh.quaternion.copy(projectile.body.quaternion);
    }
  }

  // Sync mines
  for (let mine of activeMines) {
    if (mine.mesh && mine.body) {
      mine.mesh.position.copy(mine.body.position);
      mine.mesh.quaternion.copy(mine.body.quaternion);
    }
  }

  // Sync survivor
  if (player && player.mesh && player.body) {
    player.mesh.position.copy(player.body.position);
    player.mesh.quaternion.copy(player.body.quaternion);
  }

  renderer.render(scene, camera);
}
Line-by-line explanation (7 lines)

🔧 Subcomponents:

for-loop Voxel mesh-body synchronization for (let voxel of voxels) { if (voxel.mesh && voxel.body) { voxel.mesh.position.copy(voxel.body.position); voxel.mesh.quaternion.copy(voxel.body.quaternion); } }

Copies each voxel's physics position and rotation to its visual mesh so they stay visually synchronized

for-loop Projectile synchronization for (let projectile of activeProjectiles) { if (projectile.mesh && projectile.body) { projectile.mesh.position.copy(projectile.body.position); projectile.mesh.quaternion.copy(projectile.body.quaternion); } }

Keeps fired projectiles visually matched to their physics trajectories

calculation Physics simulation step world.step(timeStep);

Advances the cannon.js physics engine by one frame timestep, calculating gravity, collisions, and forces

background(20);
Clears the p5 canvas with dark gray (even though we hidden it, p5 still runs in the background)
controls.update();
Updates three.js OrbitControls so mouse dragging rotates the camera around the scene
applyPlayerInput();
Checks the keys object to see which WASD/Space keys are pressed and applies movement forces to the survivor
world.step(timeStep);
Advances cannon.js physics simulation by 1/60th of a second, updating all rigid body positions due to gravity and forces
voxel.mesh.position.copy(voxel.body.position);
Copies the physics body's position into the three.js mesh so the visual block appears where the physics says it should be
voxel.mesh.quaternion.copy(voxel.body.quaternion);
Copies the physics body's rotation (as a quaternion) into the mesh so destroyed voxels tumble and spin realistically
renderer.render(scene, camera);
Tells three.js to draw the entire scene to the screen from the camera's viewpoint

initializeAudio()

Tone.js is a Web Audio library that lets you synthesize sounds procedurally instead of playing audio files. Each synth object represents an instrument, and triggerAttackRelease(note, duration) plays a sound. The envelope (ADSR) controls how quickly a sound appears, evolves, and fades. Pink/white/brown noise are different random signal types—pink is balanced, white is bright, brown is deep. The gameStarted flag ensures sounds only play after the audio context starts (which requires user interaction on modern browsers).

function initializeAudio() {
  destructionSynth = new Tone.NoiseSynth({
    noise: { type: 'pink' },
    envelope: { attack: 0.001, decay: 0.2, sustain: 0, release: 0.2 }
  }).toDestination();

  projectileLaunchSynth = new Tone.MembraneSynth({
    pitchDecay: 0.05,
    octaves: 8,
    oscillator: { type: 'sine' },
    envelope: {
      attack: 0.001,
      decay: 0.4,
      sustain: 0.01,
      release: 1.4,
      attackCurve: 'exponential'
    }
  }).toDestination();

  projectileImpactSynth = new Tone.NoiseSynth({
    noise: { type: 'white' },
    envelope: { attack: 0.001, decay: 0.3, sustain: 0, release: 0.3 }
  }).toDestination();

  laserSynth = new Tone.Synth({
    oscillator: { type: 'sawtooth' },
    envelope: { attack: 0.001, decay: 0.1, sustain: 0, release: 0.1 }
  }).toDestination();

  mineExplosionSynth = new Tone.NoiseSynth({
    noise: { type: 'brown' },
    envelope: { attack: 0.01, decay: 0.8, sustain: 0, release: 0.8 }
  }).toDestination();

  // Start audio context on first user interaction
  document.documentElement.addEventListener('mousedown', () => {
    if (Tone.context.state !== 'running') {
      Tone.start();
      gameStarted = true;
    }
  }, { once: true });

  document.documentElement.addEventListener('touchstart', () => {
    if (Tone.context.state !== 'running') {
      Tone.start();
      gameStarted = true;
    }
  }, { once: true });
}
Line-by-line explanation (5 lines)

🔧 Subcomponents:

calculation Destructive click sound destructionSynth = new Tone.NoiseSynth({ noise: { type: 'pink' }, envelope: { attack: 0.001, decay: 0.2, sustain: 0, release: 0.2 } }).toDestination();

Creates a pink-noise synth that plays a quick destructive crackle sound when voxels are clicked

event-listener Audio context startup document.documentElement.addEventListener('mousedown', () => { if (Tone.context.state !== 'running') { Tone.start(); gameStarted = true; } }, { once: true });

Waits for the first user interaction to start the Tone.js audio context (required by browsers)

destructionSynth = new Tone.NoiseSynth({ ... }).toDestination();
Creates a noise synthesizer that plays a short pink-noise burst when voxels are destroyed; toDestination() sends it to speakers
projectileLaunchSynth = new Tone.MembraneSynth({ ... }).toDestination();
Creates a pitched synth (like a drum) that plays a bass note when you fire a projectile
envelope: { attack: 0.001, decay: 0.2, sustain: 0, release: 0.2 }
ADSR envelope controls how the sound evolves: attack 1ms (instant), decay to 0 over 200ms, no sustain, release 200ms
if (Tone.context.state !== 'running') { Tone.start(); gameStarted = true; }
Browsers require user interaction to start audio—this line starts Tone.js on the first click and sets gameStarted = true so sounds will play
{ once: true }
The event listener only fires once, then removes itself—perfect for startup events

initializeThreeJS()

initializeThreeJS() builds the 3D rendering foundation. The scene is a container; the camera is your viewpoint; the renderer draws the scene to a canvas. The raycaster is a powerful tool for 3D picking—it shoots an invisible ray from the camera through a 2D mouse position into 3D space to detect collisions. OrbitControls lets you rotate the camera around the scene center by dragging, perfect for exploration. Lighting is critical in 3D—without it, objects look flat. Ambient light illuminates everything evenly; directional light simulates a distant light source and creates realistic shadows and depth.

function initializeThreeJS() {
  scene = new THREE.Scene();
  scene.background = new THREE.Color(0x333333);

  camera = new THREE.PerspectiveCamera(
    75,
    window.innerWidth / window.innerHeight,
    0.1,
    1000
  );
  camera.position.set(
    gridSize * voxelSize * 1.5,
    gridSize * voxelSize * 1.5,
    gridSize * voxelSize * 1.5
  );
  camera.lookAt(0, 0, 0);

  renderer = new THREE.WebGLRenderer({ antialias: true });
  renderer.setSize(windowWidth, windowHeight);
  document.body.appendChild(renderer.domElement);

  raycaster = new THREE.Raycaster();

  controls = new THREE.OrbitControls(camera, renderer.domElement);
  controls.enableDamping = true;
  controls.dampingFactor = 0.05;
  controls.screenSpacePanning = false;
  controls.minDistance = voxelSize * 2;
  controls.maxDistance = gridSize * voxelSize * 5;

  const ambientLight = new THREE.AmbientLight(0xffffff, 0.6);
  scene.add(ambientLight);

  const directionalLight = new THREE.DirectionalLight(0xffffff, 0.8);
  directionalLight.position.set(10, 15, 10);
  scene.add(directionalLight);
}
Line-by-line explanation (8 lines)

🔧 Subcomponents:

calculation Scene and camera setup scene = new THREE.Scene(); scene.background = new THREE.Color(0x333333);

Creates the 3D scene container and sets its background to dark gray

calculation Camera initialization camera = new THREE.PerspectiveCamera(75, window.innerWidth / window.innerHeight, 0.1, 1000);

Creates a perspective camera with 75° field of view; the aspect ratio matches the window so nothing looks stretched

calculation WebGL renderer creation renderer = new THREE.WebGLRenderer({ antialias: true }); document.body.appendChild(renderer.domElement);

Creates a WebGL renderer and adds it to the HTML page—this is what draws everything to the screen

calculation Camera orbit controls controls = new THREE.OrbitControls(camera, renderer.domElement);

Attaches mouse drag controls to the camera so you can rotate around the scene center by dragging

calculation Ambient and directional lights const ambientLight = new THREE.AmbientLight(0xffffff, 0.6); const directionalLight = new THREE.DirectionalLight(0xffffff, 0.8);

Creates overall ambient lighting and a strong directional light to create shadows and define geometry

scene = new THREE.Scene();
Creates an empty 3D scene—the container for all meshes, lights, and the camera
camera.position.set(gridSize * voxelSize * 1.5, gridSize * voxelSize * 1.5, gridSize * voxelSize * 1.5);
Positions the camera diagonally away from the origin so you're looking at the voxel grid from a good angle
camera.lookAt(0, 0, 0);
Points the camera to look at the center of the scene (where the voxel grid is)
renderer = new THREE.WebGLRenderer({ antialias: true });
Creates a WebGL renderer; antialias: true smooths jagged edges on shapes
document.body.appendChild(renderer.domElement);
Adds the renderer's canvas to the HTML page so it's visible
raycaster = new THREE.Raycaster();
Creates a raycaster object that will shoot invisible rays from the camera to detect which object was clicked
controls.enableDamping = true; controls.dampingFactor = 0.05;
Adds smooth inertia to camera rotation—when you stop dragging, the camera keeps spinning then slows down
const directionalLight = new THREE.DirectionalLight(0xffffff, 0.8); directionalLight.position.set(10, 15, 10);
Creates a bright directional light (like the sun) positioned above and to the side so it casts shadows

initializeCannonJS()

cannon.js is a physics engine that simulates rigid body dynamics—gravity, forces, collisions, and friction. The world object manages all bodies and runs the simulation when you call world.step(). Broadphase optimization is crucial: with 1000 voxels, checking every pair for collisions would be slow. SAP sorts bodies along each axis and only checks nearby pairs. Sleep optimization is important too: voxels at rest don't need updating, so setting allowSleep = true keeps performance smooth.

🔬 This line sets gravity to -9.82 (downward). What happens if you change it to world.gravity.set(0, 0, 0) so there's no gravity? Destroyed voxels will float in place instead of falling—perfect for a space game!

  world.gravity.set(0, -9.82, 0);
function initializeCannonJS() {
  world = new CANNON.World();
  world.gravity.set(0, -9.82, 0);
  world.broadphase = new CANNON.SAPBroadphase(world);
  world.allowSleep = true;
}
Line-by-line explanation (4 lines)
world = new CANNON.World();
Creates the cannon.js physics world—the container that manages all rigid bodies, forces, and collisions
world.gravity.set(0, -9.82, 0);
Sets gravity to -9.82 m/s² on the Y-axis (downward), simulating Earth gravity
world.broadphase = new CANNON.SAPBroadphase(world);
Uses Sweep-And-Prune broadphase algorithm for efficient collision detection among many bodies
world.allowSleep = true;
Lets physics bodies fall asleep when stationary, saving CPU by not simulating them; they wake up when hit

generateVoxelWorld()

generateVoxelWorld() is the world builder. The triple-nested loop is the classic 3D grid pattern: for each x, y, z coordinate pair, create a voxel. By centering around origin and evenly spacing voxels, the grid looks balanced. Reusing boxGeometry is a key optimization—we create one Box3 and use it 1000 times with different materials and transforms. Each voxel pairs a three.js mesh (for rendering) with a cannon.js body (for physics), and both are stored in the voxels array for easy access later. The ground plane is invisible but essential—without it, destroyed voxels would fall forever.

🔬 These three nested loops create a 10×10×10 grid (gridSize = 10). What happens if you change gridSize to 5 in the constants at the top? You'll create a much smaller 5×5×5 grid with only 125 voxels instead of 1000—much faster but less to destroy!

  for (let x = 0; x < gridSize; x++) {
    for (let y = 0; y < gridSize; y++) {
      for (let z = 0; z < gridSize; z++) {
function generateVoxelWorld() {
  const halfGrid = gridSize / 2;
  const halfVoxel = voxelSize / 2;

  const boxGeometry = new THREE.BoxGeometry(voxelSize, voxelSize, voxelSize);

  for (let x = 0; x < gridSize; x++) {
    for (let y = 0; y < gridSize; y++) {
      for (let z = 0; z < gridSize; z++) {
        const posX = (x - halfGrid + 0.5) * voxelSize;
        const posY = (y - halfGrid + 0.5) * voxelSize;
        const posZ = (z - halfGrid + 0.5) * voxelSize;

        const color = new THREE.Color(Math.random(), Math.random(), Math.random());
        const material = new THREE.MeshStandardMaterial({
          color: color,
          roughness: 0.7,
          metalness: 0.3
        });
        const mesh = new THREE.Mesh(boxGeometry, material);
        mesh.position.set(posX, posY, posZ);
        scene.add(mesh);

        const boxShape = new CANNON.Box(new CANNON.Vec3(halfVoxel, halfVoxel, halfVoxel));
        const body = new CANNON.Body({ mass: 0, shape: boxShape });
        body.position.set(posX, posY, posZ);
        world.addBody(body);

        voxels.push({ mesh: mesh, body: body, id: `${x}-${y}-${z}` });
      }
    }
  }

  const groundShape = new CANNON.Plane();
  const groundBody = new CANNON.Body({ mass: 0, shape: groundShape });
  groundBody.quaternion.setFromAxisAngle(new CANNON.Vec3(1, 0, 0), -Math.PI / 2);
  groundBody.position.set(0, -halfGrid * voxelSize - halfVoxel, 0);
  world.addBody(groundBody);

  voxelCountSpan.html(voxels.length);
}
Line-by-line explanation (10 lines)

🔧 Subcomponents:

for-loop Triple-nested loop generating 10×10×10 grid for (let x = 0; x < gridSize; x++) { for (let y = 0; y < gridSize; y++) { for (let z = 0; z < gridSize; z++) { ... }

Iterates through all positions in a 3D grid to create a voxel at each (x, y, z) coordinate

calculation Three.js mesh creation const color = new THREE.Color(Math.random(), Math.random(), Math.random()); const material = new THREE.MeshStandardMaterial({ color: color, roughness: 0.7, metalness: 0.3 }); const mesh = new THREE.Mesh(boxGeometry, material);

Creates a random-colored box mesh with physically-based materials (roughness and metalness affect how light reflects)

calculation Cannon.js physics body const boxShape = new CANNON.Box(new CANNON.Vec3(halfVoxel, halfVoxel, halfVoxel)); const body = new CANNON.Body({ mass: 0, shape: boxShape });

Creates a static physics body (mass: 0) that collides but doesn't fall—voxels become dynamic when hit

calculation Ground plane const groundShape = new CANNON.Plane(); const groundBody = new CANNON.Body({ mass: 0, shape: groundShape });

Creates an invisible plane below the voxel grid so destroyed voxels and the survivor don't fall infinitely

const halfGrid = gridSize / 2;
Calculates half the grid size so we can center the grid around (0, 0, 0) instead of starting at a corner
const boxGeometry = new THREE.BoxGeometry(voxelSize, voxelSize, voxelSize);
Creates ONE box shape that will be reused for all voxels—this is a performance optimization (geometry instancing)
const posX = (x - halfGrid + 0.5) * voxelSize;
Converts grid index x into world position by centering around origin: (0-5+0.5)*2 = -9 for x=0, (9-5+0.5)*2 = 9 for x=9
const color = new THREE.Color(Math.random(), Math.random(), Math.random());
Generates a random RGB color for each voxel—Math.random() produces 0 to 1 for each channel
const material = new THREE.MeshStandardMaterial({ color: color, roughness: 0.7, metalness: 0.3 });
Creates a physically-realistic material: roughness 0.7 makes it less shiny, metalness 0.3 makes it slightly reflective
scene.add(mesh);
Adds the mesh to the three.js scene so it will be rendered
const body = new CANNON.Body({ mass: 0, shape: boxShape });
Creates a static physics body with mass 0—it won't move or fall, perfect for a solid initial structure
world.addBody(body);
Adds the body to the cannon.js physics world so it participates in collision detection
voxels.push({ mesh: mesh, body: body, id: `${x}-${y}-${z}` });
Stores the voxel as an object linking its mesh, physics body, and unique ID in the voxels array
groundBody.quaternion.setFromAxisAngle(new CANNON.Vec3(1, 0, 0), -Math.PI / 2);
Rotates the ground plane 90° so it's horizontal (normally planes face up; this makes it face down then up)

createSurvivorPlayer()

createSurvivorPlayer() spawns the tiny character that the player is trying to protect. It's a sphere with a small radius (1.5 voxels), green color, and dynamic physics (mass 2 so it's affected by gravity and forces). High damping values make it move sluggishly so it doesn't overshoot when you push it. The survivor spawns above the grid so it falls onto the voxels from above. The player object stores both mesh and body so applyPlayerInput() can apply forces and killPlayer() can change its color or stop it from moving.

function createSurvivorPlayer() {
  const halfGrid = gridSize / 2;
  const startPos = new CANNON.Vec3(
    0,
    0,
    halfGrid * voxelSize + playerRadius + 0.5
  );

  const playerGeometry = new THREE.SphereGeometry(playerRadius, 16, 16);
  const playerMaterial = new THREE.MeshStandardMaterial({
    color: 0x00ff00,
    roughness: 0.4,
    metalness: 0.1
  });
  const playerMesh = new THREE.Mesh(playerGeometry, playerMaterial);
  playerMesh.position.copy(startPos);
  scene.add(playerMesh);

  const playerShape = new CANNON.Sphere(playerRadius);
  const playerBody = new CANNON.Body({ mass: 2, shape: playerShape });
  playerBody.position.copy(startPos);
  playerBody.linearDamping = 0.8;
  playerBody.angularDamping = 0.9;
  world.addBody(playerBody);

  player = { mesh: playerMesh, body: playerBody, alive: true };
}
Line-by-line explanation (7 lines)
const startPos = new CANNON.Vec3(0, 0, halfGrid * voxelSize + playerRadius + 0.5);
Places the survivor above the voxel grid so it spawns on top rather than inside blocks
const playerGeometry = new THREE.SphereGeometry(playerRadius, 16, 16);
Creates a sphere mesh with 16×16 resolution (higher = smoother but slower); playerRadius controls its diameter
color: 0x00ff00,
Sets the survivor color to bright green (0xFF in green channel, 0x00 in red and blue)
const playerBody = new CANNON.Body({ mass: 2, shape: playerShape });
Creates a dynamic body with mass 2 so gravity pulls it down and forces affect it; light mass makes it move easily
playerBody.linearDamping = 0.8;
Damping removes 80% of linear velocity each second, making the survivor slow down and not slide infinitely
playerBody.angularDamping = 0.9;
Removes 90% of rotational velocity, so the survivor stops spinning quickly after being hit
player = { mesh: playerMesh, body: playerBody, alive: true };
Stores the survivor as a global object so other functions can check if it's alive and apply forces to it

applyPlayerInput()

applyPlayerInput() polls the keys object every frame to check which keys are currently held down. This is better than relying on discrete key events because it allows simultaneous multi-key input (press W+A+Space at once to move diagonally and jump). The force accumulation pattern is powerful: instead of setting velocity directly, we apply forces, which interact naturally with gravity and collisions. applyForce() is called every frame for held keys, creating continuous acceleration.

function applyPlayerInput() {
  if (!player || !player.body || !player.alive) return;

  const moveForce = 120;
  const force = new CANNON.Vec3(0, 0, 0);

  // W/S: move in Z
  if (keys['KeyW']) force.z -= moveForce;
  if (keys['KeyS']) force.z += moveForce;

  // A/D: move in X
  if (keys['KeyA']) force.x -= moveForce;
  if (keys['KeyD']) force.x += moveForce;

  // Space: thrust upward
  if (keys['Space']) force.y += moveForce;

  if (force.x !== 0 || force.y !== 0 || force.z !== 0) {
    player.body.applyForce(force, player.body.position);
  }
}
Line-by-line explanation (6 lines)

🔧 Subcomponents:

conditional WASD and Space key checks if (keys['KeyW']) force.z -= moveForce; if (keys['KeyS']) force.z += moveForce; if (keys['KeyA']) force.x -= moveForce; if (keys['KeyD']) force.x += moveForce; if (keys['Space']) force.y += moveForce;

Reads the keys object (updated by keydown/keyup listeners) and accumulates movement forces

conditional Apply accumulated force if nonzero if (force.x !== 0 || force.y !== 0 || force.z !== 0) { player.body.applyForce(force, player.body.position); }

Only applies force if there's actual movement input, saving physics calculations for idle frames

if (!player || !player.body || !player.alive) return;
Early exit: if the survivor is dead or doesn't exist, do nothing—prevents movement after death
const moveForce = 120;
The magnitude of force applied per key press; higher values = faster movement, lower = slower
const force = new CANNON.Vec3(0, 0, 0);
Creates a vector to accumulate movement forces—starts at zero, then each key press adds to it
if (keys['KeyW']) force.z -= moveForce;
If W is pressed, subtract from Z (move backward in 3D convention where -Z is forward)
if (keys['Space']) force.y += moveForce;
If Space is pressed, add to Y (upward force so survivor can jump)
player.body.applyForce(force, player.body.position);
Applies the accumulated force at the survivor's center of mass, causing acceleration in the physics simulation

makeVoxelDynamicAndScheduleRemoval()

makeVoxelDynamicAndScheduleRemoval() is the destroy function called by every weapon. The key insight: voxels start static (mass 0) so they're part of the structure. When hit, they become dynamic (mass 1) and fall due to gravity. The impulse applies an instant outward velocity so they fly away from the explosion. Three.js mesh removal is instant (visual), but physics body removal is delayed 1.5 seconds so destroyed voxels keep bouncing realistically before disappearing. Disposing geometry and material prevents GPU memory leaks—this is critical in games that destroy many objects. The filter() operation keeps the voxels array synchronized with what's actually in the world.

🔬 This setTimeout removes the physics body 1500ms (1.5 seconds) after destruction. What if you change 1500 to 5000 so voxels keep falling for 5 seconds? Destroyed blocks will bounce and tumble longer before the physics stops simulating them.

  setTimeout(() => {
    if (voxel.body) {
      world.removeBody(voxel.body);
      voxel.body = null;
    }
  }, 1500);
function makeVoxelDynamicAndScheduleRemoval(voxel, explosionForceScale = 0, impulseDirection = null) {
  if (!voxel || !voxel.mesh || !voxel.body) return;

  voxel.body.mass = 1;
  voxel.body.updateMassProperties();
  voxel.body.allowSleep = false;

  if (explosionForceScale > 0 && impulseDirection) {
    voxel.body.applyImpulse(
      impulseDirection.scale(explosionForce * explosionForceScale),
      voxel.body.position
    );
  }

  scene.remove(voxel.mesh);
  voxel.mesh.geometry.dispose();
  voxel.mesh.material.dispose();
  voxel.mesh = null;

  voxels = voxels.filter(v => v !== voxel);

  setTimeout(() => {
    if (voxel.body) {
      world.removeBody(voxel.body);
      voxel.body = null;
    }
  }, 1500);

  voxelCountSpan.html(voxels.length);

  if (voxels.length === 0) {
    alert('Congratulations! You destroyed all voxels!');
  }
}
Line-by-line explanation (10 lines)

🔧 Subcomponents:

calculation Convert voxel to dynamic physics voxel.body.mass = 1; voxel.body.updateMassProperties(); voxel.body.allowSleep = false;

Changes the voxel from static (mass 0) to dynamic (mass 1) so gravity and forces affect it, and disables sleeping so it animates immediately

conditional Blast voxel away from explosion center if (explosionForceScale > 0 && impulseDirection) { voxel.body.applyImpulse( impulseDirection.scale(explosionForce * explosionForceScale), voxel.body.position ); }

Applies a one-time impulse (instant velocity change) to make the voxel fly outward from the explosion

calculation Remove visual representation scene.remove(voxel.mesh); voxel.mesh.geometry.dispose(); voxel.mesh.material.dispose(); voxel.mesh = null;

Removes the three.js mesh from the scene and releases its GPU memory

calculation Remove physics body after delay setTimeout(() => { world.removeBody(voxel.body); voxel.body = null; }, 1500);

Waits 1.5 seconds before removing the physics body so it continues to fall and collide with other objects, then stops being simulated

if (!voxel || !voxel.mesh || !voxel.body) return;
Safety check: if the voxel is already destroyed or null, exit early
voxel.body.mass = 1;
Changes mass from 0 (static/immovable) to 1 (dynamic/affected by gravity and forces)
voxel.body.updateMassProperties();
Tells cannon.js to recalculate the body's inertia tensor and other properties based on the new mass
voxel.body.allowSleep = false;
Prevents this body from sleeping so it immediately responds to forces and gravity instead of waiting
voxel.body.applyImpulse(impulseDirection.scale(explosionForce * explosionForceScale), voxel.body.position);
Applies an instant velocity change (impulse) in the direction away from the explosion, scaled by explosionForceScale
scene.remove(voxel.mesh);
Removes the mesh from the three.js scene so it's no longer rendered
voxel.mesh.geometry.dispose(); voxel.mesh.material.dispose();
Releases GPU memory allocated for the mesh's geometry and material—important for preventing memory leaks
voxels = voxels.filter(v => v !== voxel);
Removes the voxel from the voxels array using filter, so it's no longer looped over in draw()
setTimeout(() => { world.removeBody(voxel.body); }, 1500);
Schedules the physics body removal 1.5 seconds later so the voxel continues to fall/collide briefly before stopping
if (voxels.length === 0) { alert('Congratulations! You destroyed all voxels!'); }
Checks if the grid is empty—if so, congratulates the player with an alert

destroyVoxelsInRadius()

destroyVoxelsInRadius() is the bomb/mine explosion handler. It's more complex than single-voxel destruction because it must find all nearby voxels, calculate outward directions, and apply forces relative to each voxel's position (closer voxels get stronger pushes because they're already near the explosion). The upward bias makes explosions feel cinematic—voxels fly up and out, not just sideways. The survivor has two damage zones: instant death in the core, knockback in the outer ring. The filter() and for-loop pattern is efficient: first find the small subset of voxels to process, then iterate only those instead of checking all 1000 voxels.

🔬 The survivor dies if it's in the inner 70% of blast radius, and gets knocked back if it's in the outer zone. What happens if you change radius * 0.7 to radius * 0.5 so the survivor has to be CLOSER to the explosion to die? Now bombs are less lethal and the survivor can survive closer to explosions.

    if (dist < radius * 0.7) {
      killPlayer('explosion');
    } else if (dist < radius * 1.2) {
      const dir = new CANNON.Vec3();
      player.body.position.vsub(centerVec, dir);
      dir.normalize();
      dir.y += explosionUpwardBias;
      dir.normalize();
      player.body.applyImpulse(
        dir.scale(explosionForce * forceScale * 0.5),
        player.body.position
      );
    }
function destroyVoxelsInRadius(center, radius, forceScale = 1) {
  if (gameStarted) {
    mineExplosionSynth.triggerAttackRelease('D3', '0.8s');
  }

  const voxelsToProcess = voxels.filter(voxel => {
    if (voxel.mesh && voxel.body) {
      const distance = voxel.body.position.distanceTo(
        new CANNON.Vec3(center.x, center.y, center.z)
      );
      return distance < radius;
    }
    return false;
  });

  for (let voxel of voxelsToProcess) {
    const direction = new CANNON.Vec3();
    voxel.body.position.vsub(new CANNON.Vec3(center.x, center.y, center.z), direction);
    direction.normalize();
    direction.y += explosionUpwardBias;
    direction.normalize();

    makeVoxelDynamicAndScheduleRemoval(voxel, forceScale, direction);
    createExplosionEffect(voxel.body.position, forceScale);
  }

  // Affect survivor
  if (player && player.alive && player.body) {
    const centerVec = new CANNON.Vec3(center.x, center.y, center.z);
    const dist = player.body.position.distanceTo(centerVec);
    if (dist < radius * 0.7) {
      killPlayer('explosion');
    } else if (dist < radius * 1.2) {
      const dir = new CANNON.Vec3();
      player.body.position.vsub(centerVec, dir);
      dir.normalize();
      dir.y += explosionUpwardBias;
      dir.normalize();
      player.body.applyImpulse(
        dir.scale(explosionForce * forceScale * 0.5),
        player.body.position
      );
    }
  }
}
Line-by-line explanation (8 lines)

🔧 Subcomponents:

calculation Play explosion audio if (gameStarted) { mineExplosionSynth.triggerAttackRelease('D3', '0.8s'); }

Triggers a deep explosion sound effect at D3 note lasting 0.8 seconds

filter-loop Find voxels within blast radius const voxelsToProcess = voxels.filter(voxel => { const distance = voxel.body.position.distanceTo(new CANNON.Vec3(center.x, center.y, center.z)); return distance < radius; });

Uses filter to create a list of only the voxels close enough to be destroyed

for-loop Destroy and launch voxels for (let voxel of voxelsToProcess) { ... makeVoxelDynamicAndScheduleRemoval(voxel, forceScale, direction); ... }

Iterates through nearby voxels and destroys each with an outward impulse

conditional Check survivor in blast radius if (dist < radius * 0.7) { killPlayer('explosion'); } else if (dist < radius * 1.2) { ... applyImpulse ... }

If survivor is in inner radius (0.7×), kill them; if in outer radius (1.2×), knock them back

if (gameStarted) { mineExplosionSynth.triggerAttackRelease('D3', '0.8s'); }
Plays a deep explosion sound (D3 note on a brown-noise synth) for 0.8 seconds only if audio has started
const distance = voxel.body.position.distanceTo(new CANNON.Vec3(center.x, center.y, center.z));
Calculates the 3D distance from this voxel to the explosion center
return distance < radius;
Keeps only voxels within the blast radius in the filtered list
voxel.body.position.vsub(new CANNON.Vec3(center.x, center.y, center.z), direction);
Vector subtraction: direction = voxelPosition - explosionCenter, pointing outward from the blast
direction.normalize();
Scales the direction to length 1, making it a unit vector for consistent force magnitude
direction.y += explosionUpwardBias;
Tilts the direction vector upward by 0.5 so voxels fly up and outward, not just sideways
if (dist < radius * 0.7) { killPlayer('explosion'); }
If survivor is in the inner 70% of blast radius, it dies instantly from the explosion
else if (dist < radius * 1.2) { ... applyImpulse ... }
If survivor is in outer zone (70–120% of radius), it survives but gets knocked away with reduced force (0.5×)

fireLaserBeam()

fireLaserBeam() fires a laser that instantly hits everything in its path. Unlike projectiles which travel over time, lasers are hitscan—they appear instantly and destroy all objects they pass through in one frame. The raycaster already provided intersections from the click handler, so we just iterate through them and destroy each voxel. The laser line is a temporary visual (removed next frame) created by createLaserEffect(). This weapon is perfect for precision destruction because you see exactly where the beam goes and what it will hit before you fire (the laser always follows your crosshair).

🔬 This sets the max laser range to 4× grid size. What happens if you change it to gridSize * voxelSize * 2 so lasers are shorter range? You'd have to aim more carefully at distant voxels.

  const maxLaserDistance = gridSize * voxelSize * 4;
function fireLaserBeam(ray, intersectedVoxels) {
  if (gameStarted) {
    laserSynth.triggerAttackRelease('E5', '0.1s');
  }

  // Remove previous laser
  if (activeLaserBeamMesh) {
    scene.remove(activeLaserBeamMesh);
    activeLaserBeamMesh.geometry.dispose();
    activeLaserBeamMesh.material.dispose();
    activeLaserBeamMesh = null;
  }

  const startPoint = ray.origin.clone();
  const maxLaserDistance = gridSize * voxelSize * 4;
  let endPoint;

  if (intersectedVoxels.length > 0) {
    endPoint = intersectedVoxels[0].point.clone();
  } else {
    endPoint = startPoint.clone().add(
      ray.direction.clone().multiplyScalar(maxLaserDistance)
    );
  }

  const laserBeam = createLaserEffect(startPoint, endPoint);
  scene.add(laserBeam);
  activeLaserBeamMesh = laserBeam;

  // Destroy hit voxels / survivor
  for (let intersect of intersectedVoxels) {
    const hitMesh = intersect.object;

    // Hit survivor?
    if (player && player.alive && hitMesh === player.mesh) {
      killPlayer('laser');
      continue;
    }

    const hitVoxel = voxels.find(v => v.mesh === hitMesh);
    if (hitVoxel) {
      const direction = new CANNON.Vec3();
      direction.set(
        hitVoxel.body.position.x - camera.position.x,
        hitVoxel.body.position.y - camera.position.y,
        hitVoxel.body.position.z - camera.position.z
      );
      direction.normalize();
      direction.y += explosionUpwardBias * 0.5;
      direction.normalize();
      makeVoxelDynamicAndScheduleRemoval(hitVoxel, 0.75, direction);
      createExplosionEffect(hitVoxel.body.position, 0.75);
    }
  }
}
Line-by-line explanation (9 lines)

🔧 Subcomponents:

calculation Play laser sound if (gameStarted) { laserSynth.triggerAttackRelease('E5', '0.1s'); }

Triggers a high-pitched laser sound (E5 sawtooth synth) for 0.1 seconds

conditional Clean up old laser mesh if (activeLaserBeamMesh) { scene.remove(activeLaserBeamMesh); ... activeLaserBeamMesh = null; }

Removes the previous frame's laser line before drawing a new one

conditional Determine laser beam end if (intersectedVoxels.length > 0) { endPoint = intersectedVoxels[0].point.clone(); } else { endPoint = startPoint.clone().add(...); }

If laser hit something, end at that point; otherwise extend it to max distance

for-loop Destroy each voxel in laser path for (let intersect of intersectedVoxels) { ... makeVoxelDynamicAndScheduleRemoval(hitVoxel, 0.75, direction); ... }

Iterates through all intersected objects along the laser path and destroys them

const startPoint = ray.origin.clone();
Gets the ray's origin (camera position) as the laser start point
const maxLaserDistance = gridSize * voxelSize * 4;
Calculates max laser range: 4× the grid diagonal, so lasers don't shoot infinitely far
if (intersectedVoxels.length > 0) { endPoint = intersectedVoxels[0].point.clone(); }
If the laser hit something, end the beam at the first intersection point
endPoint = startPoint.clone().add(ray.direction.clone().multiplyScalar(maxLaserDistance));
If nothing was hit, extend the laser line in the ray direction to maxLaserDistance
const laserBeam = createLaserEffect(startPoint, endPoint);
Calls a helper function that creates the visual cyan laser line between start and end points
activeLaserBeamMesh = laserBeam;
Stores the current laser mesh so it can be removed next frame (laser is temporary, not persistent)
for (let intersect of intersectedVoxels) {
Loops through every object the laser intersected on its way through the scene
if (player && player.alive && hitMesh === player.mesh) { killPlayer('laser'); continue; }
If the laser hit the survivor, kill them and skip to the next intersection
direction.y += explosionUpwardBias * 0.5;
Adds half the normal upward bias so laser-destroyed voxels fly up less dramatically than bomb explosions

fireProjectile()

fireProjectile() creates a physical cannonball that travels through the scene with realistic gravity, collision, and momentum. Unlike the laser which hits instantly, projectiles have trajectory arcs because gravity continuously pulls them down. The collision listener is key: it detects impacts on voxels (destroy them), the survivor (kill them), or ground (delete the projectile). The three cleanup mechanisms (collision, 500ms delay on ground hit, 5s timeout) ensure projectiles don't linger forever. The mass property is crucial: higher mass means the projectile is heavier and harder to stop, lower mass makes it lighter and more affected by gravity.

🔬 Projectiles have mass 5, giving them weight and inertia. What happens if you change the mass to 0.5 (very light)? Projectiles will accelerate faster due to gravity and feel like feathers—they'll drop and curve much more dramatically.

  const projectileBody = new CANNON.Body({ mass: 5, shape: projectileShape });
  projectileBody.position.copy(projectileMesh.position);

  const projectileSpeed = 50;
  projectileBody.velocity.copy(direction.clone().multiplyScalar(projectileSpeed));
function fireProjectile(direction) {
  if (gameStarted) {
    projectileLaunchSynth.triggerAttackRelease('C3', '0.1s');
  }

  const projectileGeometry = new THREE.SphereGeometry(voxelSize / 2, 8, 8);
  const projectileMaterial = new THREE.MeshStandardMaterial({
    color: 0x888888,
    roughness: 0.5,
    metalness: 0.5
  });
  const projectileMesh = new THREE.Mesh(projectileGeometry, projectileMaterial);
  projectileMesh.position.copy(camera.position).add(direction.clone().multiplyScalar(voxelSize));
  scene.add(projectileMesh);

  const projectileShape = new CANNON.Sphere(voxelSize / 2);
  const projectileBody = new CANNON.Body({ mass: 5, shape: projectileShape });
  projectileBody.position.copy(projectileMesh.position);

  const projectileSpeed = 50;
  projectileBody.velocity.copy(direction.clone().multiplyScalar(projectileSpeed));
  world.addBody(projectileBody);

  const projectile = { mesh: projectileMesh, body: projectileBody };
  activeProjectiles.push(projectile);

  projectileBody.addEventListener("collide", (event) => {
    const collidingBody = event.body;

    // Hit survivor?
    if (player && player.alive && collidingBody === player.body) {
      killPlayer('projectile');
      scene.remove(projectile.mesh);
      projectile.mesh.geometry.dispose();
      projectile.mesh.material.dispose();
      world.removeBody(projectile.body);
      activeProjectiles = activeProjectiles.filter(p => p !== projectile);
      return;
    }

    // Hit voxel?
    const hitVoxel = voxels.find(v => v.body === collidingBody);

    if (hitVoxel) {
      if (gameStarted) {
        projectileImpactSynth.triggerAttackRelease('D2', '0.2s');
      }

      const impactDirection = new CANNON.Vec3();
      projectileBody.velocity.normalize(impactDirection);

      makeVoxelDynamicAndScheduleRemoval(hitVoxel, 0.5, impactDirection);
      createExplosionEffect(projectileBody.position, 0.5);

      scene.remove(projectile.mesh);
      projectile.mesh.geometry.dispose();
      projectile.mesh.material.dispose();
      world.removeBody(projectile.body);
      activeProjectiles = activeProjectiles.filter(p => p !== projectile);
    } else {
      // Hit ground or something else
      setTimeout(() => {
        if (projectile.mesh && projectile.body) {
          scene.remove(projectile.mesh);
          projectile.mesh.geometry.dispose();
          projectile.mesh.material.dispose();
          world.removeBody(projectile.body);
          activeProjectiles = activeProjectiles.filter(p => p !== projectile);
        }
      }, 500);
    }
  });

  setTimeout(() => {
    if (projectile.mesh && projectile.body) {
      scene.remove(projectile.mesh);
      projectile.mesh.geometry.dispose();
      projectile.mesh.material.dispose();
      world.removeBody(projectile.body);
      activeProjectiles = activeProjectiles.filter(p => p !== projectile);
    }
  }, 5000);
}
Line-by-line explanation (9 lines)

🔧 Subcomponents:

calculation Create projectile mesh and body const projectileMesh = new THREE.Mesh(projectileGeometry, projectileMaterial); projectileBody = new CANNON.Body({ mass: 5, shape: projectileShape });

Creates the visual projectile (gray sphere) and physics body with mass 5 so gravity affects its trajectory

calculation Set initial velocity const projectileSpeed = 50; projectileBody.velocity.copy(direction.clone().multiplyScalar(projectileSpeed));

Launches the projectile in the camera direction at 50 units/second speed

event-listener Projectile collision handler projectileBody.addEventListener("collide", (event) => { ... });

Listens for collisions: if projectile hits voxel, destroy it; if hits survivor, kill them; if hits ground, delete projectile

calculation Auto-delete projectile after 5 seconds setTimeout(() => { if (projectile.mesh && projectile.body) { ... } }, 5000);

Removes projectiles that fly off into space to prevent infinite memory buildup

if (gameStarted) { projectileLaunchSynth.triggerAttackRelease('C3', '0.1s'); }
Plays a bass launch sound (C3 membrane synth) when the projectile fires
const projectileGeometry = new THREE.SphereGeometry(voxelSize / 2, 8, 8);
Creates a sphere shape with 8×8 segments—half the size of a voxel so it looks like a cannonball
projectileMesh.position.copy(camera.position).add(direction.clone().multiplyScalar(voxelSize));
Spawns the projectile at camera position plus one voxel ahead in the firing direction (so it doesn't spawn inside the camera)
const projectileBody = new CANNON.Body({ mass: 5, shape: projectileShape });
Creates a physics body with mass 5 so gravity pulls it down during flight, creating a parabolic arc
projectileBody.velocity.copy(direction.clone().multiplyScalar(projectileSpeed));
Sets initial velocity to 50 units/second in the firing direction
projectileBody.addEventListener("collide", (event) => { ... });
Registers a collision listener so the projectile reacts when it hits something
const impactDirection = new CANNON.Vec3(); projectileBody.velocity.normalize(impactDirection);
Uses the projectile's current velocity direction as the impact direction—hit voxels fly the direction the projectile was traveling
activeProjectiles = activeProjectiles.filter(p => p !== projectile);
Removes the projectile from the array by filtering it out so it's no longer synced in draw()
setTimeout(() => { ... }, 5000);
After 5 seconds, forcefully removes the projectile even if it hasn't hit anything—prevents memory leaks from projectiles flying forever

dropExplosiveMine()

dropExplosiveMine() places a time-delayed explosive that detonates automatically after 2 seconds. The mine falls and rolls due to its heavy mass (10), so it's not an instant-effect weapon like bombs—you have to aim where it will land and wait for the timer. The red color makes mines clearly visible so you know where they are and when they're about to blow. The combination of falling physics, 2-second delay, and large explosion radius makes mines a strategic weapon: place them to cover an area, then retreat before they explode. The activeMines array tracks all active mines so their positions sync every frame.

🔬 The mine explodes 2 seconds after placement with a blast radius of bombRadius × 0.8. What happens if you change it to bombRadius × 2.0 for a much larger explosion? Mines become devastating area weapons that destroy voxels from much farther away.

  const explosionDelay = 2000;
  const timeoutId = setTimeout(() => {
    if (mineMesh && mineBody) {
      destroyVoxelsInRadius(mineBody.position, bombRadius * 0.8, 1.2);
function dropExplosiveMine(position) {
  if (gameStarted) {
    destructionSynth.triggerAttackRelease('C3', '0.1s');
  }

  const mineGeometry = new THREE.SphereGeometry(voxelSize / 2, 8, 8);
  const mineMaterial = new THREE.MeshBasicMaterial({ color: 0xff0000 });
  const mineMesh = new THREE.Mesh(mineGeometry, mineMaterial);
  mineMesh.position.copy(position);
  scene.add(mineMesh);

  const mineShape = new CANNON.Sphere(voxelSize / 2);
  const mineBody = new CANNON.Body({ mass: 10, shape: mineShape });
  mineBody.position.copy(mineMesh.position);
  world.addBody(mineBody);

  const mine = { mesh: mineMesh, body: mineBody, timeoutId: null };

  const explosionDelay = 2000;
  const timeoutId = setTimeout(() => {
    if (mineMesh && mineBody) {
      destroyVoxelsInRadius(mineBody.position, bombRadius * 0.8, 1.2);

      scene.remove(mineMesh);
      mineMesh.geometry.dispose();
      mineMesh.material.dispose();
      world.removeBody(mineBody);

      activeMines = activeMines.filter(m => m !== mine);
    }
  }, explosionDelay);

  mine.timeoutId = timeoutId;
  activeMines.push(mine);
}
Line-by-line explanation (7 lines)

🔧 Subcomponents:

calculation Create mine mesh and body const mineMesh = new THREE.Mesh(mineGeometry, mineMaterial); const mineBody = new CANNON.Body({ mass: 10, shape: mineShape });

Creates a red sphere for the mine (visual) and a heavy physics body (mass 10) so it falls quickly

calculation Schedule mine detonation const timeoutId = setTimeout(() => { destroyVoxelsInRadius(mineBody.position, bombRadius * 0.8, 1.2); ... }, explosionDelay);

Waits 2 seconds then triggers an explosion at the mine's location, destroying voxels in a 0.8-radius area with 1.2× force

if (gameStarted) { destructionSynth.triggerAttackRelease('C3', '0.1s'); }
Plays a placement sound when the mine is dropped
const mineMaterial = new THREE.MeshBasicMaterial({ color: 0xff0000 });
Makes the mine bright red (0xff0000) so it's visually distinct and clearly marks where the mine is
const mineBody = new CANNON.Body({ mass: 10, shape: mineShape });
Creates a heavy physics body (mass 10) so the mine falls quickly to the ground
const explosionDelay = 2000;
Sets the mine to explode 2000 milliseconds (2 seconds) after being placed
destroyVoxelsInRadius(mineBody.position, bombRadius * 0.8, 1.2);
Triggers the explosion at the mine's final position with slightly smaller radius (0.8×) but stronger force (1.2×)
mine.timeoutId = timeoutId;
Stores the timeout ID in the mine object so it could be cancelled if needed (not used here, but good practice)
activeMines.push(mine);
Adds the mine to the activeMines array so draw() can sync its position every frame

killPlayer()

killPlayer() handles survivor death. It sets alive = false so no more input is processed, turns the survivor red as a visual death indicator, freezes its physics motion, and updates the on-screen status text to show how it died. The cause parameter lets you track which weapon killed the survivor—useful for game feedback. Once alive = false, the survivor can't move but remains in the scene.

function killPlayer(cause) {
  if (!player || !player.alive) return;

  player.alive = false;

  if (player.mesh) {
    player.mesh.material.color.set(0xff0000);
  }
  if (player.body) {
    player.body.velocity.set(0, 0, 0);
    player.body.angularVelocity.set(0, 0, 0);
  }
  if (survivorStatusSpan) {
    survivorStatusSpan.html('DEAD (' + cause + ')');
  }
}
Line-by-line explanation (5 lines)
if (!player || !player.alive) return;
Early exit: if player doesn't exist or is already dead, do nothing (prevent killing twice)
player.alive = false;
Sets the alive flag to false so applyPlayerInput() refuses to apply movement forces
player.mesh.material.color.set(0xff0000);
Changes the survivor's color from green to red to visually indicate it's dead
player.body.velocity.set(0, 0, 0); player.body.angularVelocity.set(0, 0, 0);
Freezes the survivor's movement by setting both linear and rotational velocities to zero
survivorStatusSpan.html('DEAD (' + cause + ')');
Updates the HTML status display to show 'DEAD (cause)' where cause is 'explosion', 'projectile', 'laser', or 'click'

onWeaponChange()

onWeaponChange() is called whenever the player selects a new weapon from the dropdown. It updates the activeWeapon global so the click handlers know which weapon to fire. The laser cleanup is important because lasers are temporary visual effects drawn every frame (in draw() via the click handler). When switching away from laser, we clear the last laser beam so it doesn't linger.

function onWeaponChange() {
  activeWeapon = weaponSelector.value();

  // Clear laser line when leaving laser mode
  if (activeWeapon !== "laser" && activeLaserBeamMesh) {
    scene.remove(activeLaserBeamMesh);
    activeLaserBeamMesh.geometry.dispose();
    activeLaserBeamMesh.material.dispose();
    activeLaserBeamMesh = null;
  }
}
Line-by-line explanation (3 lines)
activeWeapon = weaponSelector.value();
Reads the dropdown's current selected value (e.g., 'click', 'bomb', 'projectile', 'laser', 'mine')
if (activeWeapon !== "laser" && activeLaserBeamMesh) {
If switching away from laser mode and there's currently a laser line visible, remove it
scene.remove(activeLaserBeamMesh); activeLaserBeamMesh.geometry.dispose(); activeLaserBeamMesh.material.dispose(); activeLaserBeamMesh = null;
Removes the laser mesh from the scene and releases its GPU memory, then sets the global to null

onMouseUp()

onMouseUp() is the main weapon firing handler. Raycasting is the core technique: we shoot a invisible ray from the camera through the click position and detect what it hits. This gives us precise 3D selection from a 2D mouse click. The isDragging check is crucial—without it, camera rotation would accidentally fire weapons. The weapon dispatch is straightforward: based on activeWeapon, call the appropriate function. Some weapons use impactPoint (bombs, mines) for area effects, some ignore it (projectiles shoot in view direction), and some use the intersects array (laser destroys all objects in path).

function onMouseUp(event) {
  if (!isDragging) {
    updateMouse(event);

    raycaster.setFromCamera(mouse, camera);
    const intersects = raycaster.intersectObjects(scene.children);

    if (intersects.length > 0 || activeWeapon === "laser") {
      const impactPoint = intersects[0]?.point;
      const hitMesh = intersects[0]?.object;
      const hitVoxel = hitMesh ? voxels.find(v => v.mesh === hitMesh) : null;
      const hitPlayer = player && player.mesh === hitMesh;

      if (activeWeapon === "click") {
        if (hitVoxel) {
          makeVoxelDynamicAndScheduleRemoval(hitVoxel);
          if (gameStarted) {
            destructionSynth.triggerAttackRelease('C4', '8n');
          }
        } else if (hitPlayer) {
          killPlayer('click');
        }
      } else if (activeWeapon === "bomb" && impactPoint) {
        destroyVoxelsInRadius(impactPoint, bombRadius);
      } else if (activeWeapon === "projectile") {
        const cameraDirection = new THREE.Vector3();
        camera.getWorldDirection(cameraDirection);
        fireProjectile(cameraDirection);
      } else if (activeWeapon === "laser") {
        fireLaserBeam(raycaster.ray, intersects);
      } else if (activeWeapon === "mine" && impactPoint) {
        const mineDropPosition = new CANNON.Vec3(
          impactPoint.x,
          impactPoint.y + voxelSize / 2,
          impactPoint.z
        );
        dropExplosiveMine(mineDropPosition);
      }
    }
  }
  isDragging = false;
}
Line-by-line explanation (14 lines)

🔧 Subcomponents:

conditional Check for non-dragging click if (!isDragging) { ... }

Only fires weapons on clicks; ignores mouse-up if the user was dragging (camera rotation)

calculation Raycast from camera through mouse raycaster.setFromCamera(mouse, camera); const intersects = raycaster.intersectObjects(scene.children);

Shoots a ray from camera through the click position to find which objects it hits

conditional Fire active weapon based on type if (activeWeapon === "click") { ... } else if (activeWeapon === "bomb") { ... } else if ...

Calls the appropriate weapon function (click, bomb, projectile, laser, mine) based on activeWeapon

if (!isDragging) {
Only processes the click if the mouse wasn't dragging (so camera rotation doesn't trigger weapons)
updateMouse(event);
Converts the mouse event's screen coordinates to normalized device coordinates (-1 to 1)
raycaster.setFromCamera(mouse, camera);
Creates a ray from the camera through the mouse position into the scene
const intersects = raycaster.intersectObjects(scene.children);
Casts the ray and returns all objects it hits, sorted by distance
if (intersects.length > 0 || activeWeapon === "laser") {
Fires the weapon if something was hit, OR if using laser (lasers fire even if they miss to show where they aim)
const impactPoint = intersects[0]?.point;
Gets the 3D world position where the ray first hit an object (using optional chaining ?. for safety)
const hitMesh = intersects[0]?.object;
Gets the mesh object that was hit (could be a voxel, the survivor, or something else)
const hitVoxel = hitMesh ? voxels.find(v => v.mesh === hitMesh) : null;
Searches the voxels array to see if the hit mesh is a voxel; returns null if not found
const hitPlayer = player && player.mesh === hitMesh;
Checks if the hit mesh is the survivor
if (activeWeapon === "click") { makeVoxelDynamicAndScheduleRemoval(hitVoxel); ... }
Click weapon: instantly destroy the clicked voxel without area effect
else if (activeWeapon === "bomb" && impactPoint) { destroyVoxelsInRadius(impactPoint, bombRadius); }
Bomb weapon: trigger radius explosion at impact point
else if (activeWeapon === "projectile") { camera.getWorldDirection(cameraDirection); fireProjectile(cameraDirection); }
Projectile weapon: ignore click position, instead fire a projectile in the camera's view direction
else if (activeWeapon === "laser") { fireLaserBeam(raycaster.ray, intersects); }
Laser weapon: destroy all voxels along the ray, displaying a visual laser line
else if (activeWeapon === "mine" && impactPoint) { dropExplosiveMine(mineDropPosition); }
Mine weapon: place a mine at the click position with a 2-second timer

onTouchEnd()

onTouchEnd() is the mobile touch version of onMouseUp(). It uses the same raycasting and weapon dispatch logic, but checks that all fingers have been released (event.touches.length === 0) before firing. This prevents accidental weapon firing while rotating the camera with one finger (touching down for rotation, then lifting generates onTouchEnd—we only want weapons to fire on intentional taps, not on camera drag releases).

function onTouchEnd(event) {
  if (!isDragging && event.touches.length === 0) {
    raycaster.setFromCamera(mouse, camera);
    const intersects = raycaster.intersectObjects(scene.children);

    if (intersects.length > 0 || activeWeapon === "laser") {
      const impactPoint = intersects[0]?.point;
      const hitMesh = intersects[0]?.object;
      const hitVoxel = hitMesh ? voxels.find(v => v.mesh === hitMesh) : null;
      const hitPlayer = player && player.mesh === hitMesh;

      if (activeWeapon === "click") {
        if (hitVoxel) {
          makeVoxelDynamicAndScheduleRemoval(hitVoxel);
          if (gameStarted) {
            destructionSynth.triggerAttackRelease('C4', '8n');
          }
        } else if (hitPlayer) {
          killPlayer('click');
        }
      } else if (activeWeapon === "bomb" && impactPoint) {
        destroyVoxelsInRadius(impactPoint, bombRadius);
      } else if (activeWeapon === "projectile") {
        const cameraDirection = new THREE.Vector3();
        camera.getWorldDirection(cameraDirection);
        fireProjectile(cameraDirection);
      } else if (activeWeapon === "laser") {
        fireLaserBeam(raycaster.ray, intersects);
      } else if (activeWeapon === "mine" && impactPoint) {
        const mineDropPosition = new CANNON.Vec3(
          impactPoint.x,
          impactPoint.y + voxelSize / 2,
          impactPoint.z
        );
        dropExplosiveMine(mineDropPosition);
      }
    }
  }
  isDragging = false;
}
Line-by-line explanation (2 lines)
if (!isDragging && event.touches.length === 0) {
Only fires if it's not a drag and there are no more fingers touching the screen
raycaster.setFromCamera(mouse, camera); const intersects = raycaster.intersectObjects(scene.children);
Same raycasting as mouse version—shoots ray from camera through touch point

createExplosionEffect()

createExplosionEffect() creates a temporary orange sphere that expands and fades, providing visual feedback when voxels are destroyed. The setInterval approach is simple but imperfect—a better approach would use the draw loop and deltaTime, but this works well for short animations. The sphere expands (scale += 0.2) while fading (opacity -= 0.1), creating the classic explosion puff effect. The cleanup is important: when opacity reaches 0, we clear the interval and remove the mesh from the scene so the frame rate doesn't degrade from accumulating invisible explosions.

function createExplosionEffect(position, scaleFactor = 1) {
  const explosionGeometry = new THREE.SphereGeometry(voxelSize * 1.5 * scaleFactor, 8, 8);
  const explosionMaterial = new THREE.MeshBasicMaterial({
    color: 0xffa500,
    transparent: true,
    opacity: 1
  });
  const explosionMesh = new THREE.Mesh(explosionGeometry, explosionMaterial);
  explosionMesh.position.copy(position);
  scene.add(explosionMesh);

  let opacity = 1;
  let scale = 1;
  const animationInterval = setInterval(() => {
    opacity -= 0.1;
    scale += 0.2;
    if (opacity <= 0) {
      clearInterval(animationInterval);
      scene.remove(explosionMesh);
      explosionGeometry.dispose();
      explosionMaterial.dispose();
    } else {
      explosionMesh.material.opacity = opacity;
      explosionMesh.scale.set(scale, scale, scale);
    }
  }, 50);
}
Line-by-line explanation (8 lines)

🔧 Subcomponents:

calculation Create orange expanding sphere const explosionGeometry = new THREE.SphereGeometry(voxelSize * 1.5 * scaleFactor, 8, 8); const explosionMesh = new THREE.Mesh(explosionGeometry, explosionMaterial);

Creates an orange transparent sphere at the explosion center

calculation Animate fade and grow const animationInterval = setInterval(() => { opacity -= 0.1; scale += 0.2; ... }, 50);

Every 50ms, reduces opacity by 10% and increases size by 20%, creating a fading expanding effect

const explosionGeometry = new THREE.SphereGeometry(voxelSize * 1.5 * scaleFactor, 8, 8);
Creates a sphere that scales with the explosion—larger explosions (higher scaleFactor) get larger visual effects
color: 0xffa500,
Orange color (0xffa500) for a classic explosion look
transparent: true, opacity: 1
Enables transparency so the explosion effect is see-through; starts at full opacity
scene.add(explosionMesh);
Adds the explosion to the scene so it's visible
const animationInterval = setInterval(() => { ... }, 50);
Creates a repeating timer that updates the explosion every 50 milliseconds (20 updates per second)
opacity -= 0.1; scale += 0.2;
Every frame: fade out 10% and grow 20%, creating the expanding-then-fading effect
if (opacity <= 0) { clearInterval(animationInterval); scene.remove(explosionMesh); ... }
When fully faded, stop the animation loop and remove the mesh to save memory
explosionMesh.material.opacity = opacity; explosionMesh.scale.set(scale, scale, scale);
Updates the mesh's opacity and size each frame to animate the explosion

createLaserEffect()

createLaserEffect() builds the visual representation of a laser beam as a cylinder stretched from startPoint to endPoint. The key math: calculate direction and length, position at the center, then rotate the cylinder to align with the direction using setFromUnitVectors. This technique—building a 3D line from a cylinder—is the standard way to visualize beams, arrows, and connections in 3D graphics. The function returns the mesh (not adding it to the scene), so the caller can place it and control its lifetime.

function createLaserEffect(startPoint, endPoint) {
  const direction = new THREE.Vector3().subVectors(endPoint, startPoint);
  const length = direction.length();
  const center = new THREE.Vector3().addVectors(startPoint, endPoint).divideScalar(2);

  const laserGeometry = new THREE.CylinderGeometry(0.1, 0.1, length, 8);
  const laserMaterial = new THREE.MeshBasicMaterial({
    color: 0x00ffff,
    transparent: true,
    opacity: 0.8
  });
  const laserMesh = new THREE.Mesh(laserGeometry, laserMaterial);

  laserMesh.position.copy(center);
  laserMesh.quaternion.setFromUnitVectors(
    new THREE.Vector3(0, 1, 0),
    direction.normalize()
  );

  return laserMesh;
}
Line-by-line explanation (7 lines)

🔧 Subcomponents:

calculation Calculate laser direction and length const direction = new THREE.Vector3().subVectors(endPoint, startPoint); const length = direction.length(); const center = new THREE.Vector3().addVectors(startPoint, endPoint).divideScalar(2);

Computes the laser's length, direction, and center point for positioning and rotation

calculation Create cyan laser line const laserGeometry = new THREE.CylinderGeometry(0.1, 0.1, length, 8); const laserMesh = new THREE.Mesh(laserGeometry, laserMaterial);

Creates a thin cyan cylinder representing the laser beam from start to end point

calculation Rotate laser to point in correct direction laserMesh.quaternion.setFromUnitVectors(new THREE.Vector3(0, 1, 0), direction.normalize());

Rotates the cylinder so it aligns with the laser direction (cylinders point up by default)

const direction = new THREE.Vector3().subVectors(endPoint, startPoint);
Calculates the vector from start to end point: direction = endPoint - startPoint
const length = direction.length();
Gets the distance between start and end (the laser's length)
const center = new THREE.Vector3().addVectors(startPoint, endPoint).divideScalar(2);
Calculates the midpoint: center = (startPoint + endPoint) / 2
const laserGeometry = new THREE.CylinderGeometry(0.1, 0.1, length, 8);
Creates a cylinder with radius 0.1, same length as the laser, 8 sides
color: 0x00ffff,
Cyan color (bright blue-green) for a classic sci-fi laser look
laserMesh.position.copy(center);
Positions the laser mesh at the midpoint between start and end
laserMesh.quaternion.setFromUnitVectors(new THREE.Vector3(0, 1, 0), direction.normalize());
Rotates the cylinder from its default upward direction to point in the laser direction (after normalizing the direction to a unit vector)

windowResized()

windowResized() is a p5.js hook that runs automatically whenever the window is resized. It updates the camera aspect ratio so 3D objects don't stretch, resizes the WebGL renderer, and resizes the hidden p5 canvas. This keeps the game looking correct on any screen size or when the user resizes the browser window.

function windowResized() {
  camera.aspect = window.innerWidth / window.innerHeight;
  camera.updateProjectionMatrix();
  renderer.setSize(window.innerWidth, window.innerHeight);
  resizeCanvas(windowWidth, windowHeight);
}
Line-by-line explanation (4 lines)
camera.aspect = window.innerWidth / window.innerHeight;
Updates the camera's aspect ratio so it matches the new window dimensions—prevents stretching
camera.updateProjectionMatrix();
Recalculates the camera's projection matrix based on the new aspect ratio
renderer.setSize(window.innerWidth, window.innerHeight);
Resizes the three.js WebGL canvas to fill the window
resizeCanvas(windowWidth, windowHeight);
Resizes the hidden p5 canvas to match (good practice even though p5 canvas isn't visible)

📦 Key Variables

scene object

The three.js scene container holding all 3D objects (meshes, lights, camera)

let scene;
camera object

The three.js perspective camera controlling the viewpoint into the 3D scene

let camera;
renderer object

The three.js WebGL renderer that draws the scene to a canvas

let renderer;
world object

The cannon.js physics world managing gravity, rigid bodies, and collisions

let world;
voxels array

Array of all voxel objects, each containing mesh, body, and id—tracks which voxels exist

let voxels = [];
player object

The survivor character object containing mesh (visual), body (physics), and alive status

let player = null;
activeWeapon string

Current weapon mode: 'click', 'bomb', 'projectile', 'laser', or 'mine'

let activeWeapon = 'click';
activeProjectiles array

Array of currently flying projectiles; each frame syncs their mesh positions to physics bodies

let activeProjectiles = [];
activeMines array

Array of placed mines waiting to explode; tracks their timers and positions

let activeMines = [];
gameStarted boolean

Flag indicating whether the Tone.js audio context has started; sounds only play after first user interaction

let gameStarted = false;
keys object

Maps key codes to boolean values (e.g., keys['KeyW'] = true if W is currently pressed)

const keys = {};
isDragging boolean

Flag set during mouse/touch drag; prevents weapon firing while rotating the camera

let isDragging = false;
bombRadius number

The blast radius of bomb and mine explosions; controls how many voxels are destroyed

const bombRadius = voxelSize * 3;
explosionForce number

The strength of impulses applied to voxels by explosions; higher = more dramatic knockback

const explosionForce = 1500;
gridSize number

Dimension of the voxel cube (10 = 10×10×10 = 1000 voxels)

const gridSize = 10;
voxelSize number

Size in units of each individual voxel cube

const voxelSize = 2;

🔧 Potential Improvements (6)

Here are some ways this code could be enhanced:

PERFORMANCE draw() - physics sync loops

The voxels, projectiles, mines, and player arrays are looped over every frame even if they're mostly empty mid-game. With thousands of voxels destroyed, these loops become expensive.

💡 Use object pooling: pre-allocate arrays and reuse objects instead of creating/destroying them. Or use a Set with sparse indices to skip destroyed voxels more efficiently.

BUG fireProjectile() - collision listener

If a projectile hits the ground, it waits 500ms before being removed. If it hits another projectile, nothing happens—projectiles can pass through each other.

💡 Add physics collision responses in cannon.js (set material friction/restitution) or add a collision listener for projectile-to-projectile impacts so they interact realistically.

BUG makeVoxelDynamicAndScheduleRemoval() - delayed removal

The physics body isn't removed immediately, only after 1.5 seconds. This means destroyed voxels' bodies still participate in collisions and gravity for that time, which looks wrong if they're visually gone.

💡 Remove the physics body immediately (world.removeBody) and only keep it around for visual collision effects if needed. Or keep both meshes and bodies in sync.

STYLE Global variables

Many global variables like scene, world, player, etc. are declared at the top but not organized by system. Audio synths are mixed with physics bodies and UI elements.

💡 Group related globals into objects: gameObjects = { scene, camera, renderer }, physics = { world, gravity }, audio = { destructionSynth, laserSynth }, ui = { voxelCountSpan }.

FEATURE Game state

Once the survivor dies, the game continues and voxels can still be destroyed. There's no win condition other than destroying all voxels.

💡 Add a game-over state: when player dies, disable weapon firing and show a restart button. Add win/loss screens when all voxels are destroyed or survivor survives X seconds.

PERFORMANCE createExplosionEffect() - animation interval

Uses setInterval instead of the draw loop, creating a separate 20 FPS timer running independently. This can desynchronize with the main 60 FPS loop and waste CPU on browsers with 120+ FPS.

💡 Integrate into the draw() loop: track explosion start time with millis(), calculate elapsed time, update opacity and scale based on time, and remove when elapsed > duration.

🔄 Code Flow

Code flow showing setup, draw, initializeaudio, initializethreejs, initializecannonjs, generatevoxelworld, createsurvivorplayer, applyplayerinput, makevoxeldynamicandscheduleremoval, destroyvoxelsinradius, firelaser, fireprojectile, dropexplosivemine, killplayer, onweaponchange, onmouseup, ontouchend, createexplosioneffect, createlasereffect, windowresized

💡 Click on function names in the diagram to jump to their code

graph TD start[Start] --> setup[setup] setup --> draw[draw loop] draw --> physics-step[physics-step] draw --> voxel-sync-loop[voxel-sync-loop] draw --> projectile-sync-loop[projectile-sync-loop] draw --> applyplayerinput[applyplayerinput] draw --> destruction-synth[destruction-synth] draw --> audio-context-init[audio-context-init] draw --> event-bindings[event-bindings] click setup href "#fn-setup" click draw href "#fn-draw" click physics-step href "#sub-physics-step" click voxel-sync-loop href "#sub-voxel-sync-loop" click projectile-sync-loop href "#sub-projectile-sync-loop" click applyplayerinput href "#fn-applyplayerinput" click destruction-synth href "#sub-destruction-synth" click audio-context-init href "#sub-audio-context-init" click event-bindings href "#sub-event-bindings" setup --> initializeaudio[initializeaudio] setup --> initializethreejs[initializethreejs] setup --> initializecannonjs[initializecannonjs] click initializeaudio href "#fn-initializeaudio" click initializethreejs href "#fn-initializethreejs" click initializecannonjs href "#fn-initializecannonjs" initializeaudio --> audio-context-init initializeaudio --> destruction-synth click audio-context-init href "#sub-audio-context-init" click destruction-synth href "#sub-destruction-synth" initializethreejs --> scene-creation[scene-creation] initializethreejs --> camera-setup[camera-setup] initializethreejs --> renderer-setup[renderer-setup] initializethreejs --> orbit-controls[orbit-controls] initializethreejs --> lighting[lighting] click scene-creation href "#sub-scene-creation" click camera-setup href "#sub-camera-setup" click renderer-setup href "#sub-renderer-setup" click orbit-controls href "#sub-orbit-controls" click lighting href "#sub-lighting" initializecannonjs --> ground-creation[ground-creation] initializecannonjs --> voxel-generation-loop[voxel-generation-loop] click ground-creation href "#sub-ground-creation" click voxel-generation-loop href "#sub-voxel-generation-loop" voxel-generation-loop --> voxel-mesh-creation[voxel-mesh-creation] voxel-generation-loop --> voxel-body-creation[voxel-body-creation] click voxel-mesh-creation href "#sub-voxel-mesh-creation" click voxel-body-creation href "#sub-voxel-body-creation" draw --> applyplayerinput applyplayerinput --> movement-checks[movement-checks] applyplayerinput --> force-application[force-application] click movement-checks href "#sub-movement-checks" click force-application href "#sub-force-application" draw --> onmouseup[onmouseup] onmouseup --> click-detection[click-detection] onmouseup --> raycasting[raycasting] onmouseup --> weapon-dispatch[weapon-dispatch] click click-detection href "#sub-click-detection" click raycasting href "#sub-raycasting" click weapon-dispatch href "#sub-weapon-dispatch" draw --> ontouchend[ontouchend] ontouchend --> click-detection ontouchend --> raycasting ontouchend --> weapon-dispatch firelaser[firelaser] --> laser-audio[laser-audio] firelaser --> remove-previous-laser[remove-previous-laser] firelaser --> calculate-laser-endpoint[calculate-laser-endpoint] firelaser --> destroy-hit-voxels[destroy-hit-voxels] click laser-audio href "#sub-laser-audio" click remove-previous-laser href "#sub-remove-previous-laser" click calculate-laser-endpoint href "#sub-calculate-laser-endpoint" click destroy-hit-voxels href "#sub-destroy-hit-voxels" fireprojectile[fireprojectile] --> projectile-creation[projectile-creation] fireprojectile --> projectile-velocity[projectile-velocity] fireprojectile --> collision-listener[collision-listener] fireprojectile --> projectile-timeout[projectile-timeout] click projectile-creation href "#sub-projectile-creation" click projectile-velocity href "#sub-projectile-velocity" click collision-listener href "#sub-collision-listener" click projectile-timeout href "#sub-projectile-timeout" dropexplosivemine[dropexplosivemine] --> mine-creation[mine-creation] dropexplosivemine --> mine-explosion[mine-explosion] click mine-creation href "#sub-mine-creation" click mine-explosion href "#sub-mine-explosion" killplayer[killplayer] --> damage-survivor[damage-survivor] click damage-survivor href "#sub-damage-survivor" createexplosioneffect[createexplosioneffect] --> explosion-mesh-creation[explosion-mesh-creation] createexplosioneffect --> explosion-animation[explosion-animation] click explosion-mesh-creation href "#sub-explosion-mesh-creation" click explosion-animation href "#sub-explosion-animation" createlasereffect[createlasereffect] --> direction-calculation[direction-calculation] createlasereffect --> laser-mesh-creation[laser-mesh-creation] createlasereffect --> laser-rotation[laser-rotation] click direction-calculation href "#sub-direction-calculation" click laser-mesh-creation href "#sub-laser-mesh-creation" click laser-rotation href "#sub-laser-rotation" windowresized[windowresized] --> camera-setup windowresized --> renderer-setup click windowresized href "#fn-windowresized"

❓ Frequently Asked Questions

What visual experience does the Voxel-destructible (Remix) sketch offer?

The sketch creates a vibrant 3D voxel landscape that users can blast apart, showcasing colorful blocks and debris flying through the air.

How can users interact with the Voxel-destructible (Remix) sketch?

Users can interact by targeting blocks with their mouse or touch to unleash various weapons and trigger physics-driven explosions.

What creative coding concepts are demonstrated in the Voxel-destructible (Remix) sketch?

The sketch demonstrates concepts such as 3D graphics rendering with three.js, physics simulations using cannon.js, and sound integration with Tone.js.

Preview

Voxel-destructible (Remix) - p5.js creative coding sketch preview
Sketch Preview
Code flow diagram showing the structure of Voxel-destructible (Remix) - Code flow showing setup, draw, initializeaudio, initializethreejs, initializecannonjs, generatevoxelworld, createsurvivorplayer, applyplayerinput, makevoxeldynamicandscheduleremoval, destroyvoxelsinradius, firelaser, fireprojectile, dropexplosivemine, killplayer, onweaponchange, onmouseup, ontouchend, createexplosioneffect, createlasereffect, windowresized
Code Flow Diagram
