Webcam Effects

This sketch captures your live webcam video and applies five different visual effects in real time: normal display, pixelation, ASCII art, edge detection, and posterization. Click anywhere on the canvas to cycle through each effect and watch your video transform.

🧪 Try This!

Experiment with the code by making these changes:

  1. Make ASCII green text turn red — The fill() call sets the text color to green; changing the RGB values will instantly recolor all ASCII characters
  2. Double the pixelate block size — Larger res values skip more pixels between samples, creating a more abstract, mosaic-like effect
  3. Pack more ASCII characters into the view
  4. Make edge detection more extreme — Reducing the posterize levels to 2 creates starker black-and-white contrast before erosion, making edges sharper
  5. Cycle through effects with keyboard instead of mouse — Using keyPressed() lets you control effects from the keyboard; this snippet goes backward on each press
Prefer the full editor? Open it there →

📖 About This Sketch

This sketch transforms your live webcam feed with five distinct visual effects that you can cycle through by clicking. It is an excellent introduction to video capture in p5.js because it shows how to grab frames from your camera, access and manipulate individual pixels, and apply built-in filters to create wildly different aesthetics from the same video source.

The code is organized around a draw loop that loads the current video frame into memory, then applies one of five effects depending on which mode is active. By reading it you will learn how createCapture() brings video into p5.js, how loadPixels() lets you read color data from images, how mapping coordinates bridges video dimensions to canvas dimensions, and when to use filters versus manual pixel loops for performance.

⚙️ How It Works

  1. When the sketch loads, setup() creates a canvas that fills the window and uses createCapture(VIDEO) to request access to your webcam—the browser will ask for permission the first time.
  2. Every frame, draw() clears the background and loads the current video frame's pixel data with loadPixels(), making color values available for inspection.
  3. The effect applied depends on effectMode, a number from 0 to 4: mode 0 displays the video normally; mode 1 reads pixels in a grid and draws colored rectangles for a pixelated look; mode 2 measures brightness at sampled points and draws ASCII characters to approximate the image.
  4. Mode 3 uses ERODE and THRESHOLD filters to create stark edge outlines, while mode 4 applies POSTERIZE to reduce the color palette to bold blocks of color.
  5. On-screen text displays which effect is active, and mousePressed() increments the effect counter each time you click, cycling through all five modes.
  6. windowResized() keeps the canvas filling the browser window whenever the user resizes the screen.

🎓 Concepts You'll Learn

Video capture and webcam accessPixel-level image manipulationCoordinate mapping and scalingBuilt-in p5.js filtersInteractive mode switchingResponsive canvas sizing

📝 Code Breakdown

setup()

setup() runs once when the sketch starts. It is the place to initialize your canvas, capture device access, and set values that do not change every frame. By pre-setting textFont and textSize here instead of inside draw(), we avoid recalculating them sixty times per second.

function setup() {
  createCanvas(windowWidth, windowHeight);
  video = createCapture(VIDEO);
  video.size(640, 480); // Keep video size consistent for pixel access
  video.hide();
  textFont('monospace');
  textSize(10); // Set textSize once for ASCII mode
}
Line-by-line explanation (6 lines)

🔧 Subcomponents:

function-call Canvas Setup createCanvas(windowWidth, windowHeight);

Creates a canvas that spans the entire browser window

function-call Webcam Initialization video = createCapture(VIDEO);

Requests access to the user's webcam and stores the live video stream

function-call Video Dimension Lock video.size(640, 480);

Sets a consistent video resolution so pixel indexing calculations remain predictable

createCanvas(windowWidth, windowHeight);
Creates a p5.js canvas that matches your browser window size, so the video effect fills the screen
video = createCapture(VIDEO);
Asks the browser for permission to access your webcam and creates a video object that updates every frame
video.size(640, 480);
Forces the video stream to be 640×480 pixels internally, so mapping and pixel calculations are consistent no matter your screen size
video.hide();
Hides the default video preview element so only your effect-processed version appears on canvas
textFont('monospace');
Sets the font to monospace so ASCII characters are evenly spaced and look correct
textSize(10);
Pre-sets the text size for ASCII mode to 10 pixels, reducing computation during the draw loop
draw()

draw() runs 60 times per second and is where animation and interaction happen. This sketch uses draw() to load fresh video pixels every frame, then applies a different effect based on effectMode. Notice that some effects (normal, edge, posterize) use high-level functions like image() and filter(), while others (pixelate, ASCII) manually loop through pixels—each approach has tradeoffs in speed and control.

🔬 These loops sample the video at 8-pixel and 5-pixel intervals. What happens if you change both to += 3 to pack more characters and show more detail?

    for (let y = 0; y < video.height; y += 8) {
      for (let x = 0; x < video.width; x += 5) {

🔬 This code maps brightness to a character. What happens if you reverse it by changing the map to map(br, 255, 0, 0, chars.length) so dark areas get detailed characters?

        let i = (y * video.width + x) * 4;
        let br = (video.pixels[i] + video.pixels[i+1] + video.pixels[i+2]) / 3;
        let charIndex = floor(map(br, 0, 255, 0, chars.length));
function draw() {
  background(0);
  
  // Always load video pixels once at the start of draw
  // This ensures all modes have access to current video frame data
  video.loadPixels();
  
  if (effectMode === 0) {
    // Normal
    image(video, 0, 0, width, height);
  } 
  else if (effectMode === 1) {
    // Pixelate
    let res = 10;
    noStroke();
    for (let y = 0; y < video.height; y += res) {
      for (let x = 0; x < video.width; x += res) {
        let i = (y * video.width + x) * 4;
        let r = video.pixels[i];
        let g = video.pixels[i + 1];
        let b = video.pixels[i + 2];
        fill(r, g, b);
        let px = map(x, 0, video.width, 0, width);
        let py = map(y, 0, video.height, 0, height);
        let pw = width / video.width * res;
        let ph = height / video.height * res;
        rect(px, py, pw, ph);
      }
    }
  }
  else if (effectMode === 2) {
    // ASCII
    let chars = ' .:-=+*#%@';
    fill(0, 255, 0); // Set fill once for ASCII mode
    for (let y = 0; y < video.height; y += 8) {
      for (let x = 0; x < video.width; x += 5) {
        let i = (y * video.width + x) * 4;
        let br = (video.pixels[i] + video.pixels[i+1] + video.pixels[i+2]) / 3;
        let charIndex = floor(map(br, 0, 255, 0, chars.length));
        let px = map(x, 0, video.width, 0, width);
        let py = map(y, 0, video.height, 0, height);
        // Using text() is still somewhat slow for many characters,
        // but pre-setting textSize and fill helps.
        text(chars[charIndex], px, py);
      }
    }
  }
  else if (effectMode === 3) {
    // Edge detection (simple)
    // Draw the video first, then apply an edge filter to the canvas
    image(video, 0, 0, width, height); // Draw video
    filter(POSTERIZE, 2); // Reduce colors for starker edges (optional)
    filter(ERODE); // Erode the image slightly
    filter(THRESHOLD); // Threshold to get binary edges
    // This approach leverages p5.js built-in filters which are often faster
    // than manual pixel iteration, especially for simple effects.
    // For more advanced edge detection (e.g., Sobel), a shader would be best.
  }
  else if (effectMode === 4) {
    // Posterize
    image(video, 0, 0, width, height);
    filter(POSTERIZE, 4);
  }
  
  // UI
  fill(255);
  textSize(16); // Reset textSize for UI
  textAlign(LEFT, TOP);
  text('Effect: ' + effects[effectMode] + ' (click to change)', 20, 20);
}
Line-by-line explanation (21 lines)

🔧 Subcomponents:

for-loop Pixelate Grid Sampling for (let y = 0; y < video.height; y += res) { for (let x = 0; x < video.width; x += res) {

Steps through the video at intervals of 'res' pixels, sampling one color per block

calculation Pixel Index Calculation let i = (y * video.width + x) * 4;

Converts 2D coordinates to a 1D index in the pixels array, accounting for RGBA (4 values per pixel)

calculation Grayscale Brightness let br = (video.pixels[i] + video.pixels[i+1] + video.pixels[i+2]) / 3;

Averages the red, green, and blue values to get a single brightness value

calculation Brightness to Character let charIndex = floor(map(br, 0, 255, 0, chars.length));

Maps brightness (0–255) to an index in the character string, so dark pixels get simple chars and bright pixels get detailed ones

calculation Video to Canvas Scaling let px = map(x, 0, video.width, 0, width);

Converts video coordinates to canvas coordinates so the effect stretches to fill the entire window

function-call Edge Detection Filters filter(POSTERIZE, 2); filter(ERODE); filter(THRESHOLD);

Applies built-in p5.js filters in sequence to create stark, high-contrast edge lines

background(0);
Clears the canvas to black every frame, erasing the previous effect so you see only the current video frame's result
video.loadPixels();
Reads the current video frame into the video.pixels array, making individual color values accessible for inspection and manipulation
if (effectMode === 0) { image(video, 0, 0, width, height); }
In normal mode, draws the raw video stretched to fill the canvas—no processing applied
let res = 10;
Sets the resolution (block size) for pixelation; the code will sample the video every 10 pixels
for (let y = 0; y < video.height; y += res) {
Loops down the video height, jumping by res pixels each time instead of going row-by-row; this skips pixels to create blocks
let i = (y * video.width + x) * 4;
Calculates the array index: multiply row (y) by width, add column (x), then multiply by 4 because each pixel has 4 values (R, G, B, A)
let r = video.pixels[i];
Reads the red channel of the pixel at index i
let g = video.pixels[i + 1];
Reads the green channel (stored right after red in the array)
let b = video.pixels[i + 2];
Reads the blue channel (stored right after green)
fill(r, g, b);
Sets the fill color to the sampled pixel's RGB values
let px = map(x, 0, video.width, 0, width);
Converts the video x-coordinate (0–640) to a canvas x-coordinate (0–windowWidth) so the effect scales to your screen
rect(px, py, pw, ph);
Draws a rectangle at canvas position (px, py) with size (pw, ph), creating one pixelated block
let chars = ' .:-=+*#%@';
A string of ASCII characters ordered from simplest (space) to most detailed (@), used to represent brightness levels
let br = (video.pixels[i] + video.pixels[i+1] + video.pixels[i+2]) / 3;
Averages the red, green, and blue values to get a single grayscale brightness (0–255)
let charIndex = floor(map(br, 0, 255, 0, chars.length));
Maps brightness to a position in the character string: dark pixels become spaces, bright ones become @
text(chars[charIndex], px, py);
Draws the chosen ASCII character at the scaled canvas position
filter(POSTERIZE, 2);
Reduces the image to just 2 brightness levels, creating stark contrast that emphasizes edges
filter(ERODE);
Shrinks light areas and expands dark areas, thinning out the image and making edges more visible
filter(THRESHOLD);
Converts every pixel to pure black or pure white, removing all mid-tones and creating a high-contrast outline
filter(POSTERIZE, 4);
Reduces the image to only 4 distinct brightness levels per color channel, creating a bold, flat, comic-book style look
text('Effect: ' + effects[effectMode] + ' (click to change)', 20, 20);
Displays the current effect name and a hint to click, updated every frame as effectMode changes

mousePressed()

mousePressed() is a special p5.js function that runs once whenever the mouse button is clicked. It is the simplest way to capture user interaction. The modulo operator (%) is key here—it keeps a number in a safe range by wrapping it back to the beginning when it gets too large.

🔬 This function increments by 1, cycling forward through effects. What happens if you replace it with random(effects.length) and cast to floor() so clicking picks a random effect instead?

function mousePressed() {
  effectMode = (effectMode + 1) % effects.length;
}
function mousePressed() {
  effectMode = (effectMode + 1) % effects.length;
}
Line-by-line explanation (1 lines)

🔧 Subcomponents:

calculation Cyclic Mode Increment effectMode = (effectMode + 1) % effects.length;

Increments effectMode and wraps it back to 0 when it reaches the number of effects

effectMode = (effectMode + 1) % effects.length;
Adds 1 to effectMode, then uses the modulo operator (%) to wrap back to 0 when the number exceeds the number of effects (5). This cycles through 0, 1, 2, 3, 4, 0, 1, ... with each click.

windowResized()

windowResized() is a special p5.js function that runs automatically when the browser window is resized. Without it, the canvas would stay at its original size. This keeps the video effect responsive and full-screen even when you resize your browser.

function windowResized() {
  resizeCanvas(windowWidth, windowHeight);
}
Line-by-line explanation (1 lines)
resizeCanvas(windowWidth, windowHeight);
Updates the canvas size to match the new browser window dimensions whenever the user resizes their window

📦 Key Variables

video object

Stores the webcam capture object; contains pixel data and methods like loadPixels() and hide()

let video;
effectMode number

Tracks which effect is currently active (0–4); increments on each click to cycle through effects

let effectMode = 0;
effects array

Array of effect names displayed on screen and used to determine the range for effectMode modulo arithmetic

const effects = ['Normal', 'Pixelate', 'ASCII', 'Edge', 'Posterize'];

🔧 Potential Improvements (5)

Here are some ways this code could be enhanced:

PERFORMANCE draw() - pixelate effect

The pixelate mode calls fill() inside a nested loop (up to 4,000+ times per frame), recalculating color settings repeatedly

💡 Remove the 'noStroke()' from inside the nested loops and place it before the loops start, then only call fill() once per sample color. Pre-calculate the pixel width and height outside the loops to avoid repeated division.

BUG pixelate effect coordinate mapping

When the browser window is much larger than 640×480, or when the aspect ratio differs, the pixelated blocks may not align perfectly with the canvas corners due to floating-point mapping

💡 Use floor() when drawing rect() to snap pixels to integer coordinates: rect(floor(px), floor(py), pw, ph)

STYLE draw() function

The function is very long (90+ lines) with five separate effect implementations, making it hard to read and maintain

💡 Extract each effect into its own function (drawNormal(), drawPixelate(), drawASCII(), etc.) and call them from draw() based on effectMode, reducing clutter and improving readability

FEATURE ASCII effect

ASCII output is always green; there is no visual variety to match the other effects

💡 Add colors that vary by brightness—use lerpColor() to blend between dark and bright colors based on the pixel's brightness value, creating a more dynamic aesthetic

PERFORMANCE setup()

Video is set to 640×480, which is fixed; if the browser is 4K, the downscaling is wasteful, but if the browser is 480p, the upscaling is blurry

💡 Detect the canvas size or screen DPI and adjust video.size() accordingly so the internal resolution matches what will actually be displayed

🔄 Code Flow

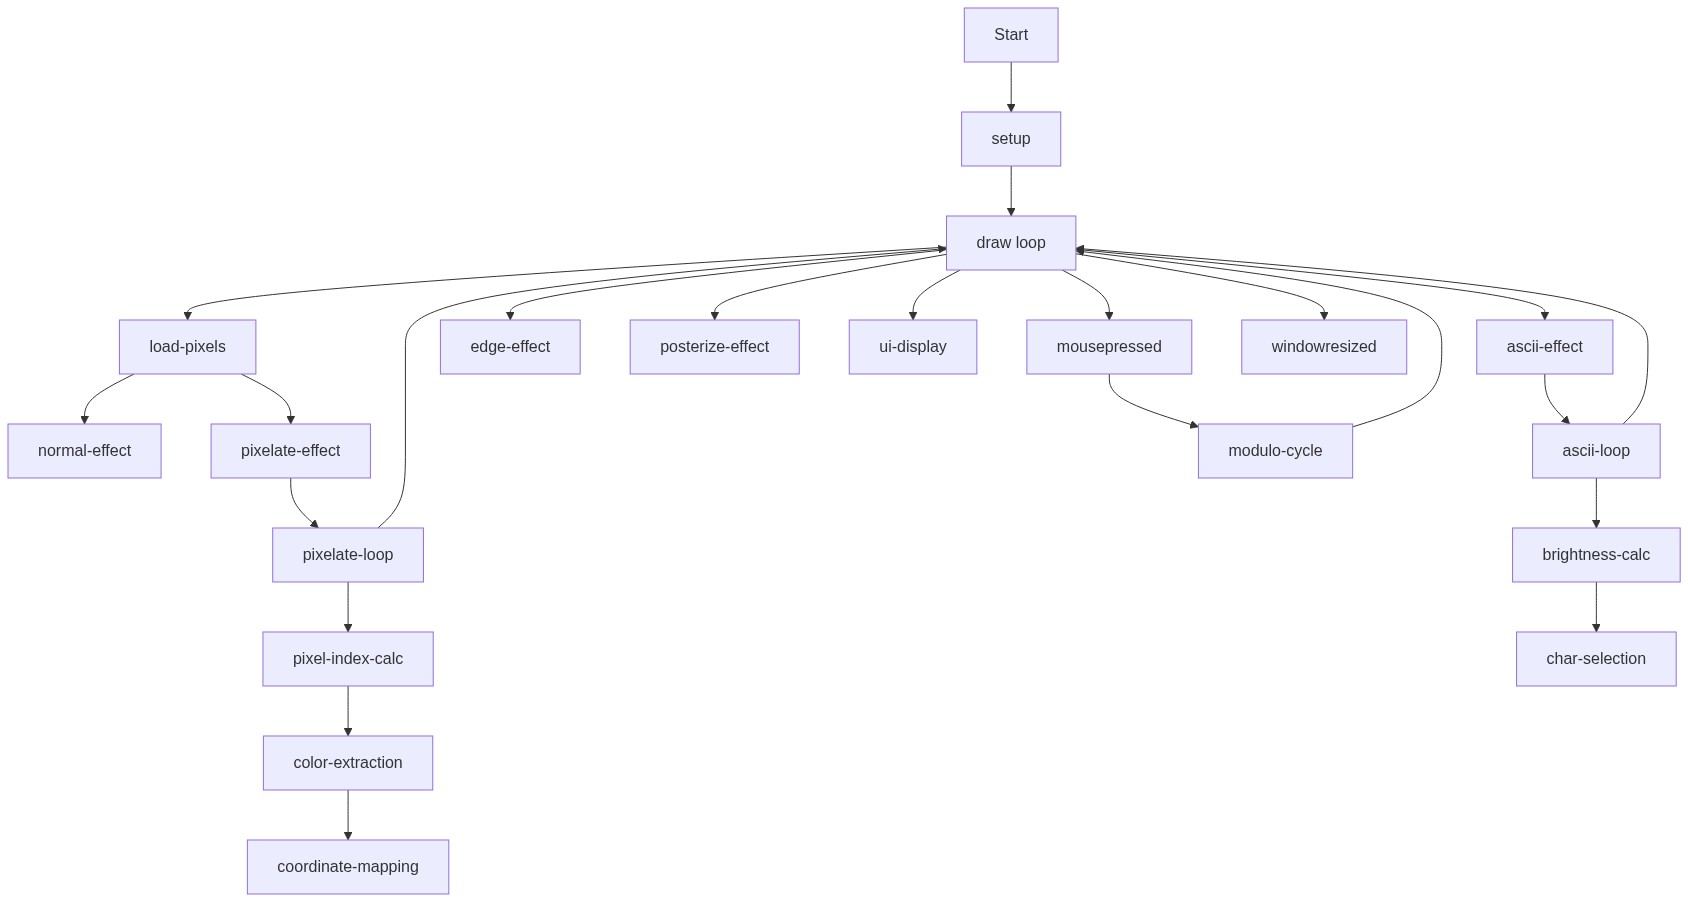
Code flow showing setup, draw, mousepressed, windowresized

💡 Click on function names in the diagram to jump to their code

graph TD start[Start] --> setup[setup] setup --> canvas-creation[Canvas Setup] setup --> video-capture[Webcam Initialization] setup --> video-sizing[Video Dimension Lock] setup --> draw[draw loop] click setup href "#fn-setup" click canvas-creation href "#sub-canvas-creation" click video-capture href "#sub-video-capture" click video-sizing href "#sub-video-sizing" draw --> mode-increment[Cyclic Mode Increment] draw --> filter-chain[Edge Detection Filters] draw --> pixelate-nested-loop[Pixelate Grid Sampling] draw --> ascii-brightness-calc[Grayscale Brightness] draw --> ascii-char-mapping[Brightness to Character] draw --> coordinate-mapping[Video to Canvas Scaling] click draw href "#fn-draw" click mode-increment href "#sub-mode-increment" click filter-chain href "#sub-filter-chain" click pixelate-nested-loop href "#sub-pixelate-nested-loop" click ascii-brightness-calc href "#sub-ascii-brightness-calc" click ascii-char-mapping href "#sub-ascii-char-mapping" click coordinate-mapping href "#sub-coordinate-mapping" pixelate-nested-loop --> pixelate-index-calc[Pixel Index Calculation] click pixelate-index-calc href "#sub-pixelate-index-calc" mousepressed[mousePressed] --> mode-increment click mousepressed href "#fn-mousepressed" windowresized[windowResized] --> canvas-creation click windowresized href "#fn-windowresized"

❓ Frequently Asked Questions

What visual effects can I experience with the Webcam Effects sketch?

This sketch transforms your live webcam feed into various styles, including normal, pixelated, ASCII-art, edgy, and posterized visuals.

How do I interact with the Webcam Effects sketch to change the visual styles?

You can click anywhere on the canvas to cycle through the different visual effects applied to your webcam feed.

What creative coding concepts are demonstrated in the Webcam Effects sketch?

The sketch showcases real-time video manipulation and pixel processing techniques, allowing for dynamic visual transformations based on user interaction.

Preview

Webcam Effects - p5.js creative coding sketch preview
Sketch Preview
Code flow diagram showing the structure of Webcam Effects - Code flow showing setup, draw, mousepressed, windowresized
Code Flow Diagram